1
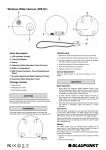
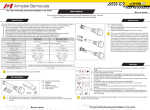
Troubleshooting - Flashlight does not turn
on or fails to switch between outputs:
1) Use new or fully charged batteries
2) Ensure the ring that holds
very important!
the pocket clip is tighten
all the way down.
3) Check battery polarity
4) Remove tailcap, ensure the battery
holding ring inside the tailcap is not stuck.
“No Hassle” EagleTac Warranty
For repair, replacement, or other inquiries
contact your EagleTac dealer. You can also
reach our customer support via email at
[email protected].
We warrant our flashlights to be free from
defects in workmanship and materials. We will
repair, replace at our option, without charging
any product or part which is found to be
defective under normal use within 120
months from the date of purchase with the
proof of purchase.
Electronics, chargers and rechargeable batteries are covered for a period of 12 months with
purchase receipt. Such repair or replacement
shall be the purchaser’s sole and exclusive
remedy under this warranty. Normal wear and
tear including batteries draining is not
covered, nor is damage resulting from modification, misuse, abuse, neglect, battery
leakage, improper maintenance or repaired
by anyone other than EagleTac.
EagleTac G25C2 brings high performance tactical flashlight to a new era.
G25C2 offers a maximum output of 720
LED lumen with CREE XM-L LED mated
with a turbo reflector. The reliability
proven multiple output selector head
allows instant access between four
different outputs. The high performance
C2100 SEL circuit utilizes low resistance
components for high efficiency and low
voltage regulation (ideal for single
li-ion). G25C2 also offers optional body
extender to prolong runtime to meet
your needs.
Quick Specifications
G25C2
G25C2
XM-L
XP-G
ANSI Lumen 600/249/45/2 420/202/35/3
LED Lumen 720/298/55/2 550/260/45/3
Runtime* 1.1/3.5/20/200 hrs1.2/3.7/20/200 hrs
Output level
4
4
AUX modes
5
5
Batteries
2 to 4 CR123A or 2 to 3 18650
Voltage
2.7V-12.6V
2.7V-12.6V
*The above runtime is performed by
two EagleTac CR123A batteries with
energy saving enabled. Using a single
rechargeable EagleTac 18650 Li-ion
battery yields more runtime. Using 3/4
cells extender yield 50%/100% more
runtime relative to 2 CR123A.
Instruction Manual
G25C2
G Series
EagleTac
The best built flashlight in the world
http://www.eagletac.com
WARNING - Lithium and Li-ion batteries
can explode or cause burns if disassembled, shorted, or exposed to high
temperature. Do not mix with used or
other battery types or install backwards.
Battery Safety Precaution
All EagleTac flashlights are designed to
use “button-top” battery (battery with
protruding positive terminal). For
rechargeable li-ion battery, use only
EagleTac li-ion battery, or other
protected li-ion battery with compatible length and diameter. Before using
the battery, check and ensure the
battery outer wrapping (the isolating
plastic film that wraps around the
metal housing of the battery) is complete. Broken battery wrapping may
lead to short circuit and damage to the
flashlight.
Lithium and Li-ion battery can explode
or cause burns if disassembled,
shorted, or exposed to high temperature. Do not mix new and used batteries. Do not mix batteries with different
brand, capacity, voltage, or install
batteries backwards. When the output
starts to dim (this implies battery is
almost drained), replace the batteries
do not drain the batteries completely
especially when you’re using two (or
more) batteries in series.
G25C2 Quick Start
Thank you for purchasing the EagleTac
G25C2 LED flashlight.
Adjusting output level
Dial the selector head to select between
four output levels. You can pre-select the
desired output level before turning on
the flashlight.
1) Unscrew the tailcap and insert new
batteries with positive terminals facing
the front. Replace tailcap and tighten
snugly.
2nd, 3rd,
4th level
1st level
LED (Front)
Tail-cap
Basic on and off
Turn on the light by pressing the tailcap
button until it clicks. Click again to shut
it off. Slightly depress the button for
momentary on and off.
Tighten the tailcap
all the way down
for proper
contact.
Level Tactical Mode Regular Mode
100%
100%
1st
10%
35%
2nd
Strobe
6%
3rd
Strobe
4th
0.3%
To switch between mode1 and mode2,
dial to 2nd level and turn the flashlight
on and off for 20 times.
Hidden AUX. settings
With the head at tight position (1st
level), loosen to 3rd (or 4th level) and
tighten the head within one second to
enter AUX. setting. Repeat to cycle
through all settings. Turn off the light or
loosen the head to quit.
Strobe
Beacon
Energy saving feature (on by default)
G25C2 reduces output by 20% after 200
seconds at turbo mode. To toggle this
feature, dial the head to 4th level and
turn the flashlight on and off for 20
times. Once setting has been changed,
LED will output 3 seconds at 100%
(enable), or 1 second at 100% (disable).
Battery tube extender (optional)
We offer 3 cells (3xCR123A) and 4 cells
(4xCR123A or 2x18650) body extender
for longer runtime. When using CR123A
batteries in extender, install the black
spacer between between the body and
the extender to prevent rattling.
Tailcap Strobe setting
With this enabled, you can access strobe
output at the tailcap switch button . To
enable (or disable) this function (disable
from factory), dial to 1th level and turn
the flashlight on and off 20 times (one
second or less between each click). With
the tailcap strobe setting enabled, a
double press of the switch button (within
one second) will activate the strobe
output.
Cigar Grip - With the rubber cigar grip
removed, you can replace it with the
included soft rubber ring.
Hi-Flash
Lo-Flash
S.O.S.
(cycle)
Accessories
A lanyard ring is located at the
tailcap for lanyard
attachment. The ring needs
to be removed (see diagram)
2
prior to installing the tail-stand
1 peel here
rubber at the tailcap.
to unlock
Filter - Unscrew the stainless steel bezel
and replace it with the threaded filter.
Maintenance
Periodically clean the thread and o-rings
with a lint free cloth and apply a thin coating of EagleTac silicon-based lubricant to
the o-rings (not the machined thread).
Clean the battery contact, signal contact,
thread, and body contact (conductive
aluminum area) with a lint free cloth and
use a small drop of Dexoit red cleaner
solution (D series) to slightly lube them for
better conductivity and smoother mode
“Dexoit” is a trademark of
switching experience.
Periodically apply
Dexoit red here
and here
to ensure
mode switching
and output
stability in long term.
Caig Laboratories, Inc.
Do not touch or attempt to clean the
reflector, as it will scratch the reflective
coating permanently.