1
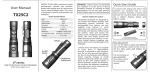
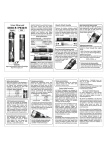
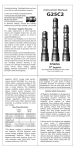
User Manual
GX / MX / SX Models
EAGTAC GX25L2, SX25L2 and MX25L2
models offer maximum output performance, versatile user interface, tough
build quality and rich accessories like no
other flashlight offers. This series is
designed for police, professionals, and
hobbyists.
GX25L2
SX25L2
XM-L U2
LED
XM-L U2
1130
LED Lumen
1060
925
ANSI Lumen
870
Runtime
2 - 150 hrs (R22) 2.7 - 200 hrs (R33)
Output/AUX level 4 / 7
4/7
Circuit
C3500 SEL
C4000 SEL
Batteries
2 x18650
2 x26650
Voltage
2.7V-12V
2.7V-8.4V
MX25L2
MX25L2
3 x XM-L U2
SST-90 N3
LED
2850
2700
LED Lumen
2350
2120
ANSI Lumen
Runtime 1.3 - 200 hrs (R44) 1.3 - 200 hrs (R44)
4/7
Output/AUX level 4 / 7
C9500 SEL
C9500 SEL
Circuit
2 x32650
2 x32650
Batteries
2.7V-8.4V
2.7V-8.4V
Voltage
EAGTAC
High Performance Tactical Flashlight
http://www.eagletac.com
IMPORTANT - Only use the integrated built-in
charging socket to charge the original EAGTAC
7.4V battery pack. Charging unbalanced third
party 7.4V 18650 battery pack, two individual
3.7V 18650 cells, or non-rechargeable batteries
(e.g. 3V CR123A) may result in flashlight damage.
WARNING - Lithium and Li-ion batteries
can explode or cause burns if disassembled, shorted, or exposed to high
temperature. Do not mix with used or
other battery types or install backwards.
Battery Safety Precaution
All EAGTAC flashlights are designed to
use “button-top” battery (battery with
protruding positive terminal). For
rechargeable li-ion battery, use only
EagleTac li-ion battery, or other
protected li-ion battery with compatible length and diameter. Before using
the battery, check and ensure the
battery outer wrapping (the isolating
plastic film that wraps around the
metal housing of the battery) is complete. Broken battery wrapping may
lead to short circuit and damage to the
flashlight.
Lithium and Li-ion battery can explode
or cause burns if disassembled,
shorted, or exposed to high temperature. Do not mix new and used batteries. Do not mix batteries with different
brand, capacity, voltage, or install
batteries backwards. When the output
starts to dim (this implies battery is
almost drained), replace the batteries.
Do not drain the batteries completely
especially when you’re using two (or
more) batteries in series.
Quick Start Guide
1) Unscrew the tailcap and remove the
battery isolation disk at the end of the
battery to use. If your flashlight does not
come with battery, insert new batteries
(w/ protrude top) to use. Ensure positive
terminals is facing the LED. Replace
tailcap and tighten snugly.
Adjusting output level
Twist the head to select between four
output levels. You can pre-select the
desired output level
before turning on
the flashlight.
1st level
Battery Isolation Disk
LED (Front)
Tail-cap (Back)
Basic ON and OFF
Turn on the light by press and release
the on/off button switch (<0.4s). To turn
off the light, press and release the
switch again.
For momentary on,
press and hold
the button
switch for
immediate
output.
2nd, 3rd,
4th level
Level Tactical Mode Regular Mode
100%
100%
1st
10%
35%
2nd
Strobe I
6%
3rd
Strobe II
0.1%
4th
To switch between tactical and regular
mode, turn on the flashlight at 1st level,
dial to 2nd level and then back to 1st
level for five times within five seconds.
Hidden AUX. settings
With the head at tight position (1st
level), loosen to 3rd (or 4th level) and
tighten the head within one second to
enter AUX. setting. Repeat to cycle
through all settings. Turn off the light or
loosen the head to quit.
Strobe (I/II) Hi-Flash
Beacon Lo-Flash
S.O.S. (I/II)
Instant Turbo output
At any output level, press and hold the
flashlight for 100% output. Release the
button to return to previous level.
Instant Strobe output
At any output level (even off ), double
press and hold the on/off button switch
for strobe output. Release the button to
return to previous level.
Battery level indicator
Reports approximate battery life for ten
seconds after changing output level or
clicking the button switch. When
battery level is very low, main LED will
flash once every 30 seconds*. Reduce
the output to extend battery runtime.
Secondary LED Turbo output Lower output
Blue
60%-100%
20%-100%
25%-60%
5%-20%
Red
0%-25%
0%-5%
Red (flash)
Charging
For rechargeable models, use EAGTAC
model specific power DC adapter (see
below), or EAGTAC 12V automobile DC
adapter to charge. Remove the waterproof cap and insert the charging plug
to charge (store the cap next to the
charging socket). Replace the waterseal cap after charging is complete.
*This may or may not show in your flashlight, because
the protection board on the li-ion battery may shut off
the battery before the LED circuit picks up the battery
critical signal.
Energy saving feature
This feature reduce output by 20%
after 200 seconds at turbo mode.
Models Model specific Charger Watt
GX
10V 1.2A or 12V 1A
12W
SX/MX 10V 1.8A or 12V 1.5A 18W
Our advice that you turn off the flashlight during charging for fast and full
charge. Leaving the flashlight on
during charge may pause it. The
charging circuit uses constant current
/ constant voltage method to charge
the li-ion batteries quickly and safely.
The secondary LED turns on in solid
blue color during fast charge state.
When the battery is full, the indicator
turns dim. A built-in countdown
timer* is implemented to shut off the
charging circuit within three hours.
User may remove the charger plug
shortly after the charging indicator
turns dim for immediate usage.
Secondary LED**
Charge status
Blue
Fast charge
Blue (dim)
Charge complete
LED off
Charging timer expire
* If the battery is nearly drained, it may only reach to
90%+ capacity within the three hours timer due to the
“soft charging” feature for safety reasons. To reset the
timer, simply remove and re-insert the charging plug
anytime during charge.
** Since the charging circuit and LED driver share the
common output. The secondary LED may flash or light
up in very dim output when user starts up or operates
the flashlight. This is normal.
Turbo head upgrade
We offer a turbo head upgrade head
for tighter beam and brighter hot spot.
To exchange the head, un-twist the
head and replace it with the turbo
head. (Important) Ensure the LED and
LED center disc is centered inside the
reflector before tightening the head,
or it may damage the LED.
LED
LED
Center
Disk
Color and diffuser filter
For models that comes with filter
upgrade. Unscrew the stainless steel
bezel and replace it with the threaded
filter.
*GX model shown using filter housing w/ flip-over feature.
SX and MX model uses standard individual filter add-on.
How to prolong battery life
1) Recharge often. Do not continuously
discharge the battery completely. Li-ion
batteries has no memory effect.
2) When the flashlight is going to be put
in storage for a long time, drain the
battery to under 50% capacity for best
battery life.
Maintenance
Periodically clean the thread and o-rings
with a lint free cloth and apply a thin coating of EagleTac silicon-based lubricant to
the o-rings (not the machined thread).
Clean the battery contact, signal contact
(the silver node at the back of the head
and the plate on the body tube), thread,
and body contact (conductive aluminum
area and) with a lint free cloth and use a
small drop of Deoxit red cleaner solution
(D series) to slightly lube them for better
conductivity and smoother mode switching experience. “Deoxit” is a trademark of Caig Laboratories, Inc.
Periodically apply
Deoxit red here
and here
to ensure
mode switching
and output
stability in long term.
Do not touch or attempt to clean the
reflector, as it will damage the reflective
coating permanently.
Troubleshooting - Flashlight does not
turn on or fails to switch between
outputs normally:
1) Charge your flashlight or battery
2) Ensure tailcap is tight
3) Clean all conductive contacts
(see maintenance section)
4) Check battery polarity
“No Hassle” EAGTAC Warranty
For repair, replacement, or other inquiries
contact your EAGTAC dealer. You can also
reach our customer support via email at
[email protected].
We warrant our flashlights to be free from
defects in workmanship and materials. We will
repair, replace at our option, without charging
any product or part which is found to be
defective under normal use within 120
months from the date of purchase with the
proof of purchase.
Electronics, chargers and rechargeable batteries are covered for a period of 12 months with
purchase receipt. Such repair or replacement
shall be the purchaser’s sole and exclusive
remedy under this warranty. Normal wear and
tear including batteries draining is not
covered, nor is damage resulting from modification, misuse, abuse, neglect, faulty battery,
battery leakage, improper maintenance or
repaired by anyone other than EAGTAC or
authorized dealer.