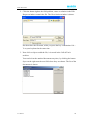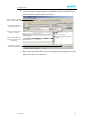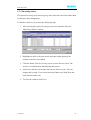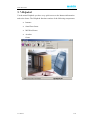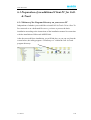
1
Call- & Track 5 User Helpdesk & License management User Manual For a Quick start! Call- & Track 5 © Copyright March 2004 by OOO MASCH St. Petersburg 1st Release 2004 The present document was created special to the Product Release. Therefore there is no any guarantee that all parts described hereto will correspond parts to the end Release. The information was given by OOO MASCH Russia when publishing the current Product. As OOO MASCH Russia is subject to market fluctuations, it declines all responsibility. The information accuracy in this document cannot be guaranteed by OOO MASCH Russia after published. The information in this document applies to the present Release and can be used only for installing. This information can be changed at any time without prior notification. The present document can be used only for information purposes. ООО MASCH RUSSLAND EXCLUDES ANY GUARANTEE EXPRESSED DIRECTLY OR INDIRECTLY TO THE PRESENT DOCUMENT. © 2004 OOO MASCH Russia Software & Consulting Services. Copyright. All products or companies names are registered trademarks. ООО "МАШ Руссланд - программное обеспечение и консалтинговые услуги" Большой проспект В. О., 10 199034 С-Петербург, Россия User Manual 2 Call- & Track 5 1 table of contents 1 table of contents.............................................................................................. 3 2 preliminary remarks ....................................................................................... 5 2.1 Helpdesk engineers today.........................................................................7 2.2 integrated collaborations ..........................................................................8 2.3 advantages for little enterprises................................................................8 3 Installation ...................................................................................................... 9 3.1 Insert the Program CD..............................................................................9 3.2 Installation in English.............................................................................10 3.3 Complete Installation of Call- & Track..................................................12 3.3.1 Start of the Call- & Track installation and license agreement .........12 3.3.2 Technician and Serial No. Registration............................................15 3.3.3 Installation of the Call- & Track Database.......................................18 3.3.4 Installation of Call- & Track’s Virtual Archive Printer ...................21 3.3.5 Installation of the Call- & Track Database Engine ..........................23 3.4 Custom Installation of Call- & Track.....................................................25 3.5 Add additional User Licenses to Call- & Track .....................................27 4 Launching the Software................................................................................ 29 4.1 The Login Window ................................................................................29 4.2 The main menu.......................................................................................30 5 The Main Menu ............................................................................................ 31 5.0 The Program Surface of Call & Track in the Overview......................31 5.0.1 Title Bar............................................................................................32 5.0.2 Menu Bar..........................................................................................32 5.0.3 Tool Bar............................................................................................33 5.1 Files ........................................................................................................34 5.1.1 Login ................................................................................................34 5.1.2 Change Password .............................................................................35 5.1.3 Server Set-up ....................................................................................35 5.1.4 Local Setup.......................................................................................39 5.1.5 Printer Setup .....................................................................................40 5.1.6 Finish ................................................................................................42 5.2 Support ...................................................................................................43 5.2.1 Enter Request ...................................................................................44 5.2.2 Enter New Request...........................................................................45 5.2.3 Edit Request Window.......................................................................47 5.2.4 System configuration-Window.........................................................51 5.2.5 Follow-Up Request...........................................................................52 5.2.6 Register Presales...............................................................................54 5.2.7 Request user ID ................................................................................56 5.2.8 Taking over an existing request........................................................58 5.2.9 Edit Request .....................................................................................59 5.2.10 View Request .................................................................................63 5.3 Edit .........................................................................................................64 User Manual 3 Call- & Track 5 5.3.1 User ..................................................................................................65 5.3.2 Incoming items .................................................................................72 5.3.3 Outgoing items .................................................................................73 5.3.4 Inventory record information ...........................................................74 5.4 Administration........................................................................................76 5.4.1 Request status ...................................................................................79 5.4.2 Problem ............................................................................................80 5.4.3 Country.............................................................................................82 5.4.5 Languages.........................................................................................84 5.4.5 Service medium................................................................................85 5.4.6 Processors.........................................................................................86 5.4.7 Operating system..............................................................................87 5.4.8 File system........................................................................................88 5.4.9 Manufacturer ....................................................................................89 5.4.10 Product............................................................................................90 5.5 Reports....................................................................................................93 5.5.1 Evaluation report ..............................................................................94 5.5.2 Report according to request status....................................................97 5.5.3 Single report for a reference number................................................99 5.5.4 Accumulated service report............................................................100 5.5.5 Service report for On-Site service ..................................................102 5.5.6 Report of the stock management ....................................................103 5.6 Transfer ................................................................................................105 5.6.1 Export of User data.........................................................................106 5.6.2 Archive of the Attachments............................................................108 5.7 Helpdesk...............................................................................................110 5.7.1 Intranet............................................................................................111 6 Multi User Environment............................................................................. 113 6.1 Add an additional user license..............................................................114 6.1.1 Add a new serial number................................................................115 6.1.2 Deleting the invalid serial number .................................................115 6.1.3 Close the Call- & Track user administration..................................115 6.2 Call- & Track user administration........................................................116 6.3 Preparation of an additional Client PC for Call- & Track....................120 6.3.1 Release of the Program Directory on your server PC ....................120 6.3.2 Starting the Client Setup program ..................................................122 A System Requirements ................................................................................ 124 A.1 System requirements for the Client Area: ...........................................124 A.2 System requirements for the Backend Area: .......................................125 B Tips ............................................................................................................ 126 C Links in the Intranet................................................................................... 130 C.1 Our Partners .........................................................................................130 C.2 Our Reference......................................................................................130 User Manual 4 2 preliminary remarks Welcome to the current version of Call & Track, the Helpdesk and license management-software for service agents. With the new functions in Call & Track systems speak the same language; Service agents have any time access to current information and can call in worldwide, teams can cooperate and carry out the coordination together independent of their working place. Single functions, such as the on-line access are not available in all versions of Call & Track. Call & Track offers new functions and technologies which support service agents and companies in the following areas: • Management of information: The transmission of relevant and topical information to service agents out of Call & Track is facilitated by the comprehensive implementing of practical standards, by integrated areas for the investigation and communication as well as by enlarged reporting functions. More over Call & Track offers a platform for process solutions in companies which allows also company specific and therefore individual extensions. • Helpdesk and service management: Call & Track enables communication between various platforms. Accordingly familiar Call & Track information can now be activated for the access on complex BackEnd-data storage devices without immense adaptation costs. Call & Track shows therefore data which are stored on desktops and servers, so that Service agents can use this information to the benefit of the organization. • Use of information: Extensive evaluation-reports are available to the analysis and documentation of the whole Helpdesk and license amount, the performance of the agents as well as product analysis, quality analysis and structural analysis. Individual extensions for analyzing the data are optional here as well. Call- & Track 5 • Protection and control of information: The Helpdesk and license management software allows the proactive control of the distribution of propriety information, by preventing that unauthorized service agents can use the data. The information reaches exclusively the desired destination. • Efficient Teamwork: The central supply of data, allow service agents mutual use and access of relevant information, working in real time with immediate reciprocal access even if there are geographic borders. • Coordination and Organization: Common used structures, rules and data information support service agents with the administration and organization of projects, information and tasks. User Manual 6 Call- & Track 5 2.1 Helpdesk engineers today Nowadays more service agents than ever use software tools to process information. OOO MASCH Russia has examined Helpdesk engineers and their working customs, ergonomic requirements, frequent routine tasks and a lot more to determine how service agents use the applications in the company really. With the design of Call & Track OOO MASCH has seen and taken into consideration the following challenges with which Helpdesk engineers are principally confronted: • Tiredness of information: Often too many information exists at too many places and service agents cannot process this flood of information. Call & Track offers new procedures how service agents remain organized and keep the overview. • Ineffective collaboration: Scheduling and communication usually require extensive, mutual interactions, even though service agents in other locations cannot be reached easily. Till present collaboration technology was difficult to start if no extensive infrastructure was furnished. Call & Track offers an efficient tool for the collaboration above a user-friendly user interface to the service agents and allows, in addition, a seamless communication. • Isolated data:During several years of technology innovations, mergers, company buyers and other factors have ended in the result, that a large volume of company data are stored in different data bases and software application like on separate "islands". Call & Track is the solution for the helpdesk and license management which entirely supports the service agents according to practical standards and user-defined patterns and therefore offers a simplistic procedure for connecting systems of information in order to make these data available for the service agents again. • Missing integration of commercial process:Call & Track can support companies with the construction of new, simple and efficient trials for User Manual 7 Call- & Track 5 everyday commercial functions, as for example by the management of users, products, licenses, serial numbers and many more. All Service agents are integrated and shoving information back and forth becomes superfluous. • Simple use:Call & Track offers new features and technologies which were conceived for an even easier use of the product, especially in team oriented environments. Companies will probably find out that they can use these functions for solving commercial problems, which seemed to be insoluble. 2.2 integrated collaborations On-line collaboration can accelerate the marketability and allow an organization additional flexibility while reacting to sales opportunities. Call & Track was designed in view of the collaboration via Intranet and offers new ways to connect the individuals, teams and organizations. The application allows the collaboration from every place, accelerates procedure and the supply of new information. 2.3 advantages for little enterprises Many of these Call & Track Track-Features were designed for single workstations as well as for small companies concerning collaboration, efficiency and management of information. Other versions from Call & Track contain further features which support middle and bigger enterprises. User Manual 8 Call- & Track 5 3 Installation 3.1 Insert the Program CD The user interface of the Call- & Track software is multi lingual available in German, English und French language. After inserting your Call- & Track 5 Program CD the multi lingual installation program will be launched automatically. The chosen installation language will be used as default language at the first launch of the software application. But you can change the user interface language at every time; you might need to do so. You can change later on the user interface language through the option “Local Setup”. Please choose now your preferred installation language by clicking on the menu option with your mouse. User Manual 9 Call- & Track 5 3.2 Installation in English After selecting the option “Installation in English”, you will see the following screen: You have now the choice to select one of the following options: “Complete Installation of Call& Track“ Or „Custom Installation of Call- & Track“ Or „Install additional User Licenses to Call- & Track“ Before you start installing the Call- & Track software, please install the MSDE 2000 and read the important installation notes regarding the use of MSDE 2000 or Microsoft SQL 2000 Server. You require, based on the Call- & Track version, which you have purchased the following database server from Microsoft: • Call- & Track 5.0 SMB Edition The complete installation of Microsoft MSDE 2000 is required • Call- & Track 5.1 NETWORK Pro Edition The complete installation of Microsoft SQL 2000 Server is required incl. Service Pack 3a or higher • Call- & Track 5.2 ENTERPRISE Edition The complete installation of Microsoft SQL 2000 Server is required incl. Service Pack 3a or higher User Manual 10 Call- & Track 5 You might install Call- & Track only, after you have successfully installed the required SQL Server from Microsoft. The MSDE 2000 software from Microsoft does not include the standard SQL Server Management Tools, as you might know it from Microsoft SQL 2000 Server product. All information regarding the license free download and installation of Microsoft MSDE2000 are included within the MSDE 2000 installation notes. Please read them first, before you might start using them. This information will be not included in our manual, because Microsoft might update them from time to time. User Manual 11 Call- & Track 5 3.3 Complete Installation of Call- & Track After installing the MSDE 2000 or your licensed Microsoft SQL 2000 Server, we recommend always to choose the option “Complete Installation of Call- & Track”, because this option includes all necessary installation steps as they are… • Installation of all program files • Installation of the database + database engine • Proper configuration of the ODBC interface • Setup of the Call- & Track archive printer driver 3.3.1 Start of the Call- & Track installation and license agreement We will explain you now each step of the complete installation procedure. Please select now the option „Complete Installation of Call- & Track“ and launch the setup procedure: User Manual 12 Call- & Track 5 Please click on “Next” for passing the Welcome Screen of the Setup Program. The SETUP program will show you now the license agreement, which you should read carefully. You only can go forward with your Call- & Track software installation, if you will agree to the license agreement of the software: Please read also carefully the version information, displayed within the following README screen: User Manual 13 Call- & Track 5 After reading and accepting license agreement and Readme Screen with the current version information about Call- & Track, you will be reminded, that your Call- & Track installation will be only successful, if you have installed Microsoft MSDE2000 or Microsoft SQL 2000 Server before: The screen above might be different depending on the Call- & Track release, which you are planning to install. • If you have already installed your Microsoft SQL 2000 Server or MSDE2000 please click now on „Yes“ und continue with your Call- & Track installation. • If you must answer this question with „No”, by clicking on the button “No” you will cancel your Call- & Track installation and you should install your MSDE2000 license or your Microsoft SQL 2000 Server before. User Manual 14 Call- & Track 5 3.3.2 Technician and Serial No. Registration You will find the Serial No. of your Call- & Track License on the sleeve of your software CD. Please do not loose this serial number, otherwise you will be not able to install or reinstall your Call- & Track software, because the license seats of your Call- & Track installation especially in a multi user environment are based and detected by the proper entry of the Call- & Track serial numbers. Please enter now the Serial No., which we have put by a sticker on to your CD sleeve and please continue then with your installation. The SETUP Program suggests now the default directories for your Call- & Track installation: User Manual 15 Call- & Track 5 Of course, you can change the default directory values, by clicking with your mouse onto the „Change“ button as displayed within the following screen: You can choose your individual program directory for Call- & Track After defining the proper Program Directory, the SETUP Program will copy all dedicated files into the Call- & Track Program Directory and the ODBC software interface will be initialized: . User Manual 16 Call- & Track 5 You must end the installation procedure by clicking on the button „Finish“ User Manual 17 Call- & Track 5 3.3.3 Installation of the Call- & Track Database The Call- & Track SETUP Program will inform you now about the next step, the installation of Call- & Track’s database. You must define now the login initials of the service engineer or administrator, who will use the Call- & Track database application. This setup includes the initials, the engineers name and his respective password, which you must confirm for security issues a second time: User Manual 18 Call- & Track 5 After entering the requested information, please continue the installation by pressing the button „Run Script“, which starts the setup process of the Call- & Track database on your Microsoft SQL Server: The screen above and below will show you several core system status messages from the Microsoft SQL Server. Please do not close this window, until you will receive the below shown status message: If you will see the message „Database successfully installed – Please press any key to continue“ you can finish this task by press any key of your keyboard. If you will receive any other message at the end of this procedure, the creation of your Call- & Track database might be failed. You will be still able to continue your Call- & Track installation, but you must repeat at the end the creation of the Call- & Track database, through the option “Custom installation of Call- & Track” within the main install menu. User Manual 19 Call- & Track 5 You will get the detailed information how to reinstall one single option within next section of the installation manual. In the following part of the manual, we expect, that your database creation was successful. After pressing any key, the database creation window will be closed automatically and you might continue by pressing onto the button „Close and Continue“: The SETUP Program will continue with the installation of Call- & Track’s virtual Archive Printer. User Manual 20 Call- & Track 5 3.3.4 Installation of Call- & Track’s Virtual Archive Printer Using the Call- & Track Virtual Archive Printer you might be able to attach external documentation, forms or email messages to your service request record. You can attach of course each kind of individual file format directly to your service request record, but some times, especially if you want to attach email message information, the procedure of saving the information and then attaching this file to your service request record, might be too complex and difficult. For these cases, we have designed the Virtual Archive Printer, which converts any kind of information into an image file, in B&W Compressed TIFF format, which you can easily stack at your service request record. If you want to use this functionality, please answer the question screen above with “YES” and you will be prompted to the install screen of Call- & Track’s Virtual Archive Printer: User Manual 21 Call- & Track 5 Please click now on to the button „INSTALL“ and the printer driver installation will be launched automatically. This process will take a couple of seconds. The procedure will install all related system modules, as shown within the two screens below: If the printer will be installed successfully, you can quit the printer driver installation by clicking onto the „EXIT“ button. You will now launch the last step of your Call- & Track software installation: The Setup of the BDE – Database Engine. User Manual 22 Call- & Track 5 3.3.5 Installation of the Call- & Track Database Engine As you know it already from the previous installation steps, the Call- & Track SETUP program will ask you, if you want to install the BDE: Important Note! Please take care, the installation of the database engine is mandatory, otherwise you will not have a link between the Call- & Track desktop application and your Microsoft SQL 2000 Server or MSDE2000. The installation of the database engine runs mostly automatic: If you will see the Welcome Screen, please click one time on the “Next” button and the installation of the BDE will be completed without any additional interaction. User Manual 23 Call- & Track 5 At the end, you only have to confirm the end of the installation procedure: Now you have finalized your Call- & Track 5 installation! Please click on „Finish“ and the install window will be closed. You will see now the Call- & Track 5.x Icon depending on the release, which you have purchased on the Windows Desktop. You might launch Call- & Track via the icon below or from the program group „MASCH“. User Manual 24 Call- & Track 5 3.4 Custom Installation of Call- & Track The option Custom Installation of Call- & Track is not an alternative option compared with the option Complete Installation of Call- & Track. The custom option provides you the option to reinstall a single program component, if you failed to install this component during the complete installation or if you have skipped the installation of any component. If you are now planning to reinstall one single option, you may choose it from the following screen: User Manual 25 Call- & Track 5 As you could see on the previous page, within the section „Custom Installation of Call- & Track“ you can choose each single option, which we have explained to you within the previous manual section. In addition to the complete installation, only the option “Call- & Track User Account Manager” might be useful for you, if you are planning to rename the service engineer’s name and initials. For this case, please be informed about the following important notes: • If you want to rename or change the service technician’s name or ID, you must be aware, that these changes will be only for future service requests tracked. • All service requests up to the time of your changes will be stored with the previous ID and Service technician name, because otherwise the consistency of the Call- & Track database might be damaged. • You will be not able to install an additional second or third service technician, because changing the name or ID, will only deactivate the old login and it will create a new alternative login. • If you are planning to install additional service technicians, who might use Call- & Track, you must purchase additional user licenses from your local reseller. If you will receive such an additional user license, you will be able to install an additional technician by his initial, name and password through the installation option “Add additional User License”. • You will find all additional information regarding the installation of a dedicated Call- & Track install option within the chapter 3.3 “Complete installation of Call- & Track” in this manual. User Manual 26 Call- & Track 5 3.5 Add additional User Licenses to Call- & Track Call- & Track offers you to manage an unlimited number of Workstation setups containing unlimited number of PC-Hardware and Software licenses. The record management and the inventory of the respective licenses will be done through the service request and user setup. The helpdesk recording of service requests will be linked to the administrating service agent or technician, who must login into Call- & Track by his unique Technician ID and the respective password. If you are planning to use the Call- & Track Helpdesk database within your ITor Service-department by multiple service technicians or administrators, it is recommended to install minimum a copy of the Call- & Track NETWORK Pro Edition, which can be used in the base license by 5 service agents or administrators simultaneously. If you are already using a Call- & Track SMB Edition, which supports in the base license only one simultaneous service technician, you are able to extend this release up to maximum of 10 service agents. There for, you can purchase through your local reseller additional client seat licenses, which you will be able to activate through the menu option “Add additional User Licenses to Call- & Track”. Please contact your local reseller for purchasing the additional client licenses. Please take notice about the different maximum client limitations within the different Call- & Track releases. User Manual 27 Call- & Track 5 You will activate the additional client licenses via the above shown menu option, within the main install screen. Please contact your local Call- & Track reseller or the Customer Service department of MASCH Software Solutions at +49-(0)2203-91133-38 and ask for the purchase of additional Client licenses. Please take care on the license and user limitations, which exist for the different versions of Call- & Track 5. You will receive the additional license agreement and the necessary serial number key. User Manual 28 Call- & Track 5 4 Launching the Software Call- & Track is real time based tracking software, which allows you to register the time, the service technician as well as the whole user setup. It gives you the opportunity to document the whole service request and is respective communication between the user and the service technician, so that in a multi user environment, every service agent within the IT department or at the service provider might be able to follow up a service request, which is tracked by anyone within the service group. • Please launch Call- & Track, by double click on to the program icon: It will launch the login window of the Call- & Track desktop application. 4.1 The Login Window Through the LOGIN window, each service technician must identify himself within the Call- & Track database software. You will be asked for your LoginID (up to max. 3 Characters) and his Call- & Track user password. This dedicated login is necessary, so that each request can be tracked and linked unique to the service technician who entered the information into the system. After entering your login ID and your password, please confirm your entries by clicking on to the button OK. During the software launch, you will see the start-up screen below: User Manual 29 Call- & Track 5 4.2 The main menu After successfully starting the Call- & Track desktop application, you will see the following main screen, which contains all menu options of the Call- & Track software. More detailed information about the software functions, you might look into detailed descriptions within the following manual chapters. Many of these Call & Track Track features were designed for a single workstation as well as for small companies concerning collaboration, efficiency and management of information. Other versions from Call & Track contain further features which support middle and bigger enterprises. As soon as a function of the program is selected, a second window opens, so that the main window of the program remains always in the background and you have access to open a second request at the same time. User Manual 30 Call- & Track 5 5 The Main Menu The description of the program surface and the basic functions of the program Call & Track as well as the tracking of user's requests and the product administration are explained to you closer in the following chapter. 5.0 The Program Surface of Call & Track in the Overview Every program running under Windows is carried out in its own window. These windows are called application window. The program surface makes a distinction between a title bar, menu bar, tool bar and status bar. Title Bar Menu Bar Tool Bar Status Bar User Manual 31 Call- & Track 5 5.0.1 Title Bar Every window owns a title bar. The title bar of the application window contains at first the name of the application "Call & Track". The buttons in the right corner also belong to the title bar. These buttons are used to change the appearance of the window as well as to close the program or document. The functions are in detail: • Minimize Window: Reduces the current window to an entry in the Task bar • Maximize Window: Enlarges the current window to full size: The window fills the whole screen except for the area of the Task bar • Reduce Window: Reduces a window • Close Window: Closes the current window 5.0.2 Menu Bar With the menu bar you have access to the complete set of tools of Call & Track. • Shortcut Keys: Many of the menu commands can be carried out alternatively with a key combination. The commands you need more often inside Call & Track can be carried out faster and easier. • Submenus: Some of the menu entries show a triangle in the right edge. As soon as you point at such a triangle, a submenu is opened. There are further entries ready for your choice. • Activated (The box in front of the entry is checked): A little hook before the menu entry indicates which settings have been selected. There are some specific features in the different menus which are explained below: • File: The menu option file gives you the possibility to log in anew if necessary with another service agent ID, to set up the user interface, as well as to change settings of the program or the printer. User Manual 32 Call- & Track 5 • Support: You find the Administration of user's requests under the menu point Support. • Edit: By choosing Edit you can edit the user's data or the stock of articles. • Administration: In the menu option Administration you define all necessary base data, such as the requests and problem categories, national information and languages, system data, manufacturers and products. • Reports: Via the menu option Reports you can select and print out various evaluations. • Helpdesk: The Helpdesk assists you on getting quick information and opening forms. • Help: Additional information to this program is offered to you under the menu option help. 5.0.3 Tool Bar The tool bar has the job to show you a row of the most often required and used functions and commands for quick access by mouse click. The simple click on a symbol of the tool bar replaces the command via the menu; indeed, not all menu orders are available via the tool bar. Call & Track has 7 functions for different jobs to start with Enter Request Take existing request User Manual Printer Setup Login Edit Request Edit User Report Exit 33 Call- & Track 5 5.1 Files The File menu is divided in six points: Login, change password, server Setup, local Setup, printer Setup and Exit. With a simple click on the option, the desired function starts. 5.1.1 Login To log in with another Login-ID without closing the program and starting once more, choose the option Login in the menu File, then the Login window is shown. Fill in the fields the initials of the agent and the password and click on OK. User Manual 34 Call- & Track 5 5.1.2 Change Password This function is supported only in the multi-user-versions 5.1 and 5.2. Here you have the possibility to change the password (only with administration rights). 5.1.3 Server Set-up Under this point in the menu you can change the settings for the server (time settings, Attachment Directory as well as the separator CSV). You can adjust the time settings individually by entering the desired time (in seconds). The option Attachment Directory defines the folder, where the Archive is stored. To change the location of the Archive, enter the respective path into the fields. In order to work on the user's inquiries efficiently, you have the possibility to set the time of the inquiry treatment. 2 options are available to you: standard and professional. Please note that this functionality is only useful in the multi user environment with several Call- & Track service agents, because in a single user environment the only user is classified at the same time as an administrator and therefore as a professional User as well. In the multi user environment, especially if you do phone support and service, Call- & Track makes a distinction between a standard or level 1 agent and the experienced professional or level 2 agent. User Manual 35 Call- & Track 5 Within the screen Enter Request appears a time beam which changes from the color green to red depending on the passed time. As you can read in the next chapters of our manual, this time beam serves for the optical orientation of the service agent to see in which time frame the treatment of the request is still to be judged as efficient. You can define the time frames yourselves, as you can see in the picture Change Server Setup: • Standard classifies in the multi user environment, as already mentioned, the Level 1 agent. Here you can set an orientation time for the Level 1 agent in which he should finish the service request in order to work efficiently and profitably under all costs and application aspects. • The option Professional serves for the classification of a Level 2 agent from whom one can expect as a rule shorter and more efficient processing time. Of course, you can use the definition following your own concepts, while you cover all Level 1 agents with shorter time default, because only the simple problems should be solved by a standard or Level 1 agent and therefore the time involved should be less. However, more time can be allowed for the professional or Level 2 agent, because he must work on the difficult and therefore protracted problem cases. You see at this simple example that Call- & Track offers you a multitude of configuration possibilities to tune the service work individually to your needs. With the CSV separator you define the separator which Call- & Track uses to create the export or report files. The accompanying functions are described within the chapters report or transfer in this manual in detail. User Manual 36 Call- & Track 5 By clicking on the above shown button „Std. Problem Categories“, you can add or modify the default problem categories of Call- & Track. The below shown problem categories … User Manual 37 Call- & Track 5 ... will be assigned each new product, which you will add into the system (see chapter 5.4.10), as long as you will activate this problem category by using the dedicated check mark there for as shown in the screen below: By clicking on the button „OK“ you will save and close the data entry for the standard problem categories. User Manual 38 Call- & Track 5 5.1.4 Local Setup In the menu Local Setup you can choose the programs for viewing the different file formats, the places where the form templates are stored as well as the temporary directory of the archive of printer and the language of the user interface. It is very important to set the respective reference paths and start directories correctly, so that you can start the necessary programs and open the forms during the inquiry treatment quickly. To change the reference paths and start directories: 1. Select one of the form options, with a click on the button Search. 2. In the opening window the predefined start directory is shown to you. 3. Open the respective start directory and click on the button Open to confirm the information. Here you can also set the language of the User Interface, by choosing the language from the Drop Down list. The option Local Directory for archive printer determines the location of the archive printer. If you have changed the location, enter the new path in the field. User Manual 39 Call- & Track 5 5.1.5 Printer Setup If you select the option Printer Setup, you see the window for setting up the printer. Here you can view or change the settings of the default printer. From Call & Track you can print out the documents (e.g., a report) on a paper printer. The C&T archive printer is also available to you. With the help of the C&T archive printer you can save and attach the documents (e.g., eMails, forms) in the archive. To print a document with the Call & Track archive printer: 1. Open the file to be printed out 2. Select in the program menu the option Printing User Manual 40 Call- & Track 5 3. In the printer setup window you choose Call & Track archive printer and click on OK. 4. Click in the following window the button Copy to clipboard & Close to copy the file name and close the window by clicking Close. 5. You can attach the document with the key combination Ctrl + V (e.g., to an inquiry). User Manual 41 Call- & Track 5 5.1.6 Finish Use this option to exit the program. User Manual 42 Call- & Track 5 5.2 Support The menu Support divides in four options: Enter Request, Take existing Request, Edit Request and View Request. The option Enter Request is used to register a New Request. With the option Take existing Request you can take over a request which you have already entered. The option Edit Request allows you to edit a request which has already been entered before. Choose the option View Request if you want to look at a request which you have already entered without the option of editing request. User Manual 43 Call- & Track 5 5.2.1 Enter Request If you select in the menu Support the option Enter Request or click on the corresponding symbol (see on the right), the following window opens. This menu has the following menu points: • Follow-Up Request: Work on a request with existing reference number. • New Request: Enter the arriving requests which represent a new problem. • Presales: Enter questions of a user before he bought a product. • Req. by user ID: Work on a request with known user ID In the selection window choose the correct tab to edit a request. User Manual 44 Call- & Track 5 5.2.2 Enter New Request With this function a new request arriving to a user opens with an "empty" request mask. To enter a new request, follow these steps: 1. Select the tab New Request. A window for entering the request opens. 2. Enter the serial number and product ID or click the button Products and select the product from the list. Click OK, to confirm the data. 3. Click the button Search to check if a user with this serial number already exists in the data base. User Manual 45 Call- & Track 5 4. If a user with this serial number is already entered in the data base his data is shown on the right. Highlight the record with the mouse and click OK. 5. You can also create a new user by clicking the button Enter a new request. 6. After you have selected or entered the user a window appears, where you can enter the request. Write down the information in the corresponding fields and select the problem category, the status and the request media. Click OK, to store the request. The reference number for this request will be shown in the next window. With this reference number you have any time access to this request in order to view existing data or to change it. User Manual 46 Call- & Track 5 5.2.3 Edit Request Window The Edit Request window allows you to edit the user's requests efficiently; you find here all data of the request already known and you can add new information. Click on this button to view the system configuration Select the problem group and status from the pop down list Select the Request medium from the pop down list Select the problem group and status from the pop down list Here the history of requests is shown Enter here the cause of the problem Use the button Open to add attachments or new documents Here you write down the solution With the help of the check list you can check if you received all information from the customer Write here your notes to this request In the upper menu bar of the Window four options are available to you: • Under Edit you can view or edit the user's data. • Via the option Duration you can edit the time spent for the request. Enter in the field Total Duration the additional time and click OK. • The option Outgoing Items allows you to administrate articles without closing the Edit Request window. • Via the option Helpdesk you can reach the Helpdesk directly from the Edit Request window. User Manual 47 Call- & Track 5 In the centre of the Edit Request window the user's data (address, phone, fax, email and user's language), the user ID as well as the product are shown to you. The time bar serves to optimize the processing of the request. According to your settings the time bar is marked green, yellow or red. Click here if you want to attach new documents to the problem. Click here if you want to view the list of attachments. Click here to open the check list If you send documents to the user or receive documents from him while working on the request, you can add these documents to the request or open already saved documents. For this you can use the buttons on the right near the text fields Problem, Cause and Solution. How to add the documents to the request: 1. Print the documents on the C&T archive printer by choosing C&T archive in the printing window. Click the button Copy to clipboard & Close to copy the file name and close the window by clicking on the button Close. User Manual 48 Call- & Track 5 2. Click the button right to the field problem, cause or solution in the Edit Request window to attach the file. The file selection window is shown. Put down here the file name, while you press the key combination Ctrl + V on your keyboard at the same time. 3. Now click on Open to add the file; it is stored in the Call & Track archives. You can look at the attached documents any time, by clicking the button Open on the right near the text field where they are shown. The list of the documents is shown. User Manual 49 Call- & Track 5 Highlight the file and click on the button View to open the file or on the button Delete to remove the file. The Edit Request window has also a check list for you. To open the check list you click on the button near the text field Notes. The following window appears: Here you can check whether you have asked the user all necessary information and check the corresponding check boxes. If you wish to view or edit system data click on the button System. User Manual 50 Call- & Track 5 5.2.4 System configuration-Window By clicking the button system configuration you can register or view the complete system configuration of the user. Processor Internal memory RAM Operating system Hard disk size Hard disk-file system Free space on the hard disk Anti-viruses software Installed software on the PC Graphic card, sound card, driver Printer Devices connected via USB or parallel port SCSI card and driver Devices with Firewire card Video camera Audio devices Other devices used by the user Choose the necessary data (processor, operating system, file system) from the drop down list and put down the information about the hard disk size, used software and connected devices on the corresponding fields. Click OK, to save the information and to close the window. User Manual 51 Call- & Track 5 5.2.5 Follow-Up Request This function serves for the capture of the Follow-Up requests of the users with existing reference number. To enter a Follow-Up request you perform the following actions: 1. Choose in the menu Support the option Enter Request and in the indicated window the tab Follow-Up request Put down here the reference number of the request. Click on OK, when you enter the new Follow-Up request. 2. Enter in the text field Ref. No. the reference number of the request. Then the system shows you the user's data and request history. 3. Click on OK, when you want to register the Follow-Up request with this reference number. User Manual 52 Call- & Track 5 4. The edit request window appears in which the reference number of the problem and the request history are shown. Here the reference number of the request is indicated Put down here the new problem description Here you can look at the history of request Click on these buttons if you have to attach or view documents Click on Ok, when you want close the window 5. Write down the information in the corresponding fields and click on OK, when you want to save the data. User Manual 53 Call- & Track 5 5.2.6 Register Presales In Call & Track you can register the requests of users who do not own the product yet but need temporary information about the product. To register a presales request you perform the following steps: 1. Choose in the menu Support the option Enter Request and then the tab Presales. 2. Enter in the text field Product ID the product number or click on the button product list. A window with the list of products appears. Here you can select the manufacturer from the drop down list and the product. 3. Click on OK, to open the edit request window and to register the request. Enter into the fields Problem, Cause and Solution the description of the question of the customer and your answer or solution to the problem, select the problem category and the request status and click OK, to save User Manual 54 Call- & Track 5 the information and to close the window. User Manual 55 Call- & Track 5 5.2.7 Request user ID In Call & Track every user receives a user ID. It is possible with a known user ID to register the request directly without having to search the user in the data base. To register a request with user ID you perform the following steps: 1. Choose in the menu Support the option Enter Request and then the tab Click here to search the user request by user ID. Enter here the users ID Click here to edit the user's data Select a product from the list Click on new Ref. to open the request with a new reference number 2. Enter in the field User ID the user ID number. If do not have a user ID, you can look for it, by clicking on the button Search. 3. After you have entered the user ID, the customer data are shown to you including available products and existing requests. 4. You can view here the user's data and edit by clicking the button edit. 5. Select the product from the list and click on the button new Ref No to register the new request with a new reference number. User Manual 56 Call- & Track 5 6. If a user has a Follow-Up request, you can highlight the request below in the list of the available requests with the mouse and click afterwards on OK, to register a new request under this reference number. Highlight with the mouse the request in the list if you might enter a Follow-Up request under this reference number Click on Ok to continue the process 7. The edit request window appears in which you can enter the new request of the customer. User Manual 57 Call- & Track 5 5.2.8 Taking over an existing request Here an already registered request is forwarded verbally to an engineer's colleague, while you inform him/her about the reference number of the request and then close the request again. The takeover of a request generates no new mask, but simply continues the already registered data and in particular the already counted time measurement. The request can be taken over only during the same day. To take over a request you perform the following steps: 1. Choose in the menu Support the option Take existing Request or click the corresponding button (see on the right), the following window appears: 2. Enter here the reference number of the request and click edit… to take over the request. 3. The window Edit Request appears and you can now work on an already existing request. User Manual 58 Call- & Track 5 5.2.9 Edit Request For the additional edit of an existing request you can use the option Edit Request. You can edit a request with the following steps: 1. Choose in the menu Support the option Edit Request or click the corresponding button (see on the right) and you receive the following window: 2. Within this window a huge number of searching criteria is available to you to the selection of the requests which you have entered and want to edit. On this occasion, primarily, you should fall back naturally on the reference number of the request. Nevertheless, there is also the possibility to use the remaining searching criteria with each other combined. 3. Enter the reference number of the request and then click the button Search, on the right all requests with this reference number will be listed to you. User Manual 59 Call- & Track 5 4. Click the check box near the field Service-Agent, and you will get a listing of all requests this engineer has handled. 5. You can also search for all requests by a certain manufacturer. Activate the check box manufacturer and select the desired manufacturer from the drop down list 6. To receive a list of all requests by a certain product you activate the check box product. User Manual 60 Call- & Track 5 7. You can combine the searching criteria also under inclusion of a problem category or the request status. 8. The option, to limit the period of the requests being searched, is also available to you. Activate the check box Date; select the date from the drop down list. Press the button Search to receive the listing. User Manual 61 Call- & Track 5 9. Choose with the mouse a request which you want to edit and click OK, to open the request. The Edit Request window in which you can perform the changes appears. User Manual 62 Call- & Track 5 5.2.10 View Request Via the option View Request you have the option to take a look in a request without being able to edit it. You can look at a request by performing the following steps: 1. Choose in the menu Support the option View Request, the following window appears: 2. Enter the reference number of the request or search the request according to the mentioned search criteria. 3. Highlight with the mouse the request you might consider and click on the button OK. The following window appears: 4. You can view the information here and also branch out into the Helpdesk. User Manual 63 Call- & Track 5 5.3 Edit The menu bar Edit divides in four options: User, Incoming items, Outgoing items and Inventory Record Information. The option User is used for searching and editing the data of a user. Three further functions incoming items, outgoing items and inventory record information enable you to edit the master data for the spare part management. User Manual 64 Call- & Track 5 5.3.1 User The option User serves for the maintenance of the regular clientele. You can look here either for registered users and edit available information, or create a new user. To find a registered user or to create a new user, perform the following steps: 1. Choose the option User in the menu or click the button, the following window is shown: Check the small box to activate it Highlight the user's name with the mouse. Click OK, to edit the user's data. Click enter a new Req. to create a new user. Click this button to start the search. 2. Within this search window a huge number of searching criteria is available to you for the selection of the user. On this occasion, primarily, you should fall back on the name of the user or the serial number of the product. Nevertheless, there is also the possibility of combining several searching criteria with each other. 3. Click with the mouse in the check box to activate it, write down in the field the data and click the button search. User Manual 65 Call- & Track 5 4. If the user exists in the data bank, his data are shown on the right. Highlight with the mouse the shown name and click the button OK, to open the screen with the user's data. 5. To create a new user, click the button Enter a new Req., thereupon you receive the following customer data screen: 6. Write down here the name, the address and phone number of the user, please note that the phone and fax number should be entered according to the following syntax: "nationalcode-town-number", e.g., 007-8123239245. User Manual 66 Call- & Track 5 7. On the tab Serial No. you find the listing of all serial numbers of the user. When creating a new user the first serial number is automatically added. 8. Click the button New Serial-No…to add a new product with a serial number, and then you receive the shown window on top in which you can select the product from the list and enter the new serial number. 9. You can change any time the serial number of the product if you click the button Edit… (like shown below). User Manual 67 Call- & Track 5 10. Under the option Systems you find the system data of the user. The following options are available to you: You can edit the listed system configuration when you highlight the record with the mouse and click on the button Edit or doubleclick the system record The system configuration screen is shown: If you want to add a new system configuration, click the button New System. User Manual 68 Call- & Track 5 11. Under the tab Request-History you find the overview of the entire requests by a user. The tab Request-History enables you to check statements which you or your colleagues have given to the user, or to go through them logically again. You can open every single request in a second window by double click to view the request. Here, you cannot edit the request, for this use the option Edit Request. 12. Important tools to the examination of the user’s data are the report of the user record and the Request-History. User Manual 69 Call- & Track 5 13. If you click the button Report User Record, you receive the following view which you can print on a connected printer. 14. With a click the button Request History Report you receive the following window: Here you have three report options: a. select the option All to receive the report for all requests b. with the option From you can determine the time period of the report c. if you activate the option Ref. No. and enter the reference number, you can print very simply and fast an overview of the whole correspondence with the user on a printer. Next to the report table all attached fax or email documents will be printed as well. User Manual 70 Call- & Track 5 After you have selected one of the options above, the report on the screen is shown as Preview. If required you can print this preview later. If you, depending in the installed release of Call- & Track, want to use other reports from this menu, you will find the appropriate description within the chapter “Reports” in this manual. User Manual 71 Call- & Track 5 5.3.2 Incoming items The options Incoming items and Outgoing items allow the edit of the master data for the spare part management. To add new articles, you perform the following steps: 1. After selecting the option Incoming items in the menu bar Edit, the following window is shown: 2. Highlight an article with your mouse and enter under Quantity the number of articles to be added. 3. Click the button Take an existing request to store the new stock. The articles are automatically added during this process. 4. In the lower bar the current date and time are shown to you. You can change this by hand, if you select the desired date in the field Date and enter the time under time. 5. To close the window click Close. User Manual 72 Call- & Track 5 5.3.3 Outgoing items Perform the following steps to take the sold articles out of stock: 1. Select in the menu Edit the option Outgoing items, the following window is shown: 2. Highlight an article with your mouse and enter under Quantity the number of the articles to be taken out of stock. 3. Click the button Take an existing request to store the new stock. The amount of the article is automatically reduced. 4. In the lower bar the current date and time are shown to you who you can change by hand, if you select the desired date in the field Date and enter the time under Time. 5. To close the window click Close. User Manual 73 Call- & Track 5 5.3.4 Inventory record information If you select the option Inventory Record Information in the menu Edit, the following window is shown to you for the management of the master data: Here yon can choose to sort either by ID or article. Activate the corresponding option with a mouse click. Click the button Add to add new articles. In the shown window you write down the article name and item ID as well as the current stock and Minimum Inventory. User Manual 74 Call- & Track 5 To store the information, click OK. The new record is shown in the list of articles. You can edit existing articles any time, by clicking the button Edit. You can edit the information in the following window. To confirm the changes and to close the window, click OK. User Manual 75 Call- & Track 5 5.4 Administration Via the menu Administration you can enter all necessary base data which you will need while working on a request. This menu comprises 10 options: • • • • • • • • • • Status of Request Problem Country Languages Service-Medium CPU Operating System File System Manufacturer Product. Before entering a request you have to define the options Manufacturer and Product first: User Manual 76 Call- & Track 5 In order to enter the user's data, you need the options Country and Languages: The options Status and Problem Category as well as Request-Med. are used in the window Enter Request Edit: User Manual 77 Call- & Track 5 In order to write down the system configuration of the user, you have to define the options CPU (Processor), OS (Operating System) and FS (File system) first: User Manual 78 Call- & Track 5 5.4.1 Request status Enter the different request status as follows: 1. Select in the menu Administration the option Status of Request, the following window comes up: 2. Here all possibilities for the registered request status are listed. You can enter a new request status by clicking on the button Add and, as shown in the following window, by typing the new name in the field Description. 3. To change an existing request status, click the button Edit and a window is shown where you can edit the data. 4. Confirm your changes with clicking OK. User Manual 79 Call- & Track 5 5.4.2 Problem Here you can set up the problem groups, please note that you have to enter the problem groups for every manufacturer and for every product individually. To enter the problem group, perform the following steps: 1. Select in the menu Administration the option Problem, the following window is shown: 2. Select the manufacturer and the product from the drop down list. 3. In order to enter the name of the problem group (in two languages), click the button Add. User Manual 80 Call- & Track 5 4. You can change the existing data by clicking Edit. 5. To store your information and to close the window, click OK. User Manual 81 Call- & Track 5 5.4.3 Country This option serves for setting up the list of countries. To work on the list of countries, perform the following steps: 1. Select in the menu Administration the option Country, the following window is shown: 2. To extend the list of countries, click on Add. 3. Enter your Agent Initials, the names of the country in German and English and click OK, to store the data. User Manual 82 Call- & Track 5 4. If you click the button Edit, you can change the existing information. 5. Confirm your changes with a click on OK. User Manual 83 Call- & Track 5 5.4.5 Languages Here you can add or edit the languages. 1. Select in the menu Administration the option Languages to open the window Edit language: 2. Click on Add to extend the list of languages. 3. If you want to change the name of a language, click on Edit. 4. To store your changes, click OK. The changes are shown in the list of languages. User Manual 84 Call- & Track 5 5.4.5 Service medium Requests of the users are coming in using different service media. To enter the list of service medium, perform the following steps: 1. Select in the menu Administration the option Service-Medium to open the window Edit Request-Medium: 2. To extend the list of the service media, click the button Add. 3. In the window below you enter the media type; click OK, to store the data. 4. Click Edit to change the media type. 5. Confirm your changes with OK. User Manual 85 Call- & Track 5 5.4.6 Processors In order to write down the system configuration of the user, you have to define the options of the list of the processors first. To enter the list of the processors, perform the following steps: 1. Select in the menu Administration the option CPU to open the window Edit Processor: 2. To add a new processor, click the button Add. 3. In the shown window you enter the processor type, and then click OK, to store the data. 4. If you click the button Edit, you can work on the type of processor. 5. Confirm your changes with OK. User Manual 86 Call- & Track 5 5.4.7 Operating system This option serves for entering the list of operating systems. How to enter different operating systems: 1. Select in the menu Administration the option Operating system, the following window is shown: 2. All registered operating systems are listed. You can enter a new operating system by clicking the button Add and entering the new name. 3. Click on Edit to change available data. 4. Confirm your changes with OK. User Manual 87 Call- & Track 5 5.4.8 File system Here you can add file systems or change them. To enter the list of the file systems, perform the following steps: 1. Select in the menu Administration the option File system to open the window Edit FS: 2. Click the button Add to extend the list of the file systems. 3. If you have to change the name of the file system, click on Edit. 4. You store your changes with a click on OK. The list of the file systems is updated. User Manual 88 Call- & Track 5 5.4.9 Manufacturer Here you can set up the list of the manufacturers. The following steps are necessary to add a new manufacturer or to change the list of the registered manufacturers: 1. Select in the menu Administration the option Manufacturer, the following window is shown: 2. To extend the manufacturer's list, click the button Add. 3. Enter the name of the manufacturer and click OK to store the data. 4. If you click the button Edit, you can work on the existing names. 5. Confirm your changes with OK. User Manual 89 Call- & Track 5 5.4.10 Product Here you can set up the product list which you will need when working on the requests. To set up the product list, perform the following steps: 1. Select in the menu Administration the option Product; the window Edit Product Information is shown: User Manual 90 Call- & Track 5 2. Select the manufacturer from the drop down list. 3. Click the button Add and a window is shown where you can enter the product information. User Manual 91 Call- & Track 5 4. To change an existing product, click the button Edit. In the window shown you can change the data. 5. Click OK to store your information and to close the window. User Manual 92 Call- & Track 5 5.5 Reports The menu bar of Reports encloses a huge number of options which allow you to create current and necessary evaluations from the request or service amount. The following options are available: • Report evaluation as a preview / printout / export file; o For every manufacturer o For every product o For every problem group o For every media type • Report according to the request status • Single report for a reference number • Accumulated service report • Service report for On-Site • service report of the stock management User Manual 93 Call- & Track 5 5.5.1 Evaluation report You can combine different evaluation report as follows: 1. Choose in the menu bar Reports the option of Evaluation Report, the following choice window is shown to you: 2. If you want to create the report "Products of all manufacturers“, activate the option All Manufacturers. You can also provide a report according to a single manufacturer, while you activate the option of Single Manufacturers and select the manufacturer from the drop down list. 3. To evaluate requests of a "fixed defined period “, enter under From and To the desired period. 4. There are three types of evaluation reports available to you: for every product, for every problem group and for every media type. Activate all check boxes if you need to evaluate all types in the report. You can select only one report type by activating only the corresponding check box of the report type. User Manual 94 Call- & Track 5 5. You can create reports in three different variants: as a preview, printout or CSV file. • If you activate the option Preview and click the button Create Report, the following window with the preview of the report Support Requests By Product appears: • You have the possibility to print out the report on a connected printer, while you click the printer symbol or you can store the report with a click on the Save symbol. Click Close to close the report. • If you have activated the option Preview for all three report types, the next preview Requests For Every Problem is automatically opened: User Manual 95 Call- & Track 5 • Click the button Close to close this report and to open the next preview Requests for every media type. 6. If you want to receive a printout of the report without preview, activate the option Printout and click the button Create Report, now the documents are printed on the connected printer. 7. To receive the report in form of an export file, activate the option CSV and click the button Create Report. A CSV file is generated which is stored in the folder Call & Track under report. User Manual 96 Call- & Track 5 5.5.2 Report according to request status This option allows the report to provide according to request status. You create the report according to a certain request status: 1. Choose in the menu bar of report the option Report after request status, the following window appears: 2. Select the request status from the drop down list and determine the period of the report. 3. You can create a short report, while you activate the option Short and click on preview. You receive the following window: You can print the indicated report either on the connected printer, or store it as a report file. Click in conclusion on Close to close the window. User Manual 97 Call- & Track 5 4. Activate the option Entire to create a detailed report. With a click on Preview, you receive the following report preview: User Manual 98 Call- & Track 5 5.5.3 Single report for a reference number The next report option which is available to you is a report for every reference number. You can create the report for every reference number, as follows: 1. Choose in the menu bar Reports the option Single Report for dedicated reference number the following window appears: 2. Enter the reference number and click the button Report to open the report preview. This report contains the detailed request history according to the reference number you entered. 3. You can print the created report on a connected printer or store it as a report file. 4. At the end click on Close to close the window. User Manual 99 Call- & Track 5 5.5.4 Accumulated service report The accumulated service report serves the service engineer and the administrator IT as a basis for the account of his service. The accumulated service report is created as follows: 1. Choose in the menu bar of Reports the option Accumulated Services Report the following window appears: 2. Enter the users ID (customer number) in the text field or click the button Browse. The search user window below is opened, in which you can look for the user: User Manual 100 Call- & Track 5 3. Determine the period of time for the account and click on preview to produce the report. 4. Now Call- & Track determines all requests of the defined period, and accumulates the used working hours. User Manual 101 Call- & Track 5 5.5.5 Service report for On-Site service You create the service report for On-Site services as follows: 1. Choose in the menu bar Reports the option Service Report for On-Site service the following window appears: 2. Enter the reference number in the text field, select the date and click OK, to open the report preview. You receive a detailed report for this reference number and the selected day incl. all information about attached documents. 3. Using the upper menu bar you can print the report alternatively on a connected printer or store it as a report file. 4. Click on Close to close the window. User Manual 102 Call- & Track 5 5.5.6 Report of the stock management The option Stock Management allows you to receive an overview of the inventory. The following steps are necessary for the creation of a report for the stock management: 1. Choose in the menu bar Reports the option Service stock management the following choice window appears: 2. Now four report options are available to you. Activate an option and click on Save to save the report. The following window for file selection appears: Enter a file name and click on Save. User Manual 103 Call- & Track 5 3. If you want to print out the report, click on the button Print. Now you receive the following report preview with the inventory: 4. Using the upper menu bar you can print the report alternatively on a connected printer or store it as a report file. 5. At the end click on Close to close the window. User Manual 104 Call- & Track 5 5.6 Transfer The function Transfer has two options: • Export of user’s data • Archiving the Attachments User Manual 105 Call- & Track 5 5.6.1 Export of User data With this option you can export the user data from Call & Track. A CSV file is created, which you can import into Microsoft Excel or other standard data bases. How to export your user's data: • Select in the menuTransferthe optionExport user;The already known search user window is shown: • Search now either specific for a user or a group of users under aid of the searching criteria. • If you wish an entire export of all users, just activate the check box in front of the field Name and click on Search. All registered users are shown. You can create the export file with a simple click on Save to CSV. You will find this file in the program folder of Call & Track in the subfolder EXPORT. User Manual 106 Call- & Track 5 The following screen is shown: • Enter the name for the Export file and finish the export with a click on Save. • The generated CSV file uses the semicolon as seperator. If you want to change the separator, go to File then Server Setup, there you find this setting. A detailed description you find under chapter 5.1 in this manual Please note, that the function Export User only exports the personal data from the user screen. If you wish a complete list of all licensed products by each user you need to activate the check box Include Products before creating the export file. Call & Track then attaches the entire list of licensed products including the serial numbers to every user's record. User Manual 107 Call- & Track 5 5.6.2 Archive of the Attachments In principle you can attach an unlimited number of documents to a reequest. These are called Attachments within Call- & Track. Attachments are collected centrally within the archive subdirectory. The more attachments are stored within the archive list, the slower searching or attaching new documents can be, due to the standard file handling of Microsoft Windows. In particular a slow insertion of new attachments can develop negative in the treatment of a request. That's why, we offer you with this function the possibility to move older attachments (that are not needed every day) into a folder so that you can work fast and efficient and have access to any saved attachment without knowing on which level the requested attachment is stored. Moving attachments into a different level is very easy: As you can see in the screen above, the archive has three levels. You can move all attachments dated older than the date entered into the next level. The attachments which are being worked on are automatically stored in level 1. If you have moved a specific attachment into level 2 or level 3, Call & Track is still able to find and open this attachment automatically by using the corresponding buttons in the Edit Request window. Only the duration of the User Manual 108 Call- & Track 5 search may take 2 – 5 additional seconds until the attachment is found and opened. We recommend you to use this function, however, first from a number of approx. 3000 Attachments within level 1. User Manual 109 Call- & Track 5 5.7 Helpdesk Via the menu Helpdesk you have very quick access to the Intranet information and to the forms. The Helpdesk function consists of the following components: • Intranet • OmniForm forms • MS Word forms • Acrobat forms User Manual 110 Call- & Track 5 5.7.1 Intranet With this function a direct link can be built up between Call & Track and an Intranet based knowledge data base or an Intranet based Support information service respectively. The only thing the user has to do is to set up the respective reference calls of the web service and the start path of the local browser within the setup option Local Setup of the menu File. With an easy click on this function the web service within your Internet browser is automatically started and will be displayed on the screen. • OmniForm forms, • Microsoft Word forms • Adobe Acrobat forms All kinds of forms of the named applications OmniForm by Scansoft Inc., Microsoft Word and Adobe Acrobat, can be opened from Call & Track directly. Here it is important that the respective reference paths and start directories were entered correctly within the setup function Working Place Setup in the menu File. If you select one of the form options, the following window for file selection opens and shows the start list defined by you: User Manual 111 Call- & Track 5 To open a form, highlight the corresponding file name and click on Open. User Manual 112 Call- & Track 5 6 Multi User Environment Call- & Track 5.0 offers you two options for Multi User Environment. First of all you need an additional user license for every registered Service Technician in Call- & Track, so that all upcoming Service-requests can be assigned without fail to the Technician dealing with it. Secondly the additional Multi User License offers you the possibility of working with the Call- & Track database from different Client PC’s in Peer-To-Peer or LAN-network. In the following sections we will explain the systematic extension of your Call& Track database for Multi-User Use from many different workstations in your local network. User Manual 113 Call- & Track 5 6.1 Add an additional user license The Call- & Track License Administration connects the registration of additional Service Technicians by entering the appropriate serial number licenses. You can purchase the additional serial numbers as 1-user or 5-user licenses later. Please note that Call- & Track 5.0 supports a maximal license size of 1+10=11 user licenses. You can order the Call- & Track licenses throughout authorized specialized dealers or the Customer Service of OOO MASCH Russia as E-License. The installation of the additional user licenses is processed over the installation procedure on the Call- & Track 5 program CD. Please insert program C and the installation procedure is automatically starting itself. Choose the following marked option. Marked Option User Manual 114 Call- & Track 5 You are now starting the license administration pool of Call- & Track 5 and the following screen is shown: Within the above shown screen you are provided with 3 functions for the administration of additional user licenses: 6.1.1 Add a new serial number Die Eingabe ist äußerst simpel gestaltet und prüft gleichzeitig die Gültigkeit der Seriennummerneingabe ab: The data entry of the additional serial numbers, is designed extremely simple. At the same time it will check the validity of the serial number, which you have entered: 6.1.2 Deleting the invalid serial number This function is on standard greyed out, since it is only used for service maintenance on system and serial number upgrades. 6.1.3 Close the Call- & Track user administration By clicking on the button „Close”, you can finish the license administration tool of Call- & Track automatically and return to the Call- & Track installation program. User Manual 115 Call- & Track 5 6.2 Call- & Track user administration The Call- & Track user administration offers you, based on the license administration, the setup of an adequate number of service technicians. Up to a number of 5 technicians the number is to be treated equivalent to the entered license numbers. On a license size of more than 5 licenses, Call- & Track offers you the setup of additional so called “inactive” service technicians. This way the administrator has the possibility to administrate more service technicians than the maximum number of user licenses. The user administration gives him the possibility to mutual activate or deactivate the necessary service technicians as you can see from the following sections. After you have now installed the additional user licenses as explained in section 6.1 please start the function Call- & Track user administration: You will find the application for the user administration within the installation program in section „Custom Installation of Call- & Track”. User Manual 116 Call- & Track 5 You are entering now the user administration of Call- & Track 5 with what you can setup, activate and deactivate the individual technicians: Attention!!! If you miss here the function „Delete a User“, it is of course understandable but in this case correct, because there is no such function. A once setup service technician you cannot delete later on, since otherwise all request tracked by the service technician would not have any source and the database would be inconsistent. Leaving service technicians that will be replaced within the database by a new user have to be switched to “inactive”. This we will further explain in this section. User Manual 117 Call- & Track 5 Now click on the button „Add“ and the user administration mask for a new service technician will be opened: • In the field „Technician ID“, please insert, with 3 letters maximum, the initials of the service technician. These initials are used by the service technician as user name when logging in as well as on personal identification of the processed requests. • Under „Full name“, please insert first and last name of the additional service technician. • Into the field „Password“, you should enter the password of the additional service technician. In the field below, you must confirm it a second time. User Manual 118 Call- & Track 5 Important for the function of the service technician is now the classification as an administrator, professional user or standard user. • As „Admin“ you grade all service technicians who are allowed to use the functions „Administration“, „Reports“ and „Transfer“ and thus are allowed to use the full amount of Call- & Track functions. • As „Professional User“ there are some greyed out sub functions within the functions „Administration“, „Reports“ and „Transfer“ that are just meant for the use by the administrator of Call- & Track 5. • Important also the last check-up field with the name „Active“. Throughout this function you can activate and thus give free for the login or deactivate a support technician. This should be processed especially when a retired service technician is to be replaced without willing to raise the number of user licenses for the same time access. Please note the information for deleting a service technician on the previous pages of this chapter. By clicking on the button „OK“, you can finish your submission and save them, so that the new and the edited data entries regarding the service technicians can be used right away after closing the user administration tool. User Manual 119 Call- & Track 5 6.3 Preparation of an additional Client PC for Call& Track 6.3.1 Release of the Program Directory on your server PC Independent of whether you would like to install Call- & Track 5.0 in a Peer-ToPeer network or on a dedicated file server, you have to process the basis installation according to the instructions of the installation manual in connection with the installation of Microsoft MSDE 2000. After the successful base installation, you will find also, as you can see from the screen below, the utility program “ClientSetup.exe” within the Call- & Track program directory: User Manual 120 Call- & Track 5 Set up in the first step a sharing for your Call- & Track Program Directory so that you can launch the Client Setup Program from each additional Client PC’s: Please complete the Sharing Setting for the Call- & Track Program Directory with „Apply“ and click on the tab “Security” where you can grant the Call- & Track users as shown in the screen below the proper rights as follows: User Manual 121 Call- & Track 5 6.3.2 Starting the Client Setup program After the successful setup of your server directory, you can now install from each Client-PC, for which you have a valid additional multi user license, the Client Setup Program. You enter then right away the following installation screen: Process now every single installation step according to the button order on this screen. After the successful processed Client installation you are without any additional work able to use Call- & Track from your workplace. Please note that you may install Call- & Track 5 Client on as many Client PC’s as you want, but the integrated Call- & Track license administration accepts only the same time access of the licensed number of active users. The first step of the installation for an additional Client PC of your Call- & Track application is as shown below to insert the above explained server directory. User Manual 122 Call- & Track 5 It must be entered into the data field “Server Directory”: Afterwards executing the following function buttons processes the configuration of your Client PC step by step: The installation of the BDE has to be processed on every workplace and will be filed locally. The button “Installation of the BDE” executes the standardized BDE installation. The ODBC data interface has to be prepared for a functioning connection to the data base server. You can process this also over the function data springs ODBC in the computer administration of your operating system. The Call- & Track Archive printer is a virtual printer driver, which makes it possible for the user to convert any document in TIFF-Format, so that it can be attached to the request. It is necessary to update the Windows Registry database for Call- & Track on each Client PC, by that the standard allowances are tracked fully for every Call- & Track workplace. To finish the installation you will need a program icon on your Windows Desktop, so that you can start the Call- & Track application from your server drive easily. After the successful and full execution of the Client installation steps you can orderly finish the Client setup program throughout the button „Exit“. User Manual 123 Call- & Track 5 A System Requirements We distinguish between the following system requirements for the application: • Client Area • Backend Area A.1 System requirements for the Client Area: • PC with Pentium III 700-Mhz processors or faster (recommended). • Operating system Microsoft Windows NT with service pack 6a, Windows 2000 with service pack 3 or Windows XP Professional or higher. • For Windows NT, Windows 2000 and Windows XP Professional: o 256 MB of RAM (512 MB recommended) for the operating system as well as, in addition, 8 MB RAM for every application which is open at the same time o 20 GB of available hard disk memory with 2 GB on the hard disk where the operating system is installed (the necessary storage space depends on the configuration; user-defined installations may require more or less free storage space on the hard disk). • CD-ROM disk drive • Super VGA-Monitor (800 x 600) or monitor with higher resolution and with 256 colors • Microsoft Mouse, Microsoft IntelliMouse or compatible device. User Manual 124 Call- & Track 5 A.2 System requirements for the Backend Area: • PC with Pentium IV 1800 MHz processors or higher (recommended). • Operating system Microsoft Windows 2000 or Windows 2003 server with current service pack. • Microsoft SQL server in 2000 with suitable CAL-license number. • For Windows 2000 and Windows 2003 server: o 512 MB of RAM (1,024 MB recommended) for the operating system o 60 GB of available hard disk memory with 4 GB on the hard disk where the operating system is installed (the necessary storage space depends on the configuration; user-defined installations may require more or less free storage space on the hard disk). • CD-ROM disk drive • Super VGA-Monitor (800 x 600) or monitor with higher resolution and with 256 colours • Microsoft Mouse, Microsoft IntelliMouse or compatible device. User Manual 125 Call- & Track 5 B Tips How to change the fixed implemented check list within the screen: “Enter Req: Edit”? Attention! The treatment and/or adjustment of this check list is not trivially possible by menu extensions, since the check list is deposited fixed in the registry of your Windows operating system. For the treatment of the check list entries in the registration data base of Windows you need founded knowledge of your used operating system. We can explain the necessary changes at an example to you indeed in the following, please deduce from it no functional assent for your Call& Track Installation or in particular for the flawless functionality of your operating system, should there be a false function or installation damage in your Windows due to inappropriate treatment of the registry. In particular in the multi-user environment you must pay attention to the fact that changes you did in the registry of on PC are also carried out on all other PCs which are linked with Call- & Track because otherwise inconsistencies in the treatment can occur. User Manual 126 Call- & Track 5 Here now the explanation concerning the check list care: • Start your Windows registry editor via Start -> Run. Type in the following command: REGEDIT.EXE and close the screen by pressing ENTER. The following window opens: • Open the folder HKEY_CURRENT_USER and the subfolders as shown in the following screen: User Manual 127 Call- & Track 5 • You find in the segment "MASCH" on right side of the screen the entries corresponding to the check list PcPointxx or MacPointxx. The letters xx stands as a numerical place holder for the list of the single entries. Please enter now a new PC check point, while you proceed like shown in the following screen. Open with the right mouse the context-sensitive menus of the registry editor and create a new String Value: User Manual 128 Call- & Track 5 • At the end you start your Call- & Track application again and open the check list screen within the window: “Enter Req: Edit” and you will find the newly created entry now in your check point list: User Manual 129 Call- & Track 5 C Links in the Intranet C.1 Our Partners On these sides you find our professional trading partner firms which you will gladly inform about Call- & Track: • http://www.masch.com/partner C.2 Our Reference Please visit one of the following Web Sites: • http://support.masch.com • http://www.masch.com/products • http://www.masch.com/tucos User Manual 130