1
ASSEMBLY
Assembly
requires two people. Set the treadmill in a cleared area and t;emove all packing materials. Do not
d!spose of the packing materials until assembly is completed. Assembl_,yrequires the included allen wrenc=_
and your own phillips screwdriver _,
and scissors _.
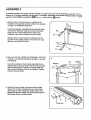
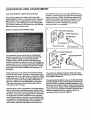
1. With the help of a second person, carefully lay the
treadmill on its right side as shown (refer to the drawing
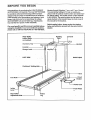
on page 4 to identifylhe right side).
Insert the Extension Legs (88) into the treadmill. Make
sure that the Extension Legs are turned so the Base
Pads (70) are on the indicated side. Attach each
Extension Leg with an Extension Leg Screw (83).
88
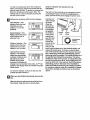
With the help of a second person, carefully raise the
treadmill to the upright position so the Extension Legs
(88) are resting flat on the floor.
2. Refer to HOW TO LOWER THE TREADMILL FOR USE
on page 11. Follow the instructions on page 11 to lower
the treadmill.
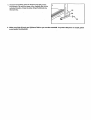
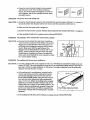
Insert the brackets on the Console Base (56) into the
Uprights (84); insert any slack in the Wire Harness (54)
into the right Uprig.ht.Thread four Handrail Bolts (48)
with Handrail Washers (47) into the Uprights. Tighten
all four Handrail Bolts.
56
Bracket
' 47
i
b
J~
_84"
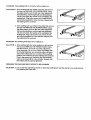
3. Attach the Frame Guide (10) and the Frame Guide
Spacer (11) to the Frame (5) with two Frame Guide
Screws (9) as shown. Note: Be careful not to overtighten the Screws. Make sure that the thick end of
the Frame Guide is at the bottom.
11
5
Thick End
Bracket