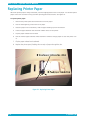
1
QBC STAR ™ System Operator’s/Service Manual 2006/02 Document Number: L–000867 Revision: A QBC Diagnostics Inc. 200 Innovation Blvd., Suite 212 State College, PA 16803 USA 877.231.3115 QBC Star™ System User’s Manual Revision Date Pages A 02/06 All Reason Updates for software version 3.0 QBC, QBC Star, Adams, and Vacutainer are registered trademarks of QBC Diagnostics Inc. © Copyright QBC Diagnostics Inc, 2006. All rights reserved. No part of this publication may be reproduced, transmitted, transcribed, stored in retrieval systems, or translated into any language or computer language, in any form or by any means, electronic, mechanical, magnetic, optical, chemical, manual, or ii L–000867(A) Preface otherwise, without the prior written permission of QBC Diagnostics Inc, 200 Innovation Blvd., Suite 212 State College, PA, 16803, United States of America. VS–0226 Contents 1 – Introduction ......................................................................................................................1–1 Intended Use ....................................................................................................................................... 1–1 Principles of the Test ........................................................................................................................... 1–1 System Overview ................................................................................................................................. 1–2 QBC STAR Blood Collection Tubes ............................................................................................. 1–2 QBC STAR Instrument ............................................................................................................... 1–3 Instrument Self-Testing and Calibration ............................................................................................... 1–4 Manual Structure ................................................................................................................................ 1–5 Getting Started ................................................................................................................................... 1–5 Use of this Manual .............................................................................................................................. 1–5 Conventions ........................................................................................................................................ 1–6 Symbols Used on the Equipment................................................................................................ 1–6 Notes, Cautions, and Warnings.................................................................................................. 1–6 Summary of Warnings and Cautions .......................................................................................... 1–7 2 – Installation and Setup ......................................................................................................2–1 Unpacking and Setup .......................................................................................................................... 2–1 Electrical Connection ........................................................................................................................... 2–1 QBC STAR Specifications ..................................................................................................................... 2–2 External Connections ........................................................................................................................... 2–4 Connecting an External Printer................................................................................................... 2–4 Updating System Software .................................................................................................................. 2–6 System Setup and Utilities ................................................................................................................... 2–6 To Enter Setup Mode ................................................................................................................. 2–6 LCD Contrast ............................................................................................................................. 2–7 Date and Time ........................................................................................................................... 2–7 Disable Auto LCD (Contrast) ...................................................................................................... 2–8 Save Data .................................................................................................................................. 2–8 Print Data .................................................................................................................................. 2–8 Shipping Prep. ........................................................................................................................... 2–8 More Options ............................................................................................................................ 2–8 3 – Controls and Indicators ....................................................................................................3–1 General Discussion .............................................................................................................................. 3–1 Power Switch ...................................................................................................................................... 3–1 “Star” Button ...................................................................................................................................... 3–2 L–000867(A) iii QBC Star™ System User’s Manual Door Release Latch .............................................................................................................................. 3–2 Liquid Crystal Display (LCD) ................................................................................................................. 3–2 Contents Printer ................................................................................................................................................. 3–3 Paper Release Lever ................................................................................................................... 3–3 Manual Advance Wheel ............................................................................................................. 3–3 Floppy Disk Drive ................................................................................................................................. 3–4 Floppy Disk Indicator.................................................................................................................. 3–4 Floppy Disk Eject Button ............................................................................................................ 3–4 Setup Keypad ...................................................................................................................................... 3–5 ESC Key Key Key Key .................................................................................................................................... 3–5 .................................................................................................................................... 3–5 .................................................................................................................................... 3–5 .................................................................................................................................... 3–5 4 – Operation .........................................................................................................................4–1 Summary of Operation Steps ............................................................................................................... 4–1 Turn Instrument Power on ........................................................................................................ 4–2 Prepare the QBC STAR tube ....................................................................................................... 4–2 Mix the tube .............................................................................................................................. 4–4 Tilt the tube ............................................................................................................................... 4–5 Cap the tube ............................................................................................................................. 4–5 Insert the tube into the instrument ............................................................................................ 4–6 Close the instrument door ......................................................................................................... 4–6 Start the test ............................................................................................................................. 4–6 Printing of results....................................................................................................................... 4–7 Tube Disposal ......................................................................................................................... 4–10 Power Down............................................................................................................................ 4–10 Stopping the Centrifuge .................................................................................................................... 4–10 Emergency Door Unlock .................................................................................................................... 4–10 5 – Performance and Limitations ...........................................................................................5–1 Operating Ranges ................................................................................................................................ 5–1 Precision .............................................................................................................................................. 5–1 Accuracy ............................................................................................................................................. 5–2 Interfering Substances ......................................................................................................................... 5–3 Limitations .......................................................................................................................................... 5–4 Expected Values .................................................................................................................................. 5–4 Controls .............................................................................................................................................. 5–5 Internal Quality Control ............................................................................................................. 5–5 Internal Electronic Quality Control Label..................................................................................... 5–5 iv L–000867(A) Preface External liquid controls............................................................................................................... 5–6 Proficiency Tests .................................................................................................................................. 5–6 Contents 6 – Maintenance .....................................................................................................................6–1 Cleaning ............................................................................................................................................. 6–1 Disinfection ......................................................................................................................................... 6–1 Replacing Printer Paper ........................................................................................................................ 6–2 Replacing Fuses ................................................................................................................................... 6–3 7 – Troubleshooting ................................................................................................................7–1 General Problems ................................................................................................................................ 7–1 Error Codes and Messages .................................................................................................................. 7–2 G – Glossary .......................................................................................................................... G–1 A – Limited Warranty ............................................................................................................. A–1 B – Parts and Accessories ...................................................................................................... B–1 C – Software Update Log ...................................................................................................... C–1 D – Contacts .......................................................................................................................... D–1 E – Blood Collection and Handling .........................................................................................E–1 General Comments ............................................................................................................................. E–1 Universal Precautions for Specimen Handling ....................................................................................... E–1 Venous Blood Collection (Venipuncture) .............................................................................................. E–2 Supplies E–2 Procedure .................................................................................................................................. E–2 Collecting Multiple Specimens from a Single Venipuncture ........................................................ E–3 Areas to Avoid When Drawing Venous Specimens ..................................................................... E–3 Errors to Avoid in Venous Blood Collection ................................................................................ E–4 Capillary Blood Collection .................................................................................................................... E–4 Supplies E–4 Procedure .................................................................................................................................. E–4 Avoiding Hemolysis during Capillary Blood Collection ................................................................ E–5 L–000867(A) v Preface F – Bibliography .....................................................................................................................F–1 Figures Figure Description Page 1 QBC STAR Blood Collection Tube ........................................................................................ 1–2 2 QBC STAR Instrument ......................................................................................................... 1–3 3 Symbols Used on the QBC STAR Instrument (rear) ............................................................... 1–6 4 External Connections .......................................................................................................... 2–5 5 Power Switch ...................................................................................................................... 3–1 6 QBC STAR Controls and Indicators ...................................................................................... 3–2 7 Printer Controls ................................................................................................................... 3–3 8 Floppy Disk Drive Controls and Indicators ............................................................................ 3–4 9 Setup Keypad ...................................................................................................................... 3–5 10 Sample Vial ......................................................................................................................... 4–3 11 Inverting the Sample Vial ..................................................................................................... 4–3 12 Filling a Tube from Venous Blood ........................................................................................ 4–3 13 Filling a Tube from Capillary Blood ...................................................................................... 4–4 14 Mixing the Tube .................................................................................................................. 4–4 15 Tilting the Tube ................................................................................................................... 4–5 16 Uncapping the Tube ............................................................................................................ 4–5 17 Seating the Cap and Float ................................................................................................... 4–5 18 Inserting the Tube into the Instrument ................................................................................ 4–6 19 Sample Results Printout ....................................................................................................... 4–9 20 Sample Results Readout ...................................................................................................... 4–9 21 Door Unlatch Access Hole ................................................................................................. 4–11 22 Replacing Printer Paper ....................................................................................................... 6–2 23 Replacing Fuses ................................................................................................................... 6–3 L–000867(A) vii QBC STAR ™ System User’s Manual QBC Diagnostics Inc. 1 – Introduction Intended Use The QBC STAR™ Centrifugal Hematology System provides a diagnostic hematology profile on venous or capillary blood providing values for: • Hematocrit • Hemoglobin • Mean Corpuscular Hemoglobin Concentration (MCHC) • Platelet count • White blood cell count • Granulocyte count (% and number) • Lymphocyte/monocyte count (% and number) Principles of the Test It has been known for many years that the grayish-white layer (buffy coat) that appears above the red blood cells in a hematocrit tube contained packed layers of leukocytes (white blood cells) and thrombocytes (platelets)1-5. The QBC STAR Centrifugal Hematology System uses technologies that make it possible to quantify the buffy coat cells. When the QBC STAR tube is filled with blood and placed into the QBC STAR instrument, the tube is spun at a high rate of speed causing the different types of cells in the blood to separate into layers or bands from the heaviest to the lightest. The QBC STAR System uses a special tube designed to enhance the natural separation properties of a whole blood sample when it is centrifuged. A special coating in the QBC STAR tube stains the two white blood cell populations (granulocytes appear orange-yellow and lymphocytes/monocytes appear green) and the platelet layer (platelets appear yellow-orange). The ability to quantify the cells is also enhanced by the insertion of a precision plastic float into the QBC STAR tube that mechanically expands the buffy coat layers. The hematocrit, white blood cell counts, and platelet count are directly measured from the cell layers. The float, whose density approximates the buffy coat cells, will also penetrate the red blood cell layer. The QBC STAR hemoglobin measurement is directly related to the density of the red blood cells, and is based on the depth of penetration of the float into the red blood cell layer. Mean corpuscular hemoglobin concentration (MCHC) is electronically calculated using the standard formula [(HGB / HCT) * 100]6, 7. The QBC STAR tube is also internally coated with anticoagulants that allow collection of capillary blood directly from a skin puncture site. The QBC STAR System is intended for in vitro diagnostic use. WARNING CAREFULLY OBSERVE ALL WARNINGS AND PRECAUTIONS IN THIS MANUAL AND ON LABELING OF QBC STAR TUBES CONCERNING THE SAFE HANDLING OF BLOOD AND BLOOD-DERIVED PRODUCTS. L–000867(A) 1–1 QBC STAR™ System User’s Manual System Overview The QBC STAR Hematology System is a self-contained, whole blood, automated hematology system. Reported results include hematocrit, hemoglobin, total white blood cell count, combined lymphocyte and monocyte count, granulocyte count, platelet count, and Mean Corpuscular Hemoglobin Concentration (MCHC). The test can be performed from either venous or capillary blood specimens. The system is factory preset and user calibration is NOT required. The system is powered by a universal voltage internal power supply that plugs directly into an AC power source. The QBC STAR Hematology System performs all tests using the QBC STAR tube. The QBC STAR tube is described below. When the QBC STAR tube is placed into the instrument, it is automatically centrifuged and analyzed. The results are computed, displayed, and printed on the internal printer. QBC STAR Blood Collection Tubes The QBC STAR Tube is a two-component device. The tube assembly represents the first component. It consists of a precision glass QBC tube and the plastic sleeve that serves as a carrier for the tube. A cap and float assembly comprise the second component. The float expands the buffy coat region by a factor of ten. It does this by reducing the cross section area of the tube. See Figure 1. The QBC STAR tube is preassembled and consists of the following components : • 3” long precision bore glass tube with dried coatings of acridine orange, heparin, K2EDTA, potassium oxalate, monoclonal antibody and reagents • a vented plug at the end of the tube • a tube carrier Figure 1 – QBC STAR Blood Collection Tube Tubes are filled by capillary action with 65 to 75 µL of whole blood. (This is the volume when the tube is filled between the 2 fill lines marked on the QBC STAR tube.) The blood can come directly from a fingerstick or from a Vacutainer™ brand blood collection tube or equivalent (lavender top only). The plug has a vent allowing air to escape during filling of the tube. The vent closes off when the tube is capped. After the tube assembly is filled with blood, the tube is mixed and the cap assembly is placed on the tube. The cap consists of the following components: 1–2 • A precision molded plastic float • A float holder • The cap L–000867(A) 1 – Introduction Placing the cap on the tube performs two actions simultaneously: • It seals the tube carrier • It inserts the float into the QBC STAR tube The density of the float is matched to the density of the buffy coat so that it centers itself in that region. The float expands the buffy coat by a factor of ten during centrifugation. If a tube breaks during centrifugation, blood and glass are fully contained within the capped tube carrier. This design provides a high degree of user and instrument protection from exposure to blood and aerosols. QBC STAR Instrument The QBC STAR Instrument is a compact, portable, centrifugal hematology analyzer. The instrument contains a single tube centrifuge for sample mixing and for separating the blood into the various cell populations. Analysis of the sample occurs in the centrifuge rotor while the centrifuge is running. See Figure 2. A single filled QBC STAR tube is placed into the rotor, the door is closed, and the “Star” button pressed to start the test process. The centrifuge cycle mixes and then separates the blood into distinct cell layers. The instrument initially spins slowly for 8 to 12 seconds typically (up to 30 seconds) allowing the blood in the tube to mix. Once mixing is done, the centrifuge accelerates to a higher speed which is maintained for 4 3/4 minutes. This stage separates the blood cell populations into distinct packed cell bands. After the cell populations have been separated, the centrifuge decelerates to measure the band lengths. Analysis of the tube occurs at the illumination/read station. This station consists of a dual light source and optical detector system. Figure 2 – QBC STAR Instrument L–000867(A) 1–3 QBC STAR™ System User’s Manual Hematological results are shown on the Liquid Crystal Display. Results are also automatically printed by the internal thermal printer onto a 2.25-inch paper tape. The instrument contains the following subsystems: • The centrifuge for mixing and separating the blood sample • An embedded microprocessor for machine control, blood sample analysis, and communications • Memory to store the operating system and application software • A 3.5” floppy drive for software updates • An internal printer • A Liquid Crystal Display to show results, prompts, and messages • Data ports for communication with optional external devices such as a LIS computer or PC, keyboard, bar code wand, full-size external printer Instrument Self-Testing and Calibration Whenever instrument power is turned on (or once every 8 hours if power is left on continuously), the system software performs a self-test to verify proper operation. The self-test checks such things as: centrifuge motor at various speeds, emission filter assembly, optics assembly, light source, xenon flash lamp, timing control, optical clarity and focus, internal printer, rotor timing, setup keypad. An internal quality control label and rotor timing target are fixed in place on the rotor assembly. These items help the system verify that the optical measurement and centrifuge subsystems are functioning properly. See paragraph 2 on Internal Quality Control. Printout occurs automatically. The instrument runs a built-in calibration check every time a sample is processed. Sample integrity checks include: statistical matching of bandlengths; ratios and absolute values for signal levels; ratios that are used to evaluate the quality of interfaces; measurement of float length; verification of optics and sensors; measurement and evaluation of sample fill volume. Additional tests performed as part of each assay cycle include centrifuge speed and electro-optical verification. Results are reported on tube tests only if all verification and integrity tests pass. The power on self-test and sample integrity tests provide verification of instrument parameters such as timing, speed, disposable integrity, reagent stability, etc. In addition to these checks, the system monitors the temperature inside and outside the instrument before and during each test. The system will not allow operation of the instrument if the temperature is higher than 40° C. This threshold insures that the sample temperature does not exceed 45° C during the assay (when temperatures can rise). Although the QBC STAR instrument contains a centrifuge, it is not necessary to periodically test the rotor. Centrifuge speed measurements are verified each time a sample is processed. If any part of the self-testing or calibration process fails, a message is displayed and printed. Confirmation of the success of self-tests is provided by the “Ready” message. In addition, each results printout indicates the outcome of electronic QC. If the calibration tests fail, an error message is reported. 1–4 L–000867(A) 1 – Introduction Manual Structure This user’s manual contains the following sections: Section 1 – Introduction – provides an overview of the QBC STAR hematology system, its major components, and its uses in the laboratory. An overview of this manual’s structure and conventions is also included. Section 2 – Installation and Setup – gives specifications for installation of the QBC STAR system and instructions for instrument installation and setup. Section 3 – Controls and Indicators – explains the use and meaning of all controls and indicators of the system. Section 4 – Operation – provides instructions for routine operation. Section 5 – Performance and Limitations – provides information on instrument performance, such as operating ranges, precision, accuracy, interfering substances, expected values, etc. Section 6 – Maintenance – explains all user system maintenance. Section 7 – Troubleshooting – provides a convenient guide identifying errors and suggesting corrective actions. The Glossary explains several terms used in this manual, as well as abbreviations. The Appendices contain supplemental information, such as warranty, list of parts and accessories, a software update form, a listing of Becton Dickinson international contacts, specimen collection, and bibliography. Getting Started The QBC STAR system has been designed and tested for ease of use. However, before you begin to use the instrument, you will find it advantageous to familiarize yourself with the material in this manual, especially: • Be sure to read the Summary of Warnings and Cautions on page 1–7. • Refer to the material in Section 2 – Installation and Setup for information on where to place the instrument and how to set it up for operation. • Read Section 3 – Controls and Indicators. It explains the lights, readouts, buttons, switches, etc. that are found on the instrument. • Read Section 4 – Operation. It tells you how to perform routine system operations. Use of this Manual This user’s manual is designed as a reference tool for personnel who operate the QBC STAR Hematology System on a regular basis. Every attempt has been made to include all information which would be needed during normal use and maintenance of the system. Should a question arise which is not answered in this manual, please contact the following (USA): Technical Services 1–866–265–1486 Contact(s) are listed in Appendix D. You can send in your comments or recommendations on this user’s manual on the postage-paid Reader Comment Card at the end of the manual. If you prefer, you can send e-mail to [email protected] Other documentation that may be of interest includes: L–000867(A) 1–5 QBC STAR™ System User’s Manual QBC STAR Tube Package Insert – This document contains important information on specimen preparation and the use, storage, and limitations of the tubes. A package insert is included with each box of tubes, and is available upon request from QBC Diagnostics Inc. QBC STAR Tube Quick Reference Guide – This document contains a summary of steps for preparing venous and capillary specimens and testing them on the QBC STAR instrument. Conventions Symbols Used on the Equipment The following symbols appear on the back of the QBC STAR instrumet F ! 250 V 3.15A Figure 3 – Symbols Used on the QBC STAR Instrument (rear) Top figure: Left: Symbol for electrical hazard; Right: Symbol for “refer to accompanying documentation” (specifically, the user’s manual) for instructions; Bottom figure: Symbol for fuse Notes, Cautions, and Warnings Throughout this manual, important information is presented in boxes offset from the regular text, and is labeled as either a NOTE, CAUTION, or WARNING. These messages are formatted as shown below and bear the following meaning: NOTE Important information about system use worthy of special attention is presented as a NOTE. CAUTION Information on an activity that potentially could cause damage to the instrument or system is presented as a CAUTION. WARNING INFORMATION ON AN ACTIVITY THAT POTENTIALLY COULD CAUSE INJURY TO THE USER IS PRESENTED AS A WARNING. 1–6 L–000867(A) 1 – Introduction Summary of Warnings and Cautions Carefully observe all warnings and precautions in this manual and on labeling of QBC STAR tubes concerning the safe handling of blood and blood-derived products. If the equipment is used in a manner not specified by the manufacturer, the protection provided by the equipment may be impaired. Do not, under any circumstances, remove the ground prong from the instrument power plug. Blood and body fluids may contain the Hepatitis B virus (HBV), Hepatitis C virus (HCV), human immunodeficiency virus (HIV), or other disease-causing agents. Handle all patient specimens as potential biohazards capable of transmitting infection. Wear appropriate personal protective equipment, including laboratory gloves, when collecting, handling, and processing blood and body fluids. In addition to wearing gloves, the use of disposable lab coats or gowns and protective glasses or goggles is recommended when working around the INSTRUMENT. ACRIDINE ORANGE REAGENT MAY BE TOXIC; DO NOT INGEST. AVOID CONTACT WITH SKIN, EYES, AND CLOTHING. If a tube breaks in the unit, carefully remove THE TUBE with a hemostat or other device, using puncture resistant utility gloves. CONTACT TECHNICAL SERVICES FOR ADDITIONAL INFORMATION. Do not handle the QBC STAR tube by the glass collection end of the tube. Do not use any QBC STAR tube if any part of the carrier or tube is chipped or cracked. The user should not perform any servicing except as specifically stated in this manual. Refer other problems to trained personnel, or return the instrument to QBC Diagnostics for repair. Turn instrument power off and unplug the power cord before servicing. Do not immerse the QBC STAR instrument in water or other liquid. Before BEGINNING to change the fuses, MAKE SURE THE UNIT’S POWER IS TURNED OFF AND disconnect the instrument POWER CORD from the POWER SOURCE. Do not attempt to move the instrument rotor by hand. Moving the rotor manually can cause damage to the instrument. L–000867(A) 1–7 2 – Installation and Setup Unpacking and Setup The QBC STAR instrument weighs approximately 30 pounds. Use caution when lifting and moving the instrument. Carefully unpack the QBC STAR instrument, noting any damage to the shipping carton. If damage is observed, notify the carrier immediately. After unpacking, remove the instrument from the plastic bag, and place it on a level, stable, working surface free of holes. Remove the packaging material (cardboard and foam block) from inside the instrument door. A clearance envelope should be marked 11.8 in. (300 mm) from each side of the unit. The operator should not stand within the clearance envelope longer than necessary for operational purposes. Proceed with electrical connection, described below. Electrical Connection Connect the female end of the power cord to the QBC STAR instrument (see Figure 4). Connect the male end of the power cord to the main AC power source. To avoid electrical shock, connect the power cord only to an approved power source such as a 3-wire grounded receptacle. If a 2-wire receptacle is all that is present, have it replaced with a properly grounded 3-wire receptacle in accordance with the National Electrical Code. WARNINGS IF THE EQUIPMENT IS USED IN A MANNER NOT SPECIFIED BY THE MANUFACTURER, THE PROTECTION PROVIDED BY THE EQUIPMENT MAY BE IMPAIRED. DO NOT, UNDER ANY CIRCUMSTANCES, REMOVE THE GROUND PRONG FROM THE INSTRUMENT POWER PLUG. Should the power cord or plug become cracked, frayed, broken or otherwise damaged, replace them immediately (see Appendix B for part number). Never attempt to override electrical safety interlocks of the instrument. L–000867(A) 2–1 QBC STAR™ System User’s Manual QBC STAR Specifications Physical Specifications Height (loading door open) 16.3 in (41.4 cm) Width 16 in (40.6 cm) Depth 16.3 in (41.4cm) Weight 30 lb (13.6 kg) Clearance 11.8 in (30 cm) Electrical Specifications 2–2 Voltage 100 – 240 VAC ±10% Frequency 47 – 63 Hz Current less than 4 amperes Power 185 watts nominal; 285 watts peak, 293 BTU @ 3 tests per hour L–000867(A) 2 – Installation and Setup Environmental Specifications Non-Operating Storage Temperature –20° C – 65° C Humidity 10% – 95% non-condensing Operating Temperature 16° C – 32° C unrestricted (at 32° C – 37° C use may be limited by instrument temperature shutdown or some results may be suppressed) Humidity 10% – 95% non-condensing Ambient Light 15 – 150 ft candles Noise < 70 db @ 3 ft Altitude Up to 2,000 m Surface Inclination 2º any direction without restraint; 10º any direction with restraint Decontamination L–000867(A) Temperature 65° C for 24 hours Surface 10% dilution of Household bleach solution IEC 664 Pollution Degree Category 2 IEC 663 Installation Category II 2–3 QBC STAR™ System User’s Manual Reporting Ranges Parameter Hematocrit (Hct) Hemoglobin (Hgb) MCHC White Blood Cells (WBC) Granulocytes % Granulocytes Lymph/Mono % Lymph/Mono Platelets Lower Limit Upper Limit 15 % 65 % 5.0 g/dL 20.0 g/dL 25.0 g/dL 37.3 g/dL 1.6 x 10⁹/L 99.9 x 10⁹/L 0.8 x 10⁹/L 70.0 x 10⁹/L 1% 99% 0.8 x 10⁹/L 99.9 x 10⁹/L 1% 99% 20 x 109/L 999 x 109/L Notes External Connections The following external connections are located on the rear of the QBC STAR instrument, and are shown in Figure 4: • AC power input • Serial Port for connecting the instrument to a Laboratory Information System (LIS) or PC • Barcode Scanner Port for connecting a barcode scanner • Parallel Port for connecting a full-size printer • Keyboard Port for connecting a full-size keyboard Connecting an External Printer You can attach a full-size external printer to the QBC STAR instrument to print results on standard letter or A4 size paper. You may print either in black-and-white or color. If you enable color printing, errors and out-of-range parameters are printed in red ink. You can also leave the internal instrument printer enabled even if you attach an external printer. If you do, results print on the internal printer first. Press the “Star” button to reprint results on the external printer. For information on what makes and models of printers can be used, contact QBC Diagnostics Technical Services. 2–4 L–000867(A) 2 – Installation and Setup Figure 4 – External Connections On Left: AC power connection; On Right: Top to Bottom: Serial Port connection; Barcode Port connection; Parallel Port connection; Keyboard Port connection. Required Materials: • Compatible external printer • Standard Centronics parallel printer cable (or IEEE 1284 Centronics parallel printer cable), 10 ft or less • 8½” x 11” (letter) or A4 paper (no envelopes, labels, or custom sizes of paper) How to attach an external printer: 1 Unpack and set up the printer according to the manufacturer’s operating instructions. 2 Connect the printer to the QBC STAR instrument’s printer (parallel) port (see Figure 4) using the cable specified above. 3 Verify that any printer cartridges are installed and that the correct size paper is present. 4 Turn on power to the QBC STAR instrument first. 5 Turn on power to the external printer second. 6 Go to the printer setup menu (see below, More Options) and make sure you: a) disable the internal printer if you do not want to continue using it; b) enable the external printer; and c) enable or disable color printing. 7 When turning power off, turn off the printer first, then the QBC STAR instrument. L–000867(A) 2–5 QBC STAR™ System User’s Manual Updating System Software Updated versions of the QBC STAR Hematology System software may be provided to you from time to time. You should install new software as soon as you receive it. You should also log the update on the form in Appendix C of this manual. Updated software is provided on 3 1/2” floppy disk, labeled “QBC STAR Software, Version y.yyz.” (“Y.yy” is the actual software version number and “z” is the revision letter.) To install a software update: 1 Be sure the instrument is empty (no tube in the rotor). 2 Turn the instrument power off. 3 Flip the floppy disk access door down. Insert the software update disk in the floppy disk drive. Insert the disk with the shutter first and with the label facing upward. 4 Turn the power on. The updated system software loads automatically. When it is complete, remove the software update disk and store it in a safe place in case the software ever has to be installed again. System Setup and Utilities Before using the QBC STAR instrument for sample testing, you should review system setup parameters to see if they are suitable for your laboratory. These parameters include: • LCD Contrast • Date and Time • Disable Auto L(CD)C(ontrast) • More Options (includes Set Language and time format, Internal/External Printer, SI Units) In addition, several utility functions can be performed through Setup. These utilities are: • Save Data • Print Data • Shipping Prep. Any changes to configuration parameters are in effect from the time of the change forward. Also note that any changes you make cannot be “cancelled” per se – if you change a value, you must manually change the new value back to its previous state. To Enter Setup Mode 2–6 1 Lift and pull back the printer access panel. 2 Insure the instrument door is closed and latched. 3 Turn on instrument power with the power switch on the rear of the instrument (Figure 5). 4 After the instrument completes a self-check and the door unlocks, press the ESC key on the setup keypad. 5 A menu appears listing all the setup functions: L–000867(A) 2 – Installation and Setup 1 – LCD Contrast 2 – Date and Time 3 – Disable Auto LCD 4 – Save Data 5 – Print Data 6 – Shipping Prep. 7 – More Options 8 – EXIT The arrow cursor ( ) points to the option that is currently selected. (When you first access the menu, the first option, LCD Contrast, is selected.) To adjust the option that is selected, press on the keypad. To select another option, use the or key to move the arrow cursor up or down the list. When the desired option is selected, press on the keypad to adjust the setting. Each of the setup options/utilities is described below. LCD Contrast The LCD Contrast option lets you adjust the contrast of the LCD screen. This can help improve the readibility of the screen. Press the or key to increase or decrease the display contrast. When you reach the desired contrast, press . Date and Time The Date and time option lets you adjust the date and time that is printed on results reports. When you select the option, a sub-menu (shown below) appears. The arrow cursor ( ) points to the item that is currently selected. (When you first access the menu, the first item, Year, is selected.) To adjust the current item, press on the keypad. To select another item, use the or key to move the arrow cursor up or down the list. When the desired option is selected, press on the keypad. When you press , the menu disappears and the cursor appears next to the item you selected. Press the or key to increase or decrease the value. When the desired value is shown, press . To return the original value, press ESC L–000867(A) 2–7 QBC STAR™ System User’s Manual Disable Auto LCD (Contrast) As the QBC STAR instrument is used, it may warm up several degrees. This can cause the LCD screen contrast to change. The instrument monitors operating temperatures and automatically adjusts the contrast. The Disable Auto LCD (Contrast) option lets you enable (turn on) or disable (turn off) the automatic contrast adjustment of the LCD screen. When you select the option, a message tells you whether the auto contrast is currently enabled or disabled. Press the or key to change the status from enabled to disabled or vice versa. When the desired status is shown, press . Save Data This option is for factory use only. Print Data This option is typically used to help QBC Diagnostics Inc. personnel to troubleshoot possible problems. When selected, “Print Data” sends raw scan data from tube readings and diagnostic parameters to the selected printer. The information is useful only to QBC Diagnostics Inc. technical personnel in trying to determine the source of errors that may occur. Shipping Prep. This option prepares the instrument to be physically shipped. It performs three functions. First, it allows the rotor to spin freely. Second, it moves the optics carriage back so that protective foam can be inserted. Third, it unlocks the door for the insertion of the foam. After you select this option, a message advises you to turn off instrument power prior to inserting the foam. More Options If you select number 7 – More Options, a new menu appears with additional selections. See the sample graphic below. 2–8 L–000867(A) 2 – Installation and Setup 1 – Set Language 2 – Internal Printer 3 – External Printer 4 – SI Units 5 – EXIT Set Language Set language lets you select from the following languages: German (Deutsch); English; Spanish (Español); French (Français); Italian (Italiano). When you select the option, a sub-menu titled “LANGUAGES” appears. It lists these language selections. The arrow cursor ( ) points to the item that is currently selected. (When you first access the menu, the cursor points to the first item, Deutsch.) To select the current item, press on the keypad. To select another item, use the or key to move the arrow cursor up or down the list. When the desired option is selected, press on the keypad. When you select a different language, another window pops up that lets you select the time format you want. English defaults to a 12-hour time format, i.e., 12:00 a.m. to 11:59 p.m. The other languages default to a 24-hour format, i.e., 00:00 to 23:59. If you want to change the time format, use the or key to move the arrow cursor to the other format. Press on the keypad to save that format. Internal Printer Internal Printer lets you enable or disable the QBC STAR system’s built-in printer. When you select the option, a sub-menu titled “INTERNAL PRINTER” appears. When the printer is ENABLED, the menu lets you disable the printer by selecting option 1. When the built-in printer is ENABLED, option 1 reads “Disable Printer.” You can disable the printer by confirming that the arrow cursor ( ) is pointing to option 1 and pressing the key. A message appears stating “Internal Printer Is Disabled.” When the built-in printer is DISABLED, you can enable it by selecting option 1. When the printer is disabled, option 1 reads “Enable Printer.” You can enable the printer by confirming that the arrow cursor ( ) is pointing to option 1 and pressing the key. A message appears stating “Internal Printer Is Enabled.” L–000867(A) 2–9 QBC STAR™ System User’s Manual External Printer External Printer lets you enable or disable a printer that would be attached to the printer port on the back of the instrument. It also lets you enable or disable color printing to the external printer. When you select the option, a sub-menu titled “EXTERNAL PRINTER” appears. Enable/Disable External Printer When the printer is ENABLED, the menu lets you disable the printer by selecting option 1. External printing is disabled by default. When the printer is enabled, option 1 reads “Disable Printer.” You can disable the printer by confirming that the arrow cursor ( ) is pointing to option 1 and pressing the key. A message appears stating “External Printer Is Disabled.” When the printer is DISABLED, you can enable it by selecting option 1. When the printer is disabled, option 1 reads “Enable Printer.” You can enable the printer by confirming that the arrow cursor ( ) is pointing to option 1 and pressing the key. A message appears stating “External Printer Is Enabled.” Enable/Disable Color Printing When color printing is ENABLED, the menu lets you disable it by selecting option 2. Color printing is enabled by default. When color printing is enabled, option 2 reads “Disable Color.” You can disable color printing by confirming that the arrow cursor ( ) is pointing to option 2 and pressing the key. A message appears stating “Color Disabled.” When color printing is DISABLED, you can enable it by selecting option 2. When color printing is disabled, option 2 reads “Enable Color.” You can enable color printing by confirming that the arrow cursor ( ) is pointing to option 2 and pressing the key. A message appears stating “Color Enabled.” SI/STD Units SI/STD Units lets you select whether certain results are reported in SI units (millimoles per Liter) or STD units (grams per deciLiter). The results that are affected are: Hemoglobin and MCHC. When SI units are selected, menu option 4 reads “STD Units.” You can select STD units by using the or key to move the arrow cursor ( ) up or down the list until it is pointing to option 4. Then press on the keypad. A message appears stating “STD Units Selected.” When STD units are selected, menu option 4 reads “SI Units.” You can select SI units by using the or key to move the arrow cursor ( ) up or down the list until it is pointing to option 4. Then press on the keypad. A message appears stating “ SI Units Selected.” 2–10 L–000867(A) 3 – Controls and Indicators General Discussion The QBC STAR Hematology System has been designed so that there are only two routine user controls: the “Star” Button, which has several functions that are described below; and the Door Release Latch, which is only used to open the door to insert or remove QBC STAR Blood Collection Tubes. All the instrument controls (buttons, switches, etc.) and indicators (readouts, lights, etc.) are described below. The following items are discussed: • Power Switch • Star Button • Door Release Latch • Liquid Crystal Display • Printer • Floppy Disk Drive • Setup Keypad Power Switch The power switch is located on the rear panel of the QBC STAR instrument, on the left side. It is a twoposition rocker switch. Place the switch in the “|” position to turn instrument power on. Place the switch in the “O” position to turn instrument power off. BD recommends that you turn the power off at the end of the day’s testing. See Figure 5. Figure 5 – Power Switch (toward left) L–000867(A) 3–1 QBC STAR™ System User’s Manual “Star” Button The “Star” Button is located on the top of the QBC STAR instrument, toward the right side. It is teal colored. See Figure 6. This button has several functions: • Start Testing – when an untested tube is in the analyzer • Abort Testing – when the instrument is in the process of testing • Reprint Test Results – after automatic test results printout, before opening door The button will only perform these functions at the times described above. Door Release Latch The door release latch is located on the front panel of the QBC STAR instrument, just below the door. It is used to pop open the door on the top of the instrument. The door can only be opened when the system determines that it is safe to do so. The door is locked electromechanically when it is unsafe to open the door (such as when a QBC STAR tube is being centrifuged). Pressing the door release latch at such a time has no effect. Liquid Crystal Display (LCD) All system prompts (instructions for use) are presented on the Liquid Crystal Display (also called the LCD or LCD Readout). In addition, the test results are shown on the LCD. If any errors occur during the system’s self-tests or during operation of the unit, this information too is shown on the LCD. See Figure 6. LCD Readout Printer Door Setup� Keypad� ypad� (beneath� panel) Star Button Door Release Latch Floppy Disk Drive Figure 6 – QBC STAR Controls and Indicators 3–2 L–000867(A) 3 – Controls and Indicators Printer Test results print automatically at the end of the testing cycle. The printer is located on the top panel of the instrument, on the right side. Samples of test results printouts are shown in Section 4 – Operation. See Figure 6 for the printer’s location. See Figure 7 for printer controls. To access printer controls, lift the rear of the printer panel and remove it from the unit. Paper Release Lever The paper release lever is located on the right side of the printer. Pull the lever forward to enable loading paper. When the lever is forward, the manual advance wheel (below) is operational. Push the lever toward the rear to lock the paper in place. Manual Advance Wheel The manual paper advance is located on the right side of the printer. It is a knurled wheel. Rotate the wheel toward the rear to advance paper when loading. Rotate the wheel forward to retract paper (for example, to unjam a paper jam). Paper Release Lever Manual Advance Wheel Figure 7 – Printer Controls L–000867(A) 3–3 QBC STAR™ System User’s Manual Floppy Disk Drive The floppy disk drive is used primarily for software updates. It is located on the front panel of the instrument, at bottom right. To access the drive, flip the top of the access door downward. Disks should be inserted with the shutter first and the label upward. See Figure 8 for disk controls and indicators. Floppy Disk Indicator The Floppy Disk Drive Indicator light is toward the left side of the drive below the insertion slot. When off, it indicates that no activity is occurring in the drive. When on or flashing, it indicates that the disk drive is accessing a floppy disk. Do not attempt to eject a floppy disk while this indicator is lit. Floppy Disk Eject Button The floppy disk drive eject button is located toward the right side of the drive below the insertion slot. When a floppy disk is inserted fully into the slot, this button extends itself. To remove a disk, fully depress the eject button. Do not attempt to eject a floppy disk while the floppy disk indicator is lit Figure 8 – Floppy Disk Drive Controls and Indicators 3–4 L–000867(A) 3 – Controls and Indicators Setup Keypad The setup keypad is located to the front of the printer beneath the printer access panel. It is used to enter setup information into the computer, such as the date and time, LCD contrast, etc. The setup keypad keys are described below. Setup functions are described in Section 2 – Installation and Setup. ESC Key Press this key to cancel an action or to return to a previous menu. Key Press this key to increase a value or scroll upward in a list. Key Press this key to decrease a value or scroll downward in a list. Key Press this key to select a menu option. Figure 9 – Setup Keypad L–000867(A) 3–5 4 – Operation WARNINGS BLOOD AND BODY FLUIDS MAY CONTAIN THE HEPATITIS B VIRUS (HBV), HEPATITIS C VIRUS (HCV), HUMAN IMMUNODEFICIENCY VIRUS (HIV), OR OTHER DISEASE-CAUSING AGENTS. HANDLE ALL PATIENT SPECIMENS AS POTENTIAL BIOHAZARDS CAPABLE OF TRANSMITTING INFECTION. WEAR APPROPRIATE PERSONAL PROTECTIVE EQUIPMENT, INCLUDING LABORATORY GLOVES, WHEN COLLECTING, HANDLING, AND PROCESSING BLOOD AND BODY FLUIDS. IN ADDITION TO WEARING GLOVES, THE USE OF DISPOSABLE LAB COATS OR GOWNS AND PROTECTIVE GLASSES OR GOGGLES IS RECOMMENDED WHEN WORKING AROUND THE INSTRUMENT. ACRIDINE ORANGE REAGENT MAY BE TOXIC; DO NOT INGEST. AVOID CONTACT WITH SKIN, EYES, AND CLOTHING. IF A TUBE BREAKS IN THE UNIT, CAREFULLY REMOVE THE TUBE WITH A HEMOSTAT OR OTHER DEVICE, USING PUNCTURE RESISTANT UTILITY GLOVES. CONTACT TECHNICAL SERVICES FOR ADDITIONAL INFORMATION. Summary of Operation Steps Routine operation of the QBC STAR Hematology System consists of the following steps: • Turn the instrument on • Print out / save electronic controls • Fill tube with blood • Mix the tube of blood • Place the cap onto the tube • Place the tube into the instrument • Close door and insure it is latched • Push the “Star” button to start the test cycle • Obtain the results from the printer • Dispose of the QBC STAR tube in a biohazard container Each of these steps is described below. L–000867(A) 4–1 QBC STAR™ System User’s Manual Turn Instrument Power on Turn on the QBC STAR instrument power if necessary. Turn power on by placing the power switch on the rear of the instrument in the “On” (|) position. The instrument performs a self-test, which can take a few minutes. During this time, the message “System Check In Progress Please Wait” is displayed. When the self-test is complete and the system is ready, the following message appears on the LCD readout “Ready Insert Sample Close Door Press Star” Note that if power is left on continuously, the power-on-self-test occurs automatically once per 8 hours when the door is closed. Electronic controls print out automatically after the self-test is complete. Save for control records. Prepare the QBC STAR tube For additional information on preparing the QBC STAR tube, refer to the package insert in the tube carton. The blood source can be either a capillary fingerstick drop of blood, or a source of anticoagulated venous blood such as a Vacutainer™ tube (lavender top only). The QBC STAR tube fills itself by capillary action. That is, when you touch the collection tip of the tube to the blood sample, it is drawn into the tube automatically. NOTES Use only QBC STAR tubes in the QBC STAR instrument. Place the tube into the instrument within 15 minutes of filling. Whatever blood source you use, make sure you touch just the collection tip of the tube to the blood. For Venous Blood Samples: It is important that you gently mix the blood sample immediately before filling the QBC STAR tube. Invert the capped sample tube 12 – 15 times as shown in Figures 10 and 11. As an alternative, you can mix the sample on a mixer such as the Adams® Nutator. WARNINGS DO NOT HANDLE THE QBC STAR TUBE BY THE GLASS COLLECTION END OF THE TUBE. DO NOT USE ANY QBC STAR TUBE IF ANY PART OF THE CARRIER OR TUBE IS CHIPPED OR CRACKED. 4–2 L–000867(A) 4 – Operation Figure 10 – Sample Vial Figure 11 – Inverting the Sample Vial Open the QBC STAR tube package by placing a fingernail between the foil seal and the molded plastic packaging, and lifting and peeling the foil layer away. After mixing, tilt the sample vial to bring the blood up to the open end. Place the collection tip of the QBC STAR tube in contact with the blood as shown below. Figure 12 shows a venous blood sample. Figure 13 shows a capillary blood sample. Figure 12 – Filling a Tube from Venous Blood L–000867(A) 4–3 QBC STAR™ System User’s Manual Figure 13 – Filling a Tube from Capillary Blood Fill the QBC STAR tube to the second black fill line. Blood must always be filled to at least the first black line. This results in a blood volume of between 65 and 75 microliters. The instrument automatically identifies the tube type and detects if the fill volume is correct. Mix the tube Rock the QBC STAR tube back and forth at least four times to mix the blood with the orange coating. Do not allow the blood to touch the white plug at the end of the tube. Note: allowing the blood to flow from the collection end toward the plug end of the tube and back is equal to one rock. Figure 14 – Mixing the Tube 4–4 L–000867(A) 4 – Operation Tilt the tube Tilt the QBC STAR tube as shown, and allow the blood to move down the tube toward the center of the tube. See Figure 15. Figure 15 – Tilting the Tube Cap the tube Remove the cap from the tube by pulling it straight off. Place the cap over the collection end of the tube by guiding the glass end of the tube into the center of the cap. Push the cap on firmly. See Figures 16 and 17. Figure 16 – Uncapping the Tube L–000867(A) Figure 17 – Seating the Cap and Float 4–5 QBC STAR™ System User’s Manual Insert the tube into the instrument Insert the tube into the QBC STAR instrument oriented as shown in Figure 18. The tube must be inserted into the instrument within 15 minutes of being prepared and capped. The best way to insert the tube is to first place the uncapped end into place, then pivot the capped end of the tube down into the recessed area. If the bottom end is not seated correctly the tube will not pivot down into place. If this happens, just lift the tube out, make sure the cap is seated fully, and place the tube back into the instrument as described above. Close the instrument door Make sure the door clicks into place. Figure 18 – Inserting the Tube into the Instrument Start the test To start the test, press the “Star” button. The system automatically locks the door electromechanically. This prevents it from being opened during high-speed centrifuge operations. The system initially performs several checks on the sample. If it detects that a cap is not seated properly, the message, “Sample Cap Not Seated” is shown. If this happens, the system unlocks the door to enable removal. You can reseat the cap, place the tube back in the instrument, and press the “Star” button to resume testing. 4–6 L–000867(A) 4 – Operation If there is no tube in the rotor or if the cap is not present, the message, “Sample or Cap Not Present” appears. To proceed, place the cap on the tube or place the tube in the instrument and press the “Star” button to resume testing. The system can detect if a sample has already been tested. If this occurs, the message “Sample already processed” appears on the LCD. The readout prompts you to remove the sample tube and unlocks the door to enable removal. A previously processed sample can not be processed or analyzed a second time. The instrument mixes the tube contents for as long as 30 seconds using a low speed spin. The float descends from the top of the tube toward the closure end of the tube. This mixes the blood and reagents in the tube. A countdown displays the time remaining in the cycle. After mixing is complete, the centrifuge accelerates to high speed to separate and pack the cell populations into distinct cell bands. A countdown displays the time remaining in the cycle. Finally, a series of readings is taken. The messages “Reading Cycle In Progress,” “Scanning QBC Sample,” and “Analyzing QBC Scan Data” are displayed while tests are being performed. It is normal for clicking sounds to be heard during the testing process. Printing of results When the test is complete, the results are automatically displayed and printed. NOTE DO NOT OPEN THE INSTRUMENT DOOR UNTIL THE RESULTS ARE REVIEWED AND PRINTED. Test results are cleared from the display when the instrument door is opened. You must manually keep track of link between the test results and the patient. A space is provided on the printout for writing the patient name or ID number. In addition, the date and time and the electronic QC status (Pass, Failed) are printed. Electronic QC values are only printed every 8 hours, and at startup. The system only prints the actual measured or calculated results, with no interpretations or normal values. The following hematology results are reported: L–000867(A) 4–7 QBC STAR™ System User’s Manual Reported Results Parameter (abbreviation) Hematocrit (Hct) Units Percentage Hemoglobin (Hgb) g/dL Mean Corpuscular Hemoglobin Concentration (MCHC) g/dL White Blood Cells (WBC) 109/L Granulocytes 109/L, Percentage Lymphocytes/Monocytes 109/L, Percentage Platelets 109/L Any results that are out of the reporting range (specified in Section 2) are shown on the display with dashes instead of actual numerical values. On the printout, out of range readings are indicated as greater than or less than the maximum or minimum value. Also the message “Out of Operating Range” prints. Calculated values based on out of range readings print as “No Report.” If the electro-optical verifications fail, an error message is displayed. Any errors that might occur are both displayed and printed on the results printout. Refer to Section 6 – Troubleshooting for causes of errors and corrective actions. Test results are printed when the electronic QC checks have been successful. This is indicated on the results printout as “Electronic QC: Passed.” A sample results printout is shown in Figure 19. A sample results readout is shown in Figure 20. You can print additional copies of the results report by pressing the “Star” button after the first printout completes. You must reprint the report BEFORE opening the door. 4–8 L–000867(A) 4 – Operation ---------------------------------------------------------QBC STAR - Hematology Results Patient: ___________________________ Date: DEC 10, 1998 Time: 2:37 pm ---------------------------------------------------------Software Version: 12/20/38 1.00XX Instrument S/N: XXXXXXX ---------------------------------------------------------Hematocrit = 45.5 % = 13.3 g/dL Hemoglobin MCHC = 29.2 g/dL Total WBC = 7.8 x10⁹/L = 4.8 x10⁹/L Granulocytes % Granulocytes = 62 % 9 Lymph+Monos = 3.0 x10 /L % Lymph+Monos = 38 % 9 = 345 x10 /L Platelets ---------------------------------------------------------Electronic QC: Passed Figure 19 – Sample Results Printout Figure 20 – Sample Results Readout L–000867(A) 4–9 QBC STAR™ System User’s Manual Tube Disposal After the results have been printed and you have reviewed the printout(s) for clarity, open the instrument door by pressing the door release latch. Remove the QBC STAR tube. Discard the tube in a biohazard container. Power Down If desired, after testing is completed you can turn instrument power off by placing the power switch in the off “O” position. Note that if you leave the power on continuously, the instrument will perform a power-on-self-test every eight hours and print electronic QC results. Stopping the Centrifuge If for some reason you must stop the test before it is complete, press the “Star” key to stop the instrument. Note that you cannot reuse or reanalyze a partially processed tube. It is perfectly normal for the analyzer to make clicking noises during the testing process. This does not indicate an abnormal condition. The system automatically stops testing if a power failure or system error occurs, or the unit breaks down. If this occurs, a message appears on the LCD display. Emergency Door Unlock In the event of a power failure or the failure of certain components, you may be unable to open the door with the door release latch. If this occurs, you can still open the door. Emergency door unlock is performed by tripping the internal latch with a screwdriver. To unlock the door: 4–10 1 Make sure the power switch is in the “Off” position (O) and the power cord is disconnected from the instrument. 2 Lift the front of the instrument and rest the QBC STAR instrument on its rear panel. 3 Locate the door latch access hole in the bottom of the instrument. It is almost directly below the door release latch. (See Figure 21.) 4 Insert a small diameter screwdriver that has a shaft at least 2 inches long. 5 Press down against the internal latch by pivoting the screwdriver handle upward. This step may require a moderate amount of pressure. 6 When the door pops open, remove the screwdriver and place the QBC STAR instrument in its normal upright position. L–000867(A) 4 – Operation Door Unlatch Access Hole (Front of instrument) (Bottom of instrument) Figure 21 – Door Unlatch Access Hole L–000867(A) 4–11 5 – Performance and Limitations Operating Ranges Hematology parameters measured with the QBC STAR system are valid over the following range of values: Hematocrit 15 – 65% Hemoglobin 5.0 – 20.0 g/dL Platelet Count 20 – 999 x 109/L WBC Count 1.6 – 99.9 x 10⁹/L Granulocyte Count 0.8 – 70.0 x 10⁹/L Lymph/Mono Count 0.8 – 99.9 x 10⁹/L Results that fall outside these ranges may be confirmed by alternate methods. Precision Data on typical within-run precision tests on QBC STAR tubes tested in the QBC STAR system are shown in the two tables below. The precision data represents the analysis of ten whole blood specimens, each assayed in replicates of 10. Whole Blood Total Imprecision Parameter Mean Value Mean %CV HCT (%) 41.7 2.0 % HB (g/dL) 14.0 1.9 % PLT (x 109/L) 235 6.0 % WBC (x 109/L) 6.0 6.4 % Range Max S. D. GRAN (%) 38 – 79 3.2 LYMPH/MONO (%) 21 – 63 3.2 Parameter L–000867(A) 5–1 QBC STAR™ System User’s Manual In a separate precision study, intra- and inter-run precision were assessed using a dual level QBC Control (#424304). The controls were assayed on multiple days at three sites using QBC STAR tubes and the QBC STAR system. The results of this study are presented in the table below. Control Precision Control Level 1 Intra-Day* Parameter Site Mean Value Control Level 2 Intra-Run** Intra-Day* Intra-Run** %CV df %CV df Mean Value %CV df %CV df HCT (%) BD POL #1 POL #2 30.46 30.93 30.71 0.28 1.37 0.73 10 10 9 1.58 1.66 1.12 20 20 19 34.87 35.27 34.65 0.00 1.22 0.00 10 10 9 0.95 2.26 1.25 20 20 19 HGB (g/dL) BD POL #1 POL #2 10.07 10.16 10.22 0.00 1.49 0.82 10 10 9 1.52 1.48 1.00 20 20 19 11.65 11.69 11.66 0.00 1.06 0.14 10 10 9 0.99 2.34 1.18 20 20 19 PLT (x 109/L) BD POL #1 POL #2 443.33 382.78 459.37 0.00 4.06 0.00 10 10 9 10.64 4.02 11.08 20 20 19 194.55 163.48 204.18 6.50 2.08 0.00 10 10 9 18.86 3.31 12.84 20 20 19 WBC (x 109/L) BD POL #1 POL #2 9.18 9.74 9.32 0.00 0.00 4.33 10 10 9 5.83 7.22 5.17 20 20 19 21.31 21.67 19.88 0.00 1.03 5.61 10 10 9 7.45 5.40 9.57 20 20 19 GRAN (x 109/L) BD POL #1 POL #2 4.80 5.27 5.06 0.00 0.00 2.89 10 10 9 8.96 8.79 6.70 20 20 19 5.51 6.23 5.37 4.82 2.92 0.00 10 10 9 5.25 8.31 8.68 20 20 19 LYMPH/ MONO (x 109/L) BD POL #1 POL #2 4.38 4.48 4.26 1.49 0.00 5.35 10 10 9 5.62 6.52 6.56 20 20 19 15.81 15.44 14.52 0.00 1.75 7.63 10 10 9 8.96 7.59 12.61 20 20 19 *Variability between runs during the same days ** Variability between tubes on the same run during the same day (error) df = degrees of freedom 0.00 denotes a negative variance estimate Accuracy The performance of the QBC STAR system is based on data from venous blood samples collected in VACUTAINER® brand collection tubes containing K3EDTA anticoagulant. Venous blood samples provide a more stable test system than capillary blood for comparing results from multiple methods. While skin puncture samples provide clinically relevant results, they are subject to more variation due to the nature of the sampling technique. Two QBC STAR tubes were prepared on each of approximately 323 blood samples and analyzed on both the QBC STAR system and either the Coulter® STKS or Sysmex K1000 analyzers*. The correlation coefficients for the WBC, Gran, L/M, Hct, and Hgb, and PLT parameters were 0.95 or greater. Complete statistical results are presented below. 5–2 L–000867(A) 5 – Performance and Limitations Correlation Coefficient Slope Hematocrit (%) 0.983 0.973 Hemoglobin (g/dL) 0.984 Platelet (x 109/L) QBC Mean Cell Counter Mean Range of Values Number of Samples 2.572 36.5 34.8 15.7 – 61.7 646 0.982 0.387 12.1 12.0 5.2 – 18.5 638 0.962 0.935 17.701 244 242 23 – 913 558 WBC (x 109/L) 0.974 1.124 –0.936 10.4 10.1 1.6 – 92.9 535 Granulocyte (x 109/L) 0.972 0.991 0.152 7.0 7.0 0.8 – 45.0 535 Lymph/Mono (x109/L) 0.987 1.206 –0.419 3.3 3.1 0.8 – 89.9 535 Parameter Intercept The hematocrit results shown above reflect the calibration methods of the Coulter or Sysmex analyzers used in the correlation study. The QBC STAR software has been calibrated to match the international reference standard for microhematocrit (MHCT) technology. The data shown in the table below were obtained by comparing the QBC STAR results against the microhematocrit reference method.12 Correlation Coefficient Parameter Microhematocrit (%) 0.986 Slope Intercept QBC Mean 1.023 –0.650 36.5 Cell Counter Mean 36.3 Range of Values Number of Samples 15.7 – 61.9 646 * Products of Coulter Electronics, Hialeah, FL and TOA Medical Electronics, Kyoto, Japan. Interfering Substances • Hemolysis: Do not perform tests on visibly hemolyzed blood specimens. • Bilirubin: No effects on test results have been observed at bilirubin concentrations up to 20 mg/dL.8 • Triglycerides: No effects on test results have been observed at triglyceride concentrations up to 1,800 mg/dL.8 • Coumadin: Anticoagulant therapy has been shown to have no clinically significant effect on performance.8 • Doxorubicin: Treatment with the anthracyclic drug Doxorubicin does not appear to interfere with the QBC test method.8 • Other Drugs: The effects of other potentially interfering drugs and their metabolites on QBC tests have not been established.9, 10 L–000867(A) 5–3 QBC STAR™ System User’s Manual Limitations Quality medical care requires that laboratory values be correlated with each patient’s symptoms and signs by a trained practitioner. Operating Ranges lists the validated upper and lower limits of the operating range. Values above and below these validated ranges are not displayed and should be confirmed by an alternate method. The QBC STAR reagent tube has been formulated to provide optimum packing and layering of normal cells. In a small number of patients, however, the system cannot read certain parameters and will not report a value. User errors in processing or use of outdated or inappropriately stored tubes can also result in non-reported results. Practitioners must not assume that unreported values are normal; further testing with an alternative method is essential. Automated granulocyte and lymphocyte/monocyte differential counts cannot replace the conventional manual differential. Due to the grouping by density of the cell populations by the QBC test method, the system cannot discriminate between normal and abnormal cell types in disease states characterized by the presence of abnormal white cell types or nucleated red blood cells. If abnormal cell populations are suspected, verification of QBC test results or testing and diagnosis by alternative methods is essential. The combined lymphocyte/monocyte count should not be used to test for lymphocytopenia in evaluating patients with known or possible immunodeficiencies. Further evaluation of lymphocyte/monocyte counts in relevant situations must include a manual differential and lymphocyte subset analysis. The presence of abnormally sized platelets may lead to discrepancies between the QBC test method platelet count, which is based on platelet mass, and results obtained with an impedance counter, which are based on measurement of particle number. Expected Values The following table provides normal ranges reported in the literature11, 13. Offices or laboratories may choose to develop normal hematology ranges based on the characteristics of their patient population. Parameter 5–4 Range Hematocrit Males (%) 42.0 – 50.0 Hematocrit Females (%) 36.0 – 45.0 Hemoglobin Males (g/dL) 14.0 – 18.0 Hemoglobin Females (g/dL) 12.0 – 16.0 MCHC (g/dL) 31.7–- 36.0 Platelet Count (x109/L) 140 – 440 WBC (x109/L) 4.3 – 10.0 Granulocyte Count (x109/L) 1.8 – 7.2 Lymphocyte/Monocyte Count (x109/L) 1.7 – 4.9 L–000867(A) 5 – Performance and Limitations Controls Internal Quality Control The QBC STAR Centrifugal Hematology System has multiple built-in-quality control (QC) systems that maintain the overall system integrity and the quality of the test results it produces. The QBC STAR System has five internal quality control elements: 1 Factory calibration. System calibration is set during manufacture and cannot be altered by the user. 2 Instrument self-test. This test assures that each time the instrument is turned on, the computer, memory, optics, and motors are fully functional. Should you choose to leave the system on continuously, the test will automatically be repeated every 8 hours. A tri-level internal electronic quality control label (electronic QC label), designed to simulate 3 hematology specimens (simulating low cell counts, normal cell counts, and elevated cell counts) tests the system’s optics against values established at the time of manufacture. At the end of the self-test. the instrument prints the hematology values obtained from reading the electronic QC label. The hematology values may be plotted to evaluate for shifts or trends in the data. The instrument will flag any results that are outside the set limits, print an error code, and automatically shut down operation of the instrument until the problem is corrected and a valid self-test is performed. 3 Electronic QC (during each sample run). The tri-level electronic QC label is re-checked during each sample run. The instrument will recognize any results that are outside the set electronic QC limits, print an error code, and automatically shut down operation of the instrument until the problem is corrected and a valid self-test is performed. Additional built-in checks include tests for proper centrifuge speed, optical focus, and internal temperature. When these quality control checks are successfully completed, the status of the electronic QC is printed on the patient record as “Electronic QC: Passed.” 4 Sample Preparation QC (during each sample run). The built in checks confirm that the QBC STAR tube has not been previously processed and is correctly assembled. Tests confirm that the cap is present, the tube assembly is the proper length, the float is present and the correct length, and the tube is filled with the correct amount of blood. 5 Reagent QC (during each sample run). These built-in checks evaluate reagent integrity using the data from the optical scan. This includes tests for fluorescent signal intensity, interface sharpness, and the reproducibility of scans around the tube. Results are reported only if all of the internal quality control requirements have been satisfied. Internal Electronic Quality Control Label An internal quality control label, designed to simulate 3 hematology specimens, is automatically read every 8 hours as part of the instrument self-test. The instrument prints the hematology values obtained from reading the tri-level electronic QC control label at the end of the self-test. These values are available to plot and evaluate shifts and trends. The label is also read with each patient sample run. The instrument compares the electronic QC values measured (during self-test and during patient sample runs) to factory established limits. Recovery of any value outside of the established limits will result in an instrument shutdown until the problem is corrected and a valid self-test is performed. The internal electronic QC label tolerances are shown in the table below. L–000867(A) 5–5 QBC STAR™ System User’s Manual Level 1 HCT (%) HGB (g/dL) MCHC (g/dL) PLT (x 109/L) WBC (x 109/L) GRAN (x 109/L) %GRANL L/M (x 109/L) %L/M Level 2 Level 3 Min Target Max Min Target Max Min Target Max 36.9 37.9 38.9 44.9 45.9 46.9 65.1 66.1 67.1 12.3 12.9 13.5 14.8 15.6 16.4 20.6 21.7 22.8 31.6 34.0 36.6 31.6 34.0 36.5 30.7 32.8 35.0 90 100 110 342 360 378 615 647 679 4.6 5.7 6.8 9.5 10.6 11.7 48.5 53.5 58.5 2.2 2.7 3.2 6.0 6.5 7.0 28.3 31.3 34.3 38 47 57 56 61 67 54 59 63 2.4 3.0 3.6 3.5 4.1 4.7 20.2 22.2 24.2 43 53 62 33 39 44 37 41 46 External liquid controls QBC Controls are available for additional performance monitoring of the QBC STAR system. You must run liquid controls and document the results before you begin testing with a new lot or newly received shipment of QBC STAR tubes. You must run liquid controls and document the results with each instance of instrument relocation or repair. Consult the package insert accompanying the controls for preparation instructions and expected results. You must also follow any quality control requirements from your regulatory or accreditation agencies. Proficiency Tests Proficiency testing is an external evaluation of the quality of a laboratory’s performance. Laboratories enrolled in a proficiency testing program for the QBC STAR System will receive five unknown specimens, three times each year. These specimens are run in the same way that patient specimens are tested. Results are submitted to the proficiency testing program for comparison to results obtained by other laboratories using the QBC STAR System. A partial list of organizations that may offer proficiency testing for the QBC STAR System is shown below: American Proficiency Institute (API) 1159 Business Park Drive Traverse City, MI 49686 800-333-0958 American College of Phycisians (ACPS) 2011 Pennsylvania Ave., NW Suite 800 Washington, D.C. 20006 800-338-2746 American Academy of Family Physicians PT Program Coordinator 11400 Tomahawk Creek Parkway Leawood, KS 66211 800-274-7911 College of American Pathologists (CAP) Surveys Department 325 Waukegan Road Northfield, Illinois 60093 800-323-4040 American Association of Bioanalysts (AAB) 205 West Levee Brownsville, Texas 78520 800-234-5315 5–6 L–000867(A) 6 – Maintenance WARNINGS THE USER SHOULD NOT PERFORM ANY SERVICING EXCEPT AS SPECIFICALLY STATED IN THIS MANUAL. REFER OTHER PROBLEMS TO TRAINED PERSONNEL, OR RETURN THE INSTRUMENT TO BD FOR REPAIR. TURN INSTRUMENT POWER OFF AND UNPLUG THE POWER CORD BEFORE SERVICING. Cleaning You should occasionally wipe interior and exterior surfaces of the QBC STAR instrument with a damp cloth. You can use a mild detergent to remove stains. Keeping these parts clean helps prolong the life of the instrument. Disinfection If a QBC STAR tube breaks while in the instrument, the spread of blood and glass is substantially contained by the capped tube carrier. This device design provides a high degree of user and instrument protection from exposure to blood and aerosols. If blood or glass should escape the plastic protective tube, clean and disinfect the QBC STAR instrument as follows: 1 Put on puncture-resistant gloves. Use a hemostat or other device to pick up any glass or plastic fragments. Dispose of in a biohazard sharps container. 2 Clean any contaminated surfaces with 10% solution of household bleach (1 part bleach to 9 parts water). Allow to stand 5 minutes, then rinse thoroughly with water and dry. Household bleach is effective against bacteria, spores, and viruses. However, it is an oxidizing agent, and is corrosive to metal alloys. Bleach must be thoroughly wiped off the instrument with a damp cloth and dried. It should never be used if there is surface damage to any metal parts. For any other cleaning methods, you must contact Becton Dickinson to verify that the proposed method does not damage the QBC STAR instrument. CAUTION Do not immerse the QBC STAR instrument in water or other liquid. L–000867(A) 6–1 QBC STAR™ System User’s Manual Replacing Printer Paper When the printer paper is nearly exhausted, a colored edge appears on the roll of paper. You should replace paper at this time to avoid running out while printing patient test results. See Figure 22. To replace printer paper: 1 Remove the printer panel and remove the old roll of paper. 2 Peel off the beginning of the new roll of paper. 3 Place the paper in the instrument, with the paper feeding up from the bottom. 4 Insert the paper between the two black rubber rollers on the printer. 5 Flip the paper release lever forward. 6 Roll the manual paper advance wheel rearward. Advance enough paper to clear the printer cover. 7 Flip the paper release lever backward. 8 Replace the printer panel, feeding the new strip of paper through the slot. Figure 22 – Replacing Printer Paper 6–2 L–000867(A) 6 – Maintenance Replacing Fuses WARNING BEFORE BEGINNING TO CHANGE THE FUSES, MAKE SURE THE UNIT’S POWER IS TURNED OFF AND DISCONNECT THE INSTRUMENT POWER CORD FROM THE POWER SOURCE. There are two fuses in the power entry module. The fuses are located in a holder just above the power cord plug. See Figure 23. F These fuses are: Diameter 5 x 20 mm F3.15A/250V Indicated by the symbol: 250 V 3.15A To replace the fuses: 1 Lift the small tab at the bottom of the fuse holder with a thumbnail or small screwdriver. 2 Slide the fuse holder out of the instrument. 3 Remove the fuses and examine the fuse elements to see which of the fuses has blown. You only have to replace the blown fuse(s). 4 Make sure the good fuses are the same voltage and current rating as the bad ones. 5 Place the good fuses back in the holder, and slide the holder back into the power module. Make sure the holder CLICKS into place. 6 Reconnect the power cord and turn instrument power back on. Figure 23 – Replacing Fuses L–000867(A) 6–3 7 – Troubleshooting If the QBC STAR instrument fails to operate properly, consult the guides below. DO NOT ATTEMPT TO PERFORM ANY SERVICE OR REPAIR THAT DOES NOT APPEAR IN THIS MANUAL. Refer service problems to the Technical Service Department of QBC Diagnostics Inc., 1-866-265-1486 (USA). Otherwise, contact your nearest QBC Diagnostics Inc. office (see Appendix D) for assistance. The General Problems section presents some general symptoms that you might notice. It also suggests corrective actions. These problems do not cause error codes to appear on the LCD or printout. The Error Codes sections presents problems that DO cause error codes. If any of these error messages appear, use the chart to find the possible causes and corrective actions. General Problems Consult the table below for general problems not reported by error codes/messages. General Instrument Problems Symptom Instrument fails to operate Instrument vibrates excessively Lid fails to open L–000867(A) Possible Causes Corrective Actions Power cord not plugged into unit or receptacle Plug cord into unit and receptacle Door not latched Close door and latch securely Line fuse blown Replace fuse(s) by following instructions in Section 5 Other Request authorized service Foam pads worn or missing on bottom of instrument Call Technical Services Power has failed Use emergency door unlock procedure in Section 4 Defective lid solenoid or internal parts Request authorized service 7–1 QBC STAR™ System User’s Manual Error Codes and Messages EXX- System Error POSSIBLE CAUSES: All the “E” type error codes (for example, E02, E13, etc.) indicate either software or hardware problems. These problems can cause the instrument to be inoperative. Some errors indicate that a component has failed or is near failure. When “E” type errors occur, all instrument operations cease. The “E” code is displayed and the system prompts you to press the “Star” key to continue. CORRECTIVE ACTIONS: Note the error number. Press the “Star” key when prompted. This causes the instrument to start a self-test. The instrument will attempt to confirm any detected abnormalities. Follow the instructions on the LCD. If the problem persists, contact QBC Diagnostics Inc for assistance. Fill Error POSSIBLE CAUSES: The tube’s fill volume was incorrect. CORRECTIVE ACTIONS: Tube that caused error must be prepared and tested again. To prevent error, fill all tubes between the two black fill lines on the tube.* Sample Already Processed POSSIBLE CAUSES: The system has detected one of two conditions. 1) The tube placed in the instrument has already been tested. 2) The tube was not placed in the instrument promptly after filling (within 15 minutes of filling). 3) The sample leaked into the safety plastic sleeve. CORRECTIVE ACTIONS: Remove incorrect tube from instrument. Place correct tube in instrument and press “Star” key to begin testing. If problem recurs, rerun test with new tube. If tube was not previously tested, and was prepared in a prompt time frame, ensure proper technique in capping the sample. Sample Cap Not Seated POSSIBLE CAUSES: The system has detected that the tube cap is not seated properly on the tube. CORRECTIVE ACTIONS: Press firmly to seat caps in place. Replace tube in instrument and press “Star” key to begin testing. Sample Error (XX) POSSIBLE CAUSES: Note the error number if you must contact QBC Diagnostics Inc for assistance. All the sample errors indicate that the readings obtained from the blood sample were out of the acceptable range. It is possible that the sample was drawn or processed incorrectly. CORRECTIVE ACTIONS: Rerun test with new tube and sample. If problem recurs, perform the assay by a different method and contact QBC Diagnostics Inc. * Sample or Cap Not Present POSSIBLE CAUSES: The “Star” key was pressed but there is no tube in the instrument or no cap on the tube. CORRECTIVE ACTIONS: Insert tube in instrument and press “Star” key to begin testing. If tube was present but cap was missing, do the following. 1) Locate cap. 2) Place cap firmly on end of tube. 3) Place tube in instrument. 4) Press “Star” key to begin testing. Tube Error (XX) POSSIBLE CAUSES: Note the error number if you must contact QBC Diagnostics Inc for assistance. The system has detected a physical problem with the tube itself. Possible causes include blood leakage, tube breakage, etc. 7–2 L–000867(A) 7 – Troubleshooting CORRECTIVE ACTIONS: Rerun test with new tube and sample. If problem recurs, perform the assay by a different method and contact QBC Diagnostics Inc.* Unit is too hot to operate POSSIBLE CAUSES: The internal temperature of the instrument exceeds 45° C. CORRECTIVE ACTIONS: Make sure there is at least 2 inches of clearance around the instrument for airflow. Make sure instrument environmental conditions meet the requirements specified in Section 2. If they do, and unit continues to issue heat warnings, contact QBC Diagnostics Inc. for assistance.* External Printer Problem POSSIBLE CAUSES: There is a problem with the external printer. Problem could be paper supply is exhausted, paper jam exists, cable has become disconnected, power is not turned on, or other problem. CORRECTIVE ACTIONS: Check paper supply to the printer, paper jam condition, cable connection to the printer, power to the printer. If these are okay, check printer’s status lights and refer to the printer’s operating instructions. Internal Printer Problem POSSIBLE CAUSES: There is a problem with the internal printer. Problem could be paper supply is exhausted or paper jam exists. Paper release lever could be in “open” (forward) position. CORRECTIVE ACTIONS: Check paper supply to the printer, or paper jam condition.Verify that paper release lever is in “closed” (rear) position. If these are okay, contact QBC Diagnostics Inc for assistance. *For trouble shooting purposes refer to 7-4 to print a diagnostic scan for technical services to interpret. L–000867(A) 7–3 QBC STAR™ System User’s Manual Date Issued: 01/2006 Product: QBC STAR™ (Model #429000) Subject: Printing Diagnostic Scans (Troubleshooting Tool Only) 1. Diagnostic Scans can be obtained after allowing the QBC STAR™ to process the sample and print the QBC™ Hematology results. Blood samples from Patients, QBC™ Controls & Proficiency Test material can be evaluated using this procedure and is for troubleshooting purposes only. 2. When the report has finished printing, perform the following steps in order to print the “Diagnostic Scan” (the sample can be printed as long as no other samples have been run prior to printing the “Diagnostic Scan” information): •Lift the printer cover to expose the “keypad” underneath. From Left to Right, you will see the following touch pad buttons: ESC (Escape), Up Arrow, Down Arrow and the Enter Key (“left” bent arrow, located on the far right of the keypad). See appropriate section in the Operator’s Manual for additional details. •Press the ESC key in order to access the Menu area. •Using the Down Arrow, scroll through the menu until you get to a selection labeled “Print Data”. •Once you are at “Print Data”, press the Enter Key (“left” bent arrow, located on the far right of the keypad). The printer will be activated and it will print 3 boxes with some graphical information followed by a block of numbers. •Press the Escape Key to return to the regular sample testing mode. 3. If using the internal printer, the “Diagnostic Scan” printout will need to be sectioned and placed on a sheet of 8 ½” x 11” paper prior to faxing to QBC Diagnostics. Note: the sheet may need to be photocopied in order to achieve satisfactory transmission results and to prevent jamming the facsimile machine. 4. Fax the “Diagnostic Scan” information to QBC® Diagnostics™, Inc. Technical Services @ 814-342-2449. Prior to faxing the scans, please call QBC® Diagnostics™ Technical Services Department @ 1-866-265-1486. Inform one of the Technical Specialists that you are faxing “Diagnostic Scan” information for review. 5. Please provide the following information with the fax: Lot Number and Expiration Dates of the QBC STAR™ tube being used. The QBC STAR™ Serial Number, which is located on the rear data label and inside the access door covering the diskette drive. Additionally, please include the sample type being tested (i.e., QBC™ Control or other vendor’s control, Proficiency Test or patient blood sample.) Please use a coversheet that includes your name, office name and a return phone number. 7–4 L–000867(A) G – Glossary CBC Complete Blood Count CCD Charge Coupled Device (linear array photo detector) g’s Unit of acceleration, 1g = acceleration of gravity Gran Granulocytes Hgb Hemoglobin Hct Hematocrit L/M Lymphocytes and Monocytes Lymph/Monos Lymphocytes and Monocytes MCHC Mean Corpuscular Hemoglobin Concentration Plt Platelets rpm revolutions per minute WBC White blood cell count L–000867(A) G–1 A – Limited Warranty This warranty gives you specific legal rights. Additionally, you may have other rights that vary from region to region. The QBC STAR Centrifugal Hematology System is warranted to the original purchaser to be free from defects in materials and workmanship for a period of twelve months following installation. QBC Diagnostics Inc., sole responsibility under this warranty shall be to repair or replace any instrument or its components (except for expendable supplies such as printer paper) which under normal operating conditions, prove to be defective within twelve months of delivery. QBC Diagnostics Inc., will furnish new or remanufactured components upon its option. All replacements shall meet new part specifications and shall be warranted as above for the remainder of the twelve month period. Replaced components become the property of QBC Diagnostics Inc. It is understood that the equipment covered by this Agreement has been installed in accordance with the recommendations and instructions in the QBC STAR System User’s Manual. Any damage to a QBC STAR system resulting from the insertion or removal of cables that connect this instrument to systems other than those approved or supplied by QBC Diagnostics Inc., or the failure of the owner to maintain reasonable care and precautions in the operation and maintenance of the system will void this warranty and terminate the obligations of the manufacturer as stated herein. The warranty stated herein shall extend to the original consumer only and not to any subsequent consumer of the instrument. This warranty is in lieu of all other warranties, whether express or implied, including but not limited to, warranties of merchantability, or fitness for a particular use. In no event will QBC Diagnostics Inc., be liable for indirect, incidental, special or consequential damages regardless of whether QBC Diagnostics Inc., has been advised of such. L–000867(A) A–1 B – Parts and Accessories Item Catalog Number Paper, Printer (3/pk) 429580 Fuses, 250V 3.15A 5x20 mm (5/pk) 429581 QBC STAR Tubes (box 100) 429625 Power Cord, U.K. 421554 Power Cord, Europe 421551 Power Cord, USA 4326000001 L–000867(A) B–1 C – Software Update Log Whenever you receive a software update, please take a moment to log it below. This can assist you and QBC Diagnostics Inc., personnel in identifying software revision levels, potential software problems, etc. Date Received L–000867(A) Software Version Date Installed Installed By Notes C–1 C – Software Update Log Whenever you receive a software update, please take a moment to log it below. This can assist you and QBC Diagnostics Inc., personnel in identifying software revision levels, potential software problems, etc. Date Received L–000867(A) Software Version Date Installed Installed By Notes C–1 D – Contact QBC Diagnostics Inc. 200 Innovation Blvd., Suite 212 State College, PA 16803 USA Voice: (814) 231-7660 • Fax: (814) 231-3118 Toll-Free: Technical Services: 1-866-265-1486 Customer Service: 1-877-231-3115 www.qbcdiagnostics.com L–000867(A) D–1 E – Blood Collection and Handling General Comments The quality of a test is only as good as the quality of the specimen. The following guidelines help ensure the quality of the blood specimens collected in your office, as well as the safety of the staff performing the tests. These specimen collection guidelines are derived from those recommended by the National Committee for Clinical Laboratory Standards (NCCLS) in the specimen collection section of the “Physician’s Office Laboratory Guidelines” (NCCLS Document POL1 and POL2). For more information, contact NCCLS at 771 East Lancaster Avenue, Villanova, PA 19085 (215) 525-2435. Universal Precautions for Specimen Handling WARNINGS BLOOD AND BODY FLUIDS MAY CONTAIN THE HEPATITIS B VIRUS (HBV), HEPATITIS C VIRUS (HCV), HUMAN IMMUNODEFICIENCY VIRUS (HIV), OR OTHER DISEASE-CAUSING AGENTS. HANDLE ALL PATIENT SPECIMENS AS POTENTIAL BIOHAZARDS CAPABLE OF TRANSMITTING INFECTION. WEAR APPROPRIATE PERSONAL PROTECTIVE EQUIPMENT, INCLUDING LABORATORY GLOVES, WHEN COLLECTING, HANDLING, AND PROCESSING BLOOD AND BODY FLUIDS. IN ADDITION TO WEARING GLOVES, THE USE OF DISPOSABLE LAB COATS OR GOWNS AND PROTECTIVE GLASSES OR GOGGLES IS RECOMMENDED WHEN WORKING AROUND THE INSTRUMENT . L–000867(A) E–1 QBC STAR™ System User’s Manual Venous Blood Collection (Venipuncture) Supplies • Disposable gloves • Tourniquet • Alcohol pads • Sterile gauze • Bandage • VACUTAINER® Brand (or other) evacuated blood collection system: - Tubes containing EDTA anticoagulant (lavender top) - Needles - Needle holder/adapter • Sharps container • Marking pen Procedure E–2 1 Identify the patient by having him or her (or a guardian) state his full name. 2 Select the appropriate blood collection supplies. Establish the order of evacuated tubes if multiple specimens are drawn. 3 Label all evacuated blood collection tubes with the patient’s name and the time and date the specimen is drawn. 4 Position the patient with the elbow extended and the arm supported. Have the patient make a fist, but avoid vigorous pumping or other hand exercise. 5 Apply the tourniquet about 3 - 4 inches above the venipuncture site. Do not stop the blood flow for more than one minute before the blood is drawn. If necessary, release and reapply the tourniquet. 6 Select the venipuncture site. The median antecubital and cephalic veins are most commonly used. 7 Clean the venipuncture site with an alcohol pad, making one smooth, circular pass of the venipuncture site. Allow the skin to dry, to prevent hemolysis and to prevent the patient from having a burning sensation when the needle is inserted. Do not touch the vein site after cleaning it. 8 Perform the venipuncture: a Wearing gloves, gently grasp the patient’s arm near the venipuncture site, using the thumb to draw the skin tight. b With the needle bevel facing up, line up the needle with the vein. Penetrate the skin and enter the vein at an angle of approximately 15 - 30 degrees. Holding the flange of the needle adapter, push the evacuated tube forward, allowing the back end of the needle to puncture the stopper to engage the vacuum. L–000867(A) E – Blood Collection and Handling 9 c As the blood begins to flow into the tube, release the tourniquet and open the patient’s fist to avoid bleeding at the puncture site. d Keep constant, forward pressure on the tube to prevent the shutoff valve from closing and stopping the flow of blood. e Allow tubes containing an anticoagulant to fill until the vacuum is exhausted and blood flow ceases, assuring the correct ratio of blood to anticoagulant. f If a blood sample cannot be obtained, change the position of the needle. If the needle has penetrated too far into the vein, pull it back a bit. If it has not penetrated far enough, move it further into the vein, but do not probe with the needle. You may need to try another tube. g Remove the tube from the needle adapter when the blood stops flowing. The automatic shutoff valve will stop any blood from flowing into the adapter. If necessary, insert other tubes in the proper order and repeat the collection procedure. h Gently remove the needle from the venipuncture site. Apply sterile gauze to the site, while keeping the arm extended. Keep pressure on the site for at least 2 minutes. Ensure that bleeding has stopped, and apply a bandage over the site. Instruct the patient to wear the bandage for at least 15 minutes. i Gently invert any tube(s) containing anticoagulant or clot activators, as in SST Brand tubes, five to ten times to mix the blood with the additive. Do not shake the tube vigorously, because this will damage the blood cells and possibly lead to erroneous test results. Dispose of needle(s) in a sharps container. Dispose of gloves and gauze in an appropriate biological hazard container. Wash hands. Collecting Multiple Specimens from a Single Venipuncture When drawing more than one tube of blood from a single venipuncture using evacuated tubes with various additives, use the tubes in the following order: • Blood culture • Red Stopper or Red/Gray (SST Brand) tube • Blue Stopper • Green Stopper • Lavender Stopper • Gray Stopper Areas to Avoid When Drawing Venous Specimens • Scarred areas, such as healed burns. • Thrombosed veins. These veins feel thick and cord-like and tend to roll. • Bruised areas. If you cannot avoid collecting from a bruise site, then draw the specimen from the site farthest away from the bruised area. • The arm on the side of a prior mastectomy. Because this surgery results in lymphostasis, specimen collection may be difficult. • The arm that has the A-V shunt in a dialysis patient. • A recent IV site, or the same side of the body as the IV site. L–000867(A) E–3 QBC STAR™ System User’s Manual Errors to Avoid in Venous Blood Collection • Do not underfill the tube. This may result in excess anticoagulant interfering with the test result, or cause hemolysis of the specimen. • Completely mix the tube to avoid clot formation in specimens collected in tubes containing anticoagulants. • Do not mix the specimen too vigorously. Overly vigorous mixing may result in cell damage and hemolysis. • Do not overfill evacuated tubes when adding blood with a syringe. This could adversely affect the ratio of blood to anticoagulant. Overfilling anticoagulant tubes can also lead to excess pressure, causing the stoppers to come off. Capillary Blood Collection Supplies • Disposable gloves • Lancet with blade no longer than 2.0 - 2.4 mm • Alcohol swab or pad • Sterile gauze • Bandage • Sharps container • QBC STAR tube Procedure 1 Identify the patient by having him or her (or a guardian) state his full name. 2 Select and organize the appropriate blood collection supplies. 3 Select a puncture site. With older children and adults, use the third or fourth finger of the nondominant hand. Choose a puncture site halfway between the center of the finger pad and the outer edge of the finger. For infants, punctures may be performed on the outer or inner portion of the plantar surface of the heel. 4 Make sure the site to be punctured is not cyanotic, edematous, or cold. If cyanotic or cold, cover the puncture site with a warm, moist towel for at least three minutes before puncture. 5 Clean the puncture site with an alcohol pad. To prevent hemolysis, allow the site to dry. 6 Wearing gloves, puncture the finger with a sterile lancet. Wipe away the first drop of blood to avoid diluting the specimen with excess tissue fluid. 7 Apply slight pressure above the puncture site. Avoid squeezing directly at the puncture area, because that may cause cell damage as well as dilute the specimen with tissue fluid. 8 Fill the QBC STAR tube by placing the collection end of the tube directly in contact with the finger puncture blood. Fill the QBC STAR tube to a level between the two black fill lines. 9 When collection is complete, apply slight pressure with sterile gauze pad and elevate the puncture site. Bandage, if necessary. 10 Dispose of lancet(s) in a sharps container. Dispose of gloves and gauze in an appropriate biological hazard container. Wash hands. E–4 L–000867(A) E – Blood Collection and Handling Avoiding Hemolysis during Capillary Blood Collection • Allow the puncture site to dry after cleaning with alcohol. • Do not squeeze the puncture site excessively. • Do not press or scrape the collection device on the skin. • To avoid clotting in capillary blood collection: - Keep the puncture site clean by wiping off excess blood on skin around puncture. - Touch collection device only to drop of blood as it exits the puncture site. Do not scoop off skin. L–000867(A) E–5 F – Bibliography 1 WIntrobe, M.M. (1933) “Macroscopic Examination of the Blood,” American Journal of Medicine, SC., 185:58-71. 2 Olef, I. (1937) “The Determination of Platelet Volume,” Journal of Laboratory and Clinical Medicine, 23:166-178. 3 Bessis, M. (1940) “Une méthode permettant L’isolement des différents éléments figurés du sang,” Sang 14:262. 4 Davidson, E. (1960) “The Distribution of the Cells in the Buffy Layer in Chronic Myeloid Leukemia,” Acta haemat., 23:22-28. 5 Zucker, R.M. and Casse, B. (1966) “The Separation of Normal Human Leukocytes by Density and Classification by Size,” Blood, 34:5,591-600. 6 Jackson, J.F. (1961) “Supravital Blood Studies, Using Acridine Orange Fluorescence,” Blood, 17.643.17: 643-649. 7 Wardlaw, S.C. and Levine, R.A.: “Quantitative Buffy Coat Analysis,” JAMA 5: 617-620 (1983). 8 Data on file at Becton Dickinson Biosciences Division, Sparks, MD 21152. 9 Young, D.S., Pestaner, L.C. and Gibberman, V. (1975) “Effects of Drugs on Clinical Laboratory Tests,” Clinical Chemistry Chemistry, 21, 313D, 3454D, 346D, 390D, 391D, 392D. 10 Elking, M.P. and Kabat, H. (1968) “Drug Induced Modifications of Laboratory Test Values,” American Journal of Hospital Pharmaceuticals, 25,485. 11 Williams, W.J., Beutler, E., Lichtman, M.A., Coller, B.S., Kipps, T.J., Ed. Hemotology Hemotology, 5th ed., New York: McGraw Hill Co., 1995, p. 9. 12 National Committee for Clinical Laboratory Standards: Approved Standard H7-A (1985) “Procedure for Determining Packed Cell Volume by the Microhematocrit Method.” 13 Wintrobe, M.M. (1981) Clinical Hemotology Hemotology, 8th Ed., Lea & Febiger, Phila., PA, 1981, p. 18851889. L–000867(A) F–1