1
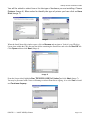
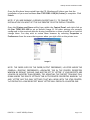
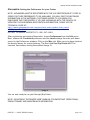
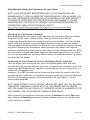
1831 Fort Union Blvd, Salt Lake City, Utah 84121
800-347-6439 • 801-943-7277
www.companioncorp.com
USB Slip Printer
Installation Guide
Alexandria v5, Textbook Tracker v3, and eLunchroom
This document was created to assist Operators and Administrators in setting up the
USB Slip printer for use with COMPanion Software.
What is the purpose of a Slip Printer?
When connected to Alexandria or Textbook Tracker the slip printer provides a
convenient and economical means of printing receipts for common circulation
transactions such as check-outs, placed holds, fines, fees, payments, and refunds.
When connected to a machine running the eLunchroom software the slip printer and
cash drawer provides a convenient and economical means of printing receipts for
common transactions such as deposits to account, withdrawals, and cash payments
as well as handling the cash money associated with these transactions.
System Requirements
A computer running Macintosh OS X, Windows 2000, Windows XP, or Windows Vista
operating system that meets the minimum system requirements for your software
product. If you are uncertain your system meets the current requirements please
contact Technical Support at 1-800-347-4942.
Setting up the printer
When unpacking, verify that you have received the printer, manual, power supply,
power cord, and a USB cable. You will also need to ensure you have a copy of your
software CD which contains the USB Slip printer drivers for Windows. For Alexandria
this support is enabled for version 5.5.3.4 and later. For Textbook Tracker - version
3.22 or later. For eLunchroom - version 1.1.4 or later.
Connecting the USB Interface Cable
Connect the “D” shaped end of the USB interface cable to the connector on the rear
panel of the printer. Connect the rectangular end of the cable to an available USB port
on your computer.
NOTE: DO NOT CONNECT THE PRINTER TO A USB KEYBOARD OR OTHER HUB.
IG0078.1 — V4007 USB Slip Printer
Page 1 of 9
USB Slip Printer Installation Guide
Connecting the AC Adapter
Connect the power cable to the AC adapter, then connect the AC adapter to the
connector on the printer. With the power switch OFF, insert the power cable plug into
a properly protected AC outlet.
NOTE: USE ONLY THE ADAPTER AND CORD THAT CAME WITH YOUR PRINTER.
Turning the Power On
To turn on the printer, flip the power switch located on the left side of the printer.
The POWER
lamp on the control panel will light up.
Loading the Roll Paper
• Use only paper that matches the printer’s specification.
• Push the cover open lever, located on the top right hand side to open the printer
cover.
• While observing the direction of the roll (see diagram on inside of printer cover),
set the paper roll into the compartment and pull the leading edge of the paper
toward you.
• Close the lid by pushing down on both sides and ensure it is firmly latched.
• The error light will blink if paper nears its end or is incorrectly installed.
•
NOTE: THE ERROR LIGHT WILL BLINK AT DIFFERENT INTERVALS FOR VARIOUS ERRORS,
PLEASE SEE THE PRINTER USERS MANUAL FOR A DETAILED EXPLANATION OF ALL
ERROR CODES.
NOTE: THE PAPER IS HEAT SENSITIVE! DO NOT EXPOSE TO HEAT, DIRECT SUNLIGHT OR
MOISTURE WHILE STORING.
If you are using a Macintosh Computer
IT IS NOT NECESSARY TO INSTALL PRINTER DRIVERS TO USE THE SLIP PRINTER WITH
YOUR MACINTOSH. PROCEED TO THE APPROPRIATE “SETTING THE PREFERENCES”
SECTION OF THIS DOCUMENT TO COMPLETE INSTALLATION.
IG0078.1 — V4007 USB Slip Printer
Page 2 of 9
USB Slip Printer Installation Guide
Windows Driver Installation:
Before using your receipt printer on a machine running Microsoft Windows, you must
install the printer driver. You’ll find the printer driver on your software installation CD
in the Utilities folder.
Insert the COMPanion CD into the CD drive. When you insert the USB cable and turn
the power on, Windows should recognize that a new device has been added and
present you with the Add New Hardware Wizard. If this does not happen, restart the
machine or select Control Panel from My Computer or the Start menu and proceed
to the Add Hardware utility. When prompted to install the software for your new
device, select from the available options to Install from a list or specific location
(Advanced) (Image 1). If you have started the Add Hardware utility from Control
Panel you will need to select Add a new hardware device from the list (Image 2).
Image 1
Image 2
Next you will be asked to Choose your search and installation options. Select Don't
search I will choose the driver to install (Image 3). Click Next.
Image 3
IG0078.1 — V4007 USB Slip Printer
Page 3 of 9
USB Slip Printer Installation Guide
You will be asked to select from a list the type of hardware you are installing. Choose
Printers (Image 4). When asked to identify the type of printer you have click on Have
Disk (Image 5).
Image 4
Image 5
When the Install from disk window opens, click on Browse and navigate to 'Look in' your CD drive.
Locate from within the CD's directory the folder containing the Star drivers and select the Star.INF file.
Click Open and then click Next (Image 6).
Image 6
From the list provided, highlight Star TSP613RS-USB [A4/Letter] and click Next (Image 7).
You may be presented with a series of Warnings or Alerts about driver signing, if so select Yes to install
and Continue Anyway.
Image 7
IG0078.1 — V4007 USB Slip Printer
Page 4 of 9
USB Slip Printer Installation Guide
Once the files have been copied from the CD, Windows will inform you that the
installation of your new hardware Star TSP613RS-USB [A4/Letter] is complete. Click
Finish.
NOTE: IF YOU ARE RUNNING A VERSION OLDER THAN 5.5, TO FINALIZE THE
INSTALLATION YOU MUST SET THE SLIP PRINTER TO BE THE DEFAULT PRINTER.
Open the Printers and Faxes utility from within the Control Panel and right click on
the Star TSP613RS-USB to set as default (Image 8). All other settings are properly
configured to the required defaults during installation so there should be no need to
change them. You may wish to review them however by selecting Properties or
Preferences from the menu that appears when you right click on the printer icon.
Image 8
NOTE: THE PAPER SIZE FOR THE PAPER/OUTPUT PREFERENCE, LOCATED UNDER THE
GENERAL--PRINTING PREFERENCES--ADVANCED TAB IN THE PRINTER PROPERTIES
WINDOW BY DEFAULT SHOULD, AND MUST BE SET TO 'LETTER'. IF YOUR RECEIPTS ARE
LONGER OR SHORTER THAN DESIRED, TRY ADJUSTING THE 'RECEIPT TEAR BAR' PULL
DOWN UNDER THE DEVICE SETTINGS TAB IN THE PRINTER PROPERTIES WINDOW. 'A4'
AND 'LETTER' ARE THE ONLY SETTINGS THAT WILL WORK WITH THE STAR PRINTER;
'A4' PRODUCES A LONGER RECEIPT WHILE 'LETTER' WILL PRODUCE A SHORTER ONE.
IG0078.1 — V4007 USB Slip Printer
Page 5 of 9
USB Slip Printer Installation Guide
Alexandria: Setting the Preferences for your Printer
NOTE: ALEXANDRIA MUST BE REGISTERED WITH THE SLIP PRINTER PRODUCT CODE IN
ORDER FOR THESE PREFERENCES TO BE AVAILABLE. YOU WILL FIND THE NECESSARY
INFORMATION IN THE MATERIALS THAT WERE SHIPPED TO YOU WHEN YOU
PURCHASED THE STAR PRINTER. IF YOU ARE UNFAMILIAR WITH THE PROCESS OF
UPDATING THE ALEXANDRIA REGISTRATION INFORMATION, PLEASE SEE THE
TECHNICAL GUIDE AT:
http://www.goalexandria.com/support/tech_notes/guides/tech_notes/
v5_21_regcodes.html
OR CALL TECHNICAL SUPPORT AT 1-800-347-4942.
After registering and starting Alexandria, choose Preferences from the Edit menu.
Next, choose the Circulation preference and the Local settings from the pull-down
menus in the Preferences window. Click on the Misc tab. Make sure you have checked
the desired boxes for receipt printing. The Box titled Use Slip Printer MUST be
checked. Save before closing the window (Image 9).
Image 9
You are now ready to use your Receipt/Slip Printer.
NOTE: PLEASE READ THE PRINTER USER'S MANUAL FOR IMPORTANT OPERATIONAL,
PRECAUTIONARY AND MAINTENANCE INFORMATION.
IG0078.1 — V4007 USB Slip Printer
Page 6 of 9
USB Slip Printer Installation Guide
Textbook Tracker: Set the Preferences for your Printer
NOTE: TEXTBOOK TRACKER MUST BE REGISTERED WITH THE SLIP PRINTER PRODUCT
CODE IN ORDER FOR THESE PREFERENCES TO BE AVAILABLE. YOU WILL FIND THE
NECESSARY INFORMATION IN THE MATERIALS THAT WERE SHIPPED TO YOU WHEN
YOU PURCHASED THE STAR PRINTER. IF YOU ARE UNFAMILIAR WITH THE PROCESS OF
UPDATING THE TEXTBOOK TRACKER REGISTRATION INFORMATION, PLEASE SEE THE
TECHNICAL GUIDE AT:
http://www.textbooktracker.com/support/tech_notes/tech_notes/TT_1_v3codes.html
OR CALL TECHNICAL SUPPORT AT 1-800-347-4942.
After registering and starting Textbook Tracker, choose Preferences from the Edit
menu. Next, choose the Circulation preference and the Local settings from the pulldown menus in the Preferences window. Click on the Misc tab. Make sure you have
checked the desired boxes for receipt printing. The Box to Use Slip Printer MUST be
checked. Save before closing the window (Image 10).
Image 10
You are now ready to use your Receipt/Slip Printer.
NOTE: PLEASE READ THE PRINTER USER'S MANUAL FOR IMPORTANT OPERATIONAL,
PRECAUTIONARY AND MAINTENANCE INFORMATION.
IG0078.1 — V4007 USB Slip Printer
Page 7 of 9
USB Slip Printer Installation Guide
eLunchroom: Setting the Preferences for your Printer
NOTE: ELUNCHROOM MUST BE REGISTERED WITH THE SLIP PRINTER AND CASH
DRAWER PRODUCT CODES IN ORDER FOR THESE PREFERENCES TO BE AVAILABLE. YOU
WILL FIND THE NECESSARY INFORMATION IN THE MATERIALS THAT WERE SHIPPED TO
YOU WHEN YOU PURCHASED THE STAR PRINTER AND CASH DRAWER. IF YOU ARE
UNFAMILIAR WITH THE PROCESS OF UPDATING THE ELUNCHROOM REGISTRATION
INFORMATION, PLEASE SEE THE TECHNICAL GUIDE AT:
http://www.elunchroom.net/support/tech_notes/1_changing_codes.html
OR CALL TECHNICAL SUPPORT AT 1-800-347-4942.
Setting up the Cash Drawer (Optional)
When unpacking the cash drawer ensure that you have the received the cash drawer
as well as (2) keys and (1) interface cable. Take the time to ensure that all
components function properly and have arrived in good condition. Test the lock and
ensure both keys function in case there were a need to manually open the drawer.
The cash drawer should be placed on a flat surface at a convenient height for the user
who will be handling the transactions. Never place the cash drawer on an uneven
surface as the force of the door opening may cause it to fall, damaging the unit. While
the cash drawer is sturdy and should support some weight placed on it's top surface
it is not recommended that any heavy objects, such as a computer monitor, be placed
on top of the cash drawer.
Connecting the Cash Drawer to the Star Slip/Receipt Printer (Optional)
The cash drawer does not require any source of external power other than that
provided from the interface with the slip printer. Located on the underside of the cash
drawer is an RJ45(Ethernet) style connector and located on the rear of the printer is a
smaller RJ11(Telephone) style
connector. Turn OFF the power to the printer and then insert the smaller end of the
provided interface cable into it's matching connector on the slip printer and the larger
end into the matching connector on the underside of the cash drawer. Turn the
printer power back ON.
NOTE: NEVER ATTEMPT TO PLUG A PHONE CABLE OR ANY CABLE THAT HAS NOT BEEN
CERTIFIED BY COMPANION TO WORK WITH THE CASH DRAWER AND SLIP PRINTER
INTO THE CONNECTOR ON THE BACK OF THE PRINTER OR ON THE UNDERSIDE OF THE
CASH DRAWER, THIS COULD SERIOUSLY DAMAGE EITHER DEVICE.
After registering and starting eLunchroom, choose Preferences from the Edit menu.
Next, choose the Receipts preference from the pulldown menu in the top left corner
of the Preferences window.
IG0078.1 — V4007 USB Slip Printer
Page 8 of 9
USB Slip Printer Installation Guide
Enable receipt printing and cash drawer functionality:
The cash drawer component is designed to function through the slip printer even if
receipt printing is turned off (The printer power must be turned ON). To enable the
cash drawer, with or without receipt printing enabled, check the box titled Cash
Drawer is attached to Slip Printer (Image 11). To enable receipt printing place a
check in the box titled Format for Slip Printer (Image 11), and enable or disable the
remaining slip printer preferences as desired to suit your needs. Save before closing
the window. Based on how these preferences are set eLunchroom will print receipts
and open the cash drawer upon the completion of certain transactions and from the
register window. The cash drawer, if enabled, can also be opened manually from the
menu on the transaction window, Transaction-Open Cash Drawer, or by the use of
the key combination Control + Alt + O (Windows) or Command + Alt + O
(Macintosh). Please review the eLunchroom users manual for further information
about transactions and using the Register window.
Image 11
You are now ready to begin using the Slip/Receipt Printer and Cash Drawer.
NOTE: PLEASE READ THE PRINTER USER'S MANUAL FOR IMPORTANT OPERATIONAL,
PRECAUTIONARY AND MAINTENANCE INFORMATION.
If you need further information or assistance with setting up, operating and
maintaining this system, please call COMPanion Technical Support at
1-800-347-4942 or email [email protected]
IG0078.1 — V4007 USB Slip Printer
Page 9 of 9

![VFC-25M 自動保存ソフトウェア(ARS)取扱説明書[PDF:702.7KB]](http://vs1.manualzilla.com/store/data/006713442_2-71cc52dee730d3420a7450b829eb9f50-150x150.png)