1
WALL SLEEVE INSTALLATION
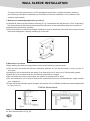
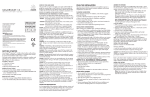
If the field supplied case angles must be used during installation(Fig 5),proceed as follows:
a)Position the case angles around top and sides of sleeve to get the proper depth,(be sure to
have the angles pointing outside).
b)Mark the sleeve using the case angles as a template for screws.
c)Drill Ø5/32”hole at the marked position,(from step 2 above)only use 10X1/2”screws.
d)Install the screws from the outside of the sleeve,do not drill any holes in the base of the sleeve.
Fig 5
4.Installation of the sleeve in the wall opening
a)Place sleeve into the wall,refer to Chart 1-D2 for room side projection(minimum 1/2”to a maximum
1-3/4”without subbase).The rear(outside)edge of the sleeve should stick out a min.of 1/4”past the
outside wall to be able to caulk properly,do not seal the drain holes on the outside(grille side)of
sleeve.If it is desired to have the rear grille flush on the outside,a drip rail must be installed under
the sleeve and caulking applied between the drip rail and sleeve.
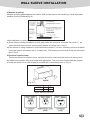
b)To ensure the unit’s maximum efficiency,the sleeve must be installed a slight downward pitch
from the indoor side to the outdoor side(Fig 6),then fasten the wall sleeve(Fig 7)
c) Lintels should be used to support the block above the wall sleeve(Fig 8).The sleeve can not
support the load of bricks/blocks(if directly under a window sill,use of lintel may not be necessary).
Inside
Outside
Wall Sleeve
Level
1/4 Bubble
Tilt To Outside
Molly or toggle bolt
Wood screw
Expansion anchor bolt
Fig 6
Outside Wall
Fig 7
Corrugated plate Inside wall
Fig 8
Note:The fastening parts and wood screws etc. are prepared by end-users themselves.
14