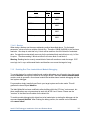
1
Tool Suite code-named Emberson Beta Intel® JTAG Debugger 3.0 Installation Guide and Release Notes Installation Guide and Release Notes Document number: 327661-003US 3 December 2012 Contents 1 Introduction ......................................................................................................................... 3 2 Technical Support and Documentation ............................................................................... 3 Product Contents .................................................................................................................... 4 3 What's New ......................................................................................................................... 5 Target Platform Support ......................................................................................................... 5 4 System Requirements ......................................................................................................... 5 Host Software Requirements .................................................................................................. 5 Target Software Requirements ............................................................................................... 5 Hardware Requirements ......................................................................................................... 6 Ordering required JTAG Device.............................................................................................. 6 5 4.1.1 Intel® ITP-XDP3 ................................................................................................... 6 4.1.2 Macraigor* usb2Demon* ....................................................................................... 6 Installation Notes ................................................................................................................ 7 Pre-Installation Steps ............................................................................................................. 7 5.1.1 Notes on installing a 32bit JRE on a 64bit Windows* system ................................ 7 Product Installation ................................................................................................................. 8 Installing Intel® XDP3 JTAG Probe ........................................................................................ 8 Installing Macraigor Systems* usb2Demon* Support .............................................................. 8 Uninstalling the Product .......................................................................................................... 9 6 Features ............................................................................................................................10 6.1.1 Full Intel LPIA Silicon & Chipset support ..............................................................10 Intel® JTAG Debugger Installation Guide and Release Notes 1 7 8 6.1.2 Execution Trace Support .....................................................................................10 6.1.3 OS Awareness / Kernel Module Debugging .........................................................10 5.1.6 Scripting Language .............................................................................................11 5.1.7 Page Translation Table .......................................................................................11 6.1.4 Unload of Symbol Information ..............................................................................11 6.1.5 Power Events Handling ........................................................................................11 6.1.6 NAND Flashing support on Intel® Atom™ Processor CExxxx ..............................11 Usage Notes ......................................................................................................................12 7.1.1 Starting the Debugger ..........................................................................................12 7.1.2 eMMC Flash Recovery on Intel® Puma6™ Media Gateway ................................12 7.1.3 eMMC Flash on Intel® Atom™ Processor CE42xx and CE53xx ..........................13 7.1.4 FTL Lite NAND Flash Programming on the Intel® Atom™ Processor CE4100 ....13 7.1.5 Enabling Run-Time Loaded Kernel Module Debugging ........................................14 7.1.6 Unload of Symbol Information ..............................................................................15 Issues and Limitations........................................................................................................15 Known Issues and Limitations ...............................................................................................15 8.1.1 Support for Intel® Atom™ processor bitfield editor register views ........................15 8.1.2 Reset on connect with Macraigor Systems* usb2Demon* ....................................15 8.1.3 Locals Window updates can be slow ...................................................................15 8.1.4 Commands ignored when console accepts commands before engine is ready ....15 8.1.5 Kernel Threads Window Population Slow ............................................................15 8.1.6 Debugger puts a Windows file system lock on symbol files ..................................15 8.1.7 Maximum number of symbol files .........................................................................16 8.1.8 Stepping out of kernel module into statically linked code .....................................16 8.1.9 Local variables and evaluation windows display multi-dimensional arrays incorrectly ..........................................................................................................................16 8.1.10 Evaluation window for global variables may be missing type information .............16 8.1.11 On-chip instruction trace window does not update after single step .....................16 8.1.12 Writing to non-writable vector register may update register value display ............16 8.1.13 Long Upload Time of Debug Information..............................................................16 8.1.14 Memory Writes to Un-Initialized Memory..............................................................17 8.1.15 Setting Software Breakpoints during OS Boot ......................................................17 8.1.16 Flash programming with empty flash parts (CE4200) ...........................................17 Intel® JTAG Debugger Installation Guide and Release Notes 2 8.1.17 Use of Macraigor* usb2Demon to debug Intel® Atom™ processor CE4xxx based platforms may require board changes ................................................................................17 9 Attributions .........................................................................................................................17 10 Disclaimer and Legal Information ...................................................................................18 1 Introduction This Intel® JTAG Debugger 3.0 release for the Emberson Tool Suite Beta provides a Windows* 7 hosted cross-debug solution for software developers to debug kernel sources and dynamically loaded drivers and kernel modules on devices based on the Intel® Atom™ Processor CE41xx, CE42xx, CE53xx and the Intel® Puma6™ Media Gateway. It does so using the In-Target Probe eXtended Debug Port (ITP-XDP) on these platforms As JTAG communication device you have the choice between the Macraigor* usb2Demon* and the Intel® ITP-XDP3. Beyond this the debugger also offers convenient and in-depth access to underlying hardware properties through a powerful graphical user interface (GUI). This makes it an ideal assistant for initial platform bringup and firmware and BIOS debugging. A set of features providing in-depth access to the development platform complete the offering for system developers: Execution trace support for identifying incorrect execution paths or memory accesses Graphical representation of the page translation table with full access of the descriptor tables Flashing Support These debugger capabilities minimize the time it takes to isolate and correct platform and system level problems. This document provides system requirements, installation instructions, issues and limitations, and legal information. 2 Technical Support and Documentation The default installation directory is C:\Program Files(x86)\Intel\Emberson_2013.1.xxx\ Intel® JTAG Debugger Installation Guide and Release Notes 3 The directory <INSTALL-DIR>\Documentation\en_US\debugger\xdb includes these release and installation notes w_XDB_Release_Install.pdf. The directory <INSTALL- DIR>\Documentation\en_US\debugger\xdb\first_use\ contains a getting started guide Getting_Started.htm. In addition, the Intel® JTAG Debugger user manual and “Intel® Debugger Online Help” can be accessed at <INSTALL-DIR>\Documentation\en_US\debugger\xdb\cl\index.htm. For information about how to find Technical Support, Product Updates, User Forums, FAQs, tips and tricks, and other support information, please contact us at [email protected]. The Installation comes with technical support through an Intel Premier Support account for the product Intel® Debug Solutions accessible through the https://premier.intel.com web portal. Please contact us at [email protected] with your contact information to request access. Product Contents Intel® JTAG Debugger, Build [79.xxx.xx] Intel® JTAG Debugger Installation Guide and Release Notes 4 3 What's New Below are some of the new features in the Intel® JTAG Debugger Target Platform Support Support for Intel® Puma6™ Media Gateway The Intel® JTAG Debugger has been tested against debugging CE Linux* PR28 builds on Intel® Software Development Platforms based on the Intel® Puma6™ Media Gateway. Flashing Support for eMMC NAND flash Intel® Puma6™ Media Gateway The Intel® JTAG Debugger is now able to flash eMMC NAND flash on Intel® Software Development Platforms based on the Intel® Puma6™ Media Gateway. eMMC flash recovery on Intel® Puma6™ Media Gateway The Intel® JTAG Debugger is now able to flash eMMC NAND flash on Intel® Software Development Platforms based on the Intel® Puma6™ Media Gateway, even if no platform initialization has taken place and no cache or RAM is available to upload the burn algorithm. Please see the eMMC Flash Recovery entry in the Usage Notes for details. 4 System Requirements Host Software Requirements 1. Microsoft* Windows* 7. 2. Java runtime environment (JRE) 1.5 or newer to use the Eclipse* framework. In a web browser, access www.java.com , and download and install JRE 1.6. Ensure that the Java runtime environment is 32bit even if you are installing on a 64bit system. (Go to http://www.java.com/en/download/manual.jsp and select “Windows 7, XP Offline (32bit)”. Target Software Requirements The target platform should be based on one of the following environments: Bare metal, BIOS, firmware environment CE Linux* OS PR28 for Intel® Atom™ Processor CE4xxx, CE53xx and Intel® Puma6™ Media Gateway Intel® JTAG Debugger Installation Guide and Release Notes 5 Hardware Requirements Intel® 64 architecture based host computer supporting Intel® Streaming SIMD Extensions 2 (Intel® SSE2) instructions (Intel® Pentium® 4 processor or later), or compatible non-Intel processor. o For the best experience, a multi-core or multi-processor system is recommended. 1GB RAM (2GB recommended) 4GB free disk space for all product features and all architectures USB 2.0 host interface In-Target Probe eXtended Debug Port on target platform Intel® Puma6™ Media Gateway based plaform Intel's ITP-XDP3 JTAG Hardware Adapter or alternatively Macraigor Systems* usb2Demon* JTAG Hardware Adapter Ordering required JTAG Device 4.1.1 Intel® ITP-XDP3 Please contact your Intel representative or application engineer for access to this JTAG communication device. For details on the hardware you may also contact ITP Support at [email protected]. To order the Intel® ITP-XDP3 device directly, please contact the Hibbert Group* at [email protected] and request the VTG order form. 4.1.2 Macraigor* usb2Demon* Go to http://www.macraigor.com/usbDemon.htm and select the Intel Atom™ Processor target with the appropriate 24, 31 or 60 pin connector for your target device. Intel® JTAG Debugger Installation Guide and Release Notes 6 5 Installation Notes Pre-Installation Steps Install the latest Java JRE. In a web browser, access www.java.com , and download and install JRE 1.6. Ensure that the Java runtime environment is 32bit even if you are installing on a 64bit system. (Go to http://www.java.com/en/download/manual.jsp and select “Windows 7, XP Offline (32-bit)”. 5.1.1 Notes on installing a 32bit JRE on a 64bit Windows* system Check your %PATH% environment variable Please check your %PATH% environment variable to make sure it is pointing to the 32-bit JRE installation. (Generally the one in “C:\Program Files (x86)” as opposed to the one in “C:\Program Files”) Rename “java.exe” and “javaw.exe” in “C:\Windows\System32” Also check your “C:\Windows\System32” directory. There appears to be local copies of the java.exe and javaw.exe in this folder. These are usually from the original Java* installation and most likely the 64-bit versions. Since “C:\Windows\System32” is always in your %PATH% these copies of the java executables will be used before the JRE directory added to your system %PATH%. Please delete the copies of “java.exe” and “javaw.exe” in “C:\Windows\System32” so that the Java directory in your PATH variable pointing to the 32-bit JREs will be used. Verify the correct Java* Runtime Environment is used To verify that the correct JRE is being used open a command prompt and change directory to the bin folder in the XDB install directory. > cd <INSTALL-DIR>\bin > java CheckJRE x86 Intel® JTAG Debugger Installation Guide and Release Notes 7 If the output of this call is x86 and not x64 or amd64 than you are ready to launch XDB. Product Installation The Intel® JTAG Debugger 3.0 on Windows* host is available as a downloadable file. Doubleclick on the executable file (.EXE) to begin installation. And follow the installer guidance. The default installation directory is C:\Program Files (x86)\Intel\Emberson_2013.1.xxx\ Installing Intel® XDP3 JTAG Probe If it is not already pre-installed, the Intel® ITP-XDP3 driver is automatically installed as part of the Intel® JTAG Debugger installation process. The Intel® ITP-XDP3 driver installer will issue a warning that the publisher could not be verified. Please acknowledge the warning and proceed with the installation. Installing Macraigor Systems* usb2Demon* Support The Macraigor Systems* usb2Demon* device can be ordered at http://www.macraigor.com/usbDemon.htm. To enable support for the Macraigor Systems* usb2Demon* device for debugging Intel® Atom™ processor based platforms with the Intel® JTAG Debugger it is necessary to install the Windows* drivers for the Macraigor Systems* usb2Demon* device. The driver can be found at http://www.macraigor.com/full_gnu.htm. You can install either the IA-32 or the Intel®64 version of the Hardware Support Package to provide the device driver support The Intel® JTAG Debugger has been validated for use with the Macraigor Systems* usb2Demon* device and OCDRemote* 9.8-1. We recommend using OCDRemote* 9.7-2 for Intel® Atom™ Processor CE53xx and at least version 9.8-1 of the Macraigor* Systems* driver for all other intended target platforms. For further details on how to configure the OCDRemote* driver set from Macraigor* Systems, please refer to the full installation instructions at http://www.macraigor.com/full_gnu.htm . Intel® JTAG Debugger Installation Guide and Release Notes 8 Uninstalling the Product In the Windows* 7 Control Panel, select Add/Remove Application and choose the Tool Suite 2013 code named Emberson Beta. To also uninstall the Intel® ITP-XDP3 driver please select Windows Driver Package – Intel Corporation XDP USB Device Usermode Driver for XDP Hardware as well. To also uninstall the Macraigor* Systems usb2Demon device driver please select OCD Commander as well. Intel® JTAG Debugger Installation Guide and Release Notes 9 6 Features 6.1.1 Full Intel LPIA Silicon & Chipset support Provides an in-depth view into Intel® Atom™ Processor chipsets. Supports silicon specific features, including architectural registers, Intel® Streaming SIMD Extensions 3 (SSE3), as well as Graphics Chipset Register support through JTAG. Graphical representation of peripheral registers and bit fields with online documentation. 6.1.2 Execution Trace Support Enables viewing of execution history and thus enhances understanding of the flow of an executed program allowing the analysis of the execution path to find errors and identify the root cause for exceptions. 6.1.3 OS Awareness / Kernel Module Debugging The Linux* OS awareness pulldown menu allows visibility of all currently active kernel threads. It also provides the ability to view a list of all currently loaded kernel modules with status information and memory location of initialization methods and cleanup methods. Setting whether to stop the target and commence debugging a kernel module on module load, initialization or cleanup/exit allows to start debugging a kernel module and loading its symbolic information. You can then set your breakpoints at the function entry points of the kernel module you want to debug, release the target using the run command and trigger an event that will cause the breakpoint to be hit to start your actual debug session. You do not need to select kernel modules that are already loaded, but can add additional kernel module names to the list of kernel modules that are monitored and have the debugger stop at load, initialization or cleanup just as it would with the kernel modules that are already populated in the OS awareness pulldown menu as they were loaded during the Linux* OS boot process. To debug kernel modules the following steps additional to selecting or adding a kernel module in the module list are necessary. In a debugger script or in the debugger console window enter the following commands: SET DIRECTORY "<kernel module path>" This path setting is necessary to enable the automatic source and symbol info mapping upon kernel module load as described above. To use this feature for runtime loaded kernel module debugging you will need to have the kernel module idbntf.ko running and installed on the target device. The folder <INSTALLDIR>\kernel-modules\idbntf contains code to generate a Linux* kernel module that enables kernel module debugging with the Intel system debugger. For generation simply transfer these files to your target system and invoke make. This will generate the kernel object idbntf.ko. Intel® JTAG Debugger Installation Guide and Release Notes 10 To enable module debugging this object has to be loaded prior to starting the debugger via the command insmod idbntf.ko. After finishing the debug session, the module can be unloaded with rmmod idbntf. 5.1.6 Scripting Language Create a batch file based on a rich set of powerful debugging script language commands and execute it in non-interactive mode. Results can be logged and analyzed afterwards. 5.1.7 Page Translation Table Instant and simple resolution and translation between physical and virtual address space. 6.1.4 Unload of Symbol Information To unload a symbol file, open the Load dialog. Click the “Unload Symbol File” tab and select the symbol file to be unloaded. This will remove the symbol information from the debug session. Removing symbol information is useful in order to load different or new symbol information. 6.1.5 Power Events Handling The debugger can properly handle externally controlled power events without needing to close the debugger. If a target is reset or powered-off the debugger will identify the “Target power loss.” Once power is restored the debugger will attempt to halt the target at the reset vector. 6.1.6 NAND Flashing support on Intel® Atom™ Processor CExxxx The Intel® JTAG Debugger supports flashing eMMC NAND partitions on Intel® Atom™ Processor CE4xxx, CE5xxx and Intel® Puma6™ Media Gateway based reference platforms. Intel® JTAG Debugger Installation Guide and Release Notes 11 7 Usage Notes 7.1.1 Starting the Debugger To start the Intel® JTAG Debugger for Intel® Atom™ Processor change into the C:\Program Files (x86)\Intel\Emberson_2013.1.xxx\ installation directory. From there run the debugger launch shell script that best fits your host-target setup. Below is a list of ready to go target connection configurations: start_xdb_MCRG_CE4100.bat start_xdb_XDP3_CE4100.bat start_xdb_MCRG_CE4200.bat start_xdb_XDP3_CE4200.bat start_xdb_MCRG_CE5300.bat start_xdb_XDP3_CE5300.bat start_xdb_MCRG_CE2600.bat start_xdb_XDP3_CE2600.bat Intel® Intel® Intel® Intel® Intel® Intel® Intel® Intel® Atom™ Processor CE41xx Atom™ Processor CE41xx Atom™ Processor CE42xx Atom™ Processor CE42xx Atom™ Processor CE53xx Atom™ Processor CE42xx Puma6™ Media Gateway Puma6™ Media Gateway Macraigor* usb2Demon* Intel® ITP-XDP Macraigor* usb2Demon* Intel® ITP-XDP Macraigor* usb2Demon* Intel® ITP-XDP Macraigor* usb2Demon* Intel® ITP-XDP In the Windows* 7 start menu select All Programs>Intel® Development Tools>Intel® JTAG Debugger Use the launch script entry for Intel ITP-XDP3 Probe or Macraigor usbDemon Probe respectively. 7.1.2 eMMC Flash Recovery on Intel® Puma6™ Media Gateway For flashing a blank eMMC flash on a platform based on the Intel® Puma6™ Media Gateway we provide a special flash recovery script in conjunction with the Intel® JTAG Debugger GUI Flash Memory Tool plugin. Please follow the steps below to recover eMMC flash or write to blank eMMC flash memory on a platform based on the Intel® Puma6™ Media Gateway: 1. Power cycle the board Launch start_xdb_MCRG_CE2600_eMMC_Flash_Recovery.bat (Macraigor* usb2Demon*) or start_xdb_XDP3_CE2600_eMMC_Flash_Recovery.bat (Intel® ITP-XDP3) in a command line window from the C:\Program Files (x86)\Intel\Emberson_2013.1.xxx\ directory. 2. Wait for the "Flash Recovery completed successfully!" message on the command line and then exit. 3. If using the Macraigor* usb2demon, it is now recommended to power the target off and back on again. Launch start_xdb_MCRG_CE2600.bat in Intel® JTAG Debugger Installation Guide and Release Notes 12 C:\Program Files (x86)\Intel\Emberson_2013.1.xxx\ 4. from a command line window Close assembler window 5. Open flash plugin a. Select CE2600 in Board dropdown and eMMC-user in the Flash dropdown box 6. Set Data file to your CEFDK binary (ce2600.bin), set Offset to 0x80800 and select burn 7. Restart target and it should boot to CEFDK. 7.1.3 eMMC Flash on Intel® Atom™ Processor CE42xx and CE53xx 7.1.3.1 Partitions There are 3 partitions defined on eMMC. Our flash tool is capable of programming each of the 3 partitions: boot1, boot2 and the user partition. 7.1.3.2 Addressing Addressing space for each partition is independent. Therefore you should address the beginning of each partition as address 0. Currently 32KB is the minimum write or read size that we support. 7.1.3.3 Erasing Block erasing is not implemented for this flash. eMMC flash can be written to without erasing first. Therefore the only erase we support is on the entire partition. Note- Currently “Verification” is not supported on eMMC flash. Please do a backup and manual binary diff the two files. 7.1.4 FTL Lite NAND Flash Programming on the Intel® Atom™ Processor CE4100 Note- Please see the Platform Support Guide that came with your development kit for more detailed information about programming the FTL Lite partition in the Intel® Atom™ Processor CE4100 NAND flash. The first 66 blocks of the flash memory is reserved as the FTL Lite partition. In this space each block is written redundantly 8 times per DHG’s spec. In order to minimize user complexity, our implementation of the FTL Lite partition accounts for these extra copies. However, by doing so, this requires a minimum read or write size to be 1 block (128 KB). 7.1.4.1 Addressing The conversion from FTL Lite partition block number to address is simple however not straightforward. Since the redundant blocks are not addressable you must divide the block number by 8 (number of redundant copies) than multiply by block size (128KB). Below is a formula and table that converts some frequently used block locations. (As described in the Platform Support Guide) address = block # / 8 * 0x20000 Intel® JTAG Debugger Installation Guide and Release Notes 13 Data Block # Address MBH and BBT 0 0x 0000 0000 CEFDK 8 0x 0002 0000 Redboot 40 0x 000A 0000 Platform parameters 48 0x 000C 0000 7.1.4.2 Backup When doing a backup use the same addressing method described above. For the length parameter, values must be a multiple of block size. Therefore 128KB (0x20000) is the minimum read size. Also keep in mind that only 1 block will be read from the first 8 blocks of redundant data. Our algorithm automatically accounts for the redundant block and will return only 1 of the 8 copies. Therefore reading 2 blocks at offset 0 will return block 0 and block 8. Warning- Reading back a recently erased block of data will sometimes crash the target. ECC error logic isn’t in sync with erased blocks and therefore can cause the target to hang. 7.1.5 Enabling Run-Time Loaded Kernel Module Debugging To use this feature for runtime loaded kernel module debugging you will need to have the kernel module idbntf.ko running and installed on the target device. The folder /kernel-modules/idbntf contains code to generate a Linux kernel module that enables kernel module debugging with the Intel system debugger. For generation simply transfer these files to your target system and invoke make. This will generate the kernel object idbntf.ko. The idbntf Makefile has been modified to allow building within the CE Linux* environment, but these modifications are not guaranteed to work with all CE Linux* flavors. Please see the "read.me" in the idbntf source solder for the latest info. To enable module debugging this object has to be loaded prior to starting the debugger via the command insmod idbntf.ko. After finishing the debug session, the module can be unloaded with rmmod idbntf. Intel® JTAG Debugger Installation Guide and Release Notes 14 7.1.6 Unload of Symbol Information To unload a symbol file, open the Load dialog. Click the “Unload Symbol File” tab and select the symbol file to be unloaded. This will remove the symbol information from the debug session. Removing symbol information is useful in order to load different or new symbol information. 8 Issues and Limitations Known Issues and Limitations 8.1.1 Support for Intel® Atom™ processor bitfield editor register views To receive information on how to access bitfield editor chipset register views for Intel® Atom™ Processors, please send an email to [email protected] for details. Bitfield editor chipset register views are currently not supported for the Intel® Atom™ Processor CExxxx and Intel® Puma6™ Media Gateway. 8.1.2 Reset on connect with Macraigor Systems* usb2Demon* When connecting the Intel® JTAG Debugger to a platform based on the Intel® Puma6™ Media Gateway using the Macraigor Systems* usb2Demon device, this may trigger a platform reset. 8.1.3 Locals Window updates can be slow The local window updates may be slow in many cases where it is evaluating many large structs or in scopes with many locals. If the slowness is noticed, it is recommended to close the locals window. 8.1.4 Commands ignored when console accepts commands before engine is ready After a stop or a symbol file load/unload, the debugger user interface may accept console commands while the assembly window is loading. In these cases the command is simply ignored and lost. If you experience this, please reissue the command. 8.1.5 Kernel Threads Window Population Slow The Linux* OS awareness plug-in for the Intel® JTAG Debugger includes a Kernel Threads Window, that displays all current kernel threads and information about their state. When the Kernel Threads Window is opened it can take several seconds before the actual content is displayed. The initial window content of “No data.” will disappear once kernel thread data is available. This can take up to 20 seconds. 8.1.6 Debugger puts a Windows file system lock on symbol files Currently when a Symbol file is loaded in the debugger a file system lock is placed on this file to prevent other processes from deleting or modifying this file. If this lock is preventing you from recompiling your program, simply use the Unload feature found in the Load Dialog. Unloading a symbol file will release the file system lock and allow you to modify or delete the symbol file without exiting the debugger. Intel® JTAG Debugger Installation Guide and Release Notes 15 8.1.7 Maximum number of symbol files Currently a limitation has been placed on the debugger to only allow one piece of debug information at a time. Loading multiple symbol files was causing unreliable results. These bugs will be addressed and this limitation should be lifted in future versions. 8.1.8 Stepping out of kernel module into statically linked code When stepping out of a function inside a kernel module into statically link OS kernel code) the debugger can lose run-control of the target. Halting code execution or single stepping will not work. Using Ctrl-C with focus on the console window or pressing the button “Send interrupt to Debugger”will reestablish full target control if this occurs. The recommended workaround is to use a breakpoint in the kernel source code instead of simply stepping out of a kernel module. 8.1.9 Local variables and evaluation windows display multi-dimensional arrays incorrectly Multi-dimensional arrays are displayed as vectors in the debugger's local variables window and evaluations window suppressing one dimension of the array. 8.1.10 Evaluation window for global variables may be missing type information When evaluating a global variable in a debugger evaluation window the variable name and it’s value are displayed, but type information may not be displayed. 8.1.11 On-chip instruction trace window does not update after single step When single stepping while having instruction trace enabled and the instruction trace window open the content of the trace window will not be updated with the single step. 8.1.12 Writing to non-writable vector register may update register value display In the vector register window it is possible that a write to a vector register seems to have been successful, when a new value was entered from within said window, despite the register being non-writable at the time and not actually having been updated. 8.1.13 Long Upload Time of Debug Information Load of debug info from large applications or from system libraries (which need to be transferred from the target to the host) may take a long time although the debugger seems to have finished the symbol load. For example, in the Console window the debugger prompts quite quickly that the breakpoint has been reached, in the Source window the source file is displayed and the yellow arrow is seen at the current position of the breakpoint. However, the load of the complete symbol info may not yet have finished and the debugger may not yet be ready to accept new commands (on Console window or with the GUI). To check whether the debugger has finished symbol load please click into the Console window and hit the "Enter" key. Once the debugger issues the debugger prompt (idb) it's ready to accept new commands. Intel® JTAG Debugger Installation Guide and Release Notes 16 8.1.14 Memory Writes to Un-Initialized Memory Memory writes to un-initialized or read-only memory (this includes setting software breakpoints or accessing memory mapped registers) can lead to a crash of the target or a loss of the target control. The debugger will not prevent these memory accesses when requested by the user (e.g. changing instructions in the disassembly window). 8.1.15 Setting Software Breakpoints during OS Boot Setting a breakpoint during OS boot without explicitly declaring it to be a hardware breakpoint (for instants by double clicking on a line in the disassembly window) will lead to a loss of target control. The debugger tries to modify memory, by setting a software breakpoint, reads it back and realizes the software breakpoint cannot be set. It will then try to set a hardware breakpoint instead, but the attempted write access to non-initialized memory may already have corrupted the platform The workaround is to force the use of hardware breakpoints for stepping as well by using the debugger script command: set option /hard=on 8.1.16 Flash programming with empty flash parts (CE4200) In order for the flash burning algorithm to execute the target must first be restarted and sitting at the reset vector. This is normally handled by the flash plugin. However, on CE4200 boards that do not have programmed flash parts, the platform’s reset does not function. Therefore, when programming these boards, a manual reset is required. To successfully burn flash on platforms with blank flash, a user should follow these steps: 1) Connect the debugger, and verify that the target is halted 2) Manually reset the target by pressing the reset button on the target 3) Verify that the EIP is not pointing at 0xFFF0 4) Open the flash plugin dialog and resume normal steps to program the flash. 8.1.17 Use of Macraigor* usb2Demon to debug Intel® Atom™ processor CE4xxx based platforms may require board changes On some of the Intel reference platforms for Intel® Atom™ processor CE4100 the RefDes serial resistor R6D20 may need to be replaced with a 0 Ohm resistor. On some of the Intel reference platforms for Intel®Atom(TM) processor CE4200 the RefDes serial resistor R4E5 may need to be replaced with a 0 Ohm resistor. Please refer to the board schematics and the platform design guides for details. 9 Attributions Portions of this software were originally based on the following: Intel® JTAG Debugger Installation Guide and Release Notes 17 - software copyright (c) 1999, IBM Corporation., http://www.ibm.com. - software copyright (c) 1999, Sun Microsystems., http://www.sun.com. - the W3C consortium (http://www.w3c.org) , - the SAX project (http://www.saxproject.org) - voluntary contributions made by Paul Eng on behalf of the Apache Software Foundation that were originally developed at iClick, Inc., software copyright (c) 1999. This product includes updcrc macro, Satchell Evaluations and Chuck Forsberg. Copyright (C) 1986 Stephen Satchell. This product includes software developed by the MX4J project (http://mx4j.sourceforge.net). This product includes ICU 1.8.1 and later. Copyright (c) 1995-2006 International Business Machines Corporation and others. Portions copyright (c) 1997-2007 Cypress Semiconductor Corporation. All rights reserved. This product includes XORP. Copyright (c) 2001-2004 International Computer Science Institute This product includes software licensed from Macraigor Systems, LLC. Copyright (c) 2004-2009, Macraigor Systems LLC. All rights reserved. This product includes software from the book "Linux Device Drivers" by Alessandro Rubini and Jonathan Corbet, published by O'Reilly & Associates. This product includes hashtab.c. Bob Jenkins, 1996. 10 Disclaimer and Legal Information INFORMATION IN THIS DOCUMENT IS PROVIDED IN CONNECTION WITH INTEL PRODUCTS. NO LICENSE, EXPRESS OR IMPLIED, BY ESTOPPEL OR OTHERWISE, TO ANY INTELLECTUAL PROPERTY RIGHTS IS GRANTED BY THIS DOCUMENT. EXCEPT AS PROVIDED IN INTEL'S TERMS AND CONDITIONS OF SALE FOR SUCH PRODUCTS, INTEL ASSUMES NO LIABILITY WHATSOEVER AND INTEL DISCLAIMS ANY EXPRESS OR IMPLIED WARRANTY, RELATING TO SALE AND/OR USE OF INTEL PRODUCTS INCLUDING LIABILITY OR WARRANTIES RELATING TO FITNESS FOR A PARTICULAR Intel® JTAG Debugger Installation Guide and Release Notes 18 PURPOSE, MERCHANTABILITY, OR INFRINGEMENT OF ANY PATENT, COPYRIGHT OR OTHER INTELLECTUAL PROPERTY RIGHT. A "Mission Critical Application" is any application in which failure of the Intel Product could result, directly or indirectly, in personal injury or death. SHOULD YOU PURCHASE OR USE INTEL'S PRODUCTS FOR ANY SUCH MISSION CRITICAL APPLICATION, YOU SHALL INDEMNIFY AND HOLD INTEL AND ITS SUBSIDIARIES, SUBCONTRACTORS AND AFFILIATES, AND THE DIRECTORS, OFFICERS, AND EMPLOYEES OF EACH, HARMLESS AGAINST ALL CLAIMS COSTS, DAMAGES, AND EXPENSES AND REASONABLE ATTORNEYS' FEES ARISING OUT OF, DIRECTLY OR INDIRECTLY, ANY CLAIM OF PRODUCT LIABILITY, PERSONAL INJURY, OR DEATH ARISING IN ANY WAY OUT OF SUCH MISSION CRITICAL APPLICATION, WHETHER OR NOT INTEL OR ITS SUBCONTRACTOR WAS NEGLIGENT IN THE DESIGN, MANUFACTURE, OR WARNING OF THE INTEL PRODUCT OR ANY OF ITS PARTS. Intel may make changes to specifications and product descriptions at any time, without notice. Designers must not rely on the absence or characteristics of any features or instructions marked "reserved" or "undefined". Intel reserves these for future definition and shall have no responsibility whatsoever for conflicts or incompatibilities arising from future changes to them. The information here is subject to change without notice. Do not finalize a design with this information. The products described in this document may contain design defects or errors known as errata which may cause the product to deviate from published specifications. Current characterized errata are available on request. Contact your local Intel sales office or your distributor to obtain the latest specifications and before placing your product order. Copies of documents which have an order number and are referenced in this document, or other Intel literature, may be obtained by calling 1-800-548-4725, or go to: http://www.intel.com/design/literature.htm MPEG-1, MPEG-2, MPEG-4, H.261, H.263, H.264, MP3, DV, VC-1, MJPEG, AC3, AAC, G.711, G.722, G.722.1, G.722.2, AMRWB, Extended AMRWB (AMRWB+), G.167, G.168, G.169, G.723.1, G.726, G.728, G.729, G.729.1, GSM AMR, GSM FR are international standards promoted by ISO, IEC, ITU, ETSI, 3GPP and other organizations. Implementations of these standards, or the standard enabled platforms may require licenses from various entities, including Intel Corporation. BlueMoon, BunnyPeople, Celeron, Celeron Inside, Centrino, Centrino Inside, Cilk, Core Inside, E-GOLD, Flexpipe, i960, Intel, the Intel logo, Intel AppUp, Intel Atom, Intel Atom Inside, Intel Core, Intel Inside, Intel Insider, the Intel Inside logo, Intel NetBurst, Intel NetMerge, Intel NetStructure, Intel SingleDriver, Intel SpeedStep, Intel Sponsors of Tomorrow., the Intel Sponsors of Tomorrow. logo, Intel StrataFlash, Intel vPro, Intel XScale, InTru, the InTru logo, the InTru Inside logo, InTru soundmark, Itanium, Itanium Inside, MCS, MMX, Moblin, Pentium, Pentium Inside, Puma, skoool, the skoool logo, SMARTi, Sound Mark, Stay With It, The Creators Project, The Journey Inside, Thunderbolt, Ultrabook, vPro Inside, VTune, Xeon, Xeon Intel® JTAG Debugger Installation Guide and Release Notes 19 Inside, X-GOLD, XMM, X-PMU and XPOSYS are trademarks of Intel Corporation in the U.S. and/or other countries. * Other names and brands may be claimed as the property of others. Microsoft, Windows, Visual Studio, Visual C++, and the Windows logo are trademarks, or registered trademarks of Microsoft Corporation in the United States and/or other countries. Java is a registered trademark of Oracle and/or its affiliates. Copyright (C) 2008–2012, Intel Corporation. All rights reserved. Intel® JTAG Debugger Installation Guide and Release Notes 20