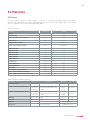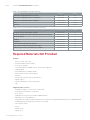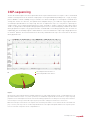
1
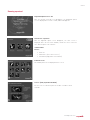
AUTO True MicroChIP KIT Cat. No. C01010140 Version 2 I 03.14 Technical Assistance & Ordering Information Diagenode s.a. BELGIUM | EUROPE Diagenode Inc. USA | NORTH AMERICA LIEGE SCIENCE PARK 400 Morris Avenue, Suite #101 Rue Bois Saint-Jean, 3 Denville, NJ 07834 - USA 4102 Seraing - Belgium Tel: +1 862 209-4680 Tel: +32 4 364 20 50 Fax: +1 862 209-4681 Fax: +32 4 364 20 51 [email protected] [email protected] [email protected] [email protected] For a complete listing of Diagenode’s international distributors, visit: http://www.diagenode.com/en/company/distributors.php For the rest of the world, please contact Diagenode s.a. PAGE 3 Contents Introduction. . . . . . . . . . . . . . . . . . . . . . . . . . . . . . . . . . . . . . . . . . . . . . . . . . . . . . . . . . . . . . . . . . . . . . . . . . . . . . . . . 4 SX-8G IP-Star Automated System for ChIP, MeDIP &MBD. . . . . . . . . . . . . . . . . . . . . . . . . . . . . . . . . . . . . . . . . . 5 Kit Method Overview . . . . . . . . . . . . . . . . . . . . . . . . . . . . . . . . . . . . . . . . . . . . . . . . . . . . . . . . . . . . . . . . . . . . . . . . . 8 Kit Materials. . . . . . . . . . . . . . . . . . . . . . . . . . . . . . . . . . . . . . . . . . . . . . . . . . . . . . . . . . . . . . . . . . . . . . . . . . . . . . . . 9 Kit Content. . . . . . . . . . . . . . . . . . . . . . . . . . . . . . . . . . . . . . . . . . . . . . . . . . . . . . . . . . . . . . . . . . . . . . . . . . . . . . 9 Required Materials Not Provided. . . . . . . . . . . . . . . . . . . . . . . . . . . . . . . . . . . . . . . . . . . . . . . . . . . . . . . . . . . . . . 10 Remarks before starting. . . . . . . . . . . . . . . . . . . . . . . . . . . . . . . . . . . . . . . . . . . . . . . . . . . . . . . . . . . . . . . . . . . . . 11 How to perform Automated ChIP in the SX-8G IP-Star ® Compact . . . . . . . . . . . . . . . . . . . . . . . . . . . . . . . . . . 13 Step 1. Cell collection and DNA-protein crosslinking. . . . . . . . . . . . . . . . . . . . . . . . . . . . . . . . . . . . . . . . . . . 13 Step 2. Cell lysis and chromatin shearing. . . . . . . . . . . . . . . . . . . . . . . . . . . . . . . . . . . . . . . . . . . . . . . . . . . . 13 Running a protocol. . . . . . . . . . . . . . . . . . . . . . . . . . . . . . . . . . . . . . . . . . . . . . . . . . . . . . . . . . . . . . . . . . . . . . . 15 How to perform Automated ChIP in the SX-8G IP-Star ®. . . . . . . . . . . . . . . . . . . . . . . . . . . . . . . . . . . . . . . . . . . 22 Step 1. Cell collection and DNA-protein crosslinking. . . . . . . . . . . . . . . . . . . . . . . . . . . . . . . . . . . . . . . . . . . 23 Step 2. Cell lysis and chromatin shearing. . . . . . . . . . . . . . . . . . . . . . . . . . . . . . . . . . . . . . . . . . . . . . . . . . . . 23 Step 3. Dispense prepared reagents into the corresponding tubes. . . . . . . . . . . . . . . . . . . . . . . . . . . . . . . . 24 Loading and running protocol. . . . . . . . . . . . . . . . . . . . . . . . . . . . . . . . . . . . . . . . . . . . . . . . . . . . . . . . . . . . . . 26 Shutting down the SX-8G IP-Star®. . . . . . . . . . . . . . . . . . . . . . . . . . . . . . . . . . . . . . . . . . . . . . . . . . . . . . . . . . 29 Quantitative PCR & Data analysis . . . . . . . . . . . . . . . . . . . . . . . . . . . . . . . . . . . . . . . . . . . . . . . . . . . . . . . . . . . . . 30 ChIP-seq data analysis recommendations. . . . . . . . . . . . . . . . . . . . . . . . . . . . . . . . . . . . . . . . . . . . . . . . . . . . . . 32 Aditional Protocols. . . . . . . . . . . . . . . . . . . . . . . . . . . . . . . . . . . . . . . . . . . . . . . . . . . . . . . . . . . . . . . . . . . . . . . . . . 34 Troubleshooting Guide. . . . . . . . . . . . . . . . . . . . . . . . . . . . . . . . . . . . . . . . . . . . . . . . . . . . . . . . . . . . . . . . . . . . . . . 36 Technical Assistance. . . . . . . . . . . . . . . . . . . . . . . . . . . . . . . . . . . . . . . . . . . . . . . . . . . . . . . . . . . . . . . . . . . . . . . . 39 Ordering Information. . . . . . . . . . . . . . . . . . . . . . . . . . . . . . . . . . . . . . . . . . . . . . . . . . . . . . . . . . . . . . . . Back Cover www.diagenode.com | PAGE 4 DIAGENODE AUTO TRUE MICROChIP KIT USER MANUAL Introduction The Diagenode SX-8G IP-Star® Automated System automates immunoprecipitation and increases reproducibility Diagenode, the leading provider of complete solutions for epigenetics research, offers a variety of end-to-end systems to streamline DNA methylation and chromatin immunoprecipitation workflows. Central to this full offering are Diagenode’s Automated Systems, simple yet robust automated bench-top instruments that standardize different epigenetic applications (i.e. ChIP, MeDIP or MethylCap). Diagenode designed these automation systems to make ChIP and DNA methylation studies accessible and reproducible, and ensure consistent data in every experiment. Diagenode Automated Systems will produce consistent results from any operator regardless of the day, the experimental run, or the lab. Robust and reproducible results is a major goal of today’s high resolution epigenomic studies. Diagenode Automated Platforms replace the numerous manual, error-prone steps of complex epigenetic applications with a reliable, highly consistent and automated process that requires minimal operator intervention. We empower researchers to simplify the tedious protocols and the complexity of many epigenetic protocols. In addition, Diagenode Automated Systems minimize sample carryover, data variability, and costly errors. The platforms offer full workflow support for epigenetics research, utilizing our complete kits and laboratory-validated protocols to rapidly deliver highquality and consistent data. Auto True Micro ChIP kit Conventional ChIP protocols require high numbers of cells (hundreds of thousands cells at least) limiting the application for ChIP technology to few cell samples. Recently, ChIP assays on smallest amount of cells have been reported. The procedure requires tedious optimization of several reaction conditions to face the increased background observed in ChIP performed with reduced amount of cells. That might consequently lead to considerable time and lab expenditures. To reduce these tedious steps, Diagenode provides the new Auto True MicroChIP kit with optimized reagents and protocol to enable successful ChIP on as few as 10 000 cells. Moreover, the Auto True MicroChIP kit protocol has been thoroughly optimised by Diagenode for ChIP followed by high-throughput sequencing on Illumina® Next-Gen sequencers. To allow the generation of consistent results in ChIP-seq on 10 000 cells, Diagenode has also optimised a library preparation protocol on limited amount of immunoprecipitated DNA. The new MicroPLEX library preparation kit allows the preparation of libraries for sequencing on picogram amount of immunoprecipitated DNA. Thus, association of the Auto True MicroChIP kit with the MicroPLEX library preparation kit provides optimised solutions to perform ChIP-sequencing on limited amount of cells. Customer Feedback Not only does the IP-Star eliminate the problem of human variation associated with producing our samples, it also enables us to produce 1000-2000 ChIP-seq samples per year very reliably. The IP-Star reduces our processing time down from one day of manual work to just one overnight run with only 30 minutes of hands-on work. The IP-Star has made all our ChIPs consistent and the process completely reliable regardless of the operator or the time of day. Dr. John Lambourne, Postdoctorate Researcher at the Innovation Centre, McGill University, Canada. Innovating Epigenetic Solutions PAGE 5 SX-8G IP-Star® and SX-8G IP-Star® Compact Systems for automation of epigenetic applications Diagenode has developed two automated platforms (SX-8G IP-Star® and SX-8G IP-Star® Compact) designed to increase your lab’s productivity, efficiency and experimental reproducibility. The two automated platforms are capable of processing up to 16 samples per cycle. The automated systems processes sheared chromatin (or DNA) to deliver purified DNA ready for qPCR, amplification, microarray and sequencing analysis. Both, the SX-8G IP-Star® and SX-8G IP-star® Compact have an easy-to-use open software that provides you with flexibility to change protocol parameters. Major benefits of Diagenode Automated Platforms SX-8G IP-Star® Compact Sx-8G IP-Star® > High resolution ChIP-seq and MeDIP-seq profiles > Automated library preparation for Next Generation sequencing > Reduces hands on time to just 30 minutes > Reduces variability between operators and labs > Ideal for low sample starting amounts > Compatible with Diagenode Kits (Auto ChIP kit, Auto Histone ChIP-seq kit, Auto Histone ChIP-seq kit, Auto True Micro ChIP Kit, Auto MeDIP kit, Auto MethylCap kit, Auto hMeDIP, Auto IPure kit) > Reduces cross-contamination www.diagenode.com | PAGE 6 DIAGENODE AUTO TRUE MICROChIP KIT USER MANUAL SX-8G IP-Star® Compact SX-8G IP-Star® ChIP-seq, MeDIP-seq, MethylCap-seq, hMeDIP, IPure, Sample preparation, Re-ChIP, MagBisulfite, RNA-IP, Library preparation for NGS platforms. ChIP-seq, MeDIP-seq, MethylCap-seq, hMeDIP, IPure, Sample preparation, Re-ChIP, MagBisulfite, RNA-IP. User interface Intuitive touch screen panel PC Software User friendly Software training not required Software training before use Dispensing Automated dispension of assay reagents Manual dispension of assay reagents Protocol optimization (flexible parameters) Antibody coating (temperature, time, mixing speed) Immunoprecipitation (temperature, time, mixing speed) Washes (temperature, time, mixing speed) Antibody coating (temperature, time) Immunoprecipitation (temperature, time) New protocol development Achievable by Diagenode product specialist Achievable by customer after training Characteristics 750W x 740 D x 610 H | 100 kg 8 Nozzles X-Y-Z axis | 4 – 95°C 1070W x 650 D x 780 H | 130 kg 8 Nozzles X-Y-Z axis | 4-95°C Applications Software Innovating Epigenetic Solutions PAGE 7 Improved reproducibility Our SX-8G IP-Star will increase the immunoprecipitation reproducibility between IPs performed by the same as well as by different operators (see figure 1 and 2 below). Reagents (Antibodies, buffers,...) and sheared chromatin were identical for “ManChIP” and “AutoChIP”. The SX-8G IP-Star Automated system removes variation that can be created by manual handling and allows you to optimize and standardize your assay within a lab. The SX-8G IP-Star is designed to improve the accuracy and the reproducibility of any immunoprecipitiation experiment. Man ChIP SD(IgG)=0,69% SD(H3K9me3)=23,84% Man ChIP SD(IgG)=0,69% SD(H3K9me3)=23,84% SD(IgG)=1,4% SD(H3K9me3)=2,38% C % of input % of input 100,0 80,0 100,0 60,0 80,0 40,0 SD(IgG)=0,94% SD(H3K9me3)=11,36% SD(IgG)=1,4% ChIP 1 ChIP 2 SD(H3K9me3)=2,38% 98,62 B A SD(IgG)=0,94% ChIP 2 SD(H3K9me3)=11,36% ChIP 1 A 50,70 ChIP 1 34,63 SD(IgG)=0,09% SD(H3K9me3)=0,65% D SD(IgG)=0,17% ChIP 1 ChIP 2 SD(H3K9me3)=1,12% ChIP 1 ChIP 2 98,62 B 57,83 ChIP 1 95,26 C 95,26 56,25 ChIP 2 SD(IgG)=0,09% SD(H3K9me3)=0,65% ChIP 1 ChIP 2 D 57,83 50,70 20,0 44,75 43,83 ChIP 2 60,0 40,0 SD(IgG)=0,17% SD(H3K9me3)=1,12% ChIP 1 56,25 ChIP 2 Figure 1: Manual ChIP. Four different operators have each performed two ChIP experiments using H3K9me3 antibody on the genomic region SAT2 (positive locus). 10,000 Hela cells have been used per IP. Reagents and sheared chromatin were identical per assay. The standard deviations between the ChIPs performed by the same operator and between the four different operators are displayed. 44,75 43,83 1,96 34,63 0,63 1,86 1,62 2,06 1,42 1,54 1,42 1,96 0,63 1,86 1,62 2,06 1,42 1,54 1,42 20,0 Auto ChIP SD(IgG)=0,28% SD(H3K9me3)=1,6% Auto ChIP SD(IgG)=0,28% SD(H3K9me3)=1,6% 100,0 90,0 % of input % of input 80,0 100,0 ChIP 2 ChIP 1 70,0 90,0 50,0 70,0 54,34 ChIP 3 54,71 56,25 ChIP 4 57,83 ChIP 2 ChIP 1 40,0 60,0 ChIP 3 54,71 56,25 60,0 80,0 ChIP 4 57,83 54,34 Figure 2: Automated ChIP. Four ChIP experiments using H3K9me3 antibody on the genomic region SAT2 (positive locus) have been performed by the SX8G IP-Star. 10,000 Hela cells have been used per IP. Reagents and sheared chromatin were identical per assay. The standard deviations between the four ChIPs performed by the SX-8G IP-Star are displayed. 30,0 50,0 20,0 40,0 10,0 30,0 20,0 10,0 1,00 1,26 IgG H3K9me3 1,45 H3K9me3 1,00 1,26 IgG IgG H3K9me3 IgG IgG 0,81 H3K9me3 1,45 H3K9me3 IgG IgG H3K9me3 0,81 H3K9me3 IgG H3K9me3 www.diagenode.com | PAGE 8 DIAGENODE AUTO TRUE MICROChIP KIT USER MANUAL Kit Method Overview Chromatin/DNA Shearing Chromatin/DNA Preparation (Bioruptor® Sonication) Increased Reproducibility Chromatin Shearing Optimization kit (Low SDS, Medium SDS and High SDS) STEP 1 Automated & High -Throughput No “Foaming” ST E No Risk of Contamination P 2 Next Gen Sequencing Bioruptor® Pico Auto MethylCap Kit nds-on time 10 min 15 STEP 4 DNA Purification IPure kit (magnetic purification) DNA Isolation Buffer S mi n P TE 6 EP 5m Ha ST 3 Auto hMeDIP Kit in Auto MeDIP Kit m DNA Methylation EP Auto Transcription ChIP kit ST Auto True MicroChIP Kit Auto Histone ChIP-Seq kit 20 Chromatin study in Magnetic IP Size Selection with AMPure® XP beads 5 Library Preparation Illumina® TruSeq™ ChIP NEBNext® ChIP-seq MicroPlex Library Preparation kit (50 pg, multiplex, manual) qPCR Figure 3. Diagenode provides a full suite of automated solutions for ChIP experiments. For Step 1, we offer products to isolate nuclei and chromatin. Step 2 describes reproducible sample shearing with the Bioruptor® product line. In Step 3 and Step 4, the Diagenode IP-Star Compact provides error-free, walk-away automation for all your immunoprecipitation and antibody capture needs. Innovating Epigenetic Solutions PAGE 9 Kit Materials Kit Content The Auto True MicroChIP kit contains reagents to perform 16 Chromatin Immunoprecipitations by using the SX-8G IP-Star and SX-8G IP-Star® Compact Automated System. The kit content is described in Table 1. Upon receipt, store the components at the temperatures indicated in Table 1. Table 1. Kit content Description Quantity Storage Glycine 5 ml 4°C Lysis Buffer tL1 1,1 ml 4°C Protease inhibitor cocktail 200x (PIC) 270 µl -20°C ChIP Buffer tC1 5 ml 4°C Beads Wash Buffer tBW1 15 ml 4°C Protein-A coated magnetic beads 220 µl 4°C Do NOT freeze ! Wash Buffer tW1 5 ml 4°C Wash Buffer tW2 5 ml 4°C Wash Buffer tW3 5 ml 4°C Wash Buffer tW4 5 ml 4°C Elution Buffer tE1 12 ml 4°C Elution Buffer tE2 500 µl 4°C Precipitant tP1 1,2 ml 4°C Co-precipitant tCP1 60 µl -20°C Co-precipitant tCP2 60 µl -20°C Control IgG 10 µl -20°C ChIP-seq grade antibody H3K4me3 10 µg -20°C ChIP-seq grade GAPDH TSS primer pair 50 µl -20°C ChIP-seq grade Myoglobin exon 2 primer pair 50 µl -20°C Table 2. Reagents available separately Description Reference Description Quantity Storage 1 M Sodium butyrate kch-817-001 1 ml -20°C Protein A-coated paramagnetic beads kch-802-220 kch-802-600 kch-802-150 The beads are supplied for 16 IPs; detergent and 0.02% sodium azide included. 220 µl 660 µl 1500 µl 4°C Do not freeze Protein G-coated paramagnetic beads kch-818-220 kch-818-600 kch-818-150 The beads are supplied for 16 IPs; detergent and 0.02% sodium azide included. 220 µl 660 µl 1500 µl 4°C Do not freeze Rabbit IgG kch-504-250 1 µg/µl 250 µl 4°C Mouse IgG kch-819-015 1 µg/µl 15 µl 4°C Antibodies - Primer pairs - - 5µM each (Rv & Fw) www.diagenode.com www.diagenode.com www.diagenode.com | PAGE 10 DIAGENODE AUTO TRUE MICROChIP KIT USER MANUAL Table 3. Kits and Modules available separately Description Reference Quantity Chromatin shearing optimization kit - Low SDS AA-001-0100 1 kit Chromatin shearing optimization kit - Medium SDS AA-002-0100 1 kit Chromatin shearing optimization kit - High SDS AA-003-0100 1 kit IPure AL-100-0100 100 rxns AL-Auto01-0100 100 rxns Reference Quantity Auto IPure Table 4. Plastics and consumables available separately Description 200 μl tube strips (12 tubes/strip) + cap strips WA-001-0080 80 200 μl tube strips (8 tubes/strip) + cap strips for SX-8G IP-Star® Compact WA-002-0120 120 96 well microplates WA-003-0010 10 Tips (box) WC-002-0960 960 Tips (bulk) WC-001-1000 1000 2 ml microtube for SX-8G IP-Star® Compact WA-008-0100 100 Large reagent container for SX-8G IP-Star Compact WA-007-0020 20 Medium reagent container for SX-8G IP-Star® Compact WA-006-0010 10 ® Required Materials Not Provided Reagents • Gloves to wear at all steps • Phosphate buffered saline (PBS) • Cell culture medium • 1 M Sodium butyrate (NaBu) (Cat. No. kch-817-001) (optional) • Trypsin-EDTA • Formaldehyde (fresh MolBiol Grade) • Hank’s balanced salt solution (HBSS) • Ethanol • Phenol/chloroform/isoamyl alcohol (25:24:1) • qPCR reagents • Quant-IT dsDNA HS assay kit (Invitrogen) • TE Equipment and accessories • DiaMag 1.5 magnetic rack (Cat. No. kch-816-015) • Refrigerated centrifuge for 1.5 ml tubes • Cell counter • Eppendorf Low retention 1.5 ml Tubes (VWR 525-0130) • Bioruptor® sonication apparatus • Diagenode 1.5 ml TPX microtubes (optimized for chromatin shearing with Bioruptor) (Cat. No. M-50050/M-50001) • DiaMage Rotator (rotating wheel) (Cat.No. VL-100-0001) • Thermomixer (65°C) • Vortex • Qubit system • qPCR cycler Innovating Epigenetic Solutions PAGE 11 Remarks before starting 1. Cell number and sample manipulation This protocol has been optimized for shearing of 10 000 cells in 100 µl using the Diagenode's Bioruptor® and then subsequent immunoprecipitation on 10 000 cells in 200 µl. Determine the number of IP you will perform and start with fixation of a unique batch of chromatin. For example, if you would like to perform 4 ChIP on the same chromatin, start with fixation of 40 000 cells. Add also an extra chromatin preparation to use for the input. Due to the low amount of starting material it is critical to avoid sample loss throughout the experiment to ensure reproducible and consistent results. Avoid pipetting up and down when adding buffers to samples. It is also recommended to use low retention Eppendorf tubes at each step of the protocol to minimize sample loss. The use of an automated cell counter is also recommended to reduce variations in the amount of the starting cell number. The True MicroChIP kit is also compatible with higher cell numbers. Efficient shearing has been validated with the True MicroChIP kit in a cell range from 10 000 cells to 100 000 cells to allow performing ChIP assay on 10 000 to 100 000 cells. Determine the number of cells you would like to use per ChIP reaction (between 10 000 and 100 000 cells) and perform shearing on that cell number. Fixation can be done on larger cell numbers (scale accordingly volumes of Lysis Buffer tL1 and HBSS to use) and cell lysate will then be split into 100 µl aliquots (corresponding to the number of cells that will be use per IP reaction) before shearing. Then sheared chromatin will be diluted two times with ChIP Buffer tC1 before performing the immunoprecipitation. 2. Shearing optimization and sheared chromatin analysis. Before starting the ChIP, the chromatin should be sheared to fragments in the 100 to 600 bp range. Our kit is optimized for chromatin shearing using the Bioruptor®. We recommend using Diagenode's micro tubes as shearing has been shown to be more efficient and reproducible using these tubes. The shearing conditions mentioned in the protocol are adequate for a variety of cell types. However, you should optimize shearing conditions for your specific cell type and fixation protocol before starting a ChIP. Nevertheless analysis of shearing efficiency is not obvious when working with 10 000 cells due to the low amount of DNA recovered after sonication and crosslinking reversion for subsequent analysis on agarose gels. Therefore at least 6 replicates should be performed to check the shearing efficiency and pooled before loading onto agarose gel. The protocol for shearing analysis is described in “Additional Protocols”. 3. Antibodies The optimal amount of antibody to use per ChIP experiment has to be optimized for each antibody. However, we recommend to start with 0.25 µg of antiboby per IP when performing ChIP on 10 000 cells. The kit contains a negative (IgG) and a positive (H3K4me3) control antibody. We recommend including one IgG negative IP control in each series of ChIP reactions. We also recommend using the positive control ChIP-seq grade H3K4me3 antibody at least once. The kit also contains human qPCR primer pairs for amplification of a positive and negative control target for H3K4me3 (GAPDHTSS and Myoglobin exon 2, respectively). 4. Magnetic beads This kit includes DiaMag Protein A-coated magnetic beads. Make sure the beads do not dry during the procedure as this will result in reduced performance. Keep the beads homogenously in suspension at all times when pipetting. Variation in the amount of beads will lead to lower reproducibility. Do not freeze the beads. www.diagenode.com | PAGE 12 DIAGENODE AUTO TRUE MICROChIP KIT USER MANUAL 5. Quantification Determine the concentration of the IP’d DNA after the ChIP with a highly sensitive method such as the 'Quant-IT dsDNA HS assay kit’ on the Qubit system from Invitrogen. PicoGreen is also suitable but UV spectrophotometric methods such as the NanoDrop are usually not sufficiently sensitive. In most cases it is sufficient to use approximately one quarter of the IP'd material for quantification (when working with 10 000 cells). The expected DNA yield will be dependent on different factors such as the cell type, the quality of the antibody used and the antibody target. 6. Quantitative PCR Before sequencing the samples, we recommend analysing the IP’d DNA by qPCR using at least 1 positive and 1 negative control target. In order to have sufficient DNA left for sequencing, we recommend not using more than one third of the total IP’d DNA for qPCR. You can dilute the DNA (1/4 or more) to perform sufficient PCR reactions. PCR reactions should be performed at least in duplicate although performing them in triplicate is recommended to be able to identify potential outliers. 7. Quantitative PCR data interpretation The efficiency of chromatin immunoprecipitation of particular genomic loci can be expressed as the recovery of that locus calculated as the percentage of the input (the relative amount of immunoprecipitated DNA compared to input DNA). % recovery =100* 2^[(Ct(input) – log(X%)/log2) – Ct(sample)] • Ct (sample) and Ct (input) are threshold values obtained from exponential phase of qPCR for the IP’d DNA sample and input sample respectively • (logx%/log2) accounts for the dilution 1/x of the input. If the amount used for the input was 10% of the amount used for ChIP, the recovery can be calculated as follows: % recovery =100* 2^[(Ct(input) – 3,32) – Ct(sample)] This equation assumes that the PCR is 100% efficient (amplification efficiency = 2). For accurate results the real amplification efficiency, if known, should be used. Criteria to decide whether the sample is good enough for sequencing will be largely target dependant. Therefore, the following are only general guidelines: • the recovery of the positive control target should be at least 5% • the ratio of the positive versus the negative control target should be at least 5 Innovating Epigenetic Solutions ® How to perform Automated ChIP in the SX-8G IP-Star® Compact SX-8G IP-STAR COMPACT PAGE 13 www.diagenode.com | PAGE 14 DIAGENODE AUTO TRUE MICROChIP KIT USER MANUAL How to perform Automated ChIP in the SX-8G IP-Star® Compact Chromatin preparation The protocol below is for use with 10 000 cells per ChIP. To perform ChIP with higher cell numbers refer to « Notes Before Starting ». STEP 1. Cell collection and DNA-protein crosslinking 1. Harvest and count the cells. 2. Add medium to cells to a final volume of 1 ml. 3. Add 27 μl of 36,5% formaldehyde per 1 ml sample. Invert tube and incubate 10 minutes at RT. 4. Add 115 μl of Glycine to the sample. Invert the tube and incubate 5 minutes at RT. 5. Work on ice from this point anwards. 6. Centrifuge at 300 x g for 10 minutes at 4°C. Aspirate the supernatant slowly. 7. Wash cells with 1 ml ice-cold HBSS with inhibitors. Invert the tube to resuspend the cells and centrifuge at 300 x g for 10 minutes at 4°C. 8. Aspirate the supernatant and keep the cell pellet on ice. STEP 2. Cell lysis and chromatin shearing 9. Add 25 μl of complete Lysis Buffer tL1 (Lysis Buffer tL1 + Protease Inhibitor Cocktail - PIC) per 10 000 cells and agitate manually the bottom of the tube to resuspend the cells. 10. Incubate on ice for 5 minutes. 11. Add 75 μl of complete HBSS (HBSS + PIC) per 10 000 cells and sonicate aliquots of 10 000 cells (in 100 μl) for 1 to 5 x 5 cycles of: [30 seconds “ON”, 30 seconds “OFF”] using the Bioruptor®. Optimization is needed depending on the cell type and the Bioruptor® model used. 12. Centrifuge at 14,000 x g for 10 minutes and collect the supernatant. 13. Add 120 μl of complete ChIP Buffer tC1 (ChIP Buffer tC1 + PIC) to 100 μl sheared chromatin. This is the Sheared chromatin mix • Use 200 μl for the IP • Keep 20 μl as input Note: D iluted Chromatin is ready now for the IP. Select automated ChIP IPure 200 μl protocols indirect method in the IP-Star® Compact system. Innovating Epigenetic Solutions PAGE 15 Running a protocol Diagenode Splash Screen – A0 After the software start-up screen disappears, the Diagenode splash screen is displayed for several seconds, and then disappears. Start Screen – Top menu After the Digenode splash screen disappears, the start screen is displayed. This is the first active window; it allows the user to enter into three different parts of the software. USER ACTIONS: Buttons: • P rotocols • Maintenance (for technical service) • Information (Diagenode contact details) Protocols screen All available protocols are displayed on this screen. Screen – [ChIP preparation methods] The user can select between protocols for direct or indirect ChIP methods. www.diagenode.com | PAGE 16 DIAGENODE AUTO TRUE MICROChIP KIT USER MANUAL Screen – [Categories Name] Protocol List After the user presses the “[Categories Name]” button, the “[Categories Name]” appears. When selected the protocol on the protocol list, the “Run” button shall turn executable. Defined protocol name lists Buttons: • T he user presses the “Back” button. The user returns to the “Protocols” screen. • The user presses the “Shutdown” button. The screen shall be changed to “Power Off”. • The user presses the “Run” button. The screen shall be changed to “Sample number”. • Page up the list box. • Page down the list box Screen – Sample number After the user presses the “Run” button, the “Sample number” appears. Buttons: Keyboard Innovating Epigenetic Solutions • T he user presses the “Sample number” Text box. Then screen will be changed to keyboard. • The user presses the “Back” button. The user returns to the “Protocol List” screen. • The user presses the “Next” button. Then screen shall be changed to “Configuration” or “Layout information”. PAGE 17 DIRECT ChIP INDIRECT ChIP Screen – Configuration After the user presses the next button from the “Sample number” screen, the “Configuration” screen appears. Buttons: Keyboard • T he user presses the “Back” button. The user returns to the “Protocol List” screen. • T he user presses the “Next” button. The screen shall be changed to “Layout information”. • T he user presses the “Save Parameter” button. The screen will be changed to “Save Parameter - Confirmation”. - OK – Current parameters shown in the Display View will be stored to the [Protocol].ptd. And, returns the user to the display of the “Configuration” screen. - No – Returns the user to the display of the “Configuration” screen. • T he user presses the Text box. The screen will be changed to Keyboard or Speed list menu. Speed list menu www.diagenode.com | PAGE 18 DIAGENODE AUTO TRUE MICROChIP KIT USER MANUAL Screen – Layout Information After the user presses the “next” button from “Sample number” screen or “Configuration” screen, the “Layout Information” screen appears. Buttons: Layout information • T he user presses the “Back” button. The user returns to the previous screen. • T he user presses the “Next” button. The screen shall be changed to “Set confirmation”. • W hen the user presses a block, that block is magnified on the work surface layout background. The magnified view provides a better display of the correct method setup for that block on the work surface. • B ased on the selected protocol, the user follows the indications provided in the screens to set up correctly the different reagents and samples. Block-Tip Screen – Layout Information Beads Wash Buffer: Beads Wash Buffer tBW1 Elution Buffer: Elution Buffer tE1 IP wash 1: Wash Buffer tW1 IP Wash 2: Wash Buffer tW2 IP wash 3: Wash Buffer tW3 IP wash 4: Wash Buffer tW4 Block-Regent Tip Rack DIRECT ChIP INDIRECT ChIP NOTE: Well 7: Sample=200 μl sheared Chromatin mix Well 6: Ab (in buffer): 100 μl (Bead Wash buffer tBW1 + x μl Ab) Well 3: Magnetic beads = 10 μl Note that Diagenode protein A and proteina G magentic beads have a binding capacity of 3 ug antibody/10 μl beads Innovating Epigenetic Solutions PAGE 19 DIRECT ChIP INDIRECT ChIP Screen – Set confirmation After the user presses the “next” button in the “Layout information” screen, the “Set confirmation” screen appears. At this point, user is expected to be ready to press RUN. Buttons: • The user presses the “Back” button. The user returns to the Layout information screen. • T he user presses the “Run” button. This is the expected action when user gets to this display after reviewing blocks. Runs the protocol. Protocol name Progress Bar Remaining time Current Temperature Value Screen – Running After the user presses the “Run” button in the “Set confirmation” screen, the “Running” screen appears. Buttons: • The user presses the “Stop” button. Then screen shall be changes to “Stop Dialog”. Status screen is preferred as a progress bar that moves across the screen as the step progresses www.diagenode.com | PAGE 20 DIAGENODE AUTO TRUE MICROChIP KIT USER MANUAL Screen – Running status This screen gives informations about the current running step of the protocol. The user can check through this screen the passed and remaining time of the experiment. ChIP - IPure Screen – Elution INPUT is defined as 200 µl protocol 10% INPUT= 20 µl sheared chromatin mix +76 µl Elution buffer tE1 1% INPUT= 2 µl sheared chromatin mix +94 µl Elution buffer tE1 NaCl = Elution Buffer tE2 Screen – Finish/End When the protocol is complete, a window appears telling user the run is over. The screen behind this window should be the Startup screen. When OK is pressed, then the Startup screen appears and the user can immediately begin to remove their sample and prepare the next run. At this point, user is expected to be ready to press RUN. Buttons: Innovating Epigenetic Solutions • T he user presses the “OK” button. Then screen shall be changed to “[Categories Name] Protocol List”. PAGE 21 Screen – Caution ! When the protocol finishes the user can return to the protocol list (screen A.) or warm the peltier block (screen B.) to eliminate possible condensation in the block. A. B. Defined protocol name lists Note 1: RNase treatment by incubating the samples with RNase at 37°C during 30 minutes can be performed after the reverse crosslinking and it is recommended for ChIp-seq experiments. However, Diagenode does not provide RNase. Note 2: DNA purification using MicroChIP DiaPure columns (Cat. No. C03040001) (Alternatively phenol chloform extraction can be performed) 1. In a 1.5 ml microcentrifuge tube, add 5 volumes of ChIP DNA Binding buffer to each volume of sample (100 µl sample + 500 µl buffer). Mix briefly. 2. Transfer mixture to a provided Spin column in a Collection tube. 3. Centrifuge at ≥ 10,000 x g for 30 seconds. Discard the flow-through. 4. Add 200 μl DNA Wash buffer to the column. Centrifuge at ≥ 10,000 x g for 30 seconds. Repeat wash step. 5. Add 6-100 μl DNA Elution buffer directly to the column matrix. Transfer the column to a new 1.5 ml microcentrifuge tube and centrifuge at ≥ 10,000 x g for 30 seconds to elute the DNA. 6. That corresponds to the purified immunoprecipitated DNA. www.diagenode.com | SX-8G IP-STAR ® How to perform Automated ChIP in the SX-8G IP-Star® PAGE 23 How to perform Automated ChIP in the SX-8G IP-Star® The protocol below is for use with 10 000 cells per ChIP. To perform ChIP with higher cell numbers refer to « Notes Before Starting ». STEP 1. Cell collection and DNA-protein crosslinking 1. Harvest and count the cells. 2. Add medium to cells to a final volume of 1 ml. 3. Add 27 μl of 36,5% formaldehyde per 1 ml sample. Invert tube and incubate 10 minutes at RT. 4. Add 115 μl of Glycine to the sample. Invert the tube and incubate 5 minutes at RT. 5. Work on ice from this point anwards. 6. Centrifuge at 300 x g for 10 minutes at 4°C. Aspirate the supernatant slowly. 7. Wash cells with 1 ml ice-cold HBSS with inhibitors. Invert the tube to resuspend the cells and centrifuge at 300x g for 10 minutes at 4°C. 8. Aspirate the supernatant and keep the cell pellet on ice. STEP 2. Cell lysis and chromatin shearing 9. Add 25 μl of complete Lysis Buffer tL1 (Lysis Buffer tL1 + Protease Inhibitor Cocktail - PIC) per 10 000 cells and agitate manually the bottom of the tube to resuspend the cells. 10. Incubate on ice for 5 minutes. 11. Add 75 μl of complete HBSS (HBSS + PIC) per 10 000 cells and sonicate aliquots of 10 000 cells (in 100 μl) for 1 to 5 x 5 cycles of: [30 seconds “ON”, 30 seconds “OFF”] using the Bioruptor®. Optimization is needed depending on the cell type and the Bioruptor (R) model used. 12. Centrifuge at 14,000 x g for 10 minutes and collect the supernatant. 13. Add 120 μl of complete ChIP Buffer tC1 (ChIP Buffer tC1 + PIC) to 100 μl sheared chromatin. This is the Sheared chromatin mix. • Use 200 μl for the IP • Keep 20 μl as input Note: D iluted Chromatin is ready now for the IP. Select automated ChIP IPure 200 μl protocols indirect method in the IP-Star® system. www.diagenode.com | PAGE 24 DIAGENODE AUTO TRUE MICROChIP KIT USER MANUAL STEP 3. Dispense prepared reagents into the corresponding tubes (see picture below) ChIP Direct Method (Ab coating) ith this method the antibody is first coated on the surface of the magnetic beads and after that the bound antibodies W are added to the sheared chromatin. Preparation Antibody Mix Antibody x µl Beads Wash Buffer tBW1 100 - x Antibody coating Elution buffer (Input) ChIP reaction Bead washes 1 2 3 4 5 6 Washes 7 8 9 10 11 Elution buffer (IP) 12 IPure Tube # Description 200 µl protocol 1 Input ** 2 Empty - 3 Magnetic beads* 10 µl 4 Beads Wash Buffer tBW1 100 µl 5 Beads Wash Buffer tBW1 100 µl 6 Antibody Mix 100 µl 7 Sheared Chromatin Mix 200 µl 8 Wash Buffer tW1 150µl 9 Wash Buffer tW2 150µl 10 Wash Buffer tW3 150µl 11 Wash Buffer tW4 12 Elution buffer tE1 + Elution buffer tE2 150µl 96µl + 4µl * This Auto MicroChIP kit has been optimized with Diagenode’s high quality ChIP-grade antibodies and we use very low amounts of antibody per IP. The binding capacity of 10 µl of magnetic beads is ~3 µg of antibody. If you plan to use more than 3 µg of antibody per IP we recommend that the quantity of beads is adjusted accordingly. Please contact us for advice if required. ** The Input will be prepared in well 1 just before the reverse crosslinking step (see instructions in page 19) Innovating Epigenetic Solutions PAGE 25 ChIP Indirect method (IP and beads incubation) With this method the antibodies are incubated first with the sheared chromatin and after that the magnetic beads are added to the immunocomplex. Beads Elution buffer (Input) Chromatin + Ab Bead washes 1 2 3 4 5 6 Washes 7 8 9 10 11 Elution buffer (IP) 12 IPure Tube # Description 200 µl protocol 1 Input ** 2 Empty - 3 Magnetic beads* 10 µl 4 Beads Wash Buffer tBW1 100 µl 5 Beads Wash Buffer tBW1 100 µl 6 Beads Wash Buffer tBW1 100 µl 7 Sheared Chromatin Mix + Antibody 200 µl 8 Wash Buffer tW1 150 µl 9 Wash Buffer tW2 150 µl 10 Wash Buffer tW3 150 µl 11 Wash Buffer tW4 12 Elution buffer tE1 + Elution buffer tE2 150 µl 96µl + 4µl * Auto True MicroChIP kit has been optimized with Diagenode’s high quality ChIP-grade antibodies and we use very low amounts of antibody per IP. The binding capacity of 10 µl of magnetic beads is ~3 µg of antibody. If you plan to use more than 3 µg of antibody per IP we recommend that the quantity of beads is adjusted accordingly. Please contact us for advice if required. ** The Input will be prepared in well 1 just before the reverse crosslinking step (see instructions in page 19) www.diagenode.com | PAGE 26 DIAGENODE AUTO TRUE MICROChIP KIT USER MANUAL Loading and running protocol Be sure that the computer connected to the SX-8G IP-Star never switches to the standby modus. (standby modus has to be inactivated). Standby of the computer will lead to the abort of the protocol. Table 3. Step Time needed Day 1 to 2 hours 1 1 hour 1 1 Cell collection and protein-DNA crosslinking 2 Cell lysis and chromatin shearing 3 Magnetic immunoprecipitation and washes Overnight + 3 hours 1-2 4 DNA decrosslinking and purification 5 hours + overnight 2-3 5 qPCR and data analysis before amplification and sequencing 2 to 3 hours 3 1. Switch on the SX-8G IP Star. The power switch is on the right side of the instrument. 2. Switch on the computer. 3. Start SX-8G V52 software through the following icon 4. Place the prepared tube strip on the right cooling / heating block of the workstation 5. Close the workstation door and lock it using the following icon 11 0 Innovating Epigenetic Solutions PAGE 27 6. Press the following icon Select the protocol of interest. Press start. IMPORTANT NOTE: If the ChIP protocols do not appear in the screen, 1. Open the SX-8V52 directory 2. Open Easy start ini file. Write the directory location of the protocols The Easy start ini file should contain the following information: [EASYSTARTSCREEN] HoldFilePath = C:\Documents and Settings\Desktop\New software protocols\ChIP\Ab Coating for loading ChIP Direct protocols or HoldFilePath = C:\Documents and Settings\Desktop\New software protocols\ChIP\IP and beads incubation for loading ChIP Indirect protocols In red it is indicated the directory location of the ChIP protocols. 3. Start now SX-8G V52 software through SX-8G V52 exe.file 4. Press button for Easy Protocol Start screen and load the protocol of interest Before starting the protocol a start confirmation window will appear. Press OK and the protocol will run. www.diagenode.com | PAGE 28 DIAGENODE AUTO TRUE MICROChIP KIT USER MANUAL Alternatively, incubation time for antibody coating and temperature and incubation time for the IP reaction can be adjusted in an existing protocol by selecting the modify button. The modified protocol can also be saved as new protocol. If running ChIP 16 protocol, setup half of the incubation time. It will incubate half of the time on each block but total time will be correct (For instance, if you want 10h incubation, you have to setup 5h). 7. The program will run through the following steps: magnetic bead washes, IP and IP washes. During protocol the next window will be displayed indicating the step that the protocol is processing. Innovating Epigenetic Solutions PAGE 29 8. ChIP-IPure After the IP washes the following window will be appear. 1. Prepare input as: a) Add 10 % Input to well 1> 20 μl of input + 76 ul Elution Buffer Et1 + 4 ul elution buffer Et2. b) Add 1% Input in well 1> 2 ul input + 94 ul Elution Buffer Et1 + 4 ul Elution Buffer Et2 2. Close the tube strip with the corresponding caps. 3. Press OK. 10 % or 1 % input 1 2 3 4 5 6 7 8 9 10 11 12 4. Reverse crosslinking will be performed at 65°C for 4 hours or O.N. Note: Optional. RNase treatment by incubating the samples with RNase at 37°C during 30 minutes can be performed after the reverse crosslinking. Diagenode does not provide RNase. 5. DNA purification DNA purification using MicroChIP DiaPure columns (Cat. No. C03040001) (Alternatively phenol chloform extraction can be performed) 1. In a 1.5 ml microcentrifuge tube, add 5 volumes of ChIP DNA Binding buffer to each volume of sample (100 µl sample + 500 µl buffer). Mix briefly. 2. Transfer mixture to a provided Spin column in a Collection tube. 3. Centrifuge at ≥ 10,000 x g for 30 seconds. Discard the flow-through. 4. Add 200 μl DNA Wash buffer to the column. Centrifuge at ≥ 10,000 x g for 30 seconds. Repeat wash step. 5. Add 6-100 μl DNA Elution buffer directly to the column matrix. Transfer the column to a new 1.5 ml microcentrifuge tube and centrifuge at ≥ 10,000 x g for 30 seconds to elute the DNA. 6. That corresponds to the purified immunoprecipitated DNA. Shutting down the SX-8G IP-Star® 1. Click on File and press End to close the software correctly. 2. Switch off the computer and its monitor. 3. Switch off the SX-8G IP-Star® Automated System (power switch on the right side). Note: Ensure that the door is closed! www.diagenode.com | PAGE 30 DIAGENODE AUTO TRUE MICROChIP KIT USER MANUAL Quantitative PCR & Data Analysis Before sequencing the samples, we recommend analysing the IP’d DNA by qPCR using at least 1 positive and 1 negative control target. In order to have sufficient DNA left for quantification and sequencing, we recommand to use one third of the total immunoprecipitated DNA for qPCR analysis. 1. Prepare the qPCR mix using SYBR Green master mix. qPCR mix (total volume of 25 μl/reaction): • 1 μl of primer pair (stock: 5 μM each: reverse and forward) • 12.5 μl of master mix (e.g.: iQ SYBR Green supermix) • 5.0 μl of purified diluted DNA sample and purified input(s) • 6.5 μl of water Use the following PCR program: 3 to 10 minutes denaturation step at 95°C (please check carefully supplier’s recommendations about Taq polymerase activation time), followed by 45 cycles of 30 seconds at 95°C, 30 seconds at 60°C and 30 seconds at 72 °C. These conditions may require optimisation depending on the type of Master Mix or qPCR system used. Figure 4. ChIP was performed with IP-Star® Compact on human HeLa cells using the Diagenode antibody H3K4me3 (Cat No. pAb-003-050). Sheared chromatin from 10 000 cells, 0.25 μg of the H3K4me3 antibody and 0.25 μg of the negative IgG control were used per IP. Quantitative PCR was performed with the positive controls GAPDH-TSS and EIF4A2 promoter and the negative controls Myoglobin exon 2 and Sat 2 primer sets. The recovery, expressed as a % of input (the relative amount of immunoprecipitated DNA compared to input DNA after qPCR analysis) is shown in figure 4. Figure 5. Average and error bars of 10 IP’s performed with IP-Star® Compact on Human Hela cells using the Diagenode antibody H3K4me3. Innovating Epigenetic Solutions PAGE 31 ChIP-sequencing The True MicroChIP kit protocol has been optimised for ChIP-seq on an Illumina® Next-Gen sequencer. The recommended amount of starting material for the Illumina® sample prep is 10-20 ng of IP’d DNA. Depending on the cell type, the target protein abundance and the antibody used, you should recover between 500 pg to a few nanograms of IP’DNA when starting with 10 000 cells. Moreover, after quantification and qPCR analysis, you could have only picogram amounts of immunoprecipitated DNA left for sequencing. Therefore an amplification step is necessary before sequencing the sample using a classical library preparation protocol. Thus, to provide a complete solution for ChIP-sequencing on 10 000 cells, Diagenode has developed a library preparation protocol for use with limited quantity of DNA. The MicroPlex library preparation kit requires only picogram amounts of ChIP'd DNA to start library preparation. This kit allows for rapid amplification of few DNA picograms combined with the conversion of DNA into a sequencing-ready preparation for the Illumina® platform. The True MicroChIP kit has been fully validated in ChIP-seq in association with the MicroPlex library preparation kit. A. B. Matched by Broad Institute data set Unatched by Broad Institute data set 98% 2% Figure 2 A: ChIP has been peformed with H3K4me3 antibody, amplification of 17 pg of DNA ChIP’d from 10.000 cells and amplification of 35 pg of DNA ChIP’d from 100.000 cells (control experiment). The IP'd DNA was amplified and transformed into a sequencing-ready preparation for the Illumina plateform with the True MicroPlex library preparation kit. The library was then analysed on an Illumina® Genome Analyzer. Cluster generation and sequencing were performed according to the manufacturer's instructions. B: We observed a perfect match between the top 40% of True MicroChIP peaks and the reference dataset. Based on the NIH Encode project criterion, ChIP-seq results are considered reproducible between an original and reproduced dataset if the top 40% of peaks have at least an 80% overlap ratio with the compared data set. www.diagenode.com | PAGE 32 DIAGENODE AUTO TRUE MICROChIP KIT USER MANUAL ChIP-seq data analysis recommendations To find the captured regions of the genome after the sequencing you must perform a) a reference alignment followed by b) a peak calling, then c) further data analysis (annotation, visualization etc.) to help you find what you are looking for. There are abundant software tools for each task that use different approaches to the same problem; choose your preferred one considering your dataset and scientific goals. The workflows for different sequencers basically differ only in the alignment step, since every sequencer has its own characteristic read set (short or long, fixed or variable length, nucleotide or colour code etc.). a)The built-in aligners with default settings worked very well for our ChIP-seq experiments (e.g. ELAND for Illumina®, TMAP for PGM). If you cannot access them, open source tools are also available; we have positive experience with BWA: http://bio-bwa.sourceforge.net. If you use a multipurpose aligner, do not forget to use settings appropriate to your dataset; please consult with the manual of your software. b)The purpose of the peak calling is to find the enriched regions in the alignment. Take extreme care when you choose and set up your peak caller, since the outcome can vary widely depending on the used software and its settings. We advise you to read the comparative literature and the software manuals to fully understand how a certain program works. One of the key features of your data is the expected length of the enrichment regions. Transcription factors tend to produce short and sharp peaks, while histone marks create broad islands of enrichment. A remarkable tool for sharp peak detection is MACS, while SICER is dedicated to histone marks, and tools like ZINBA can be used for both with decent outcomes. MACS 2 is reported to be better suited for histone marks than previous versions. The availability of the mentioned softwares: • MACS: http://liulab.dfci.harvard.edu/MACS • MACS 2: https://github.com/taoliu/MACS/tree/master/MACS2 • SI CER: http://home.gwu.edu/~wpeng/Software.htm • ZINBA: http://code.google.com/p/zinba We are extensively using MACS 1.4.1 for our experiments. While it is a prominent tool for shorter peaks, sometimes it has difficulties with broader regions, therefore we recommend you to set a wider local peak background and lower the pvalue cutoff if necessary for histone marks. In some cases turning off the local lambda calculation provides a better coverage of broad enrichment islands, though this can result in more false positive peaks detected. Please refer to the MACS manual (http://liulab.dfci.harvard.edu/MACS/README. html) if you are not sure how to tweak the parameters. c)Having your peaks you can start decrypting the epigenetic code. The visual inspection is a common first step, especially if the aim of your experiment was to see if certain genes have certain histone modifications/transcription factors attached, or you want to check some positive/negative control sites for enrichment. Choose the appropriate viewer software according to the output format of your peak caller and your preferences. Annotation is always very useful, since you can identify biological features that are relevant to your peaks, or check if you have the peaks at the expected loci, like H3K4me3 enrichments in the promoter regions of active genes. You can expand the annotation with a gene ontology/pathway analysis of the peak associated genes, thus discovering how your transcription factor/histone modification is involved in the cell’s or the whole organism’s life. Motif search is almost an obligatory analysis for the sequence specific transcription factors, but you may find common motifs among histone modification sites as well, so you can check for example if you indeed have promoter specific motifs in your theoretically promoter specific enrichments. A lot of programs, including peak callers themselves output descriptive statistics of the peaks, measuring for example their enrichment ratios, significances, width, heights, reads in peaks. This characterization helps you better understand your data, which is essential for most applications; a typical example is the comparison of performance of different sample preparation protocols or different sequencer setups. The final recommended analysis type is the comparative analysis. We encourage scientists to use replicates in Innovating Epigenetic Solutions PAGE 33 their experiments; removing peaks that are not common could effectively reduce false positives. You can also use a validated reference set of peaks for comparisons, but that is rarely available. Additionally, if you have other biologically relevant data from your samples, it is wise to compare and integrate them. For example, an RNA-seq dataset is a great source of validation for histone marks that are supposed to regulate gene expression. Recommended free tools for the peak analysis: • IGV (visualization): http://www.broadinstitute.org/igv • UCSC Genome Browser (visualization): http://genome.ucsc.edu • HOMER (motif search, annotation, gene ontology, comparison, statistics): http://biowhat.ucsd.edu/homer • PinkThing (annotation, conservation, comparison, gene ontology, statistics): http://pinkthing.cmbi.ru.nl • GREAT (annotation, statistics): http://great.stanford.edu When analysing ChIP-seq, please always keep an eye on sequencing quality and the performance of the software tools used for analysis. For example with a low quality sequencing with a lot of read errors you will have a hard time finding the peaks you are looking for, despite your excellent IP’d DNA. To control the quality use the vendor supplied software and metrics, like the ones available in the Illumina®® pipeline for GA II. Open source tools can also be used, e.g. the FastQC by Babraham Institute: http://www.bioinformatics.bbsrc.ac.uk/ projects/fastqc. Throughout this chapter we recommended some free tools, because they are accessible for everyone and we have tested most of them. Please note that there are commercial softwares for the same purposes as well, most of them capable of performing several tasks, or even a complete ChIP-seq workflow. Here are a few examples that we know of (but we have not tested them): • CLC Genomics Workbench: http://clcbio.com • Partek Genomics Suite: http://www.partek.com/partekgs • NextGENe: http://www.softgenetics.com/NextGENe.html • Avadis NGS: http://www.avadis-ngs.com • Geneious: http://www.geneious.com/web/geneious/geneious-pro • GenoMiner: http://www.astridbio.com/genominer.html • GenoMatix: http://www.genomatix.de www.diagenode.com | PAGE 34 DIAGENODE AUTO TRUE MICROChIP KIT USER MANUAL Aditional Protocols Sheared chromatin analysis This protocol refers to the Diagenode’s Elution module (Cat. No. mc-magme-002) that can be ordered separately. Reagents not supplied • RNase cocktail (e.g. Ambion, AM 2286 A) • Phenol/chloroform/isoamyl alcohol (25:24:1) • Chloroform/isoamyl alcohol (24:1) • 100% Ethanol • 70% Ethanol • Agarose and TAE buffer • TE 1. Take an aliquot of 100 μl of sheared chromatin and spin the chromatin at 14,000 x g (13,000 rpm) for 10 min at 4°C. Transfer the supernatant to a new tube for chromatin analysis. A minimum of 60 000 cells is needed to be vizualized onto agarose gel. If each 100 µl of sheared chromatin correspond to 10 000 cells, then perform 6 reactions in parallel and pool the DNA pellets obtained at Step 14 during respuspension in TE. 2. Prepare RNase cocktail dilution (e.g. Ambion, AM 2286 A: dilute 1 μl of cocktail in 150 μl of water). 3. Add 2 μl of diluted RNase cocktail to the chromatin. 4. Incubate 1h at 37°C. 5. Prepare the Complete Elution Buffer by mixing thoroughly Buffer D, E and F (Elution module) as follow : Reagents Volume Buffer D 96 µl Buffer E 10 µl Buffer F 4 µl Total volume 110 µl 6. Add 100 μl of the Complete Elution Buffer to each chromatin sample. 7. Mix thoroughly and incubate samples at 65°C for 4 hours (or overnight). 8. Extract DNA once with an equal volume of phenol/chloroform/isoamyl alcohol (25:24:1). Incubate the samples at RT for 10 minutes on a rotating wheel. 9. Centrifuge for 2 minutes at 14,000 xg (13,000 rpm) at RT. Transfer the top aqueous phase into a new 1.5 ml tube. 10.Add 1 volume of chloroform/isoamyl alcohol (24:1). Incubate the samples at RT for 10 minutes on a rotating wheel. 11.Centrifuge for 2 minutes at 14,000 x g (13,000 rpm) at RT. Transfer the top aqueous phase into a new 1.5 ml tube. 12.Precipitate the DNA by adding 20 µl of meDNA precipitant, 5 µl of meDNA co-precipitant and 0.5 ml 100% cold ethanol to the sample. Incubate at -80°C for 30 minutes. Innovating Epigenetic Solutions PAGE 35 13.Centrifuge for 25 minutes at 14,000 x g (13,000 rpm) at 4°C. Carefully remove the supernatant and add 500 μl of icecold 70 % ethanol to the pellet. 14.Centrifuge for 10 minutes at 14,000 x g (13,000 rpm) at 4°C. Carefully remove the supernatant, leave tubes opened for 30 minutes at RT to evaporate the remaining ethanol. 15.Resuspend the pellet in 10 μl of TE. That corresponds to the purified DNA from the sheared chromatin. Several DNA pellets can be pooled at this step to have DNA corresponding to a minimum of 60 000 cells in 10 µl of TE. 16.Run samples (10 μl of DNA + 2 μl of 6x loading dye) in a 1.5% agarose gel along with DNA size marker to visualise shearing efficiency. M 1 Figure 3: Hela cells were fixed with 1% formaldehyde (for 10 minutes at RT). Cell lysis are performed using the Lysis Buffer tL1 of the Diagenode True MicroChIP kit. Samples corresponding to 10 000 cells are sheared during 5 rounds of 5 cycles of 30 seconds “ON” / 30 seconds “OFF” with the Bioruptor® Plus combined with the Bioruptor® Water cooler (Cat No. BioAcc-cool) at HIGH power setting (position H). For optimal results, samples are vortexed before and after performing 5 sonication cycles, followed by a short centrifugation at 4°C. 10 μl of DNA (equivalent to 60 000 cells) are analysed on a 1.5% agarose gel. (lane 1; lane M: 100 bp DNA Molecular Weight Marker) www.diagenode.com | PAGE 36 DIAGENODE AUTO TRUE MICROChIP KIT USER MANUAL Troubleshooting guide Process Crosslinking and fixation Cell lysis Cell type Number of cells required Protocol step Optimize crosslinking time Poor crosslinking causes DNA loss, elevated background, and/or reduced antigen availability in chromatin. Emperically determine optimal crosslinking time for maximal specificity and efficiency of ChIP. The optimal duration of cross-linking varies between cell type and protein of interest. Short crosslinking time (5-10 minutes) may improve shearing efficiency. Crosslinking duration should not exceed 30 minutes or shearing will be inefficient. Assure proper fixation time with formaldehyde Crosslinking may be too weak or too strong without proper fixation time. Optimize fixation step e.g: incubate for 8 minutes at room temperature with high-quality, fresh 1% formaldehyde final concentration (weight/volume). Optimize formaldehyde concentration Lower formaldehyde concentrations (1%weight/volume) may improve shearing efficiency. For some proteins, however, especially those that do not directly bind DNA, this might reduce crosslinking efficiency and thus the yield of precipitated chromatin. Empirically determine the formaldehyde concentration as some antigen epitopes may be more sensitive to formaldehyde. Make sure cells disrupt completely Do not use too many cells per amount of lysis buffer (w/v) so that cells can be completely disrupted. Follow the instructions in the protocol Maintain cold temperature during lysis Perform cell lysis at 4°C (cold room) or on ice. Always keep the samples ice cold during cell lysis and use cold buffers. Prevent protein degradation Add the protease inhibitors to the lysis buffer immediately before use. Determine which cell types have previously been validated with the kit HeLa have been used to validate this magnetic ChIP protocol. Determine number of cells for ChIP The number of cells for ChIP is determined by cell type, protein of interest, and antibodies used. Use chromatin from 10,000 cells per ChIP. (In some cases, chromatin from up to 100,000 cells may be needed). You may need to empirically determine the optimal number. Maintain 4°C temperature during shearing Keep samples cold at 4°C before sonication to maintain sample integrity. Maintain 0⁰C temperature during sonication Maintain temperature of the samples at 4°C to maintain sample integrity. Optimize SDS concentration High % SDS favours better sonication but inhibits immunoselection (optimal range: 0.1% to 1%). Final SDS concentration should not be higher than 0.15 to 0.20% (e.g. If the shearing buffer contains 0.75% SDS, the sheared chromatin is diluted 3.5 to 4.0 fold in the ChIP buffer. Determine amount of sheared chromatin needed for ChIP Most of the sheared chromatin will be used for ChIP and the input control. A small amount will be checked on agarose gel. Dilute the sheared chromatin in ChIP buffer for Immunoselection incubation The sheared chromatin is diluted in complete ChIP Buffer tC1 prior to the immunoselection incubation (see Step 3). Dilute the sheared chromatin 2-fold. Determine cell number Start with 1x10e4 to 1x10e5 cells. Sonication conditions with the Bioruptor tips Shear the samples of chromatin using the Bioruptor® for 1 to 5 runs of cycles of: [30 seconds “ON” / 30 seconds “OFF”] each. These conditions were tested with many mammalian cell lines and were excellent for subsequent ChIP experiments. A troubleshooting guide for Bioruptor-chromatin shearing is available. Chromatin shearing Chromatin shearing with a probe sonicator tips Sonication tips Innovating Epigenetic Solutions Issues and resolutions Probe sonicator: Sonicate each sample for 3 x 30 seconds on ice. Allow 30 seconds pause on ice between each pulsing session. Avoid foaming. Chromatin shearing with Diagenode modules tips You can also use the LowCell ChIP kit for shearing. 25 µl of complete Buffer B are added per 10 000 cells. After 5 minutes lysis on ice, 75 µl of HBSS are added and chromatin is sheared in 100 µl aliquots. Sheared chromatin have to be diluted 2 times with the complete ChIP Buffer tC1 from the True MicroChIP kit (Protocol STEP3 point 21) before adding antibodies. Shearing with other protocols tips When using your own protocol,make sure the shearing buffer contains between 0.75% and 1% SDS, EDTA (1-10 mM) and/or EGTA (0-0.5 mM) with pH 7.6-8.0. The sheared chromatin is to be diluted in the Complete ChIP Buffer tC1 prior to immunoselection. PAGE 37 Load enough DNA on gel Gel analysis of sheared chromatin Use correct agarose concentration Use a 1-1.5% agarose gel. Use correct running buffer concentration and run time 1x TAE or TBE is preferred to 0.5x TAE (which can lead to smears). Run slowly. Make sure beads are in suspension. The provided beads are coated with protein A. Resuspend into a uniform suspension before each use. Use proper bead centrifugation methods Antibody-bead binding Protease inhibitors and other inhibitors Store at 4°C. Do not freeze. Determine antibody binding capacity pAb from rabbit, guinea pig, pig, human IgG. MAb from mouse (IgG2), human (IgG1,2 and 4); and rat (IgG2c). Store protease inhibitors properly Some inhibitors are unstable in solution. The provided P.I. mix should be kept frozen at -20°C and thawed before use. Always use fresh, complete buffers Add protease inhibitor mix to buffers, just before use, in HBSS (Steps 1 and 2), Lysis Buffer tC1 (Step 2), ChIP Buffer tC1 (Step 3). Discard within 24 hours. Add phosphatase inhibitors or others to Lysis Buffer tC1 and ChIP Buffer tC1, if necessary, depending on your research field and protein(s) of interest. Add NaBu for histone ChIPs. Use non-immune IgG in the IP incubation mix. Use the non-immune IgG fraction from the same species the antibodies were produced in as a negative control. Do not add antibody to the IP to serve as a negative control Incubation with uncoated beads could also be used as a negative ChIP control. Use an unblocked antibody and specifically blocked antibody in parallel Determine number of negative controls needed Antibody in IP Use gentle centrifugation (500 x g for 2-3 minutes) as described in the manual protocol. g= (1.118 x 10⁻⁵) x r x rpm2 where r is the radius (www.msu.edu/~venkata1/gforce.htm). It is possible to centrifuge the 1.5 ml tubes at 1,000 – 2,000 g for 20 seconds. Store beads at 4°C Use other inhibitors as needed. Negative ChIP controls Chromatin equivalent to at least 60,000 cells can be be visualized on a gel. Do not use an excessive amount or it will obscure the visualization. The DNA amount to load depends on well size and on the gel size. Use one antibody in ChIP and the same antibody that is blocked with specific peptide. To specifically block one antibody, pre-incubate the antibody with saturating amounts of its epitope specific peptide for about 30 minutes at room temperature before use in the IP incubation mix. If multiple antibodies of the same species are to be used with the same chromatin preparation then a single negative ChIP control is sufficient for all of the antibodies used. Antibody-antigen recognition may affect ChIP Antibody-antigen recognition can be significantly affected by crosslinking resulting in loss of epitope accessibility and/or recognition. Use ChIP-grade antibodies, include controls, and test antibodies before ChIP Use ChIP-grade antibodies or several antibodies directed against different epitopes of the same protein. Verify that the antibodies work directly in IP on fresh cell extracts. When testing new antibodies, include known ChIP-grade antibodies as a positive control. Be aware of the possible cross-reactivity of antibodies. Verify by Western blot analysis the antibody specificity. Antigen affinity purification can be used to increase titer and specificity of polyclonal antibodies. Determine amount of antibody per ChIP Empirically determine amount of target and antibody. Titration of the antibody is recommanded to find the optimal concentration. When working with 10 000 cells, start with 0.1 to 0.5 µg of antibody per ChIP. On higher amounts of cells, use 1-2 µg of purified antibody per ChIP for abundant proteins like histones. Efficient IPs result from optimal ratios between the amount of chromatin and the amount of antibody. More antibody (or less chromatin) can be required with low affinity to antigen or high abundance of target protein (e.g. histones). Insufficient amount of antibody can result in low efficiency of ChIP whereas large excess of antibody might lead to lower specificity. www.diagenode.com | PAGE 38 DIAGENODE AUTO TRUE MICROChIP KIT USER MANUAL Concerns about antibodies binding to protein A or protein G. There is a significant difference in affinity of different types of immunoglobulins to protein A or G. Thererfore, in function of the antibody used for your ChIP, it is recommended to choose either protein A or protein G coated beads. Species Immunglobulli Isotype Human Protein A Protein G IgG1 +++ +++ IgG2 +++ +++ IgG3 - +++ IgG4 +++ +++ IgGM Mouse - + IgGA - + IgG1 IgG2a + +++ +++ +++ IgG2b ++ ++ IgG3 IgGM Rat IgG1 IgG2a IgG2b IgG2c PCR tips Sample storage and freezing Innovating Epigenetic Solutions + + Use anti Mouse IgM + + +++ ++ ++ Chicken All Isotypes Cow All Isotypes ++ ++ +++ Goat All Isotypes Guinea Pig All Isotypes Hamster All Isotypes Horse All Isotypes Pig All Isotypes Rabbit All Isotypes +++ + ++ + +++ ++ ++ ++ +++ ++ ++ - ++ Sheep All Isotypes Immunoselection incubation Use anti Human IgM IgGF Understanding the benefits of using an ultrasonic water bath The use of ultrasonic energy to enhance mass transport across liquid/solid interfaces can dramatically accelerate antigen binding to antibodies, the typical rate-limiting step in ChIP. Buying an ultrasonic bath See http://www.bransonic.com/model_3510.asp: Branson Cat. No. CPN-952316 or Fisher Scientific Cat. No.15-337-22F. Determine water bath specifications Model MT-3510. Capacity: 5.5 liters. Size (LxWxH): 29x15x15 cm. Frequency: 42 kHz. Max power requirement: 130 W. RF-Power: 130 W Optimize the incubation time with an ultrasonic bath Incubation of 15-30 minutes is usually sufficient but may differ depending on antibodytarget kinetics. A longer incubation may be required in some cases. Using the kit without an ultrasonic water bath Without the bath, a long incubation at 4ºC should be used. Depending on the antibody and target, the times of incubation range from 2 to 16 hours and should be determined empirically for each antibody. Optimize primer design Primer length: 18 to 24 nucleotides and primer Tm: 60°C (+/-3.0ºC)/ % GC: 50% (+/-4%) Include negative and positive controls Negative PCR controls: PCR with DNA from samples IP’d with non-immune antibodies (negative IgG). Alternatively, PCR using DNA from ChIP samples and primers specific for a DNA region to which, your antigen of interest is not binding. Positive PCR control: PCR using input DNA. Troubleshoot high Ct values Use more input chromatin in the case of high Ct values. Determine the ratio between Ct(NegCtl) and Ct(Target) The ratio between target IP and negative control IP depends on the antibody used. Minimize high background Keep the antibody binding beads in suspension during the experiment. Check by eye that equal pellets of beads are present in each tube. Washes (step 3) are critical. Using end-point PCR analysis rather than quantitative PCR If gel electrophoresis is used to estimate intensities of PCR products, the relative occupancy of a factor at a locus is the ratio of the intensity of the target IP band to the negative control IP band. Samples can be frozen at several steps of the protocol Snap freeze and thaw on ice (e.g. fixed cell pellets and sheared chromatin). Pellets of formaldehyde fixed cells can be stored at -80˚C for at least a year. Sheared chromatin can be stored at -80ºC for months, depending on the protein of interest. Purified DNA from ChIP and input samples can be stored at -20ºC for months. Avoid multiple freeze/thawing. PAGE 39 Technical Assistance At DIAGENODE we pride ourselves on the quality and availability of our technical support. Our Technical Services Departments are staffed by experienced scientists with extensive practical and theoretical expertise in molecular biology and the use of DIAGENODE products. If you have any questions, or experience any difficulties regarding the SX-8G IPStar or DIAGENODE products in general, do not hesitate to contact us. DIAGENODE customers are a major source of information regarding advanced or specialized uses of our products. This information is helpful to other scientists as well as to the researchers at DIAGENODE. We therefore encourage you to contact us if you have any suggestions about product performance or new applications and techniques. For technical assistance and more information call the DIAGENODE Technical Service Department or contact your local distributor. • [email protected] • [email protected] www.diagenode.com | Ordering information Description Cat. No. (NEW) Cat. No. (OLD) Format SX-8G IP-Star® Compact B03000002 UH-002-0001 1 unit Auto True MicroChIP kit C01010140 / 16 rxns Auto True MicroChIP & MicroPlex Library Prep Package C01010141 / 16 ChIP rxns & 12 library prep rxns MicroPlex Library Preparation kit x12 C05010010 AB-004-0012 12 rxns Auto Histone ChIP-seq kit protein A x16 C01010020 AB-Auto02-A016 16 rxns Auto Histone ChIP-seq kit protein A x100 C01010022 AB-Auto02-A100 100 rxns Auto Histone ChIP-seq kit prowwtein G x16 C01010021 AB-Auto02-G016 16 rxns Auto Histone ChIP-seq kit protein G x100 C01010023 AB-Auto02-G100 100 rxns Auto Transcription ChIP kit protein A x16 C01010030 AB-Auto03-A016 16 rxns Auto Transcription ChIP kit protein A x100 C01010032 AB-Auto03-A100 100 rxns Auto Transcription ChIP kit protein G x16 C01010031 AB-Auto03-G016 16 rxns Auto Transcription ChIP kit protein G x100 C01010033 AB-Auto03-G100 100 rxns Auto ChIP kit protein A x100 C01010011 AB-Auto01-A100 100 rxns Auto ChIP kit protein G x100 C01010013 AB-Auto01-G100 100 rxns Auto MeDIP kit x16 C02010011 AF-Auto01-0016 16 rxns Auto MeDIP kit x100 C02010012 AF-Auto01-0100 100 rxns Auto hMeDIP kit x16 C02010033 AF-Auto02-0016 16 rxns Auto MethylCap x48 C02020011 AF-Auto01-0048 48 rxns Auto IPure kit C03010010 AL-Auto01-0100 100 rxns Visit us at one of Diagenode’s demo sites or discover our Automated Systems by performing some assays with the help of our R&D and Technical Department. diagenode headquarters www.diagenode.com Diagenode s.a. BELGIUM | EUROPE LIEGE SCIENCE PARK Rue Bois Saint-Jean, 3 4102 Seraing - Belgium Tel: +32 4 364 20 50 | Fax: +32 4 364 20 51 [email protected] [email protected] Diagenode Inc. USA | NORTH AMERICA 400 Morris Avenue, Suite #101 Denville, NJ 07834 - USA Tel: +1 862 209-4680 | Fax: +1 862 209-4681 [email protected] [email protected] For a complete listing of Diagenode’s international distributors visit: www.diagenode.com/en/company/distributors.php For rest of the world, please contact Diagenode s.a. © 2013 Diagenode, Inc. All rights reserved. The content of this document cannot be reproduced without prior permission of the authors. Bioruptor and IP-Star are registered trademarks of Diagenode. MA_ATrueMChIP-V2_03_14