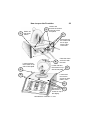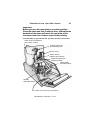
1
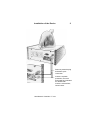
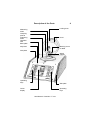
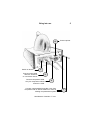
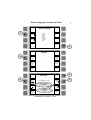
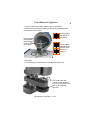
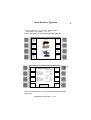
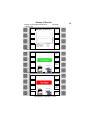
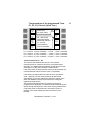
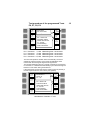
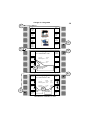
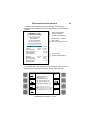
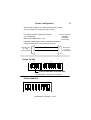
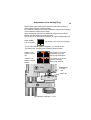
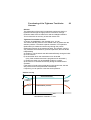
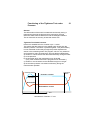
0
Greiner
Leak Tester
Poseidon LT - 100
User - Manual
Lindholts Fourniturehandel ApS.
Sportsvej 6
DK - 8930 Randers NØ
Tlf.: 86 42 52 99 - Fax: 86 41 37 45 - Mail: [email protected]
User Manual- Poseidon LT-100
L
Table of Contents
Page C
ontents
1
Table of Contents
2
Installation of the Device
3
Description of the Parts
4
Description of the Parts
5
Commissioning
6
Select Language, Set Date and Time.
7
Select Language, Set Date and Time.
8
Test a Watch for Tightness
9
Test a Watch for Tightness
10
Results - Display
11
Functions of the Programmed Tests P1,P2,P3,P4,P5
12
Functions of the Programmed Tests P6,P7,P8,P9,
13
Functions of the Programmed Tests P10,P11,P12
14
Changing of Programs
15
Change Program Name
16
Edit Measurement Record Head
17
Printer Configuration idp 460 + CBM 910
18
Printer Configuration idp 562 + idp 3535
19
Adjustment of the Setting Ring
20
Functioning of the Tightness Test Under Vacuum
21
Functioning of the Tightness Test Under Pressure
22
How to open the Poseidon
19
Poseidon is now open like a flower
User Manual- Poseidon LT-100
1
Installation of the Device
2
Remove protective plug
and attach quick
connection
If there is a plastic
protection, remove it
and install the inclouded
air release filter.
If there is a brass filter,
leave it there.
User Manual- Poseidon LT-100
Description of the Parts
Screw to open
the rear side
3
Pin
Hinge
Serial
interface
Typeplate
Screw to open
the rear side
Main On / Off switch
Main fuse box
Fuse 10 A F / 230 V
Mains cable connection
115 / 230 Volt 50 / 60 Hz
Compressor connection
Air release filter
Quick connection
Compressed air
supply
dia. 6 mm
User Manual- Poseidon LT-100
Description of the Parts
4
Locking lever
Measuring
head
Clamping
plate to
measuring
head
Chamber
seal
Base plate
Hood
Keyboard
Blocking screw
for table
Side plate
Watch
support
Operating
keys
Side plate
Colour
display
Operating
keys
User Manual- Poseidon LT-100
Bring into use
5
4.
Connect printer
5.
Switch on device
Connect mains cable
230 Volt 50/ 60 Hz
or 115 Volt 50 / 60 Hz
3.
Connect compressor cable.
Only if a compressor without
reservoir is used.
2.
Connect compressed air hose dia. 6 mm from
compressor with or without reservoir or from an
existing compressed air system
User Manual- Poseidon LT-100
1.
Select Language, Set date and time
6
1. Press « Menue » , « System » , « Language»
P1
Water
resistant
1 Bar
No watch
P2
Water
proof
3 Bar
P3
Water
proof
5 Bar
More
Tests
P5
Quick
test
Dome open
WPL 310
air supply
1.
P4
Water
proof
10 Bar
Menü
Menu
Contrast
2.
System
Contrast
Modify
program
settings
Info
back
System
3.
date/
time
Edit
printout
header
Language
Sprache
Idioma
Jazyk
View
Service
center
Select
printer
back
User Manual- Poseidon LT-100
Select Language, Set date and time
7
Select Language
1.
Select
Select
English
Deutsch
Français
Italiano
Español
Portugès
Svenska
Cesky
Save
2.
System
3.
date /
time
Edit
printout
header
Sprache
Language
Idioma
Jazyk
View
Service
center
Select
printer
back
Date/time
4.
Select
Select
Select
printer
23.04.2004 14.52
Save
Value
Selects a position
horizontal
Value
Changes the
value
back
User Manual- Poseidon LT-100
6.
5.
Test a Watch for Tightness
8
1. Lay the watch on the table rest as shown in the picture.
2. Move with the measuring head by pressing the measuring head
downwards onto the watch.
This indication
will appear on
the display
Press together
the plate with
the measuring
head to move
Up or down.
If one of these
indications will
Appear, read
about it on
Page 19
Information:
For small and very hard watches, used the small watch rest.
The small watch rest
can be moved upwards
by turning the screw to the
stop in the clockwise
direction.
User Manual- Poseidon LT-100
Test a Watch for Tightness
1. Select a test ( P1 , P2 , P3, P4 ), (Quick Test) or
(more tests). See Pages 11, 12 , 13
2. Close the hood. The test will be started automatically.
P1
Water resistant
1 Bar
More
Tests
No watch
P2
Waterproof
3 Bar
P3
Waterproof
5 Bar
P5
Quick
test
Dome open
WPL 310
air
pressure
P4
Waterproof
10 Bar
Menue
P1: Water resistant 1 Bar
Sollwert
Diagram
Istwert
Vacuum:
Measuring time:
Max.compression:
Decompression:
-0.5 bar -0.5 bar
Auto
35 s
2.2 µm
-0.1 µm
Test passed
Pressure:
Measuring time:
Max.compression:
Decompression:
1.0 bar
60 s
1.0 bar
42 s
-32 µm
0.2 µm
Test running
Please wait
STOP
Press the Diagram key if you want to see the measured values
graphically.
User Manual- Poseidon LT-100
9
Display of Results
Display of the measured values in
a grafic form.
P1: Water- resistant 1 Bar
Pressure:
Measuring time:
Max.Compression:
Decompresion:
1.0 bar
42 s
-8.6 µm
0.3 µm
Example
Values
Stop
Display of the Result with a water proof watch.
P1: Waterresistant 1 Bar
Values
Diagram
print
certificate
No watch
Dome open
back
Display of the Result with a leaking watch.
P1: Water resistant 1 Bar
Values
Diagram
No Watch
Dome open
Print
certificate
back
User Manual- Poseidon LT-100
10
Test procedure of the programmed Tests
P1, P2, P3, P4 and ( Quick Test )
P1
Waterresistant
1 Bar
P2
Waterproof
3 Bar
P3
Waterproof
5 Bar
P4
Waterproof
10 Bar
More
Tests
Press here
For more Tests,
P5 – Quick Test
The watch will be
tested with Vacuum
of – 0,5 bar.
The measuring
Time is automatic.
P1 = Vacuum - 0,5 bar / Pressure = 1,0 bar
P2 = Vacuum - 0,7 bar / Pressure = 3,0 bar
P3 = Vacuum - 0,7 bar / Pressure = 5,0 bar
P4 = Vacuum - 0,7 bar / Pressure = 10,0 bar
P5
Quick
test
WPL 310
air
pressure
Menue
/
/
/
/
Time = automatic.
Time = automatic.
Time = automatic.
Time = automatic.
Test Procedure for P1 – P4
The watch is first tested under vacuum. The required
measuring time for a precise conclusion is programmed for
automatic. It is determined automatically by the device through
the behaviour of the watch during the measurement.
If the watch does not pass this test, the test under pressure will
not be performed and the result is (Test 1 not passed).
If the watch has passed the test under vacuum, the result is
(Test 1 passed). The test under pressure will then follow
automatically. The test is started only after the housing of the
watch has stabilised, which means when the housing has
regained its original form.
The required measuring time for a precise conclusion is
programmed for automatic. It is determined automatically by the
device through the behaviour of the watch during measurement.
If the watch does not pass this test, the result is (Test not
passed). If the watch passes this test, the result is (Test
passed).
User Manual- Poseidon LT-100
11
Test procedure of the programmed Tests
P6, P7, P8, P9
P6
1 Bar
60 s
P7
3 Bar
60 s
P8
5 Bar
60 s
P9
10 Bar
60 s
P6 =
P7 =
P8 =
P9 =
Press here
For more Tests,
P5 – Quick Test
The watch will be
tested with Vacuum
of – 0,5 bar.
The measuring
Time is automatic.
Pressure = 1,0 bar
Pressure = 3,0 bar
Pressure = 5,0 bar
Pressure = 10,0 bar
More
Tests
P5
Quick
test
WPL 310
air
pressure
Menu
/ Measuring time = 60 seconds
/ Measuring time = 60 seconds
/ Measuring time = 60 seconds
/ Measuring time = 60 seconds
The test under pressure will then follow automatically. The test is
started only after the housing of the watch has stabilised, which
means when the housing has regained its original form.
The required measuring time for a precise conclusion is programmed
for automatic. It is determined automatically by the device through the
behaviour of the watch during measurement.
If the watch does not pass this test, the result is (Test not passed). If
the watch passes this test, the result is (Test passed).
P10
-0,5 Bar
60 s
P11
- 0,7 Bar
60 s
P12
P9
10 Bar
60 s
Press here to
Return to
P1 – P4
P5 – Quick Test
The watch will be
tested with Vacuum
of – 0,5 bar.
The measuring
Time is automatic.
More
tests
P5
Quick
test
WPL 310
air
pressure
Menu
User Manual- Poseidon LT-100
12
Test procedure of the programmed Tests
P10, P11, P12
P10
- 0,5 Bar
60 s
P11
- 0,7 Bar
60 s
P12
Press here to
Return to
P1 – P4
P5 – Quick Test
The watch will be
tested with Vacuum
of – 0,5 bar.
The measuring
Time is automatic.
More
tests
P5
Quick
test
WPL 310
air
pressure
Menu
P10 = Vacuum – 0,5 bar / Measuring time = 60 seconds
P11 = Vacuum – 0,7 bar / Measuring time = 60 seconds
P12 = Not programmed
Test Procedure for P10 + P11
The watch is tested with the vacuum displayed. The measuring
time is programmed for 60 seconds. If the watch does not pass
this test, the result is (Test not passed). If the watch passes this
test, the result is (Test passed).
Prepare Your Own Test Programs.
Read how you can prepare your own test program on Page 14 and
how you can give your test program its own name on Page
15.
If you again want to install the test values pre-programmed
by the factory, proceed as follows:
-
Press (Menu), then (Change program)
Press (Change program) again
Select the desired Programm.
Now press (Factory settings) and (Save).
The original values are installed again.
User Manual- Poseidon LT-100
13
Change of a Programm
1.
14
Press « Menu »
P1
Waterresistant
1 Bar
More
Tests
No watch
P2
Waterproof
3 Bar
P5
Quick
test
Dome open
P3
Waterproof
5 Bar
WPL 310
air
pressure
P4
Waterproof
10 Bar
2.
Press « System »
3. « change Programm »
Show programm
Change
programm
P1: Waterresistant 1 Bar
Programm
Programm
4.
Vacuum:
Measuringtime
-0.5 bar
Auto
Druck:
measuringtime
1.0 bar
60 s
Select the desired
Programm No.
P 1 – P 12
Change programm
Factorysettings
P1: Water resistant 1 Bar
Select
Select
Actual
-0.5 bar
Vacuum:
Measuring time: Auto
New
-0.7
30 s
1.0 bar
Pressure:
Measuring time: 60 s
5 bar
60 s
5.
Change
Programmname
Select a
Line
3.
back
« Save Programm »
« Name of Programm »
7.
1.
Menue
Changes
The Value
Save
Value
Value
back
User Manual- Poseidon LT-100
6.
Change Program Name
15
You can prepare your own test programs and provide these
programs with their own names.
Change Program-name
Cursor
P9: Waterproof 10 Bar
Cursor
Neuer Programmname
P9
Chrono
Mat 100
caracter
abcdefghijklmnopqrstuvwxyz0123456789,.!?+:;ABCDEFGHIJKLMNOPQRSTUVWXYZ"()@'¡¿€$£¥
New line
ßàáâãäåªæçèéêëìîïñòóôõöøºùúûüýÿ#%&*/<=>[\]^{|}
ÀÁÂÃÄÅÆÇÈÉÊËÌÍÎÏÑÒÓÔÕÖØÙÚÛÜÝ~§©®µ
caracter
Save
clear
caracter
Insert
caracter
back
How to proceed:
Use the « Cursor » to move to the desired
position. Right or left.
Use « Character »
To move to the
desired character.
Right or left.
P 9
Chrono
Mat 100
abcdefghijklmnopqrstuvwxyz0123456789,.!?+:;ABCDEFGHIJKLMNOPQRSTUVWXYZ"()@'¡¿€$£¥
New line
ßàáâãäåªæçèéêëìîïñòóôõöøºùúûüýÿ#%&*/<=>[\]^{|}
ÀÁÂÃÄÅÆÇÈÉÊËÌÍÎÏÑÒÓÔÕÖØÙÚÛÜÝ~§©®µ
Use « Delete character » to delete the
character to the left of the cursor. In this case,
it is the 9
P 9
Chrono
Mat 100
Use « Insert character » to free 1 place to
the left of the cursor for a character.
In this case, it is to the left of n
P 9
Chro no
Mat 100
Use « Save » to save the program name.
P9
Chrono
Mat 100
User Manual- Poseidon LT-100
Edit record head for printout
A record of the measurement can be printed out after every
Measurement, if required. The record (Certificate) is structured as
follows.
******************************
Name of Instrument
Testing programm
(will be printed allways)
POSEIDON LT-100
P3: Water proof 5 Bar
******************************
Greiner vibrograf AG
Weststrasse 69
CH-4900 Langenthal
Tel. 0041 62 923 44 33
Fax: 0041 62 923 18 46
www.greinervibrograf.com
25.04.2004
Vacuum:
Measuring time:
Max.compression:
Decompression:
Test 1 passed
Nominal
Pressure:
Measuring time:
Max.compression:
DFecompression:
Test 2 passed
3.0 bar
60 s
Record head: contains
Max. 6 lines
Max. 42 caracters per line
Current
-0.5 bar -0.5 bar
Auto
35 s
2.2 µm
-0.1 µm
3.0 bar
60 s
-32 µm
0.1 µm
Test protocol
(will be printed allways)
To input the text in the measurement record head, proceed in the
same way as to change the program name. (See Page XX).
Cursor
Cursor
Edit record head
Greiner vibrograf AG
Weststrasse 69
CH-4900 Langenthal
Tel. 0041 62 923 44 33
Fax. 0041 62 923 18 46
www.Greinervibrograf.com
caracter
caracter
abcdefghijklmnopqrstuvwxyz0123456789,.!?+:;ABCDEFGHIJKLMNOPQRSTUVWXYZ"()@'¡¿€$£¥
New line
ßàáâãäåªæçèéêëìîïñòóôõöøºùúûüýÿ#%&*/<=>[\]^{|}
ÀÁÂÃÄÅÆÇÈÉÊËÌÍÎÏÑÒÓÔÕÖØÙÚÛÜÝ~§©®µ
Save
delete
caracter
insert
caracter
back
User Manual- Poseidon LT-100
16
Printer Configuration
17
The link cable contains on o side a D-plug 9 pins ( female )
and on the othe end a D-plug 25 pins ( male ).
RS-232, asynchron
9600 Baud
8 Datenbits
keine Parität
Link cable between Poseidon and Printer
Typ: D-SUB 9/25
DB9 female / DB25 male / 1.8m
Folgende Verbindungen müssen mindestens existieren:
Following connections must exist as a minimum.
Poseidon side
D – plug
9–poles female
3
3
5
7
Printer side
D – plug
25–poles male
Citizen idp 460
DS1
DS2
ON
ON
1
2
3
4
1
2
3
4
5
6
7
8
If the Characters look like this,
Change the position of the micro switch.
Normally leaf it in the position as delivered.
Citizen CBM-910
ON
1
2
3
4
5
6
7
8
User Manual- Poseidon LT-100
18
Citizen iDP-562
SSW1
DSW1
ON
ON
1
2
3
English
Español,
Português,
Ceski
4
5
4
5
4
5
4
5
6
7
8
9
10
Deutsch,
Svenska
Sprache:
Français,
Italiano
Citizen iDP-3535
DS2
DS1
ON
ON
Sprache:
1
1
2
2
3
3
4
4
4
4
4
5
5
5
5
5
6
6
7
7
8
8
English
Español,
Português,
Ceski
User Manual- Poseidon LT-100
Deutsch,
Svenska
Français,
Italiano
Adjustment of the Setting Ring
19
When lowering the measurement head onto the watch, press the
plate together with the measuring head.
As a result, the setting ring moves downwards and limits the lowering
of the measuring head onto the watch.
When the plate is released, the measuring head is blocked in the
position and the setting ring goes upwards.
The sensor pin is now free on the watch. The green display lights up.
Green display
is in the middle.
The sensor pin is in the correct range.
If one of the following pictures appears, you should correct
the setting ring. First drive the measuring head upwards.
Yellow or red
display is at the
top.
The sensor pin is too far
downwards. Turn the
setting ring downwards.
Yellow or red
display is at the
bottom.
The sensor pin is too far
upwards. Turn the
setting ring upwards.
Setting Ring
Platte
Tool size
7 mm
Sensor pin
Uhr
User Manual- Poseidon LT-100
Functioning of the Tightness Test Under
Vacuum
20
General
The deformation of the watch is measured continuously during a
tightness test through the high precision mechanics, the high
resolution state-of-the-art electronics and the intelligent software.
This is done with an accuracy of less than 0.0001 mm.
Tightness Test Under Vacuum.
A vacuum is established in the chamber up to -0.7 bar.
This means that the pressure in the sealed watch is greater than the
ambient pressure. The watch expands outwards. This expansion
(deformation) is measured continuously through the precise
displacement sensor in the measuring head. The program, which is
very extensive and is based on years of experience, will now decide
independently
a) whether or not the watch was deformed sufficiently during the buildup of the vacuum.
b) the time after which the measurement can be ended.
(Only if the measurement time is programmed on automatic. )
c) whether the watch can be classified as tight or not tight.
d) the vacuum is checked continuously during the measurement
operation.
If the watch is found to be not tight during the vacuum test, the test
with pressure will not be performed automatically.
If required, you can perform a new test under pressure.
Vacuum set up
Vacuum-Control
Temperatur
-stabilising
Deformation
Vacuum
release
Deformation control
time
User Manual- Poseidon LT-100
Functioning of the Tightness Test under
Pressure
21
General
The deformation of the watch is measured continuously during a
tightness test through the high precision mechanics, the high
resolution state-of-the-art electronics and the intelligent software.
This is done with an accuracy of less than 0.0001 mm.
Tightness Test Under Pressure.
Pressure is established in the chamber up to + 10 bar.
This means that the pressure in the sealed watch is less than the
ambient pressure. The watch is pressed together. This (deformation)
is now measured continuously through the precise displacement
sensor in the measuring head. The program, which is very extensive
and is based on years of experience, will now decide independently
a) whether or not the watch was deformed sufficiently during the buildup of the pressure.
b) the time after which the measurement can be ended.
(Only if the measurement time is programmed on automatic. )
c) whether or not the watch can be classified as tight or not tight.
d) the chamber pressure is checked continuously during the
measurement operation.
Pressure setup
Temperatur
Pressure
Pressure- control
stabilisation
Deformation
Deformation -control
time
User Manual- Poseidon LT-100
release
How to open the Poseidon
3.
1.
Switch off
the power
switch
22
Loosen and
remove the screws
on the top of the
rear panel.
2.
Disconnect all
the cables and
the air pipe
with the fast
connection.
Loosen half turn
the screws on top
side of side plate.
5.
4.
Close the dome
and lock it with
the lever
Loosen half turn
the screws on top
side of side plate.
6.
5.
Loosen and
remove the
screws on side
plate in front.
6.
Loosen and
7.
remove the 3
screws on top of
the display.
User Manual- Poseidon LT-100
Poseidon is now open like a flower
23
Important:
Important:
Before you turn the main plate in a vertical position,
position,
Close the dome and lock it with the lever.
lever. Otherwise the
backside of the dome will touch the rear plate of the
instrument and it can remove a part of the painting.
painting.
If the Poseidon is opened like this ,you have access of all moduls.
Cable of the controlswitch
dome open or close.
Locking unit for the
dome closing lever
Sensor circuit
Sensor unit for
pressure and vacuum
Cable of sensor from
measuring head.
Power supply
converting circuit
Air inlet
and outlet valves
Main circuit with micro processoor
User Manual- Poseidon LT-100
General Information
Included in delivery:
- 3 m of air pressure hose Ø 4 – 6 mm with with fitting G 1 / 8
for compressor.
- Power connector for compressor
- User manual.
Maintenance:
For cleaning: use a cloth with a soft detergent.
Don‘t use a sharp cleaning solution.
From time to time, clean the sealing ring on the main plate
and the surface byond the dome.
If necessary clean the keyboard and the display.
EG Conformity
-The Poseidon corresponds with the following
EG directives and rules.
89/392/EWG
machinery
EN 292 – 1991
89/336/EWG
EMV
EN 50082-2
disturbing security Industry
EN 55011-1991
disturbing emission
23/73/EWG
Low voltage directives
EN 61010 – 1993
Electrical security
User Manual- Poseidon LT-100
24