1
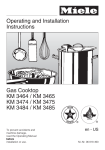
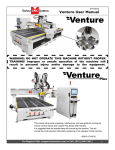
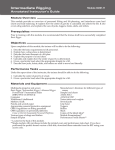
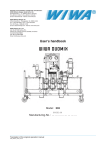
Ph: 1300 LITEMAN www.liteman.com.au LITEMAN AUSTRALIA 3000W ANTI-GLARE HYDRAULIC MOBILE LIGHTING TOWER USER MANUAL 1 INTRODUCTION This manual provides the information necessary for the safe operation and maintenance of the Liteman 3000w Hydraulic Mobile Lighting Tower. Specific operating details and specifications are contained in this publication to familiarise the operator and maintenance personnel with the correct and safe procedures necessary to maintain and operate this equipment. Take time to read this book thoroughly. If you are uncertain about any of the information presented, contact Liteman Australia before operations commence. All instructions in this manual are based on the machine being used under the operating conditions for which it was designed. In reading this manual, particular attention should be given to safety related Cautions and Warnings. Proper use and care will see this machine providing years of reliable service. 2 OPERATORS AND SAFETY MANUAL CONTENTS PAGE General 4 Safety alert symbols 5 Safety precautions 6-7 Preparation for use 8 Delivery and periodic inspection 8 Controls identification 9-11 Machine set up/pack down instructions 12-15 Towing instructions 15 Forklifting machine 16 Craning machine 16 Maintenance 17-22 Parts Listing 23-27 Liteman Aust Product Warranty 28 Warranty Registration Information Form 29 3 GENERAL This section prescribes the proper and safe practices for machine operation. In order to promote proper usage of the machine, it is mandatory that a daily routine be established based on instruction given in this section. A maintenance program shall also be established by a qualified person and should be followed to ensure that the machine is safe to operate. The user/operator of the machine shall not accept operating responsibility until this manual has been read and operation of the machine under the supervision of an experienced and qualified operator has been completed. If there is a question on application and/or operation, Liteman Australia Pty Ltd should be consulted on 1300 LITEMAN(5483626). MODIFICATION OF THE MACHINE WITHOUT PRIOR WRITTEN APPROVAL OF LITEMAN AUSTRALIA PTY LTD IS PROHIBITED. 4 SAFETY ALERT SYMBOLS AND SAFETY SIGNAL WORDS This is the Safety Alert Symbol. It is used to alert you to the potential personal injury hazards. Obey all safety messages that follow this symbol to avoid possible injury or death. INDICATES AN IMMINENTLY HAZARDOUS SITUATION. IF NOT AVOIDED, WILL RESULT IN SERIOUS INJURY OR DEATH. INDICATES A POTENTIALLY HAZARDOUS SITUATION. IF NOT AVOIDED, MAY RESULT IN MINOR OR MODERATE INJURY. IT MAY ALSO ALERT AGAINST UNSAFE PRACTICES. INDICATES A POTENTIALLY HAZARDOUS SITUATION. IF NOT AVOIDED, COULD RESULT IN SERIOUS INJURY OR DEATH. IMPORTANT INDICATES PROCEDURES ESSENTIAL FOR SAFE OPERATION. 5 SAFETY PRECAUTIONS This section outlines the safety precautions applicable to the general use of this product. Throughout the Operator and Safety section of this manual, cautions and warnings are shown in BOLD TYPE. These outline where special care is required when undertaking the various procedures outlined. NOTE: The safety precautions applicable to the service and maintenance of the machine are covered in the SAFETY PRECAUTIONS section of the Service and Maintenance Manual. The user of this machine should read this manual thoroughly to ensure that all operating procedures are clearly understood prior to accepting responsibility. Modifications or alterations to the lighting tower are not permitted without prior written permission of Liteman Australia. Failure to comply with the safety precautions listed here and elsewhere in the manual may result in injury or death. Prior to erecting the mast the operator should ensure that no overhead obstructions are within a 6 –metre radius of the base of the machine. In particular be aware of the dangers of overhead power lines. The following chart is a guide to applicable safe operating distances from overhead power lines. Voltage Minimum Safe Range Distance 0-300V 5 Metres 300-50KV 8 Metres Over 50KV 10 Metres Be aware of the radius of the mast when telescoped out and lowered. Be aware of swaying power lines and swaying tree branches in strong winds. Be familiar with all controls on the machine prior to operation. The machine incorporates powerful hydraulic mechanisms that can cause serious mechanical damage if the machine is allowed to strike external structures such as buildings etc. 6 SAFETY PRECAUTIONS Ensure that the ground is suitable to support the machine, particularly under each of the stabiliser legs. A suitable packing material such as a timber block may be required on soft surfaces to ensure that the stabiliser legs do not sink under the weight. FAILURE OF THE STABILISER LEGS TO SUPPORT THE MACHINE DUE TO SOFT SURFACES COULD CAUSE THE MACHINE TO TIP OVER. NEVER RAISE THE MAST WITHOUT FIRST SETTING ALL 4 STABLISER LEGS AND ENSURING THE LIGHTING TOWER IS LEVEL. The Liteman Australia 3000W Hydraulic Mobile Lighting Tower incorporates an A.C. alternator which generates lethal voltages. Do NOT operate the machine without all safety covers in place covering all wiring and electrical devices. Do not alter the electrical wiring type, size or standard in any way without prior written approval from Liteman Australia. The lighting tower is NOT a mobile generator set. It should only be used for the specific purpose for which it was designed. The Hydraulically operated mast has hazardous crushing/pinch points. Do NOT put arms, hands etc. near the mast structure while it is in operation. The Anti Glare lamp fixtures can get extremely hot during operation. Do NOT operate the lights in easy reach of people’s hands. Even after lights have extinguished, the lamp fixtures can remain hot for up to 20minutes. The mast of the Lighting Tower is designed specifically to carry the 3 lamp lights supplied. Alternative lights should not be adopted unless specifically authorised by Liteman Australia. The mast is not a crane. Do NOT attempt to lift any objects by using the mast and hydraulic system. There are moving parts in and around the engine and alternator area of the unit. Prior to carrying out any maintenance or checks ensure engine is shut down and the mast retracted prior to accessing the engine area. 7 PREPARATION FOR USE Before a new machine is put into operation it must be carefully inspected for any evidence of damage resulting from shipment. Preparation for use of the machine requires good common sense principles ensuring that a run up check together with visual inspections show that everything is working correctly. Prior to use all fluid levels should be checked including Radiator coolant Engine oil level Fuel level. Ensure that all warning decals have been read and understood prior to operating machine. Ensure that machine setup location is clear of any dangers such as roadways with moving traffic, moving machinery etc. Some locations may require that checks are made with regulatory authority such as councils prior to the setup and use of this Lighting Tower. Ensure that machine is securely parked prior to use. Barriers, fences and warning signs may need to be erected to ensure awareness of the unit in operation. DELIVERY AND PERIODIC INSPECTION IMPORTANT This machine requires periodic safety and maintenance inspections by a qualified person. Particular attention is required during checks to ensure that the machine functions as it was designed to. There should be no abnormal noises or vibrations evident during the machine’s operation. In the event that an operator becomes aware of any abnormal operation while using the machine, then it should be shutdown immediately, stowed safely and the problem reported to an authorised person. Please refer to manufactures manual for engine and alternator service requirements. For Lighting Tower MAINTENANCE requirements please refer to pages 17 to 22 in this manual. All machines require both preventative and corrective maintenance throughout their useful service life to maintain the machine in a safe and reliable condition. 8 CONTROLS IDENTIFICATION Engine Control Panel 1. Fuel Gauge 2. Start Control Panel 3. Tilt Mechanism for tilting Light Bar 4. 12v DC Circuit Breaker 15amps 5. Main Circuit Breaker and RCD (240v AC) 6. Individual breaker Switches for lights (240v AC) Hydraulic Controls 1. Hydraulic Power Button—Button to be pressed to operate hydraulic system 2. Mast Raise Lever—Push up or down to raise or lower mast from horizontal to vertical position. 3. Mast Extend Lever—Push up or down to extend or retract mast. Hydraulic Mast Cradle and Lifting Locking Pin Hydraulic Mast Safety Pin 360° Mast Rotation Devise 1. 360° Rotation Grub Screw 2. Mast Rotation Grip Handle 9 CONTROLS IDENTIFICATION Outrigger Stabiliser Legs Light Bar Tie Down Straps Centrepoint Lifting Point and Forklift Pockets Mast Spacers Hydraulic Mast Limit Switch (prevents mast folding down once extended) Hydraulic Mast Limit Switch Bypass Button (To be used only by qualified service personnel) 10 CONTROLS IDENTIFICATION 1. Park Brake 2. Tow Hitch Coupling 3. Reversing Tab 4. Safety Chains PRIOR TO TOWING WITH A VEHICLE ENSURE THE PARK BRAKE IS RELEASED AND THE REVERSING TAB IS DISENGAGED FAILURE TO DO THIS WILL GIVE THE TRAILER NO BRAKES WHILST BEING TOWED. 11 MACHINE SET UP AND PACK DOWN SAFETY CHECKS 1. Pull handbrake on, Chock wheels (if fitted on machine), do a visual inspection over machine. Insure all nuts and bolts are secure, cables, conduit, lines and fittings are in their correct placement and are not worn or broken/missing. If there are any faults present consult with a qualified servicemen do not use machine until all problems are rectified and the machine is fully operational again. Once you are satisfied that your Liteman Lighting Tower is fully operational you may now commence the next stage of operating the lighting tower. OPERATION Use in a well ventilated area! 1. Look up is there any power lines or overhead obstructions nearby? If so relocate machine to a clear air space. 2. Check oil dip stick and add oil if needed. 3. Check coolant level in radiator and overflow bottle. Add coolant if required. 4. Check Fuel level (it is important that the fuel is not run dry as this will cause an air lock in the fuel lines) add diesel if needed. 5. Extend all 4 x Stabiliser Leg outriggers fully until pin locks in, spin stabiliser leg around until vertical and wind handle until foot begins to take weight off the machine, repeat this step for all 4 stabiliser legs. Using the bulls eye level located on drawbar adjust leg height until the light tower is level. 6. Release the 2 x light bar tie down straps located at the back of machine. 7. Pull and turn mast lifting locking pin at the mast cradle. 8. Close fuel and service doors lock if necessary. 9. Turn all electrical switches/breakers to off this will ensure the longevity of the A.C. Alternator. IT IS NOT NECESSARY TO RAISE THE WHEELS OF THE MACHINE OFF THE GROUND WHEN LOWERING THE STABILISER LEGS. WHEN SET UP CORRECTLY THE WHEELS MAY STILL BE IN FIRM CONTACT WITH THE GROUND. USE BUBBLE LEVEL ON THE DRAWBAR TO ASSIST IN LEVELLING. DO NOT USE STABILISER LEGS AS A JACK TO CHANGE A WHEEL , AN APPROPRIATE TROLLY JACK IS REQUIRED. 12 MACHINE SET UP AND PACK DOWN 10. Now start the engine by turning the key or switch to on position, then push the start button. Engine will turn over and start. Release the start button. 11. Now engine is running check all warning lights are off, if a warning light is on, shut down engine and check the specified problem and rectify. OPERATING HYDRAULIC MAST SYSTEM THE NEXT STEPS REFER TO RAISING THE MAST. CHECK AND ENSURE THAT NO OBSTRUCTIONS ARE LOCATED ABOVE THE UNIT TO A HEIGHT OF 10 METRES. REFER ALSO TO SAFE DISTANCES FROM POWER LINES AS DESCRIBED IN SECTION—SAFETY PRECAUTIONS. TO AVOID CRUSHING INJURY KEEP HANDS AND ARMS AWAY FROM MOVING PARTS OF THE MAST 1. Turn the main breaker /RCD switch on (no lights will come on). 2. Using the hydraulic valve lever ‘Raise Mast’ to the up position, now press the circular hydraulic power button, the mast will now lift to the vertical position, check the bottom of the mast near the drawbar to see if the mast safety pin is engaged and is locking the mast in the vertical position. 3. Using the hydraulic valve lever ’Mast Extend’ to the up position, push the circular hydraulic power button, the mast will begin to extend in height hold button in until desired height is reached or mast will not extend any further. TURNING LIGHTS ON 1. Turn on each individual breaker/switch for the desired level of lighting required. 2. Lights may take up to 10mins before maximum light output is reached. 3. Finally, adjust the light bar tilt to the desired angle by operating the tilt toggle switch. Please note: The globes used are a metal halide gas discharge type. If they are switched off and back on again after they have been running they may take up to 15mins to reignite. This is normal for this type of globe. 13 MACHINE SET UP AND PACK DOWN MAST ROTATION 1. Mast can be rotated up to 360°. Start by unscrewing large rotation grub screw, approx. at eye level on mast. 2. Now use mast rotation grip handle to rotate mast so the lights are facing the desired area to be illuminated. 3. Screw the rotation grub screw back in so the mast will stay in desired position. Now secure and lock all doors, your lighting tower produces electricity that could potentially kill or harm any persons not familiar with the operation of this machine. If at any time you are unsure or require advice regarding Liteman Lighting Towers please contact your local Liteman dealer on 1300 LITEMAN. Your LITEMAN Lighting Tower is now in full operation. PACK DOWN AND TURNING OFF 1. Turn all light switches/breakers off (leaving main RCD on). 2. Put hydraulic valve lever ‘Mast extend’ in the down position, you do not need to press circular hydraulic power button, the mast will descend via gravity. 3. While mast is descending unscrew the mast rotation grub screw and rotate the mast back to the original position this can be done by aligning the 2 red lines at the swivel points. Lock in the rotation grub screw by tightening. 4. Using the tilt mechanism tilt the light bar all the way down until the light bar stops. 5. Now that the mast scope has fully descended using the hydraulic valve lever “Mast Raise” in the down position, lean across and release the mast safety pin located at the bottom of the mast where it meets the drawbar and press the circular hydraulic power button, the mast will now fold/lower back down in the stowed away position, ensure the Hydraulic Mast Cradle and Lifting Locking Pin handle locks in properly. 6. Switch off the main breaker /RCD (as good measure you can press the trip test button as an added safety check if you wish). 7. Turn key/switch to off, engine will stop running. 8. Wind up all 4 x Stabiliser legs and slide in all outriggers to the travel position. 9. Attach 2 x Tie down straps from back of machine to light bar, being careful not 14 MACHINE SET UP AND PACK DOWN to touch light heads as they mays still be hot and can cause burns. 10. Your LITEMAN Lighting Tower is now ready for transport, please leave handbrake on until lighting tower is hitched to vehicle. TOWING INSTRUCTIONS PRIOR TO TOWING THE LIGHT TOWER UNIT THIS MANUAL SHOULD BE READ AND UNDERSTOOD. ENSURE THAT THE TOWING VEHICLE AND TOW BAR ARE RATED TO TOW THE TRAILER WEIGHT SAFELY. The standard tow coupling is 2inch 51mm ball type. Others are available as an option on request. The light tower is fitted with mechanical cable brake system. PRIOR TO TOWING Ensure that the machine is shutdown, the mast correctly stowed and all access doors closed. Retract and stow the 4 outriggers and the stabiliser legs are in transport position with all pins engaged to lock all outriggers and stabiliser legs in place. IMPORTANT Ensure 2 x light bar tie down straps are secured firmly. Attach the Light Tower to the towing vehicle and ensure ball coupling is locked in. Swing the jockey wheel into the horizontal stowed position. Attach safety chains. Connect and test the lights at rear of trailer including turn indicators and brake lights. Ensure that the overriding brake lockout lever is swung up to allow brakes to work. NOTE: For reversing the unit the overriding brake lockout lever may need to be swung down to prevent brakes being applied when reversing. Move off slowly and apply the brake gently to test the coupling and brake action. 15 LIFTING MACHINE FORKLIFTING MACHINE WHEN USING A FORKLIFT TO MOVE THE MACHINE ONLY THE FORKLIFT POCKETS LOCATED AT THE TOP OF THE MAST SHOULD BE USED (MAST MUST BE IN STOWED AWAY POSTION WITH THE LIFTING LOCKING PIN ENGAGED). Prior to using a forklift to lift the machine, ensure that the mast is lowered to the stowed position, Lifting Locking Pin must be engaged and the engine generator is shut down. Ensure that only a suitable forklift with adequate capacity is used to lift the machine. When positioning the forklift tines into the forklift pockets, ensure the tines go through far enough to pick up the machine safely. CRANING MACHINE USE ONLY THE CENTREPOINT LIFTING POINT LOCATED AT THE TOP OF THE MAST (MAST MUST BE IN STOWED AWAY POSITION WITH THE LIFTING LOCKING PIN ENGAGED). The mast and the lights must be in the stowed position with the lifting locking pin engaged and the engine generator shut down prior to lifting the machine off the ground. Using suitable lifting equipment attached to the centrepoint lifting hole at the top of mast, proceed to lift the machine as per the instructions provided for the lifting crane. 16 MAINTENANCE PROCEDURES GENERAL A Good maintenance programme is the key to long lighting tower life. Maintenance and service should only be carried out by qualified technicians. Records of this work should be kept to aid the development of an efficient maintenance programme. PREVENTATIVE MAINTENANCE Depending on the application of the lighting tower, requirements for preventative maintenance will vary. The preventative maintenance requirements associated with the engine are detailed in the Engine Manual which should be reviewed in conjunction with this section. Maintenance intervals for the engine may be more frequent then those shown in this section. ALTERNATOR PREVENTATIVE MAINTENANCE There is no routine maintenance required on the alternator, however periodic inspection of the alternator winding condition and periodic cleaning is recommended. ENGINE PREVENTATIVE MAINTENANCE Refer to the Engine Manual provided with this manual for information on regular maintenance required to keep engine operating efficiently. RADIATOR MAINTENANCE Corrosion in the radiator can be a prime cause of failure. This is prompted by air in the water. Always ensure good pipe connections (not leaking) and water circulation in the radiator to keep the system “air free”. Radiators should not be left standing in a partially filled condition. Radiators left partly filled with water will corrode much more rapidly. For an inoperative lighting tower, either drain the radiator completely or ensure that water tank is maintained at full level. Wherever possible, radiators should be filled with distilled or naturally soft water and dosed with suitable corrosion inhibitors. CLEANING The lighting tower employs various electronic controls that may be damaged by liquid spray washing or high pressure washing. Follow these procedures to prevent any damage to these components. EXTERIOR CLEANING Exterior cleaning can be done with any automotive cleaning products. 17 INTERIOR CLEANING Clean the area around the electric controls , generator and thermostats carefully with a piece of damp cloth soaked with detergent. LIGHT FIXTURE CLEANING Clean the light fixtures with any commonly available window cleaner. RADIATOR CLEANING In dusty or dirty conditions the radiator fins can become blocked. This fouling will have an effect on the performance of the radiator. Use an air hose to blow out any debris, then if needed wash out with a low pressure, pressure washer. TRAILER MAINTENANCE HITCH MAINTENANCE Check 1. All moving parts operate smoothly. 2. Positive lock mechanism is functional (if fitted) 3. Lightly grease moving parts TYRES AND WHEELS Regular maintenance of tyres and wheels is essential to safe operation of the machine and to maximise component life. Tyre or wheel failure will result in unsafe towing conditions, increasing risk of machine tip-over. Component damage may also result if problems are not discovered and resolved. Each wheel nut or lug is tightened to 115Nm using a torque wrench or similar and in the correct sequence. AXLE MAINTENANCE When used properly, the torsion suspension requires no maintenance and will provide years of reliable and uninterrupted service. Abuse such as overloading or impact will greatly reduce axle life. Axles mounted with bolts should be checked at least every 10,000km or 6 months and the bolts torqued to 150-165Nm. Inspect stub axle bearings every 3 months: Check 1. Lubrication of bearings 18 2. Check for leaking of grease seals. Replace or regrease as required. WARNING The hub bearing is not protected against water submersion. CHECK BRAKE LININGS Checks must be performed on the wheel brake linings after every 5000km or every 3 months - adjust as necessary. Where continuous travel in hilly regions or high mileage is experienced, earlier inspection and adjustment may be necessary. Check 1. For gouging on any components 2. Thickness on shoes (drum) or pads. Maintain greater than 1mm clearance from rivets; replace if necessary 3. Brake adjustment WARNING Brake adjustment is required if travel of mechanical override shaft is more than 60%. Replace and adjust as required. MAINENANCE AND CARE OF GALVANIZED VEHICLE PARTS The formation of white rust is only a blemish and can never be excluded completely. Procedure recommended to minimize formation of white rust Ensure adequate air circulation during storage Clean the galvanized surfaces with clear water (eg. Steam clean) after journeys in winter Regularly re-grease and/or oil joints and bearing points STABILISER LEGS AND JOCKEY WHEEL MAINTENANCE Inspect the jockey wheel and stabiliser legs every 3 months Check 1. Free operation of the winding mechanism and rotation of the wheel and legs 2. Free rotation of the swivel plate 3. Stabiliser legs operate smoothly 4. Locking pins operate correctly and lock into place 19 5. No slack in mechanism 6. Condition of wheel (if fitted). Ensure no flat spots. 7. Wheel pressure for pneumatic tyres. Replace faulty components as required. Spray all moving parts with silicone based lubricant every 12months. BATTERY MAINTENANCE Batteries supplied are maintenance free—replace battery when it will no longer hold charge. MAST MAINTENANCE Lights to Light bar. Ensure all connecting fasteners are secured. Check condition of spring or star washers and replace as required. WARNING MAST SPACERS MUST BE INSPECTED DAILY TO ENSURE THEY ARE SECURED IN PLACE AS ANY MOVEMENT MAY RESULT IN MAST FAILURE, THAT COULD RESULT IN INJURY OR DEATH. Visually inspect components for evidence of rust or mechanical damage. Repair or replace as required, following site procedures for damaged equipment. HYDRAULICS MAINTENANCE WARNING All repairs must be undertaken by an experienced hydraulics technician. Hydraulic system commonly supplied is of a 240v AC system. Qualified personnel should only check /change electrical connections/components. Hydraulic systems operate under extreme pressure, care should be taken when operating inspecting or maintaining. Daily inspection is required of the following Check hoses for damage or abrasion Check hard lines are in good condition and are free from mechanical damage Check connections for leaks Check connections for security Check all functions to ensure correct operation ELECTRICAL MAINTENANCE WARNING Electrical work must be carried out by appropriately qualified and trained operators. 20 Any damage or malfunction machine must be removed from service immediately. Ensure all damaged or malfunctioning parts of machine are repaired before operating. Exposure to electrical wires or electrical current will result in death or serious injury. Remove all rings, watches and other jewellery. Turn off all power when not needed for testing. Use extreme caution when working with high voltage electrical components. CHECK OPERATION OF RCD Push test button. RCD should trip to off position. If test fails replace RCD. To test RCD function in the circuit, use test point or general purpose outlet provided, using approved equipment. CHECK LIGHT BALLAST Open ballast box: Check for moisture—if found ensure that drains are clear allowing proper ventilation. Visually inspect wires and conductors to ensure no damage has occurred. Follow site procedure for repair of electrical equipment. Check terminal blocks for evidence of overheating (corrosion, discolouration). Replace as required following site procedures for repair of electrical equipment. Check ballast trays are secured and not able to move. CHECK CONDUIT CONDITION Light bar conduits Check each conduit for corrosion and mechanical damage Check security of connections to light fitting Check security of connections to junction boxes Secure as required Mast conduits Check conduit for corrosion and mechanical damage Check security of connections to junction box at light bar Check security of connection to ballast box Check security of connection to hard line conduit on mast Check conduit is clear of crush points and moving parts. Secure as required 21 Control Panel and Alternator Conduit Check conduit for corrosion and mechanical damage Check conduit is clear of sources of heat and moving parts. Secure away from heat sources using appropriate clamps/ties as required. Check security of all gland connections Curly cord Visually inspect for mechanical damage or material degradation. Replace as required following site procedures for repair of electrical equipment. Check security of all gland connections CHECK EARTH CONTINUITY Visually check all circuits for: Security of earth bonding at terminal blocks Discolouration or corrosion of cable at terminal block Mechanical damage of cable LAMP MAINTENANCE WARNING Do not touch lamps/globes with bare hands as oil residue may be left behind decreasing the life of your lamp. Light housing and lamps are extremely hot when in operation. Allow sufficient time to cool down before handling. Inspect lamp housing for damage. Replace as required. Remove lens cover. Inspect for chips, discolouration. Check operation of clamps securing lens cover and rear housing cover Ensure no dust ingress to interior of housing. Inspect seal and replace as required before failure occurs. 22 PARTS LISTING TRAILER 1. Tow hitch 2. Handbrake 3. Jockey wheel 4. Drawbar 5. Stabiliser Leg 6. A - Frame 7. Torsion suspension 8. Outrigger 9. Hub & bearing 10. Wheel 23 PARTS LISTING MAST 1. Circular mast base 2. Swivel spacers (nylon) 3. Mast main boom (1st) 4. Middle mast scope (2nd) 5. Main boom spacers (nylon) 6. Middle mast scope spacers (nylon) 7. Small mast scope (3rd) 8. Bazooka 24 PARTS LISTING LIGHTS 1. Anti Glare Hardshell 2. Light Bar 3. Top 4. Bottom 25 PARTS LISTING HYDRAULIC MAST CRADLE AND LIFTING LOCKING PIN 1. Hydraulic mast cradle 2. Locking pin spring 3. Locking pin adjust screw 4. Locking pin 5. Locking pin handle 26 PARTS LISTING CANOPY 1. Tail lights 11. Door hinges 2. Tail light protector 12. Air inlet vent plate 3. Rear panel 13. Front panel 4. Rear backing plate 14. Fuel door (larger) 5. Side panel 15. Side panel 6. Hydraulic mast cradle 16. Rear inner radiator panel 7. Mudguard 8. Service door 9. Roof 10. Mudguard 27 LITEMAN AUSTRALIA PRODUCT WARRANTY COVERAGE EXCLUSIONS This is a warranty which applies to all Liteman Australia products (herein after referred to as ‘The Company’). These products are warranted against defects in material and workmanship for a period of 12 months from invoice date. This warranty coverage is applicable to the first end user of the machine. The first end user shall be deemed to be a person who places the products in actual use, and any person holding such goods solely for wholesale or retail sale purposes shall not constitute as the first end user. Specific items excluded are: lamps/globes, lamp lenses, capacitors, ballasts, reflectors, filters, belts, fuses, tyres, wearable brake parts, tearable rubber covers and mechanical seals. WARRANTY ON PARTS PROVIDED FREE OF CHARGE Warranty on parts provided free of charge for warrantable repairs is for the unexpired portion of the original warranty period. THE COMPANY’S RESPONSIBILITIES If a defect in material or workmanship arises during the warranty period The Company will, during normal working hours and through The Company’s place of business or other place approved by The Company: AUTHORISED REPAIRER Under the terms of this warranty only The Company or such other agent nominated in writing by The Company are permitted to repair this product. Provide (at The Company’s choice) new, remanufactured or approved repaired parts or assembled components needed to correct the defect. Provide for the cost of service supplies such as coolant, oil and filters which are made unserviceable by the defect. Provide for the repair of any failure which is due to a defect in the workmanship or materials thereof. Repair times will be as per The Company Repair Time Schedule. Provide for authorised repair agent travel costs if the machine is inoperative due to a defect and in the opinion of The Company cannot be reasonably transported to an appropriate service location. This is to a maximum of AUD$500 per approved claim. Note: Items replaced under this warranty become the property of The Company. THE USER’S RESPONSIBILITIES The user is responsible for: LIMITATIONS This warranty does not extend to repairs or replacement due to: The user’s improper installation, maintenance or use or negligent operation. Any operation in excess of The Company’s specified rating and operating parameters. Failures resulting from unauthorised or improperly performed repairs or adjustments to fuel settings or to engine RPM. Failures resulting from continued running after a defect has become apparent. Failures resulting from the user’s delay in making the product available after being notified of a potential product problem. Providing proof of purchase by returning the Warranty Registra- tion form within 1 month of purchase. Installing and operating the product in accordance with The Company’s instructions. Providing suitable proof that the required servicing and maintenance has been performed at the correct hours of running or time intervals. Informing The Company via Email [email protected] of the defect immediately and removing the machine from service immediately until defect is resolved. Accepting The Company’s sole judgement as to whether the faulty part is defective in material or workmanship. Promptly making the product available for repair. Costs to investigate complaints. Clogged fuel pipes/lines, sticking valves or any other damage caused by contaminated or stale fuel. Parts which are scored or broken because and engine was operated with insufficient or contaminated lubricating oil, or an incorrect grade of lubricating oil. Damage or wear caused by dirt which entered the engine because of improper air cleaner maintenance, re-assembly, or the use of a non-original air cleaner element or cartridge. Low battery voltage, under/over speeding, overload or short circuit. This includes damage to wiring, diodes and electrical or electronic devices. Fading of painted surfaces, deterioration of painted surfaces, rubber and plastics, and rusting due to the passage of time. Parts shipping charges. Any costs in excess of the of the purchase price of the product. Completing payment for the purchase of equipment, parts or services relating to the equipment under warranty. Overheating caused by restriction of airflow by foreign material, or by inadequate ventilation. Alterations, repairs or attachments not authorised by The Company in writing. Altered fuel or alternate fuel such as LPG or aviation fuel. The costs associated with transporting the product to and from the place of business of The Company or other source approved by The Company. Other miscellaneous costs including but not limited to travel, mileage, lodging, taxes, telephone calls, overtime etc. except under ‘The Company’s Responsibilities”. Damage due to corrosive environment. Labour costs, except as stated under, ’The Company’s Responsibilities’ including costs incurred in removing and replacing a failed engine or pump. However, consideration will be given in certain circumstances. Premium or overtime labour costs. Failures resulting from unauthorised or improperly performed repairs or adjustments. An accident resulting in damage. Normal wear and tear. THE COMPANY IS NOT RESPONSIBLE FOR INCIDENTAL OR CONSEQUENTIAL DAMAGE. This guarantee is given by The Company and no person is authorised to extend, modify or vary it in any manner whatsoever. All other warranties, conditions or representation, expressed or implied, statutory or otherwise are excluded. This guarantee is solely for the benefit of the purchaser and is not transferable. Any claims under the terms of this guarantee will be subject to our judgement, which will be final and conclusive. However nothing in this guarantee shall be read or applied in any way to limit the generality of the foregoing of all so as to exclude restrict or modify, any right to remedy implied by law whether by statute or otherwise, are hereby excluded to the extent this it is unlawful to do so. 28 Ph: 1300 LITEMAN Warranty Registration Information Dear Customer, Liteman Australia wishes to thank you for your purchase. We are committed to providing our customers with the finest products and product support available in the market today. To do this, we need to update our database with some specific information. Liteman Australia will set the warranty date if you will complete the information below and return this form to us. Warranty Activation To set the warranty start date, please do one of the following: 1. Send the completed form to Liteman Australia with reply paid envelope or 2. Email completed form to [email protected] or request an emailed version. Purchase Date:_______________________ Product Detail: 4000w Manual 4000w Hydraulic 3000w Anti-Glare Balloon Manual 6000w Manual 6000w Hydraulic 3000w Anti-Glare Balloon Hydraulic Serial or Vin Number: ______________________________________________________________________ Your Details: Company Name:___________________________________________________________________________ Address:_____________________________________________________________________ City:_____________________ State:_______ Area Code:______ Country:________________ Telephone Contact Number:________________________________________ Equipment Use: Mining Civil Construction Defence Roads/Traffic Other :_________________________________________________ Signed:_____________________________________ Name Please Print:______________________________ Date:_____________________________________ 29