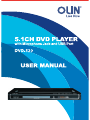
1
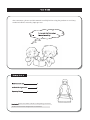
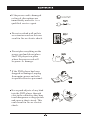
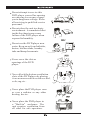
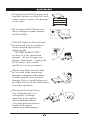
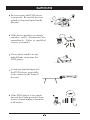
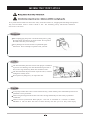
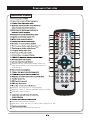
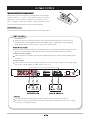
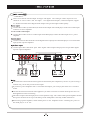
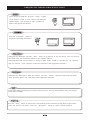
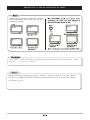
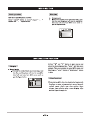
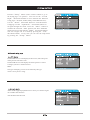
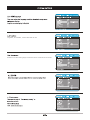
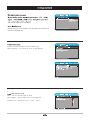
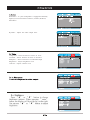
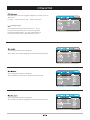
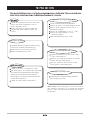
dear customers, please read this manual carefully before using the product to avoid any
undesired effects caused by improper use.
Please check the contents of the package to ensure
all abovementioned components are included.
TABLE OF CONTENTS
Important safety instructions
Advice for everyday use
Hdcd
Flast memory
Frequently used playback functions
Microphone setup
Sharpness
Brightness
Set the tv rype
USB function
Normal photo display
Troubleshooting
Overview of the function of buttons on the
remote control unit
Olin_DVD PLAYER_DVD-520_User_Manual_V.1
If the power cord is damaged
or frayed, discontinue use
immediately and refer to a
qualified service agent
Do not overload wall outlets
or extension cords as this can
result in fire or electric shock.
Do not place anything on the
power cord and do not place
the DVD player in a place
where the power cord will
be prone to damage.
If the DVD player has been
dropped or damaged, unplug
from mains power and refer
to qualified service personnel.
Never push objects of any kind
into the DVD player through
slots in the cabinet as they may
touch dangerous voltage points
and cause a short circuit. This
could result in fire or electric
shock.
Do not attempt to service this
DVD player yourself as opening
or removing covers may expose
you to dangerous voltage. Refer
all servicing to qualified service
personnel.
Do not place the unit in a dusty
environment. Accumulated dust
inside the chassis may cause
failure of the DVD player when
exposed to humidity.
Do not use the DVD player near
water. Keep away from bathtubs,
basins, kitchen sinks, laundry
tubs and damp basements.
Never cover the slots or
openings of the DVD
player.
Never block the bottom ventilation
slots of the DVD player by placing
it on an uneven surface such as a bed,
sofa, rug etc..
Never place the DVD player near
or over a radiator or any other
heating device.
Never place the DVD player in
a “Built in” enclosure. The
unit requires ventilation from
all sides for safe operation.
Do not place the DVD player on an
unstable surface as it may fall and
cause serious injury and damage
to the unit.
Do not place the DVD player in
direct sunlight or under intense
artificial light.
If the DVD player does not work
properly and you are unable to
restore normal operation by
following the
“TROUBLESHOOTING”
section of your instruction
manual, do not attempt any
further adjustment. Unplug the
DVD player and consult
qualified service personnel.
Adjust only those controls that
are covered in the instruction
manual as improper adjustment
of other controls may result in
damage. Refer to qualified service
personnel to restore the DVD player
to normal operation.
During an electrical storm,
any electronic device is
susceptible to damage
caused by power spikes.
We recommend the use
of a surge protected power
board to safeguard
against any such damage.
Do not expose the DVD player
to moisture. Be careful never to
splash or drip any liquid inside
the unit.
If the device produces a strange
sound or smell, discontinue use
immediately. Refer to qualified
service personnel.
Never place candles or any
naked flame on or near the
DVD player.
Avoid any kind of impact to
the DVD player, especially
to the screen on the front of
the unit.
If the DVD player is to remain
unused for a long period of time,
turn it off and unplug it from the
wall socket.
Every effort has been taken to ensure the safety of the unit. However, inappropriate handling and operation
may cause accidents such as electric shock or fire. The following safety instructions should be
observed at all times.
When unplugging the power cord from mains power, grasp
the plug firmly and draw it out of the socket. Never pull on
the cord as this may cause damage.
If any damage has occurred refer to a qualified repair
technician. Never attempt to repair the unit yourself.
The unit should be placed in an area with proper ventilation
to prevent overheating. The unit should not be placed on a
bed, sofa or rug which may block the ventilation slots.
The unit should not be placed near any heat source, in direct
sunlight or in dusty areas.
Do not place anything heavy on top of the unit.
If any object other than a disc is inserted into the tray, switch off the power immediately and refer to
qualified service personnel.
There is high voltage inside the unit. The outer casing should only be removed by a qualified
technician.
There is a laser system inside DVD players. The unit is classified as a CLASS 1 LASER
PRODUCT. Do not allow the laser to shine directly into the eyes as it may cause injury.
ADVICE FOR EVERYDAY USE
If the DVD player is subject to rapid temperature changes,
particularly if the player is brought directly from a cold
environment into a warm one, moisture may condense on
the lens. This is referred to as “sweltering”. This
condensation may cause the player to stop functioning
correctly. Should this occur, put the player in a warm
environment, turn the unit on and wait for the moisture
to evaporate. This may take an hour or two, depending
on the environment. The player should resume normal
functions after the condensation has evaporated.
Clean the cabinet, panel and controls with a soft cloth slightly moistened with a mild detergent solution. Do not use
any type of abrasive pad, scouring powder or solvent such as alcohol or benzene, as these may cause damage to the
surface of the unit.
Deformed
As the disc is rotated at high speeds, it is very dangerous to play a damaged disc. Do not attempt to repair a
broken disc with tape or glue as these may cause damage to the unit. If there is any strange noise or vibration
during playback, if the picture or sound skips or if the picture is distorted, discontinue use immediately
and refer to a qualified technician.
Dolby digital surround sound
The Dolby Digital system developed by Dolby Laboratories and the DTS system developed by Digital Theater
Systems Inc. boast high quality surround sound. This high quality sound can be enjoyed when playing both
DVDs and CDs at home.
The MPEG2 coding format was adopted so that the horizontal definition can be as high as 720p / 1080i. So in
the line-by-line condition, the effect will be excellent.
MPEG-4,
The DVD player supports multi-region and multi-language playback. The parental control feature allows
you to restrict the content that can be viewed on the DVD player.
The player has the following playback functions: Play, fast forward, rewind, slow-motion play, repeat play
and programmed play.
Playback of a DVD can be resumed from the point where it was stopped, which makes it great for
watching movies.
The content of discs can be viewed with the OSD in English.
The DVD player supports various types of video output, including Component, S-Video and standard.
The unit supports 5.1 surround sound via coaxial or optical audio output. The unit can be connected to an
external amplifier to enjoy high quality sound.
The unit is capable of running on a wide range of voltages. It can operate properly on AC110-240V.
This is a reset button which immediately restores the default factory settings.
When viewing pictures or music, the DVD player will create a list so you can scroll through and select the
media you wish to play.
Most DVD's are organized into several chapters, making it more convenient to search for a particular
scene in a film. Some discs may not have chapter numbers.
Some DVD's contain scenes filmed from multiple angles. On these discs the user can view the same content
from different angles.
file
file
Numerical key: select file number ( When you
input password in the state of parental control, ten
stand for zero)
Stop Key :press this key to stop playback.
Step Key :Press to advance playback frame by frame.
Pause Key: Press to pause
Slow Key: Slow motion playback
Mute Key: Press this key to switch audio output on or off.
Open/Close Key: Open/Close the disc tray
DVD-520
Remove the cover for the battery compartment on the remote
control. Insert 2 “AAA” size batteries into the remote,
taking care to orientate the batteries according to the +
and – markings inside the remote. When using the remote
control, point it towards the front of the DVD player.
Connection
Disconnect the unit from mains power before connecting cables.
There are three ways of connecting the video output of the DVD player to a TV. These are
Standard Video (using supplied audio/video signal cable), Component ( using supplied
RGB signal cables) and S- Video ( using an S- Video cable)
Connect the AV cable (Yellow) to the standard video out jack (Yellow) on the back of the DVD
player. Connect the other end of the cable to the standard video jack on the TV (Yellow)
Component Video Output
Connect the three AV cables (green Y, blue Cb/Pb and red Cr/Pr) into the corresponding jacks
on the TV.
S-Video Output
Connect an S-Video cable (available separately) to the S- Video output on the DVD player,
and to the corresponding S-Video input on the TV.
The method of connection depends on the available video connections on your TV.
It is not necessary to use more than one of these connection methods at any one time. Doing
so may have undesired effects.
There are two kinds of audio output: analogue and digital. The analogue audio output has two
channels of stereo sound ( left and right) . The digital audio outputs, coaxial and optical, support
5.1 channel surround sound. Digital audio outputs will give the highest audio quality.
Connect RCA cables (red and white) from the audio output of the DVD player to the stereo audio input
of the TV or stereo amplifier.
5.1 Surround sound output
Connect RCA cables to the 5.1 audio output of the DVD player and to the audio input of a 5.1 power
amplifier.
Connect a coaxial cable from the coaxial digital audio output jack of the DVD player to a coaxial audio
input jack on a power amplifier.
Connect optic fiber cable from optic fiber digital audio output of the player to an optic fiber digital
input on a power amplifier.
The method of connection for audio signal is determined by the components you have. If you are using a
common TV, you can only use the stereo output.
If you have a power amplifier with 5.1 surround sound input, you can enjoy the effect of 5.1 surround
sound.
Consult the instruction manual of the appliance you want to connect to. Switch off the power source to
both appliances before connecting.
The audio output of the DVD player has a wide dynamic range. The volume of the power amplifier should
be kept to a moderate level to prevent damage to the loudspeaker caused by sudden loud noises.
When using a power amplifier, switch off the power to the amplifier before switching the power to
the DVD player on or off.
Before using the DVD player, complete the following steps:
1.Switch on the TV, select the appropriate AV audio input. If the DVD player has been connected via
S- terminal connection, select S-audio mode.
2.If a power amplifier is connected, switch on the power of the amplifier and select “AC-3 or DVD”
3.Connect the DVD player to a power source.
Step 1: Press the “Open/Close” button on the DVD player. The disc tray will slide out automatically.
Step 2: Load a DVD disc into the disc tray. Press the “Open/Close” button. The screen will indicate
“Close.” The player will identify the format of different discs and then indicate this in the upper
left hand corner of the TV screen. The display on the DVD player will also indicate the format of the disc.
After reading the disc, the DVD player will
automatically begin to play:
When playing a DVD, it will go to the title menu of
Previous Chapter / Next Chapter:
Pressing the “PREV” button will play the
the DVD.
previous chapter. Pressing the “NEXT”
When playing a VCD 2.0, it will go to the PBC
button will play the next chapter.
control display.
When playing a CD, it will go to the track listing
Fast Forward / Rewind:
and begin playing the first track.
Press the “FWD” button to search forward
Play:
When the player is stopped or paused, press
the “Play ” button to resume normal playback.
Pause:
During DVD playback, press the “Pause”
button to pause playback.
Stop:
During DVD playback, press the “stop” button
once for memory stop. Pressing the “play”
button will resume playback from the point
where the stop button was pressed. Pressing
the “stop” button a second time will completely
stop playback.
at various speeds ( x2 , x4, x8, x16, x32) Press
the “REV” button to search backward at
various speeds ( x2 , x4 , x8 , x1 6 , x3 2 ) .
FREQUENTLY USED PLAYBACK FUNCTIONS
When the following discs are played, pressing the
“Display” button will display various types
of information.
When a VCD or SVCD is played with PBC on.
Pressing the “Display” button will display the
following information:
When a DVD disc is played
Pressing the “Display” button will display
the following information:
Pressing the “Display” button a second time
will display the following information:
Pressing the “Display” button a second time
will display the following information:
Pressing the “Display” button a third time
will display the following information:
Pressing the “Display” button a fourth time
will display the following information:
Pressing the “Display” button a fifth time
will clear the information from the screen.
Pressing the “Display” button a third time
will clear the information from the screen.
With PBC off
Pressing the “Display” button will display the
following information:
Pressing the “Display” button a second time
will display the following information:
Pressing the “Display” button a third time will
display the following information:
Pressing the “Display” button a fourth time will
display the following information:
Pressing the “Display” button a fifth time will
clear the information from the screen.
You can choose to display subtitles from a list of available languages by pressing the “Subtitle”
button. This operation only works with DVD discs that have this function.
FREQUENTLY USED PLAYBACK FUNCTIONS
When watching a DVD disc, press the “Angle” button
on the remote control to view content from different
camera angles. This function is only available on
DVD' s that support this function.
Press the “Language” button to
display the following information:
When playing a DVD disc, press the “Title” button to go directly to the title menu. You can navigate
this menu using the directional buttons or the numeric buttons.
When playing SVCD or VCD 2.0 discs, it returns to PBC menu. If PBC is switched off, the operation
will not function. ( This operation works only with DVD' s that support this function)
When playing a DVD with a multi- layer menu, press the “Menu” button to return to the root menu.
( This operation works only with DVD' s that support this function)
Change this setting according to the colour format of your TV. Pressing the N/P button will cycle between
NTSC, PAL and Multi.
Press the “Step” button to advance the video frame by frame. Each time the step button is pressed the
video will advance one frame. Press the “play/pause” button to resume normal playback.
FREQUENTLY USED PLAYBACK FUNCTIONS
The four directional buttons ( up, down, left & right) can be used to navigate through the menus.
When playing a disc, a title or chapter can be selected by pressing one of the numeric buttons. You can
use the left & right buttons to select between title and chapter, and use the numeric buttons to input the
desired title/ chapter.
With PBC set to ON, a song can be selected only after returning to the main
menu.
With PBC set to OFF, when a song is playing, pressing numeric button will
select a song directly and begin playing the selected track.
When viewing a video or still image, press the “Zoom” button repeatedly to enlarge the image by 2, 3 or
4 times. Press the zoom button again to return to normal view.
Press “Volume -/+” buttons to adjust the volume level output. Press the “Mute” button to stop
the output of audio signal from the DVD player. Press mute again to resume the output of audio signal.
FREQUENTLY USED PLAYBACK FUNCTIONS
When playing a DVD, pressing the “Repeat”
button repeatedly will cycle between the
following settings:
Press “Slow” button repeatedly to toggle between different speeds of slow motion playback. Choose
between ½, ¼, 1 / 8 and 1 / 1 6 speeds.
When a DVD disc is playing, press the “GOTO” button to skip to a specific chapter.
Use the Left/ Right directional buttons and the numeric keys to select the chapter
you wish to go to.
FREQUENTLY USED PLAYBACK FUNCTIONS
USB function
Insert a compatible USB drive into the USB port on the side of the DVD player. Press the “USB/DVD”
button to select between DVD and USB. Select USB and press the “ENTER” button. Press the
“ENTER” button again to select USB1. Press the “MENU” button to display a list of files
on the USB drive. Use the “Up & Down” directional buttons to select the file you wish to use and
press the “ENTER” button. When a file has finished playing, the next file on the list will be played
automatically. This applies to JPEG images as well as audio and video files stored on the USB drive.
Press the “Setup” button on the remote control to go to
the Setup page ( see picture) . You can use the “Left &
Right” directional buttons to move between the different
setup pages (General, Audio, Dolby, Video & Preference).
Use the “Down” directional button to enter the desired
setup page. Use the “Up & Down” directional buttons to
navigate through the menu. Press the “Enter” button to
confirm the selection. Some options will have submenus
which can be accessed with the “Right” directional button.
You can navigate out of a menu by pressing the “Left”
directional button. At any time you can exit the setup menu
by pressing the “Setup” button.
TV Display
HDCD
1X
Last Memory
Off
TV Display
Normal/PS: The TV will display in full screen, but some parts
of the picture will not be seen.
Normal/LB: the TV will display the entire picture. Use this
setting if you have a widescreen TV.
HDCD
1X
Last Memory
Off
Last Memory
Off
Note:
The type of display you can see is limited by the type
of TV screen you are using.
Some DVDs support playback from a variety of camera angles.
On: Enables this function
Off: Disables this function
TV Display
HDCD
1X
Last Memory
Off
Captions, or subtitles, can be turned on or off.
HDCD
1X
Last Memory
Off
If there is no disc in the player or Screen saver can be set to on or off.
HDCD
1X
Last Memory
Off
HDCD
1X
Last Memory
Off
HDCD
HDCD
1X
Last Memory
Off
Set Last Memory Atate
There are 3 options in Downmix: LT/RT, ST/RT, OFF.
For stereo select - ST/RT
For 5.1 channel surround sound select off
Default is LT/ RT
Select between Large and Small.
Default is “Large”
Select between Large, Small or Off.
Default is “Large”
Select between Large, Small or Off.
Default is “Large”
Select between On or Off. Default is “Off”
SPDIF Output
SPDIF /RAW
SPDIF/PCM
SPDIF setting includes SPDIF OFF, SPDIF/RAW, SPDIF/PCM
Default is SPDIF/RAW
Enable or disable karaoke function in MIC setup.
MIC threshold – set sensitivity level of microphone.
Microphone setup
MIC – can be switched ON or OFF
MIC Volume – Adjust input level of microphone
ECHO Level – Adjust level of “echo” effect
Go To SPDIF Setup Page
Dual Mono – If your loudspeaker is equipped with Dolby
digital you can select between Stereo, L-Mono, R-Mono,
Mix-Mono.
Dynamic – Adjust the audio output ratio.
Component – Select between S-Video or YUV
TV Mode – Select between P-Scan or Interlace
Sharpness – Select between Low/ Medium/ High
Brightness – Adjust brightness level
Contrast - Adjust contrast level
Component
S-video
The DVD player must be stopped completely in order to access
this menu.
TV Type – select between PAL, Multi and NTSC
PAL
Set the TV type
According to the color format of your TV, if you
select the wrong formats, the TV screen may flash
or become black & white. For more information on
color format refer to the user manual for your TV.
Select Language (Default is English)
The number of available languages is determined by the DVD.
Italian
Select Language (Default is English)
The availability of subtitles is determined by the DVD.
Italian
Select Language (Default is English)
The number of available languages is determined by the DVD.
Italian
Set parental control level (1-8) Password must be entered in
order to use this setting. Users can restrict content viewed on
the DVD player according to rating.
ENG
ENG
ENG
Password – change password
0000
ENG
ENG
0000
You are required to key in the old password ( 0000 )
ENG
change
before creating a new one.
change password
Default - reset
This function resets all values on the DVD player to the
default settings.
ENG
ENG
ENG
5.1 soundtracks not playing properly
Check all connections between the DVD
player and other components such as
power amplifier or TV.
Ensure all plugs are firmly connected.
Confirm the audio output settings are
correct.
Check connections to all loudspeakers.
Ensure the Disc is in Dolby Digital format.
Ensure Audio Output has been set to 5. 1
Soundtrack Output.
Ensure the Loudspeaker is set to “On”
Ensure the Audio output is set to
“Analogue Output”
Make sure Karaoke is set to “Off”
Disc does not play
Check that the disc has been loaded correctly
into the tray (with the label facing up)
Ensure there is only one disc in the tray.
Make sure that the disc is clean.
Remote control unit does not work
Replace the batteries in the remote with
2 new AAA batteries.
Remove any obstacles between the remote
control and the DVD player.
Aim the remote at the receiver on the
front panel of the DVD player.
Check if the disc is scratched or dirty.
The DVD player is controlled by a microchip.
If you notice any unusual behaviour during
playback, switch off the unit to allow the
microchip to reset. Wait 10 seconds and then
switch the unit back on.
Check all video output connections.
Sound only (No picture)
Ensure the Video output settings match the
picture input of your TV.
*Please note: When the power is turned on with a
disc already in the drive, it is normal for the DVD
player to take a few moments to start up as it checks
the disc info.
NTSC/PAL/multi
AC
This manual contains information protected by copyright law.
No part of this document may be used or reproduced in any form or by any means, or stored in a database/
retrieval system without prior written permission from us.
The information of this manual is based on the current version of the product.
We reserve the right to alter the content without prior notice.
All brand names in this manual are the property of their respective owners.