1
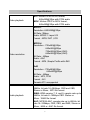
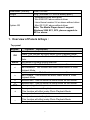
DM120 OPERATION
INSTRUCTIONS
Dear Customer,
Thank you for purchasing Olin DM120 Media
Player.
To kick start of using it, you need to:
1. Fully charge the battery.
2. Install the driver if you are a Windows 98 user.
3. Make sure the HDD has already been
partitioned or formatted as FAT system (Refer
to 2-4, 2-5).
4. Keep the Media Player plugging into the AC
adapter/charger while it connects to your
computer.
2
Index
1. Overview of Panels & Keys………………………………………….7
2. Use the Media Player………………………………………………..9
3. Settings for your Media Player……………………………………..12
4. Photo Play Mode…………………………………………………….14
5. Video Play Mode…………………………………………………….16
6. Music Play Mode…………………………………………………….17
7. Recording…………………………………………………………… 19
8. File and Folder Operations…………………………………………20
9. Transfer photos from memory cards ……………………...………20
10. Battery Recharge…………………………………………………..22
11. If an erroneous display / operation occurs….….……….……….22
12. Take care of the Hard Drive and unit...……………….………….22
13. Troubleshooting…………………………………………………….23
3
CAUTION
Please be aware that you should not try to repair the system by yourself
under any circumstances, as this will invalidate the warranty. Please do not
open the system as there is a risk of danger.
IMPORTANT WARRANTY INFORMATION
y To reduce the risk of danger, please do not expose this equipment to
rain, any liquid or humid environment.
y The repair and replacement service will not apply to the products which
are misused or repaired without authorization.
y Any replacement of faulty product may be either new or looks like new,
provided it works properly.
y We are not responsible for any data stored on the returned products,
please backup all data before you send back the unit.
y The limited warranty for accessories (included battery) is only valid for 6
months from the date of purchasing.
y All OUT OF WARRANTY repairs maybe subject to a normal repair fee.
Please contact your dealer for details.
Accessories
y
y
y
y
y
y
y
y
y
Main unit
Earphone
A/V cables
USB cable
Remote Control
User manual
Line-in cable
Driver CD
Power Adapter (100-240V auto switched )
4
Specifications
Video playback
AVI : Motion-JPEG in AVI format,
640x480@30fps with PCM audio
MOV: Motion-JPEG in MOV format,
640x480@30fps with PCM audio
MPEG-1
Resolution :640X480@30fps
Bit Rate :3Mbps
Audio :MPEG-1 Layer II/III
Format :.MPG/.DAT ,VCD
Video resolution
MPEG-4
Resolution : 720x480@25fps
640x480@30fps
720x480@10fps (4MV)
640x480@15fps (4MV)
Bit Rate : 4Mbps
Audio : AAC
Format :.MP4 ,Simple Profile with 4MV
XviD
Resolution : 720x480@25fps
640x480@30fps
Bit Rate : 4Mbps
Audio : MP3, PCM
Format :.AVI
Remark:AC3 unsupported
Audio playback
MP3: MPEG-1 Layer I/II/III, sample rate up to
48KHz, bit rate 16~384kbps, CBR and VBR,
Stereo or Mono, .MP3 file format
WMA: WMA version 7, 8, and 9, sample rate up to
44KHz, bit rate 8~192kbps CBR. Stereo or
Mono. .WMA file format
AAC: MPEG4-AAC, sample rate up to 48KHz, bit
rate 16~320kbps, CBR, VBR, and ABR, Stereo or
Mono, .M4A or .AAC file format
5
Photo viewer
Supported Memory
Cards
Hard Disk Size
Hard Disk Capacity
WAV: sample rate up to 48KHz, Stereo or Mono,
un-compressed 8 or 16bits PCM in MS-RIFF
WAV , .WAV file format
CDA: CD-Audio (16bits 44.1KHz stereo)
JPEG: Baseline YUV
TIFF: 1 and 8 bits grayscale, 8 bits indexed-color,8
and 16 bits true color
BMP: Monochrome, 8 bits indexed-color, RGB
GIF: Standard Format
RAW: Please check the web site for updated
camera supported list
Zoom IN/Out
Rotate by 90 degree
EXIF data
Slideshow with background music
Compact Flash TM Card type I/type II (CF)
Smart Media TM Card (SM)
Memory Stick® (MS)
Secure Digital Card (SD)
Multimedia Card (MMC)
IBM ® MicroDrive
Mini-SD (with adapter)
RS-MMC (with adapter)
MS Duo (with adapter),
MS Pro Duo (with adapter).
2.5 inch
20G ~ 100G ( 2.5”, 9.5mm )
Video playback
TV system
Analog AV-OUT composite RCA jack
Stereo earphone jack
2.5 “LTPS TFT high resolution LCD
USB 2.0 (compatible with USB 1.1)
5V/2.5A DC IN, Li-ion 3.7V 1800 mAh battery
(NP-120)
3.5 hours video playback
PAL / NTSC
Remote Control
IrDA, (Lithium Battery CR2025 3V x1)
AV device
Display
Interface
Power supplier
6
Dimensions (WxLxH)
Weight
System OS
128x77x27mm
282g ( Included 2.5” HDD & battery pack )
y Windows98/98SE with driver
y Win 2000 SP3 above without driver
y Linux Kernel version 2.4 or above without driver
y Mac OS 10.01 above without driver
Note: The Media Player doesn’t support
Windows 2000 SP1, SP2, please upgrade to
SP3 or above.
1. Overview of Panels & Keys :
Top panel
keypad
OK
MENU
ESC
+
_
Function Description
Enter: To execute the current selection
Rotate: This function will effect under Photo Playback Mode.
Pause: This function will effect under Music & Video Playback
Mode.
Play modes & system setting selection
Direction icon: Use Ok button to move cursor on the screen.
Fast Backward : This function will effect under Music & Video
Playback Mode.
Direction icon: Use Ok button to move cursor on the screen.
Fast Forward : This function will effect under Music & Video
Playback Mode.
Direction icon : Use Ok button to move cursor on the screen.
Direction icon : Use Ok button to move cursor on the screen.
Takes you to go back to previous mode
Allows you to zoom out the photo
This function will effect under Photo Playback Mode.
Allows you to decrease the volume
Allows you to zoom in the photo
This function will effect under Photo Playback Mode.
Allows you to increase the volume
7
Right Panel:
Compact Flash Type I/II
IBM MicroDrive Slot
LINE IN: Use the line-in cable for recording
LINE OUT: Stereo audio output (use the Earphone)
Composite video output
Battery Compartment
Left Panel:
Smart media Card Slot
Scroll upward/increase volume
Memory Stick / Memory Stick Pro ,MMC/SD card slot
IR sensor
USB port: Insert USB cord mini jack
DC In: Insert AC adapter jack
8
2. Use the Media Player
2.1 Starting up
1) Charge the batteries
z Charge the batteries for 4 hours for the first use
2) Power On /Off
z To turn on the unit, long press the Power button for 2 seconds.
z The green light indicates the unit is operating.
z To turn off the unit, long press the power button for 2 seconds.
3) Driver installation
Windows 98/98 SE
1
Insert your driver CD into your CD-ROM.
2
Run "setup.exe "to begin driver installation. Press "Next" and follow
the installation instructions.
3
Restart your computer after installation is completed.
4
Under Windows 98, the 4 removable disk drives will look like
the following:
Macintosh MacOS 9.x
1
Insert your driver CD into your CD-ROM.
2
Follow the installation instructions to install the driver.
3Res
Restart your computer after installation is completed.
9
2-2 USB CONNECTION:
When the Media Player is connected to the computer, the "USB Mode"
message will appear on the bottom of the screen.
During file transferring process, PLEASE DO NOT:
1. Unplug the USB cable;
2. Remove memory card(s) from the card slot.
Otherwise, there may be a chance of data lost or corruption.
Note:
(1) Keep it plugged into the AC adapter/charger while it is connecting
to your computer, to avoid battery running too low.
(2) To safely disconnect the Media Player from computer, click on the
and wait untill you get a message
system tray remove icon
saying that you can safely unplug the device.
2-3 Downloading or Editing the files on PC:
z
Power on the Media Player
z
Connect the Media Player and PC with the provided USB cable
z
Double Click the " My computer" icon, the operating system will
display 4 icons identifying the media types correspondingly.
z
You can then read, edit, copy, and remove data on the PC.
2-4 Format Hard Disk under Windows 2000/ Windows XP
Due to Windows 2000 / Windows XP can not support Disk Formatting for
Hard Drive with capacity of 30G or above, please use the Application
Program called “FDisk AP” in the CD-ROM. It has a simple interface
which you can use it to format the Hard Disk.
Note: If you are using the new Hard Disk, please remember to initialize
the HDD first. Learn more information about your partitioning and formatting
options, please link to http://support.microsoft.com.
10
z Follow instructions to format drives.
N Tick FDiskSel
c Type the drive letter
ཝG Start formatting
Note: The Hard Drive normally pre-formatted as FAT before ex-factory.
2-5 Format Hard Disk without PC
(1) Scroll to the Hard Disk icon and press [ MENU ] button.
(2) Scroll down to [ Format Disk ] option and press [OK] button , then the
function will be performed.
Attention: If the hard disk already contains data, please backup the data
first, because all the data on that partition will be permanently deleted
after the formatting process.
11
3. Settings for your Media Player
3-1.To enter the setup screen, click [OPTIONS ] then [ SYSTEM ].
1) Language:
This can be set to English, Japanese, Korean, Spanish, German,
French, Italian, Portuguese, Chinese, Thai.
2) Auto shutdown Timer:
Use “left” and “right” buttons to adjust the setting, this setting can be
adjusted from one to 30 minutes.
Scroll down to decrease time value, scroll up to increase time value.
3) Copy Speed (HD):
Use “left” and “right” buttons to adjust the setting, this setting can be
adjusted from NORMAL, HIGH to ULTRA.
Note: For the Fujitsu HDD users, it is recommend that please do not to set
the speed to High, to avoid any shut down.
4) Copy Speed (CF):
Use “left” and “right” buttons to adjust the setting, this setting can be
changed from NORMAL, HIGH to ULTRA.
Note: For the Fujitsu HDD users, it is recommend that please do not to set
the speed to High, to avoid any shut down.
12
To set up your Screen Display, click [OPTIONS ] then [ DISPLAY].
1) File Viewer Mode:
Use “left” and “right” button to change the file viewer mode at graphic
icons or lists view.
2) Screen Save Idle Timer:
There is an auto screen-off timer to save battery power, you can change
this setting by using “left and right” button.
This setting can be adjusted from 0 to 180 seconds.
3) LCD Backlight:
Use “left” and “right” button to adjust the LCD backlight
Scroll down to decrease setting value, scroll up to increase setting value.
4) Cursor Color:
Use “left” and “right” button to adjust the cursor color.
5) Text Color:
Use “left” and “right” button to change the text color.
6) TV Standard:
- NTSC (Taiwan, US, Japan, etc)
- PAL (European countries)
You can change this setting by using “left” and “right” button.
13
7) Reset Background:
Reset desktop background to the original picture.
3-2 Your Media files
For quick playing or searching of the MPEG, MP3 and JPEG files, you
must create folders first, there is an example below. Then import files to
different folders.
Now you can enter the path of Photo, Music, Movie, Backup on the main
page to enter different categories.
4. Photo Play Mode
Enter the path of Photo
Press “ MENU “ to select the play mode. As you finish the selection, just
press " OK " button.
Icon View / List View
List View : The screen will display
all the JPEG pictures in group of 8 .
14
Icon View : The screen will display
Thumbnail of all the JPEG pictures in
group of 8.
Copy
z Use the OK button to high-light the file you want to copy.
z Press “ MENU “ to select “ COPY “mode, then press “ OK ” button
z The message “ copied to clipboard “ will pop up on the screen , then
press “OK” button.
z Use the “OK” button to find the folder or Path you want to paste.
z Press “ MENU “ to select “Paste “mode, then press “ok” button
z The question “Paste from clipboard?” will appear on the screen. Use
the “OK” button to reply Yes or No.
z Click “ Yes” , the copy fucntion will be performed
Delete
z Use the Ok button to find the file you want to delete.
z Press “ MENU” to select “Delete” mode, then press “OK” button
z The question “Delete File ?” will appear on the screen. Use the “OK”
button to reply Yes or No..
Other Functions
Exif info: Click on the specific JPG file you want to view and press
“Menu” button to find “Show EXIF” to show file information such as shutter
speed, flash condition, focal length, and other image information.
Slide Show:
Click on the specific JPG file you want to view and press “Menu “Button to
find “Slide Show” mode, then press “OK” button.
y Use “left” and “right” buttons to decrease or increase the interval time.
15
Set as Background :
Click on the specific JPG file you want to use and press “Menu” button to
find “Set as Background” mode, then press “OK” button.
ZOOM IN / OUT DISPLAY
You can use “+” button to zoom in the picture and use “–” button to zoom out.
z Use the “OK” button to pan right or left, up and down .
ROTATE DISPLAY
z You can press “OK” button to rotate the picture in anticlockwise direction.
5. Video Play Mode
z Push up the “OK” button to fast forward the videos.
z Hold and push “OK” button to the left to rewind and find the specific
part of movie you want to play.
z Hold and push “Ok” button to the right to fast forward and find the
specific part of movie you want to play.
z To pause or start/resume playback, press “OK “button.
16
Press “MENU” to select the play modes while the video is playing. As you
finish the selection, just press "OK” button
Playlist :
Playlist is a list of video files that the Media Player will automatically play
one after another.
To create Playlist, you can simply copy, delete, paste the files to the
appropriate folder.
Repeat On /OFF:
Press “ MENU “ button to select the Repeat Mode.
Press “ OK “ button to set the Repeat ON or OFF.
Stereo/Right and Left Channel
Select the audio mode as Stereo, Right Channel or Left Channel.
6. Music Play Mode
Scroll to the MUSIC path, when you finish the selection, just press "OK"
button.
Playlist
z Playlist is a list of songs that the Media Player will automatically play one
after another.
Create and use a music playlist
The Media Player can play the mp3 songs listed in an .m3u playlist file.
It will play each of the mp3 files listed in the m3u file in the order listed.
1. Connect Media Player to your PC using USB.
17
2. Use Winamp to create a playlist.
3. Save the playlist on the Media Player hard drive.
4. Save the playlist at m3u as the type of playlist (e.g., in the Save as type
pull-down).
Note: Please remember to set both playlist and OS language to be the same,
otherwise, the M3U playlist won’t work.
Repeat Single ON /OFF
z Press “MENU” button to select the Repeat Mode.
z Press “ OK “ button to set the “Repeat ON or OFF.
Shuffle ON /OFF
z To shuffle the music in a random order, you can scroll to “ Shuffle “, then
press “OK “ button.
Equalizer
z There are 6 EQ modes (Normal, Bass, Classic, Dance, Live, Rock ,
Treble ).
KeyLock
z To lock all the buttons from being accidentally pressed, scroll to “KeyLock”
mode and press “OK” button.
z Press “MENU” and “ESC” buttons to effect the buttons again.
Play in Background
z This allows you to switch to other modes, such as viewing the photos
simultaneously when the music is playing.
Other funcations
z Hold and push the “OK” button to the left to rewind and find the specific
part of music you want to play.
z Hold and push the “OK” button to the right to fast forward and find the
specific part of music you want to play.
z Add to Playlist: To add the songs to the current playlist.
1. After hiding the jukebox ( Play in background )
18
2. Switch to other folders and High–light a music file you want,
press menu to select the "Add to Playlist " and press “OK” button,
then the song will be added to the current playlist.
7. Recording:
y You can use the “Record” function anytime. However, you are not able to
record voice streams and listen to music at the same time.
y To get a better recording performance, it is recommended to use the 2.5”
HDD with Fluid Dynamic Bearing (FDB) motor which provides the quiet
operation
Recording setting:
Scroll to [AudioRec] and press [OK] button to enter the recording mode. Press
“MENU” to open the setting options.
1. Line-In or Mic-In : Select the Recording Input ( Line-In or Mic-In) Setting
2. Recording Quality : Stereo 32KHz, Stereo 24KHz, Stereo 16KHz
3. Enable AOUT (Audio Output: ON / OFF): Allows you to listen to the
recording file simultaneously.
Recording from built-in microphone
1. Scroll to [AudioRec] and press [OK] button.
2. Press [MENU] button and scroll to [MIC-in].
3. Press OK button to set the REC INPUT at [MIC-In].
4. Press [OK] button again to execute the recording
5. Press [OK] button again to pause the recording.
6. Press [ESC] to stop the recording.
Recording from Line-in
You can use a line-in cord to record music directly from an audio device
(such as CD player).
1. Scroll to [AudioRec] and press [OK] button.
2. Press [MENU] button and scroll to [Line-in].
3. Press OK button to set the REC INPUT at [LINE IN].
19
4. Press [OK] button again to execute the recording.
5. Press [OK] button again to pause the recording.
6. Press [ ESC ] to stop the recording.
Finding your recorded files
1. Scroll to the path of [HDD] and press [OK] button.
2. Scroll to Media folder and press [OK] button to search the Voice folder.
3. Scroll up and down to finding your recorded files.
All recording files are saved as AAC format.
8. File and Folder Operations
Copying, Pasting and Deleting Files & Folders
Under the screen Browser mode, you can copy, paste or delete files from
one location to another. Simply Press “MENU” to select the modes. Then
press "OK” button.
9. Transfer photos from memory cards to the Media Player
When a memory card is inserted, system will automatically display a menu
for asking "Full Backup", "Photo Backup" or "No Action".
1) Full Backup
y Scroll to the Full Backup mode and press “OK” button.
20
You can backup the whole folder (including it's subfolders and files) from
memory card(s) to internal storage (Hard Drive Disk).
2) Photo Backup
y Scroll down to the “Photo Backup” mode and press “OK” button.
The Photo Backup allows you to quickly search the digital images by
saving the subfolders only. You can backup your subfolders from
memory card(s) to internal storage (HDD).
3) No Action
Escape from the current mode.
If you want to go back to the Photo/Full backup modes, just scroll to the
path of memory card you want to do backup, and press MENU button.
¾ When the same card was inserted and copied twice, two different folders
were created, the Media Player won't overwrite the old folder.
¾ All files transfered from each memory card are stored onto the Backup
folder in numerically, under the name "CF0000 ", " CF0001", "CF0002”,
"CF0003” and so on.
¾ To stop the data transfer, just depress the “ESC” button or “OK” button.
¾ If an erroneous displays, please re-format the memory card(s) first. It may
be due to the bad sectors.
4) Navigating the Directory Structure
You can see the current working directory from the status bar on top.
21
10. Battery Recharge:
1) To charge the batteries, please connect the plug of the AC adapter to DC
5V jack of the main unit. When the Power LED indicator goes off, it
indicates that the batteries are fully charged.
2) Please use only the FUJIFILM NP-120 1800mAh 3.7V rechargeable
Li-ion battery.
3) For additional battery packs, please contact your dealer or purchase it at
Digital Camera Stores.
11. If an erroneous display/operation occurs:
1) If there is an error message displayed on screen, there may be a chance
of data corruption or damage of memory card, you can try to change
another memory card.
2) If any shut down caused by erroneous operation, you can depress the
[reset] button located on the bottom to switch off the main unit.
3) If the unit is operated via USB on PC while the battery is low, erroneous
display /operation may occur, if this happens, unplug the USB cable, and
press the [reset] button.
12. Take care of the Hard Drive and unit:
1) If the computer or the Media Player does not detect the Hard Drive, it
may be caused by several reasons:
z The flat connector is not plugged securely.
z Driver is not installed properly.
z It is not recommended to format the Hard Disk with capacity over 32G
in Windows 2000 or Windows XP.
Note: Windows 2000/ Windows XP can not format Hard Disk of
capacity over 30G. Please refer to 2-4, 2-5 to format the disk.
2) Please don't force to connect the flat cable to the unit and Hard Drive.
22
3) To keep your hard drive with better operating performance, we
recommend to periodically run Scan Disk and Disk Defragmenter.
4) Hard Drive must be formatted to the FAT or FAT-32 format, NTFS format
is not compatible with this function.
5) Please carefully insert and remove the memory card from each slot.
6) Do not drop, jar, bump, shock the unit, or expose to severe vibration
while data is being transmitted.
7) To reduce the risk of electronic shock, do not remove cover (or back).
8) To reduce the risk of fire or shock hazard, do not expose this equipment
to rain, any liquid or humid environment.
9) Keep it plugged into the AC adapter/charge while it connects to your
computer.
13. Troubleshooting
WARNING
If fault occurs, please first check the following points before having the unit
repaired. If you are still unable to solve the problem, please contact your
dealer or service centre.
Problem
USB Connection issues
Solutions Under Windows 98SE, the Media Player should not be
connected to the system before the driver has been installed.
If you are currently using a USB port at the front of your
computer, try the USB ports at the back. Front USB ports are
often non-powered.
If you are currently using a laptop computer with a docking
station, try to disconnect the docking station.
23
If you cannot see the files on the device after copying files to the
Media Player via USB from computer, you must properly remove
(un-mount) the Media Player from the computer before
disconnecting the USB cable to avoid loss of data or freezing of
the computer or device.
Problem
MacintoshTM OS issues
Solutions MacOS 10.0.x does not adequately support FAT volumes.
Upgrade to 10.1 or later.
The FAT-32 format made by MacOS X´s Disk Utility is incorrect.
Formatting must be done under MacOS 9.
The FAT volumes do not appear or disappear until the mouse is
moved.
Problem Corrupt data , General Error , Can’t open Source File
Solutions Due to file allocation table (FAT) has been corrupted, the data in
memory card transferred into the Media Player may look faulty,
please backup the data and run ScanDisk, Disk Defragmenter or
reformat the memory card.
The browser will show a “?” icon indicating that it is not one of
the standard file types that it can play.
Problems Formatting, and partitioning
Solutions To work in the stand-alone mode, both the disk and the memory
cards must be formatted to the FAT or FAT-32 file systems.
Note: Windows 2000/ Windows XP can not format Hard Disk
with capacity of 30G or above. Please refer to 2-4, 2-5 to
format the disk.
Please find the FDisk AP inclued in the driver disc or use the
built-in “Format Disk” function to format the HDD.
Problems Video Playback
Solutions The un-synchronization may be caused by original video
encoding at an NTSC frame rate and the Media Player is set to
display the output as PAL (see the system display settings) or
vice versa. Try changing this to other settings.
24
Frequently Asked Questions
Problem
Why can't I hear music?
The system does not
react when buttons are
pressed.
The remote control does
not function properly.
Solution
y If the player says it is playing a video or music
and you can’t hear anything, there may be a
problem with your speakers, headphones. If
you can hear other sounds through your
speaker then there might be a problem with
our device.
Remove and reconnect the AC adapter plug and
switch on the system again
y Reduce the distance between the remote
control and the system.
y Replace the batteries.
y Point the remote control directly toward IR
sensor at the front of the system.
y If the unit is within the warranty period, it needs
to be sent to the original dealer for
replacement.
y If it is out of warranty period, you can get it
from digital camera dealers. Please note only
use the Li-ion 3.7V 1800 mAh battery
Model : FUJIFILM NP-120
How do I browse my files You can browse your files while listening to a
on the Media Player
MP3 or WMA, WAV music file only. While your
while I am playing a
music is playing, press the “MENU” button to
music file?
enter the “Play in Background” mode.
How can I get a battery
replacement for my
Media Player?
When I playback videos
on my TV, the picture
image has no color
and/or is distorted, why?
Note: This feature only performed during Music
playback
Televisions in USA and Europe use different
systems to display the video signal. The NSTC
standard is used in the USA and the PAL
standard is used on European televisions.
25
Check whether your Media Player is set to the
correct standard: Enter the OPTIONS and go into
“DISPLAY “, and then set the TV standard to the
the one which is suitable for your country.
26