1
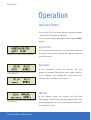
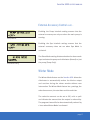
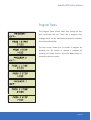
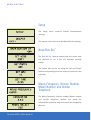
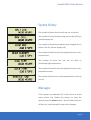
SURECHLOR 4000
USERS MANUAL
Your Handy Guide To Your New
Pool Management System
Index
Installation
4
Surechlor 4000 Cell
4
Surechlor 4000 Power Pack
4
Mounting the Surechlor 4000 Power Pack
5
Connecting the Pool Pump
5
Off Peak Installations
5
General Warnings
6
Adding Salt to the Pool
6
Calculating Pool Capacity
7
Calculating Salt to be Added
7
What Salt Concentration to Use
8
Dissolving the Salts
10
When the Salt has dissolved
10
Operation
Surechlor 4000 USERS MANUAL
12
Operating Modes
12
Chlorine Control
13
Chlorine Output Monitor
13
Menus & Settings
14
Salt Test
14
Super Chlorinate
14
Backwash
15
External Control
16
Winter Mode
17
Program Times
19
Setup
20
Messages
21
Maintenance
22
Pool Chemistry
22
Surechlor 4000 Cell
26
Specifications
28
Approvals
29
Customer Responsibility30
Warranty31
page INSTALLATION
Installation
Surechlor 4000 Cell
The Surechlor 4000 Cell must be installed horizontally
(level) within 5°, in the return to pool line. The two
plumbing ports and the arrow on the label must be
pointing downward and in the direction of the water
flow.
Heaters and other pool equipment that are also in the pool return
line must be installed before the cell.
Surechlor Power Pack
The Surechlor 4000 Power Pack must be mounted on a
vertical wall or fence within 1.5 metres of the cell and at
least 1 metre above the ground.
WARNING: Do not mount the Power Pack on a metal fence or shed
wall as this will void your warranty
The Surechlor 4000 Power Pack must also be in a position
to allow its supply lead to be plugged into a 10 amp 240
volt power point.
Remember the filter pump must be plugged into the Power Pack.
Surechlor 4000 USERS MANUAL
Surechlor 4000 USERS MANUAL
Mounting the Surechlor 4000 Power Pack
Select a suitable place to attach the mounting bracket. Ensure that the location selected is well
ventilated (allowing plenty of airflow behind the unit) and is not in direct sunlight.
Mount the bracket horizontally ensuring that the vent louvres above the screws are
facing upwards. Carefully hook the Surechlor 4000 Power Pack onto the mounting bracket.
Plug the lead into a suitable 240 volt power point but do not switch the unit on.
Connecting the Pool Pump
Plug the pool pump into the socket at the bottom of the unit.
Note: If a pump load greater than 1.5Kw or the use of a 3 phase pump is required, an interface
relay must be installed.
Warning: Do not use double adaptors or stackable plugs as this will void the warranty.
Off Peak Installations
This unit is suitable for off-peak tariff supply.
page INSTALLATION
General Warnings
The warranty will be void if the Surechlor 4000 Power Pack is:
• Installed or operated on, or less than 1 metre from, the ground
•
Placed in a location that can be flooded by storm water or by accidental immersion
•
Where the airflow is obstructed, i.e. Within a poorly ventilated auxiliary enclosure
•
Mounted close to, against, or on top of an auxiliary heat source (eg. metal fence/shed wall)
•
With a pump connected to the 240 volt pump outlet socket greater than 1.5Kw continuous
•
From an electrical supply socket which is not rated to supply 10 amps at 220 – 240 volts
50Hz and is not adequately protected by the correct size fuse or circuit breakers
The calcium concentration in the water is higher than 350 ppm or in a newly installed
•
concrete marble plaster pool where the excess calcium compounds are still leaching
Extension leads are not recommended for use with this equipment because they are unsafe in and around the pool zone.
For extended equipment service life and peace of mind, Poolrite recommends that your Surechlor 4000
is serviced regularly on a six monthly basis by a reputable qualified pool professional.
Adding Salt to the Pool:
Start Up Procedure for Marble Surface Pools
For new concrete pools with marble plaster (marblesheen) finishes we recommend that salt
not be added to the pool until the excess calcium compounds in the plaster have leached
out and the pH level of the water has stabilised. The recommended stabilising period is
Hand Mixed/Applied Plaster – 12 Weeks or for Machine Mixed/Applied Plaster – 24 weeks.
During this period the pool should be sterilised with liquid chlorine.
Surechlor 4000 USERS MANUAL
Surechlor 4000 USERS MANUAL
Calculating Pool Capacity
Swimming pool grade salt (low mineral content sodium chloride) must be added to the pool
and allowed to completely dissolve before operating the chlorinator cell. The amount of salt to
be added cannot be calculated until the volume of water contained in the pool is determined.
This volume can be obtained by:
• Referring to the pool manufacturer’s data (if pre-moulded fibreglass)
• Reading the difference on the water metre before and after filling
• By mathematical calculation:
Water Volume (m3) = (Surface Area (m2) X Average Depth (m)) minus the volume
occupied by steps, swim-outs, etc.
Calculating Salt to be Added
The amount of salt to be added to the calculated volume of water in the pool depends on the
salt concentration selected.
Salt Quantity (kg) = Water Volume (m3) x Salt Concentration (ppm)
1000
For example, if the calculated volume of water in your pool is 60 m3 (cubic metres) and the
minimum salt level of 6000 ppm (parts per million) is required (for cool climates), the amount
of salt needed will be:
Salt Quantity =
60 X 6000
1000
= 360 kg
page INSTALLATION
What Salt Concentration To Use
Although your Surechlor 4000 Chlorinator has been designed to operate within a
wide range of salt concentrations, the minimum recommended level is 6000 ppm.
However with heated and outdoor pools in tropical and subtropical climates, salt
levels between 7000 and 8000 ppm should be maintained in order to gain the
benefits of increased chlorine output, reduced cell maintenance and extended cell life.
The Chlorine Control can be switched to 100% output if higher salt levels are used without
the risk of damage occurring, due to the incorporation of electronic output limiting on all of
these model’s chlorinators.
To make the calculation easier, we have provided a chart for calculating the quantity of salt
for various sized pools.
To use the chart on the adjacent page:
Instructions
1. Mark the point along the bottom edge which corresponds
with the calculated volume of water in the pool
2. Draw a vertical line from this point which intersects
the inclined lines showing the salt concentrations
3. From the point where this vertical line intersects
the inclined line showing the chosen salt concentration,
draw a horizontal line across the left side of the graph
The quantity of salt in kilograms will be indicated
Surechlor 4000 USERS MANUAL
Surechlor 4000 USERS MANUAL
Note:
1 x Cubic Metre
= 1000 litres
If you are quite sure of your calculations then add the calculated amount of salt directly to your
pool.
WARNING: Only swimming pool grade salt (Sodium Chloride) should be used. Inferior grades may lead to
problems with the chlorinator cell.
• Do not attempt to add salt via the surface skimmer as this can cause damage to the filtration system.
• Any suction type pool cleaners should also be disconnected before adding salt.
At the same time add the recommended quantity of stabiliser. This is most imporant as your
Surechlor 4000 will not operate efficiently during summer months without the correct level of
stabiliser in the pool. The recommended level for maximum efficiency is between 30 and 60 ppm.
pH buffer can also be added now if required.
page INSTALLATION
Dissolving the Salts
Before attempting to operate the Surechlor 4000 Cell, the salt must be allowed to fully dissolve
in the pool water. This is best achieved (after allowing sufficient time for the glue on the
pipe fittings to set properly) by running the filter pump with the Surechlor 4000 turned off for
24 hours to circulate the water.
Cloudiness and some foaming may be observed in the water until the salts are fully
dissolved.
To assist the dissolving of the salt regularly brush the floor of the pool
with a pool broom until the salt has dissolved. It can take up to 24 hours to fully
dissolve the salt.
When the Salt has dissolved
With the pump still operating, increase the Chlorine Control to maximum. The Monitor
should indicate full output – 10 triangles. Your Surechlor 4000 is now generating chlorine!
Should the Display read low with the Chlorine Control at maximum, do not be concerned,
just allow the pump to run with the Surechlor 4000 turned off for another 24 – 48 hours. If the
Display continues to give a low reading after this period, run the Salt Test (with the system
running) and note the displayed message.
If the ambient water temperature is approximately 25°C and the cell is relatively clean, this
reading will give a rough indication of salt concentration. If it confirms the salt level is low
then add more salt gradually over a period of days until the display reads normal. Continue
brushing the floor of the pool until the additional salt has dissolved.
Surechlor 4000 USERS MANUAL
Surechlor 4000 USERS MANUAL
page 11
OPERATION
Operation
Operating Modes
The Surechlor 4000 has three distinct operating modes
– System Off, Automatic and Manual.
You can cycle through these modes by pressing the Mode
button.
System Off
In the ‘System Off’ mode, the unit is completely off with
Display when the unit is in System Off mode.
the menus and controls disabled. No program times will
run in this mode.
Automatic
In the ‘Automatic’ mode, the Surechlor 4000 will
Display when the unit is in Automatic mode, but
is not chlorinating
operate as normal, chlorinating at the times specified
by the Program Time settings. All of the menus and
controls will be available in this mode.
Display when the unit is chlorinating
Manual
In the ‘Manual’ mode, the Surechlor 4000 will start
Display when the unit is in Manual mode and
is chlorinating.
chlorinating immediately, ignoring program times and
only stopping when the user cycles back to ‘System Off’
or ‘Automatic’ mode.
Surechlor 4000 USERS MANUAL
Surechlor 4000 USERS MANUAL
Chlorine Control
As your Surechlor 4000 has been designed to operate
over a wide range of salt levels, water temperature and
running times, the chlorine output of the unit can be
varied very easily.
The desired chlorine output is displayed in the
bottom right hand corner of the main screen in both the
Automatic and Manual operating modes. To adjust this
value between 10% and 100% simply press the ‘Up’ and
‘Down’ buttons accordingly.
When first starting the unit and where maximum
chlorine production is needed the output should be set
to maximum. The Chlorine Control on all models can be
set to 100% in higher salt concentrations without the
risk of damage occurring, due to the incorporation of
electronic output limiting.
Chlorine Output Monitor
When the unit is chlorinating, it will display a series of
triangles in the bottom left of the display as a bar graph
This display can assist you in determining the
condition of the cell, and the salt level in the
pool.
with one triangle equal to 10% output.
For example, if 3 triangles were displayed, then the unit
is producing 30% of its rated chlorine output.
page 13
MENUS & SETTINGS
Menus &
Settings
To access the menu on the Surechlor 4000, simply press
the Menu button when in the Automatic mode of
operation. Pressing the Menu button will cycle through
the available menu items and pressing the Enter
button will enter the currently selected menu. To exit the
menu repeatedly press the Menu button until the main
screen re-appears.
Salt Test
Salt OK
Entering the salt test menu will have the unit perform an
immediate salt test and will display one of two screens
indicating the current salt level in the pool.
Salt LOW
Super Chlorinate
The Super Chlorinate feature on the Surechlor 4000 allows
Display when the user is in the Super
Chlorinate menu.
you to force the chlorinator to run at maximum output for
a 12 hour period.
Pressing the ‘Up’ button whilst in the Super Chlorinate
menu will activate the feature, locking the screen and
Display when the Super Chlorinate feature is
activated and in count-down mode with 10
hours and 52 minutes remaining.
Surechlor 4000 USERS MANUAL
starting the countdown timer. The super chlorinate can
be disabled by pressing the ‘Down’ button
Surechlor 4000 USERS MANUAL
Backwash
Entering the Backwash menu will have the unit step you
through the backwash process, including the automatic
starting and stopping of the pump. Starting a backwash
will automatically pause any currently running program.
Simply follow the instructions and press Enter after
completing each step.
1.Set the valve on the top of your filter to backwash
then press Enter.
2.After setting the valve, press Enter to have the unit
start the pump.
3.Wait until the sight glass on the valve becomes clear
and then press Enter to stop the pump.
4.Set the valve to rinse and then press Enter.
5.After setting the valve, press Enter to start the pump.
6.After allowing the filter to rinse for 30 seconds press
the Enter button to stop.
7.Set the valve back to filter and press Enter.
8.The backwash has been completed.
page 15
MENUS & SETTINGS
External Control
The external control menu exposes some of the more
advanced features of the Surechlor 4000.
Pump Control
Display with the pump turned OFF
The main pump can be turned on and off manually using
this setting. If the pump is currently in use (due to the
unit currently chlorinating) this setting will be locked.
Display with the pump turned ON
External Accessory Control
The Surechlor 4000, with the addition of an External
Accessory Kit, can flexibly control an external device to
simplify pool management.
Surechlor 4000 USERS MANUAL
Surechlor 4000 USERS MANUAL
External Accessory Control cont...
Enabling the Pump Interlock setting ensures that the
external accessory can only run when the main pump is
Pump Interlock
running.
Enabling the Spa Interlock setting ensures that the
external accessory does not run when Spa Mode is
Spa Interlock
activated.
The Slave Mode setting dictates whether the slave mode
input activates the pump and chlorinator (Normal) or just
Slave Mode setting
the pump (Pump Only).
Winter Mode
The Winter Mode feature on the Surechlor 4000 allows the
chlorinator to automatically reduce its chlorine output
and run-time during the winter months without user
intervention. The Winter Mode feature has 3 settings, the
reduction amount, the start date and the end date.
The reduction amount can be set to Off, 20% or 40%
and dictates the amount that the output is reduced by.
The program times will also be automatically reduced by
1 hour when Winter Mode is activated.
page 17
MENUS & SETTINGS
Winter Mode cont..
To operate the winter mode settings, press the Menu
button until “WINTER MODE” is displayed, then press
Enter. Select the chlorine reduction by pressing the ‘Up’
and ‘Down’ arrows and then press the Enter button.
To Adjust the start and end dates use the ‘Up’ and ‘Down’
arrows as required and press Enter to proceed to the next
screen.
Surechlor 4000 USERS MANUAL
Surechlor 4000 USERS MANUAL
Program Times
The Program Times dictate what time during the day
your chlorinator will run. There are 3 program time
settings which can be individually enabled or disabled
for maximum flexibility.
The first screen allows you to enable a program by
pressing the ‘Up’ button or disable a program by
pressing the ‘Down’ button. Press the Enter button to
proceed to the next screen.
page 19
MENUS & SETTINGS
Setup
The Setup menu contains several miscellaneous
settings.
The beeper in the unit can be disabled with this setting.
Neva Run Dry
TM
The Neva Run Dry feature ensures that the pump does
TM
not continue to run if the cell becomes partially
empty.
The system date can be set using the ‘Up’ and ‘Down’
buttons and pressing the enter button to proceed to the
next item.
Mains Frequency, Version Number,
Model Number and Vendor
Telephone
The Mains frequency, Version number, Model number
and
Vendor
telephone
number
are
purely
for
informational purposes only and cannot be changed by
the user.
Surechlor 4000 USERS MANUAL
Surechlor 4000 USERS MANUAL
System History
The number of hours that the unit has run in low salt.
The number of hours that the pump has run with a fully or
partially empty cell.
The number of times the pump has been stopped due to
the Neva Run Dry feature (empty cell).
TM
The number of times the unit has stopped due to an overcurrent event.
The number of hours the unit has run with an
abnormally high temperature.
The number of times the unit has stopped due to an overtemperature event.
The number of hours the unit has operated since the last
service.
Messages
If the system has switched off, it will sound an alarm
every minute and display the reason, to reset the
system press the Mode button. Not all alarms will turn
off the unit, only those which may cause damage.
page 21
MAINTENANCE
Maintenance
Pool Chemistry:
Chemical Balance Guide
Your Surechlor 4000 is designed to be used for swimming
pool water, which needs to be balanced in accordance
with the “Langlier Saturation Index”, with a pH level
of 7.0 to 7.8 and maintains the recommended levels of
sanitizer (i.e. 2 - 3 ppm of free chlorine).
Regular
water
analysis
and
advice
on
correct
addition of chemicals and/or products to achieve
suitable water quality and balance by a reputable
professional pool shop will ensure bather health and
comfort and extended equipment service life.
Please Note: Proof (i.e. hard copy) of regular water analysis by
a reputable professional pool shop will be required as evidence
of suitable water quality and balance in the event of a warranty
claim.
Chlorine Level
Using a 4-in-1 test kit, test the pool water daily at first then
at least once a week to ensure sufficient chlorine level is
being maintained. A free chlorine reading of 2ppm and
above is adequate when taken near the skimmer.
Surechlor 4000 USERS MANUAL
Surechlor 4000 USERS MANUAL
Should the level fall below 2 ppm check the salt level and / or increase the daily running time
of the filter and the Surechlor 4000.
Health Department regulations require free chlorine levels be kept between 2 - 3 ppm
pH Control
Check the pH of your pool at least once a week after your Surechlor 4000 is first installed. The
recommended range for swimming pool water is 7.2 to 7.6 for concrete pools, and you should
refer to your builder’s recommendations for other types of pools.
Controlling
the
pH
of
your
pool
is
vital
to
the
correct
operation
of
the
chlorinator, the effectiveness of the chlorine produced and the comfort of the
swimmers.
finishes in
Correct pH also effects the life of metals, cement products and plaster
the
pool.
If a
pH
test indicates a
low
pH
then
add
sodium
bicarbonate (pH buffer) to raise the pH. If the pH is high then add acid (hydrochloric or dry
acid) to lower the pH.
Total Alkalinity
Check the Total Alkalinity at least once a month and maintain the correct level
for proper pool balance. Total Alkalinity is a measure of the acid neutralising
capacity of water which indicates its ability to buffer (resist) changes in pH. The addition of
sodium bicarbonate will increase the level and acid will reduce it. Measurements can be
made with the 4-in-1 test kit. Correct levels depend on other factors such as hardness, pH and
temperature, however the following levels, on the next page, can be used as a guide.
page 23
MAINTENANCE
Pool Chemistry:
Total Alkalinity cont...
Type of Pool
Total Alkalinity
Concrete Pool
150 - 250 ppm
Vinyl Lined Pool
Above 100 ppm
Fibreglass Pool
80 - 100 ppm max.
Stabiliser
Have a water sample tested at least once a month by your pool shop to determine the
level of stabiliser present. It is most important that a level between 30 and 60 ppm
be maintained in order for your Surechlor 4000 to work efficiently during the summer months
if your pool is outdoors.
Calcium Hardness
Calcium Hardness is a measure of the calcium compounds dissolved in the water.
Recommended levels should be as low as practical to minimise problems with calcium
deposits forming in the cell. Do not add any further calcium chloride (to raise hardness) or
calcium hypochlorite (granular chlorine) to your pool once the decision has been made to
install saltwater chlorination.
WARNING: Water supplies from bores / rivers / dams etc., can be unsuitable for addition to swimming pools
as it can be high in mineral contaminants resulting in poor chlorine production, therefore water may require
additional treatment
Surechlor 4000 USERS MANUAL
Surechlor 4000 USERS MANUAL
Algaecides
Adherence to the mentioned water chemistry recommendations should alleviate the need to
use algaecides in your pool.
WARNING: If metal based algaecides are used the warranty will be void as they may cause damage to the
electrode.
Maintaining Salt Levels
Before attempting to add salt to your pool ensure that the cell is clean. Then, with the filter
and cell operating, the “SALT TEST” should be run and the reading on the display noted. If this
reading indicates the level of salt is too low it must then be increased. This will normally be
required about 4 times a year on average domestic pools but will vary depending on the type of
filtration, climate conditions, etc.
Surechlor 4000 Cell:
Maintenance Frequency
Your Surechlor 4000 has been designed to operate for extended periods with a minimum of
maintenance. The cell cleaning function is performed automatically by the unit.
However manual cleaning on a regular six monthly basis will enhance chlorine production and
extend equipment service life.
page 25
MAINTENANCE
Surechlor 4000 Cell:
Manual Cell Cleaning Procedure
SAFETY MEASURES: Rubber gloves and protective eyewear must be worn before proceeding with Step 4.
• As an alternative to using the acid solution (Step 4) we recommend the use of a proprietary cell cleaning
product available from reputable pool shops and service companies.
• Do not put used acid solution into your pool
1. Remove Surechlor 4000 Power Pack plug from 240 volt power point.
2. Remove cell from plumbing.
3. Turn cell upside down (inlets facing upwards) and place on a level non-metallic
surface in a well ventilated area.
4. Prepare an 8:1 acid cleaning solution by measuring 2 litres of water into a plastic
bucket and then carefully adding 250ml of Hydrochloric Acid. Stir thoroughly with
a wooden stick.
5. Carefully pour sufficient cleaning solution into the upturned cell so as to fully cover the
metal electrodes.
6. Allow to stand for 10 minutes then flush out with clean water.
7. If electrodes still show white deposits, repeat the above steps.
It is recommended that a warm water detergent solution be used to soak the electrodes at this point if
there is any evidence of body fats, oils or grease.
8. Refit the cell to plumbing line making sure both rubber “O” ring seals are in place.
9. Re-connect the Power Pack plug to 240 volt power point and switch on.
This system is fitted with a backup battery and real time clock. The time will not require resetting.
Surechlor 4000 USERS MANUAL
Surechlor 4000 USERS MANUAL
Common Causes of Premature Cell Failure
To assist you in prolonging the life of your Surechlor 4000 Cell, we have provided the
following list of common causes of premature cell failure based on our extensive
experience in designing, manufacturing and servicing salt water chlorinators. In order to
achieve the longest possible life from your Surechlor 4000 Cell, we recommend that the owner
bear these important points in mind:
• Operating the cell with too little/too much salt in the water (can often happen after heavy rain)
• Incorrect installation
• Excessive accumulation of calcium deposits on electrodes
• Low water flow through cell (poor filter maintenance or a faulty pump are typical causes)
• Physical damage to electrode coating caused by scraping with a screwdriver, etc.
• Cleaning of electrodes in too strong an acid solution (greater than 1 part hydrochloric acid
in 8 parts water) or acid washing for too long (10 minutes maximum)
• Operating the unit in water over 40ºC
• The use of metal based algaecides
page 27
SPECIFICATIONS / APPROVALS
Specifications
Electrical Specifications
INPUT: 240V / 50Hz
POWER CONSUMPTION (Max):
15G:
110 VA
25G:
160 VA
35G:
220 VA
45G:
270 VA
70G:
370 VA
OUTPUT (Max):
Pump Socket:
240V / 50Hz
1.5Kw (2.0HP)
8.0A
Cell:
15G:
17.5VDC 6A
25G:
17.5VDC 9A
35G:
17.5VDC 12A
45G:
17.5VDC 15A
70G:
17.5VDC 21A
OVERLOAD PROTECTION
Electric current limiting on cell output (all models)
Replaceable 10A slow blow fuse
Cell Fuse:
Surechlor 4000 USERS MANUAL
1.25 Amp for 15G, 25G, 35G
2 Amp for 45G and 70G
Surechlor 4000 USERS MANUAL
Approvals
All Poolrite Surechlor 4000 salt water chlorinators have
been fully tested and approved by the QLD Electrical
Safety Office and have been issued with a AS/NZS 3136
Certificate of Approval.
The Surechlor 4000 Enclosure is rated as complying with
IP24 as per AS1939 and as such can be legally installed
within the designated Pool Zone as defined in Section 7
of AS/NZS 3000 wiring rules.
Poolrite Equipment Pty. Ltd. reserves the right to change
these specifications without prior notification.
page 29
CUSTOMER RESPONSIBILITY / WARRANTY
Customer
Responsibility
Your “Before You Call for Service”
Checklist
Before calling for service read the instructions in this
Surechlor 4000 manual carefully.
The following points are your responsibility:
• Power point not turned on or faulty (check with another
appliance)
• Time switch incorrectly set
• Unit incorrectly installed
• Pump not plugged into Surechlor 4000 pump outlet socket
• Controls incorrectly set
• Poor water chemistry (salt level, pH etc.)
• Cell not being cleaned (acid wash) properly
• Poor water flow (check filter is clean / pump operating /
skimmer free of obstructions)
• Unit being tampered with by unauthorised persons
• If the supply cord is damaged, then it shall be repaired by Poolrite or an authorised service agent.
Please Note: A service charge will be made for service as a result
of the above points
Surechlor 4000 USERS MANUAL
Surechlor 4000 USERS MANUAL
Warranty
Surechlor 4000 Salt Water Chlorinator
Poolrite Equipment Pty. Ltd.
Your Poolrite Surechlor 4000 is manufactured to the highest possible standards using the most up-to-date
technology.
Accordingly the equipment carries the following Warranty, should a fault occur due to faulty
manufacturing or materials.
IMPORTANT: In the event of a fault covered by warranty occurring, the purchaser must, in the first instance, contact Poolrite Equipment
Pty. Ltd. or the closest authorised distributor. Poolrite warrant the original purchaser of the Power Pack and Electrolytic Cell for a period
of 12 months from the date of purchase by the original owner, should examination disclose to its satisfaction that the Cell or Power Pack
has failed due to faulty manufacturing or materials. In addition for a further period of 24 months the Electrolytic Cell will be repaired
or replaced at Pro Rata cost from date of purchase by the original owner.
This Warranty is void if the following occur:
1. Damage resulting from matters beyond Poolrite’s control.
2. The Cell or Power Pack has been installed incorrectly and not in accordance with these instructions.
3. The Power Pack has been connected to a power supply other than 240 volt 50Hz.
4. The cell or Power Pack has been used for any purpose other than swimming pool or spa sterilisation.
5. Water above the temperature of 40º or below 5º has been permitted to flow through the cell.
6. Water has not been permitted to flow freely through the cell when turned on.
7. The safety flow detector or connections have been tampered with.
8. The Power Pack has been serviced by a person other than a person authorised to do so by Poolrite
or its agent.
9. The Cell power terminals have been submerged in acid solution whilst cleaning.
10. Non-swimming pool grade salt has been used in the pool.
11. Metal based Algaecides have been used.
12. Insect / vermin infestation.
13. Incorrect water chemistry (refer to “Chemical Balance Guide” on page 22)
This Warranty is applicable to workmanship and materials. Poolrite will repair or replace at no charge, all parts
returned freight paid, which display faulty workmanship or materials.
Poolrite Equipment Pty. Ltd. Accepts no responsibility for loss, damage or injury to persons or property arising
from Warranty failure of equipment, or installation of that equipment. Unless with the express prior authority
of Poolrite, any repair or replacement shall be provided only by Poolrite or it’s authorised distributors and this
Warranty shall not extend to any expenditure otherwise incurred.
page 31