1
Connecting the R/C Radio
Connecting the R/C Radio
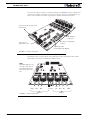
Connect the R/C adapter cables to the controller on one side and to two or three channels
on the R/C receiver on the other side.
When operating the controller in “Separate” mode, the wire labelled Ch1 controls Motor1,
and the wire labelled Ch2 controls Motor2.
When operating the controller in “Mixed” mode, Ch1 is used to set the robot’s speed and
direction, while Ch2 is used for steering.
See “R/C Operation” on page 113 of the User’s Manual for a more complete discussion on
R/C commands, calibration and other options.
Channel 3
Channel 2
3:
4:
6:
7:
8:
Channel 1
Channel 1 Command Pulses
Channel 2 Command Pulses
Radio battery (-) Ground
Radio battery (+)
Channel 3 Command Pulses
8
9
Pin 1
Wire loop bringing power from
controller to RC radio
15
FIGURE 4. R/C connector wiring for 3 channels and battery elimination (BEC)
This wiring - with the wire loop uncut - assumes that the R/C radio will be powered by the
AX3500 controller. Other wiring options are described in “R/C Operation” on page 113 of
the User’s Manual.
Important Warning
Do not connect a battery to the radio when the wire loop is uncut. The RC battery
voltage will flow directly into the controller and cause permanent damage if its voltage is higher than 5.5V.
Powering On the Controller
Important reminder: There is no On-Off switch on the controller. You must insert a switch
on the controller’s power tab as described in section“Connecting to the Batteries and
Motors” on page 17.
AX3500 Motor Controller User’s Manual
7