1
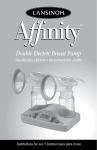
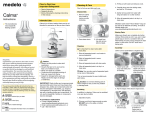
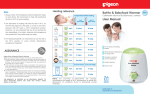
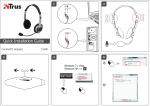
®
2in1 AFFINITY PRO
Electric Breast Pump
INSTRUCTIONS FOR USE
1
Congratulations!
Designed for breastfeeding mums who want to continue to provide their babies
with their breastmilk even if they have to be apart, the Lansinoh Affinity® Pro Electric
Breast Pump is safe, efficient, and effective.
Allows for single or double pumping to save you time
Lansinoh® Custom ExpressionTM technology allows mum to separately select
from 3 pumping styles that they can tailor for comfortable and efficient milk expression
● Patented design prevents milk back-up in tubing and pump. Easy to care and
easy to clean
● AC or battery operated—so you can use it on the go (batteries not included)
● Small, lightweight and low noise compared to other breast pumps
●
●
When babies breastfeed, they start with quick sucking to stimulate your milk to
let-down and flow. Once your milk has let-down, the baby draws the milk out with
slower, deeper sucks. While nothing can replicate exactly how a baby feeds at the
breast, to simulate the natural rhythm, Lansinoh Affinity® offers two phases – the
Stimulation Phase
and the Expression Phase
.
Stimulation Phase (Phase 1) is a faster pumping style to trigger your milk to let
down and start flowing.
Expression Phase (Phase 2) has 3 adjustable pumping styles and suction strengths
that can be customized to your preferences---a unique feature of the Lansinoh Affinity® Pro Electric Breast Pump!
If you have any questions, please call our customer service department at +44 (0) 113 205 4201 or email [email protected].
Contents
Important Safeguards
3
Pump Diagram
5
Affinity Pro Breast Pump Parts 7
®
Cleaning Instructions
8
Assembling the Breastmilk
Expression Set
9
2
Pumping Tips
10
Using the Affinity® Pro Breast Pump
for single and double pumping
11
Power Options
13
Breastmilk Storage Guidelines
Technical Data Troubleshooting
13
14
15
Warranty
16
Important Safeguards
The Lansinoh Affinity Pro Electric Breast Pump is a personal care item and for hygienic reasons should never be shared between mothers or resold from one mother
to another. Either of these actions will void the warranty.
®
If you are a mother who is infected with Hepatitis B, Hepatitis C or Human Immunodeficiency Virus (HIV), pumping breastmilk using the Lansinoh Affinity® Pro Electric
Breast Pump will not reduce or remove the risk of transmitting the virus to your
baby through your breastmilk.
When using electrical products, especially when children are present, basic safety
precautions should always be maintained, including the following:
Read All Instructions Before Using
Danger:
To reduce the risk of electrocution:
● Always unplug this product immediately after using
● Do not use while bathing
● Do not place or store this product where it can fall or be pulled into a tub or sink
● Do not place or drop pump into water or other liquid
● Do not reach for an electrical product that has fallen into water. Unplug
immediately
Warning:
To reduce the risk of burns, electrocution, fire, or injury to persons:
● This product should never be left unattended when plugged in
● Close supervision is necessary when this product is used near children
or invalids
● Use this product only for its intended use as described in this manual. Do not
use attachments not recommended by the manufacturer
● Never operate this product if it has a damaged cord or plug, if it is not working
properly, if it has been dropped or damaged, or dropped into water
● Keep the cord away from heated surfaces
● Never use while sleeping or drowsy
● Never drop or insert any object into any opening or tubing
● Do not use this product if it is broken or any parts are missing
● Do not allow small children or pets to play with the pump unit, AC adaptor, etc.
● Do not use outdoors with the AC adapter or operate where aerosol spray
products are being used or where oxygen is being administered
Save These Instructions
along with your receipt for future reference.
3
IMPORTANT POINTS FOR OPERATING YOUR LANSINOH AFFINITY® PRO ELECTRIC BREAST PUMP
Do not wash or sterilize the tubing or tubing connector
and will automatically change to the Expression Phase
For maximum milk flow, please follow these instructions:
The Lansinoh® Affinity® Pro Electric Breast pump will start in the Let-Down phase
after two minutes and put you into style 2.
If you prefer to bypass the pre-set two minute let-down Phase
or your milk lets down sooner than two minutes press the Let-Down Button
to move to the Expression Phase. If during pumping your milk flow slows down or stops, you can press the Let-Down button
again and go back
into the let-down
phase to hopefully gain a second Let-Down.
Pumping style
selector
Figure 2
Suction Levels
Figure 1
Pumping style
Style 1
Style 2
Style 3
• The pumping styles can be changed using the pumping style selector Button
to find the pumping rhythm that works best
for you. Pressing this will alter between styles 1, 2 and 3 as indicated in Figure 1.
• You can Increase/Decrease the suction level to the maximum level that you find comfortable. You can control the suction levels in both the Let-Down
(stimulation) and the Expression phase by pressing the
and
buttons, as indicated in Figure 2.
Let-Down
Button
Suction Level
Lansinoh® is here to support you in your breastfeeding journey. If you have any questions, please do not hesitate to contact us at
+44 (0) 113 205 4201 or [email protected] in the UK, or contact your country distributor.
Pump Diagram
4
5
3
6
2
1
Basic Controls, Display and Features
1 Power, On/Off button
8 Time Display
2 Suction Level Increase Control Button
9 Pumping Style Indicator
If this shows, you are in the
3 Pumping Style selector button
4 LCD Display
10AC Power Indicator
5 Let-Down (stimulation) button
to change between the let-down and
expression phase and back
11 Battery Power Indicator
Expression Phase
12 Suction Level Indicator
6 Suction Level Decrease Control Button
7 Stimulation/Expression Phase Indicator
(If this shows, that means you are in the
Let-Down phase)
8
7
10
11
9
12
5
Pump Diagram
14
13
13 Tubing input
14 Battery compartment
for 6 AA batteries (not included)
NOTE: rechargeable batteries are
not recommended.
15 AC adapter connector socket
15
AA Battery Compartment
(underneath pump)
AC Adapter
6
Affinity® Pro Breast Pump Parts
Item
a
b
c
d
e
Item Number
Affinity Pro Tubing
a1 Silicone Tubes 300 mm (2)
a2 Silicone Tube 600 mm a3 Tubing Y Connector
a4 Tubing Strap
a5 Pump Connnector
Breastmilk Expression Set Includes:
b1 ComfortFitTM Breast Cushion (2)
b2 Breast Cushion Body (2)
b3 Diaphragm (2)
b4 Diaphragm Cap (2)
b5 White Valve (2 + 2 extra)
b6 150 ml Container (2)
Container Ring (2) and Disk (2)
AC Adapter/power cord
Bottle Holder (2)
#53403
#53405
#50417
#53407
#50408
#53415
#53402
#53410
#53401
#50414
#50406
#50409
#53404
b4
b3
b
a1 a3 a2
b1
b2
e
b5
c
b6
d
a
a4
a5
Two extra white valves are included. Larger size cushions are separately available for sale. To order replacement part or larger size breast cushions please call
+(0)113 205 4201 or visit www.lansinoh.co.uk for details in the UK. You can also
contact your Country Distributor.
7
Before Each Use…
● Always wash hands thoroughly with soap and water before handling the
Breastmilk Expression Set, the pump body, or other attachments.
● Disassemble the Breastmilk Expression Set to clean. Set aside the tubing as it
does not need to be washed or sterlised.
● Do not operate the pump if liquid or moisture is visible in the tubing, but thoroughly dry it first before use if there are any signs of moisture
Cleaning Instructions
Unless otherwise instructed by your healthcare provider, follow these sterilisation
and cleaning instructions.
Sterilisation
1. Prior to using the set for the first time, disassemble and boil for 10 minutes
all parts of the Breastmilk Expression Set that come into contact with breastmilk.
The Set includes all parts except for the Pump Base, Plug, Tubing and Tubing
Connector.
● Note: Ensure you use enough water to keep parts afloat while boiling.
● Note: Do not boil the tubing and tubing connector.
2.Remove all parts from water immediately after boiling.
3.Completely air dry before assembly and next use.
● Note: Partially dried parts may affect operation of the pump.
Please ensure parts are completely dry before use.
Cleaning
● Set aside the tubing and tubing connector. These items do not need to be
washed or sterilised because the diaphragm prevents them from coming into
contact with the breastmilk.
● The breast cushion and containers may be cleaned in the upper compartment of
your dishwasher or hand washed with dish soap in hot water. For best results,
we recommend using a baby bottle brush to clean the container and a teat
brush to clean the insides of the breast cushion. DO NOT use solvents or abrasives. Rinse with hot, clean water.
● All other parts of the Breastmilk Expression Set should be hand washed to prevent loss and extend their usefulness.
● To clean your breast pump, wipe the base with a damp cloth, using only water
or mild soap.
● Do not wash or sterilise the tubing or tubing connector.
●
Note: For best results, make sure the diaphragms are completely
dry before use.
Note: Before using the Breastmilk Expression Set, visually inspect the individual components for cracks, chips, tears, discoloration or deterioration, as this may affect the functionality of the Breastmilk Expression Set. Please visit www.lansinoh.co.uk or call +44 (0) 113 205
4201 in the UK or contact your country distributor for further guidance
and replacement parts.
8
●
Assembling the Breastmilk Expression Set
Your Breastmilk Expression Set comes preassembled in Lansinoh product packaging.
Clean Breastmilk Expression Set parts (except tubing and tubing connector) as
described in the “Cleaning Instructions” section (see page 8). Once all parts are clean
and completely dry, assemble the expression set as follows:
Diaphragm Cap
Diaphragm
ComfortFit™
Breast Cushions
Breast Cushion Body
White Valve
150ml Breastmilk
Collection Container
1.Place purple diaphragm on top of breast cushion body. Ensure lips on diaphragm snap tightly into gaps on the cushion body per the illustration above.
Then, snap clear diaphragm cap onto breast cushion body enclosing the purple
diaphragm.
2.Push ComfortFit™ breast cushion into breast cushion body.
3.Gently secure white valve into the bottom of breast cushion body.
Note: Use caution when handling and cleaning the small white valve (see page 8).
4. Screw collection container onto breast cushion body.
5. Insert tubing into back of Diaphragm Cap; ensure tight fit.
6. Insert tubing connector between the sets. Place tubing input into the pump.
9
Pumping Tips
The most important part of successful pumping is the ability to trigger the let-down
reflex. This is when your milk begins to flow freely. Warm wet compresses applied
to the breasts and gentle, circular massaging of the breasts prior to and/or during
a pumping session can help encourage this natural reflex. Thinking of or looking at
your baby, or a photo of your baby if you are apart, can also be helpful. You also
may wish to try the Lansinoh Therapearl® 3in1 Breast Therapy which can help with
your milk let-down.
Some mums can achieve more than one let-down during a pumping session. You
may be able to achieve a second or third let-down during your pumping session by
returning to the let down (Stimulation) phase by pressing the Let-down Button
.
How Long To Pump
Whilst the Affinity® Pro can be used as a single breast pump, double pumping
compared to single pumping, will reduce the time you spend expressing your milk.
Breastmilk is produced on a supply and demand basis and by expressing your
breastmilk regularly, your body will be stimulated and you will be able to maintain
your milk supply. Just like with breastfeeding, it is not necessary to time your pumping sessions though you will get a better sense of the time it takes for your body
to express your milk using a breast pump. If you have any breastfeeding or breastpump related questions, consult with your Midwife, Health Visitor or other health
care professional or visit www.lansinoh.co.uk.
Pumping and Feeding Tips
You may pump one breast while nursing the baby on the other. This allows you
to maximize pumping effectiveness, using the let-down reflex stimulated by your
baby’s sucking
● You may pump into any standard sized screw-top bottle or container
● Should you choose to use the Lansinoh bottle with a teat of your own, please
take the following precautions:
●
Always test the temperature of any liquid before feeding your baby
●
Do not let a child take a bottle to bed or self feed without supervision
●
To prevent possible choking hazard, test strength of the nipple by pulling on the bulb portion. Discontinue use if any tear or crack appears
•
You may also want to to try the Lansinoh® mOmma® bottle, featuring the NaturalWave™ teat - which is clinically proven to help babies maintain established breastfeeding patterns - allowing your baby to go from breast to bottle and back again.
●
Using the Lansinoh Affinity® Pro
Electric Breast Pump
The Adjustable Difference
Your Lansinoh Affinity® Pro Breast Pump allows you to select a pumping style and
adjust the suction levels separately to identify the settings that are most comfortable for you. You would use the pumping style selector button
to select a style.
Then adjust the suction levels with the
and
buttons to the level which is
most comfortable for you.
10
For Single Pumping
Remove one tube and close the tubing connector. Make sure that the plug is
placed into the pipe outlet properly and pushed in securely. Then follow the
instructions below from step 2.
For Double Pumping
1.Make sure all tubes are attached to the tubing
connector
2.Hold the Breastmilk Expression Set to your
breasts so that the nipple is aligned to extend
straight toward the nipple tunnel of the breast
cushion. Make sure the breast completely fills
the breast cushion so that a vacuum is formed
and no air escapes. If you experience friction or
discomfort on your nipples, you may need a different size cushion. Larger size cushions are also available. For more details, please call +44 (0)113 205 4201 visit www.lansinoh.co.uk
or contact your Country Distributor.
The Breastmilk Expression Set and nipple tunnel
must tilt slightly downward to allow milk to flow
naturally toward the bottle.
3.Press and hold the On/Off Button for a few
seconds to turn the pump on. Breast Pump will
start in the let-down (Stimulation) Phase
.
After two minutes, the let-down (Stimulation)
Phase will automatically change and put you into
Pumping Style 2 in the Expression Phase
.
The let-down icon will disappear from the LCD
display and the expression icon will appear.
11
If you prefer to bypass the pre-set two minute let
down (Stimulation) Phase
or your milk lets down
sooner than two minutes press the Let-Down
Button
to move to the Expression Phase
,
where you can separately select the pumping style
and suction levels.
Note – the Pumping Style Indicator
will appear
in the display to indicate that you are in the
Expression Phase and the let-down indicator
will disappear.
Using the Affinity® Pro Breast Pump
The pumping styles can be changed using the
pumping style button
. Pressing this button
will switch between the three styles.
Note – if at any time the suction on your breast reaches uncomfortable levels,
reduce the suction level by pressing the
button on the left side of the LCD
screen. You can control suction levels in both phases by pressing the
and
buttons.
4.When a pumping session is finished, turn the pump off with the on/off button.
After turning the pump off, the display will remain on for a few seconds. Make
sure there is no suction on the nipple(s) before removing the breast cushions
from the breast. If necessary, break the suction by inserting a finger between the
breast cushion and the breast. Once the suction is broken, the breast cushion
can be removed safely.
Please note: LCD display back light will automatically switch off if no control
buttons are pressed for 20 seconds in order to save power. If the pump unit is
left switched on and unattended for more than 60 minutes, the control system
will automatically switch the power off. You have to press and hold the power-on
button in order to switch the unit back on again.
NOTE: If the suction on your breast reaches uncomfortable levels,
reduce the suction level by pushing the
Suction button, or disconnect the tubing connector from its tubing input on the electric
pump base.
12
Power Options
The pump may be operated under any of the following power supply modes:
AC Adapter (included)
Connect the AC adapter to the power connector socket located on the right side of the pump.
Plug the AC adapter into an available electrical
outlet.
Electrical safety can only be achieved when the
breast pump is connected to the AC Power
Adapter supplied with the product.
(See “Technical Data” section, page 14-15 )
6 AA Alkaline Batteries (not included)
Make sure the batteries are inserted correctly
according to the polarity (+) and (-) as indicated.
Close the compartment by gently pressing the
cover until it snaps into place.
Remove batteries if pump is not in use for a long
period of time. Dispose of batteries according
to regulations for environmental protection and
recycling. Replace all batteries at the same time.
Please note that the pump is not designed to be
used with rechargeable batteries.
Do not mix old and new batteries. Do not mix alkaline and standard (carbon-zinc)
batteries. If batteries are in the pump, but AC adapter is in use, the pump will use
the adapter to power the pump, not the batteries. For the most economical use, we
recommend using your pump with the AC adapter provided. Your AC adaptor is a
universal AC plug adaptor type and can be used with 100 V to 240V systems with
50Hz and 60Hz mains.
Breastmilk Storage Guidelines
Breastmilk Storage and Thawing Guidelines
For Healthy Term Babies
Check with your healthcare professional, Midwife or Health Visitor for specific
storage instructions.
When you are freezing your breastmilk, do not fill containers more than ¾ full to
allow for expansion from freezing. Date containers with the date you expressed
your milk for future reference.
13
Breastmilk Storage Guidelines
Note: DO NOT store breastmilk in freezer door. The door tends to be
the warmest part of the freezer.
Date all breastmilk and use the oldest breastmilk first.
Thawing
Thaw frozen milk in the refrigerator or place the containers under cool running
water, gradually warming the water until the milk is thawed. Thawed milk can be
kept in a refrigerator for up to 24 hours.
NOTE: DO NOT refreeze milk once it is thawed.
Gently shake thawed milk before feeding to baby to mix the layers that have
separated. Breastmilk is not homogenized and the “cream” will rise to the top of
the bottle. Breastmilk can vary in color and consistency depending upon the time
of the day that the milk was expressed, what you have eaten, and the age of the
baby at the time of pumping.
NOTE: DO NOT MICROWAVE HUMAN MILK! Microwaving alters the
composition of the milk. Microwaving also may create “hot spots” in
the milk that could burn the infant.
NOTE: DO NOT thaw breastmilk in hot or boiling water.
Technical Data
1.
Power Supply
Battery operation: 6 AA size alkaline batteries (not included), all connected in series. Do
not use rechargeable batteries
Battery operating time: Approximately 2 hours with 6 alkaline batteries (not included). AC Adaptor operation: 110V / 220V wall plug type AC adaptor, galvanically isolated with 9V output voltage
Pump power dissipation:10 Watts maximum
Voltage regulation: Linear voltage regulator with low dropout voltage and short circuit protection
2.
Control System
Control unit: Microcontroller with integral program memory
Program memory: 32K flash ROM, 1K RAM memory
HMI: LCD display with LED backlight, soft keypad
Single / double control: Single or double breast pumping possible
Selectable pumping styles: 3 pumping styles are selectable and controlled from keypad
Adjustable suction level: 8 suction levels are selectable and controlled from keypad
Suction vacuum level: Minimum 80 mmHg, maximum 220 mmHg
14
Technical Data
Technical Data
Power Requirements
AC Adapter (included)
AC Adapter – UK
Plug Configuration
110V/220V wall plug type
AC adaptor, galvanically isolated
adaptor with 9V DC output voltage.
Batteries (not included)
6 AA batteries, 1.5V alkaline
Regulatory Compliance
UL (E302267 ) and CSA approved
with UK power adapter.
Regulatory Complianc
e
Type BF Applied Part
Type BF
Applied Part
Keep dryK
eep away
from sunlight
Must not be
disposed of
together with
household
refuse
To maintain your power adaptor follow these instructions
:
DO NOT wrap CORRECT
DO NOT unplug CORRECT
cord of power
power adaptor
adaptor around
by pulling on the
the plug body.
cord.
DO NOT use power adaptor if damaged.
Troubleshooting
Troubleshooting the Lansinoh Affinity® Pro Electric Breast Pump
Interruption of Electrical Service
If you experience an interruption in the normal operation of the electrical and/or
mechanical functioning of the pump, simply do the following:
■ Unplug the AC adapter cord from the electrical outlet.
■ Wait a few seconds, and then plug the AC adapter cord back into the electrical outlet.
If you still experience electrical failure, try using the pump with the six AA batteries making
sure the AC adapter is removed.
Discomfort While Pumping
If you feel any discomfort, you may need a different size breast cushion.
Visit www.lansinoh.co.uk or call +44 (0) 113 205 4201 in the UK or contact your country
distributor.
Decreased Suction
If it feels like the suction has decreased, try the following:
■ Remove the tubing from pump and place a finger over the tubing connector. If you feel
suction, the pump is operating properly, but the Breastmilk Expression Set may not be
correctly assembled or the white valve may be damaged. If no suction is felt on your
finger, try unplugging the adapter from the electrical outlet, wait a few seconds, and
plug it back into the electrical outlet.
■ Make sure the Breastmilk Expression Set has been properly assembled. Check the
assembly information in the section “Assembling the Breastmilk Expression Set”, on page 9.
■ Inspect the white valve for a tear or pinhole. This component is critical to achieving proper
suction. Replace the white valve with one of the spare valves provided with the product.
■ When single pumping, check the tubing connector on the front of the pump to make sure
it is closed for single pumping. If open, close the connector.
■ If double pumping, ensure that the breastmilk expression set is on both breasts before
starting the pump.
Increased suction level for single pumping:
If it feels like the suction is higher than usual when single pumping, check that the plug for the
pipe is clean and that the airway in the plug is not blocked.
15
Warranty
Limited Consumer Product Warranty
This product is warranted to the original consumer purchaser (the “purchaser”)
to be free from defects in material and workmanship which are not commercially
acceptable for the period of one year from the date of purchase on the pump
mechanism and the period of 90 days on all other product components. Warranty
coverage terminates if you sell or otherwise transfer this product to another person.
This warranty gives you specific legal rights and you may also have other rights,
which vary, by location.
LANSINOH® MAKES NO EXPRESS WARRANTY OF ANY KIND REGARDING
THE PRODUCT OTHER THAN THOSE WARRANTIES EXPLICITLY SET FORTH
HEREIN. ANY IMPLIED WARRANTY, INCLUDING ANY IMPLIED WARRANTY
OF MERCHANTABILITY OR ANY IMPLIED WARRANTY OF FITNESS FOR A
PARTICULAR PURPOSE, TO THE EXTENT PERMITTED BY LAW, SHALL BE
LIMITED IN DURATION TO A PERIOD OF 90 DAYS FROM THE DATE OF
PURCHASE BY THE ORIGINAL PURCHASER.
In the event the product is found by Lansinoh® to not meet the above limited
warranty, as purchaser’s sole and exclusive remedy Lansinoh® will repair or, at the
option of Lansinoh®, replace this product without charge for such replacement or
parts or labor.
NOTE: The purchaser shall bear all expense for returning this product
to Lansinoh®. This warranty does not apply to any product that has
been subjected to misuse, abuse, or alteration.
Only Lansinoh® brand replacement parts are recommended for use with Lansinoh®
breastfeeding products. Improper or incorrectly performed maintenance or repair, or
use of non-Lansinoh® brand replacement parts may invalidate this warranty.
TO THE EXTENT PERMITTED BY LAW, LANSINOH® SHALL NOT BE
LIABLE FOR ANY INCIDENTAL OR CONSEQUENTIAL DAMAGES INCLUDING, BUT NOT LIMITED TO, REPLACEMENT COSTS RESULTING
FROM THE BREACH OF ANY WRITTEN OR IMPLIED WARRANTY.
If you wish to make a claim under this warranty, please telephone +44 (0)113 205
4201 if you are in the UK or contact your country distributor. You will be given a
Freepost address to return the product, if necessary, together with your original
dated bill of sale or other dated proof of purchase and a brief statement of the
problem.
16
Declaration for Electromagnetic Compatibility (EMC)
For information use only
FCC Statement:
This device complies with part 15 of the FCC rules. Operation is subject to the following two
conditions: (1) This device may not cause harmful interference, and (2) this device must accept any interference received, including interference that may cause undesired operation.”
Wireless Statement:
Keep safe distance from portable and mobile RF communications equipment as they can
affect the performance of this device.
Stacking:
This device should not be used adjacent to or stacked with other equipment. And if adjacent
or stacked use is necessary, this device should be observed to verify normal operation in the
configuration in which it will be used.
17
This product is a personal care product and therefore cannot be returned once opened. If
you experience any problems with this product, please telephone our free customer service
line at +44 (0)113 205 4201 in the UK or contact your Country Distributor. Our representative
will be happy to assist you.
Lansinoh Laboratories, Inc
Jason House
Kerry Hill
Leeds
LS18 4JR UK
Lansinoh.co.uk
Lansinoh® and Affinity® Pro are registered trademark of Lansinoh Laboratories, Inc.
©2012 Lansinoh Laboratories, Inc. All rights reserved. Printed in Turkey.
DE53035IF0912
18