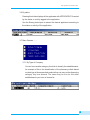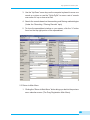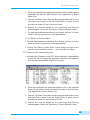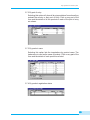
1
Setting up a computerized
drug registration & allied
information system
A User’s MANUAL
World Health Organization
Regional Office for the Western Pacific
WHO Library Cataloguing in Publication Data
Setting up a computerized drug registration & allied information system : a user’s manual
1. Technology, Pharmaceutical - standards 2. Drug monitoring 3. Legislation, Drug 4. Information
systems 5. Manuals
ISBN 92 9061 064 6
(NLM Classification: QV 778)
© World Health Organization 2004
All rights reserved.
The designations employed and the presentation of the material in this publication do not imply the expression of any
opinion whatsoever on the part of the World Health Organization concerning the legal status of any country, territory,
city or area or of its authorities, or concerning the delimitation of its frontiers or boundaries. Dotted lines on maps
represent approximate border lines for which there may not yet be full agreement.
The mention of specific companies or of certain manufacturers’ products does not imply that they are endorsed or
recommended by the World Health Organization in preference to others of a similar nature that are not mentioned.
Errors and omissions excepted, the names of proprietary products are distinguished by initial capital letters.
The World Health Organization does not warrant that the information contained in this publication is complete and
correct and shall not be liable for any damages incurred as a result of its use.
Publications of the World Health Organization can be obtained from Marketing and Dissemination, World Health
Organization, 20 Avenue Appia, 1211 Geneva 27, Switzerland (tel: +41 22 791 2476; fax: +41 22 791 4857; email:
[email protected]). Requests for permission to reproduce WHO publications, in part or in whole, or to translate
them – whether for sale or for noncommercial distribution – should be addressed to Publications, at the above address
(fax: +41 22 791 4806; email: [email protected]). For WHO Western Pacific Regional Publications, request for
permission to reproduce should be addressed to Publications Office, World Health Organization, Regional Office for
the Western Pacific, P.O. Box 2932, 1000, Manila, Philippines, Fax. No. (632) 521-1036, email:
[email protected]
TABLE OF CONTENTS
ACKNOWLEDGEMENTS
V
INTRODUCTION
1
PART 1
4
1.
2.
3.
4.
5.
Deciding to computerize drug registration
Fulfilling the requirements
Setting up a computerized drug registration system
Description of the system
Application forms
PART 2
1.
2.
3.
4.
5.
6.
7.
8.
9.
10.
4
4
7
12
15
16
Installing the drug registration and information system
Getting started
The Windows desktop
Menu bar
Quick catalogue reference buttons
Menu selection buttons
Searching and filtering
Sorting buttons
Limitations
Moving around
PART 3
Licensing of establishments subsystems
Entering a new application
View all (multiple)
View approved registrants
Print
Update catalogue files
Share information
Exit
Product registration system
Receiving
16
17
22
23
25
26
26
27
28
28
29
29
32
33
34
38
42
42
43
43
44
View all records
Query registered products
Prepare to print form 1
Prepare drug registration certificate
Update databases
Exit
Drug monitoring subsystem
Enter new invoice
View records menu
Update catalogue files
Exit
ANNEX A: GENERAL OUTLINE OF THE SYSTEM
46
49
66
67
69
76
77
77
79
84
85
86
Drug registration and information system
INTRODUCTION
There are three parts to this user manual: Part 1 outlines the minimum
requirements needed before setting up to computerize the drug registration
system. It then describes the drug registration and information system in
general. An overview of the drug registration system with emphasis on the
hardware and the software needed to install a computerized drug registration
system and finally, the data preparation requirements is presented; Part 2
presents, in detail, how to install the application systems. A step by step
guide is presented to aid the user during the actual installation process;
and Part 3 explains the details of the three subsystems under the DRUG
REGISTRATION SYSTEM AND INFORMATION SYSTEM and it provides in depth
illustrations on the use of the installed subsystems.
Introducing a computerized DRUG REGISTRATION AND INFORMATION
in a drug regulatory authority will entail investment in terms of time
and energy. The benefits derived in using such a system however, cannot
SYSTEM
be overemphasized. Not only will the system facilitate the systematic
organization of data, a computerized system can also help the drug
registration staff reduce the amount of time spent on clerical work. The
drug registration staff can thus concentrate more on the technical evaluation
of product applications.
A computerized DRUG REGISTRATION AND INFORMATION system will greatly
reduce the amount of clerical errors that abound in most manual systems.
Management information reports can easily be prepared when using a
computerized system. Preparation and printing of the certificates for product
registration (CPR) and the licenses to operate (LTO) for establishments
may be automated. The tremendous reduction in the time for the staff in
preparing certificates results in a more efficient management of resources.
Preparation of reports is a keystroke away and can be redesigned using
MSWord™ or MSExcel™ to suit user preferences. Ultimately, this results
in a more professionally run drug regulatory agency.
1
Drug registration and information system
Users of the system will also appreciate that moving from a manual to
a computerized drug registration and information system is an investment
well spent in the long run.
Developed as a tool for Drug regulatory agencies (DRA) implementing
a computerized system for the registration of pharmaceutical products, the
system is designed to aid the DRA in countries in the management of drug
registration data. The system was developed to provide for a fast and
efficient way for recording and retrieving data. With the information
generated by the system, sound management decisions may be enhanced
which may help countries regulate and ensure the quality of drugs available
in the market.
The system was purposely made as simple as possible and has been
pre-tested in several installations for user-friendliness. It is also designed
to encourage the DRA to implement a computerized system with resources
that may already be available. No other special equipment or software
other than the basic windows office suite is required. Because Microsoft
Office Suite is commonly used in most drug regulatory offices, the DRUG
REGISTRATION AND INFORMATION SYSTEM was developed using one of
the office suite packages: MSAccess™. Another version of the same system
may also be available, with the same user interface, recoded in Visual
Basic™. The recoded version of the system can be used in a multi-user
environment in a true client-server relational database management system
such as Microsoft SQL™ server, where tighter security may be a
prerequisite.
The primary reason for using MSAccess™ as the database
management system was to simplify future maintenance. With the system,
the user can easily transport the data to another database management
system. The entire dataset can then be moved to Dbase™, FoxPro™,
SQL™, MS Excel™, or Oracle™. Abandoning the database will not be
necessary in the event of a policy change to use another database
management system. This will save the user countless time and resources
in reentering the data.
2
Drug registration and information system
A generic report preparation scheme is employed in the DRUG
REGISTRATION AND INFORMATION SYSTEM. The MSWord™ word-processing
and the MSExcel™ spreadsheet programs are utilized to maximize user
familiarity with these programs - a plus for user acceptance of the drug
registration system.
Data can easily be exported to other Microsoft™ office products as well
as to similar database engines. Thus, upgrading to a true client-server
database management systems like SQL Server™, Oracle™, or some other
highly scalable database management system as the back-end database
will be less daunting. The main database was purposely not split into smaller
tables, as would normally be done, for the very same reason.
3
Drug registration and information system
PART
1
1. DECIDING TO COMPUTERIZE DRUG REGISTRATION
A crucial step towards the computerization of a DRUG REGISTRATION
AND INFORMATION SYSTEM is the planning phase. This step is often taken for
granted when managers want to get on with the project, reasoning that
“events will just fall in place.” Embarking on computerizing a manual drug
registration system is not a quick fix remedy to flaws that may be inherent
in the manual registration system. The procedures followed should be in
consonance with the provisions spelled out in the drug legislation and
regulation of the country. Although training of the staff in using a
computerized system for drug registration is part of setting up a
computerized drug registration and information system, computerization
per se should not replace technical drug registration training that is
necessary to equip the staff with skills to examine product registration
dossiers.
Managers in drug regulatory agencies (DRA) should be aware that
prerequisites to computerization must first be met in order to successfully
implement a computerized DRUG REGISTRATION AND INFORMATION SYSTEM.
The absence of these conditions may mean a low success rate and,
although the project may eventually succeed, the entire computerization
process may take a little longer to accomplish.
2. FULFILLING THE REQUIREMENTS
The management of drug regulatory agencies must establish its
readiness to undertake the computerization of the DRUG REGISTRATION AND
INFORMATION SYSTEM or risk not accomplishing the desired objectives. The
ultimate goal is to get the system running and be able to retrieve up-todate drug registration reports. Management should also be able to maintain
and upgrade the system in the future. Figure 1 lists the pre-requisites that
the DRA management must meet before installing and implementing the
4
Drug registration and information system
drug registration and information system. Political support is the foundation
upon which all the other prerequisites rest. Without it there will be no basis
to carry on with the computerization of the drug registration and information
system. Figure 1 illustrates important questions to answer before starting
P o l i t i c a l
Can data be
computerized?
to
co
mp
ute
riz
e
Is there existing system &
procedure?
Are there funds to undertake
computerization?
Have you defined your
information needs?
Is there drug
legislation &
regulation?
ess
din
ea
r
s
ses
As
Have you identified a responsible
person who can do the job?
this project.
Su p p o r t
Fig 1. Is the regulatory agency ready for computerization?
2.1 Is there a drug legislation and regulation in place?
Legislation establishes the general framework for the government to
act. It is the legal basis that creates the drug regulatory authority in the
country. From the legislation, a regulation document is prepared that outlines
the operating procedures. It is essential, therefore, that legislation and
regulation are clear and well articulated.
2.2 Can the information needs be defined?
If an existing reporting system exists in the drug regulatory authority,
then the time needed to convert from a manual to a computerized system
is greatly reduced. Management should decide which reports it needs to
aid them in future decisions and directions. Gather all generated reports,
tabular lists and other ad hoc reports in the existing manual system and
examine their contents. Because we wish to generate similar reports and
lists in the future using the DRUG REGISTRATION AND INFORMATION SYSTEM,
5
Drug registration and information system
the data must be contained in the Drug Registration System database. A
plan is then needed in order to extract them from the drug dossiers and
other registration application forms.
2.3 Do you have the funds to undertake computerization?
Without the proper logistical support, planning to implement a
computerized drug registration system is an exercise in futility. Resources
in terms of hardware, software, personnel and training will be required to
make the plan operational. Take away one and the system will be incomplete.
2.4 Can you identify a responsible person who shall act as the lead person for the
project?
If an existing drug registration system is operational, then the most
likely candidate to act as the leader of the project will be the person who is
in-charge of the present manual drug registration system. There may be
some resistance if this person feels that computerization is too complex an
undertaking. The goal of this user manual is to simplify the process by
explaining the tasks involved in setting up a computerized drug registration
system.
The drug registration system was designed to be as simple as possible.
That is why it was developed in the MSAccessTM environment.
2.5 Do you have an existing system of drug registration procedures?
A systematic way of receiving, evaluating and approving of product
applications in the regulatory authority should already exist. Computerization
of the registration system will not work if decisions for the registration of
are made arbitrarily. There must be a clearly defined path from the receipt
of the application up to the issuance of the product marketing authorization
certificate stages. If there is no such system, then a manual system must
be prepared before starting a computerized system of registration.
2.6 Can your drug registration data be computerized?
The drug registration data must be in a format that can be entered into
a computer. If there is existing drug registration data, can the data be entered
in an electronic format? If not, the data must be converted into a format
6
Drug registration and information system
that the computer can understand. Can the data be extracted for all products
and not just for some product applications? Information for all of the products
in the registry must be complete and consistent throughout all the fields in
all levels.
3. SETTING UP A COMPUTERIZED DRUG REGISTRATION SYSTEM
3.1 Identify the data and information
The DRUG REGISTRATION AND INFORMATION SYSTEM requires two basic
sets of data. These data are gathered from two drug regulatory activities:
licensing of establishments and product registration. In some drug regulatory
authorities, these functions may sometimes be assigned to different units
and therefore are performed by different staff. In the computerized DRUG
REGISTRATION AND INFORMATION SYSTEM, the data in the product registration
system is shared with the licensing of establishments system data, and
vice versa in order to minimize data redundancy. Both systems’ data in turn
are shared with the third system, the drug import monitoring system.
Tables 1 and 2 enumerate the data that are needed in the
implementation of the computerized DRUG REGISTRATION AND INFORMATION
SYSTEM. These are the basic data that will have to be gathered and will
later be required to be entered into the computerized drug registration and
information system:
The current drug registration data in the drug regulatory agency may
be in a different format. The data might be contained in an index card,
printed in stocks of papers, printed in continuous forms or even be in
electronic format. Common electronic data formats in DRAs are Lotus123™,
Microsoft Excel™, dBase™. Some DRAs have entered their drug registration
data in a word processing format. If so, it will be necessary to convert the
records to the MS Access™ database format. Conversion of the contents
of the record files from the existing format in the Access format may not be
a straight forward process. This is because the existing database template
may not exactly match with the template of the DRUG REGISTRATION AND
INFORMATION SYSTEM. To
systematically do the conversion, a strategic plan
may have to be formulated. This will help prevent a disruption of the
operations of the existing drug registration system.
7
Drug registration and information system
Table 1. Licensing of establishments data
1.
2.
3.
4.
5.
6.
7.
8.
9
10.
11.
12.
13.
14.
15.
16.
17.
18.
19.
20.
21.
22.
23.
24.
25.
26.
27.
Application number
Name of company
Licensing classification
Type of company
Address: street
Address: district
Address: province / state
Address: country
Address: zip code
Telephone number
Fax number
Email address
Company URL (website)
Contact person
Date of birth of contact person
Contact person’s street address
Contact person’s district address
Contact person’s province address
Contact person’s position in company
Contact person’s educational attainment
University graduated
Date graduated
Years in service
License to operate number
Date registered
Expiration date
Application status
Conversion of the data is a critical step towards implementing a
computerized drug registration system. In instances where data are too
numerous, planning the conversion process will greatly contribute to a
successful project. Planning the conversion with an experienced strategic
planner will be helpful when thousands of records are already in existence.
In these installation, a parallel run of the old system vis-à-vis the new
computerized drug registration and information system may be necessary.
8
Drug registration and information system
Table 2. Product registration data
1.
Application number
2.
License owner
3.
4.
5.
Manufacturer
Brand name
International nonproprietary name
6.
7.
Dosage form
Storage conditions
8.
9.
Shelf life
Primary packaging
10.
11.
Packing size
Dispensing category
12.
13.
Anatomical therapeutic chemical classification code
Pharmacological classification
14.
15.
Listed as essential drug in country?
Description
16.
17.
Country of import
Registration number in country of import
18.
19.
Date of registration in country of import
List of active ingredients and dosages
20.
21.
Indications
Contraindications
22.
23.
Side effects
Unit price
24.
25.
Activity / status of product
Date of application
26.
27.
Product registration number
Date of registration
28.
Date of expiration
3.2 Determine the required resources
Three kinds of resources are necessary to carry out the drug registration
and information system:
9
Drug registration and information system
3.2.1 Hardware
This is the equipment used for input, output and storage of data.
Hardware is normally the computer and hard drive. The minimum hardware
required to run the drug registration and information system is listed below:
o 486 Microprocessor 1xx Mhz or higher;
o 32 MB random access memory (RAM);
o 5 Gigabytes hard disk;
o 1.44 MB disk drive;
o CD ROM drive;
o Super video graphics adaptor monitor;
o Mouse;
o Keyboard;
o Printing device.
3.2.2 Software
The software is a set of instructions that tell the hardware what to do.
To implement the DRUG REGISTRATION AND INFORMATION SYSTEM, an operating
system and two application systems are needed to get the system up and
running. The Microsoft Office Suite, preferably MSOffice2000TM, must be
installed before finally installing the DRUG REGISTRATION AND INFORMATION
SYSTEM.
Below is a list of the minimum software requirements needed to
install and run the DRUG REGISTRATION AND INFORMATION SYSTEM. After
installing the operating system and the MSOffice Suite, the DRUG
REGISTRATION AND INFORMATION SYSTEM software can be installed as
described in the section under the heading, “Installing the DRUG
REGISTRATION AND INFORMATION SYSTEM.” Follow the instructions outlined in
the appropriate section of the user manual. The DRUG REGISTRATION AND
INFORMATION SYSTEM application software is contained in the CDROM as a
package with this user manual.
Shown below are the minimum software needed in order to install the
system:
o
Windows98™ operating system;
o
MSOffice2000™ (MSWord™, MSExcel™, MSAccess™);
o
DRUG REGISTRATION AND INFORMATION SYSTEM
10
Drug registration and information system
Because the Computerized Drug Registration and Information System
was developed in the MSAccess™ environment, the MSOffice office suite
together with the Windows™ operating system must be preinstalled in each
computer where the application systems will reside.
3.2.3 Human resources
In computer jargon, peopleware is the term used to refer to the users of
computer systems. No special computing skills are required from users to
operate the DRUG REGISTRATION AND INFORMATION SYSTEM. Users should know
how to operate a computer, how to type (or use a typewriting machine),
and how to use MSWordTM and MSExcelTM
Users will have to undergo training on how to use the system. The
users must understand the relationships among the different functions in
the registration system. This will give them a working knowledge about
how the different functions coordinate as a whole. Users must also learn
how to prepare back-up copies of the databases and how to act as a
facilitator in training other staff.
A responsible person, preferably one who is already in charge of the
product evaluation, should be identified to act as the key personnel for the
computerized DRUG REGISTRATION AND INFORMATION SYSTEM. The person in
charge must ensure that data entered in the DRUG REGISTRATION AND
INFORMATION SYSTEM are accurate, up-to-date and kept physically secured.
Future enhancements to the system may also be necessary because of
policy changes in the regulatory body.
To ensure that the drug registration system is kept up to date with current
technological advances, the person in charge of the system must also be
abreast of advances in the field so as not to be at risk of technological
obsolescence.
In most DRAs installing a computerized system for the first, a full time
IT staff (computer personnel) is usually not employed. This makes the role
of the person in charge a more challenging endeavor because the person
will be expected to know some maintenance chores needed to keep the
system fit at all times. Maintenance consists of two components: hardware
maintenance, which is usually deputized to a computer hardware supplier;
11
Drug registration and information system
and software maintenance, usually done in-house. Depending on how
complex the existing installed system is and how secure the network is
from outside intrusion such as virus infections, software maintenance can
be as complex as the system setup is.
The person in charge also has to ensure that procedural changes in
the organization will be added into the computerized system in order to
keep it up to date with the ever changing policies in the organization. Once
again, this makes the role of the person in charge a challenging task.
4. DESCRIPTION OF THE SYSTEMS
The DRUG REGISTRATION AND INFORMATION SYSTEM consists of three
application subsystems: a licensing of establishments system; a product
registration system; and a drug import monitoring system.
The DRUG REGISTRATION AND INFORMATION SYSTEM is an integrated
system consisting of smaller systems built and designed according to
function, i.e. licensing of establishments, product registration, drug import
monitoring. The system was built modularly for obvious reasons. This makes
it possible for the DRUG REGISTRATION AND INFORMATION SYSTEM to evolve
with the growing information requirement in a drug regulatory agency. Each
system has a corresponding database that is maintained and “owned” by
the office or unit performing the said function. For example, the “product
registration system” shall be operated and maintained by the unit performing
the evaluation of products for registration while the “licensing of
establishments system“ shall be used and maintained by the unit performing
the licensing of the different establishments.
Each system in the DRUG REGISTRATION AND INFORMATION SYSTEM has
its own set of catalogue files. The catalogue files will ensure that consistent
and uniform data is entered in the DRUG REGISTRATION AND INFORMATION
SYSTEM.
The staff or the office in the regulatory body performing a function
updates its own database. Data in different databases are shared with
others in the DRUG REGISTRATION AND INFORMATION SYSTEM, making it one
12
Drug registration and information system
whole and integrated system within the same drug regulatory office. The
different databases can later be linked to new application systems that
may be designed and developed in the future.
The licensing of establishments system contains the list of registered
establishments transacting pharmaceutical products in the country. These
establishments may be imports, agents, manufacturers, exporters, repacking
companies, pharmacy outlets, or donors. After an evaluation of the activities
of these establishments, and presuming that the establishment passes the
minimum standards set for registration, a license to operate (LTO) certificate
is issued by the regulatory authority. The list of registered establishments
is “shared” information with the product registration (see below) and the
drug import monitoring (see below) systems. Essentially, each product has
a license holder/ marketing authorization owner who is the referred applicant
in the product registration system. If an applicant is not registered, then the
product registration system cannot accept the product application because
the applicant company is not a registered company.
The product registration system is a database of products registered
with the regulatory authority. Basic information of registered products can
be retrieved and reports printed when required. A product registration
certificate is issued once the criteria for product registration has been met.
The list of registered products is shared information with the drug import
monitoring system.
Once data for “licensing of establishments” and the “product registration”
systems have been entered, information on the importations of drugs can
be monitored using the drug import monitoring system. This will be done by
entering the data on importations in the system. The system checks that
the product being imported is a registered product. Likewise, the importer
will be checked against the information in the licensing of establishments
system. If one is not in the system, importation details cannot be entered in
the system and an importation certificate cannot be issued. The system
generates numerous management information reports that will describe
the drug importation profile.
13
Drug registration and information system
Drug importation data are checked against the product registration
system and against the licensing of establishments databases. Importation
data are entered into the drug importation and monitoring subsystem. An
importer must be a registered establishment and the product being imported
must have already been registered. The system can generate various
reports that enable the regulatory authority to monitor the importation profile
of drug products in the country.
Figure 3 is a data diagram of the relationship between the product
registration and the licensing of establishments systems in the integrated
DRUG REGISTRATION AND INFORMATION SYSTEM.
Product Information
Classifications
Manufacturer
Catalogue
Dosage Forms
Catalogue
Primary Packaging
Catalogue
Dispensing Category
Catalogue
ATC Classification
Catalogue
Pharmacologic Classification
Catalogue
Country
Catalogue
Applicant Information
Catalogue
* ApplicationNo
* Lic_owner
* ManuID
* Brand name
* DosageCode
* Storage Condition
* Shelf life
* PackingCode
* Packing Size
* Dispensing Code
* ATCCode
* PharmClass
* EDL
* Description
* CountryID
* Registration(Import)
* Date of registration(import)
* Ingredients
* Indications
* Contraindications
* Side Effects
* Unit price
* ActivityCode
* Date of application
* Registration No
* Date of registration
* Date of expiration
* ApplicationNo
* CompanyName
* Classification
* TypeOfCompany
* Street
* District
* ProvID
* CountryID
* ZipCode
* Telephone
* Fax
* BankName
* BankAcct
* ContractPerson
* DOB
* CPStreet
* CPDistrict
* CPProvince
* Education
* University
* DateGraduated
* YearsInService
* LTO#
* DateRegistered
* Expiration
* Status
Catalogue
Types of Company
Catalogue
Districts
Catalogue
Provinces
Catalogue
Countries
Catalogue
Status
Catalogue
Activity
Product registration system
Licensing of establishments system
Fig 3. Product registration vis-à-vis the licensing of establishment system
14
Drug registration and information system
5. APPLICATION FORMS
To facilitate data entry into the systems, two application forms are
provided in the Computerized Drug Registration and Information System:
an application form for a license to operate (LTO); and an application form
for product registration. The application forms are provided in the respective
subsystems. It is suggested that the provided application forms will be used.
5.1 Licensing of establishments application form
An LTO (license to operate) application form is provided. It will be used
in conjunction with the Licensing of establishment subsystem. The form
will facilitate data entry of the information into the Licensing of establishment
subsystem.
5.2 Product registration application form
An application form for the registration of the products is also provided
for data entry into the product registration and information system. The
form was designed to facilitate data entry of the drug registration data.
Data are grouped according to applicant information, manufacturer
information, product information and finally, status of application information.
It is suggested, therefore, that evaluators use the application form as a
working sheet in the performance of the evaluation of the products.
Evaluators are encouraged to make corrections on the worksheet.
Together with the product application form is a routing slip. This form
may be used to manually transmit the product dossier to key personnel
involved in the evaluation of a product application. The drug registration
committee can later refer to the routing slip information during its committee
deliberation meetings. The routing slip contains the summary of the
decisions made for a particular product application. This form can be used
to update the application status for each product application into the DRUG
REGISTRATION AND INFORMATION SYSTEM.
15
Drug registration and information system
PART 2
1. INSTALLING THE DRUG REGISTRATION AND INFORMATION SYSTEM
A compact disc containing three self-extracting subsystems in the DRUG
REGISTRATION AND INFORMATION SYSTEM is provided together with this
manual. To install the complete drug registration system, you have to repeat
the procedure three times. First, install the Licensing of Establishments
subsystem; second, install the Product Registration subsystem; and third,
install the Drug Import System.
The three subsystems may be used by three separate units in the drug
regulatory agency (DRA). The three subsystems share common databases
in order to eliminate redundancy of information in the same DRA. Even
though each subsystem has its own core database, data is shared with the
other systems when needed. In smaller DRAs, the three functions may be
integrated as a function of one unit or may even be performed by one
personnel in the DRA. The integration of the functions in one unit or to one
person is immaterial on how the drug registration system will be used in
such environments.
Sample database records are included, on installation, with each
subsystem. Installing the system with a sample database will enable the
user to use fictitious data and familiarize himself or herself with the
operations of the system before finally using the drug registration system.
16
Drug registration and information system
2. GETTING STARTED
2.1 Insert the install CD in the CDRom Drive (usually drive D).
NOTE: The installation disc contains three executable installation files: “Licensing of
establishments.exe”; “Product registration.exe”; and “Drug import.exe.”
Insert installation CD in CDRom drive
2.2 At the WindowsXX desktop, click the mouse on “Start”;
Note: XX – 95; 98; 2000
17
Drug registration and information system
2.3 Then, select “Run.”
Select "run"
Type “D:\product
registration”
2.4 The “run” window appears.
2.5 At the “Open” dialogue box, type
D:\XXX
Where: “D:” is the CDRom drive and XXX will be one of the following:
product registration;
licensing of establishments; or
drug import system.
The user will do this procedure for each of the subsystems above.
2.6 Click “OK”.
18
Drug registration and information system
2.7 The “PreSetup” dialogue box appears. Press the “OK” button to continue
the installation process.
2.8 Another dialogue box appears (see below), informing the user that
installation is in progress.
2.9 The appropriate subsystem installation window appears e.g. the product
registration subsystem window appears as shown next.
19
Drug registration and information system
Press the “Next” button to continue the installation of the appropriate
subsystem.
After pressing the “Next” button, the options window appears as shown
below.
In the options window, you now have a choice of whether to install the
subsystem with a sample database or to install the subsystem with an empty
database in order to start entering your own data.
Position the mouse button on the desired choice and press the left mouse
button while positioned on the small box, (For example “Sample database”
or “Blank database”.)
After making the selection, press the “Next” button. Another window appears.
20
Drug registration and information system
Follow the instructions by pressing the “Next” button after each window
until the Setup dialogue box informs you that installation is complete. Press
the “OK” button.
Repeat the same steps above to install the other two subsystems.
After the installation process is completed, three application system icons
will appear on your active Windows desktop.
21
Drug registration and information system
3. THE WINDOWS DESKTOP
After installation of the drug registration subsystems, three icons will
appear on the Windows desktop: a) Licensing of establishments; b) Product
registration; and c) Drug import.
To launch a subsystem, position the mouse cursor on one of the three
icons. Once positioned on the desired application, click the “left” mouse
button. The desired application is launched, showing the Main Menu screen
of the application. All three subsystems’ main menu screens all have a
consistent look and feel. Each has the following: a) Menu bar; b) Menu
selection buttons; and c) Quick catalogue reference buttons.
a) Menu Bar
b) Menu selection buttons
c) Quick Catalogue reference buttons
22
Drug registration and information system
4. MENU BAR
The Menu bar at the top enables the manipulation of the records in the
database. Once the records are displayed, use the icons on the menu bar
to search, filter, sort and print records in the database based on the criteria
you have set. The function of each button is explained below:
4.1
- Exit.
This exits or quits the subsystem and brings you back to the Windows
desktop.
4.2
- Close
Closes the current open window and goes up one menu level.
4.3
- Print
Print whatever is on the window to the default printed. To change the printer
settings, you have to make the change from the “control panel” in the
Windows operating system settings.
4.4
- Preview.
View the list of records or view the current window on the computer screen
before printing.
4.5
4.6
- Find button. This button searches for a specified text in the open
table / database.
The Sort buttons
These buttons sort records based on a selected column in ascending /
descending order.
Sorts the selected items in order from the beginning of the alphabet, the
lowest number, or the earliest date and visa versa using the column that
contains the insertion point.
23
Drug registration and information system
4.7 Filter buttons
4.7.1
- Filter by selection.
In the field or column, find one instance of a value you want records to
contain in order to be included in the filters results.
4.7.2
- Filter by form.
A form with empty fields is presented. This filtering technique allows you to
type in the values in the fields of a form for extracting a subset of records
from a database.
- Apply filter (on/off). This is an on/off filter button switch. This is a
4.7.3
toggle button. If the figure is depressed, it indicates that the filter is on. To
turn filtering to off, press the same button. To turn it back on, press the
button again.
4.8 Format buttons
4.8.1
4.8.2
Character format buttons.
Paragraph format buttons.
4.9 Go-to buttons - You use the navigation buttons to move the records in the
database forward or backward one record at a time.
4.9.1
- This button takes you to the FIRST record in the database.
4.9.2
- This button takes you to the PREVIOUS record from where the
cursor is.
4.9.3
is.
- This button takes you to the NEXT record from where the cursor
4.9.4
- This button takes you to the LAST record in the database.
4.9.5
- Press this button to Add a new record in the database. The add
button (
form (
) that is found on the menu bar or at the bottom of the data entry
). Pressing the >* button brings up a blank entry form. Enter
data in the new form.
24
Drug registration and information system
4.10 Report preparation buttons
4.10.1
- Send selected records to the MSExelÔ program.
4.10.2
- Send selected records to the MSWordÔ program.
5. QUICK CATALOGUE REFERENCE BUTTONS
To the right of the Main Menu selections are vertically aligned buttons
with a single underlined letter on each button face. These are the Quick
Catalogue Code Reference selection buttons. Each button represents a
catalogue-table that is used by the subsystem. In a field that depends on
data from a catalogue file, if an item being entered is NOT already an
existing item in the catalogue file, then the record will not be acceptable to
the system and a data entry error will be displayed. For the data to be
acceptable to the system, the item being entered first be entered in the
appropriate catalogue file.
The catalogue files ensure consistency and accuracy in the data entry
process. This is a way to minimize typographical errors that may be entered
into the databases.
Positioning the mouse cursor in any of the catalogue file buttons and
simultaneously clicking the left button activates the catalogue file to open.
Once displayed, the catalogue file window can be closed by bringing the
mouse cursor to the “X” mark on the upper right hand side of the active
window and left-clicking the mouse button. This closes the active window.
The main menu reappears.
The same activation and closing techniques can be used to close active
windows throughout the subsystems.
Another method to activate a command button is to use a shortcut. To
activate the same button for example is to press the “alt”-key on the keyboard
simultaneously with the alphanumeric key of the letter that is underlined.
25
Drug registration and information system
6. MENU SELECTION BUTTONS
The main menu selection buttons contain the needed tasks to enter
new records, to view and to edit existing records, to update the status of a
record, to update catalogue files and, finally, to prepare and to print needed
reports. The buttons are grouped by a common activity: updating/ adding
new records; viewing and searching records; editing records; and printing.
6.1 Combo – boxes (
)
Several of the fields in the drug registration system get their contents from
catalogue files. The fields have a consistent combo-box look, similar to the
one shown here (). Combo-box field allows entry only from existing records
that are contained in a catalogue file.
If an error message is displayed after trying to enter data in a combo-box,
it is an indication that what you are entering is not found in a catalogue file.
Data entry of the item is not allowed. The item must first be entered in the
catalogue file.
7. SEARCHING AND FILTERING
Filtering is a searching technique we shall employ to find an item or
several items throughout the drug registration system.
To do a search, filter buttons (
) are used extensively
throughout most of the forms. There are two filter buttons on all the drug
registration menu toolbars, the “filter by selection” and the “filter by form”
buttons. The type of button to use depends on user preference and the
individual situation when a search is needed. If what you are looking for is
already found on the form, then the filter by selection is the most appropriate
button to use.
7.1 Filter by selection (
): In using the “filter by selection” button, an instance
of the item you want filtered is already found on the form or a sub-form in
the window on your computer screen.
To use the button, position the cursor on the field where the item is found
and then click the “filter by selection” button. How you select the value
determines what records the filter will return. Repeat the same steps until
26
Drug registration and information system
you have the set of records you want. The number of reported records is
reduced when the “filter by selection” button is repeatedly clicked because
that would have set several criteria on the dataset.
7.2 Filter by form (
): Clicking the “filter by form” button will blank out the
contents of the fields on the form or a sub-form on the window. You are
expected to enter the item or items on the blank fields. After entering the
) and the set of
data you want filtered, activate the “apply filter” button (
records based on the criteria you typed on the blank fields are presented
on your computer screen. In the “filter by form” searching methodology,
you enter all the criteria in one form without having to keep on filtering the
dataset one at a time until a subset of the desired data has been derived.
Note: The result of the filter, based on the criteria you specified are the
number of records shown. The total number of records found, based on
the criteria you have typed in the blank fields in the form, is shown on the
navigation buttons on the lower portion of the form or sub-form
). Notice the word “filtered” right
(
beside the number of records. This indicates that filtering is still “on.” Take
note that the “apply filter” button on the drug registration menu bar is
). The “apply filter button” is a toggle button – “on/off
depressed (
switch.” To turn off filtering, depress the button and the record set is reset
to all records in the database. Note that once filtering is off, this is how the
icon will look
. The apply filter is not depressed. It is important that
you take note of whether filtering is ON (
icon not depressed).
8. SORTING
icon depressed) or OFF (
BUTTONS
Another interesting buttons that are found on the main drug registration
menu toolbar are the
buttons. Positioning the cursor on the field
or the
where you want the records to sort and then pressing either the
button will arrange the records in the database in alphabetical or
numerical order, in ascending or descending order depending on which of
the two buttons was pressed.
27
Drug registration and information system
9. LIMITATIONS
In most small installations where only a few staff are involved in the
management of drug registration data, security of the data in the system is
not of primary concern. Most drug regulatory installations operate with a
limited number of personnel, meaning data security is not a major problem.
Data security can easily be managed by keeping a physical lock on the
system. In contrast, a multi-user environment enables multiple users to
simultaneously work on the same database with each user having a different
access capability. Keeping track of who has permission to change or who
changed data in the system is an issue that has to be dealt with in such
environments.
To use the system in a multi-user environment, the present drug
registration system will need recoding to ensure the tighter security
measures needed in a multi-user system and for tracking changes made
by users updating records in the database. In such environments, a multitier architecture may be a more appropriate setup as compared to the
present two-tier traditional client/server architecture.
10. MOVING AROUND
Use the keyboard as you would normally use a typewriter. On the right
hand side of the keyboard is a numeric keypad that can be used to key in
numbers (see figure below).
To use the numeric keypad to type in numbers, press the numlock key.
Once enabled, you can now type numbers straight from the numeric keypad.
If not enabled, the keys will move the cursor left (number 4), right (number
6), up (number 8) or down (number 2).
28
Drug registration and information system
PART
3
The remaining portion of this user manual is best used in conjunction
with the installed “DRUG REGISTRATION AND INFORMATION SYSTEM”.
Before one can use any of the installed systems, ensure that your
computer has been booted up. Otherwise, perform the following steps:
1. Turn on your computer.
At this time, your computer must be connected physically to a power outlet.
Depending on how your system was installed, you may be asked to enter a
network password or a windows desktop password.
2. At the Windows95™ or 98 Windows98™ desktop windows, you will find
three (3) icons. These are the three subsystems in the computerized drug
registration and information system.
3. Click the icon for the system you want to use.
LICENSING OF ESTABLISHMENTS SUBSYSTEM
Double clicking the Licensing of Establishments shortcut icon
will load the Microsoft Access2000™ program and subsequently load the
Licensing of Establishments System from within the Access 2000™
environment. The Licensing of Establishment System main menu will open.
The licensing of establishments system contains the list of registered
establishments transacting pharmaceutical products in the country. These
establishments may be importers, agents, manufacturers, exporters,
29
Drug registration and information system
repacking companies, pharmacy outlets and donors. After an evaluation of
the activities of these establishments, and presuming that the establishment
passes the minimum standards set for registration of an establishment, a
regulatory authority issues a license to operate (LTO) certificate for that
establishment. The list of registered establishments is “shared” information
with the product registration (see below) and the drug import monitoring
(see below) systems.
Essentially, each product has a license holder or owner who is the
applicant of a product being registered in the product registration system.
If an applicant is not registered, then the product registration system cannot
accept the product application data that is being entered because the
applicant company is not already a registered company and therefore will
not be found in the system.
Shown below is the Licensing of Establishments System’s main menu
with the various activity choices.
30
Drug registration and information system
Menu
Explanation
1. Enter New Applications
Select this menu selection button to enter a new LTO application or to
search and view existing establishments data records. A single form is
presented on the screen. Use the filtering technique to search or to set
the conditions of the search.
2. View all (multiple)
All LTO application records are shown in spreadsheet format.
3. View approved
registrants
Various submenu choices for approved registrants will be shown.
Approved registrants are based on the condition that the LTO # field in the
dataset is not empty or left blank, indicating that the establishment has an
existing LTO # assigned. The list of approved registrants does not
consider whether the LTO license has expired.
4. Print
This selection button allows you to print the LTO certificate / license, a
generic letter or a copy of an LTO sample application form.
5. Update catalogue Files
This menu selection button will be used for maintaining the data in
catalogue files. Additions and/or corrections made on the catalogue files
will immediately be reflected in the database records. The descriptions of
catalogue files can be changed.
6. Share Information
Once new LTO applications are entered, the new data only resides in the
Licensing of Establishments System database. The most recent record
updates are only shared with the product registration system once this
selection button is pressed. Sharing replaces the old licensing of
establishments subset records that was last copied into the product
registration system database.
7. Exit
This button closes all forms and exits the Licensing of Establishments
System.
31
Drug registration and information system
1.
ENTERING A NEW APPLICATION
1. This form presents single documents of all the LTO applicants in the
Licensing of Establishments System. Press the navigation buttons to
) or to the left (
) to move records forward or backward.
the right (
Press
to go to the first record on file (based on the sorted field) or
to go to the last record.
2. To enter a new application, press “>*” on the bottom of the form. A
blank form is presented.
3. Using the application form, enter the data contained on the form, starting
with a unique LTO application number.
4. After data entry, close the form by clicking on the “x” button on the top
right of the open form.
32
Drug registration and information system
2. VIEW ALL (MULTIPLE)
Clicking on the View all (multiple) button presents all the LTO applications
in spreadsheet format. The data of all product records are shown on your
screen in a spreadsheet format.
Each row represents one product on file and each column represents
the data for that field item (e.g. Application #, Brand Name, etc.).
Use the “Up-Down” arrow keys on the computer keyboard to move one
record up or down or use the “PgUp-PgDn” to move a set of records one
full screen up or down at a time.
Search the records based on the searching and filtering methodologies
(Under the “Searching / Filtering Records” topic).
To close the spreadsheet window on your screen, click the “x” button
found on the top right portion of the spreadsheet.
33
Drug registration and information system
3. VIEW APPROVED REGISTRANTS
This submenu is a selection of all approved registrants regardless of
whether or not the LTO licenses are expired. The registration # field of all
approved registrants are assumed to contain a registration # which is tagged
by the system as having an existing license.
3.1 By Classification
Pressing the “By classification” button displays all approved applications
arranged by Classification type. (i.e. agents, donors, distributors, exporters,
importers, manufacturers, and pharmacies).
Use the filtering techniques discussed earlier to extract the desired
classification type.
3.2 By Country
Pressing this button displays all the applicants with APPROVED LTOs
arranged by their country of origin.
34
Drug registration and information system
Use the filtering technique to extract the applicants according to their country.
3.3 By District
Pressing this button displays all the applicants with APPROVED LTOs
arranged by the district.
Use the filtering technique to extract the Applicants according to district.
3.4 By LTO Expiration
Pressing this button displays all the applicants with APPROVED LTOs sorted
by the LTO expiration dates.
Again, use the filtering techniques to extract the desired applicants by their
expiration dates.
3.5 By Position of Contact
Pressing this button displays all the applicants with APPROVED LTOs sorted
by the position of the contact person in the company.
Again, use the filtering techniques to extract the desired applicants by their
positions in the company.
35
Drug registration and information system
3.6 By status
Pressing this button displays all the applicants with APPROVED LTOs sorted
by the status or activity tagged to the application.
Use the filtering techniques to extract the desired applicants according to
the status or activity of the application.
3.7 More Queries ……
3.7.1 By Type of Company
You can have another category for which to classify the establishments.
An example of this is the classification of the pharmacy outlets based
on what type of pharmaceutical products they can carry or the dispensing
category they are allowed. The same may be true for the other
establishments you issue a license for.
36
Drug registration and information system
3.7.2 Multiple Criteria
This menu selection presents all the approved registrants in spreadsheet
format. From the list presented, use the sorting and filtering technique
in order to extract the desired records according to a set of conditions.
3.7.3 Expired LTOs as of Today
This selection lists all APPROVED licenses that are expired as of the
computer’s system date. Make sure that the computer’s clock is set on
the correct day or the result of this query may be erroneous.
3.7.4 Return to previous menu
This selection takes you back to the previous menu selection.
37
Drug registration and information system
4. PRINT
The printing submenu opens a set of printing selections. Below is the
list of printing options:
4.1 LTO Certificate
This selection allows you to prepare and automate printing of LTO
Certificates. Selecting this option opens the submenu below. Follow through
steps 1 and 2 to automate the printing of the certificates.
4.1.1 Step 1: Set appropriate status
Selecting this option opens the “Change Status” form as shown below.
38
Drug registration and information system
Position the cursor on the “Status” field on the form and double click
the left mouse button. All the field color changes to green, indicating
that data in the fields can be changed. Please see below:
Change the “status” field to “PRINT LTO*.”
Go to the next record and follow the same procedure above for the rest
of the applications for which you want to print an LTO Certificate. After
you have changed the status field of all the records you want to print
certificates for, close the “change status form.” Proceed to Step 2.
4.1.2 Step 2: Print LTO
Making this selection will open a submenu. The submenu allows you to
choose the certificate type you wish to print. For example, you want to
print an agent’s LTO certificate,: two conditions must be met: a) the
agent’s STATUS field must first be set to “PRINT LTO*”; b) the
establishment’s classification must be that of an agent. Unless these
two conditions are met, the LTO certificate for that agent will not be
printed. The same is true for the rest of the other establishments such
as an importer or manufacturer.
39
Drug registration and information system
4.1.3 Print [Agents/Exporters/Importers/Manufacturers/Pharmacies] LTO
This selection will start the merging of the licensing of establishments
data for the desired establishments for which you wish to print an LTO
certificate. The data is merged into a template document. The certificates
are now ready for printing in MSWord™.
4.1.4 Return to Previous menu
This selection takes you back to the previous menu selection.
4.2 Generic Letter
This selection allows you to prepare and automate printing of a Generic
Letter you can later send to establishments that are listed in the Licensing
of Establishments database. Selecting this option opens the submenu below.
Follow steps 1 and 2 to automate the printing of the generic letter.
4.2.1 Step 1: Set appropriate status
Selecting this option opens the “Change Status” form as shown below.
40
Drug registration and information system
Position the cursor on the “Status” field on the form and double click
the left mouse button. All the field color changes to green, indicating
that data in the fields can be changed. Please see below:
Change the “status” field to “Write letter*.”
Go to the next record and follow the same procedure above for the rest
of the applications for which you want to print an LTO Certificate. After
you have changed the status field of all the records you want to print
certificates for, close the “change status form.” Proceed to Step 2 below.
4.2.2 Step 2: Print letter
The submenu will start the merging process in order to start printing the
generic letter. Take note that the STATUS field must first be set to
“WRITE LETTER*”
4.2.3 Return to Previous Menu
This selection takes you back to the previous menu selection.
4.3 LTO application form
This option will print an LTO application form.
4.4 Return to Previous Menu
This selection takes you back to the previous menu selection.
41
Drug registration and information system
5. UPDATE CATALOGUE FILES
This option will open the CATALOGUE file tables. There are six
CATALOGUE tables in the licensing of establishments system: 1) Activity;
2) Classification; 3) Country; 4) Education; 5) Position; and 6) Type of
Company.
Catalogue file tab
To enter a new catalogue item, select the catalogue file tab. In the
example above, the activity catalogue file is displayed. To enter a new
icon below the form. Enter the new item in the blank
item, click on the
row. Close the form after entering the item or items by clicking the
on the top right of the form.
icon
6. SHARE INFORMATION
Sharing the information selection will copy a subset of the list of
establishments records into the product registration database. This
essentially overwrites the old licensing of establishments records that was
last shared with the product registration system with the most recent
recordset.
42
Drug registration and information system
7. EXIT
This closes all windows and subsequently closes all databases and
then quits the application system.
PRODUCT REGISTRATION SYSTEM
To activate the product registration system, double click the
icon
on your windows desktop. The product registration system MAIN MENU is
presented as shown below.
To select an item (e.g. View all records), move the mouse pointer to the
selection you wish and then double click the left button. Each item in the
selection has an underlined letter. You can use this as a keyboard shortcut
to call up the underlying submenu. For example in View records, the letter
V is underlined so you can simply press V on the keyboard to activate the
selection.
The product registration system is an application system that keeps
track of drug product applications for drug registration. Basic information
such as registered products can be retrieved and various reports printed
as needed. Reports can be printed using MSWord™ or MSExcel™. Printing
of the product registration certificate is automated.
43
Drug registration and information system
THE PRODUCT REGISTRATION SYSTEM
1. RECEIVING
Choose this menu selection to do the following:
o
To enter new PRODUCT APPLICATIONS into the drug registration system
database
o
To print an acknowledgement receipt for the product applications
o
To print a routing slip document to be attached to the dossier for product
applications
o
To print routine reports on product applications received on a specified
time frame/s, arranged by applicant or marketing authorization holder, by
name of Manufacturer or by pharmaceutical dosage format of the products.
The general layout of the report can be designed by user preference with
the use of the MSWord™ or MSExcel™ office suite programs. It is assumed
that the user is familiar with either using the MSWord and/or MSExcel
applications.
1. At this stage, it is presumed that you have examined all the items on
the application form and that the entries have been completed.
2. On the “Product Registration System” MAIN MENU, double click on the
‘RECEIVING” button.
44
Drug registration and information system
3. The “Receiving New Product Application” window opens.
4. To add a new application, click the “>*” button found on the bottom of
the receiving window or the same button that is found on the drug
registration system menu bar.
5. A blank form opens (the cursor is positioned on the Application number
field).
6. There are 6 items you will need to enter:
a. Application number;
b. Applicant name;
c. Name of manufacturer;
d. Brand name / trade name;
e. Dosage form; and
f.
Date of application.
7. Enter a unique application number on the application number field.
8. From the product application form that was submitted, enter the required
data.
9. At the end of the data entry process, move the records forward or
backward by pressing “>” or “<” to save the data you just entered.
10. To print an acknowledgement receipt and routing slip document for
each of the applications you just entered, press the “Print
Acknowledgement” button.
11. A dialogue box opens.
12. On the “Enter begin #” field, enter the application # of the product
application where you want to begin the printing of the acknowledgement
receipt and/or routing slip.
13. Enter “OK”.
14. A second dialogue box appears.
15. On the “Enter end #” field, enter the application # from where you want
to end printing.
45
Drug registration and information system
16. After entering the “end #”, an MSWord™ word processing document
opens.
17. What you have in front of you is a MSWord™ template.
18. Click on the “merge” icon on the drug registration menu bar.
19. A “merge” dialogue box opens.
20. You have a choice of where to print your document (a printer or another
file).
21. After making your choice, click the “merge” button on the “Merge window ”
dialogue box.
Note: If you chose the MSWord™ document to be printed to another file instead of directly to
a printer, the documents are presented on your screen and are now ready for printing.
22. Print the document as you would normally print an MSWord™ document
(by pressing the selections File-Print on the MSWord™ program).
23. To close each window on your screen, click the “x” button found on the top
right portion of each open window.
2. VIEW ALL RECORDS
Choose this menu selection to do the following:
o
To view product records in individualized forms (one record at a time)
o
To view product records in a spreadsheet format (several records at a time)
o
To search and find records using one several criteria
o
To print record data based on the set criteria
o
To print generic-type reports, based on set criteria, using MSWord™ or
MSExcel™
46
Drug registration and information system
2.1 View individual record
2.1.1
The first product record on file is shown on the screen - the order
will depend on the sorting order when the records were last saved.
2.1.2
The screen is divided in four distinct parts: product data; applicant
holder data; manufacturer data and product status (shown as
“Status”-button next to the Application # field).
Search the records based on the searching and filtering techniques
(under the “Searching / Filtering Records” topic)
2.2 View multiple records
1. All data of all product records are shown on your screen in a spreadsheet
format.
2. Each row represents one product on file and each column represents
the data for that field item (e.g. application #, brand name, etc.)
47
Drug registration and information system
3. Use the “Up-Down” arrow keys on the computer keyboard to move one
record up or down or use the “PgUp-PgDn” to move a set of records
one screen full up or down at a time.
4. Search the records based on the searching and filtering methodologies
(Under the “Searching / Filtering Records” topic)
5. To close the spreadsheet window on your screen, click the “x” button
found on the top right portion of the spreadsheet
2.3 Return to Main Menu
1. Clicking the “Return to Main Menu” button brings you back to the previous
menu selection screen (The Drug Registration Main Menu).
48
Drug registration and information system
3. QUERY REGISTERED PRODUCTS
Choose this menu selection to do the following:
o
To view all registered product records in a spreadsheet format (several
records at a time).
o
To search and find records of only registered products on file using one or
multiple criteria.
o
To print record data based on the set criteria.
o
To print generic-type reports of registered products based on set criteria
using MSWord™ or MSExcel™.
NOTE: The system assumes all product applications have been approved when the
REGISTRATION # field of the record is not empty.
3.1 Products by Applicant
1. A dialogue box appears on the screen after clicking the “PRODUCTS
BY APPLICANT” button.
2. Enter the name of the applicant as it was spelled exactly when it was
entered in the database. If you are unsure of the spelling, make use of
the wild card “*” symbol to represent any letter or group of letters in the
dialogue box field.
3. Click the “OK” button to start the search process.
49
Drug registration and information system
4. The data of all APPROVED product records, in spreadsheet format,
based on the applicant field criteria you have earlier specified is shown
on the screen.
5. Each row represents one APPROVED product on file based on the
applicant field criteria earlier set. Each column represents the data for
that field item (e.g. Application #, Brand Name, etc.).
6. Use the “Up-Down” arrow keys on the computer keyboard to move one
record up or down or use the “PgUp-PgDn” to move a set of records
one screen full up or down at a time.
7. Search the records based on the searching and filtering methodologies
(Under the “Searching / Filtering Records” topic).
8. To close the spreadsheet window on your screen, click the “x” button
found on the top right portion of the spreadsheet.
3.2 Products by Anatomical Therapeutic Chemical Classification Codes
1. A dialogue box appears on the screen after clicking the “PRODUCTS
BY ATC CODES” button.
2. Enter the exact ATC Code of the product. If unsure of the code, then
make use of the wild card “*” symbol to represent any letter or group of
letters in the dialogue box field.
50
Drug registration and information system
NOTE: A listing of ATC Codes is available in the CATALOGUE CODE REFERENCE
found on the MAIN MENU. The code listing can be sorted by ATC codes or by the drug
classification.
3. Click the “OK” button to start the search process.
4. The data of all APPROVED product records, in spreadsheet format,
based on the ATC criteria you have earlier specified is shown on the
screen.
5. Each row represents one APPROVED product on file based on the
ATC criteria earlier set and each column represents the data for that
field item (e.g. Application #, Brand Name, etc.).
6. Use the “Up-Down” arrow keys on the computer keyboard to move one
record up or down or use the “PgUp-PgDn” to move a set of records
one screen full up or down at a time.
7. Search the records based on the searching and filtering methodologies
(Under the “Searching / Filtering Records” topic).
8. To close the spreadsheet window on your screen, click the “x” button
found on the top right portion of the spreadsheet.
51
Drug registration and information system
3.3 Products by Brand Name
1. A dialogue box appears on the screen after clicking the “PRODUCTS
BY BRAND NAME” button.
2. Enter the exact BRAND NAME of the product. If unsure of the code,
make use of the wild card “*” symbol to represent any letter or group of
letters in the dialogue box field.
3. Click the “OK” button to start the search process.
4. The data of all APPROVED product records, in spreadsheet format,
based on the Brand Name criteria you have specified is shown on the
screen.
5. Each row represents one APPROVED product on file, based on the
BRAND NAME criteria set, and each column representing the data for
that field item (e.g. Application #, Brand Name, etc.).
52
Drug registration and information system
6. Use the “Up-Down” arrow keys on the computer keyboard to move one
record up or down or use the “PgUp-PgDn” to move a set of records
one screen full, up or down, at a time.
7. Search the records based on the searching and filtering methodologies
(Under the “Searching / Filtering Records” topic).
8. To close the spreadsheet window on your screen, click the “x” button
found on the top right portion of the spreadsheet.
3.4 Products by Country
1. A dialogue box appears on the screen after clicking the “PRODUCTS
BY COUNTRY” button.
2. Enter the exact name of the country from where the product is
manufactured or imported from. If unsure of the exact spelling of the
country, make use of the wild card “*” symbol to represent any letter or
group of letters in the dialogue box field.
3. Click the “OK” button to start the search process.
4. The data of all APPROVED product records, in spreadsheet format,
based on the name of country criteria you have specified is shown on
the screen.
53
Drug registration and information system
5. Each row represents one approved product on file based on the name
of the country criteria set and each column represents the data for that
field item (e.g. Application #, Brand Name, etc.).
6. Use the “Up-Down” arrow keys on the computer keyboard to move one
record up or down or use the “PgUp-PgDn” to move a set of records
one screen full, up or down, at a time.
7. Search the records based on the searching and filtering methodologies
(Under the “Searching / Filtering Records” topic).
8. To close the spreadsheet window on your screen, click the “x” button
found on the top right portion of the spreadsheet.
3.5 Products by Dosage Forms
1. A dialogue box appears on the screen after clicking the “PRODUCTS
BY DOSAGE FORMS” button.
2. Enter the exact name of the DOSAGE FORM of the product. If unsure
of the exact spelling of the dosage form, make use of the wild card “*”
symbol to represent any letter or group of letters in the dialogue box
field.
3. Click the “OK” button to start the search process.
4. The data of all approved product records, in spreadsheet format, based
on the dosage form criteria you have specified is shown on the screen.
54
Drug registration and information system
5. Each row represents one approved product on file based on the dosage
form criteria set, and each column represents the data for that field
item (e.g. Application #, Brand Name, etc.).
6. Use the “Up-Down” arrow keys on the computer keyboard to move one
record up or down or use the “PgUp-PgDn” to move a set of records
one screen full up or down at a time.
7. Search the records based on the searching and filtering methodologies
(Under the “Searching / Filtering Records” topic).
8. To close the spreadsheet window on your screen, click the “x” button
found on the top right portion of the spreadsheet.
3.6 Products by Manufacturer
1. A dialogue box appears on the screen after clicking the “PRODUCTS
BY MANUFACTURER” button.
2. Enter the exact name of the manufacturer of the products. If unsure of
the exact spelling of the country, make use of the wild card “*” symbol
to represent any letter or group of letters in the dialogue box field.
3. Click the “OK” button to start the search process.
4. The data of all approved product records, in spreadsheet format, based
on the Name of Manufacturer criteria you have specified is shown on
the screen.
55
Drug registration and information system
5. Each row represents one approved product on file based on the name
of the manufacturer criteria set and each column represents the data
for that field item (e.g. Application #, Brand Name, etc.).
6. Use the “Up-Down” arrow keys on the computer keyboard to move one
record up or down or use the “PgUp-PgDn” to move a set of records
one screen full up or down at a time;
7. Search the records based on the searching and filtering methodologies
(Under the “Searching / Filtering Records” topic)
8. To close the spreadsheet window on your screen, click the “x” button
found on the top right portion of the spreadsheet.
3.7 More Queries
1. Clicking the “….. more Queries” button activates another set of Query
buttons.
2. The …more Queries menu appears on the screen.
3.7.1 Products by Application # (Routing Slip)
1. A dialogue box appears on the screen after clicking the “PRODUCTS
BY APPLICATION # (Routing Slip)” button.
2. Enter two sets of numbers: a beginning number, the application
number of the first in the range of records you wish to retrieve; and
an end number, the last in the range of records you want to retrieve.
56
Drug registration and information system
For example, if you wish to retrieve application numbers 1 through
100, the beginning number is 1 and the end number is 100. Enter
the appropriate numbers.
3. Click the “OK” button to start the search process.
4. The data of all approved product records, in spreadsheet format
based on the application number ranged criteria you have specified
is shown on the screen.
5. Each row represents one approved product on file based application
number range criteria set, and each column represents the data for
that field item (e.g. Application #, Brand Name, etc.).
6. Use the “Up-Down” arrow keys on the computer keyboard to move
one record up or down or use the “PgUp-PgDn” to move a set of
records one screen full up or down at a time.
7. Search the records based on the searching and filtering
methodologies (Under the “Searching / Filtering Records” topic).
8. To close the spreadsheet window on your screen, click the “x” button
found on the top right portion of the spreadsheet.
57
Drug registration and information system
3.7.2 Products by Expiration Dates
1. A dialogue box appears on the screen after clicking the “PRODUCTS
BY EXPIRATION DATES” button.
2. You are expected to enter two dates – the beginning and ending
dates that enclose the group or groups of approved product records
based on the expiration date field.
(NOTE: Date format is of the form: dd/mm/yyyy)
3. Click the “OK” button to start the search process.
58
Drug registration and information system
4. The data of all approved product records, in spreadsheet format,
based on the expiration dates criteria you have specified is shown
on the screen;
5. Each row represents one approved product on file based on the
name of the expiration date criteria set and each column represents
the data for that field item (e.g. Application #, Brand Name, etc.).
6. Use the “Up-Down” arrow keys on the computer keyboard to move
one record up or down or use the “PgUp-PgDn” to move a set of
records one screen full up or down at a time.
7. Search the records based on the searching and filtering
methodologies (Under the “Searching / Filtering Records” topic).
8. To close the spreadsheet window on your screen, click the “x” button
found on the top right portion of the spreadsheet.
3.7.2.1 Products Expiring as of Today
1. Activating the “Products Expiring as of Today” button displays, in
spreadsheet format, the list of all approved application records in
the database whose current registration certificates have expired
as of the current date.
59
Drug registration and information system
2. Each row represents one approved product on file and each column
represents the data for that field item (e.g. Application #, Brand
Name, etc.).
3. Use the “Up-Down” arrow keys on the computer keyboard to move
one record up or down or use the “PgUp-PgDn” to move a set of
records one screen full up or down at a time.
4. Search the records based on the searching and filtering
methodologies (Under the “Searching / Filtering Records” topic).
5. To close the spreadsheet window on your screen, click the “x” button
found on the top right portion of the spreadsheet.
3.7.2.2 Return to Previous Menu
1. To close the spreadsheet window on your screen, click the “x” button
found on the top right portion of the spreadsheet.
2. Clicking the “Return to Main Menu” button brings you back to the
previous menu selection screen (… more Queries sub Menu)
3.7.3 Products In the essential drugs list
1. Activating the “Products In the EDL” button displays, in spreadsheet
format, the list of all approved application records in the database
that are listed as essential drugs in the country.
2. Each row represents one approved product on file in the essential
drugs list and each column represents the data for that field item
(e.g. Application #, Brand Name, etc.).
3. Use the “Up-Down” arrow keys on the computer keyboard to move
one record up or down or use the “PgUp-PgDn” to move a set of
records one screen full up or down at a time.
4. Search the records based on the searching and filtering
methodologies (Under the “Searching / Filtering Records” topic).
60
Drug registration and information system
5. To close the spreadsheet window on your screen, click the “x” button
found on the top right portion of the spreadsheet.
3.7.4 Products by Ingredients
1. A dialogue box appears on the screen after clicking the “Products
By Ingredients” button.
2. Enter a known ingredient of a product. If unsure of the exact spelling
of the ingredient, make use of the wild card “*” symbol to represent
any letter or group of letters in the dialogue box field.
3. Click the “OK” button to start the search process.
4. The data of all approved product records, in spreadsheet format,
based on the name of ingredient specified is shown on the screen.
5. Each row represents one approved product on file based on the
name of the manufacturer criteria set and each column represents
the data for that field item (e.g. Application #, Brand Name, etc.).
6. Use the “Up-Down” arrow keys on the computer keyboard to move
one record up or down or use the “PgUp-PgDn” to move a set of
records one screen full up or down at a time.
7. Search the records based on the searching and filtering
methodologies (Under the “Searching / Filtering Records” topic)
61
Drug registration and information system
8. To close the spreadsheet window on your screen, click the “x” button
found on the top right portion of the spreadsheet.
3.7.5 Products by Pharmacologic Classification
1. A dialogue box appears on the screen after clicking the “Products
By Pharmacological Classification” button.
2. Enter a pharmacological classification description. If unsure of the
exact spelling of the pharmacology classification, make use of the
wild card “*” symbol to represent any letter or group of letters in the
dialogue box field.
3. Click the “OK” button to start the search process.
4. The data of all approved product records, in spreadsheet format,
based on the specified pharmacological classification is shown on
the screen.
5. Each row represents one approved product on file based on the
pharmacological classification criteria set and each column
represents the data for that field item (e.g. Application #, Brand
Name, etc.).
6. Use the “Up-Down” arrow keys on the computer keyboard to move
one record up or down or use the “PgUp-PgDn” to move a set of
records one screen full up or down at a time.
7. Search the records based on the searching and filtering
methodologies (Under the “Searching / Filtering Records” topic)
8. To close the spreadsheet window on your screen, click the “x” button
found on the top right portion of the spreadsheet.
62
Drug registration and information system
3.7.6 Products by Registration Dates
3.7.6.1 Current Registration License
1. A dialogue box appears on the screen after clicking the “Current
Registration License” button.
2. You are expected to enter two dates – a beginning and an end
dates that encloses the group or groups of approved product records
based on the current registration license date field.
(NOTE: Date format is of the form: dd/mm/yyyy)
3. Click the “OK” button to start the search process.
4. The data of all approved product records, in spreadsheet format,
based on the current registration date criteria you have specified is
shown on the screen.
63
Drug registration and information system
5. Each row represents one approved product on file based on the
current registration date criteria set and each column represents
the data for that field item (e.g. Application #, Brand Name, etc.).
6. Use the “Up-Down” arrow keys on the computer keyboard to move
one record up or down or use the “PgUp-PgDn” to move a set of
records one screen full up or down at a time.
7. Search the records based on the searching and filtering
methodologies (Under the “Searching / Filtering Records” topic).
8. To close the spreadsheet window on your screen, click the “x” button
found on the top right portion of the spreadsheet.
3.7.6.2 Historical (Range)
1. A dialogue box appears on the screen after clicking the “Historical
(Range)” button.
2. You are expected to enter two dates – a beginning and an end date
that enclose the group or groups of registered products based on
the historical data field. For example, if you want to list all registered
products during the year 1998 one will enter 01/01/1998 as the
beginning date and 31/12/1998 as the end date value.
(NOTE: Date format is of the form: dd/mm/yyyy)
3. Click the “OK” button to start the search process.
4. The data of all approved product records, in spreadsheet format,
based on the historical date criteria of the product you have specified
is shown on the screen.
5. Each row represents one approved product on file based on the
historical date of the product criteria set and each column
representing the data for that field item (e.g. Application #, Brand
Name, etc.)
6. Use the “Up-Down” arrow keys on the computer keyboard to move
one record up or down or use the “PgUp-PgDn” keys to move a set
of records one screen full up or down at a time.
64
Drug registration and information system
7. Search the records based on the searching and filtering
methodologies (Under the “Searching / Filtering Records” topic).
8. To close the spreadsheet window on your screen, click the “x” button
found on the top right portion of the spreadsheet.
3.7.6.3 Return to Previous Menu
1. Clicking the “Return to Main Menu” button brings you back to the
previous menu selection screen.
3.7.7 Products by Status
1. A dialogue box appears on the screen after clicking the “Products
By Status” button.
2. Enter a status code of a product. If unsure of the status codes,
make use of the wild card “*” symbol to represent any letter or
group of letters in the dialogue box field.
3. Click the “OK” button to start the search process.
4. The data of all APPROVED product records, in spreadsheet format,
based on the status specified is shown on the screen.
65
Drug registration and information system
5. Each row represents one approved product on file based on the
product status criteria set and each column represents the data for
that field item (e.g. Application #, Brand Name, etc.).
6. Use the “Up-Down” arrow keys on the computer keyboard to move
one record up or down or use the “PgUp-PgDn” to move a set of
records one screen full up or down at a time.
7. Search the records based on the searching and filtering
methodologies (Under the “Searching / Filtering Records” topic).
8. To close the spreadsheet window on your screen, click the “x” button
found on the top right portion of the spreadsheet.
3.7.8 Return to Previous Menu
1. Clicking the “Return to Main Menu” button brings you back to the
previous menu selection screen.
3.8 Return to Main Menu
1. Clicking the “Return to Main Menu” button brings you back to the Drug
Registration Main Menu.
4. PREPARE TO PRINT FORM1
This menu selection allows you to print the Application Form (two pages),
Routing Slip (one page) and the Checklist of Requirements (one page).
The forms will again be displayed in MSWord™ and can be printed from
the MSWord™ program.
66
Drug registration and information system
5. PREPARE DRUG REGISTRATION CERTIFICATE
This submenu is an office automation aid to print the Drug Registration
Certificate. This will make printing of the certificates more efficient and less
time consuming. Typographical mistakes will also be limited to the errors
entered in the forms. This selection will be performed in two steps. Follow
the steps in the order they are presented below.
5.1 Step 1. Set appropriate “Status?” number
This first step in the preparation of the Drug Registration Certificate is to
check the status of the product record. Setting the status to “Print certificate”
enables you to print the registration certificate for the product. After selecting
this button, the “Change Status Form” is presented. Position the cursor on
the Application No. field and press the “binoculars” icon to bring up the
status of the product. The “Brand Name” and “Dosage Form” of the product
is displayed together with the application number for you to confirm that
the product you are referring to is indeed the one you want.
67
Drug registration and information system
Set the mouse on the “Applied” field and double-click the field. The fields in
the form should turn green. This allows you to change data in any of the
green-colored fields. Go further down and pull down the selection button
on the “Activity” field. A list of all the available “status/activities” is listed.
You can also change a group of records of the same current status to
another status by clicking on the
icon on the form. A window asking
you to enter a status code is shown. Look up the status codes on the quick
reference guide on the product registration main menu.
5.2 Step 2. Print Certificate
The second step in the printing of the certificates will open the MSWord™
program and then load the Drug Registration Certificate template. This
step will open a file containing all the products whose “Activity/Status” is or
has been changed to “Print Certificate.” This will load the data of the products
into the template. You are then ready to start merging the data with the
68
Drug registration and information system
drug registration certificate template. Click the “merge icon” on the menu
and a window asking you to start the merge will appear. Press “merge” on
the MSWord™ menu bar and the merge process will start. The different
Drug Registration Certificates will be shown on your computer screen. You
can now proceed by printing the Drug Registration Certificates as you would
any other MSWord™ document. The number of copies you wish to print
can be set on the File-Print menu of the MSWord™ program. Press the
“printer” button to start the printing of the certificates. Once done, press the
“X” in the upper right corner of the window or exit Microsoft Word without
saving the documents.
5.3 Return to Main Menu
Selecting this button brings you back to the product registration system
main menu.
6. UPDATE DATABASES
This section updates the data in the product registration system.
6.1 Update CATALOGUE files
There are eight catalogue files used in the product registration system.
Each table contains the needed data used in the database. The catalogue
files ensure uniformity when entering data into the system. Without these
catalogue tables, variable data entry can be expected, and which can lead
to inaccuracies when retrieving data.
69
Drug registration and information system
For example, without the catalogue tables, the dosage form tablets can be
entered in various different ways e.g. tab, tabs, tablet, tablets, tab., tabs.
1. Selecting the “Update Catalogue Files” button brings up the Update
catalogue file form. The first tabbed catalogue, “applicants,” is shown.
The applicants catalogue file cannot be updated from the Product
Registration System.
Because the list of applicants is “shared” information from the Licensing
of Establishments System, the product registration system cannot
update this catalogue file. It can only be updated from the Licensing of
Establishments System.
There are seven catalogue tables: ATC classification; Countries; Dosage
Forms; Manufacturers; Packaging; Pharmacologic classification; and
Status/Activity. The tabbed catalogues are arranged alphabetically.
2. Position the mouse pointer on the flap of the tab and the catalogue
table of your choice is ready for data entry. You will need to add an item
when the item that you are entering in Form 1 will not be accepted by
the system because it is not known to the system i.e. it is not in the
catalogue tables.
70
Drug registration and information system
3. Use the add button
to add new catalogue data. Use the “PgupPgdn” keys to scroll down the list.
4. After updating close the form by clicking on the “x” icon on the top right
of the form.
6.2 Enter DATA for new application (Form 1)
1. Before entering the data for a new application, check that the entries
needed by the new application are in the catalogue files. After updating
the catalogue tables.
2. You can now start data entry. Always enter a unique number for a new
application. Applications have been entered sequentially starting with
00001, 00002, ……05000….
3. The form is divided into four parts. This is similar to the form that was
submitted by the applicant. Parts one and two are the applicant and
manufacturer information respectively. Part three is the product
information while Part four is the importation / status information. Most
of the fields require that data should be entered or else the record will
not be accepted by the database.
71
Drug registration and information system
6.3 Update “Status” of applications
1. This will be the submenu selection you will use when you want to print
a certificate, send the application for the Drug Control Committee, and
send samples to laboratory.
2. When you want to group a batch of applications such as sending a
group for the Drug Control Committee deliberation, you simply change
the status of the group of applicants to a particular activity or status. As
soon as you have done that, you are ready to print a report.
3. The same selection is used after evaluation is performed. When the
application is referred to the Drug Registration Committee for
deliberation, the application gets a new status by changing the status
using this form. After the Drug Registration Committee deliberations, a
new status is again assigned. When final action status is reached, the
application has a final status that is either approved, rejected or
abeyance, depending on the outcome of the deliberations by the Drug
Registration Committee.
4. Once the application is approved, a registration number, date of
registration and expiration date are assigned to the application using
this same form.
5. The date of expiration was intentionally not pre-computed to provide
for flexibility as to the number of years a product certificate will be given
an expiration date.
72
Drug registration and information system
6. Navigation tools are provided in the status form. A “status reference” is
built into the form so that when you have forgotten a status code, you
simply click on the status reference button from there. Also in the form
is a button that will display the records of a particular status. This will
allow the user to know the status of records.
6.4 Add “Sample” information for Laboratory
In regulatory agencies with laboratory facilities, you wish to track down
the list of samples that have been sent to the laboratory for testing. This
menu selection will give you the information of the samples that have so
far been sent to the laboratory with the corresponding quantity and expiration
dates. Follow the instructions below to enter a sample to be sent for testing.
1. Enter the application number corresponding to the application number
or routing slip of the samples. Use the
laboratory.
to enter a sample sent to
2. Position the cursor on the application number field. A list of applications
numbers will scroll down.
3. Enter the number of samples that will be sent and the expiration date
of the samples. Exit by clicking on the exit (door) button.
4. You can view the report containing the products for analysis that will be
sent to the laboratory by going to the print reports submenu under the
submenu “List of Samples for Analysis.” The list of products in the report
was positioned in the middle of the document. This was intentionally
done so that a pre-printed document with the DRA header can be used.
The format of the document can also be changed using MSWord™ to
suit user preference.
73
Drug registration and information system
6.5 Sample Inventory
This menu selection will give you an inventory of all samples and enables
you to track down their expiration dates.
To enter data of a sample you wish to add in the inventory, press the
button and a blank “Add samples form” screen is presented. Go to the
application# field and press the
button and the list of all the routing slip
numbers is shown. Enter the routing slip number of the sample you wish to
enter in the inventory list. Enter the quantity and the expiration date of the
sample. Save the sample by moving the record forward or backward by
pressing any of the
buttons at the bottom of the
form.
6.6 Modify Registration History
This selecting this button allows you to modify the registration history
of products already in the registry. This option is provided in order to update
the registration status of products that have been entered.
74
Drug registration and information system
1. On the application # field, enter the application number of the product.
2. Enter the registration number, the registration date and expiration date
of the product.
3. Press “exit” when finished.
6.7 Edit Records
This option allows you to edit the data of products in already in the registry.
6.7.1 Individual record
The form below is the complete data of one product in the registry. To
edit the product information, enter the details on the fields. Use the
searching techniques described in this manual in order to retrieve a
product of interest.
75
Drug registration and information system
6.7.2 Spreadsheet-type
Making this choice opens a list of products in the registry in spreadsheet
format. Use the searching methods described in this manual to go to a
particular product of interest.
1. This menu selection uses the familiar interface of Microsoft Excel.
When correcting a batch of records in this format, the Excel program
is appealing.
2. On this screen, data can be edited or updated and records can
even be deleted. This screen is provided to facilitate data entry and
searching.
6.7.3 Return to Main Menu
Select this to return to the main menu.
7. Exit
This closes the database and exits the Product registration subsystem.
76
Drug registration and information system
DRUG IMPORT MONITORING SUBSYSTEM
MAIN MENU
The Drug Import Monitoring Subsystem tracks down the importations
of drugs based on the invoice documents submitted by importers. Importers
who are not registered as duly registered establishments with the Licensing
of Establishments System cannot transact an importation. Likewise, only
products that are registered and listed in the Product Registration System
can be entered.
The main menu window has several selections for entering new invoices,
viewing and printing management reports and updating the Import
Monitoring System catalogue files. On the left side of the Main Menu are
the quick reference catalogue file buttons.
1. Enter new invoice
1. Activating this selection will open the invoice data entry form. The form
is organized into two parts. At the top portion is invoice information and
at the lower portion are the transaction details. The transaction details
outline the information about the drug being imported.
77
Drug registration and information system
2. The subsystem checks two very important data: the applicant and the
product. The applicant (also importer) should be a registered importer
listed in the Licensing of Establishments Subsystem. Similarly, the
product being imported should be a registered product and should be
listed in the Product Registration System. If neither one is registered,
then the importation should not be allowed.
3. A button that opens the list of prohibited drugs is provided on the same
form as a guide for the type of goods (i.e. whether the product being
imported is classed as a narcotic, psychotropic or precursor chemical)
being imported.
4. Applicants and products must both be registered entities with the
regulatory authority before importation is authorized and subsequently
monitored in this subsystem.
78
Drug registration and information system
2. View Records Menu
There are several options to view the contents in this database. Shown
below are the available choices for viewing.
2.1 By importer
This option provides the list of importations made by importers (also
called the applicant or product license holder). The list is
alphabetically arranged according to the name of applicant or
company. The second column (see below) shows the number
products, weight in kilograms and the total importations made.
2.2 By classification
Choosing this option lists the products imported according to the
classification of the product. Examples of importation classification
include: commercial use; clinic use only; donated product; and
hospital use only. The second column shows the number of products
in the classification category and the weight and the total value of
the product in the classification. Position the mouse in any portion
on the form and the details of the importations will be shown. Close
the windows one by one by clicking the
“close button” on the
top menu.
79
Drug registration and information system
2.3 By country
Using this option opens a window that shows all the importations by
country and the number of products imported by the country. The
weight in kilograms and the total value are also reflected. Double
click on any part of the form and the details will be shown.
2.4 By date of importation
Viewing the importations by date is the most useful as far as drug
importation monitoring is concerned. Most queries on drug
importations are date-related so this will be the most widely used
feature in the drug import monitoring. There will be varied queries
from the drug regulatory staff.The data presented in the tables will
have to be manipulated using MSExel in order to answer the more
complex queries. The dataset in this viewing option can be exported
using the
(MSExel) button provided on the top of the menu bar.
Once exported, the data can be summarized or manipulated using
various MSExel techniques.
Clicking on any part of the form will display the importation details
by date. Again, exporting the data to MSExel provides a way to
analyze the data. Staff training should be provided for maximum
benefit.
80
Drug registration and information system
2.5 By inspector
Activating this option will show all importations by inspector. The list
of drug inspectors in the regulatory authority should be entered in
the catalogue file under the inspector heading. Once the inspectors’
names are in the catalogue file, then entering the inspectors and
the products they have inspected is just a click of a button away.
2.6 By invoice number
Viewing importations by invoice number provides a way to look at
the summary of product importations by invoice number. The invoices
are the source document from where all the data in the drug import
monitoring system are taken. The valuation summary is provided.
Double click on any part of the form and the importation details per
invoice will be shown.
81
Drug registration and information system
2.7 More views …
Activating this option gives you more ways to view the drug import
monitoring database.
2.7.1 By manufacturer
This option shows all the product importations by manufacturer.
The details of products imported by manufacturer are also provided
by double clicking on any part of the form.
82
Drug registration and information system
2.7.2 By port of entry
Selecting this option will show all drug importations from where they
entered the country or their port of entry. Click on any part of the
form and the details of all the products in each of the port of entry
are shown.
2.7.3 By product name
Selecting this option lists the importations by product name. The
trade name is used as the name of product. Click on any part of the
form and the details of each product are listed.
2.7.4 By product registration status
83
Drug registration and information system
2.7.5 By type of goods
Selecting this viewing option shows the summary of drug
importations by type of goods. The different types of goods will
have to be determined by the drug regulatory authority. These are
first entered in the catalogue file. Once in the catalogue file, each
product being imported into the country can be classified when a
request is made. Click on any part of the form and the details of
each type of good are shown.
2.7.6 Return to previous menu
This selection will bring you back to the previous menu.
2.8 Return to Main Menu
Choosing this option brings you back to the Drug Import Monitoring
Subsystem Main Menu.
3. Update CATALOGUE FILES
The catalogue files are an important part of each subsystem in the Drug
Registration and Information System.
84
Drug registration and information system
4. Exit
This option will close the Drug Import Monitoring Subsystem and bring you
back to the Windows desktop.
85
Drug registration and information system
ANNEX A.
GENERAL OUTLINE OF THE SYSTEMS
When using the integrated computerized drug registration system, begin
by entering the data of the companies to be licensed with the DRA. This is
under the Licensing of establishment subsystem. The list of companies
that need to be registered include importers, agents, exporters, drug retail
outlets (pharmacies), and all other establishments dealing with
pharmaceutical products. When entering the data of the list of
establishments, take note that certain fields take data from CATALOGUE
FILES. In instances when the data that is being entered is not already an
existing item in the catalogue file, you will have to enter the item in the
appropriate catalogue file. To access the catalogue files, go to the “Update
CATALOGUE file” sub menu. Update the list of establishments as needed
when new establishments are registered.
Once the data on the information of all licensed establishments have
been entered, then data entry for product registration can start because
the product registration subsystem expects a legitimate licensed
establishment as the holder of the marketing authorization issued by the
DRA. Without a licensed product holder, data entry of the product application
will not proceed.
The chart on the next page is a quick reference guide when entering
new establishments for registration or when entering new products for
registration.
Follow the flowchart and then refer to the succeeding pages for a step
by step instruction.
86
Drug registration and information system
87
Drug registration and information system
P1: Launching the “Product registration system”
o
On the desktop window, click the “Drug registration” icon
P2: Checking if application is a new PRODUCT application
o
While on the “Product registration system” main menu click “View all
records”.
o
Click “View multiple records”.
o
A list of all the records in the database in spreadsheet format opens.
o
Pan across the top of the spreadsheet and look for the “Brand Name”
column.
o
Check if the product name is an item found under the “Brand Name”
column
o
Scroll down using arrow keys, or
o
Use “filter by form” button and enter product name in “brand name”
column.
o
If found, product is registered.
o
If not found, product not registered.
P3: Checking if APPLICANT already registered
o
Go to menu selections.
o
On the “CATLOGUE CODE REFERENCE” buttons column click the
“Applic” button.
o
List of registered applicants, in spreadsheet format, appears.
o
Check if the applicant name is an item found under the “CompanyName”
column.
o
Scroll down using arrow keys, or
o
Use “filter by form” button and enter product name in
“CompanyName” column.
o
If found, applicant is registered.
o
If not found, applicant not registered.
88
Drug registration and information system
P4: Checking if the manufacturer is already in database
o
Go to “Drug registration system” main menu.
o
On the “catalogue code reference” buttons column click the “Manu”
button.
o
List of manufacturers in database, in spreadsheet format, appears.
o
Check if the manufacturer name is an item found under the “Name”
column.
o
Scroll down using arrow keys, or
o
Use “filter by form” button and enter product name in “Name” column.
o
If found, name of manufacturer is in the database.
o
If not found, name of manufacturer is not in the database.
P5: Entering new manufacturer data
o
On the “Drug registration system” main menu click “Update database”
button.
o
Click “Update catalogue files” button, catalogue files screen opens.
o
Select by clicking “Manufacturer” tab on the top of the form.
o
Click “>*” to add manufacturer data.
o
Blank row opens.
o
Enter appropriate data in the empty column fields.
o
When finished, close window by clicking the “x” on the top of the form.
o
Menu returns back to Update databases menu.
P6: Opening “Receiving” menu
o
On the “Drug Registration System” main menu click “Receiving” menu.
o
Receiving form opens.
89
Drug registration and information system
L1: Launching the “Establishments Licensing system”
o
On the desktop window, click the “Licensing of Establishments” icon.
L2: Checking if APPLICANT already registered
o
On the main menu, click the “View All (multiple)” button.
o
List of all registered applicants, in spreadsheet format, appears.
o
Pan across top of spreadsheet and look for the “Name of Company”
column.
o
Check if product name is an item found under the “Name of Company”
column.
o
Scroll down using arrow keys, or
o
Use “filter by form” button and enter product name in “Name of Company”
column.
o
If found, APPLICANT is registered.
o
If not found, APPLICANT is not registered.
o
When finished, close window by clicking the “x” on the top of the form.
o
Menu returns back to “Establishments Licensing system” MAIN MENU.
L3: Entering new APPLICANT data in “Establishments Licensing system”
o
On main menu, click “Enter New Applications” button.
o
The “Establishments” form opens.
o
Click “>*” button found on the bottom of the form / or “>*” found on the
menu bar.
o
A blank form appears.
o
On the bottom of the screen, you will find the total number of applicants
already registered.
o
Enter a new application number on the “LTO Application No.” field.
o
Fill in the rest of the APPLICANT data in the form.
90
Drug registration and information system
o
To save your data, move the record forward or backward using the “>”
or ”<” buttons on the bottom of the form or on the menu bar.
o
When finished, close the window by clicking the “x” on the top of the
form.
o
The “Establishments Licensing system” MAIN MENU reappears.
91