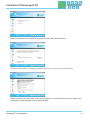
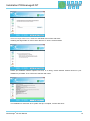
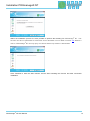
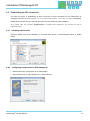
1
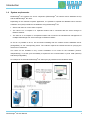
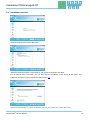
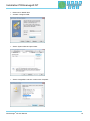
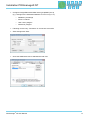
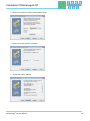
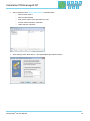
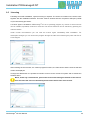
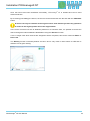
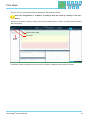
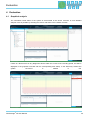
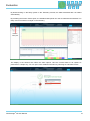
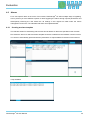
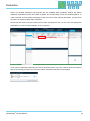
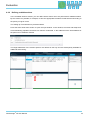
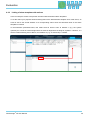
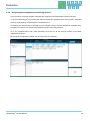
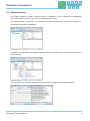
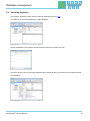
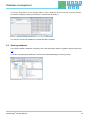
Revision overview Revision overview Date Revision Change(s) 16.03.2015 0 First version © Copyright 2015 Indu-Sol GmbH We reserve the right to amend this document without notice. We continuously work on further developing our products. We reserve the right to make changes to the scope of supply in terms of form, features and technology. No claims can be derived from the specifications, illustrations or descriptions in this documentation. Any kind of reproduction, subsequent editing or translation of this document, as well as excerpts from it, requires the written consent of Indu-Sol GmbH. All rights under copyright law are expressly reserved for Indu-Sol GmbH. ® PROmanage NT User Manual 3 Contents Contents Revision overview 3 Contents 4 1 Introduction 6 1.1 General 6 1.2 Disclaimer 6 1.3 Explanation on licensing 6 1.4 System requirements 7 2 Installation PROmanage NT 9 2.1 Start of the installation 9 2.2 Installation process 9 2.3 Installation process 10 2.4 Establishing an OPC connection 14 ® 2.4.1 Installing KepServerEx 14 2.4.2 Configuring KepServerEx for PROmanage NT 14 2.5 Licensing 22 3 First steps 24 3.1 Starting the program 24 3.2 Program structure 24 3.2.1 Menu bar 24 3.2.2 Toolbar 25 3.3 Setting up devices 26 4 Evaluation 30 4.1 Graphical analysis 30 4.2 Alarms 32 4.2.1 Creating an alarm template 32 4.2.2 Defining available actions 34 4.2.3 Linking of alarm templates with actions 35 4.2.4 Assigning alarm templates to monitoring devices 36 ® PROmanage NT User Manual 4 Contents 4.2.5 Email settings 37 4.3 Notifications / alarm overview 38 5 Database management 39 5.1 Creating and changing databases 39 5.2 Managing data collectors 40 5.3 Database backup 41 5.4 Restoring databases 42 5.5 Deleting databases 43 ® PROmanage NT User Manual 5 Introduction 1 Introduction 1.1 General ® PROmanage NT is a central piece of software for the analysis, management and storage of data on the quality of communication in industrial networks. Using standard SNMP queries, standard network parameters can be queried cyclically across networks and protocols (PROFINET, PROFIBUS, Ethernet, CAN and AS-i) and saved with a time stamp. A threshold value and alarm management system analyses the incoming network data and issues warnings in the event of any anomalies detected. Data can be displayed to the exact minute, from several months in the past, through statistics functions. This means historical events can be opened up for viewing at any time for cause analysis – for analysing sporadic stoppages, for example. 1.2 Disclaimer ® PROmanage NT has been carefully developed and tested by Indu-Sol GmbH according to the best of the company's knowledge and judgement. Nevertheless, based on the latest technology, it is impossible to create a piece of software that is entirely fault-free. That is why this company does not guarantee that the hardware and software will work properly in all application situations. Any liability for direct or indirect damages arising from the operation of the hardware and software and the usability described in the manual is therefore rejected. Indu-Sol GmbH will rectify defects which nullify or reduce the software's capability for the usual or contractually agreed purposes within an appropriate period of time, usually as part of regular software maintenance. 1.3 Explanation on licensing The licence defines the maximum number of network ports or devices that can be queried simultaneously. The following defaults apply here: One PB-INspektor, ASi-INspektor, CB-INspektor or INBLOX DP Diag Rep module (single-channel) equates to a port quantity of 8 One PN-INspektor or INBLOX DP Diag Rep module (dual-channel) equates to a port quantity of 16 For Ethernet switches, the quantity of network ports is simultaneously the quantity of licensed ports ® PROmanage NT User Manual 6 Introduction 1.4 System requirements ® ® PROmanage NT consists of a server component (PROmanage NT collector and a database server) ® and the PROmanage NT client. Depending on the customer's specific application, it is possible to operate the database server and the ® evaluation unit (client) in different constellations using PROmanage NT. Server and client run on the same computer The client is on a computer in a separate location and is connected with the server through an Ethernet network The client is on a computer in a separate location and is used for the simultaneous management of ® multiple PROmanage NT servers through an Ethernet network As far as it is possible to do so, we recommend installing both the collector and the database server (PostgreSQL) on one corresponding server. The collector requires the relevant license for querying the devices to be monitored. The client can be installed on any current workstation to be used for the evaluation (licenseindependently). To do this, port accessibility is required for the communication on ports 1988 (collector) and 5432 (PostgreSQL). ® An example of an external PROmanage NT client query is presented in the illustration below. ® PROmanage NT User Manual 7 Introduction Depending on the quantity and scope of the devices to be queried, the following system requirements apply in this regard: Number of ports CPU RAM Required hard drive space Up to 160 Dual Core ® ™ 2 (Intel Core i3) 2 GB 50 GB Up to 480 Dual Core, Quad Core ® ™ 2 (Intel Core i3, i5) 4 GB 100 GB Up to 960 Quad Core ® ™ (Intel Core i5, i7, ® ® 2 Intel Xeon ) 8 GB 200 GB (server HDD recommended) Up to 2,000 Quad Core ® ™ (Intel Core i7, ® ® 2 Intel Xeon ) 16 GB 400 GB (server HDD) 1 1) The specifications cover the hard drive space for PROmanage® NT (client, data collector and database server) and the required space of the database with a data retention period of 6 months 2) CPU example models In the event of permanent operation applications, we recommend using a server hard drive for ® PROmanage NT (server). ® ® PROmanage NT (client) requires at least an Intel HD Graphics 3000 graphics card or equivalent. The following operating systems are supported: ® ® ® ® ® ® ® ® Microsoft Windows XP Professional 32 bit Microsoft Windows 7 32 bit / 64 bit Microsoft Windows 8, 8.1 64 bit Microsoft Windows Server 2008 R2, 2012, 2012 R2 ® PROmanage NT User Manual 8 Installation PROmanage® NT 2 Installation PROmanage® NT 2.1 Start of the installation To start with connect the PROmanage NT installation stick into your PC ® You must have administrator rights for this process to be able to perform the installation Go to the installation stick using Windows Explorer Select the file 'PROmanageNTSetup.exe' by double-clicking 2.2 Installation process ® The PROmanage NT installation first checks and updates the installed Windows components. Checking of the installed Windows components with subsequent updating/setting up of missing Windows components (optional) ® Installation and configuration of PROmanage NT client Allowing the communication of PROmanage® NT through Windows Firewall Installation of Visual C++ Redistributable Installation of WinPcap Installation and configuration of PROmanage® NT collector (data gatherer) Allowing the communication for PROmanage ® NT data collector through Windows Firewall ® Installation of drivers for the Indu-Sol licence agent Database connection configuration Installation as Windows Service Installation and configuration of PostgreSQL and the database Database server installation New database creation Uninstaller PROmanage NT User Manual 9 Installation PROmanage® NT 2.3 Installation process Select a language and confirm with 'Next'. Select the required program components for your system and confirm with 'Next'. For an optional OPC connection you can also start the installation of the driver at this point. The additional procedure for this is explained under section 2.4. ® Select the PROmanage NT client installation path for your system and confirm with 'Next'. ® PROmanage NT User Manual 10 Installation PROmanage® NT Make your selection for the creation of program icons and confirm these with 'Next'. ® Select the PROmanage NT collector installation path for your system and confirm with 'Next'. During the issuing of access data, for the user 'postgres' we recommend using the same word for the password (i.e. 'postgres' again). Then confirm with 'Next'. ® PROmanage NT User Manual 11 Installation PROmanage® NT Select the target folder for the database data folder and confirm with 'Next'. Installing the target folder on a drive other than the C: drive is recommended. Define your database network options here and, in so doing, decide whether external access to your database is permitted. Then confirm the selection with 'Next'. The installation is executed. Once system set-up is complete, confirm with 'Next'. ® PROmanage NT User Manual 12 Installation PROmanage® NT ® Within the installation process it is also possible to perform the licensing for PROmanage NT . This function can also be performed at a later time and is described in more detail in section 2.5. Without a ® licence, PROmanage NT can only query one device and the trap monitor is deactivated. Click 'Finished' to start the data collector service after activating the function and after successful installation. ® PROmanage NT User Manual 13 Installation PROmanage® NT 2.4 Establishing an OPC connection You have the option of establishing an OPC connection to other computers for the transmission of ® messages recorded by PROmanage NT to a higher-level system. To do this, the item 'PostgreSQL ODBC driver (for OPC server)' must also be ticked and executed during the installation. As a further step, the program 'KepServerEX' is installed and configured. The process for this is explained below. 2.4.1 Installing KepServerEx Install the ODBC client (Full Installation Communication Server Communication Driver ODBC Client) 2.4.2 Configuring KepServerEx for PROmanage NT Start KepServerEx configuration as an administrator Add channel ( Edit Channels/Devices New Channel) ® PROmanage NT User Manual 14 Installation PROmanage® NT Device driver: ODBC client Activate 'Enable diagnostics' Optimisation method: write only latest value for all tags Duty cycle: perform 10 writes for every 1 read Non-normalised values should be: unmodified ® PROmanage NT User Manual 15 Installation PROmanage® NT Data source: dBASE files Activate 'Configure DSN' Select 'System DSN' and press 'Add' Select 'PostgreSQL' and then confirm with 'Complete' ® PROmanage NT User Manual 16 Installation PROmanage® NT Configure PostgreSQL ANSI ODBC driver (psqlODBC) set-up ® (e.g.: settings for the standard installation of PROmanage NT) o Database: promanage o Server: localhost o User name: postgres o Password: postgres Following correct entry: Test button Connection successful Save settings with 'Save' Close the ODBC data source administrator with 'OK' ® PROmanage NT User Manual 17 Installation PROmanage® NT Data source selection: select created data sources Data source login timeout: 5 seconds Check and confirm settings ® PROmanage NT User Manual 18 Installation PROmanage® NT Add a new device with 'Click to add a device' in KEPServerEX o Device name: alarms o Device model: MySQL o Scan mode: respect client specified scan rate o Access method selection: fixed table o Table selection: opcalerts Store settings under 'New device – auto tag database generations options' ® PROmanage NT User Manual 19 Installation PROmanage® NT Query interval: set 5,000 milliseconds Check and confirm settings As a result the tags are generated automatically by the system ® PROmanage NT User Manual 20 Installation PROmanage® NT Explanation of the individual alarms (alerts) Alarm Meaning Id Automatically generated primary key Culture Language alert0_message Message generated by PROmanage NT alert0_messagetype Message type (system, trap, etc.) alert0_occurencetime Date of the generated message … … … … … … alert9_message Message generated by PROmanage NT alert9_messagetype Message type (system, trap, etc.) alert9_occurencetime Date of the generated message Alarm 0 is the last generated alarm (latest notification) ® PROmanage NT User Manual 21 Installation PROmanage® NT 2.5 Licensing Following successful installation, system licensing is required. The licence is located on the licence stick together with the installation software. This stick must be inserted into the computer's USB port (≤ USB 3.0) for all licensing processes. ® A 'licence agent' is included in PROmanage NT as an operating program, by means of which licences can be installed, expanded, restored or removed. The various functions can be selected by pressing the relevant buttons. Under normal circumstances you can start the licence agent immediately after installation. For subsequent changes you can access the program through the start menu following the path: Indu-Sol LicenceAgent. After inserting the licence stick, the various program functions, the full licences and the licences that still remain are displayed. Through the 'Use' button it is possible to transfer a licence to the current PC system and to activate the software with it. Never, under any circumstances, pull out the licence stick during the transfer of the licence. This will cause the licence to be destroyed and cause the full loss of the license. ® PROmanage NT User Manual 22 Installation PROmanage® NT ® Once the licence has been transferred successfully, PROmanage NT is enabled and can be used without restriction. By recovering (uninstalling) the licence, the licence can be saved back onto the stick with the 'Withdraw' button. A licence can only be restored to the original licence stick. Should you have any questions or issues in this regard, please refer to the support team. In the event of licence loss due to Windows problems or a hard drive fault, it is possible to restore the licence through the internal hardware identification using the 'Recover' function. If it is no longer clear which licences are assigned to which computers, this can be viewed at Extras Device list. The Destroy function irrevocably deletes a licence and is only used in cases where a USB stick is defective or has gone missing. ® PROmanage NT User Manual 23 First steps 3 First steps 3.1 Starting the program The login window appears once program is opened. In it you must select the user and enter the password. By default, the password for admin (administrator) access is also the word 'admin'. The system is started when the login is executed. It is only possible to configure settings in the system with administrator rights. Other users can log in to the system with 'user' access using the password 'user'. 3.2 Program structure 3.2.1 Menu bar In the menu bar you can see the main menus 'File', 'Window' and 'Help' on the left. The 'File' menu contains the additional sub-items 'Change/create database', 'Manage data collector', 'Settings' and 'Log off user' and is therefore mainly used for adjusting the database management. The functions for changing language and selecting the different display formats are contained within the item 'Window'. The menu item 'Help' contains the electronic manual, as well as program and device information. On the right side of the menu bar you will find the selection criteria 'Timeline', 'Analysis', 'Alarm management' and 'Notifications', which allow you to quickly switch between the various display screens. The timeline presents the entire status of all monitored systems in a simple fashion. In Analysis you can find and open more detailed event-related information. Timeline Analysis Under the Alarm management menu item, all the settings for alarm evaluation, and the actions resulting from this, are defined. The Notifications window contains a detailed alarm overview on the exceeding of threshold values of the set alarms. ® PROmanage NT User Manual 24 First steps Alarm management Notifications 3.2.2 Toolbar ® For simple operation and the activation of important functions, PROmanage NT has a toolbar at the top of the program window. This offers quick access to the most important menu functions. Opens a new document / a new tab in the analysis Saves the settings and changes that have been made Activates the zoom function for the timeline resolution of the active document Activates the selection of the event points User change Updates the active document Activates the automatic updating of the active document ® PROmanage NT User Manual 25 First steps 3.3 Setting up devices Device set-up in the current network is only possible with an active data collector. ® After PROmanage NT restarts, the program opens with the timeline displayed. Since there are not yet any diagnostics devices integrated at the current time, this overview does not yet contain any additional information. To set up devices, you should therefore go to the 'Analysis' menu item. ® PROmanage NT User Manual 26 First steps Here, for a better system overview, you can create a folder structure below the main folder 'root' in the network overview. After each change to the configuration, the disc icon flashes as an indication that the result has not yet been saved. The associated querying devices (inspectors, switches) are created in these folders in the next step. ® PROmanage NT User Manual 27 First steps ® Press the 'Scan' button in the device set-up to have PROmanage NT begin searching for and listing all supported devices in its network. To filter the search, a shortlist of possible device types is stored in the sub-menu. If the device in question is not identified during the course of the automatic search, a manual scan is recommended. To do this the device type is selected from, and the IP address searched for is entered into, an input mask. ® Once the scanning process is complete, PROmanage NT shows you all the devices found in tabular form. In this process, it is automatically detected whether querying the devices is possible. If not, the devices are listed in the category 'Unsupported devices' and indicated with an exclamation mark !. By clicking on a particular device, more information is shown in the right-hand column. Device settings can be configured in the active fields. Press the 'Set up' button to include all selected devices in the querying process. If the 'Adopt immediately' field is activated during this process, these settings will be adopted into the database immediately without any further, subsequent saving. ® PROmanage NT User Manual 28 First steps Now you can see your selected devices displayed in the network overview. Once the configuration is complete, all settings must be saved by clicking on the disc button. The set-up process is closed by saving. If the Indu-Sol data collector is active, recording mode is started at the same time. Activate automatic update Save settings Installed devices If automatic update is activated, the first device information is displayed after around 2 minutes. ® PROmanage NT User Manual 29 Evaluation 4 Evaluation 4.1 Graphical analysis The calculated overall status of the system is documented in the device overview. A more detailed analysis of this is possible by selecting the various sub-items in the network overview. If there is a fault event from any diagnostics device within the course of the recording period, this will be displayed in the graphical overview with the corresponding time stamp. In the 'Summary' window the system ® concerned PROmanage NT User Manual is marked in red. 30 Evaluation By double-clicking on the faulty system in the 'Summary' window, the data associated with it is loaded automatically. By activating the function 'Select point', the individual data points can now be marked and evaluated. The faulty event is marked in red again in the summary. Function: select point The display in the timeline also offers the same options. Here the overall status of all systems is presented in a simple way. You can open more detailed information by selecting the individual entries. ® PROmanage NT User Manual 31 Evaluation 4.2 Alarms ® For a user-specific alarm in the event of an incident, PROmanage NT offers multiple ways of signalling. In this process you have different options for both triggering the alarm through special parameters and subsequently informing the user about this. All settings in this regard are made under the 'Alarm management' menu item. The individual sub-items are explained below. 4.2.1 Creating an alarm template The relevant entries for determining which events should lead to an alarm are specified in this overview. First select the device for which an alarm template should be created from the 'Network overview' screen. You are then automatically presented with the parameters or traps available for selection for this device. Traps available: ® PROmanage NT User Manual 32 Evaluation Select your desired parameter and drag this into the 'Available alarm templates' window. By adding additional parameters into the same alarm template, the corresponding events are bundled together. In order to be able to set up different strategies for the occurrence of the relevant parameters, you also have the option of creating multiple alarm templates. Should you later want to remove entries from the alarm management, then you can move the appropriate parameters, or even the entire template, to the recycle bin. Then open the individual parameters and set the threshold values you want. If these values are reached later in the running processes, the respective alarms associated with them will be tripped. ® PROmanage NT User Manual 33 Evaluation 4.2.2 Defining available actions In the 'Available actions' window, you can define which actions are to be performed for additional alerts. By this means it is possible, for example, to have the appropriate members of staff informed according to the priority of a given event. The setting up of email alarms is presented below. Press the 'New email action' button to open the input window. In this window, the name and subject line are automatically populated, but these can also be customised. In the address line the email address of the person to be notified is entered. The target addresses of the relevant persons are defined in this way and are subsequently available for additional alarm linking. ® PROmanage NT User Manual 34 Evaluation 4.2.3 Linking of alarm templates with actions In the next step the actions now present are linked with the desired alarm templates. To do this select your prepared action and drag this into the desired alarm template. As a result of this, an email is sent to the stored address as a corresponding action when the threshold value of the alarm template is reached. In the illustration presented below, this means that an email is sent to address 1 (e.g. the system operator) as a result of internal diagnostics or external diagnostics or telegram repetition. However, if a device restarts following device failure, then address 2 (e.g. an electrician) is notified. ® PROmanage NT User Manual 35 Evaluation 4.2.4 Assigning alarm templates to monitoring devices In the next step, the prepared alarm templates are assigned to the appropriate monitoring devices. ® To do this, PROmanage NT provides the option to assign the templates to the entire system, individual device groups (folders) or specifically to individual devices. Accordingly, the desired path is selected from the network overview and the designated, available alarm template is moved into the 'Active alarm template' window using drag and drop. So in the example below, both alarm templates are active for all the devices present in the folder 'PROFIBUS inspector'. By saving the configuration created, the set-up process is completed. ® PROmanage NT User Manual 36 Evaluation 4.2.5 Email settings In order to be able to send alarm notifications via email, you also need to configure the SMTP (Simple Mail Transfer Protocol) settings. To do this, open the relevant sub-item through 'File' 'Settings'. Under the item 'Sender address', specify from which email account the alarm mail is to be sent. You enter your server with the port-enabling for SMTP in 'Email server'. It is also possible to select a type of encryption. In the 'User' and 'Password' fields, enter the details for your sender address. In order to check the accuracy of the entries, a test mail can be sent to a specified email address. Once all settings have been set correctly, the following message appears: You should then find an email in your/the configured inbox. Ports required for the SMTP transfer: Port Function 25 SMTP server connection 465 SMTP over SSL 993 Internet Message Access Protocol over SSL (IMAPS) 995 Post Office Protocol 3 over TLS/SSL (POP3S) ® PROmanage NT User Manual 37 Evaluation 4.3 Notifications / alarm overview All system or device messages are compiled and listed in an alarm overview under the menu item 'Notifications'. Displaying specific entries is possible by selecting display criteria and then updating. ® PROmanage NT User Manual 38 Database management 5 Database management 5.1 Creating and changing databases You can reach the configuration window of the database connections by following the path 'FileChange/create database' in the menu bar. In the overview, information on the selected server and the currently active database within it are presented to you, and you can choose between any entries that might already be present in the selection menu. When selecting the database, you must decide whether this should be used for simultaneous recording and displaying of device data or merely for an evaluation of available data (display only). If you opt for synchronous logging and displaying of accumulated data, the 'Also adopt for data collector' field must also be activated. Press the 'Check' button to check the connection to the server. The test is acknowledged with a confirmation dialogue. ® PROmanage NT User Manual 39 Database management To create a new database, specify the desired name for this under the item 'Database' (no special characters permitted). After pressing the 'create' button and confirming the security prompt, this new database is created and is available for further use. 5.2 Managing data collectors By opening the sub-menu 'Manage data collectors', the currently selected server is displayed in the input mask. Following activation of the connection with this sever, the general and licence information for PROmanage and the database currently connected to the server are displayed. ® PROmanage NT User Manual 40 Database management 5.3 Database backup The program 'pgAdmin' is used to create a backup of a database. This is a component of PostgreSQL and is started via the program menu in the associated program folder. The relevant server is selected in the program and, after password entry (pre-set as 'postgres'), a connection to the server is established. Following successful dial-up, all available database entries are displayed. Now select the desired file and start the backup. Then specify the file name and destination location for the backup file and complete the backup. ® PROmanage NT User Manual 41 Database management 5.4 Restoring databases The program 'pgAdmin; is also used for restoring databases (see item 5.3). To do this, go to the items 'Databases New database, ...'. Specify a database name (without special characters) and then confirm with 'OK'. In order to fill the new but still empty database with the desired data, now select the new folder and start the restoration. ® PROmanage NT User Manual 42 Database management In the next step search for the storage folder of your backup file and execute the recovery process. Successful completion of this process will be confirmed with 'Exitcode 0'. You can then access the database to evaluate the data contained. 5.5 Deleting databases If you want to delete a database completely, this is also performed using the 'pgAdmin' program (see item 5.3). To do this, the appropriate database is selected and deleted following the security prompt. ® PROmanage NT User Manual 43


![[1]Oracle® DIVAdirector](http://vs1.manualzilla.com/store/data/005731358_1-211e3778ae12716a403cbbeaab90ad2a-150x150.png)