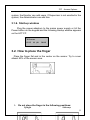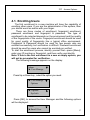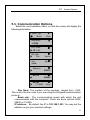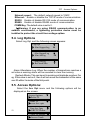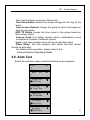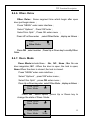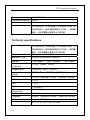
1
ACT FP User Manual PRINT ELECTRONICS (USA), INC. 505, 8th Avenue, 17th Floor, Suite # 1703 New York, NY 10018 Tel: 212-268-5020 Ext:202 Fax: 212-268-4858 e-mail: [email protected] www.printelectronics.com I Replication or Reproduction of this document or part of this document is strictly prohibited without prior approval of Print Electronics All the functions and uses are recommended for ACT FP products only. Due to continuous upgrades and customization of the products, we do not take any responsibility for any or part of the functions not present in the ACT FP which you purchased. Design and Specifications are subject to change without notice. All trademarks and copyrights are acknowledged. II Contents Contents 1、 Introduction ..................................................................................31 2、 Things to know.............................................................................32 3、 Basic Concepts ............................................................................32 3.1. Basic Concepts..........................................................................32 3.1.1. User Enrollment.................................................................33 3.1.2. User Verification ................................................................33 3.1.3. Match Threshold Levels ...................................................33 3.1.4. User ID Numbers ..............................................................33 3.1.5. Authority (status) Levels...................................................34 3.1.6. Start-up window.................................................................35 3.2. How to place the finger.............................................................35 4、 Enrollment and Verification Procedures .....................................36 4.1. Enrolling Users...........................................................................37 4.1.1. Fingerprint Enrollment ......................................................38 4.1.2. Password Enrollment........................................................39 4.1.3. Fingerprint & Password....................................................40 4.2. Testing an Enrollment ...............................................................41 4.3. Enrolling a User with the Display Finger Option On.............42 4.4. Verifying Your Identity ...............................................................42 4.4.1. Fingerprint Verification......................................................42 4.4.2. Password Verification .......................................................43 4.4.3. ID number & Fingerprint...................................................43 4.5. Hints for Successful Enrollments ............................................44 5、 System Options ...........................................................................45 5.1. System Options .........................................................................46 5.1.1. Date Time ...........................................................................47 5.1.2. Language ...........................................................................47 5.1.3. Format.................................................................................47 1 User Guide 5.1.4. Advanced Options.............................................................48 5.2. Power Manager .........................................................................49 5.3. Communication Options ...........................................................51 5.4. Log Options ................................................................................52 5.5. Access Options..........................................................................52 5.6. Auto Test .....................................................................................53 6、 System Information.....................................................................54 7、 Troubleshooting...........................................................................55 8、 User Acc Opts Guide ..................................................................56 8.1. Product Features .......................................................................56 8.2. Basic Concepts ..........................................................................57 8.3. Access Options..........................................................................57 8.3.1. Brief Introduction to Access Options ..............................58 8.3.2. Verification Flow of Access Options ...............................59 8.4. Function Description .................................................................36 8.4.1. Definition of Time zone.....................................................36 8.4.2. Definition of Grouping Function ......................................38 8.4.3. User Acc Opts....................................................................48 8.4.4. Access Comb.....................................................................51 8.4.5. Lock.....................................................................................54 8.4.6. DSen. Delav.......................................................................55 8.4.7. Dsen. Mode........................................................................55 Technical specifications ........................................................................56 2 Access Options 1、 Introduction In this chapter, details of the commonly used terms and the functions of each key are explained. OK Confirm the current option 31 Access Options MENU Access to Menu and configuration C Cancel your current operation Scroll up Scroll down ~ Power button BELL Door bell; Number: Numerical keys 2、 Things to know Please do not install ACT FP in direct sunlight as this may affect the performance of the fingerprint sensor. This may result in false verifications of the fingerprints. Try to avoid the ambient temperature to rise above 40 deg. C where ACT FP is installed. If the unit is installed we strongly recommend to cover the unit with a protective cover for trouble free operation. 3、 Basic Concepts 3.1. Basic Concepts This section explains and describes the functions and options of enrolling the users. ¾ User Enrollment ¾ User Verification ¾ Match Threshold Levels ¾ User ID Numbers ¾ Authority (Status) Levels The two most important functions are user enrollment and user 32 Access Options verification. 3.1.1. User Enrollment Enrollment is the process of associating an ID number to the user’s finger/s to create a template. This template is stored in the memory of ACT FP for future verification. During user verification, the stored template is compared to the current fingerprint scan to confirm the user’s identity. The enrollment process takes approximately 2-4 seconds. Up to ten fingers can be enrolled for the same ID number, so the user may have more verification options. Ideally, we recommend enrolling two fingers of each hand so that in case of injury of one hand the user can use the finger of the other hand as a backup. It is recommended to enroll left or right index finger and left middle or right middle fingers. For users with extremely thin fingers, we recommend to enroll the thumb. For users whose fingers are difficult to enroll or cannot be enrolled, we recommend to enroll the password along with fingerprint. 3.1.2. User Verification Verification occurs when a user either enters an ID number or places a finger on the fingerprint sensor. If the user is enrolled with fingerprint and/or password than he need to enter the password as an alternative to finger. 3.1.3. Match Threshold Levels The Match Threshold is a number that represents the degree to which a verification is performed to ensure that the user is the user who he claims to be. The Match Threshold Levels establishes a balance between False Acceptance Rate (FAR) and False Rejection Rate (FRR). FAR measures how often a non-authorized user is falsely recognized and granted access to the system. FRR measures how often an enrolled and authorized user, who should be granted access to the system, is denied on the basis that the system did not recognize him. You can set match threshold levels on a per user basis. However for fingerprints which are facing difficulties in verification we recommend to use 1:1 matching i.e. enter his user ID than place the 33 Access Options finger for verification. Raising the threshold increases security, while lowering it increases throughput. Based on the quality of the fingerprints of the users, you need to strike a correct balance. For users with worn or damaged fingers, match threshold levels can (and should) be reduced. Different installations have different requirements. Table 1—1 Suggested Match Threshold Settings FRR FAR One-to-one High Low One-to-many 45 25 Middle Middle 35 15 Low High 25 10 3.1.4. User ID Numbers Each fingerprint is assigned a User ID Number. This ID number is used to call up the fingerprint template each time the verification is requested. ID numbers can also be called up via the keypad or RF card 3.1.5. Authority (status) Levels ACT FP has four authority or status levels: ·Users are people whose identity must be verified, to have access to the door. ·Enrollers are Users who are authorized to enroll new users or delete from the system. ·Administrator can perform other operations, except set advanced option and enroll administrator authority. ·Supervisors are users who has access to all functions and can modify all the settings in the system. Note: Without Administrator and Supervisor enrolled in the 34 Access Options system, the Enroller can add users. If Supervisor is not enrolled in the system, the Administrator can add him. 3.1.6. Start-up window Plug the power adaptors to the mains power supply or hit the Power button on the keypad and the following startup window appears on the ACT FP. Welcome 03 15 10:08 MON 3.2. How to place the finger Place the finger flat and in the center on the sensor. Try to cover atleast 80% of the sensor area. Do not place the finger in the following positions: Upright Sideways 35 Access Options  Note: Please adopt the correct method for placing the finger for verification. We are not responsible for malfunctioning of the unit due to improper placement of the finger. 4、 Enrollment and Verification Procedures This chapter describes how to enroll and verify users on the ACT FP. The following topics are included: ¾ Enrolling User ¾ Testing an Enrollment ¾ Enrolling a User with the Display Finger Option On ¾ Verifying Your Identity ¾ Hints for Successful Enrollments Note: You must have Enroller, Administrator, or Supervisor status to enroll users. For information on status levels, see “Authority (Status) Levels” on 1.1.5. 36 Access Options 4.1. Enrolling Users The first enrollment in a new machine will have the capability of enrolling other users .If you are the administrator of the system, than you should enroll as admin with your finger. There are three modes of enrollment, fingerprint enrollment, password enrollment and fingerprint & password. The type of enrollment to be selected depends on the environment and the quality of the fingerprints of the users. Fingerprint enrollment should be used for good quality of fingerprints like a typical office environment. Fingerprint & Password should be used for few people who are enrolled successfully, but verification is difficult. Password enrollment should be used for users who cannot be enrolled nor verified. To start the enrollment process, identify yourself first—press [Menu], enter your ID number or fingerprint, and then verify your identity. Note: If this is the first enrollment in a new or empty system, you will not be prompted for verification. The following message appears on the display: Menu ► User Manage Press Up or Down key , select the option you need: ► User Manage Options ► Options Sys Info Press [OK], to access the User Manager and the following options will be displayed: Menu ►Enroll User 37 Access Options Press Up or Down key select what you need options: ►Enroll User Enroll Admin Enroll Admin Delete Press [OK] to access the User Enrollment and options will be displayed: the following Enroll User ►Enroll FP Press Up or Down key select what you need options: ►Enroll FP Enroll Pwd ►Enroll Pwd FP& Pwd ►FP& Pwd Reg FP ID 4.1.1. Fingerprint Enrollment (1) Select the Enroll Fingerprint option and the following options will be displayed: New Enroll? ESC OK 38 press [OK], so that Access Options (2) If you want to enter a different ID no. than type that ID and press [OK].The ID number should be in the range of 1 to 65536. New Enroll? Enroll ID 00001 (3)Select the ID no. and press [OK], so that the following screen will be displayed: 00008-0 Place Finger. .. ... (4) If the enrollment is successful three times in a row, so that the following screen appears: Enroll ID 00008-1 ESC OK Note: 00008-1 The number 1 represents the first fingerprint enrolled against that ID no. Press [OK], the previous message continues to be displayed while the template is created. If your identity cannot be verified, you are prompted to try again. And you must restart the verification procedure from step 3. 4.1.2. Password Enrollment (1) Access the password enrollment option and press [OK], so that the screen appears: New Enroll? ESC OK (2) Press [OK], so that the following screen appears: New Enroll? Enroll ID 00002 39 Access Options (3) Input the User ID (from 1 to 65534), press [OK], so that the following screen appears: New Enroll Input Pwd***** (4) Input the password and press [OK], so that the following screen appears: New Enroll Pwd Affirm *****  Note: The password range is 1 to 5. (5) Input the password again, press [OK], so that the following screen appears: 00002-P ESC OK Note: 00002-P The last letter P means user ID is enrolled with password. Press [OK], and the previous message continues to be displayed while the template is created. 4.1.3. Fingerprint & Password Access the Fingerprint & Password, press [OK], so that the following screen appears: New Enroll? ESC 40 OK Access Options (2) Press [OK], so that the following screen appears: New Enroll Enroll ID 00003 (3) Input the password (from 1 to 65534), press [OK], so that the following screen appears: 00003-0 Place Finger。 。。 。。。 (4) If the enrollment is successful three times in a row, the following screen appears: New Enroll Input Pwd***** (5) Input your password, so that the following screen appears: New Enroll Pwd Affirm***** (6) Input the password again and press [OK], so that the following screen appears: ESC 00003- 1P OK Note: 00003—1P 1P means the User is enrolled with one fingerprint and password. Press [OK] so that the previous message continues to be displayed while the template is created. 4.2. Testing an Enrollment Ask the users to place their finger to perform a verification. If the verification is successful, we recommend to adopt Fingerprint enrollment. If the verification is inconsistent, we recommended to use Fingerprint & Password. 41 Access Options 4.3. Enrolling a User with the Display Finger Option On Press [ESC] after the user is enrolled so that the Option can be turned On. ESC New Enroll? OK Display Finger Backup Enroll Enroll ID 00003  Note: Where system memory permits, it is advisable to have at least two fingers enrolled for all users. 4.4. Verifying Your Identity After all enrollments are done in ACT FP, the reader is ready to be used for access control. ACT FP has three modes of verification: Fingerprint verification, Password verification or Fingerprint and Password. 4.4.1. Fingerprint Verification Place the finger on the sensor surface, so that the following screen appears: FP Verify Please Move Finger After about 1 second, if the verification is successful, it will say “Thank you” and following screen appears: Enroll ID 00008 Verified! If your identity cannot be verified, you are prompted to try again, and the following screen appears: 42 Access Options FP Verify Place Finger Agn! After about 0.5 seconds, the display returns to the main screen. 4.4.2. Password Verification To verify a user enrolled with password, enter the userID number, so that the following screen appears: Enroll ID 00003 ESC OK Press [OK], the following appears: Enroll ID 00003 Input Pwd***** Input correct password and screen appears: Pwd Affirm Enroll ID press [OK], so that the following 00003 If the password cannot be verified, the following screen appears: Pwd Affirm Error pwd! 4.4.3. ID number & Fingerprint To verify a user enrolled with fingerprint and password, enter the userID number, so that the following screen appears: Enroll ID 00003 ESC OK The user will be prompted to place the finger and following screen appears: 43 Access Options FP Verify Please Move Finger If your identity is verified, the following screen appears and thereafter the user will be prompted to enter his password : Enroll ID 00003 Verified! 4.5. Hints for Successful Enrollments If the fingerprint of the user is of good quality then the verification will be successful. In order to improve the fingerprint verification quality, we recommend the following suggestions Dry or dirty fingerprints Sensor does not recognize the presence of finger 44 If the finger is dry, the user should rub his finger on his palm and than try to enroll and verify. The finger should be clean while enrolling The user should place the finger firmly with enough pressure and squarely on the sensor surface. How to select the finger? How to place the finger? Others Access Options We recommend to use left or right index or middle finger. Use fingerprints of good quality, which does not have more wear and tear. If the user’s finger is thin and does not cover 80% of the sensor surface, we recommend to use the thumb. Place your finger firmly and touch the sensor surface so that it covers 80% of the area Do not remove the finger too fast and do not move the finger on the sensor surface. However, few users fingerprint quality is too poor to verify. Please use ID & fingerprint verification, and the Match Threshold Levels can be reduced or use password verification. 5、 System Options Press the [Menu], then verify your identity. So that the following screen appears: Menu User Manage Press Up or Down key, to select “Options” Scroll down the menu and the following information will be displayed: User Manage Options System Opt Power Mng Power Mng Comm Opt Comm Opt Log Opt ▼ 45 Access Options In the setup options, there are six options : system setup, power setup, communication setup, record setup, door lock function setup, auto examination. We will discuss each option in details. 5.1. System Options The following are the list of options within the System Options System Opt Date Time ▼ Date Time Language ▼ ENG Language S Fmt YYYYMMDD 46 Fmt YYYYMM Adv Option Access Options 5.1.1. Date Time You can set the date and time using this option 2004-07-28 9:47:56 To change the date, press Up and Down Key, then input the correct date and time. Press [OK] to save the changes. 5.1.2. Language Select the desired language and press OK. The default language is English. Data Time Language ▼ SCH 5.1.3. Format for Display of Date on the Main Screen Press UP or Down to select “Fmt” option. Press OK, and select the option. Language Fmt Fmt S YYYMMDD There are four formats to choose from YYYYMMDD、YY.MM.DD、 YY-MM-DD、YY/MM/DD. 47 Access Options 5.1.4. Advanced Options Select the Advanced Option. Press [OK], so that the following screen appears: ▼ Adv Option Reset Opts. Press UP or Down key and select the desired option. Reset Reset Opts. Opts. Del Del Att Att Logs Logs ▼ ▼ Del Del Att Att Logs Logs Clear Clear All All Data Data Clear Clear All All Data Data Clr Admin Clr Admin Pri Pri Clr Clr Admin Admin Pri Pri Show Show Score Score Show Show Score Score Match Match Thr Thr Y Y 35 35 Match Match Thr Thr Only Only 11 to to 11 N N Only Only 11 to to 11 1:1 Thr 1:1 Thr 15 15 1:1 1:1 Thr Thr Voice Card Only Voice Image Qlt Y Y 100 Each option is explained in details as follows: 48 Access Options Reset Opts: Restore all default settings. Del Att Logs: Clear all the transactions stored in the memory. Clear all Data: Delete all the fingerprint templates and transactions. Clr Admin Pri: Change the rights of the administrator to a normal user. Show Score: Display the score of the quality of the fingerprint match. Match Threshold Levels: For helping in selecting threshold level settings, see Table 3.1.3. Only 1 to 1: Disable 1:N matching 1:1 Threshold Levels: For selecting the right level please refer the table 3.1.3 below, Image Qlt: The fingerprint clearance degree Table 3.1.3 FRR FAR One-to-many One-to-one High Low 45 25 Middle Middle 35 15 Low High 25 10 5.2. Power Manager Select the power setup menu and the screen shall display the following information: Power Mng Shutdown ▼ No Shutdown Power on ▼ No 49 Access Options There are various power modes which can be selected This may significantly increase the life of the machine and satisfy the various requirements of the users. Shut down: Turn off the power at pre-defined time Power on: Turn on the power at pre-defined time Sleep: Enable sleep mode at pre-defined time. Press any key to bring the unit out of sleep mode. Idle and Idle Minute: These two options are related to each other. When you set idle time to 0, then the idle setup function is off. When the idle time is not set to 0 (unit is minute), for example, 1, then the system will go to sleep mode in 1 minute. Setup On time Fun? ESC OK 50 Access Options 5.3. Communication Options Select the communication menu; so that the screen will display the following information: Comm. Opt Baud Rate BaudRate 115200 Dev Num IP Addr IP Addr Net Speed Net Speed 100M Ethernet RS232 RS232 RS485 RS485 COMM Key Dev Num: The number of the machine, ranged from 1-255. This is also the site code if you are using the Weigand communication protocol. Baud rate: The communication speed with which the unit communicates with the computer. There are three options 9600, 38400 or 115200. IP address: By default, the IP is 192.168.1.201. You may set the address as per your network settings. 51 Access Options Network speed: The default network speed is 10M-F. Ethernet: Enable or disable the TCP/IP mode of communication. RS232: Enable of disable RS 232 mode of communication. RS485: Enable of disable RS485 mode of communication. COMM Key: The default value is set to 0. #Warning: If you are using RS485 communication in an outdoor environment, a lightening protection device must be installed to protect the circuit from voltage spikes. 5.4. Log Options Select Log Opt, and the following screen appears: Log Opt Alm SupperLog 10 Alm SupperLog Alm AttLog 10 Alm AttLog ReCheck Min 0 Alarm Attendance Log: When the number of transactions reaches a set value a warning alarm will be sounded to clear the memory, Recheck Minute: This can be set to avoid record duplicate punches. For eg. If this value is set as 2, then it will not record the transaction of the same user ID within 2 minutes of the first punch. 5.5. Access Options: Select the Acc Opt menu and the following options will be displayed on the screen. Access Options Define TZ Define TZ User Acc Opts 52 User Acc Opts GRP TZ Define GRP TZ Define Access Comb Access Options Five main functions in Access Options are: Time Zone Define: Define the access timings for the day of the week. User Access Options: Assign the group to each user based on their access rights. GRP TZ Define: Assign the time zones to the group based on their access rights. Access Comb is to define various unlock combinations, every combination consists of different groups; Lock: Lock open duration time can be set with this option DSen. Delay: The time duration after which the door sensor should be activated. For details of the operation, please refer to the Access Options Operating Guide 5.6. Auto Test Select the auto test option and the following screen appears: Auto ▼ Run ▼ Test All Test FLASH Test LCD Test LCD Test Voice Test Voice Test FP Reader FP Reader Key Test Key Test RTC Test 53 Access Options With this option, we can conduct test on the different modules of the system. This will enable you to find the cause of the problem is the unit is malfunctioning. It tests the Memory LCD, Fingerprint sensor, keypad and clock. During the course of test, you should guarantee the stability of the power. If the power fails during the test it can cause damage to the hardware and make it unusable. 6、 System Information From the Menu select the Sys Info, press [OK], so that the following screen appears: Sys Info User Cnt ▼ 4 User Cnt FP Cnt ▼ 0 FP Cnt Att Log Att Log Admin Cnt Admin Cnt Pwd Usr Pwd Usr Super Logs Super Logs Free Space Info 54 Free Space Info Dev Info Access Options It displays the number of users enrolled, number of passwords enrolled, fingerprints enrolled, manager and log information on the screen. You can see some other information like remainder log capacity in the memory, the device capacity, the default date, machine number. 7、 Trouble shooting 1. Cleaning From time to time, the optical platen, the keypad and display window require cleaning. Since working environments differ, it is not possible to define when cleaning should be performed. Following is guide: Figure 7-1 Cleaning Schedule Item Keypad and display window Cleaning Frequency Cleaning when visibly dirty and hard to read. See cleaning the keypad and display below. Optical platen Do not over clean. The platen is designed to work under greasy or dirty conditions. However, do clean if the platen is obscured or if users report deteriorating performance. See cleaning the Optical Platen below. 2. Cleaning the Keypad and Display To clean the keypad and display, use a soft paper tissue which should be slightly damp. 3. Cleaning the Optical Platen Clean the optical platen as follows: 55 Access Options (1) If dusty, blow air on the platen to clean any dust particles. (2) If the sensor is greasy wipe it with a mild window cleaner or other similar neutral detergent. Warning: Do not use any other cleaner or the platen may be damaged. Be careful not to scratch the platen. 8、 Opts Guide 8.1. Product Features Can store upto 1500 templates and 15000 transactions Easy to configure access control functions Internal integrated single-door controller Self-contained doorbell option for visitors Red and Blue LED indication for acceptance and rejection of fingerprints Provision to connect to Alarm if the unit is tampered Wall mountable back plate for secured installation 26 bit Weigand standard output to interface with third party controllers 56 Access Options 8.2. Basic Concepts Basic concepts in Access Options function: 8.3. Access Options Select the Access Options function from the main menu, and the following screen appears: Access Options Define TZ Define TZ User Acc Opts User Acc Opts GRP TZ Define GRP TZ Define Access Comb Access Comb Lock Lock DSen. Delav DSen. Delav ▲ Dsen Mode “Access Options” has 7 main functions: Time Zone : Access Timings for a user for a week. User Acc Opts : Define various options like groups and time zone options for each user. GRP TZ Define :To create a group based on the time zones. 57 Access Options Access Comb : Define different unlocking combinations for each group. Lock : Duration for which the lock needs to be kept open after the user is successfully verified. 8.3.1. Brief Introduction to Access Options Access Options function is used to program the settings of registered user’s based on their access rights Each user should be assigned a group and is assigned a time zone based on the access rights. Users can be divided into a maximum of 5 groups and for each individual group a separate time zone can be defined. Each individual user can belong a to maximum of three different groups. The lock will be activated if the users access rights are satisfied from any of the three groups. Conditions of a registered user can unlock the door are: 1: The group that user belongs to should be in unlocking combination (also this group can be in unlocking combination with other groups, but it is required to unlock door together with them). 2: Current unlocking time should be in any effective time zone in user time zone. By default a new user is assigned a group 1 and time zone 1 By default group 1 and time zone 1 have unlocking option set for all days of the week. If the group of a user does not include in any grouping combination then that user can only record attendance but it will not activate the relay contacts to open the door. 58 Access Options 8.3.2. Verification Flow of Access Options User places the fingerprint F ifi ti No User TZ Records entry but can’t unlock Yes GRP TZ No Yes TimeZone Deny No Effective TZ Yes No T&A User GRP in unlocking Comb Yes Satisfy certain unlocking combination No Next GRP user Yes Combine to unlock door 59 Function Description 8.4. Function Description 8.4.1. Definition of Time zone Time zone is the minimum time zone unit of Access Options. Whole system can define maximum 50 time zones. 7 time regions (i.e. one week) can be set in each time zone. Each time region is effective time zone in 24 hours of a day. Each user can set maximum 3 time zones. Relationships among these three time zones are “OR”. It is effective as long as the time to verify can meet one of these three time zones. Each time region format of time zone is HH:MM-HH:MM, i.e. the format is according to 24-hour mode and accurate to minute. End-time less than start-time (23:57-23:56) represents all-day forbidden. End-time larger than start-time (00:00- 23:59) represents effective in this region. Effective time zone for user to unlock: all-day open (00:00-23:59) or end-time larger than start-time in time zone. #Note: System defaults that time zone of serial number 1 is all-day open (i.e. new registered user default can unlock door). 1) Enter “Define TZ” and screen displays as follows: Define TZ Time Zone No 1 Press “OK” to enter setting of time zone 1 and screen displays as follows: Def Time Zone 1 Sun 0 0 : 0 0 - 2 3 : 5 9 00 00 23 59 36 Sun 0 0 : 0 0 - 2 3 : 5 Mon 0 0 : 0 0 - 2 3 : 5 9 二 00 00 23 59 Mon 00:00-23:5 Function Description Definition of time zone 1 above is all-day open, i.e. factory default status. 2) For example: Time zone can be redefined, i.e. definition of time zone 1 is: Saturday and Sunday are break, and not allow to enter. Working time of Monday to Friday allow to enter. Working time: 08:30-18:00 Setting is as follows Def Time Zone 1 Sun 2 3 : 5 7 - 2 3 : 5 6 08 30 18 00 Sun 2 3 : 5 7 - 2 3 : 5 Mon 0 8 : 3 0 - 1 8 : 0 0 二 08 30 18 00 Mon Tue 08:30-18:0 08:30-18:00 Tue Wed 08:30-18:0 08:30-18:00 37 Function Description On analogy of this, multi time zones can be defied according to practical requirements. Whole system can define maximum 50 time zones. 8.4.2. Definition of Grouping Function Grouping function can divide users into group, and can also combine different groups into different unlocking combinations, which are easy and convenient for grouping management of Access Options. And all that, the grouping function can combine many unlocking combinations. System defines 5 groups: group 1, group 2, group 3, group 4 and group 5. New registered user default belongs to group 1, but the user can be relocate into other group. Select serial number of Time Zone already being set in group Time Zone .New registered user default uses time zone of group 1. But after user resets the belonged group, the user uses default time zone of correlative group. So default time zone of each group should be defined first.For details of use group time zone, please refer to “User Access Options”. #Note: time zone of system defaults that group 1 selects serial number “1” of time zone. (i.e. new registered user default can unlock door) a) 38 Enter “GRP 1 TZ Define ” and screen displays as follows: GRP TZ Define Group No. ▲ 1 Function Description Press OK to enter. GRP 1 Dflt TZ TZ 1 时间段 2 1 8 TZ 1 TZ 2 时间段 3 8 40 TZ 2 TZ zones 3 40 Define. Relationships There are 3 time in GRP TZ among these 3 time zones are “OR”. Group 1 is effective in time zones of 1, 8 and 40, and can also select other defined time zones. b) Enter “GRP 2 Dflt TZ ” and screen displays as follows: Setting of time zone of group 2: ▲ 2 GRP TZ Define Group No. Press OK to enter. GRP 2 Dflt TZ TZ 1 时间段 2 8 TZ 1 TZ 2 时间段 2 8 1 10 TZ in 2 time zones of 2, 10 and 36, and can also Group 2 is effective TZ 3 36 select other defined time zones. 时间段 2 8 On the analogy of this, time zones of each group can be defied according to practical requirements. Whole system can define time zones of maximum 5 groups. 39 Function Description 8.4.3. User Acc Opts User Access Options is to process correlative setting according to user’s requirements. 1. Enter this menu to check certain user’s Access Options status. User Access Options include: belonged grouping setting, use group time zone and user time zone Grouping: divides registered users into several groups, is easy and convenient to manage. Use group time zone: whether the user uses default time zone of belonged group. User time zone: is user to set user’s unlocking time, and select serial number of time zone already being set. #Note: relationships between use group time zone and user time zone Yes and No in “Use Group Time zone” only have impact on the following user time zone: 1) If use group time zone is “Yes”, then user time zone will automatically be assigned the value of serial number of time zone of belonged group (group time zone should be set in advance). 2) If User Time zone is changed, then use group time zone automatically change to “No”. 48 Function Description 2. Example of setting: The following example is to set user 00001 and 00002 to group 1 and group 2, respectively. A. Enter setting interface of serial number 00001, and screen displays as follows: User Acc Opts Enroll ID: 00001 Press “OK” to enter setting menu of use group time zone. Press “UP” and “DOWN” keys and select “Yes”. Screen displays as follows: User 00001 Opt Belong to GRP 1 Belong to GRP Use GRP TZs Yes Use GRP TZs TZ 1 1 TZ 1 TZ 2 40 TZ 2 TZ 3 48 User of serial number 00001: User’s belonged grouping is “1”, it uses time zone of group 1 (serial number of user time zone is serial number of group time zone). User 00001 is effective in time zones of 1, 8 and 48. 49 Function Description B. Enter setting interface of serial number 00002, and screen displays as follows: ▲ User Acc Opts Enroll ID: 00002 Press OK to enter. If serial number of user time zone is 1 or 20, then use group time zone automatically change to “No”. User 00002 Opt Belong to GRP Belong to GRP UserGRP TZs 2 No UserGRP TZs TZ 1 1 TZ 1 TZ 2 20 TZ 2 TZ 3 48 User of serial number 00002: User’s belonged grouping is “2”, it uses user time zone and does not use group time zone, i.e. it is effective in time zones of 1 and 20. When user wants to use group time zone, then select “Yes”. In user time zone, serial number of group time zone will be automatically assigned the value of serial number of group time zone. Contrariwise, if user wants to use user time zone, just directly modify the serial number in user time zone and use group time zone will automatically change to “No”. 50 Function Description 8.4.4. Access Comb Unlocking combination is the direct representation of controlling unlocking. For example, if user wants that all registered users cannot unlock, then the user can set all 10 unlocking combinations to null. Unlocking combination definition is to define different unlocking combinations, and each combination is composed of different groups. Unlocking combination directly uses group number and does not consider user verification sequence between each group. For example “123” represents group 1, group 2, group 3 and at least one user in each group congregates and passes verification together, then door can be unlocked. “4” represents that after individual user in group 4 passes verification, then door can be unlocked. System can simultaneously define maximum 10 unlocking combinations. It is required that only one of them passes verification. #Note: Unlocking combination of system initial default setting is “1” (i.e. new registered user default can unlock door). Press “MENU” and enter main interface. Select “Options” and press “OK” to enter setting menu. Select “Access Options” and press OK to enter menu. Select “Unlocking Combination Definition” to enter “Unlocking Combination” and screen displays as follows: Access Comb Comb 1 1 Comb 1 Comb 2 51 Function Description Comb 2 Comb 3 Comb 3 Comb 4 。 。 。 。 。 。 。 。 。 。 。 。 。 。 。 。 Comb 9 Comb 10 When do not process setting yet (i.e. factory default status), system defaults that group 1 is unlocking combination 1 and others are null. If do not want to allow all users to unlock door, then set 10 unlocking combination all to null. If only want to allow some groups to unlock door together, then set these groups in unlocking combination definition. 1) For example: Access Comb Comb 1 52 123 Comb 1 Comb 2 4 Comb 2 Comb 3 24 Comb 2 Comb 3 45 Comb 2 Comb 3 15 Function Description From above combination setting, it can be seen that: 123 is a combination. 4 is a combination. 24 is a combination. 45 is a combination. 15 is a combination. Combination 1: when personnel of group 1, group 2 and group 3 are all on the scene and the time zone is effective in which at least one user in each group passes verification together, then door can be unlocked. Combination 2: only one of personnel belonged to group 4 is on the scene, then door can be unlocked. Combination 3: when personnel of group 2 and group 4 are all on the scene and the time zone is effective in which at least one user in each group passes verification together, then door can be unlocked. Combination 4: when personnel of group 4 and group 5 are all on the scene and the time zone is effective in which at least one user in each group passes verification together, then door can be unlocked. Combination 5: when personnel of group 1 and group 5 are all on the scene and the time zone is effective in which at least one user in each group passes verification together, then door can be unlocked. 53 Function Description Note: time zones that cannot pass verification User time zone does not select serial number of time zone. Group time zone does not select serial number of time zone. Time in which user passes verification does not include any time zone that is set by user. Time zone is defined as forbidden. #Note: If time zone that user sets is the time zone that cannot pass verification. n When meet combination 2 above, user who displays prompt of “Invalid Time zone Access” cannot unlock door, but can record attendance. (If there is user in group 4 who can meet unlocking condition, then combination 2 can unlock door) o When meet combination 1, 3, 4, and 5 above, user who displays prompt of “Invalid Time zone Access” cannot unlock door, but can record attendance. 2) For example: one bank treasury requires that 3 people are all on the scene to open the door of treasury. Detailed settings are as follows: These 3 people belong to group 2, group 4 and group 5 respectively, and have the right to unlock door within the same time zone. Select “Group 1” and press “OK” to enter edit status. Press digit keys to enter 245. Then press ESC to exit and save setting interface. #Note: When combination 245 is defined, then user cannot define 24, 25, 45 as combination. 8.4.5. Lock System requires to set fingerprint scanner to control the time to open electronic lock. Setting to “0” is close. Close lock control function. One quantity unit is 20ms; maximum value can be set to 254, i.e. 5.08s. Select this item and press “OK” to enter Options. Then press digit keys to enter corresponding digits. Finally press “ESC” to exit and save setting. 54 Function Description 8.4.6. DSen. Delav DSen. Delav : Some segment time which begin after open door just begin alarm; Press “MENU” enter main interface; Select “Options”,Press“OK”enter; Select“Acc Opts”,Press OK enter menu ; Press UP or Doen enter ,select DSen.Delav,display as follows: Lock DSen. Delav 10 Press OK,select number,Press Up or Down key to modify DSen. Delav. 8.4.7. Dsen. Mode Dsen. Mode include three ::No、NC、None;No: No use door magnistor; NC : When the door is open, the lock is open; None:When the door is closed ,the lock is closed. Press “MENU”enter main interface; Select “Options”,press“OK”enter menu; Select“Acc Opts”,prsee OK enter menu; Press Up or Down key enter , select DSen.Mode,display as follows: DSen. Delav Dsen. Mode No Press OK,select option,press Up or Down key to change the state of Dsen. Mode DSen. Delav Dsen. Mode DSen. Delav Dsen. Mode NC 55 None Function Description User capacity Transaction capacity Verification mode 500/1000/1500 30000 Access Contro 50 TimeZone,5 Grouping,10 Access Comb,支 1:1or 1:N 持多指纹进入,指纹或密码验证方式可选,一路报警 输出,拆机报警输出等高安全门禁功能 Technical specifications Access Contro 50 TimeZone,5 Grouping,10 Access Comb,支 持多指纹进入,指纹或密码验证方式可选,一路报警 Electrocontrol 考勤功能(可选) 其他输入 Communications (Optional) Wiegand 输出 keyboard Display Power 输出,拆机报警输出等高安全门禁功能 Relay output 3A/12VDC Support zk attendance software 一组门磁输入,一组开门按钮输入,一组门铃输出 TCP/IP、RS485、RS232 Wiegand26 output(Optional) and 液晶显示屏,4*4 数字键盘,蓝色背++光 12V DC,待机电流:50 mA,工作电流:400 mA Validating speed <=2 s FRR <=1% FAR <=0.0001% 0°C - 45°C Operating Temperature Operating Humidity Language OEM Size 56 20%-80% English、Simplified Chinese、Traditional Chinese Supply OEM Produce 82(L)*35(W)*180(H)mm Function Description 57