1
IMPORTANT: CDA is equipped with a 20-minute logput feature to protect your data in case you
leave your computer unattended. A 'seconds remainingycounter appears in the lower left comer df
your browser's window to let you know how much time is left before the system logs you out. The
counter restarts every time the user clicks "Submity' or navigates to another page.
SECTION I - GETTINGSTARTED
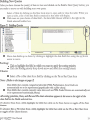
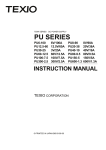
Accessing the CDA W e b Site
The CDA database is easily accessible from any computer with an Internet connection, regardless of
the user's opefating system. .Becausethe system is web-based, data is available 24 hours per day,
every day.
1. Open the Internet browser (CDA requires Intemet Explorer 5.0 or &her, or MAC v.10)
2. Type the database URL in the "Address" block in the navigation menu:
-
OR Click on the File drop-down menu and choose "Open." T v e the URL in the window and
click "OK." At the CDA home Pane, the user has the oution to exulore the site or to log in.
3. To log in to the system, select "Log into CDA" from the left side of the window.
Figure 1. CDA Website
1
4
Alleahenv Intermediate Unit
--
A,
1
I
.
The amount of data Mac lkws chrwgh scRwl
dmgtn&
wn be overwhehn& mdbi?p it d i h l t
m target the infbrmalion ehar deckdon-makers
need. hbw dWicB can qucw and efkiently
share Information that is mmtid
to improving
studaot achmwment.
The Allegheny mtennediata Unit ( m 3 )
developed a web-bard data colkction,
manawment ard reoortirm svstern to assist
schoa? dsbicb in organizing &d using their data
for informed decision-making. Using CDA, schools
can make informed deci9ions about cunicula,
stratesic plannimg, and school policies thmugh
systematic data %olkctionand.analysis, which
oosirivdv imoacts the school's ohvsicd.. s o c i l
and leaming'envimnments.
..
AIU CDAa002 User Manual
Revised: 712006
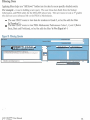
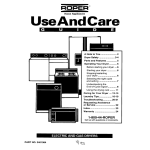
CDA Start Up Screen
The next screen that you see, after you Log into CDA from the CDA website, is the CDA Start Up
Screen. The information displayed on this screen includes system updates, changes, and other
systems-related information.
To access the CDA Log In Screen - Click on the blue Login to CDA link located on the left side of
the window.
Figure 2. CDA Start Up Screen
~mi
5
--------.---
m p n m "Mates amt manges
- -.
+
--
-
.. .
-
-
..- .
----
*a upctatect r/3o/2me
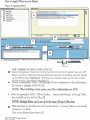
If you redeve M e IE security warning message "This page contains both secure and nonsecure Item. Da vau want to
display the nonsecwe items?', y w can disable this behavior by doing the followinp:
1. In your web browser go to Took.
2. Select Internet Options horn the drop down menu.
3. Click on the Security b b .
4. Click on the Web content m e you use to access t ' SiCa.
6. Scroll down t o find the heading MisceRaneous.
7. Find the sub-heading Display Mix& Content
8. C l i i Enable.
9. Qick OK.
10. In response to 'Are wu sure you want to change the sea&
11.CW( OK to dose the lntemet Ophons box.
settings for this zone7' didc Yes.
rebievaing FSSA and pthnassessment informalion.This mcdute is active, however we are in the
dits kabaos on an mdic6sbict basis. If you have a m e urgent needfor this kinbim,
Logging In To CDA
Figure 3. CDA Log In Screen
Please enter your user name and password
Password
User names and
passwords are
case sensitive.
At the login screen, enter your user name and password and click on the
button.
4.
AIU CDAQZWZUser Manual
u-..i.-a.
7
f m n ~
User name and Password
+;
Have you forgotten your CDA user name and paswoxd? If you have, use the in$u btts bel0s.v to
*send us your last name and email address, and a&&'rfoiward this info,rm~ti&;D~QU.
7, ..A
8
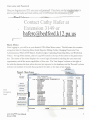
Contact Cathy Hafer at
Extension 3 149 or
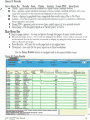
Main Menu
After logging in, you will be at your district's CDA Main Menu screen. The left menu bar contains
nallgation links for Querying Data, Quick Reports, Editing Tables, Changing Passwords, User
Administration, PSSA (AYP) Repon, Student Ledger, Uploading/Importing Data, and Workshop
Videos. To log off the system, click on Log Off located at the top of the screen in the green menu
bar. The center of the screen displays the current login information including the user name and
organization, and all the access capabilities of that user. The 'Last Import' column to the right of
the table list denotes the date when data was last imported to the database, and the 'Records' column
indicates the number of records that populated the table on the date of last import.
,7?>;k.L' ;'8.:
A<<r,,,.Gz.,:..:
Figure 5. Menu Screen
..
.
--
--~
- .. .-
~ 1 ~ ~ 0 ~ 0 3 0 4
CDA
Naxigation
Links
Change Your ~assbkrd
..
.
User Adminktratlon
PS~A
Report
.
.
A N CDAQ2002User Manual
Revised: 7/2006
MATHOP0405
PSATO304
PSSA0304
PSSA0405
.--.
--
-
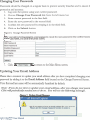
Changing User Passwords
Passwords should be changed on a regular basis to prevent security breaches and to ensure d
protection and accuracy.
1. Log onto the system using your current password.
2. Choose Change Your Password link from the left menu bar.
3. Enter current password in the first field.
4. Enter the new password in the second fieid.
5. Confirm the new password by retyping it in the third field.
6 . Click on the Submit button.
Figure 6. Change Password Scxeen
nter your old (current) password, a new password, repeat the new password in the Confwm Passwo
Last Name, and Email then press Submit
7. Click )I Main Mentr
to return to the Main Menu screen.
Updating Your Email Address
Please take a moment to update your email address after you have completed changing your
password by adding it to the Email Address field located on the Change Password Screen.
Your first and last name will be automatically furnished by default.
Note: Ifyou do not elect to update your emaifaddress, &er you change yourpasswc
CDA wiUpe~~wlicaffyremindyou
to do so. You wiLl see the followkg message.
Firmre 7- IJndate Rmail
LA-.,:
Mensage
,oft Internet Explorer
I
Please llse the Change Pasward firnction Ln enter it.
AIU CDAQ2002User Manual
Rpoicrrl. 7/700(1
C
-
SECTION IV QUERYING
STUDENT DATA
b
Query I1
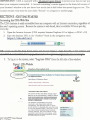
Getting Started -Adobe SVG Viewer must be installed on your PC in order to view the reports that
are generated by query. Click on the link below to access Adobe's SVG Viewer download page then
follow the instructions to complete the download. Like Adobe Reader this software is available at
no cost, and it is available for both Windows and MAC operating systems.
htm: //www,adobe.com/sv~/viewer/installlmain.hd
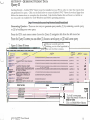
Generating Queries - There are two ways to generate query results, (1) by retrieving a saved query,
or (2) by building your own query.
From the CDA main menu screen choose the Query I1 navigation link from the left menu bar.
From the Query I1 screen you can either [I] choose a saved query, or [2] build a new query.
-
,: Figure 15. Query I1 Screen
2
/
I
Choose a saved query by
clicking on the blue hyperlink in
the sort by Date column. +
I
sort by
Datev
juplterrll
Yes
S N D E N T I N ~ U 5 , D ~ O 3 W , D I B E L W ? O 5 , S Fjvp~h?rI
l
Y@s
Sn/OENTTN~0SSOIBELSO3W,DIBELSW05,SFARt4DOSW
juHter1.l
Yes
0
STvDERlTINvR7040S,OIBHSO3W,DIBELSWO5,SFAR
juppterl l
Yes
0
~DEN~WMOS,DIBELSO3W,DIBELSWOS,SFARUIDOS06jupRW1 I
Yes
SNDEN7TNRM405,DIBELS03WIDIBELSWOS
Iupitwll
Yes
6
~D€MIIYFOWO~,PSMO~OS
jupirer11
Y e
0
SNDENTfNR10405
juprtwll
Yes
A
STU~NM0405,0BELSOU)$,DIELSO405
- -
B
-9
ut@h
4s@ht-k-s
j
for 3rd Grd Read
zoa6BCOB
Gat-
2&?6-OIG2
PSS4 GTade 8 R&ng
D I M Grade 1 & 2
by
- - -
4
eB
#I1
I
SEhDd YenrD111
,,
.
.,@~@==ag3
9
.
b
7
'vm?m
Sm+..
1;
'
2
@
~
D
t
R
-
CC
-
1
1
AIU CDAQ2002User Manual
n .-:..
,
-.,me.,
V
2
To build a new query
Select the year(s) of data you
wish to view.
Click on Build New Q u q
't
Saved Queries
If you choose a saved query, you can run the query "as is" by clicking on the Submit Query button
from the lower right comer of your screen or you can modify the saved query by adding sorting
priorities, and/or filters.
Figure 16. Fields Selected Box
-
S U D E I J ~ N F O M O ~ . ~ ~ ~ ~ ~ ~ S
I IPieChartl
~ O ~ M )I S
I I }I I
STUMMINF00405.Free Reduced Lunch { S I 0 4 0 2 7 ) I I /Pie Chartl I I I I
DIBELS0304.End Oral Readina Fluancv Score CDB03023&-1
IStatsl I I IH&l
I
.
DIBELSO-+OS.~ Oral ~ e r d l G~ l u e n & ~ c o r~eD B W O ~ ~ I - I
I M ~i iI i ~ i d d e n i
SFAREAD0506.4Sight Raw Score EL (Test 1) {SR05002}-1
1Sutsl I I IHidden1 I
I 1St8trl I I IHiddanl 1
SFAREADOM6.4SrPht R m Score 1 s t mast 2) ~ S R 0 5 0 0 4 ~
S F A R E A D O S O ~ . ~ SRaw
G ~ ~Score 2nd ( T a t 3) < ~ ~ ~ 5 0 0 6 } = 1
1 Stata 1 I I IH h [ I
i
C
-
Sorting:
Click to highlight the field to which you want to apply the sorting priority.
Click the Sorting priority drop down arrow and select the sorting criteria.
Charts:
Select a Pie or Bar chart for a field by clicking on the Pie or Bar Chart Icon
Note:
Data fields that contain catptltlcaldata like PSSA Pe16onnance Level Code am
automatical&set to be representedpph.id& matha [Bar chart].
Data fields that con& nurnezi'c value data such as PSSA Scaled Scores am automatical&sei
to be represented starrirtica& [Stats].
AU s o ~ p z i o z i d e sStats,
,
and Bar and Pie chart selections appeat in the m a to the dgljt of the
dam f f d din the Fidds sdected box.
To deselect Stats &om a field
h&hIight
the field then dck on the Stats button to w
e offtheStats
fiae,
To deselect Bar or Pie Chart fivm a field, h&Mght the field then d c k on the Pie or Bar ChartIcon
to toggle offtheCharts fi3tute.
AIU CDAOzW User Manual
D-:---I.
7
19nn~
Building New Queries
After you have chosen the year(s) of data to view and clicked on the Build a New Query button, you
are ready to move on with building your own query.
Select a Table by clicking on the blue book icon to open and/or close the table. When you
open a table, a list of the data fields contained in that table will display.
Click once on your choice of data field - the data field chosen will list to the right in the
Fields selected builder box.
Figure 17. Building Queries
Move data fields up or down by clicking to highhght the data field then using the up/down
arrow to move.
Sorting:
Click to hghlight the field to which you want to apply the sorting priority.
Click the Sorting priority drop down arrow and select the sorting criteria.
Charts:
Select a Pie or Bar chart for a field by clicking on the Pie or Bar Chart Icon
Note: {Rder to the image onpage 2)
Data fields that contah categotkd data U e PSSA Petfomance k e l Code are
automaticdy set to be representedgraphicdy with a [Bar chart].
Data fields that contain numeiic value data such as PSSA Scaled Scores are automatically set
to be mpmsented statisticdy [Stats].
All sortingpnbtues, Stats, and Bar and Pie chart selections appar in the area to the nght of the
data field in the Fields selected box.
To deselect Stats &om a field highh@t the field then click on the Stats button to toggIe offtheStats
feature.
Po deselect ~ aorrPie Chart &om a 1Fel4 highlight the field then click on the Pie or Bar Chart Icon
e
Chartsfeature.
to t o ~ I offthe
A N CDA02002 User Manual
Rroicrrl7 171)nh
Filtering Data:
Applying filters helps you "drill down" funher into the data for more specific detailed results.
For example -A user is building a new query. The user chose data fields from the Student
Information, and PSSA tables for the 2004-2005 school year. The user wants to look at 5&graders
who did not score Advanced (4) on the PSSA in Mathematics.
The user ONLY wants to view data for students in Grade 5, so helshe adds the filter
'is Equal to' 5.
The user ONLY wants to view PSSA Mathematics Performance Codes 1,2, and 3 (Below
Basic, Basic and Proficient), so he/she adds the filter 'is Not Equal to' 4.
Figure 18. Filtedug Queries
... I I
OR the Student ...
Double click on a criteria line tm Nsmova it.
-PI4D the Student
31
AIU CDAQ2002User Manual
R-";c.A.
7 19mL
Include students vath mlulnp record..
j
l
(
Submit Query
]
I
How to Apply Filters to your Quety:
Figure 19. Applying Filters
m
Double dick on
Calmlate a percentage bared
on!
e to remove
R the Studei
to ramwe
I
Induc..
F
_-.
Kith missing words.
Submit Q u w
]
Click to highlight the field you wish to filter. [A]
Select a Comparison Type from the drop down list (Is less than, Is greater than, etc.). p]
Select a Common Value from the drop down list (selections in this drop down list depend
on the field you have highlighted). If there are no common values you can type a value
directly into the Comparison Value field. [C]
Choose a relationship -AND / OR (See page 20 for an explanation of data relationships).
By clicking to highlight AND/OR p]
NOTE: When building a basic query, most filter relationships are AND.
.
Select the appropriate AND / OR the Student.. . button in the Group 1 or Group 2 filter
box, and click on it to 'set' the filter. F;]
NOTE: Multiple filters can be set up in the same (Group 1) filter box.
Filter selections can be easily removed from the Group 1 or Group 2 filter box by doubleclicking on it to delete.
Click on the Submit Query button. [Fl
AIU CDAOZOOZ User Manual
Revised: 7/2006
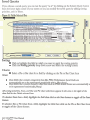
Query I1 Results
fl
Green Menu Bar Details Stats Charts Analyze Create PDF Save Query
Details - query results records rendered in a report format (example below).
Stats - displays a quick statistical summary of mean, median, standard deviation,, min, max,
range and variance for the total records displayed in the query results.
Charts - displays, in graphical form, categorical data results using a Bar or Pie Chart.
Analyze - Use Stat Crunch for more advanced statistical analyses (correlations, inferences,
linear regression and more).
Create PDF - generate, print or save a clean, orderly report of your queried records.
Save guery - File the query report as a "Saved Query" in CDA.
Blue Mmu Bar
Jump to page options - for easy navigation through the pages of query results records.
Records per page option - 25 records are displayed by default. If you wish to see more or all
of the records choose the number of records to display by using the drop-down arrow, then
cIick on Records per page:
Reset Results -will reset the results page back to its original state.
Download - Save and file the query report as an Excel worksheet.
-
Use the Query Builder button to navigate back to the query builder screen.
Figure 20. Query Results
0405
*a
ES
AIU CDAQZOOZUser Manual
R&d:
7 1MOh
0405
0405
0405
Math PerformanceLevel Mathmatics Performance Level Mathemath Sealed
Code
Name
5
3
5
3