1
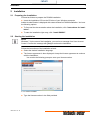
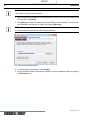
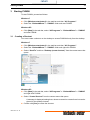
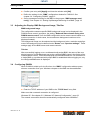
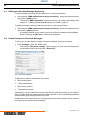
return
Commissioning Instructions for
SM200 PHWIN
Issue 2011-11-10
A
return
2
This user manual replaces all user manuals with a lower version number or older release
date.
This copy is not updated automatically.
Subject to technical changes at any time.
Kieback&Peter is not liable for damages that result directly or indirectly from the improper
use of this document.
Copyright
© 2011
Kieback&Peter GmbH & Co KG
Tempelhofer Weg 50
12347 Berlin, Germany
Telephone: +49 30 60095-0
All rights reserved. No part of this book may be reproduced in any form (by printing,
photocopying, or otherwise) or processed, copied, or distributed using electronic systems
without written permission from Kieback&Peter.
Document number: 9.44-10.200-01-EN
Issue: 2011-11-10
A
Issue 2011-11-10
return
Table of Contents
3
Table of Contents
Content
Issue 2011-11-10
Page
1
Introduction . . . . . . . . . . . . . . . . . . . . . . . . . . . . . . . . . . . . . . . . . . . . . . . . . . . . . . . . . . . 5
1.1
System requirements . . . . . . . . . . . . . . . . . . . . . . . . . . . . . . . . . . . . . . . . . . . . . . . . . . . . 5
1.2
Changes to Previous Versions . . . . . . . . . . . . . . . . . . . . . . . . . . . . . . . . . . . . . . . . . . . . . 6
2
Installation . . . . . . . . . . . . . . . . . . . . . . . . . . . . . . . . . . . . . . . . . . . . . . . . . . . . . . . . . . . . 7
2.1
Preparing the Installation . . . . . . . . . . . . . . . . . . . . . . . . . . . . . . . . . . . . . . . . . . . . . . . . . 7
2.2
Starting the Installation. . . . . . . . . . . . . . . . . . . . . . . . . . . . . . . . . . . . . . . . . . . . . . . . . . . 7
2.3
Uninstallation . . . . . . . . . . . . . . . . . . . . . . . . . . . . . . . . . . . . . . . . . . . . . . . . . . . . . . . . . . 9
3
Starting PHWIN . . . . . . . . . . . . . . . . . . . . . . . . . . . . . . . . . . . . . . . . . . . . . . . . . . . . . . . 11
3.1
Creating a Shortcut . . . . . . . . . . . . . . . . . . . . . . . . . . . . . . . . . . . . . . . . . . . . . . . . . . . . 11
3.2
Setting up PHWIN for Several BMSs . . . . . . . . . . . . . . . . . . . . . . . . . . . . . . . . . . . . . . . 12
3.3
Adjusting the Display: BMS Background Image, Title Bar . . . . . . . . . . . . . . . . . . . . . . . 13
3.4
Configuring PHWIN . . . . . . . . . . . . . . . . . . . . . . . . . . . . . . . . . . . . . . . . . . . . . . . . . . . . 13
3.5
Reentering the License Number . . . . . . . . . . . . . . . . . . . . . . . . . . . . . . . . . . . . . . . . . . 15
4
Starting BMS Message Monitoring. . . . . . . . . . . . . . . . . . . . . . . . . . . . . . . . . . . . . . . . . 17
4.1
Setting Up Message Monitoring for a BMS . . . . . . . . . . . . . . . . . . . . . . . . . . . . . . . . . . 18
4.2
Connecting to a BMS . . . . . . . . . . . . . . . . . . . . . . . . . . . . . . . . . . . . . . . . . . . . . . . . . . . 19
4.3
Editing and Deleting Message Monitoring . . . . . . . . . . . . . . . . . . . . . . . . . . . . . . . . . . . 20
4.4
Sound Settings for Received Messages . . . . . . . . . . . . . . . . . . . . . . . . . . . . . . . . . . . . 20
4.5
Displaying and Confirming New Malfunction Messages . . . . . . . . . . . . . . . . . . . . . . . . 21
4.6
Preventing Unauthorized Exit. . . . . . . . . . . . . . . . . . . . . . . . . . . . . . . . . . . . . . . . . . . . . 21
4.7
Displaying the Log . . . . . . . . . . . . . . . . . . . . . . . . . . . . . . . . . . . . . . . . . . . . . . . . . . . . . 22
5
Appendix . . . . . . . . . . . . . . . . . . . . . . . . . . . . . . . . . . . . . . . . . . . . . . . . . . . . . . . . . . . . 23
5.1
Required TCP/IP Ports. . . . . . . . . . . . . . . . . . . . . . . . . . . . . . . . . . . . . . . . . . . . . . . . . . 23
5.2
Windows XP: Network Configuration . . . . . . . . . . . . . . . . . . . . . . . . . . . . . . . . . . . . . . . 23
A
return
4
A
Table of Contents
Issue 2011-11-10
return
Introduction
1
5
Introduction
Communication between a Windows computer and the Neutrino BMS can be established
using the SM200 PHWIN software module. This allows the operators to change the plant
status of the TBE (Technical Building Equipment) from a Windows computer via the operator interface of the Neutrino BMS.
Communication between a Windows computer and the Neutrino BMS is based on the
network functions of the QNX operating system as well as on the corresponding protocol.
The multi-user/multitasking function of the QNX operating system allows multiple operators to access the data pool and the software module of the Neutrino BMS from the
Windows computers at the same time for the operation of the TBE.
The software module has a low memory requirement and does not write any entries to
the registry. Therefore, the application programs of the Windows computer can continue
to be used without restrictions.
NOTE
If PHWIN is installed on several Windows computers, the program“Additional operating window” must be installed on the BMS and enabled by the dongle.
Software package for PHWIN
The PHWIN software module includes an installation CD. Accept the included software
license contract by entering the license number. Your license number can be found on
the back of the installation CD for PHWIN.
“Phindows” is a component of the PHWIN software module and a tool for connecting
removed BMSs. In this way, you can use the graphic BMS applications of the QNX operating system as a user of the Windows platforms.
1.1 System requirements
PHWIN can be installed on the following operating systems:
■
Microsoft Windows 7 32 bit and 64 bit
■
Microsoft Windows XP 32 bit
■
Microsoft Windows XP Embedded
No entries are written to the registry of your Windows computer.
Hardware requirements
Minimum hardware requirements:
Issue 2011-11-10
■
20 MB of free hard disk space
■
LAN or modem connection
A
return
6
Introduction
1.2 Changes to Previous Versions
Version 6.3.1.0
■
Support for Microsoft Windows 7 64 bit operating system
■
Custom installation
Version 6.2.0.0
■
Support for Microsoft Windows 7 32 bit operating system
■
Acoustic differentiation of increasing and decreasing messages
Any four sound files can be set to report alarm screens and malfunction messages
(each for increasing and decreasing messages).
■
An unauthorized exit of PHWIN is prevented.
■
PHWIN is automatically started without further confirmation prompts for an incoming
alarm screen.
■
A customer-specific BMS background image for PHWIN is displayed.
■
The BMS name and user name are displayed in the PHWIN title bar.
A
Issue 2011-11-10
return
Installation
2
7
Installation
2.1 Preparing the Installation
Proceed as follows to prepare the PHWIN installation:
► Insert the installation CD into the CD drive of your Windows computer.
Adobe Acrobat Reader is displayed with a start window for PHWIN installation. You have
the following options:
► To first read the documentation about the installation, click “Instructions for installation”.
► To start the installation right away, click “Install PHWIN”.
2.2 Starting the Installation
NOTE
Windows 7: At the start of the installation, you receive a message from User Account
Control. Confirm the message with [Yes] to continue the installation.
Follow the instructions of the installation wizard:
► Select the desired installation language.
► The license agreement is then displayed: Accept the license agreement to continue
with the installation.
You receive the following prompt to enter your license number.
2-1: License number
► Type the license number in the field provided.
Issue 2011-11-10
A
return
8
Installation
NOTE
The license number is case-sensitive.
► Select whether the program is to be installed for one user or for all of the users of the
PC and then click [Next].
► Click [Next] and select the directory where PHWIN is to be installed. You can enter
the installation path directly or select it by clicking [Browse].
NOTE
It is recommended to accept the default target directory.
2-2: Select the installation path
► To start the actual installation, click [Install].
► Once PHWIN has been successfully installed, exit the installation wizard by clicking
the [Finish] button.
A
Issue 2011-11-10
return
Installation
9
2.3 Uninstallation
Proceed as follows to remove PHWIN from your Windows computer:
Windows 7
► Click the [Windows logo] in the task bar of your Windows computer and then
[Control Panel] in the right section of the start menu.
The “Control Panel” window is displayed.
► Click [Uninstall a program] and select PHWIN from the list of installed programs.
► While PHWIN is selected: Click [Uninstall/Change] at the upper edge of the table to
uninstall PHWIN.
The installation wizard is started.
► Follow the instructions of the installation wizard. Click [Finish] to complete uninstallation of the PHWIN software.
Windows XP
► Click [Start] in the task bar of your Windows computer and open “Control Panel”
under “Settings”.
The “Control Panel” window is displayed.
► Open “Add or Remove Programs” and select PHWIN in the list of installed
programs.
► While PHWIN is selected: Right-click [Change/Remove]to uninstall PHWIN.
The installation wizard is started.
► Follow the instructions of the installation wizard. Click [Finish] to complete uninstallation of the PHWIN software.
Issue 2011-11-10
A
return
10
A
Installation
Issue 2011-11-10
return
Starting PHWIN
3
11
Starting PHWIN
To start PHWIN, proceed as follows:
Windows 7
► Click [Windows start button] in the task bar and then “All Programs”.
► Select the “Kieback&Peter” > “PHWIN” folder and start PHWIN.
Windows XP
► Click [Start] in the task bar, select “All Programs” > “Kieback&Peter” > “PHWIN”
and start PHWIN.
3.1 Creating a Shortcut
You must create a shortcut on the desktop to access PHWIN directly from the desktop.
Windows 7
► Click [Windows start button] in the task bar and then “All Programs”.
► Select the “Kieback&Peter” > “PHWIN” folder and right-click PHWIN.
► Select “Send To” and then “Desktop (create shortcut)” from the context menu that
opens.
3-1: Creating a shortcut
Windows XP
► Click [Start] in the task bar, select “All Programs” > “Kieback&Peter” > “PHWIN”
and right-click PHWIN.
► Select “Create Shortcut” from the context menu that opens.
A message is displayed stating that a shortcut cannot be created here but can be
placed on the desktop instead.
► Confirm with [Yes] to create the shortcut.
Issue 2011-11-10
A
return
12
Starting PHWIN
3.2 Setting up PHWIN for Several BMSs
To set up PHWIN for several BMSs, proceed as follows:
► Create a shortcut for PHWIN on the desktop. See chapter 3.1 “Creating a Shortcut”,
page 11.
The following icon is displayed on the desktop:
► Rename the shortcut if necessary, e.g. to PHWIN 2:
To do this, right-click
and select “Rename” from the context menu. Confirm
your entry with the Enter key.
► Right-click the shortcut to PHWIN 2 and select “Properties” from the context menu.
The “PHWIN 2 Properties” window is displayed with the “Shortcut” tab activated.
► In the “Target” entry field, add “PHWIN2” after the path “C:\Program
Files\Kieback&Peter\PHWIN\phglt.exe”.
NOTE
Please note: enter a space before the additional text. Example: “C:\Program
Files\Kieback&Peter\PHWIN\Phglt.exe” PHWIN2
3-2: PHWIN 2 properties
A
Issue 2011-11-10
return
Starting PHWIN
13
► Confirm your entry with [Apply] and close the window with [OK].
► Define the settings in the “BMS” configuration window for PHWIN 2: See
chapter 3.4 “Configuring PHWIN”, page 13.
► Set up message monitoring for the BMS in the program “BMS message monitoring”: See chapter 4.1 “Setting Up Message Monitoring for a BMS”, page 18.
3.3 Adjusting the Display: BMS Background Image, Title Bar
BMS background image
The configurable customer-specific BMS background image is also displayed in the
PHWIN remote control (exception: the setting “Reduced data volumes during slow
PHWIN remote control” from the BMS configuration and a remote control based on a
modem connection. In both cases, the monochrome background continues to be
displayed instead).
The background image can be selected and the background color, resolution and alignment of the background can be defined under “Extras” and “Operator settings”. These
settings apply for the BMS server and remote controls.
Title bar
After successfully logging on to a multitenant/multi-project BMS, the name of the user
who is logged on is also displayed next to the configured BMS name in the tile bar of the
PHWIN remote control. This is also displayed in the Windows task bar. If a connection to
a single BMS or a multitenant/multi-project BMS is established without logging on, only
the configured BMS name is displayed.
3.4 Configuring PHWIN
When PHWIN is called up for the first time, the “BMS” configuration window opens,
where a connection from your Windows computer to the BMS can be established.
3-3: BMS configuration
► Enter the TCP/IP address of your BMS in the “TCP/IP host” entry field.
Make sure that a network connection is configured.
Windows XP: See chapter 5.2 “Windows XP: Network Configuration”, page 23.
The network connection should be automatically configured under Windows 7.
Issue 2011-11-10
A
return
14
Starting PHWIN
NOTE
Instead of the IP address, you can also enter the host name of the BMS for existing DNS
servers. The DNS server uses the host name entered to obtain the valid IP address. Ask
your system administrator for the IP address or host name of your BMS.
When using several PHWIN remote controls:
► Enter the number of the screen used in the “Screen” entry field on several Windows
computers. Malfunction messages that have been assigned to BMS message groups
with certain output devices (e.g. screens) during project planning can consequently
be selectively sent from the BMS to this screen.
NOTE
Screen addressing is effective for BMS version 6.26 or higher.
► Enter a name in the “Name” entry field and confirm your entry with [OK].
Use a secure encrypted Internet connection:
► Activate the checkbox “Use SSH” to use a secure encrypted network connection via
SSH (Secure Shell).
► Click the [Import] button, select an SSH key file and confirm your selection by
pressing [OK]. (For information on generating an SSH key file, see Volume I, Section
14 “BMS Security” in the BMS manual.)
NOTE
When connecting to the Internet, you should always use a secure encrypted connection
via SSH.
A
Issue 2011-11-10
return
Starting PHWIN
15
3.5 Reentering the License Number
If the license number was not correctly entered during installation, the following window
is displayed at the start:
3-4: Phindows license
► Reenter the license number in the entry field and confirm with [OK].
When the license number is entered correctly, the “Phindows - Send Connect”
window opens that displays the establishment of the connection to the BMS.
If the license number was not correctly entered, the entry is reset and you can enter the
license number again. The [Cancel] button closes the window without applying the entry.
If the “Phindows License” window is to be displayed every time that PHWIN is started
although you have correctly entered the license number, you must change the license
number directly in the system files. To do this, proceed as follows:
► Go to the directory “C:\Windows\” and open the file “phindows.ini”.
To be able to change the file, it is recommended to move it to the desktop.
► Open the file with the editor and enter your license number in the file after
“License=phin.<License number>”.
If necessary, delete the existing license number.
► Save your changes and close the file.
► Move the file back to the directory “C:\Windows\”.
Issue 2011-11-10
A
return
16
A
Starting PHWIN
Issue 2011-11-10
return
Starting BMS Message Monitoring
4
17
Starting BMS Message Monitoring
To start BMS message monitoring, proceed as follows:
Windows 7
► Click [Windows start button] in the task bar and then “All Programs”.
► Select the folder “Kieback&Peter” > “PHWIN” and start BMS message monitoring.
Windows XP
► Click [Start] in the task bar, select “All Programs” > “Kieback&Peter” > “PHWIN”
and start BMS message monitoring.
When started for the first time or when no active monitoring is set up, a message window
opens:
► Click [OK] to start the program“BMS message monitoring”.
NOTE
BMS malfunction messages can only be sent to the Windows computer when the
program “BMS message monitoring” is opened or placed in the task bar. For a remote
data transmission network, you must first establish a connection to the BMS to receive
malfunction messages that are sent. If there are malfunctions present, the BMS does not
establish a connection to the Windows computer.
4-1: BMS - malfunction message monitoring inactive
The program “BMS message monitoring” is placed in the task bar of your Windows
computer with the window “BMS malfunction message monitoring”and can be
opened with a click. Malfunction message monitoring is inactive when the window “BMS
malfunction message monitoring” is opened for the first time.
Issue 2011-11-10
A
return
18
Starting BMS Message Monitoring
The following information is given in this window:
■
active: displays active monitoring of the malfunction messages with the icon
inactive monitoring with the icon .
and
■
Designation: specifies the name entered for the BMS to be monitored.
■
New: displays the new malfunction messages received (incoming messages).
■
curr. message: displays all current (existing) malfunction messages (outgoing
messages).
■
Alarm screen: displays malfunction messages that have triggered an alarm screen.
■
BMS/screen: specifies the number of the BMS or screen.
If PHWIN is installed on several Windows computers, the number of the screen used
must be different. See chapter 3.4 “Configuring PHWIN”, page 13.
■
Connection status: specifies the status of the connection to the BMS. Possible
states: not connected, connected.
Click to select the respective screen and click the [Edit...] button. The “BMS connection” window opens, where you must click the “Active” radio button. See
figure 4-2 “BMS connection”, page 19.Confirm the change by clicking the [OK] button.
Malfunction message monitoring is now active.
To place the program “BMS message monitoring” in the task bar of your Windows
computer as an icon, click “Icon in Taskbar” under the “Options” menu item in the
window “BMS malfunction message monitoring”.
Use the function “Info on evalarm” under the “Help” menu item to open the window
“Info on evalarm”, where you receive information about the program “BMS message
monitoring”. Click the [OK] button to close this window again.
4.1 Setting Up Message Monitoring for a BMS
To set up message monitoring for a BMS, click the [New] button. The window “BMS
connection” opens, where you must make entries for this message monitoring. See
chapter 3.4 “Configuring PHWIN”, page 13.
You can also define the following settings with the option fields:
■
Notification: opens an information window when a new malfunction message is
received.
■
Play sound for alarm: reports when a malfunction message is received with an
acoustic signal that has been triggered by an alarm screen.
■
active: activates monitoring of the malfunction messages.
A
Issue 2011-11-10
return
Starting BMS Message Monitoring
19
4-2: BMS connection
NOTE
The “Name” entry field must be completed so that monitoring remains active when a
malfunction message is received.
► Activate the checkbox “Active” to use a secure encrypted network connection via
SSH (Secure Shell).
► Click the [Import] button, select an SSH key file and confirm your selection by
pressing [OK]. (For information on generating an SSH key file, see Volume I, Section
14 “BMS Security” in the BMS manual.)
NOTE
When connecting to the Internet, you should always use a secure encrypted connection
via SSH.
► Confirm the entries with the [OK] button. Message monitoring that is set up for
another BMS is displayed in the window “BMS malfunction message monitoring”.
4-3: BMS malfunction message with several BMS units
4.2 Connecting to a BMS
To connect to the BMS from the program “BMS message monitoring”, proceed as
follows:
► In the window “BMS - malfunction message monitoring”, select the respective
screen and then click the [Start] button.
The window ”Phindows - Send Connect” opens, where the connection progress
is displayed.
After the program is connected to the BMS, the window automatically closes and the
initial screen of this BMS is displayed.
Issue 2011-11-10
A
return
20
Starting BMS Message Monitoring
4.3 Editing and Deleting Message Monitoring
To edit message monitoring that has been set up, proceed as follows:
► In the window “BMS malfunction message monitoring”, select the respective entry
and click the [Edit] button.
The window “BMS connection” opens, where you can change the settings. See
chapter 4.1 “Setting Up Message Monitoring for a BMS”, page 18.
To delete message monitoring that has been set up, proceed as follows:
► In the window “BMS malfunction message monitoring”, select the respective entry
and click the [Delete] button.
A message window opens, where you must confirm the deletion with the [Yes]
button. Pressing the [No] button cancels the procedure.
4.4 Sound Settings for Received Messages
To set up an acoustic signal for newly received messages, proceed as follows:
► Click “Settings” under the “File” menu.
The window “Phindows settings” opens, where you must enter the target path
for the desired file in the entry field “Sound file”.
4-4: Phindows settings
A distinction is made here between four cases:
■
More malfunctions
■
Fewer malfunctions
■
More alarm screens
■
Fewer alarm screens
Alternatively, you can search for and open the directory with the button [...] to the right of
the entry field. After the respective file has been selected, it can be partially played back
with the button [>] to the right of the entry field.
Depending on the case that occurs, the appropriate sound file is played. Alarm screens
have priority over present fault messages.
A
Issue 2011-11-10
return
Starting BMS Message Monitoring
21
NOTE
The newly received message is only indicated by an acoustic signal when your Windows
computer has a soundcard and speakers.
► Confirm the entry with the [OK] button.
► Click the [Start] button to connect to the BMS.
If message monitoring detects an alarm screen, a message is displayed and the operator
can decide whether he or she wants to start a PHWIN remote control. Optionally, the
PHWIN remote control can be automatically started without this message. Activate this
function in the window “Phindows settings” with “Automatically start PHWIN remote
control of BMS when an alarm screen appears”. If a PHWIN remote control for the
BMS in question is already active, it is automatically called to the foreground.
In the window “BMS malfunction message monitoring”, you can define further
settings for the sound entered with the functions “Sound active” and “Sound permanent” under the “Options” menu.
The sounds entered are activated with the function “Sound active”. The function
“Sound permanent” plays the sound entered in a loop when a malfunction message is
received. The “Sound permanent” checkbox is enabled Alternatively, you can activate
or deactivate the function “Sound permanent” with the checkbox.
Click the button [Sound off] to cancel the continually playing sound loop.
4.5 Displaying and Confirming New Malfunction Messages
If new malfunction messages are received on your Windows computer, the window
“BMS malfunction message monitoring” opens with a message window, where you
can connect to the BMS by choosing [Yes]. An acoustic signal is also output if the appropriate setting is made.
NOTE
The program “BMS message monitoring” should not be closed, but only placed in the
task bar so that newly received malfunction messages can continue to be displayed on
your Windows computer.
Alternatively, when the message window is closed, you can establish the connection by
double clicking the respective entry in the window “BMS malfunction message monitoring”. You can also mark the respective entry and click the [Start] button.
To display and confirm the malfunction messages received, you must log on with your
code word. Click the
icon in the BMS status bar to open the “Individual display”
window.
Refer to the manual for the BMS for information about confirming malfunction messages.
4.6 Preventing Unauthorized Exit
The user can be prevented from exiting “BMS malfunction message monitoring” and
PHWIN remote control started from the monitoring system as an option.
When attempting to exit “BMS malfunction message monitoring” or the PHWIN
remote control, the user receives a message stating that the program can not be closed.
Issue 2011-11-10
A
return
22
Starting BMS Message Monitoring
To activate this function, proceed as follows:
► Go to the directory:
Windows 7
Windows XP
C:\Users\<username>\AppData\Local\VirtualStore\Windows\
C:\Windows\
► Find the file “evalarm.ini”.
NOTE
To enable you to change the file, we recommend that you move it to the desktop.
► Open the file in Notepad and enter the following line under “[Default]”:
block_quit_program=[value]
Value
Function
1
0
activated
deactivated
► Save your changes and close the file.
Move the file back to the appropriate directory.
Closing the program
To exit message monitoring or the PHWIN remote control with the function activated,
close the program using Task Manager.
► To do this, right-click the task bar and select “Task Manager”.
► Now choose the program on the “Applications” tab and click [End Task].
► Close the message window with [OK]. A Windows screen is then displayed. Here you
must click [Close the program].
The program is closed. This can take a few seconds depending on the speed of
your Windows computer.
4.7 Displaying the Log
To display the connection log, click the [Log] button in the window “BMS malfunction
message monitoring”. The window “Message log” opens that displays an overview of
the connections established.
A
Issue 2011-11-10
return
Appendix
5
23
Appendix
5.1 Required TCP/IP Ports
The following TCP/IP ports are required when using PHWIN:
■
4868 TCP
■
4869 TCP
■
4870 TCP
■
4994 TCP
■
4991 UDP
5.2 Windows XP: Network Configuration
► Click [Start] in the task bar, select “Settings” > “Network connections” and then
“Create a new connection” under Network Tasks.
The wizard for new connections opens and guides you through the configuration.
You have the following selection options to connect to your BMS.
Network connection type
Selection
Modem or ISDN
“Connect to the network at my workplace” > “Dial-up
connection”
“Connect to the network at my workplace” > “Virtual
Private Network connection”
“Set up a home or small office network”
VPN
LAN
► Now follow the instructions of the Windows wizard.
NOTE
For a VPN connection type: Instead of the IP address, you can also enter the host name
of the BMS. The DNS server uses the host name entered to obtain the valid IP address.
Ask your system administrator for the IP address or host name of your BMS.
Issue 2011-11-10
A
return
24
A
Appendix
Issue 2011-11-10