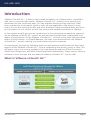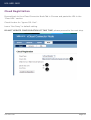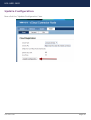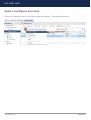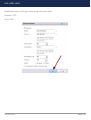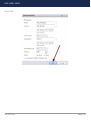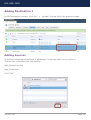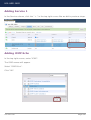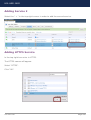
1
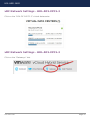
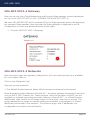
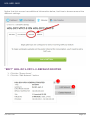
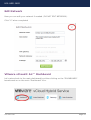
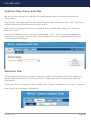
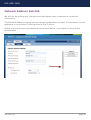
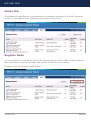
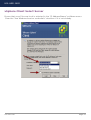
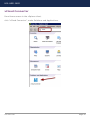
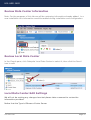
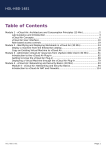
HOL-HBD-1482
Table of Contents
Lab Overview - HOL-HBD-1482 - VMware vCloud Air Networking & Security .................... 2
Lab Guidance .......................................................................................................... 3
Module 1 - Introduction to VMware vCloud® Air™ Networking and Security (15 Min) ...... 5
Introduction............................................................................................................. 6
VMware vCloud® Air™ Portal Networking............................................................... 8
VMware vCloud® Air™ Networking in vCloud Director ......................................... 16
Conclusion for VMware vCloud® Air™ Networking ............................................... 28
Module 2 - IP Address Portability Between Customer and VMware vCloud® Air™ Data
Centers (Data Center Extension) (45 Min) ...................................................................... 29
Introduction........................................................................................................... 30
vCloud Connector Server and Node Installation and Configuration ...................... 32
vCloud Connector Node ........................................................................................ 36
vCloud Connector Server ...................................................................................... 58
vCloud Connector User Interface .......................................................................... 73
Conclusion............................................................................................................. 80
Module 3 - Public and Private Cloud Multi-Tiered Application Networking (45 Min)......... 81
Introduction........................................................................................................... 82
Configuring VPN tunnel between the Local Data Center and VMware vCloud®
Air™ ...................................................................................................................... 84
Verify and Test Network and Security Configuration ........................................... 106
Conclusion........................................................................................................... 136
HOL-HBD-1482
Page 1
HOL-HBD-1482
Lab Overview - HOLHBD-1482 - VMware
vCloud Air Networking &
Security
HOL-HBD-1482
Page 2
HOL-HBD-1482
Lab Guidance
Lab Introduction and Overview
Introduction
VMware announced the rebranding of VMware vCloud Hybrid Service to VMware vCloud Air on
Thursday, August 21st. The new name represents VMware’s transformation into a cloud
services provider, and and our plans to extend the vCloud Air beyond Infrastructure as a
Service. The new name has been rolled out in marketing content and documentation, and it
will begin to show up in service UIs, videos, and other assets in the weeks ahead. Some
references to vCloud Hybrid Service remain in the lab manual
This lab will help build your VMware vCloud® Air™ skills by introducing you to the
Advanced Networking and Security features of vCloud Air. After completing this lab, you
will:
• Have an overview of the vCloud Air networking and security features
• Know how to install, configure, and understand the features of vCloud Connector
in both your local and remote vCloud Air hosted data centers
• Explore a use-case around a multi-tiered architecture that utilizes the isolation
features of vCloud Networking and Security, Firewall, IPSEC VPN, and vCloud Air
hosting
IMPORTANT! Please note that in this lab you are working in a fully selfcontained SIMULATED vCloud Air instance. There is no external access from the
lab environment to the internet. The simulated environment has limited resources
assigned to it, the performance and stability of the lab may not match what you can
expect from the publicly accessible hosted vCloud Air.
Module Overview
The concepts introduced in HOL-HBD-1482 are divided up into three modules. Each
module is independent and can be completed in any order within the allotted time.
Module 1 - Introduction to Networking and Security
Description: In this module we will guide you through the vCloud Air networking
capabilities and the various access rights and roles available.
Duration: 15 minutes
Lab Captain(s): Jason Scanga, Jon Pawlowski and Cabot Harrington
HOL-HBD-1482
Page 3
HOL-HBD-1482
Module 2 - IP Address Portability Between Customer Data
Centers and VMware vCloud® Air™
Description: In this module we will demonstrate how the IP address range in private
data centers can be extended to the vCloud Air environment.
Duration: 45 minutes
Lab Captain(s): Jason Scanga, Jon Pawlowski and Cabot Harrington
Module 3 - Public and Private Cloud Multi-Tiered
Application Networking
Description: In this module we will demonstrate how to implement network features
needed to deploy a multi-tiered application across a private data center and VMware
vCloud Air.
Duration: 45 minutes
Lab Captain(s): Jason Scanga, Jon Pawlowski and Cabot Harrington
***********************************
Follow up steps - If you haven't done so already, you may wish to take labs HOLHBD-1481, HOL-HBD-1483 and attend the Expert-led Workshop ELW-HBD 1484 to
further expand your knowledge of VMware vCloud® Air™.
** COPY/PASTE NOTE - Please note that you will not be able to copy/paste from
the user manual into the lab console. If you need to copy a username/
password to enter into a lab exercise, please open and use the 'README.txt'
file that is on the desktop. If that doesn't work, you can also try the "Send
Text" button found under the console window in the NEE interface.
HOL-HBD-1482
Page 4
HOL-HBD-1482
Module 1 - Introduction to
VMware vCloud® Air™
Networking and Security
(15 Min)
HOL-HBD-1482
Page 5
HOL-HBD-1482
Introduction
VMware vCloud® Air™ is built on the trusted foundation of vSphere and is compatible
with your on-premise data center. VMware vCloud® Air™ allows you to extend your
workloads into the cloud with ease. You can migrate existing virtual machines (VMs)
from on-premises to the public cloud or start up new application VMs directly in the
cloud. You can also easily port VMs and other business-critical workloads back and forth
to the location of your choice, all with the secure and capable foundation of vSphere.
In this module we will give you an introduction to the networking components exposed
via the VMware vCloud® Air™ portal, as well as those available and configurable from
within vCloud Director. As the VMware vCloud® Air™ evolves many tasks still performed
within vCloud Director, or vShield Manager, will start to be exposed from the VMware
vCloud® Air™ as well, making it an even easier service to consume.
As we progress through the following steps you will become familiar with the high level
aspects of the VMware vCloud® Air™ from a networking and security point of view. This
will assist you in the coming modules of this lab where we explore vCloud Connector,
Data Center Extensions, and Multi-Tiered Application Networking. Thank you for taking a
moment to work through and see what the VMware vCloud® Air™ has to offer.
What is VMware vCloud® Air™
HOL-HBD-1482
Page 6
HOL-HBD-1482
Video: VMware vCloud® Air™ - Overview
HOL-HBD-1482
Page 7
HOL-HBD-1482
VMware vCloud® Air™ Portal
Networking
In this module we will give you an introduction to the networking components exposed
via the VMware vCloud® Air™ portal.
IMPORTANT
**This lab is a facsimile of the vCloud Air. Issues that might arise in this environment
are not an indicator of the performance or reliability of the actual service.
*Before you launch Firefox and attempt to login make absolutely sure the DesktopInfo
watermark on the desktop says Ready (see graphic).
Launch Portal
To begin, let's launch the VMware vCloud® Air™ portal by clicking on Firefox from the
desktop.
Proceed to the following URL: https://portal.vchs-int.vmware.com/login
HOL-HBD-1482
Page 8
HOL-HBD-1482
VMware vCloud® Air™ Login
We will login with the [email protected] user which should already be auto populated on
the page.
Click on the "Sign in" button.
PLEASE NOTE: If for some reason this does not auto populate the account information is:
Username: [email protected]
Password: VMware1#
HOL-HBD-1482
Page 9
HOL-HBD-1482
VMware vCloud® Air™ Portal
The dashboard is the main overview of resources available for administrators. As you
can see, there is a listing of all the resources that we have available to us.
In this lab we will be focusing on the networking options, gateways and controls that
administrators have for the deployed virtual datacenters (vDC).
Notice that this screen has additional information below, feel free to scroll down to view
all the options/data.
NOTE: For the purposes of this lab you have a 2GHz by 1GB by 10GB slice of resources
purchased. This resource division is not representative of the actual service and used
here for demonstration purposes only.
HOL-HBD-1482
Page 10
HOL-HBD-1482
vDC Network Settings - HOL-DC1-VPC1-3
Click on the "HOL-DC1-VPC1-3" virtual datacenter
vDC Network Settings - HOL-DC1-VPC1-3
Click on the "Gateways" tab.
HOL-HBD-1482
Page 11
HOL-HBD-1482
HOL-DC1-VPC1-3 Gateway
Here we can see the vCloud Networking and Security Edge gateway instance deployed
for use in the HOL-DC1-VPC1-3 vDC. (DOUBLE CLICK HOL-DC1-VPC1-3)
We have 192.168.220.102 as the external IP for the Edge gateway device. We deployed
the compact Edge gateway. Also note that the Edge gateway is deployed in an HA
configuration to cover any potential failure of the node.
1. Click the HOL-DC1-VPC1-3 Gateway
HOL-DC1-VPC1-3 Networks
Now that we've seen our gateway configuration, let's see what networks are available
for us to deploy VMs on.
Click on the "Networks" tab.
Here we can see networks:
1. The Default-Routed network allows VMs to access the external environment.
Routed networks within VMware vCloud® Air™ provide a gateway and network services,
such as DHCP, NAT, Firewall, etc. These services, with the exception of DHCP, are not
available on isolated type networks within VMware vCloud® Air™, or vCloud Director.
Additionally, take note of the IP Range shown in the picture, and on your screen. This
range represents the range of network addresses available, and assigned, to Virtual
Machines provisioned to this network. The network range, and IP addresses, are
configurable from within vCloud Director.
HOL-HBD-1482
Page 12
HOL-HBD-1482
Notice that this screen has additional information below, feel free to browse around the
different settings.
"EDIT" HOL-DC1-VPC1-3-DEFAULT-ROUTED
1. Click the "Down Arrow"
2. Click the "Edit Network" button
HOL-HBD-1482
Page 13
HOL-HBD-1482
Edit Network
Here you can edit your network if needed. (DO NOT EDIT NETWORK).
Click "X" when completed
VMware vCloud® Air™ Dashboard
Let's return back to the main dashboard by either clicking on the "DASHBOARD"
breadcrumb or on the main "Dashboard" icon.
HOL-HBD-1482
Page 14
HOL-HBD-1482
Conclusion
We have just reviewed the networking components available via the VMware vCloud®
Air™ portal.
In the next module, we will explore in greater detail these networking settings from
within the vCloud Director instance. Managing the network settings via vCloud Director,
allows the administrator to manage the network settings of their vDC with greater
granularity.
To continue with this lab module, do not close the Firefox browser.
HOL-HBD-1482
Page 15
HOL-HBD-1482
VMware vCloud® Air™ Networking in
vCloud Director
Now that we have have explored the networking views in VMware vCloud® Air™, let's
review the networking capabilities available to us via vCloud Director for your HOLDC1-VPC1-3 virtual datacenter.
Note that in addition to the default routed and isolated networks that VMware vCloud®
Air™ creates automatically you can create up to nine total networks for use within your
virtual data center. These can be used for the creation of multi-tiered network enclaves
to isolate data, or various other reasons. Due to space and size restriction within the lab
environment we will not be creating additional networks today; however we will call out
the appropriate screen later in this module.
vDC Network Settings - HOL-DC1-VPC1-3
Click on the "HOL-DC1-VPC1-3" virtual datacenter
vDC Network Settings - HOL-DC1-VPC1-3
Click on the "Gateways" tab.
HOL-HBD-1482
Page 16
HOL-HBD-1482
HOL-DC1-VPC1-3 Gateway
Here we can see the vCloud Networking and Security Edge gateway instance deployed
for use in the HOL-DC1-VPC1-3 vDC. (DOUBLE CLICK HOL-DC1-VPC1-3)
HOL-HBD-1482
Page 17
HOL-HBD-1482
Accessing the vCloud Director views
Click the "Manage in vCloud Director" button.
This will automatically log you into vCloud Director.
HOL-HBD-1482
Page 18
HOL-HBD-1482
HOL-DC1-VPC1-3 Networks via vCloud Director
The image above shows you the networks that are available for the HOL-DC1-VPC1-3
Organization. You will notice that there are two networks available here as well.
In addition to the two default networks (routed and isolated) that VMware vCloud® Air™
creates you may also create additional ones, as indicated in the introduction, from this
screen. In your own environment this would be done by clicking the green plus (+) icon
and walking through the wizard. Please do not add a new network to this lab
environment.
Note: vCloud Director provides role based security and therefore the view above may
not necessarily be available to all users and roles.
Routed network - Configure Services
1. Click the HOL-DC1-VPC1-3-default-routed network line to highlight it.
2. Click the arrow to the right of the blue wheel. A drop down menu will appear.
3. Click "Configure Services".
HOL-HBD-1482
Page 19
HOL-HBD-1482
Services available for the routed network
As you can see, there are six services available for configuration within vCloud Director.
Let's walk through each of these individually.
HOL-HBD-1482
Page 20
HOL-HBD-1482
DHCP Services
The DHCP services tab allows you to automate the IP address assignments for the
virtual machines connected to this network.
Note that you can "add" DHCP configurations from this screen as well.
The IP Range, Lease information, and whether it is enabled, is viewable from this screen.
HOL-HBD-1482
Page 21
HOL-HBD-1482
NAT Services
The NAT screen gives you the ability to add a Source NAT and Destination NAT for the
vCloud Networking and Security Edge gateway.
The Source NAT translates the source address of a packet before leaving the gateway.
The Destination NAT translates the destination IP address/port of a packet received by
the gateway.
HOL-HBD-1482
Page 22
HOL-HBD-1482
Firewall Services
In this Firewall tab, we have the ability to add, edit, or delete firewall rule ids.
You will see in subsequent chapters of this lab that we use the firewall rules to establish
greater security for our virtual machines that are located in the local datacenter and in
VMware vCloud® Air™.
HOL-HBD-1482
Page 23
HOL-HBD-1482
Static Routing Services
As you can see in this tab, you have the ability to add Static Routing to this network.
HOL-HBD-1482
Page 24
HOL-HBD-1482
VPN Services
In the VPN tab, we have the ability to add an IPSEC VPN to connect two vCloud
Networking and Security Edge Gateways.
There is also the ability to Configure Public IPs for the external networks.
Load Balancer Services - Pool Servers
In the Load Balancer tab we have the ability to configure Pool Servers and Virtual
Servers.
Note that a pool is a construct used to manage and share backend member instances. A
pool manages its backend members, health-check monitors and load balancer
distribution method.
This also allows you to see the service and health check for the individual load
balancing member pools.
HOL-HBD-1482
Page 25
HOL-HBD-1482
Let's review the Virtual Servers screen.
HOL-HBD-1482
Page 26
HOL-HBD-1482
Load Balancer Services - Virtual Servers
In this Load Balancer section, we can configure the Load Balancer for the virtual servers.
A virtual server is a highly scalable and highly available server built on a cluster of real
servers called members.
Click the "Cancel" button to exit out of this screen.
HOL-HBD-1482
Page 27
HOL-HBD-1482
Conclusion for VMware vCloud® Air™
Networking
In conclusion, we have shown you the network and security capabilities for VMware
vCloud® Air™ that are available in vCloud Director.
There are two additional modules available in this lab. We will discuss the vCloud
Connector Node and Server capabilities and configurations. We will show you a multitier environment that utilizes both VMware vCloud® Air™ and the local datacenter. We
will also set up firewall rules to ensure the environment is secure.
Please continue to Module 2 will discuss "IP Address Portability Between Customer and
VMware vCloud® Air™ Data Centers (Data Center Extension)"
HOL-HBD-1482
Page 28
HOL-HBD-1482
Module 2 - IP Address
Portability Between
Customer and VMware
vCloud® Air™ Data
Centers (Data Center
Extension) (45 Min)
HOL-HBD-1482
Page 29
HOL-HBD-1482
Introduction
In this module we will explore different aspects of the vCloud Connector and how it
enables seamless transfer of content between multiple public and private clouds.
vCloud Connector is an enterprise product that provides a single user interface for
overseeing multiple public and private clouds and for transferring cloud content from
one cloud to another. It allows you to connect multiple clouds, both internal and
external, in a single user interface.
Using vCloud Connector, you can manage virtual machines, deploy templates, and
transfer virtual machines, vApps, and templates from one cloud to another.
vCloud Connector also provides the following key features.
• Content Sync lets you set up a Content Library to distribute and synchronize
templates across clouds.
• Data Center Extension (Stretch Deploy) lets you extend your private data center
to a public vCloud.
• Offline Data Transfer enables you to transfer large amounts of data from your
private data center to VMware vCloud® Air™.
The vCloud Connector consists of three distinct components: vCloud Connector User
Interface (UI), vCloud Connector Server, and vCloud Connector Nodes.
The vCloud Connector UI is the user interface that the vCloud Connector server
produces. It is registered to and accessed from the vSphere Client. You decide where to
register the UI during the configuration process.
vCloud Connector Server is a virtual appliance that coordinates the activity of vCloud
Connector, controls vCloud Connector Nodes, and produces vCloud Connector UI. Only
one vCloud Connector Server is needed.
vCloud Connector nodes are virtual appliances that handle transferring content from
one cloud to another. A vCloud Connector node must be installed in every vSphere or
vCloud Director-based cloud that vCloud Connector oversees.
On public vCloud Director-based clouds, the service provider can install a vCloud
Connector node as a multitenant node for multiple customers to use so that each
customer does not have to install a node. This configuration can also be used by private
vCloud Director administrators who have multiple organizations.
In vCloud Air, a vCloud Connector multitenant node is installed by VMware by default.
This module is broken into four parts.
HOL-HBD-1482
Page 30
HOL-HBD-1482
Part 1 - vCloud Connector Server and Node Installation - Here we will provide a video
example of vCloud Connector Server and Node Installation for review. Please note that
these steps have already been completed in the lab to save time.
Part 2 - vCloud Connector Node - Here we will go through configuration of the vCloud
Connector Node already installed as demonstrated in Part 1.
Part 3 - vCloud Connector Server - Here will review various configuration aspects of the
vCloud Connector Server, as well as providing some configuration information to
register our lab node.
Part 4 - vCloud Connector User Interface (UI) - Here we will review the information used
to connect the vCloud Connector Node and vCloud Connector Server to the UI.
HOL-HBD-1482
Page 31
HOL-HBD-1482
vCloud Connector Server and Node
Installation and Configuration
In this portion of the lab we will demonstrate the requirements and procedures
necessary to install both the vCloud Connector Server and the vCloud Connector Node
inside our environment. Due to the length and process involved we have provided this
information in video format.
vCloud Connector Server Installation
This video demonstrates the installation of vCloud Connector Server from within
vSphere. Steps in this video include:
• Deploying vCloud Connector Server via the provided OVF template
• Booting up and showing the web-based configuration screen
Configuration of vCloud Connector, beyond that needed for basic installation, will be
covered later in the module.
HOL-HBD-1482
Page 32
HOL-HBD-1482
Please note, the above video does not contain audio.
vCloud Connector Node Installation
This video demonstrates the installation of vCloud Connector Node.
• Deploying vCloud Connector Node via the provided OVF template
• Booting up and showing the web-based configuration screen
Configuration of vCloud Connector, beyond that needed for basic installation, will be
covered later in the module.
Please note, the above video does not contain audio.
HOL-HBD-1482
Page 33
HOL-HBD-1482
vCloud Connector Configuration
This video will cover the configuration of the node and server, as well as the addition of
the local data center serviced by the node into vCloud Connector User Interface in
vSphere.
• Configure vCloud Connector Node, connecting it to the local vSphere instance
• Configure vCloud Connector Server, adding the Node above as a resource
• Configure the vCloud Connector User Interface, adding the local vSphere instance
as a cloud resource
Please note, the above video does not contain audio.
Conclusion
In this article we provided a series of videos illustrating how vCloud Connector Server
and vCloud Connector Node were installed into this lab. After the installation we
covered configuring one Node to connect to the local vSphere instance, and added it to
vCloud Connector User Interface. At some points later in the lab will have vCloud
Connector Server and Nodes configured for you. However, in the next portion, we will
HOL-HBD-1482
Page 34
HOL-HBD-1482
configure a vCloud Connector Node to a VMware vCloud® Air™ virtual data center so
you can see how it is configured against vCloud Director, and in a public setting.
HOL-HBD-1482
Page 35
HOL-HBD-1482
vCloud Connector Node
In this module we will configure vCloud Connector Node. In the previous section, we
used videos to demonstrate the installation of the vCloud Connector Server and vCloud
Connector Node within the local data center. Here we will configure an already
deployed vCloud Connector Node within vCloud Air.
Just a reminder that vCloud Connector nodes are virtual appliances that handle
transferring content from one cloud to another. Transfers between clouds that are
interrupted, for example because of network problems, can be resumed at the point that
they were interrupted. A vCloud Connector Node must be installed in every vSphere or
vCloud Director cloud that vCloud Connector oversees.
Launch Google Chrome
On the desktop, double click the "Google Chrome" shortcut.
vCloud Connector Node Login
Expand the Bookmarks Toolbar Menu and choose "vCC vSphere Node"
HOL-HBD-1482
Page 36
HOL-HBD-1482
Accept Security Certificate
If prompted about the site security certificate, click "Proceed anyway"
Enter User Name and Password
Log in with:
User name: admin
Password: vmware
HOL-HBD-1482
Page 37
HOL-HBD-1482
vCloud Connector Node Interface
Use the vCloud Connector (vCC) Node admin web console for each node to perform
basic configuration tasks - such as defining time zone, specifying proxy servers, or
setting log levels.
vCC Node admin web console is divided into "System", "Network", "Update", and "Node"
tabs. Now we will review these tabs individually.
System Tab
The System tab provides general information for the virtual appliance, allows
configuration of time zones, and provides buttons to shutdown and reboot the
appliance.
As you can see, the System tab is broken into "Information" and "Time Zone" sub-tabs.
Now we will look at these individually.
HOL-HBD-1482
Page 38
HOL-HBD-1482
System Information Sub-Tab
We will not be making any changes here but please take a moment to review the
information.
The system information section provides general information on the virtual appliance
such as the version number and the hostname. It also contains Reboot and Shutdown
buttons.
HOL-HBD-1482
Page 39
HOL-HBD-1482
System Time Zone Sub-Tab
We will not be making any changes here but please take a moment to review the
information.
The System Time Zone section allows setting the apropriate time zone. The Time Zone
setting displays all the time zones of the world.
Note that the changes in time zone settings are not reflected in logs, etc. until the
service is reset.
The virtual hardware clock is always maintained in UTC, which the virtual appliance
converts to local time. Correct local time is important for the update repository and
VMware Update Manager.
Network Tab
The Network tab provides a view of network related information about the appliance,
allows switching between DHCP and static IP addresses, and configuration of proxy
information.
As you can see, the Network tab is broken into "Status", "Address" and "Proxy" sub-tabs.
Now we will look at these individually.
HOL-HBD-1482
Page 40
HOL-HBD-1482
Network Status Sub-Tab
The Network Status section provides already configured network information about the
appliance, such as DNS servers, network interfaces, and IP addresses.
HOL-HBD-1482
Page 41
HOL-HBD-1482
Network Address Sub-Tab
We will not be making any changes here but please take a moment to review the
information.
The Network Address settings section allows configuration of static IP information for the
appliance or to retrieve IP settings from a DHCP server.
Notice that this screen has additional information below, scroll down to view all the
options/data.
HOL-HBD-1482
Page 42
HOL-HBD-1482
Network Proxy Sub-Tab
We will not be making any changes here but please take a moment to review the
information.
The Network Proxy Settings allows configuration of any necessary proxy settings,
including address and port.
Update Tab
The Update tab allows review of update status of the virtual appliance and to set the
update policy.
As before, the Update tab is broken into sub-tabs.
We will now look at these individually.
Update Status Sub-Tab
We will not be making any changes here but please take a moment to review the
information.
HOL-HBD-1482
Page 43
HOL-HBD-1482
The Update Status section allows provides a view of information about the virtual
appliance and to check for and install updates.
By clicking "Check Updates", the system will check for updates from the update
repository. This repository is shown in the Available Updates pane.
HOL-HBD-1482
Page 44
HOL-HBD-1482
Update Settings Tab
We will not be making any changes here but please take a moment to review the
information.
Notice that this screen has additional information below, please scroll down to view all
the options/data.
The Update Settings section allows configuration of update settings such as frequency
and Update Repository. Leave the Use Default Repository button selected.
HOL-HBD-1482
Page 45
HOL-HBD-1482
Node Tab
On the Node tab configuration is available for the Node administrative password, adjust
log levels, and manage SSL certificates.
As before, the Node tab is broken into sub-tabs.
Now we will look at these individually.
Node Cloud Sub-Tab
In the Node Cloud section we have the ability to specify vSphere or vCloud Director
configuration.
We will be working in the tab later in the lab but feel free to review it now.
HOL-HBD-1482
Page 46
HOL-HBD-1482
Node General Sub-Tab
We will not be making any changes here but please take a moment to review the
information.
In the Node General section the option to change the administrative password for the
Node is provided.
Set log levels and download logs using this section. Use the drop-down menu to select
the log level from TRACE, DEBUG, INFO, WARN, or ERROR and the click Change Log
Level.
Please note that we will not be working with the logs in this lab so please do not change.
Please review the options by scrolling down on the screen.
Node SSL Sub-Tab
We will not be making any changes here but please take a moment to review the
information.
Notice that this screen has additional information below, please scroll down to view all
the options/data.
In the Node SSL tab certificate management is available. vCloud Connector Node
includes a self-signed certificate.
HOL-HBD-1482
Page 47
HOL-HBD-1482
In this section, the certificate currently assigned to your vCloud Connector Node is
displayed.
The option to create a Certificate Signing request or use a self-signed certificate is
provided on this screen.
HOL-HBD-1482
Page 48
HOL-HBD-1482
Cloud Registration
Proceed back to the "Node" / "Cloud" tab.
Change "Cloud Type" to vCloud Director.
DO NOT UPDATE CONFIGURATION AT THIS TIME, please proceed to the next step.
Launch Firefox
Click on the Mozilla Firefox icon on your desktop.
HOL-HBD-1482
Page 49
HOL-HBD-1482
Login to VMware vCloud® Air™
Expand the Bookmarks Toolbar Menu and choose "vCHS Portal"
Enter User Name and Password
Log in with:
Username:[email protected]
Password: VMware1#
HOL-HBD-1482
Page 50
HOL-HBD-1482
HOL-DC1-VPC1-3 Virtual Data Center
Double click in the HOL-DC1-VPC1-3 Virtual Data Center box
HOL-HBD-1482
Page 51
HOL-HBD-1482
vCloud Director API URL
Select the "vCloud Director API URL" and a box will appear below with the appropriate
URL to be placed in vCloud Connector Node section previously mentioned.
Note: If the URL does not show up on the first click, try again.
HOL-HBD-1482
Page 52
HOL-HBD-1482
Copy vCloud Director API URL
Right mouse click the URL and select "Copy".
HOL-HBD-1482
Page 53
HOL-HBD-1482
Cloud Registration
Proceed back to the vCloud Connector Node Tab in Chrome and paste the URL in the
"Cloud URL" section.
Check the box for "Ignore SSL Cert".
Leave "Use Proxy" in default setting.
DO NOT UPDATE CONFIGURATION AT THIS TIME, please proceed to the next step.
HOL-HBD-1482
Page 54
HOL-HBD-1482
Remove :443
Proceed back to the "Cloud URL:" section and highlight " :443 " in the URL and delete it.
HOL-HBD-1482
Page 55
HOL-HBD-1482
Update Configuration
Now click the "Update Configuration" box.
HOL-HBD-1482
Page 56
HOL-HBD-1482
Cloud Registration Updated
Note that a "Cloud Registration updated." message is displayed in the top of the window
once registration is complete.
We will now proceed with configuring the vCloud Connector Server.
HOL-HBD-1482
Page 57
HOL-HBD-1482
vCloud Connector Server
The vCloud Connector Server is a virtual appliance that coordinates the activity of
vCloud Connector, controls the vCloud Connector nodes, and produces the vCloud
Connector User Interface (UI). Only one vCloud Connector Server is needed.
The vCloud Connector server admin web console is used to perform basic configuration
tasks, such as defining the time zone, specifying proxy servers, or setting log levels.
What is needed depends on the particular installation.
Open New Tab in Chrome
In Chrome, click the light blue shape to the right of the current tab to open a new tab.
vCloud Connector Server Login
On the Bookmarks Toolbar choose vCC Server
HOL-HBD-1482
Page 58
HOL-HBD-1482
Accept Security Certificate
If prompted about the site security certificate, click "Proceed anyway".
Enter Username and Password
Login with:
User name: admin
Password : vmware
HOL-HBD-1482
Page 59
HOL-HBD-1482
vCloud Connector Server Interface
Use the vCloud Connector Server admin web console to perform basic configuration
tasks such as defining time zone, specifying proxy servers, or setting log levels.
vCloud Connector Server admin web console is divided into "System", "Network",
"Update", "Server", and "Nodes" tabs. Now we will review these tabs individually.
System Tab
The System Information tab provides general information for the virtual appliance,
allows configuration of time zones, and provides buttons to shutdown and reboot the
appliance.
As you can see, the System tab is broken into "information" and "Time Zone" sub-tabs.
Now we will look at these individually.
HOL-HBD-1482
Page 60
HOL-HBD-1482
System Information Sub-Tab
We will not be making any changes here but please take a moment to review the
information.
The system information section provides general information on the virtual appliance
such as the version number and the hostname. It also contains Reboot and Shutdown
buttons.
HOL-HBD-1482
Page 61
HOL-HBD-1482
System Time Zone tab
We will not be making any changes here but please take a moment to review the
information.
The System Time Zone section allows setting the apropriate time zone. The Time Zone
setting displays all the time zones of the world.
Note that the changes in time zone settings are not reflected in logs, etc. until the
service is reset.
The virtual hardware clock is always maintained in UTC, which the virtual appliance
converts to local time. Correct local time is important for the update repository and
VMware Update Manager.
Network Tab
The Network tab provides a view of network related information about the appliance,
allows switching between DHCP and static IP addresses, and configuration of proxy
information.
As you can see, the Network tab is broken into "Status", "Address" and "Proxy" sub-tabs.
Now we will look at these individually.
HOL-HBD-1482
Page 62
HOL-HBD-1482
Network Status Sub-Tab
The Network Status section provides already configured network information about the
appliance, such as DNS servers, network interfaces, and IP addresses. Notice the refresh
button for updating the information.
HOL-HBD-1482
Page 63
HOL-HBD-1482
Network Address Sub-Tab
We will not be making any changes here but please take a moment to review the
information.
The Network Address settings section allows configuration of static IP information for the
appliance or to retrieve IP settings from a DHCP server.
Notice that this screen has additional information below, scroll down to view all the
options/data.
HOL-HBD-1482
Page 64
HOL-HBD-1482
Network Proxy Sub-Tab
We will not be making any changes here but please take a moment to review the
information.
The Network Proxy Settings allows configuration of any necessary proxy settings,
including address and port.
HOL-HBD-1482
Page 65
HOL-HBD-1482
Update Tab
The Update tab allows review of update status of the virtual appliance and to set the
update policy.
As before, the Update tab is broken into sub-tabs.
We will now look at these individually.
Update Status Sub-Tab
We will not be making any changes here but please take a moment to review the
information.
The Update Status section allows provides a view of information about the virtual
appliance and to check for and install updates.
By clicking "Check Updates", the system will check for updates from the update
repository. This repository is shown in the Available Updates pane.
Update Settings Sub-Tab
We will not be making any changes here but please take a moment to review the
information.
HOL-HBD-1482
Page 66
HOL-HBD-1482
Notice that this screen has additional information below, please scroll down to view all
the options/data.
The Update Settings section allows configuration of update settings such as frequency
and Update Repository. Leave the Use Default Repository button selected.
Server Tab
On the Server tab configuration is available for the Server administrative password,
adjust log levels, and manage SSL certificates.
As before, the Server tab is broken into sub-tabs.
Now we will look at these individually.
HOL-HBD-1482
Page 67
HOL-HBD-1482
Server General Sub-Tab
We will not be making any changes to this tab but please take a moment to review the
information.
In the Server General tab the administrative password for the Server can be changed.
Set log levels and download logs using this section. Use the drop-down menu to select
the log level from TRACE, DEBUG, INFO, WARN, or ERROR and the click Change Log
Level.
Scroll down to review additional options.
Server SSL Sub-Tab
We will not be making any changes here but please take a moment to review the
information.
Notice that this screen has additional information below, please scroll down to view all
the options/data.
In the Server SSL tab certificate management is available. vCloud Connector Server
includes a self-signed certificate.
HOL-HBD-1482
Page 68
HOL-HBD-1482
In this section, the certificate currently assigned to your vCloud Connector Server is
displayed.
The option to create a Certificate Signing request or use a self-signed certificate is
provided on this screen.
HOL-HBD-1482
Page 69
HOL-HBD-1482
Server vSphere Client Sub-Tab
We will not be making any changes here but please take a moment to review the
information.
In the Server vSphere Client sub-tab the vCenter configuration information can be
provided.
When reviewing the vSphere Client tab, it may take a moment for the information to
display. Notice that vCloud Connector Server is already registered to the vCenter in Site
A.
HOL-HBD-1482
Page 70
HOL-HBD-1482
Nodes Tab
The Nodes tab identifies all the nodes that are already registered to vCloud Connector
Server. To proceed we will connect another node to this server.
Register Node
For the purposes of this lab we will not be registering any other nodes, however please
take a moment to review the steps and options involved in the process.
To begin, click the Register Node button.
HOL-HBD-1482
Page 71
HOL-HBD-1482
Register Node with Server
Here you would provide such information as:
1. The desired Display name
2. The Node URL
3. Whether this is a Public Node, if a Proxy is used, and if the SSL Certificate should
be ignored
4. The Could Type, either vSphere or vCloud Director
5. the VCD Org Name if the Cloud Type is vCloud Director
6. The Username and Password
HOL-HBD-1482
Page 72
HOL-HBD-1482
vCloud Connector User Interface
In this part of the module, we will review the process for adding the vCloud Connector
Node and vCloud Connector Server to the vCloud Connector User Interface (UI).
vSphere Client
Open the vSphere client using the desktop shortcut.
HOL-HBD-1482
Page 73
HOL-HBD-1482
vSphere Client Select Server
Ensure that vcsa-01a.corp.local is selected in the "IP Address/Name" pulldown menu.
Clear the "Use Windows session credentials" checkbox if it is not already.
HOL-HBD-1482
Page 74
HOL-HBD-1482
vSphere Client Login
Login using:
User name: root
Password: VMware1!
Click the Login button.
HOL-HBD-1482
Page 75
HOL-HBD-1482
vCloud Connector
From Home screen in the vSphere client,
click "vCloud Connector", under Solutions and Applications.
HOL-HBD-1482
Page 76
HOL-HBD-1482
Review Data Center Information
Note: For the purposes of this lab we will be reviewing information already added. In a
new installation this information would be added during installation and configuration.
Review Local Data Center
In the Clouds pane, click Rainpole Local Data Center to select it, then click the Pencil
icon to edit.
Local Data Center Edit Settings
We will not be making any changes here but please take a moment to review the
information provided.
Notice that the Type is VMware vCenter Server
HOL-HBD-1482
Page 77
HOL-HBD-1482
The option to change the Username & Password used by vCloud Connector is available
here.
Click "Cancel" to close this window.
Review Rainpole_VCHS_Production
In the Clouds pane, click Rainpole_VCSHS_Production to select it, then click the Pencil
icon to edit.
Rainpole_VCHS_Production Settings
We will not be making any changes here but please take a moment to review the
information provided.
Note that the Type is VMware vCloud Director
The option to change the Username & Password used by vCloud Connector is available
here.
HOL-HBD-1482
Page 78
HOL-HBD-1482
Click "Cancel" to close this window.
HOL-HBD-1482
Page 79
HOL-HBD-1482
Conclusion
In this module, we used videos to demonstrate how vCloud Connector Node and vCloud
Connector Server were installed.
We went through the user interfaces for both vCloud Connector Node and Server and
identified all the options available. we configured both vCloud Connector Node and
vCloud Connector Server, and we reviewed the information used connecting these to
the vCloud Connector User Interface.
Connecting these components allows us to copy our virtual machines between our local
data center and VMware vCloud Air. We also have the ability to publish the catalogs
across all the sites.
To see a use case demonstration of vCloud Connector Node & Server, please proceed to
the next module in this lab, Public and Private Cloud Multi-Tiered Application Networking
Also, please be aware that there are three other VMware vCloud Air Hands on Labs,
HOL-HBD-1481, HOL-HBD-1483 and HOL-HBD-1484.
HOL-HBD-1482
Page 80
HOL-HBD-1482
Module 3 - Public and
Private Cloud Multi-Tiered
Application Networking
(45 Min)
HOL-HBD-1482
Page 81
HOL-HBD-1482
Introduction
The purpose of this lab is to show you how your organization can utilize a local data
center and a public cloud such as VMware vCloud® Air™, for a multi-tier environment.
We will be utilizing the local data center for the App and Database virtual machines and
the Web virtual machine will be located in vCloud Air.
We will test the firewall rules that are implemented when the connection is initially
established and make the appropriate changes to ensure that the Web virtual machine
can only talk to the App virtual machine and not the Database virtual machine.
Security is an important part to any hybrid implementation and here at VMware we want
to ensure that when you put your virtual machines in our vCloud Air, that they have the
same security policies that they would have if they were located in your private virtual
data center. We want to ensure mobility between the two sites and that your private
virtual data center runs as efficiently as possible and as securely as possible because ...
wait for it ... that is what we do best at VMware!
If you are interested in seeing the Architecture Diagram for module, feel free to review
the diagram below.
HOL-HBD-1482
Page 82
HOL-HBD-1482
Module 3 Architecture Diagram
HOL-HBD-1482
Page 83
HOL-HBD-1482
Configuring VPN tunnel between the
Local Data Center and VMware
vCloud® Air™
In this lab, we will configure a VPN connection between the local Data Center and
VMware vCloud® Air™. In the second part of this module, we will change the firewall
configuration between our two sites. This gives us the opportunity to test the most
important part of any Data Center ... SECURITY! Let's begin!
Launching Firefox
Double click on the Mozilla Firefox icon on the desktop.
HOL-HBD-1482
Page 84
HOL-HBD-1482
Logging into vCloud Air
Click the "Sign in" button as the Username and Password have already been entered for
you.
PLEASE NOTE: If for some reason this does not auto populate the account information is:
Username: [email protected]
Password: VMware1#
HOL-HBD-1482
Page 85
HOL-HBD-1482
Select Virtual Machines
Click on "Virtual Machines" in order to see all the virtual machines available to you.
Powering on Virtual Machine
1. Highlight the "Web_Production" virtual machine
2. Select the "Power On" option
HOL-HBD-1482
Page 86
HOL-HBD-1482
Powered on Virtual Machine
Once the machine is powered on, the window above will appear.
Please DO NOT shut down the Firefox browser as we will use it in later steps.
Open vSphere Client
Open vSphere Client from the desktop.
HOL-HBD-1482
Page 87
HOL-HBD-1482
Login to vSphere Client
1. Ensure that the "Use Windows session credentials" is checked and
vcsa-01a.corp.local is the selected vCenter.
2. Select the "Login" button.
HOL-HBD-1482
Page 88
HOL-HBD-1482
Power on Virtual Machines
Due to the nature of this environment, 3 virtual machines need to be manually powered
on. Right-click each virtual machine below and select "Power" -> "Power On". Please
wait a minute or so for the virtual machines to boot up. Patience is a virtue!
1. vShield Manager
2. App_Production
3. DB_Production
Enable vShield Manager Plug-in
In order for the vShield Manager console to appear, the vShield Manager Plug-in will
need to be enabled. On the top menu, click "Plug-ins" -> "Manage Plug-ins...".
HOL-HBD-1482
Page 89
HOL-HBD-1482
Enable vShield Manager Plug-in Continued...
In the Plug-in Manager dialog, right-click "vShield Manager" and click "Enable". Close out
the dialog box.
Home Button
Select the "Home" button.
HOL-HBD-1482
Page 90
HOL-HBD-1482
Open vShield Manager (Local Data Center)
Select "vShield" under "Solutions and Applications".
Accept Security Alert
If a "Security Alert" appears, click "Yes".
Logging into vShield Manager (Local Data Center)
Log in to vShield Manager with the following credentials .. sorry we could not auto log
you in this time :(
User name: admin
HOL-HBD-1482
Page 91
HOL-HBD-1482
Password: default
Select the "Login" button
Edge view (Local Data Center)
Proceed to the "View:" option, hit the down arrow and select "Edges".
HOL-HBD-1482
Page 92
HOL-HBD-1482
Edge device (Local Data Center)
Double click the "edge-1".
Review Configuration and Setup VPN
Review the configuration detail for the Edge device in our local Data Center. For
instance, this is Edge Gateway is setup as Compact and HA is disabled.
Select the "VPN" button.
HOL-HBD-1482
Page 93
HOL-HBD-1482
Adding a VPN (Local Data Center)
Select the green " + " symbol to add the VPN configuration information.
VPN Configuration (Local Data Center)
Fill in the following information. Note that you may need to scroll down the screen in
order fill in all the steps. When completed, it should look like the picture above:
Name: Local Data Center to vCHS
Local Id: 192.168.110.102
Local Endpoint: 192.168.110.102
Local Subnets: 10.0.1.0/24
Peer Id: 192.168.220.102
Peer Endpoint: 192.168.220.102
Peer Subnets: 192.168.109.0/24
Encryption Algorithm: AES256 (NOTE: you will need to select the down arrow in order to
choose this option)
HOL-HBD-1482
Page 94
HOL-HBD-1482
Pre-shared Key: VMworld2014isthebestconference123
Feel free to scroll through the rest of the configuration options but note that the default
values should be applied.
When finished click the "ok" button (on the bottom of the screen).
HOL-HBD-1482
Page 95
HOL-HBD-1482
Publish Changes
Click the "Publish Changes" button in order for this VPN configuration to be enabled.
HOL-HBD-1482
Page 96
HOL-HBD-1482
Enable the VPN (Local Data Center)
Notice that the IPSEC VPN Service Status is disabled.
Although we published the changes, we need to Enable the configuration. Please select
the "Enable" button ... don't be shy ... do it!
Publish Changes
And we have to publish these changes again so please click the "Publish Changes"
button.
(this is a safeguard just in case you hit the Enable button by accident!).
HOL-HBD-1482
Page 97
HOL-HBD-1482
Return to vCloud Air
Return to the Firefox browser and select the "Dashboard" tab.
HOL-DC1-VPC1-3 Virtual Data Center
Double click the "HOL-DC1-VPC1-3" virtual Data Center.
HOL-HBD-1482
Page 98
HOL-HBD-1482
Launch vCloud Director
We now want to setup the VPN service to connect the vCloud Air to the local Data
Center.
You should automatically be taken to the "Networks" tab. If you are not at the
"Networks" tab, please proceed to it and select "Manage in vCloud Director".
Routed Network in vCloud Director
Highlight the Routed "hol-dc1-vpc1-3-default-routed" network.
HOL-HBD-1482
Page 99
HOL-HBD-1482
Configure Services
Select the down arrow on the blue gear and select "Configure Services".
HOL-HBD-1482
Page 100
HOL-HBD-1482
Enabling VPN
Proceed to "VPN" tab.
Ensure the "Enable VPN" box is selected.
Click "Add...".
VPN Configuration for vCloud Air
Configure the VPN for vCloud Air with the following information. Please note there are
TWO scroll bars that you may need to adjust in order to add all the configurations.
Name: vCHS to Local Data Center
Establish VPN to: a remote network (NOTE: you will need to select the down arrow to
select this option)
Click to select the network "hol-dc1-vpc1-3-default-routed" under Local Networks:
Peer Networks: 10.0.1.0/24
Local ID: 192.168.220.102
HOL-HBD-1482
Page 101
HOL-HBD-1482
Peer ID: 192.168.110.102
Peer IP: 192.168.110.102
Encryption protocol: AES-256
Shared Key: VMworld2014isthebestconference123
HOL-HBD-1482
Page 102
HOL-HBD-1482
Verify VPN Configuration
In order to verify that the Status is up, click the "OK" button.
HOL-HBD-1482
Page 103
HOL-HBD-1482
Configure Services
NOTE: Before continuing on with the following steps please wait for at least one minute
for the VPN settings to synchronize with the vShield Edge Device.
Select the "hol-dc1-vpc1-3-default-routed" network.
Select the down arrow to the right of the blue gear.
Select "Configure Services".
HOL-HBD-1482
Page 104
HOL-HBD-1482
Confirming Status
Once you have gone back into the VPN tab, you should see the status is now UP...
Wasn't that easy??!! In this lab, we created a VPN tunnel between edge devices.
However, you can setup the VPN between any network device and the edge device in
the vCloud Air.
PLEASE NOTE: If it continues to show down and you have verified your settings, you can
verify tunnel status via vShield Manager on the local Data Center. Remember that you
launched vShield Manager via the vSphere Client.
HOL-HBD-1482
Page 105
HOL-HBD-1482
Verify and Test Network and Security
Configuration
Now that we have configured the VPN tunnel between our local data center and VMware
vCloud® Air™, we will walk through the process of ensuring network connectivity and
that the security is implemented correctly. Again ... we want the Web_Production VM to
talk to the App_Production VM and only the App_Production VM.
Let's get started!
Logging in to the vCloud Air
Proceed back to the Firefox browser and the first tab (vCloud Air).
Click "Sign in".
PLEASE NOTE: If for some reason this does not auto populate the account information is:
Username: [email protected]
Password: VMware1#
HOL-HBD-1482
Page 106
HOL-HBD-1482
Virtual Machines in the vCloud Air
Click on the "Virtual Machines" tab.
Options for VM
Do you notice the down arrow for the virtual machine? If not, move the mouse over to
the right side of the row and the arrow will appear.
Select the down arrow.
HOL-HBD-1482
Page 107
HOL-HBD-1482
Launch Console for Web_Production Virtual Machine
Click the "Launch Console" option for this particular machine.
HOL-HBD-1482
Page 108
HOL-HBD-1482
Log into Web_Production Virtual Machine
Now that the console is open, the screen may be black so you will need to click in the
screen and hit "enter" in order to get it to respond.
Log into the virtual machine with the following credentials:
portal login: root
Password: VMware1!
Test Connectivity to DB_Production
At the prompt sign enter in:
ping 10.0.1.12
This is the DB_Production VM.
You will see the the ping is not responding. In other words, the Web VM can not access
the DB_Production VM.
Press Ctrl+c in order to get the ping attempt to stop.
Test Connectivity to App_Production
At the prompt sign enter in:
ping 10.0.1.11
This is the App_Production VM.
HOL-HBD-1482
Page 109
HOL-HBD-1482
You will see that again the ping is not responding. Or shall we say, the Web VM can not
access the App_Production.
Press Ctrl+c in order to get the ping attempt to stop.
In order to get out of the console, select Ctrl+Alt.
Return to vCloud Air
Return to the Firefox browser and select the "Dashboard" tab.
HOL-HBD-1482
Page 110
HOL-HBD-1482
HOL-DC1-VPC1-3 Production
Double click the "HOL-DC1-VPC1-3" Virtual Data Center.
HOL-HBD-1482
Page 111
HOL-HBD-1482
Launching vCloud Director
You should automatically be taken to the "Networks" tab. If you are not at the
"Networks" tab, please proceed to it and select "Manage in vCloud Director".
Routed Network in vCloud Director
Highlight the Routed hol-dc1-vpc1-3-default-routed network.
HOL-HBD-1482
Page 112
HOL-HBD-1482
Select Configure Services
Select the down arrow on the blue gear and select "Configure Services".
HOL-HBD-1482
Page 113
HOL-HBD-1482
Adding Firewall Services
Select the Firewall tab.
Select the "Enable Firewall" box.
Click "Add..."
Adding Source 1
Please fill in the information as it appears in the screen with the following information:
Name: Web_Production
Source: 192.168.109.2
Source port: 443 (you must enter this port id in)
Destination: 10.0.1.11
HOL-HBD-1482
Page 114
HOL-HBD-1482
Destination port: 443 (you must enter this port id in)
Protocol: TCP
Click "OK".
HOL-HBD-1482
Page 115
HOL-HBD-1482
Adding Firewall Services
Click "Add...".
Adding Source 2
Please fill in the information as it appears in the screen with the following information:
Name: Web_Production
Source: 192.168.109.2
Source port: any
Destination: 10.0.1.11
Destination port: any
Protocol: ICMP
HOL-HBD-1482
Page 116
HOL-HBD-1482
Click "OK".
HOL-HBD-1482
Page 117
HOL-HBD-1482
Adding Firewall Services
Click "Add...".
Adding Source 3
Please fill in the information as it appears in the screen with the following information:
Name: App_Production
Source: 10.0.1.11
Source port: 443 (you must enter this port id in)
Destination: 192.168.109.2
Destination port: 443 (you must enter this port id in)
Protocol: TCP
HOL-HBD-1482
Page 118
HOL-HBD-1482
Click "OK".
HOL-HBD-1482
Page 119
HOL-HBD-1482
Adding Firewall Services
Click "Add...".
Adding Source 4
Please fill in the information as it appears in the screen with the following information:
Name: App_Production
Source: 10.0.1.11
Source port: any
Destination: 192.168.109.2
Destination port: any
Protocol: ICMP
HOL-HBD-1482
Page 120
HOL-HBD-1482
Click "OK".
HOL-HBD-1482
Page 121
HOL-HBD-1482
Saving All Firewall Settings
Click "OK" to save all firewall settings.
HOL-HBD-1482
Page 122
HOL-HBD-1482
Firewall at Local Data Center
Return to vSphere Client.
Note that the VPN section shows the Channel Status as a green checkbox.
Click the Firewall button.
Note that vShield Manager may log you out. The credentials to log back in are:
User name: admin
Password: default
HOL-HBD-1482
Page 123
HOL-HBD-1482
Add rule
Hit the green " + " symbol.
Note that I already highlighted rule #4 and therefore a new rule will be added above it.
Firewall Rule Configuration (Local Data Center)
Click the top right corner of the Name column in order to add the Name.
HOL-HBD-1482
Page 124
HOL-HBD-1482
Rule Name (Local Data Center)
For Rule Name, add App_Production VM to portal.
Click "OK".
Adding Source 1
In the Source column, click the " + " in the top right corner.
Adding IP Addresses
As we did in the previous steps, we need to add the new IP Addresses.
HOL-HBD-1482
Page 125
HOL-HBD-1482
Click the "New IP Addresses..." link.
HOL-HBD-1482
Page 126
HOL-HBD-1482
Web_Production IP
Enter in the following information:
Name: Web_Production
IP Addresses: 192.168.109.2
Click "OK".
HOL-HBD-1482
Page 127
HOL-HBD-1482
Adding Source 2
Click the " + " symbol again in order to add the second source.
HOL-HBD-1482
Page 128
HOL-HBD-1482
Adding IP Addresses (Local Data Center)
The configuration window will appear. Notice that our previous name appears on the top
of the screen.
In order to add the configuration,
please select the "New IP Addresses..." option.
HOL-HBD-1482
Page 129
HOL-HBD-1482
App_Production IP
Enter in the following information:
Name: App_Production
IP Addresses: 10.0.1.11
Click "OK".
HOL-HBD-1482
Page 130
HOL-HBD-1482
Adding Destination 1
In the Destination column, click the " + " symbol, like we did in the previous steps.
Adding Sources
In previous steps we created the IP addresses. In the top right corner, enter in
"Production" and select the two options:
Web_Production and
App_Production
Click "OK".
HOL-HBD-1482
Page 131
HOL-HBD-1482
Adding Service 1
In the Service column, click the " + " in the top right corner like we did in previous steps.
Adding ICMP Echo
In the top right screen, enter "ICMP".
The ICMP names will appear.
Select "ICMP Echo".
Click "OK".
HOL-HBD-1482
Page 132
HOL-HBD-1482
Adding Service 2
Select the " + " in the top right corner in order to add the second service.
Adding HTTPS Service
In the top right box enter in HTTPS.
The HTTPS names will appear.
Select "HTTPS".
Click "OK".
HOL-HBD-1482
Page 133
HOL-HBD-1482
Publish Firewall Rule
Now that our rule is completed in the Local data center, we can publish it.
Click the "Publish" button.
Test Connectivity to DB_Production
Proceed back to the Web_Production VM in the vCloud Air to test the firewall rules via a
ping command to the DB_Production.
Click in the box if the screen has gone black. You may also need to hit the "enter" key in
order to get a response.
At the prompt enter:
ping 10.0.1.12
You will see the ping still does not respond.
Again, Ctrl+c to exit you out of the ping command.
Test Connectivity to App_Production
Now let's test the firewall rules via a ping command to the App_Production.
HOL-HBD-1482
Page 134
HOL-HBD-1482
At the prompt enter:
ping 10.0.1.11
You will see the ping DOES work. Exactly how we drew it up! You did it!
Enter Ctrl+c to cancel.
HOL-HBD-1482
Page 135
HOL-HBD-1482
Conclusion
In conclusion, we created a tunnel between the local data center and VMware vCloud®
Air™. Once the tunnel connectivity was established, we wanted our security policies
were consistent even when using machines in VMware vCloud® Air™.
We set up some firewall rules to ensure that the Web_Production VM can only
communicate with App_Production VM. This configuration is common because when you
start moving virtual machines to the public cloud, you want to make sure your local data
center stays safe. This lab has shown that you can continue to have consistent security
policies no matter where the virtual machines are being deployed.
We hope you enjoyed our lab and again, if you are interested in other VMware vCloud®
Air™ labs, HOL-HBD-1481, HOL-HBD-1483 and HOL-HBD-1484 are available.
Thank you so much for taking our lab! We really appreciate it!
HOL-HBD-1482
Page 136
HOL-HBD-1482
Conclusion
Thank you for participating in the VMware Hands-on Labs. Be sure to visit
http://hol.vmware.com/ to continue your lab experience online.
Lab SKU: HOL-HBD-1482
Version: 20150406-081231
HOL-HBD-1482
Page 137