1
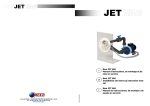
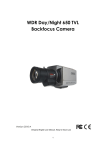
thanks you for using our products
Please read this manual carefully before using our
products,
and please keep the manual proper for future reference.
Catalogue
Notices···································3
Common problems explanation········4
CCTV camera with SD card storage
·5
Specification··················6
Connection show···
·················8
···················8
Dimension ············
OSD Menu·······························8
SYSTEM ············
··················8
SECURITY ·····························9
IMAGE ·······························10
Notices
This mark is used to warn the users to avoid the dangerous voltage inside the
camera
This mark is used to warn the users that label printed on the products which
have important operation or maintain in description
This equipment is according to the article 15 of the treaty FCC about CLASSA
digital equipment restriction to test . These restrictions are designed to prevent the
products form the harmful interference when using under the business environment .
This product will emit electromagnetic wave during the course of production and
using, if you are not according to the user's manual when installing and using, You
can be interfered by the electromagnetic wave ,When using this product in the
residentialareas,it could bring electromagnetic wave and be interfered by. in this
case,please handle properly.
Attention:
To replace or repair the camera privately without manufacturers’ permission, the
consumers’ interests will not be protected properly.
Warning: please do not touch the plug with wet hand, Otherwise it will lead to
electrical shock.
Please do not put the camera close to be the flammable gas or oil , which will result
in fire or other dangerous.
Please do not install the camera on the unsolided surface , which will lead to falling
or other dangerous.
Common problems explanation
Please refer to the table below when you find Problems during using. If there are no
resolution for your problems,please contact our authorized technician
problem
solution
No images display ·Check whether the power cord of the camera and the monitor is
on the screen
connected correctly,and check whether there is voltage output from
the power supply.
·Check whether the VIDEO cable and the VIDEO output jack of the
camera is connected
·Check whether he power supply and the current of the camera is
meet the requirement.
Blurry images
·Check if there are dirt on the lens ,please use a soft&clean cloth to
clean lens,
·Check if the monitor is on the correct state.
·If the camera is in a strong light, please change the location of the
camera
·Adjust the focal length of the lens properly
The images on che ·Adjust the contrast of the monitor
Screen is dark
·If using intermediate device,please set up 75Ω/Hi-Z correctly
The surface of the ·Check if the correct power supply is correctly connected to the
camera is too hot
camera
Images flashes on ·Check the camera lens whethe or not towards the sun or fluorescent
the screen
light?Please change the camera’s position.
CCTV camera with SD card storage
features
Use SD card to store picture
z Unique design beautiful look,patented products
z Motion diction and auto tracking
z 10X digital zoom
z Support RS-485(PELCO-D )
z OSD Menu
SAFETY PRECAUTION
z Do not open and modify
Don't open the cabinet except during installation and maintenance, or it
may cause the camera damage.
z Don't leave other objects inside the unit.
Make sure that nometal objects or flammable substances inside the
camera.it couklcause fire,shot-circuits or damage.
z be careful when handling the unit
To prevent damage,do not drop or hit the camera or install away from
electric or magnetic fields.
z install it wheraway from strong electromagnetic fields.
Moisture-proof, dust-proof, anti- high temperature.when istall the camer
the ceiling, kitchen boiler room,should pay particular
z cleaning
Dirt can be removed by a wet soft cloth sticked ab luent.
Specification
image Sensor
Scanning Frequency
Effective pixels
Horizontal resolution
Minimum illumination
S/N Ratio
video output
AWB
BLC
gamma correction
Sync.system
Take
Store
MAX.ZOOM TIMES
Lens
Power supply
Operating on Temperature
Ttorage Temperature
Dimensions(mm)
Weight
ST-911S
1/3”SONY SUPERHAD CCD
NTSC/PAL
PAL:537(H)*597(V)NTSC:537(H)
*505(V)
420TVL
0.5μLux/F1.2
>48dB
1.0Vp—pat75ohm
Auto
Auto
0.45
Sync Internal
MD/MT
SD
2X/4X/10X
2.8/3.6mm(eligibility)
DC12V
—10℃~50℃
—20℃~60℃
130(L)X105(W)X78.5(H)MM
200G
Monitor concatenate
z Connect the camera’s VIDEO and the monitor’s VIDEOIN .
z Since the connection methods are changing with the use of different tools,so
please refer to the methods provided by manual.
z Connect the cable after the power off.
Connect the power
z
z
z
z
Use DC 12V power supply
Please refer to the connect power that maked on the camera.
DC power supply
The power lines have its own polarity ,please be sure to distinguish clearly
between "+" and "-"
The power card’s length will affects the drop of the DC voltage, if the cable is too
long ,it will cause the camera failure.
Attention
z Please make sure all the installation have been completed, then connected power
z Do not provide the AV or DC adapter
z GND terminals shoud be connected with the ground.
Dimension
一、Dimension
Picture
一、 Picture Review
When you want to review the pictures stored in SD card, push the Picture
function key “UP”, push “UP” again to exit.
二、 Snap Shoot
When want to snap shoot ,push the “Down” key.
三、 Zoom in /Zoom out
This camera has Zoom in/Zoom out function. Push the “left” key to zoom in, push the
“right” key to zoom out.
OSD menu
Push the “MENU”to enter system(refer photo1)
SYSTEM
1.1 Move the Cursor to SYSTEM and push “ MENU ” then can enter
submenu(refer photo2)
一、
Move the Cursor to DATE/TIME and push “MENU ”then can enter
submenu(refer photo3)
Move the Cursor to DATE/TIME and push “MENU”to set DATE/TIME.Use the
UP/DOWN bottom to set.
1.2 Move the Cursor to PELCO and push “MENU”and come to menu as photo4.
PROTOCOL(RS-485):PELCO-D;BAUD RATE:2400;ADDRESS:0~255
1.3 Move the Cursor to FORMAT DISK and push“MENU”and come to menu as
photo5.
Choose Yes and FORMAT the SD card
1.4Move the Cursor to FIRMWARE UPDATE and push “MENU”to menu as
photo 6.
FIRMWARE UPDATE is for factory to do the update,custmer no need to operate it.
二、SECURITY
2.1 Move the Cursor to SECURITY and push “MENU”to menu as photo 7.
2.2 INTELLIGENCE MODE,use “LEFT/RIGHT” bottom to select MD/MT/OFF and
push “MENU”to exit
MD Format:Motion ditaction format, snapshoot moving objects.
Default mode is MD.
MT Format:Mobile Tracking Mode, track and shot moving objects.
OFF:under this format ,camera snapshot is off.
2.3PHOTO SIZE:default mode is D1
2.4 PHOTO OUALITY:ues “LEFT/RIGHT” botttom to chose L/M/H,Default model
is M.
2.5 MAX.ZOOM TIMES: ues “LEFT/RIGHT” botttom to chose 2X 、 4X 、
10X ,Default model is10X.
2.6 AUTO ANAPSHOT:when is ON,camera snapshot moving object,Interval is 3
seconds. When is OFF,camera stop snapshot.
2.7RED FRAME:When is ON,open RED FRAME. When is OFF,close RED
FRAME.(will not affect snapshot).
2.8. MT SENSITIUITY:0-6 adjustable,When it’s 0 ,MT SENTIVITY is low, when
it’s 6, MT SENTIVITY is high ,Default is 3.
2.9 DISK OVERWRITE:when it’s ON, cover the previous content when SD card is
full. When it’sOFF,camera will stop snapshot when SD card is full.
2.10DEFAULT SETTING :push “MENU”to come menu as photo 8.
Choose YES and the menu will revert to the default value .
三、IMAGE
3.1 IMAGE:push “MENU”to come to menu as photo 9
3.2 BRAIGHTNESS:0~100 adjustable. Customer can adjust according to
circumstances at the scene .The default value is 50
3.3 CONTRAST:0~100 adjustable .Customer can adjust according to circumstances
at the scene.The default value is 50.
3.4SATURATION:0~100 adjustable .Customer can adjust according to circumstances
at the scene.The default value is 50.
3.5DEFAULT SETTING: push “MENU”and come to menu as photo 10.
Choose YES BACK to the default value .
四、 Back/Exit
4.1 When want to back to Main Menu ,use the left Picture function Key
ZOOM—:EXIT,When want to exit the menu ,use the right picture function key
ZOOM+: