1
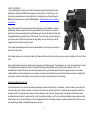
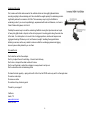
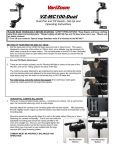
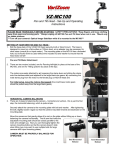
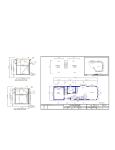
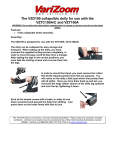
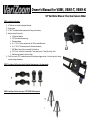
Owner’s Manual for VSM1, VSM1-T, VSM1-K
54” VariSlider Manual 1-Section Camera Slider
VSM1 includes the following:
54” slider w/ cart and 4x leveling feet attached
Carrying case
¼”-28 x 1” stainless knurled thumbscrew for fixing cart to endcap
Head mounting kit (in pouch)
a. 100mm bowl adapter
b. 100-75mm bowl step-down ring
c. Flat base adapter
d. 2x - ¼”-20 x ¾” button socket screw (for 100mm bowl attachment)
e. 4x - ¼”-20 x ½” flat socket screw (for flat base attachment)
f. M10 ‘Metric’ hand knob w/ removable 3” stud and nut
g. 3/8”-16 ‘Inch’ hand knob w/ removable 3” stud (bowl mount), 2” stud (flat mount), & nut
h. Machined cup washer for bowl mounting
5) Tool Kit (in pouch): 5/16” combination wrench for adjusting outrigger position + Inch hex key set for tuning
cart and making attachments
1)
2)
3)
4)
VSM1-T includes all of the above plus 2 attached tripod mounts w/ tie-down knobs
+
VSM1-K includes all of the above plus 2 VZT100AM 100mm tripods
+
1
Notes and Warnings:
1) The track surface (the upside-down ‘V’ part) must remain in good condition for the slider to move smoothly. Always protect this surface by
packing the slider in its case as it was received, with the padding on top of the slider.
2) The track surface must be clean and free of debris for the slider to move smoothly. We recommend periodically cleaning the track with WD40,
which will remove any residue or debris, and it acts as an excellent lubricant for smooth rolling.
3) Do not stand on the slider or attempt to ride it like a skateboard – being a human slider is tempting, but dangerous.
4) Do not attempt to mount the 54” slider to only one tripod – IT WILL TIP OVER. When using the slider on 2 tripods, as recommended, make sure
the unit is level and the tripod legs are locked.
5) After extended use, the cart’s subtrack rollers may need adjustment – this is easy, read on!
Unpacking the VSM1
Although the VSM1 is sturdy and designed for heavy loads, it can be damaged by careless handling in a way that will make it work poorly,
and unfortunately we can’t cover damages under warranty. The good news is that as long as you treat it well, pack it in its case and don’t
back over it with your car, it will work beautifully for many years.
Please note that we pack the unit with the padded insert on top of the track to protect the most sensitive area of the device. When removing
the slider from its case, always set it down feet first, and be aware that onlookers may suddenly feel irrational jealousy at the sight of your
VSM1. This is normal.
Remove the slider from the case and set it down feet-first. Remove the bubble wrap by hand - DON’T USE A KNIFE OR SHARP OBJECT,
OR YOU MIGHT DAMAGE THE SLIDER.
You’ll also find a ‘VariZoom’ pouch inside the case that contains your tools and head mounting kit.
Setting up the First Time
-VSM1
If you’re operating from a tabletop or ground mount, take note of the leveling feet. These can be adjusted by hand or using tools. The
advantage of being able to use tools is that you can achieve excellent precision and fixity, and you can adjust the feet easily even under
heavy loads. The top end of the leveling foot incorporates a hex socket that allows you to use your hex wrench to thread the feet in or out
from the topside for easy adjustment, or you can simply use your fingers to thread the feet from the bottom. Also included with the leveling
feet are nuts for fixing position and eliminating wobble. Again, you can do this by finger tightening or use a wrench if you wish.
2
-VSM1-T and VSM1-K
If you’re operating from a tripod mount, then there are more options and methods for setup.
Hopefully you bought the VSM1-K that includes our tripods, but if not, I’ll still help you. Our
tripod mounts should allow you to mount the slider to virtually any type of tripod, although a
Mitchell tripod will require our optional VZMBA adapters - http://www.varizoom.com/productp/vzmba.htm
Using 100mm tripods is the best all-around option for security, ease of installation, and costeffectiveness. Since your tripod mounts came pre-installed, all you need to do is set up the
tripods level, to the same height and the right distance apart, then set the slider onto them with
the largest-diameter ring nested into the 100mm bowls. This mount style is pretty forgiving, but
you’ll know quickly if the tripods aren’t quite set up properly. Once you have it right, use the
supplied tie-down knobs to secure the mount.
75mm tripods will essentially work the same as described above, but using the second ring to
nest into the 75mm bowl.
65mm tripods will also work, but using the third ring. Please note that some 65mm tripods may not be as rigid or reliable as 75mm or 100mm
units.
Using a flat-base tripod mount is a little more time-consuming, but still easy enough. The safest way to do it is by removing the tripod mounts
from the slider and mounting them directly to the tripods first, then placing the slider on top of them and securing the mount. You’ll
essentially have to thread the tripod mount onto the projecting stud on your flat-base tripod. Be careful, though, because you can easily
cross-thread the mount and damage it if you’re careless. Just make sure to thread the mount onto the tripod nice and square / straight, then
you’ll want to make use of the tripod mount’s lock-down set screws to prevent the mount from loosening.
Operating the Slider the First Time
All you should have to do is unscrew the stainless steel thumb screw that locks the cart to the endcap – save this screw in your toolkit. If the
track looks dirty, clean it with a microfiber or soft cotton cloth and roll the cart back and forth. You should be able to operate the slider now
and get a feel for it. As a simple rule of physics, the more weight you add to the cart, the more inertia it will possess. More inertia means
smoother starts and stops for a system like this, so don’t be shy about loading it up. We don’t include an adjustable drag mechanism on this
slider because it’s not only unnecessary, but it’s an inappropriate solution for this type of system, anyway. Remember this: Inertia is on your
side, while drag is literally something that just gets in your way.
3
Mounting a Fluid Head / Camera Head
For starters, determine the type of head you want to mount and then select the appropriate mounting plate from the kit pouch.
-Mitchell mounting – you should be able to attach directly to the cart
-Flat-base mounting – select the flat plate and attach it to the cart with 4 supplied flat head screws
-100mm / 75mm mounting – select the bowl mount and attach it to the cart with 2 supplied button head screws – if using a 75mm head,
you’ll need to insert the step-down ring into the larger 100mm bowl.
Now that you have your mounting surface situated, select the appropriate hand knob - included are ‘Metric’ (M10) and ‘Inch’ (3/8”-16) knobs,
and each includes a removable stud w/ nut. If your head has a projecting stud (male), then you need to remove the stud from the hand knob.
If your head has a female thread, then leave the stud attached. You can also adjust how far the stud projects by threading it in or out and
tightening the nut up against the knob. Note: 3/8”-16 knob also includes a shorter 2” stud for use with the flat-base adapter.
Level your head, if necessary, and tighten the hand knob thoroughly.
Operating the Camera on the Slider
This is pretty self-explanatory, but here are a few pointers to help you get the best results. For one, we recommend adjusting the fluid head
to a medium-low level of drag so that when you pan and tilt it doesn’t cause any unwanted motion in the slider. Also, don’t worry about
stripping your camera down – the more weight, the better. Always be aware of the endpoints on the slider, otherwise you might ruin an
otherwise beautiful shot. You can roll the cart by using your tripod handle or by directly pushing it – do whatever feels most natural so you
can focus on your composition and pacing. Although you should be able to get smooth shots even at telephoto, keep in mind that at longer
focal lengths, any tiny motion will be greatly exaggerated in the image.
If you ever feel the cart is hitting a point on the track with increased drag, you may need to adjust the subtrack rollers (see “Adjusting the
Subtrack Rollers”). If you feel spots that are less than smooth, you probably just need to clean the track.
4
Adjusting the outriggers / Adjusting the tripod mounts (attached to outriggers)
One of the unique features of the VSM1 is the ability to position the outriggers anywhere along the length of the track. This is accomplished
by virtue of a sliding dovetail system. The outriggers also serve as the attachment points for the tripod mounts, so you can position the tripod
mounts anywhere along the track. This could be useful for a number of scenarios, including, but not limited to: 1) Resting one end of the
slider on a countertop and the other end on a tripod. 2) Placing the slider on a narrow surface (close-spaced outriggers). 3) Using closespaced tripods. 4) Virtually unlimited overhead / underslung mounting options. 5) Adding additional outriggers to the middle of the track for
added support or creative mounting possibilities. 6) Using slightly different outrigger positions at each corner.
Adjusting the outriggers is very simple. Using the supplied 5/16” combination wrench, loosen the 2 hex
cap screws on the inside wall of each outrigger. Don’t loosen too much, just enough so the tension is
released. You’ll feel the outriggers loosen up when the expanding dovetail mechanism disengages
slightly from the track, and then you’ll be able to slide the outriggers.
Note: If the tripod mounts are attached to the outriggers and you want to reposition them, you may have
to loosen the outrigger screws slightly more to move the entire tripod mount/outrigger assembly.
Once you’ve repositioned the outriggers (or outrigger/tripod mount assemblies), tighten the 2 screws on
each outrigger. Don’t go crazy tightening these, just turn the wrench until it starts to take a bit of hand
strength and the outrigger position is fixed. Warning: Don’t position the outriggers or tripod mounts
such that the system is cantilevered out so far that the weight of the camera/head can cause the
system to buck up or tip over. Test your setup before shooting to make sure it is safe.
Adjusting the Subtrack Rollers
This is not something you should necessarily have to do, but over time you may want to
adjust the subtrack rollers, and it’s good to know about and easy to understand. These are
the 8 little wheels (4 each side) that hold the cart onto the track, prevent bucking, and allow
you to use the slider in the underslung position. To adjust each side, you’ll have to loosen
the 2 black side screws and then loosen or tighten the smaller silver screw on top. As you
tighten the silver screw, the wheels will be drawn tighter to the track. You can probably
guess what loosening the silver screw does. Roll the cart back and forth and make sure
there are no tight spots. Ideally, you want the subtrack rollers to be as tight as they can be
without affecting the smoothness of the slider’s action. Keeping the subtrack rollers close
helps keep the cart snug and free of play. Tighten the 2 black side screws thoroughly.
5
Underslung Mounting
First, make sure that the side screws for the subtrack rollers are thoroughly tightened before
mounting anything to the underslung cart. Also note that the weight capacity for underslung mode is
significantly reduced to a maximum of 40 lbs. There are many ways to rig the VariSlider in
underslung mode. If you are not a qualified grip, experienced with tools and fasteners, or at least a
Class 2 Redneck Engineer, don’t risk it.
Probably the easiest way to mount the underslung VariSlider is using the tripod mounts and a pair
of heavy-duty light stands or tripods, as this will only require 2 mounting points along the center line
of the track. Your other option is to mount to the 4 outrigger positions, which would require more
rigging and leveling. Whatever you do, test the mount, weight / sandbag the supports before
attaching a camera, and be very careful to make sure that the overhanging camera and rigging
does not pose a safety hazard to you or others.
Do’s and Don’ts
Don’t slam the cart into the endcaps
Don’t try to adjust the cart to add drag – it doesn’t work that way
Don’t store or transport the slider outside of its case
Don’t mount the slider or adjust the outriggers in a way where it can tip over
Don’t overload the slider in underslung mode
Do clean the track regularly – wiping with a soft cloth is fine, but WD40 works very well for a thorough clean
Do send us video clips
Do review us online
Do continue to buy American goods
Thanks for your support!
VariZoom
Austin, TX
www.varizoom.com
512-219-7722
6