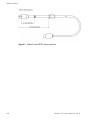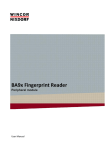
1
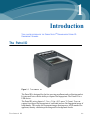
Cross Match® Technologies, Inc.
Patrol ID
Flat Fingerprint Scanner for Enrollment
and Identification
User Manual
Version 1.0 (August 2010)
Specifications are subject to change without prior notice.
Cross Match Technologies GmbH assumes no liability for maloperation or
improper use of products.
Cross Match® and L SCAN® are registered trademarks, and the CROSS
MATCH TECHNOLOGIES logo is a trademark of Cross Match
Technologies, Inc.
All other trademarks, brands and names are the property of their respective
owners and are protected by US and international copyright and trademark
laws.
No portion of this guide may be reproduced in any form or by any means
without the express written permission of Cross Match Technologies.
© Copyright 2010, Cross Match Technologies. All rights reserved.
Contents
Introduction
The Patrol ID .................................................................................. 1-1
How this book is arranged ................................................................. 1-2
Standards ....................................................................................... 1-2
FCC statement ................................................................................. 1-2
CE ................................................................................................. 1-3
Recycling information ....................................................................... 1-3
WEEE Directive ................................................................................ 1-3
Safety instructions ........................................................................... 1-3
Glossary ......................................................................................... 1-4
Installation
Patrol ID ........................................................................................ 2-1
The top view ................................................................................... 2-2
The back view .............................................................................. 2-3
The product label ......................................................................... 2-3
System requirements ....................................................................... 2-4
Operating systems ........................................................................ 2-4
Hardware .................................................................................... 2-4
Software requirements .................................................................. 2-4
Installation ...................................................................................... 2-4
Remove the contents .................................................................... 2-4
List of contents ............................................................................ 2-4
Prepare to use the Patrol ID .............................................................. 2-5
Connect the Patrol ID .................................................................... 2-5
Attach the Patrol ID to a surface ........................................................ 2-6
Prepare the installation ................................................................. 2-6
Installation .................................................................................. 2-7
Drill template Patrol ID .................................................................. 2-8
How to use the Patrol ID
Preliminary considerations ................................................................. 3-1
Introduction .................................................................................... 3-1
The indicator lights ........................................................................... 3-2
The icon lights ............................................................................. 3-2
The status lights ........................................................................... 3-2
Contents
iii
Red status lights .......................................................................3-2
Green status lights ....................................................................3-2
Yellow status lights ....................................................................3-3
Capture flat fingerprints ....................................................................3-3
Incorrect actions ...........................................................................3-3
Capture thumbprints .....................................................................3-4
Maintenance
Scanners without silicone membrane ...................................................4-1
Clean the platen ...........................................................................4-1
Use normal glass cleaner ............................................................4-1
Use the Acetone Alcohol Prep Pad ................................................4-2
Clean the case .................................................................................4-2
Patrol ID specifications ......................................................................4-3
The USB cable ..................................................................................4-3
Problems and Corrections
The optical scanner does not operate ...............................................5-1
Cannot capture a fingerprint ...........................................................5-1
Customer Care and Contact Information
Technical support .............................................................................6-1
E-mail .........................................................................................6-1
Telephone and facsimile .............................................................6-1
Return and repair of the Patrol ID ...................................................6-2
Delivery costs ..................................................................................6-2
The product is in the warranty period ...........................................6-2
Customers inside the EU .........................................................6-2
The product is not in the warranty period .....................................6-3
Contact information ..........................................................................6-3
Corporate Headquarters .............................................................6-3
Corporate Web Page ..................................................................6-3
Product Warranty
Limited Warranty ..............................................................................7-1
Repair or Replacement ...................................................................7-1
Limitations ...................................................................................7-2
Out-of-Warranty Repairs ................................................................7-3
Index
iv
Patrol ID User Manual V1.0
Figures
Figure
Figure
Figure
Figure
Figure
Figure
Figure
Figure
Figure
Figure
Figure
Figure
Figure
Figure
Figure
1.1:
2.1:
2.2:
2.3:
2.4:
2.5:
2.6:
2.7:
3.1:
3.2:
3.3:
3.4:
4.1:
4.2:
4.3:
The Patrol ID ................................................................ 1-1
Patrol ID top view ......................................................... 2-2
Patrol ID back view ....................................................... 2-3
Product label ................................................................ 2-3
Cable compartment ....................................................... 2-5
USB connection ............................................................ 2-6
Placing drill template ..................................................... 2-7
Mount points ................................................................ 2-7
The status lights and icon lights ...................................... 3-2
The correct hand position for flat fingerprints .................... 3-3
Examples of incorrect pressures ...................................... 3-4
The correct position for flat thumb prints ......................... 3-4
Cleaning with glass cleaner ............................................ 4-1
Cleaning with Alcohol Prep Pad ....................................... 4-2
Cable tie and EMC clamp position .................................... 4-4
v
vi
Patrol ID User Manual V1.0
1
Introduction
Chapter 0
THIS CHAPTER INTRODUCES THE CROSS MATCH® TECHNOLOGIES PATROL ID
FINGERPRINT SCANNER.
The Patrol ID
Figure 1.1
The Patrol ID
The Patrol ID is designed for the fast growing enrollment and verification market.
It joins small size with the ability to capture flat fingerprints. The Patrol ID is a
USB device.
The Patrol ID active platen is 3.2 in. x 3.0 in. (81.3 mm x 76.2 mm). You can
capture four-finger flat fingerprints of each hand and one flat fingerprint image of
both thumbs. The results are fingerprint images that improves AFIS matches for
applicant, identity validation processing and for background checks.
The Patrol ID
1-1
Introduction
The scanner meets the FBI specifications for an EFT Type 14 record that contains
the flat fingerprints for Applicant processing by the AFIS.
The L SCAN Essentials™ CD-ROM included with the Patrol ID contains a
software package that provides the capture functions, the USB driver, separate
software tools, and the User Manual.
How this book is arranged
• Chapter 1 “Introduction” describes the scanner and covers standards for
the manual. The chapter also contains safety instructions and a glossary of
technical terms.
• Chapter 2 “Installation” describes how to install the Patrol ID.
• Chapter 3 “How to use the Patrol ID” describes how to use the indicators
on the Patrol ID to capture the best quality fingerprint.
• Chapter 4 “Maintenance” explains how to maintain the Patrol ID and
contains the specifications.
• Chapter 5 “Problems and Corrections” describes the problems, causes,
and corrections.
• Chapter 6 “Customer Care and Contact Information” explains how to
get the technical support that is available from Cross Match Technologies.
• Chapter 7 “Product Warranty” contains the full text of the product
warranty from Cross Match Technologies.
Standards
The following standards are used in this book:
• Bold UPPER/lower case and tilted text identify important information.
• Special information can appear as a Note, Caution, Warning.
Note
Caution
Warning
A Note contains additional information. To ignore a note can cause a delay, but not
mechanical damage or personal injury.
A Caution contains a method to prevent data loss or damage to equipment. To ignore the
caution can cause damage or data loss.
A Warning describes an action that can cause injury or loss of life. Mechanical damage can
occur.
FCC statement
This device has been tested and found to comply with the limits for a Class A
digital device, pursuant to Part 15 of the FCC Rules. These limits are designed to
provide reasonable protection against harmful interference when the equipment is
operated in a commercial environment. This equipment generates, uses, and can
radiate radio frequency energy and, if not installed and used in accordance with
the instruction manual, may cause harmful interference to radio communications.
Operation of this equipment in a residential area is likely to cause harmful
1-2
Patrol ID User Manual V1.0
Introduction
interference in which case the user will be required to correct the interference at
his own expense.
Operation is subject to the following two conditions: (1) This device may not
cause harmful interference, and (2) This device must accept any interference
received, including interference that may cause undesired operation.
Changes or modifications not expressly approved by the party responsible for
compliance could void the user's authority to operate the equipment.
CE
This device complies with the mandatory European marking to indicate
conformity with the essential health and safety requirements set out in European
Directives. Declaration of Conformities may be directly obtained from Cross
Match Technologies GmbH.
Recycling information
Cross Match Technologies recommends that customers dispose of their used
computer hardware, monitors, printers and other peripherals in an
environmentally sound manner. Potential methods include reuse of parts or whole
products and recycling products, components and/or materials.
WEEE Directive
The following is the test of the Waste Electrical and Electronic
Equipment (WEEE) Directive.
In the European Union, this label indicates that this product should not
be disposed of with household waste. It should be desposited at an
appropriate facility to enable recovery and recycling.
Safety instructions
This product has been designed, manufactured and tested according to
international safety standards. The following general safety precautions must be
observed during all phases of operation to ensure safe operation of the Patrol ID.
Cross Match Technologies GmbH assumes no liability for the customer's failure
to comply with these requirements.
• When operating, the electrical installation and cabling must comply with the
IEC 60950 standard.
• To connect the fingerprint scanner to a computer, use the USB cable as
supplied with the scanner.
• The device must be operated only in a dry room. Exclude any condensation.
• The environmental temperature range is 32 °F to 122 °F (0 °C to 50 °C).
CE
1-3
Introduction
Caution
Do not open the device. Repairs are only allowed by Cross Match Technologies.
• Whenever it is likely that the electrical protection has been compromised, the
device and system must be made unplugged and secured against
unauthorized use.
• Do not apply mechanical stress to the scanner platen. Do not throw heavy
objects onto it. The platen is made of glass and might be destroyed if not
handled properly.
Warning
A broken platen might have sharp edges, which could cause injuries.
• Do not scratch the scanner platen. The platen is vulnerable to sharp metallic
instruments (knives, scissors), extremely hard objects (diamonds) and also
dust. Scratches may reduce the image quality and thereby lead to scanning
results below the required quality specification.
• Always keep the platen clean. Use the provided cleaning pads or normal
glass cleaner and lint-free tissue for cleaning.
Caution
Do not use oily or abrasive cleaners since they might affect the platen surface quality.
• Do not pour liquids (water etc.) onto the scanner. The scanner device is
protected against cleaning with a damp cloth or tissue, however, it is not
waterproof.
Glossary
This section contains some terms that are used in this manual.
Table 1.1
Glossary of terms
Term
Definition
AFIS Automated Fingerprint Identification System. A fingerprint
database (for example, the database maintained by the FBI).
LED Light Emitting Diode.
Semiconductor which emits light if connected to voltage.
NFIQ The NIST Fingerprint Image Quality standard. The quality
standard has five levels.
NIST The National Institute for Science and Technology. A US
standards organization.
Platen The surface on which the fingers are put to capture the fingerprint
images.
RMA A Return Merchandise Authorization or Return Material
Authorization allows a customer to return goods to Cross Match
Technologies. The company can repair or replace the product, or
arrange for a refund or a credit.
Silicone A thin surface between the finger and the platen that improves
membrane the fingerprint image and protects the platen. Also called a
silicone pad.
1-4
Patrol ID User Manual V1.0
Introduction
Table 1.1
Glossary of terms
Term
Definition
Flat fingerprint The fingerprint captured with the fingertip pressed on the platen.
A set includes an image of the left thumb and the right thumb
prints, and images of the four fingers of each hand. Also called
Slaps.
USB 2.0 The Universal Serial Bus is a standard that describes how the
devices communicate. The 2.0 version transfers the data at an
increased speed.
User The person who captures the fingerprints, also called the
Operator or the Official.
Glossary
1-5
Introduction
1-6
Patrol ID User Manual V1.0
2
Installation
Chapter 0
THIS CHAPTER DESCRIBES THE PATROL ID AND HOW TO INSTALL THE PATROL ID.
Patrol ID
The Patrol ID fingerprint scanner has an improved optical system and a digital
CMOS camera.
The Patrol ID has the following characteristics:
• Small size and light weight make the device easy to use.
• The Patrol ID requires only one cable connection.
• The scanner gets its power over the USB cable from a USB 2.0 card or a
USB hub.
• The scanner has an easy-to-use interface to capture quality fingerprints.
• Operator-friendly pictograms and status lights to enhance the image capture
experience.
• The scanner creates high quality 500 DPI images.
• The scanner can use NFIQ standards to check the quality of the fingerprint
images.
• The scanner lowers the rate of rejected transactions from an AFIS.
• The Patrol ID can use the auto-capture option.
• Threaded holes on the bottom allow the user to attach the scanner to a flat
surface.
Patrol ID
2-1
Installation
The top view
1
2
3
Figure 2.1
Patrol ID top view
Table 2.1
Patrol ID top features
Description
1*
The Prompt Icons provide visible indications to the user about the current
mode of the scanner. See “How to use the Patrol ID” on page 3-1.
2*
The four status lights use color to indicate the quality of the fingerprint
image. See “How to use the Patrol ID” on page 3-1.
3
Platen. Put fingers on the platen to capture fingerprints. When the scanner has
power, a green light illuminates the platen.
* Some programs can assign different uses to the icons and lights.
2-2
Patrol ID User Manual V1.0
Installation
The back view
2
3
1
Figure 2.2
Patrol ID back view
Table 2.2
Patrol ID back features
#
Description
1 Cable compartment. The USB connection is in the compartment.
2 Hand-hold. Use the hand-hold to move the scanner.
3 Kensington security slot. Used to secure the unit in place with a key and
attached through a rubberized metal cable. The end of the cable has a small loop
which allows the whole cable to be looped around a permanent object, such as a
heavy table to secure it in place.
The product label
A label on the back of the device contains the Part Number, Version number, and
the Serial Number.
Figure 2.3
The top view
Product label
2-3
Installation
System requirements
The Patrol ID requires a PC workstation, or a laptop, with an available USB 2.0
connector.
Operating systems
• Windows XP Professional, Windows Vista, Windows 7
• L SCAN Essentials 6.3 Runtime software
Hardware
•
•
•
•
•
Intel® Core™ 2 Duo 2,4 GHz or equivalent CPU
1 GB RAM
10 GB of available space
USB 2.0 Highspeed-compliant connector or USB 2.0 PCI/PCMCIA Card
1024 x 768 Video-Resolution monitor
Software requirements
You must install the L SCAN Essentials 6.3 or higher before you connect the
Patrol ID to the USB connector of your computer.
Installation
This section describes how to install the Patrol ID.
Remove the contents
Note
Keep all original materials in the event you return the scanner.
Remove all the contents from the product package.
List of contents
The following items are included in the Patrol ID package:
• Patrol ID Fingerprint Scanner
• USB 2.0 cable, standard length 6 ft (1,8 m)
• The User Manual is included on the L SCAN Essentials CD.
2-4
Patrol ID User Manual V1.0
Installation
Prepare to use the Patrol ID
Before you use the Patrol ID, perform the following actions.
• Put the product on a level surface.
• Make sure the surface of the platen is clean.
• When you operate the scanner in the field, try to maintain the heat, humidity,
and level of light of a normal office. Protect the platen from direct sunlight.
• Make sure the scanner remains warm and dry.
• Protect the scanner from dust and humidity.
• Allow the scanner to adjust to the temperature at a new location.
Connect the Patrol ID
Note
The procedure applies to desktop and laptop computers.
The USB socket is on the bottom of the Patrol ID in a compartment. Connect the
USB cable to the Patrol ID with the following procedure. You need a screwdriver.
1 Put the device upside down on a clean flat area like a table. You see the cable
tray with the USB (U) connector.
• In front of the USB connector a gasket is mounted to prevent liquid entry.
Note
Protect the top of the scanner with a soft cloth.
2 Loosen both fasteners of the strain relief device (1) and remove one screw.
3 Get the USB cable.
1
U
Figure 2.4
Cable compartment
Prepare to use the Patrol ID
2-5
Installation
4 Insert the cable connector (U) into the connector in the cable tray.
2
U
Figure 2.5
USB connection
5 Make sure that the cable is inside the cable support (2).
6 Attach the locking device of the strain relief and tighten the fasteners. It
prevents accidental disconnects between the cable and the Patrol ID.
7 Connect the other end of the USB cable to the computer.
8 You have completed the procedure.
Attach the Patrol ID to a surface
You can attach the Patrol ID to a flat surface like a table or counter top. The
fingerprint scanner has four threaded mount points on the bottom of the case. Use
the drill template to mark the holes.
Prepare the installation
Make sure that the following conditions exist before you begin:
• The Patrol ID is on a level surface.
• Collect the necessary pieces (drill template, four screws M3) and the tools
required for the surface you selected.
• Keep a soft cloth handy.
• Read the Patrol ID User Manual.
2-6
Patrol ID User Manual V1.0
Installation
Installation
To attach the Patrol ID:
1 Put the drill template in position.
2 Mark the center of each hole.
3 Make four holes.
Figure 2.6
Placing drill template
4 Connect the USB cable.
5 Use M3 metric screws to fasten the Patrol ID. The mount points on the scanner
are 0.35 inches (9 mm) deep.
1
Figure 2.7
Caution
Mount points
Make sure that the screws do not extend more than 0.35 inches (9 mm) above the surface.
Longer screws will damage the bottom of the device.
6 Attach the device to the surface with the four screws.
7 You have completed the procedure.
Attach the Patrol ID to a surface
2-7
Installation
Drill template Patrol ID
scale 1:1, use a borderless print method)
2-8
Patrol ID User Manual V1.0
3
How to use the
Patrol ID
Chapter 0
THIS CHAPTER DESCRIBES HOW TO CAPTURE THE FINGERPRINT IMAGES WITH THE
PATROL ID.
Preliminary considerations
Before you capture fingerprint images, you should always perform the following
preliminary actions as standard practice.
• Clean the capture surface of the Patrol ID. It is required for proper
operation and avoids the transfer of communicable diseases and prevents
dirt from reducing the quality of the captured images. See “Clean the
platen” on page 4-1 for more information.
• Make sure that the hands of the person are clean. Moisten excessively dry
hands with skin lotion. Dry excessively moist or sweaty hands before
every capture.
• Encourage the person to keep fingers, hand, and wrist as relaxed as
possible.
Introduction
The acceptable fingerprint occurs when you put the finger in the correct position
on the platen and apply the correct pressure.
With your software in capture mode:
• In the Auto-Capture mode the program captures an acceptable
fingerprint when you put the finger in the correct position on the platen
and apply the correct pressure.
• Manual capturing only starts after you click a button. If a finger or part of
a finger is left out of the image area box the program does not capture the
image.
Preliminary considerations
3-1
How to use the Patrol ID
• The program does not allow incorrectly placed fingers, a finger captured
twice, or moved or reversed fingers.
• To correct a misplacement, lift the finger off the platen and then replace
the finger inside the image area.
The indicator lights
The Patrol ID gives the user visible indications that the fingerprints are correct.
The scanner uses two sets of indicator lights: the four status lights (1) and the four
icon lights (2).
2
1
Figure 3.1
The status lights and icon lights
The icon lights
Below each prompt icon is a light that indicates the correct fingerprint to capture.
The status lights
The four status lights indicate how to correct each fingerprint image. The color of
the status light shows if the finger pressure is correct. When the user captures the
thumbs, the outside status lights are disabled.
Red status lights
When the pressure of the finger is less than required to capture a fingerprint, the
status light for that finger is red. Increase the pressure until the light is green.
Maintain that pressure until the program captures the image.
Green status lights
When the pressure of the finger is correct to capture a fingerprint, the status light
for that finger is green. Maintain the pressure until the program captures the
image.
3-2
Patrol ID User Manual V1.0
How to use the Patrol ID
Yellow status lights
When the pressure of the finger is more than required to capture a fingerprint, the
status light for that finger is yellow. Decrease the pressure until the light is green.
Maintain that pressure.
Note
Different software programs can use the status and icon lights differently.
Capture flat fingerprints
The Patrol ID has a large platen that captures all four fingers at the same time. The
platen can capture the thumbs together or separately.
The illustrations show where to put the fingers and thumbs to capture flat
fingerprints. Put all four fingers on the platen, parallel to the finger guide. The
icon light shows that the program requires the left hand and shows where to put
the hand for flat fingerprints. The green status lights indicate that the finger
pressure is correct. The position for the right hand is like the position for the left
hand.
Figure 3.2
The correct hand position for flat fingerprints
Incorrect actions
The illustrations show incorrect actions. The picture on the left shows the
following indications.
• Less pressure than required from the little-finger
• The correct pressure from the middle- and ring-fingers
• More pressure than required from the index finger
The picture on the right shows that the pressure from each finger is more than
required.
Capture flat fingerprints
3-3
How to use the Patrol ID
Figure 3.3
Examples of incorrect pressures
Capture thumbprints
The icons for the thumbs show which thumbs to put on the platen. You can
capture each thumb separately or you can capture both thumbs.
The illustration shows the correct position for flat thumb prints. The icon lights
indicate the program requires both thumbs. The green status lights indicate that
the finger pressure is correct.
Figure 3.4
3-4
The correct position for flat thumb prints
Patrol ID User Manual V1.0
4
Maintenance
Chapter 0
THIS CHAPTER DESCRIBES THE MAINTENANCE PROCEDURES THAT INCREASE THE LIFE OF
THE SCANNER AND THE PLATEN.
Scanners without silicone membrane
Caution
Do not use acetone, oil-based, abrasive or other unauthorized cleaners. This may damage
the device and render it inoperable. Using unapproved cleaning solutions will void the
warranty.
Clean the platen
Check the condition of the glass platen each day. A clean platen is required for
proper operation. It avoids the transfer of communicable diseases and prevents
dirt from reducing the quality of the captured images. To clean the platen use
normal glass cleaner or the Acetone Alcohol Prep Pads.
Use normal glass cleaner
1 Spray the glass cleaner onto the glass platen.
2 With a lint-free cloth or tissue, wipe off the surface until clean and allow the
surface to dry.
3 Use a Microfiber cloth to remove any remaining moisture on the platen until
clean and dry.
Figure 4.1
Cleaning with glass cleaner
Scanners without silicone membrane
4-1
Maintenance
Use the Acetone Alcohol Prep Pad
1 Open the package and remove the Acetone Alcohol Prep Pad.
2 Clean the platen surface with the pad. Allow the surface to dry.
3 Use a Microfiber cloth to remove any remaining moisture on the platen until
clean and dry.
Figure 4.2
Cleaning with Alcohol Prep Pad
Clean the case
The procedure to clean the outside surface of the scanner applies to both the
scanner without silicone membrane and the scanner with silicone membrane.
Warning
Do not pour liquids (water etc.) onto the scanner. Use a damp cloth to clean the outside
surface of the scanner.
To remove smudges, finger prints or other dirt, and grime:
1 Take a damp soft, lint-free cloth.
2 Carefully wipe the case in a direction AWAY from the glass platen and the
silicone membrane.
3 Allow the outside surface to dry before starting the capture process.
Caution
4-2
Do not use acetone, oil-based, abrasive or other unauthorized cleaners. This may damage
the device and render it inoperable. Using unapproved cleaning solutions will void the
warranty.
Patrol ID User Manual V1.0
Maintenance
Patrol ID specifications
Item
Specification
Resolution 500 dpi +/- 1% in X and Y axes
Linearity and Rectilinearity Less than one pixel average
Active image area (W X H) 3.2 in x 3.0 in (81.3 mm x 76.2 mm)
Platen (W X H) 3.2 in x 3.5 in (81.3 mm x 89.0 mm)
Output (Digital) USB 2.0
Power Supplied through the USB 2.0 interface (5V@)500 mA)
Operating temperature range 32 °F to 122 °F (0 °C to +50 °C)
Recommended temperature 64 °F to 100 °F (18 °C to 38 °C)
range
Storage temperature range -4 °F to 149 °F (-20 °C to +65 °C), in the original transport
packaging
Humidity range 10-90% non condensing. Do not operate the scanner if water
drops appear on the scanner case.
Weight 3.2 lbs (1.4 kg)
Dimensions (W x D x H) 6.0 in x 6.0 in x 5.1 in (152,4 x 152,4 x 129,4 mm)
Image quality specifications Delivers more than the requirements of the Electronic
Fingerprint Transmission Specification Version 7, Appendix F
Agency listings CE, WEEE
The USB cable
This section describes the cable dimensions for the USB cable. You find
information to use a special device to prevent accidental cable disconnects. The
standard cable length is 6 ft (1,8 m).
Note
A cable longer than 6 ft (1,8 m) requires an USB 2.0 Hub with power.
Note
Use the approved cable dimensions that appears in the illustration.
Patrol ID specifications
4-3
Maintenance
Figure 4.3
4-4
Cable tie and EMC clamp position
Patrol ID User Manual V1.0
5
Problems and
Corrections
Chapter 0
THIS CHAPTER DESCRIBES COMMON PROBLEMS AND STEPS TO CORRECT THEM.
Before you contact the Cross Match Technical Support department, do the
procedures in this section.
The optical scanner does not operate
The error messages displayed
None
The actions to correct the problem
1 Make sure that the green light in the platen is illuminated.
2 Make sure that the USB cable is connected to the scanner.
3 Make sure that the power is applied to the computer.
4 Make sure that the power is available at the electrical source. Use a lamp to test
the power.
More actions to correct the problem
1 Make sure that the correct software to operate the scanner is installed in the
computer.
More actions to correct the problem
Contact the Technical Support department.
Cannot capture a fingerprint
The error messages displayed:
None
5-1
Problems and Corrections
First actions to correct the problem
1 Check the condition of the fingertip.
2 If the finger is wet, dry the finger.
3 If the finger is dry, put a drop of moisture on the fingertip. Remove the excess
moisture.
More actions to correct the problem
Contact the Technical Support department.
5-2
Patrol ID User Manual V1.0
6
Customer Care and
Contact Information
Chapter 0
THIS CHAPTER CONTAINS TECHNICAL SUPPORT INFORMATION FOR THE PRODUCT AND
CONTACT INFORMATION FOR THE COMPANY.
Technical support
The Technical Support department is available for the Patrol ID.
E-mail
You can get technical support on-line from Cross Match Customer Care during
the warranty period, in the order that the requests are received.
Table 6.1
The Technical Support department addresses
North America and South America
[email protected]
Europe, Africa, Asia, Australia
[email protected]
If the warranty has expired, contact the Customer Care department.
Telephone and facsimile
Contact the Customer Care department at the following telephone numbers:
Table 6.2
The Customer Care department numbers
North America and South America
Europe, Africa, Asia, Australia
Monday- Friday 8 am to 5:30 pm EST
Customer Care
Tel: 1.866.276.7761 (Toll Free)
Tel: 1.561.622.9210 (International)
Fax: 1.561.622.8769
Monday- Friday 8 am to 4 pm CET
Customer Service
Tel: +49 (0)3641 4297-852
Fax: +49 (0)3641 4297-757
Technical support
6-1
Customer Care and Contact Information
Under the warranty, you can use the telephone or facsimile to get technical
support for the Patrol ID under the warranty (see Chapter 7 “Product
Warranty” for Warranty Terms). After the warranty expires, you can get
technical support at a given cost per hour. Contact the Customer Care department.
The Technical Support for the software products and the services purchased from
Cross Match Technologies is not included under the warranty. The Technical
Support for other products is available at a given cost to the customer.
When you contact the Customer Care department, make sure that you can provide
the following information:
• Company name
• Contact person
• The Patrol ID serial number (found on the back of product)
• The configuration of your PC workstation or laptop
• The error messages that appear on the screen
Return and repair of the Patrol ID
You must get an RMA number to return a Patrol ID for repair or replacement.
Contact the Technical Support department an RMA number. Put the RMA number
on the outside of the box and on the label.
Table 6.3
The addresses for product returns
North America and South America
Europe, Africa, Asia, Australia
Cross Match Technologies, Inc.
3960 RCA Boulevard, Suite 6001
Palm Beach Gardens, Florida
33410
USA
RMA: Rnnnn.nnnn
Cross Match Technologies GmbH
Service Department
Unstrutweg 4
07743 Jena
Germany
RMAnnnn
The product is sent to the correct department for service or replacement, then
returned to the customer. Any product sent to Cross Match Technologies without
an RMA number is returned.
Delivery costs
The product is in the warranty period
• The customer accepts all charges to send the product to Cross Match for
service.
• Cross Match accepts all charges to return the product to the customer.
Customers inside the EU
• Cross Match accepts all charges to send the product to Cross Match for
service and to return the product to the customer.
6-2
Patrol ID User Manual V1.0
Customer Care and Contact Information
The product is not in the warranty period
The customer accepts all charges.
Note
You must return a product in the original boxes. If the original boxes are not available,
contact the Customer Care department for instructions.
Contact information
Corporate Headquarters
Cross Match Technologies, Inc.
3950 RCA Boulevard, Suite 5001
Palm Beach Gardens, FL 33410
USA
T: +1 (561) 622-1650
F: +1 (561) 622-9938
T: (866) 725-3926 (Toll Free)
General Mailbox: [email protected]
Sales Department: [email protected]
Technical Support: [email protected]
Corporate Web Page
www.crossmatch.com
Contact information
6-3
Customer Care and Contact Information
6-4
Patrol ID User Manual V1.0
7
Product Warranty
Chapter 0
THIS CHAPTER CONTAINS THE TEXT OF THE PRODUCT WARRANTY.
Limited Warranty
Cross Match Technologies, Inc. and its subsidiaries (“Cross Match”) warrants that
the Cross Match Product (other than customized software) you have purchased
will be free from defects in material and workmanship in normal service and
under normal conditions for a period of one year from the date of shipment.
Normal service and normal conditions are defined in the Product documentation.
This Limited Warranty is subject to the terms and conditions set forth below.
Repair or Replacement
Unless otherwise stated herein, the sole obligation of Cross Match and your
exclusive remedy and recourse under this Limited Warranty is for Cross Match, at
its sole election, to either (i) repair the suspected defective Product and return the
same to you or (ii) replace the suspected defective Product, all on the terms set
forth below. The repair or replacement will provide you with a Product which, in
Cross Match’s opinion, performs consistently with its age and usage.
If you become aware that your Cross Match Product is defective in material or
workmanship in normal service and under normal conditions during its one year
Limited Warranty period, then you must promptly contact Cross Match’s
Customer Care Center, describe the suspected defect in detail and request a Return
Merchandise Authorization (“RMA”) number prior to sending the affected
Product for repair or requesting a replacement product. Please see your product
manual for more information on RMA’s. Unless otherwise specified by law, you
will pay the freight to send the Product to Cross Match’s designated Service
Center. Cross Match will pay the freight to return the repaired Product to you.
Each repaired or replacement Product is warranted (as set forth herein) for the
remaining portion of the original one year Limited Warranty.
THE FOREGOING CONSTITUTES YOUR SOLE AND EXCLUSIVE
REMEDY AND CROSS MATCH’S SOLE AND EXCLUSIVE LIABILITY IN
CONNECTION WITH YOUR CROSS MATCH PRODUCT, AND IS IN LIEU
OF ANY AND ALL OTHER REMEDIES WHICH MAY BE AVAILABLE TO
YOU.
Limited Warranty
7-1
Product Warranty
Limitations
This limited warranty does not cover visits to repair the Cross Match product at
your premises, or the commissioning of the Product on site. This Limited
Warranty is not a warranty, guarantee or promise that your Cross Match Product
will conform to its specification or will not fail. Some defects and failures are not
covered.
Cross Match shall incur no liability under this Limited Warranty and this Limited
Warranty is voidable by Cross Match if in Cross Match’s sole reasonable opinion:
(a) the Product is used other than under normal use and under proper
environmental and/or electrical conditions, as specified in the Product manual; (b)
the Product is not maintained as specified in the Product manual; (c) the Product is
subject to abuse, misuse, neglect, accident, flooding, storm, lightning, power
surges, dirty power, third-party errors or omissions, or acts of God; (d) the Product
is modified or altered (unless expressly authorized in writing by Cross Match); (e)
the Product is installed or used in combination or in assembly with products not
supplied or authorized by Cross Match; (f) there is a failure to follow specific
restrictions or operating instructions; or (g) payment for the Product has not been
timely made.
This Limited Warranty includes software “updates” (a revision or minor change to
a Product intended to correct defects and provided as a change in the then current
release of the Product). Software updates may be made from time to time in Cross
Match’s sole discretion. This Limited Warranty does not cover software
“upgrades” (a revision to a Product that adds new enhancements and functionality
resulting in a new release of the Product) or any software product or interface
customized by Cross Match to meet Purchaser’s specific requirements or
Purchaser furnished equipment or software. Software upgrades may be available
for purchase from time to time at Cross Match’s then current published prices.
This Limited Warranty does not provide additional hardware or computing
platform software or its installation when required by Cross Match software
supplied hereunder. If required, these may be obtained from Cross Match at the
published prices in effect at such time.
The Limited Warranty does not cover nondurable consumable items including, but
not limited to, batteries, paper, silicon pads, cleaning solution, towels, printer
cartridges and cables. Replacement supplies of these items may be ordered by
contacting Cross Match Sales at http://www.crossmatch.com/sales-contacts.php.
This Limited Warranty does not cover third party peripheral equipment (such as
laptops and printers) that are not provided by Cross Match.
Cross Match’s obligations hereunder are contingent upon your providing the
Product serial number as proof-of-purchase, and upon Cross Match’s
determination that the suspected malfunction is actually due to defects in material
or workmanship.
THIS LIMITED WARRANTY IS IN LIEU OF ALL OTHER
WARRANTIES RELATED TO THE CROSS MATCH PRODUCT,
WHETHER EXPRESS, IMPLIED, OR STATUTORY, INCLUDING THE
WARRANTIES OF MERCHANTABILITY AND FITNESS FOR A
PARTICULAR PURPOSE, ALL OF WHICH ARE HEREBY EXPRESSLY
DISCLAIMED BY CROSS MATCH. THIS LIMITED WARRANTY IS
7-2
Patrol ID User Manual V1.0
Product Warranty
NOT TRANSFERABLE OR ASSIGNABLE TO ANY THIRD PARTY AND
SHALL BE FOR THE SOLE AND EXCLUSIVE BENEFIT OF THE
ORIGINAL PURCHASER OF THE CROSS MATCH PRODUCT
COVERED HEREUNDER; ANY ATTEMPTED TRANSFER OR
ASSIGNMENT HEREOF SHALL BE VOID AB INITIO.
Cross Match reserves the right to improve/modify products at any time, at its sole
discretion, as it deems necessary.
Out-of-Warranty Repairs
When warranty coverage for your Cross Match Product lapses, or for repairs or
replacements not covered by Cross Match’s warranty, (i) you will pay for all
repairs at Cross Match’s then-prevailing hourly labor rate (with a one hour
minimum) plus parts and shipping, (ii) you will pay Cross Match’s then-current
price for all replacement Products plus shipping, and (iii) you will pay Cross
Match’s then-prevailing hourly labor rate (with a one hour minimum after the first
15 minutes) for telephone support in 15 minute increments.
To obtain out-of-warranty service, you must obtain an RMA number and send the
affected Product, at your expense, to the designated Cross Match Service Center
for inspection. You will be contacted with an estimated price and time of repair or
replacement after analysis. No repairs or replacements will be made until Cross
Match receives a Purchase Order or credit card number from you. You shall pay
return freight charges, which will be added to the invoice, for the return of the
repaired Product or replacement Product.
In the event you decide not to have a unit repaired or replaced after receiving a
repair estimate, there will be a one hour labor charge at the prevailing hourly rate
for evaluation plus return freight charges.
At your request, Cross Match will, for a premium, ship a refurbished unit to you in
exchange for the failed unit. Cross Match will contact you with a price for the
exchange after receipt of the failed unit. The shipment will be made when Cross
Match receives a Purchase Order or credit card number from you. You will pay
return freight charges, which will be added to the invoice, for the exchange unit.
The original returned Product will become the property of Cross Match and will
not be returned to you. The refurbished unit will retain the remaining warranty
term of the original returned Product.
Limited Warranty
7-3
Product Warranty
7-4
Patrol ID User Manual V1.0
Index
A
active image area (W X H) 4 -3
agency listings 4 -3
B
operating systems 2 -4
Operator 1 -5
optical scanner does not work 5 -1
output (digital)
before you use the Patrol ID 2 -5
C
cable compartment 2 -3
cleaning
clean the case 4 -2
scanners without silicone membrane 4 -1
use normal glass cleaner 4 -1
use the Acetone Alcohol Prep Pad 4 -2
P
packing list 2 -4
Patrol ID
before you use it 2 -5
packing list 2 -4
prompt icons 2 -2
status lights 2 -2
summary 2 -1
top view 2 -2
unpacking 2 -4
company
sales number 6 -3
contact information 6 -3
corporate headquarters 6 -3
corporate headquarters 6 -3
corporate web page 6 -3
D
dimensions (W x D x H) 4 -3
E
e-mail, see contact information
F
FCC statement 1 -2
freight guidelines 6 -2
G
not under warranty 6 -3
under warranty 6 -2
glass cleaner 4 -1
glossary 1 -4
H
hand-hold 2 -3
hardware 2 -4
how this book is organized 1 -2
humidity range 4 -3
I
image quality specifications 4 -3
installation 2 -1 , 2 -4 , 3 -1
L
linearity and rectilinearity 4 -3
N
not under warranty 6 -3
O
Official 1 -5
specifications
output (digital) 4 -3
platen
area (W X H) 4 -3
power 4 -3
Prepare 2 -5
problems
optical scanner does not work 5 -1
unable to capture a fingerprint 5 -1
product label 2 -3
product warranty 7 -1
limited warranty 7 -1
limitations 7 -2
out-of-warranty repairs 7 -3
repair or replacement 7 -1
R
recycling information 1 -3
resolution 4 -3
returns and repair 6 -2
RMA number 6 -2
S
safety instructions 1 -3
specifications
active image area (W X H) 4 -3
agency listings 4 -3
dimensions (W x D x H) 4 -3
humidity range 4 -3
image quality specifications 4 -3
linearity and rectilinearity 4 -3
platen area (W X H) 4 -3
power 4 -3
resolution 4 -3
weight 4 -3
Index-1
standards
caution 1 -2
note 1 -2
warning 1 -2
statement of compliance 1 -3
storage temperature range
specifications
storage temperature range 4 -3
supplies 6 -3
system requirements 2 -4
hardware 2 -4
operating systems 2 -4
T
technical support
e-mail
returns and repair 6 -2
telephone and fax 6 -1
Index-2
terms 1 -4
Official 1 -5
Operator 1 -5
top view 2 -2
U
unable to capture a fingerprint 5 -1
under warranty 6 -2
unpack the Patrol ID 2 -4
USB 1 -5
user 1 -5
W
warranty 7 -1
web page 6 -3
WEEE directive 1 -3
weight 4 -3
Patrol ID User Manual V1.0