1
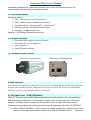
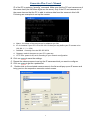
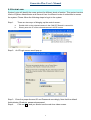
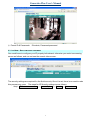
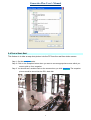
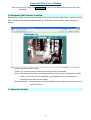
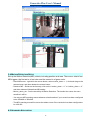
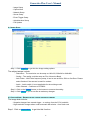
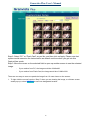
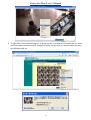
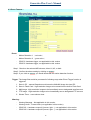
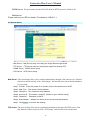
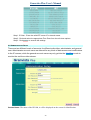
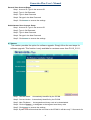
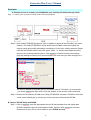
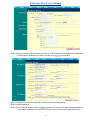
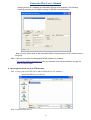
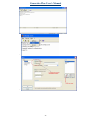
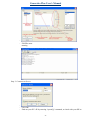
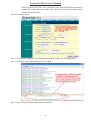
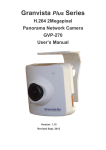
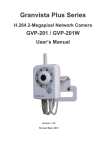
Granvista Plus User’s Manual Plus Video Recorder Camera Order Code: Cam2Mpix Your Best Choice for Meg-Pixel IP Camera Solution Longvast International Co., Ltd. 1 Granvista Plus User’s Manual 1.0 OVERVIEW ..................................................................................................................................3 1.1 Copyright Statement ...................................................................................................3 1.2 Trade Mark ...................................................................................................................3 1.3 Contact Information ....................................................................................................3 1.4 General Description ....................................................................................................3 1.5 System Requirement ..................................................................................................4 1.6 Standard Package .......................................................................................................4 1.8 Hardware System overview .......................................................................................4 2.0 GET STARTED ...............................................................................................................................4 2.1 Software tool - CAM_EZ Search ................................................................................4 2.2 System Login ..............................................................................................................6 2.3 LiveView – Real-time video streaming ......................................................................7 2.4 Take a Snap Shot ........................................................................................................9 3.0 ADVANCED FUNCTION WITH LIVEVIEW ..........................................................................10 3.1 Image Adjustment ....................................................................................................10 3.2 AVI Record Setup ..................................................................................................... 11 3.3 Zoom In display ........................................................................................................ 11 3.4 Motion Detection Setup ...........................................................................................12 4.0 ADVANCED APPLICATION ......................................................................................................12 4.1 Image Setup ..............................................................................................................13 4.2 CaptureView – Review on the logged historical images .......................................13 4.3 Event Trigger – ..........................................................................................................16 4.4 Network Setup ...........................................................................................................17 4.5 Server Setup ..............................................................................................................18 4.6 Administration Setup ................................................................................................20 4.7 Update ........................................................................................................................21 APPENDIX ..........................................................................................................................................23 A. Example of how to connect you IPCAM with your existing PC facility through a hub: .................................................................................................................................23 B. Setup a PPPoE dialup and DDNS: ............................................................................23 C. How to get the most out of its FTP function: ..........................................................25 APPENDIX B. FAQ: ........................................................................................................................29 2 Granvista Plus User’s Manual 1.0 OVERVIEW Granvista Plus is your best low-cost choice for meg-pixel IP camera Solution. It enables you to continuously monitor and record the critical-moment images with 2m-pixel high resolution, and the friendly Internet Explorer user interface helps you retrieving real-time video and stored image data as easy as surfing on the Internet, no matter where you are! 1.1 COPYRIGHT STATEMENT The copy right of this user’s manual belongs to Longvast International Co. Ltd. Any kinds of copy, re-production or translation without prior written permission are strictly prohibited. This user’s manual has been made to help users of Granvista Plus to configure and operate the Granvista Plus video recorder camera more easily only, and it is subject to any possible product upgrades or modifications without further notices. 1.2 TRADE MARK The product names mentioned in this document are for identification purposes only, and these names might belong to other companies, or relate to applicable trade marks or copy rights. 1.3 CONTACT INFORMATION Longvast International Co., Ltd. Address: 10F., No. 65, Sec. 1, Chongde 6th Rd., Beitun District, Taichung City 406, Taiwan, R.O.C. Tel:+886-4-22474001 Fax:+886-4-22474556 Url:www.longvast.com Email: [email protected] 1.4 GENERAL DESCRIPTION Granvista Plus is the best meg-pixel IP Camera solution for the contemporary remote control and surveillance requirements. It can be installed alone without the conventional need of a central processing and data recording facility. The built-in web server facilitates it with easy IE or Netscape data access through LAN or wide band services that the users can quickly get control over the secured area through real-time video streaming and checking on the stored high-resolution images. Granvista Plus has integrated CPU, CMOS/CCD/CCIR Sensor Control, Image Processor, GPU, JPEG CODEC, Ethernet MAC into one single chip that it can reach an ultimate level of 2M pixel at optimal compression size. Granvista Plus has excellent network connectivity that it is compatible with many network protocols such as PPPoE, DHCP, Static IP, DDNS, SMTP, FTP and NTP., etc., in addition to its high performance in SDRAM control and memory read/write functionality. On the top of its 3 Granvista Plus User’s Manual outstanding performance, Granvista Plus will be your most cost-effective solution for constructing a network-based surveillance system. 1.5 SYSTEM REQUIREMENT Computer system: 1. CPU:Intel Pentium 4 ® 2.0GHz pr above 2. RAM:64MB or above ( 256MB recommended) 3. Operation platform:Windows 2000® 或 Windows XP® 4. Navigator software:Microsoft IE 6.0® or above 5. HD space:10MB available / min Network:10/100Mbps Ethernet connectivity 1.6 STANDARD PACKAGE 1. Granvista Plus IP camera ( lens not included) 2. AC 90-260v DC +5V 1A Adapter x 1 3. User’s manual x 1 4. CAM_EZ Search software 1.8 HARDWARE SYSTEM OVERVIEW Rear view of Granvista Plus Side view of Granvista Plus 2.0 GET STARTED Only two types of application software are involved, one is CAM_EZ Search, and the other is Internet Explorer. After the basic network configurations are done with CAM_EZ Search, you will find this IPCAM a very easy, plug-and-play machine to work with. 2.1 SOFTWARE TOOL - CAM_EZ SEARCH CAM_EZ Search is a powerful software application tool dedicated for inter-communication and networking configuration. It will be able to locate all the IP cameras in this local area network, and allow users to modify the IP and station name of each individual camera. Following are procedures for configuring names and IP addresses with CAM_EZ SEARCH. A. Open CAM_EZ SEARCH , click on Update to search on all the IP cameras on the same domain. All the cameras would be listed on the CAM_EZ SEARCH screen. Check the 4 Granvista Plus User’s Manual IP of the PC by entering “ipconfig” command. Make sure that the PC and camera are of the same class (the first three digits are the same). Only if the PC and camera are of the same class so that the PC is able to retrieve data from the camera in this LAN. Following are examples to set up the camera. a. Name:the name of the camera can be whatever you like. b. IP: for instance if your PC’s IP is 192.168.1.2 then you may define your IP camera to be 192.168.1.* ( *= ~254) c. SubMask:normally set to be 255.255.255.0 d. Gateway: make it the same as your PC’s gate way. e. HTTP Port: preset is 80, set it according to your network configuration. B. Click on Submit to save the settings. C. Repeat the above process to set up the IP cameras which you want to configure. D. Click on Update to get the updated list. E. Double-click on the selected camera name in the list would pop up an IE screen and bring you into the respective camera’s control screen. 5 Granvista Plus User’s Manual 2.2 SYSTEM LOGIN System Login will identify the users and set for different levels of entries. This system has two levels of System Administrator and General User for different levels of authorities to access the system. Please follow the following steps to login to the system: Step 1. There are two ways of bringing up the control screen: a. Double-click on the selected camera in the CAM_EZ Search’s camera list. b. Directly enter the IP of the selected camera in the IE screen. Step 2. An IE login screen would pop up Step 3. Enter the proper Account ID and Password accordingly. Note that the default Administrator ID=admin, password=password. Step 4. Click on OK , and you should see the real-time video screen. 6 Granvista Plus User’s Manual ※ Preset ID & Passwords: ID=admin, Password=password 2.3 LIVEVIEW – REAL-TIME VIDEO STREAMING You would have to configure your IE properly beforehand, otherwise you would see warning screen as follows, and can not see the normal video screen. The security settings are required fro the first time only. Once it is set, there is no need to redo this process any more. The steps for IE Security settings are as follows: Step 1. IE’ Tool roll-down screen ---> Internet Option ---> Security ---> Custom Level 7 Granvista Plus User’s Manual Step 2. Click on Custom Level to open the security setup screen, the settings should meet the following. a. Select “Prompt” for “Download unsigned ActiveX controls” option. b. Select “Enable” for “Initialize and script ActiveX controls not marked as safe” option. c. Select “Enable” for “Run ActiveX controls and plug-ins” option. d. Select “Enable” for “Script ActiveX controls marked safe for scripting” option. Note that the above steps are to allow the camera to load the needed components into PC. You may change the settings back to what they were after the normal video stream has shown properly on the screen, which indicates that the download has been completed. 8 Granvista Plus User’s Manual 2.4 TAKE A SNAP SHOT This feature is to take a snap shot picture into the PC from the real-time video screen. Step 1. Get into LiveView mode Step 2. Click on the Snapshot button when you want to see an appropriate screen which you want to pick up for a snapshot Step 3. You should see a sudden flash on the screen when you click Snapshot. The snapshot picture would be stored into the PC’s hard disk 9 Granvista Plus User’s Manual Step 4. And then you may click CaptureView to review the snapshot from retrieving from PC’s hard disk. 3.0 ADVANCED FUNCTION WITH LIVEVIEW Pointing the cursor on the screen and then click on the mouse’s right button, and you should see a small screen with four options pops up. Roll down to pick up the option you like to adjust. - Image: Adjust the screen quality - Record: To record the video stream into AVI files in the PC’s hard disk - Zoom: Click and drag to zoom in on the selected area. This function is particularly usefully when you focus the lens at installation (in this application you should zoom on appropriate area with obvious pattern. - Motion Detec Set:Set the sensitivity of Motion Detection, the smaller the number the more sensitive it will be. 3.1 IMAGE ADJUSTMENT 10 Granvista Plus User’s Manual Adjust the respective sliding bars to fine-tune the video quality. Recommend you to maintain the Smooth setting at zero. Because this practice would impose much load to CPU, and in turn lower down the overall performance. You may want to increase the sharpness so that you would get sharper video quality. 3.2 AVI RECORD SETUP Click the Record option, and then you may set up the frame rate, file name and path to record real-time video stream into AVI file. 3.3 ZOOM IN DISPLAY Click and drag to select the area you want to zoom in after the Zoom option has been selected. You may right-click the mouse, and then click on the Zoom option to de-select this option. This function is extremely helpful when you focus the lens at installation. Zoom in to an area with specific pattern (non-plane surface) would blow up the view and help you quickly get the lens focused. 11 Granvista Plus User’s Manual 3.4 MOTION DETECTION SETUP Set up the Motion Detection(MD) criteria, including position and area. There are a total of two MD triggers, the first set is of red color and the second is of green color. - Reset MD areas:right-click the mouse button, select motion_detec -> 1, click and drag on the selected area, and then release the mouse button. - Deactive MD:Similar as the last step, click on the “motion_detec -> 1” or “motion_detec -> 2” and then release will deactivate MD setting. - Motion_detec_set:Set the sensitivity of Motion Detection. The smaller the value, the more sensitive it will be. - You may set MD’s sensing area at whatever sizes/locations if your screen has been configured to be 640x480 or 320x240. - The MD’s sensing area will be set as the whole screen if the resolution has been configured to be 160x120. 4.0 ADVANCED APPLICATION 12 Granvista Plus User’s Manual - Image Setup - CaptureView - Network Setup - Server Setup - Event Trigger Setup - Administration Setup - FW Update 4.1 IMAGE SETUP Step 1. Click ImageSet to get into the image setting options The subject setups include: - Resolution:The resolution can be setup as 160x120, 320x240 or 640x480. - Quality:The quality could be setup as Fine, Normal or Basic - Anti-Flicker:Anti-Flicke frequency setup, it can be set as 60Hz, 50Hz or Out Door. Please select Outdoor if the camera is used for outdoor. - Audio:Audio switch, it is not applicable for the existing model - Video Channel:Conforms to CCIR656. Step 2. Click on the Submit button on the bottom to execute the setting. Step 3. Click Cancel if you do not like to make any changes. 4.2 CAPTUREVIEW – REVIEW ON THE LOGGED HISTORICAL IMAGES The image data include: - Snapshot Images from manual trigger – to retrieve from the PC’s hard disk - High-resolution Images taken under automatic MD criteria – from flash card Step 1. Click on CaptureView to get into this function. 13 Granvista Plus User’s Manual Step 2. Select “PC” or “Flash Card” as you like, and then click on Apply. Please note that system would memorize the last selection as default next time when you get into this CaptureView mode. Step 3. Move the curser on the selected field to open up another screen to see the selected image. - If you retrieve from PC, the image would be of 640x480. - If you retrieve from Flash Card, the image would be of 1600x1200. There are two ways to save one particular image from 16 ones shown on the screen: 1. To right click the mouse from the “Step 3” when you are viewing the image, a roll down screen would pop up, select SAVE AS to save into designated location. 14 Granvista Plus User’s Manual 2. To right-click on the selected image on 16-image screen, a roll down screen would pop up, select the Email option, and then another “image size option” screen pops up, select the size you want the IPCAM to mail out. 15 Granvista Plus User’s Manual 4.3 EVENT TRIGGER – Event: - Motion Detection 1 (red color) - Motion Detection 2 (green color) - GPIO DI: hardware trigger, not applicable in this version - GPIO DI: hardware trigger, not applicable in this version Step 1. Check on the selected MD scheme, either #1, #2, or both. Step 2. Confirm the above setting by clicking on Submit Step 3. If you click on Default, you would deactivate the motion detection function. Trigger: The image files would be processed in following ways when Event Trigger function is triggered. 1. Save in PC:manual Snapshot would store the 640x480 image into local PC. 2. Save in Flash Card:high-resolution images to be stored into the built-in Flash Card 3. Mail Image:high-resolution images to be immediately sent to designated email account 4. FTP Image:high-resolution images to be immediately sent to designated FTP account 5. Shutter Timer:event shutter timer Warning: - Warning Message:Not applicable in this version - Warning Audio:Preset Audio (not applicable in this version) - GPIO DO 1: hardware output #1 (buzzer, light…), not applicable in this version - GPIO DO 2: hardware output #2 (buzzer, light…), not applicable in this version 16 Granvista Plus User’s Manual 4.4 NETWORK SETUP The network can be configured in several ways, the default IP setting is STATIC. - IP Assignment:the ways to assign IP, including Static, DHCP and PPPoE. - PPPoE: according to your way of net connectivity - Http Server port: default is 80, please consult your network administrator - DNS: please consult your network administrator - WLAN:Wireless station connectivity (not applicable in this version) MAC Address:the MAC Address of this IP camera IP Assignment:For Static IP application, following data need to be entered properly: - IP Address:the address of this IP CAM - Subnet Mask:preset is 255.255.255.0 - Gateway:preset gateway You do not have to enter fixed IP address if you have chosen DHCP. If you are using PPPoE then proper ID and Password need to be entered. PPPoE: Please refer to your ISP for the Account ID and Password setup. Step 1. Enter proper ID in the Account field. Step 2. Enter proper password in the Password field Step 3. Click on Submit for execution. 17 Granvista Plus User’s Manual HTTP Server: The port number for the IPCAM’s built-in HTTP protocol, default is 80. DNS Server: Please refer to your ISP for details. The default is 168.85.1.1. 4.5 SERVER SETUP - Mail Server:Mail Server setup for mailing the image files through emails - FTP Server:FTP Server setup for sending the image files through FTP - DDNS Server:DDNS Server setup - NTP Server:NTP Server setup. Mail Server: The stored image files can be emailed immediately through valid email service. But this function would work only if the “Mail Image” function has been checked and submitted for execution. Step 1. IP/Host:Enter the proper IP or domain name of the email server HOST Step 2. Mail From:The sender’s email address Step 3. Receipt to:The recipient’s email address. Step 4. Account ID:The sender’s email ID. (Similar to your Outlook setup) Step 5. Password: Password of this ID Step 6. Authorization:Whether the email server would need authorization Step 7. Click Submit to execute the settings FTP Server: The stored image files can be transmitted immediately through valid FTP service. But this function would work only if the “FTP Image” function has been checked and 18 Granvista Plus User’s Manual submitted for execution. This function supports both Port and Passive Modes. Step 1. IP/Host:Enter the proper IP or domain name of the FTP server HOST Step 2. Port: The designated FTP port number, default is 21 Step 3. Account ID:The ID for FTP service Step 4. Password: Password of this ID Step 5. Select Port Mode or Pasv Mode Step 6. Click Submit to execute the settings DDNS Server: DDNS(Dynamic Domain Name Server) function copes with dynamic IP setting. Please check with your ISP for details. Step 1. Register a domain name for DDNS service. Step 2. Host Name : Can be IP or domain name Step 3. Account ID:Account ID Step 4. Password:Password Step 5. Status:Automatic indication Step 6. Click Submit to execute the settings NTP Server: NTP(Network Time Protocol) is used for time calibration. What listed below are some existing worldwide servers available. Please execute “ping n.n.n.n” command (for instance “ping 140.109.1.10”) to make sure the selected server is valid and online. If not, change to other server. If your camera is not connecting to the Internet, you would have to enter the IP of your local PC as the NTP server. In this case the camera would synchronize its time with the PC. In case the camera is not connecting to Internet, and the PC’s IP has not been set as NTP server either then its system time would start from the mid night of Jan 1, 2004. 19 Granvista Plus User’s Manual Step 1. IP/Host:Enter the valid NTP server IP or domain name Step 2. Click and select the appropriate Time Zone from the roll-down options. Step 3. Click Submit to execute the settings 4.6 ADMINISTRATION SETUP There are two different levels of accounts for different authorities, administrator and general user. Administrator account users are allowed for any kinds of data access and modifications to the IP camera, while the general account users may only get into the LiveView mode to monitor the real-time video-stream. Camera Name: The name of the IPCAM, it will be displayed on the screen for identification. 20 Granvista Plus User’s Manual General User Account Setup: Step 1. Account ID: Type in the account ID Step 2. Type in Old Password Step 3. Type in New Password Step 4. Re-type in the New Password Step 6. Click Submit to execute the settings Administrator User Account Setup: Step 1. Account ID: Type in the account ID Step 2. Type in Old Password Step 3. Type in New Password Step 4. Re-type in the New Password Step 5. Click Submit to execute the settings 4.7 UPDATE This version provides the option for software upgrade. Simply follow the next steps for software upgrade. This function is only available for versions newer than PV4.0_2.91.1. Step 1. Camera Name: Automatically identified by the IPCAM Step 2. Current Version:Automatically identified by the IPCAM Step 3. New File Name: the targeted new binary code to be downloaded. Step 4. Click on Browse… to designate to the targeted new binary code Step 5. Click Submit to execute the settings Step 6. System now will download the new files to the IPCAM. It will take only 7-10 seconds for 21 Granvista Plus User’s Manual a 100Mbps LAN environment. Step 7. System will make a 50 seconds countdown, and then reset the system itself. Step 8. System will get back to the original Login screen after the reset. Enter the ID and proper password to re-login to the system. Note: Please do not cut the power when step 6 through step 8 are in process. Otherwise it will result in a vital program damage to the IPCAM. 22 Granvista Plus User’s Manual APPENDIX A. Example of how to connect you IPCAM with your existing PC facility through a hub: Step 1. Connect your system according to the following diagram. Step 2. Open CAM_EZ SEARCH software, click on Update to search all the IPCAMs in the same network. The CAM_EZ SEARCH will list all the found IPCAMs. Never mind about the original setups and modify the settings accordingly to fit into your existing network. Please note that the IPCAMs need to be of the same “class”, i.e. the first three digits should be same as your existing network system. Click Submit to execute and save the settings. Once the settings are saved, they would maintain until next time you make changes to it. 2. 1. 3. 4. 5. You are not allowed to duplicate the IP in the same network. Therefore, we recommend you select STATIC and make all IPs of all the stations in the network unique and fixed. Step 3. Double-click on selected IPCAM in the CAM_EZ SEARCH software’s IPCAM list, and then a new screen should pop up to bring you into the access of the selected IPCAM. B. Setup a PPPoE dialup and DDNS: Step 1. Click on Network, enter the appropriate account ID and password into the designated PPPoE’s respective Account and Password fields, and then click Submit for execution. Please refer to your ISP for more details on your PPPoE account. 23 Granvista Plus User’s Manual Step 2. Enter the appropriate Host Name, Account IP and Password into the appropriate fields into the designated DDNS Server fields, and then click Submit for execution.. Step 3. change your network setup back to DHCP for dynamic addressing. Step 4. Setup completed Step 5. Open CAM_EZ Search, click on Update and wait for a second (the time it takes depends on the network condition), and then you should be able to locate the IPCAM with screen 24 Granvista Plus User’s Manual showing that the IP, SubMask and GateWay data are unchangeable. The following screen shows that your IPCAM is working on PPPoE connection basis. Now you may double click on the selected IPCAM, and get access to its IE control screen it brings up. Step 6. Now you may enter the designated DDNS address (for instance http://GranvistaPlus.dnsalias.com/ into your Browser from remote locations, and get full control of this IPCAM. C. How to get the most out of its FTP function: Step 1. Setup your local FTP server (take FileZilla Server for instance) - Install FileZilla Server software Step 2. start FileZilla Server 25 Granvista Plus User’s Manual - - 26 Granvista Plus User’s Manual - FileZilla starts running Step 3: Connnect to Server - Click OK Find out your PC’s IP by entering “ipconfig” command, or check with your ISP to 27 Granvista Plus User’s Manual find out your fixed IP. The LAN’s virtual IP is also good for this FTP application if both the PC and the camera are of the same “class” of network (the first three digits of their IPs are the same). Step 4: Set up the camera Step 5: You should reconfigure your Windows Fire Wall to enable your FTP application. Step 6:Verify that your FileZilla FTP server is working Step 7: Retrieve the transferred image data from local PC 28 Granvista Plus User’s Manual You would find it much easier and faster to retrieve or browse image data from local PC’s hard disk. Besides, with PC’s large disk space you may restore a much longer time of image data. APPENDIX B. FAQ: Q:Why the screen is not showing the proper time. A:Please refer to 3.5 Server Setup It might be because the pre-selected SNTP server is not valid and online. If it is the case, select other valid server instead. If the IPCAM can not have access to Internet, you should put the IP of one selected PC in this network for time calibration. The IPCAM would calibrate at system startup, and then once every hour. In case your IPCAM has assess to Internet, but still can not show the time correctly. Please check whether this SNTP function has been blocked by your network firewall. Q:Why the IP Address can not be changes? A:Please check following items: - If STATIC option is selected. - Whether there exists any duplicated IP address in the same network class. - Whether there exists any duplicated Mac number in the same network class. Q:Why CAM_EZ Search can find the IPCAM, but the IE screen can not be brought up properly through double-clicking the selected IPCAM on CAM_EZ Search? A: It could be due to following reasons: 29 Granvista Plus User’s Manual - The IPCAM IP has not been setup properly. The IPCAM and PC must be of the same network class (IP’s first three digits must be the same) so that you may bring up the IE screen from double-clicking on the selected IPCAM. - The Proxy has not been deactivated. The IE’s ActiveX has not been properly configured. Q:Can we save the image into the SD and send it out through email in parallel? A:Yes we can. Q:What would the IPCAM do if the email can not be sent out successfully? A:If the emails can not be sent out successfully, the IPCAM will terminate this action without retrying it. Q: What would the IPCAM do if the FTP practice can not be performed successfully? A: Likewise, if the FTP practice can not be performed successfully, the IPCAM will terminate this action without retrying it. Therefore, to setup a local FTP server would significantly improve data loss due to slow response from remote FTP server which is either busy or too far away. The actual experiment data show that data loss could go down to even zero if we have a local FTP server setup. 30