1
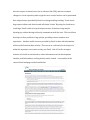
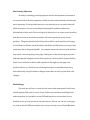
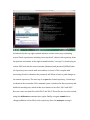
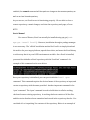
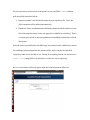
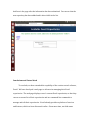
Will Vaughan
Taylor Kimmett
Computer Science 4240
27 April 2014
Milestone 3
Introduction
For our project, we installed and set up our Virtual Machines to support a mostly
unknown version control system, known as Fossil. Installing and setting up Fossil
on our machines was not very difficult because one of the strongest attributes of
Fossil is its ease of use. Because Fossil’s easy nature to get up and running, we
needed to take our project a bit further. We developed a web page to display to the
user an arbitrary number of Fossil repositories, as well as allow them to create new
repositories on the fly from the web page. This will help a user to easily see what
repositories they have access to, as well as provide a link to the built-in web
interface served by Fossil. Before we did this, we had to use the command line to
check on the status and contents of our repositories, which for most users is a
difficult hassle.
Background
In order to better understand the purpose of this project some background
about Fossil is necessary. Although it is relatively unknown, Fossil is a very
streamlined and easy-to-setup version control software not unlike more popular
systems like Git and Mercurial. Being a ‘distributed’ version control system, Fossil
does not require a central server (as in software like SVN), and users commit
changes to a local repository where typical source control actions can be performed.
One unique feature provided by Fossil is its integrated bug tracking. Fossil stores
bug reports within each check-in and calls them ‘tickets.’ By using the check-ins to
track bugs, Fossil is able to keep developers aware of whatever bugs may be
showing up, without having to directly communicate with the user. This can allow a
developer to fix a problem or bug quicker, providing a more seamless user
experience. Another useful resource provided by Fossil is their wiki information,
which can be found on their website. This serves as a reference for developers to
make the experience even easier as they use Fossil. One of Fossil’s strongest
features is its built-in web interface, where information such as development
timeline, wiki information, and bug tickets can be viewed. A screenshot of the
current Fossil webpage can be found below.
Motivations/Objectives
As today’s technology world progresses and the development of software is
not as much left to the big companies, reliable version control software will become
more important. Fossil provides an easy to use and easy to set up option that will
allow developers to focus on actually developing their software and not the
distribution of their work. The overall goal of this project is to create a web interface
that allows access to an arbitrary number of Fossil repositories on the server
machine. The general end result of this project will be a web interface (web page)
served from our Ubuntu virtual machine, which lists and allows access to any Fossil
repository that is designated public. An example interaction with our web interface
may entail a user navigating to the page, clicking one of the listed repository links,
and subsequently being directed to that repository’s web interface as generated by
Fossil. Users will also be able to add repositories through our web page. Our
machine will act as a Fossil server, allowing developers a centralized repository
from which they can pull software changes from others as well as push their own
changes.
Methodology
The tools we will use to create the web server and subsequent Fossil server
include Apache, PHP, and of course Fossil. Before we could start installing Fossil
and setting it up, we needed to set up PHP and Apache on our machine, for our
machine to act as local servers for our repositories. Below, you can see a test page
we used to check if PHP and Apache were set up correctly on our Virtual Machines.
As you can see, a simple PHP page is used to display the date and time that the page
is called. By doing this, we can assure that our Virtual Machines are ready and able
to install and setup Fossil and the subsequent server. Our next step was to make
sure we could serve and interact with Fossil repositories over HTTP. This
screenshot demonstrates our successful setup of serving Fossil repositories over
HTTP using Apache.
As indicated by the top right terminal window, we have a directory containing
several Fossil repositories, including ‘new-repo.fossil’, which is the repository from
the previous screenshot. In the right terminal window, ‘test-repo’ is cloned using its
remote URL. Note that the same username (tkimmet) and password (848b00) that
the repository was created with are used here to clone it. This, coupled with
instructing Fossil to remember the password, will allow us later to push changes to
the remote repository. The next step is to open the cloned repository, ‘cloned.repo’
as shown in the screenshot. This command opens a checkout for that repository and
builds the working tree, which in this case consists of two files: ‘file1’ and ‘file2’.
Now we create two new files called ‘file3’ and ‘file4’. These files are set to be tracked
using the addremove command once again. Finally, we again commit these
changes (addition of two files) to the repository. Since the autosync setting is
enabled, the commit command will also push our changes to the remote repository as
well as our local cloned repository.
As you can see, our Fossil server is functioning properly. We are able to clone a
remote repository, commit changes, and view the repository web page, all over
HTTP.
User’s Manual
For users of Ubuntu, Fossil can actually be installed using apt-get (sudo
apt-get install fossil). However, installation through a package manager
is not necessary. The ‘official’ installation method for Fossil is to simply download
the archive for your target platform, unpack the archive, and move the Fossil binary
to a directory that is in your PATH environment variable. Once Fossil is installed,
you must first initialize a Fossil repository with the ‘fossil init’ command. An
example of this command can be seen below.
Once your repository is initialized, you can open it with the fossil open
command. This command requires the desired name of the repository as input, and
creates a repository with the name provided. Another important command is the
‘open’ command. The ‘open’ command is used to build what is called a working
checkout from an existing repository. A working checkout consists of all the files
and directories that have been committed and stored in the repository thus far. You
can think of it as ‘unpacking’ the contents of the repository. Below is an example of
the fossil open command.
As you can see from the screenshot, Fossil provides some statistics about your
repository upon the ‘open’ call. The information provided by open is just some
general information like repository name, comments, and configuration. In addition
to this information, Fossil will also normally display all the files and directories,
which are built upon calling ‘open’, but in this case there is nothing in the repository
yet. More information about the repositories can be found by using the fossil
status command. Now that you have fossil set up and a repository created, you
can begin adding files to your repository. For our project, we simply created some
example files to show how Fossil works. In reality Fossil would be used for software
version control and not simple files like we use in our examples, however, the
concept is the same. The first step in adding files and changes to a repository is to
tell Fossil that your files need to be tracked. The simplest way to make Fossil start
tracking any untracked files in your checkout is by using the ‘addremove’. The ‘add’
part of this command obviously adds untracked files to the working checkout, but
the ‘remove’ part less obviously removes any files that were previously being
tracked, but are now considered ‘missing’ by Fossil (i.e. they no longer exist in the
file system). This is probably the easiest way to handle updating the files to your
repository. Fossil also provides other options such as ‘add’ and ‘remove’ that let you
do each of these functions on the repository separately. Despite adding your files to
the working checkout so Fossil can track changes in them, you still have not saved
any changes to the repository. To do this you must use the ‘commit’ command.
Running fossil commit will store all of your changes in the repository, creating
a new ‘version’ of the code, or whatever your project happens to be. Below you can
see a commit in action. You can see that two files are created, and then they are
added to the working checkout using ‘addremove’. Finally they are stored in the
repository using ‘commit’:
Analysis/Results
As an exercise in extending the basic functionality provided by Fossil, we created a
simple web portal where users can view a list of links to all of the repositories
residing on the server (that are web-facing, that is), as well as create a new
repository right from the web page. The portal is a single PHP page, which examines
the directory where all web-facing Fossil repositories are located, and creates a link
to each one using the filename. The link simply directs the user to the page actually
served by Fossil. From there they can perform any other administrative tasks or
status checks that are necessary.
For the repository creation part of the portal, we use an HTML <form> element
with two fields described below:
1. Repository name - this will be the name of your repository file. Note: the
.fossil extension will be added automatically.
2. Password - this is an administrator-defined password, which resides in a text
file in the same directory as the web page (not readable by outsiders). This is
a security precaution to prevent spammers from adding repositories to flood
the system
Once the form is posted back to the PHP page, we perform some validation to ensure
the challenge password matches the password file, and to ensure the specified
repository name is not already in use. Finally, if everything checks out, we execute a
fossil init using PHP’s exec function to create the user’s repository.
Here is a screenshot of the web portal with the form information filled out:
And here is the page after the information has been submitted. You can see that the
new repository has been added and is also visible in the list:
Conclusions and Future Work
To conclude, we have extended the capability of the version control software,
Fossil. We have developed a web page to aid users in managing their Fossil
repositories. The web page displays a user’s current Fossil repositories, so that they
can see a current list of their repositories and use command line commands to
manage and edit their repositories. Fossil already provides a plethora of services
and features, which we have discussed earlier. Given more time, we think some
more work could be done to add even more to our Fossil web portal. One feature
we think would be compelling is the ability to specify initialization parameters such
as admin user, and default password straight from the portal. A weakness in our
current setup is that the portal is running over HTTP without SSL. This decision was
made simply for testing purposes. If this were going to be available over the
Internet, we would definitely want to secure it with SSL to prevent security leaks
with the password. The HTTPS work is mainly with the apache web server,
however, and we simply did not do it because we just wanted to test the concept.