1
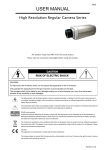
308Z
USER MANUAL
Regular Camera Series
The product image may differ from the actual product.
Please read the instructions thoroughly before using the product.
CAUTION
RISK OF ELECTRIC SHOCK
CAUTION:
To reduce the risk of electric shock, do not expose this apparatus to rain or moisture.
Only operate this apparatus from the type of power source indicated on the label.
The company shall not be liable for any damages arising out of any improper use, even if we have been
advised of the possibility of such damages.
The lightning flash with arrowhead symbol, within an equilateral triangle, is intended to alert the
user to the presence of uninsulated “dangerous voltage” within the product’s enclosure that may be
of sufficient magnitude to constitute a risk of electric shock to persons.
This exclamation point within an equilateral triangle is intended to alert the user to the presence of
important operating and maintenance (servicing) instructions in the literature accompanying the
appliance.
ROHS Announcement
All lead-free products offered by the company comply with the requirements of the European law
on the Restriction of Hazardous Substances (RoHS) directive, which means our manufacture
processes and products are strictly “lead-free” and without the hazardous substances cited in the
directive.
The crossed-out wheeled bin mark symbolizes that within the European Union the product must be
collected seperately at the product end-of-life. This applies to your product and any peripherals
marked with this symbol. Do not dispose of these products as unsorted municipal waste.
CE Mark
This apparatus is manufactured to comply with the radio interference.
The company does not warrant that this manual will be uninterrupted or error-free. We reserve the
right to revise or remove any content in this manual at any time.
KPC131D_135D_V1.0
OVERVIEW
Equipped with a 1/3” Color CCD image sensor, this regular camera possesses
satisfactory minimum illumination to provide clear and sharp images and has a
microphone built-in to consolidate the quality of your surveillance system.
FEATURES
1. High quality picture
2. Satisfactory minimum illumination of 0.05 Lux/F2.0
3. Audio function supported
4. Auto Electronic Shutter built-in
5. Signal-to-noise ration of 48dB
SPECIFICATIONS*
MODEL
Model 1
Model 2
Pick up Element
1/3" Color CCD image sensor
Number of Pixel
512(H) x 492(V) <NTSC> / 512(H) x 582(V) <PAL>
Standard
Resolution
0.05 Lux / F2.0
Min. Illumination
More than 48dB (AGC off)
S/N Ratio
1/60 (1/50) to 1/100,000 sec.
Electronic Shutter
CS mount
Lens Mount
D.D./ V.D./ AES
IRIS Mode
AGC
Auto
White Balance
ATW
Video Output
1.0 Vp-p composite, 75Ω
Microphone
YES
Power Source (±10%)
DC12V
Current Consumption (±10%)
Dimensions (mm)**
* The specifications are subject to change without notice.
** Dimensional Tolerance: ± 5mm
PACKAGE CONTENT
‧ Camera x 1
‧ User manual x 1
‧ Wrench x 1
AC230V
80mA
108(L) x 62(W) x 50(H)
AC24V / DC12V
MAJOR OPERATING CONTROL AND FUNCTIONS
VIDEO
AUDIO
V.D .
D.D.
AES
AI
1
3
2
4
LEVEL
L
H
PL
12V DC
AU TO IRI S
DC12V
VIDEO
AUDIO
V.D.
D.D.
AES
AI
1
AC 230V
AC230V
D.D.
AES
AI
L
2
4
1
3
2
4
LEVEL
AC 24V
DC 12V
H
PL
AUDIO
V.D.
3
LEVEL
L
VIDEO
H
PL
AU T O IRI S
AU T O IRI S
AC24V / DC12V
1. Flange Back Adjusting Ring
It is suitable for CS-mount lens. When using C-mount lens, please use the CS-C conversion ring*.
2. Back Focal Lock Hexagonal Bolt
The camera is set at the standard back focal position. Fine-tuning is inevitable according to the lens types.
Adjust the lens back-focus by turning the focusing knob.
3. Auto Iris Lens Connector
Supplies power and controls signals to an Auto Iris Lens.
Connect to the auto iris lens cable with the supplied iris connector (4-pin male connector).
4. DC Drive Level adjustment V.R.
When using Direct Drive Lens, you can adjust the DC Drive Level for the bright of video output.
5. Power LED Indicator
The Power LED Indicator indicates normal status during operation.
6. Power Input Terminal !
For connecting to DC12V regulated power supply.
For connecting to the regulated AC230V power supply.
For connecting to DC12V / AC24V regulated power supply.
: For connecting with the ground (earth) of power supply cable.
*
7. Video Output Connector (VIDEO OUT)
For connecting to CCTV monitor video input with coaxial cable.
8. Function Select
AES (Automatic Electronic Shutter) / AI (Auto Iris Lens) selectable:
AES – When using a manual iris lens or fixed iris lens, set this switch to AES.
AI – When using an auto iris lens, set this switch to AI.
9. V.D. / D.D. selectable
When using Auto Iris Lens, select Video Drive or Direct Drive depend on the type of lens you used.
10. Audio Output Connector (AUDIO OUT)
Connect to the AUDIO IN connector of the recording device.
* The CS-C conversion ring is not supplied in the sales package and needs to be purchased separately.
INSTALLATION
***The following installation is better accomplished by qualified service personnel or system installer.***
1. Mount a lens onto the camera (By turning it clockwise).
It is suitable for CS-mount lens.
But if the lens you chose is C-mount, please use the CS-C conversion ring* to connect the C-mount lens
and the camera.
2. Switch the lens selection depending on the lens you used.
* Manual iris lens or fixed lens:
AES: When using manual iris lens or fixed iris lens, set switch to AES.
* Auto iris lens:
AI: When using auto iris lens, set switch to AI.
V.D. / D.D.: When using Auto Iris Lens, select VD or DD depend on the type of lens you used.
3.
4.
5.
6.
Connect the camera VIDEO output and the monitor video input with a 75Ω coaxial cable.
Connect the camera AUDIO output and the monitor audio input with a coaxial cable.
Connect the POWER terminal of the camera to a right power supply.
Adjust the focus or flange-back (Please refer to NOTE for adjustment instructions).
NOTE: Focus or Flange-Back Ring Adjustment
1. Mount the lens
by turning it clockwise on the lens mount of the camera.
2. Loosen the screws on the flange-back adjusting ring.
3. Turn the flange-back adjusting ring to the desired position.
4. Tighten the screws on the flange-back adjusting ring.
PRECAUTIONS
Do not install the camera in an environment where the humidity or temperature is high
Do not install the camera under the unstable lighting condition
Do not expose the camera to rain or moisture
Do not keep the camera face to strong light directly
Do not touch the front glass of the camera
Do not use other than specified power source
Do not disassemble the camera
* The CS-C conversion ring is not supplied in the sales package and needs to be purchased separately.