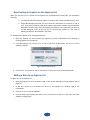
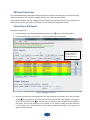
1
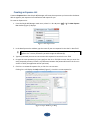
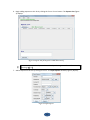
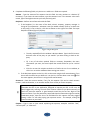
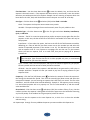
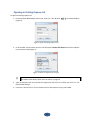
Simple Bill Manager™ USER GUIDE Credits Program Design: Reginald Jenkins GUI Layout: Reginald Jenkins, Ariel Vargas Programming: Reginald Jenkins, Ariel Vargas, Mohamed Bouaziz Installer and Security: Ariel Vargas Program Help Files: Reginald Jenkins, Catherine Jenkins User Manual: William Hough Internal Testing: Mohamed Bouaziz Beta Testing: William Hough, Lisa Jenkins, Adam Allbright Box and CD Design: Reginald Jenkins Legal Notice and Notice of Copyright The contents of this Simple Bill Manager User Guide (the “Manual”), ©2010 Concise Applications, and any officially-issued corrections, updates and/or the content of later editions are the exclusive property of Concise Applications (including any subsidiary or other affiliate, the “Company”). All copyrights, data (including any manual entries and/or notes), and other intellectual property contained in this Manual are the sole property of the Company. This Manual, including any Companydirected and manually entered contents, cannot be used and/or reproduced, in whole or in part, without the express prior and written agreement of the Company. This Manual is to be used only by you, the license holder, in conjunction with the Simple Bill Manager™ application/software licensed to you solely by Concise Applications. By reading this Legal Notice and Notice of Copyright and/or by using the content in this Manual and/or the software for which it accompanies, you acknowledge that the Manual cannot be distributed, reproduced, scanned, and/or stored via any electronic medium without the express prior consent of Concise Applications. Concise Applications vigorously enforces its contractual and intellectual property rights. Edition Notice This Simple Bill Manager User Guide (the “Manual”), is the first edition issue of its title anywhere. Any other editions claiming to issue prior to the date contained in this notice are not official editions associated with the Manual or Concise Applications in any way. If you obtained a copy of the Manual without a cover, it is possible that the copy in your possession is stolen property. This Manual ©August 2010 Concise Applications. 2 Table of Contents Simple Bill Manager™.............................................................................................................................1 Credits....................................................................................................................................................2 Legal Notice and Notice of Copyright......................................................................................................2 Edition Notice.........................................................................................................................................2 Table of Contents...................................................................................................................................3 Table of Figures......................................................................................................................................4 Introduction...........................................................................................................................................5 How to Read and Use this Guide............................................................................................................5 Help with Simple Bill Manager...............................................................................................................5 Installing Simple Bill Manager................................................................................................................7 Quick Start.............................................................................................................................................7 Creating an Expense List.......................................................................................................................10 Opening an Existing Expense List..........................................................................................................14 Editing an Expense within an Existing Expense List...............................................................................15 Deactivating an Expense on the Expense List........................................................................................17 Adding a Note to an Expense List..........................................................................................................17 Bill Report Overview.............................................................................................................................18 Generating a Bill Report.......................................................................................................................18 Saving a Bill Report as a File.................................................................................................................19 Index....................................................................................................................................................21 2 Table of Figures Figure 1: New Expense List...................................................................................................................10 Figure 2: Simple Bill Manager Help.......................................................................................................10 Figure 3: Expense List (No Expenses or Bills Entered Yet).....................................................................11 Figure 4: Input Expense........................................................................................................................11 Figure 5: Input Recipient.......................................................................................................................12 Figure 6: Open an Existing Expense List................................................................................................14 Figure 7: Choose an Expense List to Open.............................................................................................14 Figure 8: Existing Expense List..............................................................................................................15 Figure 9: Edit Expense Window............................................................................................................16 Figure 10: Deactivate Expense..............................................................................................................17 Figure 11: Bill Report Window..............................................................................................................18 4 Introduction Thank you for purchasing Simple Bill Manager. We’ve written this user guide in order to make your experience with your new software as smooth as possible. If you don’t have time to go over the entire user guide, simply turn to page 7 and follow the steps listed in Quick Start. You’ll be mastering your finances in no time! Simple Bill Manager was created with you, the consumer who wants to take (or take back) control of their finances, in mind. While using this software, we hope it will fulfill every personal financial purpose that encouraged you to purchase it. If it does not, we have made it easy for you to find out how it can – see the Help with Simple Bill Manager section below. This program and user guide were written through the cooperation and hard work of many people, all on the same mission – to create an application that eliminates the headache of monthly finances. We ask only that you please not make unauthorized copies of the software nor distribute it. If you find, however, that Simple Bill Manager has made your life a little easier, we would be most grateful if you recommended it to your family and friends and perhaps help to ease the financial tension in their lives as well. How to Read and Use this Guide While we have made every effort to keep these instructions clear and to the point, we have also made minor use of graphics and symbols to better communicate the functions of Simple Bill Manager. The most common use of these graphics and symbols appears in the step-by-step instructions for accomplishing routine tasks. For example, to open an existing file, we state the following in this guide: Select FILE > OPEN or press ALT + O. What “Select FILE > OPEN” means is to click on the FILE menu heading in the upper left part of the software screen, then click the word OPEN underneath the FILE menu; we use the symbol “>” to indicate a sequence. Notice also that we highlight actual commands and fields found in the application menu or on the various screens using SMALL CAPS. What “press ALT + O” means is to hold down the ALT key (either one) and press the O key, then release. Note too that we highlight the actual keys you should press using gray shading. We also frequently use the word “or” because there are often two different methods presented for accomplishing the same task; in this example, we give you two different methods for opening a file; you may use whatever method best suits you. Help with Simple Bill Manager While using this application, always keep in mind that there are several different methods at your disposal for getting help in case you run into problems. For instance, this user guide alone was written to walk you through every aspect of the application using clear and practical language. In addition, the guide features a very handy table of contents as well as a thorough index. 22 Don’t have time to consult the guide? Anywhere in the application, press F1 to bring up the HELP window. There, you will find quick shortcuts for accessing various views and reports, as well as a comprehensive help topic list. Finally, if you feel like you’ve tried everything possible to solve your problem, or you’re about to throw this guide at your computer monitor in frustration, we also offer two methods for contacting Concise Applications, the producers of Simple Bill Manager, directly: Via E-mail: [email protected] Via Telephone: (512) 782-8878 – Monday through Friday, 8AM to 5PM U.S. Central Time Via Regular Mail: Concise Applications Attn: Customer Support PO Box 500069 Austin, Texas 78750 22 Installing Simple Bill Manager Simple Bill Manager requires Java JDK 1.5 (or higher) or Java JRE 5.0 (or higher) in order to run properly. If your operating system has neither of these platforms installed, the installation program will guide you through downloading one or the other to your PC. To install Simple Bill Manager: 1. Insert the Simple Bill Manager CD into your CD-ROM or DVD-ROM drive and close the door. 2. If the AutoPlay feature is enabled in your operating system, a window will display; if it does not, follow these steps: a. Open Windows Explorer. b. Navigate to the CD-ROM drive. c. Right-click on the drive letter representing your CD-ROM drive and select OPEN. d. Look for the file named SetupSimpleBillManager.exe and double-click the file to run it. If your operating system is either Windows Vista or Windows 7, we recommend that you run the above file by right-clicking on the file name, and selecting the option Run as Administrator. 3. Upon running the SetupSimpleBillManager.exe file, follow the installation instructions. Quick Start Want to get started using Simple Bill Manager right away? Just follow these steps: 1. From the Simple Bill Manager main menu, select FILE > NEW or press ALT + N. 2. In the New Expense List window, type the name of your new expense list into the FILE NAME field. 3. Type the password you want to use to access this expense list into the PASSWORD field. 4. Re-type the same password you just typed into the RETYPE field (this ensures that you enter the exact password you want; if there is any difference between the passwords listed in the PASSWORD and RETYPE fields, the application will let you know). 5. Click CREATE to create this expense list, or click CANCEL to start over. Clicking CREATE will display the Help window, since this is a new expense list. 6. Begin adding expenses to this list by clicking the EXPENSE EXPLORER button. The Expense List displays. 7. Add an expense to this list by clicking ADD EXPENSE. The Input Expense window displays. 8. At the very least, you must complete the AMOUNT and RECIPIENTS fields. a. In the AMOUNT field, type the exact or approximate amount due each month. You may use a decimal point to two places, but do not include the dollar sign ($). If the amount due is different each month, type the highest amount you expect to be charged based on past bills. 22 You can flag this expense as Variable only at the time of creation. It cannot be undone after creation. b. In the RECIPIENT field, click Add to add a new recipient (since this is a new expense). The Input Recipient window displays. i. At minimum, you only have to type a name into the BUSINESS NAME field; this is the name of the company or other business or person to whom you would normally send the payment. ii. You can and in fact are encouraged to fill out as many of the remaining fields in the Input Recipient window as apply to this particular bill, as it will make life easier for you down the road. iii. When you have completed as much of the Input Recipient window as you deem necessary, click SAVE to save this recipient to the expense. 9. You are encouraged to complete as many of the remaining fields in the Input Expense window as you can, but they are not required. Just remember that the more information you add now, the less headache for you later on! For now, you should at least complete the ACCOUNT # field (if the bill has an account number associated with it). When you are finished, click SAVE in the Input Expense window. Note: If you are inputting information concerning a credit card bill and have security concerns, remember that this is your application, designed to improve your life. In this case, we would suggest only entering as much of the account number as you deem necessary to recall this particular expense. A good example would be the last four digits of the account number. If you are particularly nervous that the information might be read by unwelcome parties, leave the ACCOUNT # field blank for this expense. 10. Repeat steps 7 to 9 for each expense you want to add to this expense list. 11. Select VIEW > BILL REPORT or press ALT + B to access the Bill Report window. 12. Generate your first bill report by doing the following: a. To the right of the CREATE REPORT button is a drop-down menu arrow to select either TEXT or HTML. For now, we’ll select TEXT. b. To the right of the drop-down arrow is a field marked REPORT NAME. Type a short name for this report into this field. c. Click CREATE REPORT. You will find text-generated reports in your Windows directory, in a folder named C:\SimpleBillManager\Reports. This folder was created when you installed Simple Bill Manager. In some versions of the application, the folder will only be created upon generating your first report. i. Open this file using Microsoft Windows program WordPad. You can use NotePad if you wish, but the report will not display properly. ii. (optional) In the WordPad program, print the report by selecting FILE > PRINT or pressing CTRL + P. 22 There’s more – much more – to Simple Bill Manager, but now you know the basics of getting started. To add more to your knowledge of the application, keep on reading! 22 Creating an Expense List Create an Expense List so that Simple Bill Manager will know what expenses you have and to be better able to organize your expenses into notifications and reports for you. To create an Expense List: 1. From the Simple Bill Manager main menu, select FILE > NEW or press ALT + N. The New Expense List window (Figure 1) displays. Figure 1: New Expense List 2. In the New Expense List window, type the name of your new expense list into the FILE NAME field. Only letters, numbers, spaces, and the underscore may be used when naming a new Expense List. Use any characters you wish to type the Password(s). 3. Type the password you want to use to access this expense list into the PASSWORD field. 4. Re-type the same password you just typed into the RETYPE field (this ensures that you enter the exact password you want; if there is any difference between the passwords listed in the PASSWORD and RETYPE fields, the application will let you know). 5. Click CREATE to create this expense list, or click CANCEL to start over. Clicking CREATE will display the Help window (Figure 2), since this is a new expense list. Figure 2: Simple Bill Manager Help 22 6. Begin adding expenses to this list by clicking the EXPENSE EXPLORER button. The Expense List (Figure 3) displays. Figure 3: Expense List (No Expenses or Bills Entered Yet) You can also access the Expense List window by selecting VIEW > EXPENSE EXPLORER or by pressing ALT + E. 7. Add an expense to this list by clicking ADD EXPENSE. The Input Expense window (Figure 4) displays. Figure 4: Input Expense 22 8. Complete the following fields; only the AMOUNT and RECIPIENTS fields are required. Amount – Type the amount of the expense into this field. Use only numbers or a decimal (if necessary). If you know the exact amount, type that amount here. If the amount varies each month, type in the highest amount you have previously paid. Recipients – Perform one of two tasks with this field: a. If the Recipient (i.e. the name of the bank, electric company, property manager in charge of your apartment – whatever name you would normally write on a check sent to this party) is not on the list, click the ADD button to the right of this field. The Input Recipient window (Figure 5) displays. Figure 5: Input Recipient • The only required field in this window is Business Name. Type in the full name or business name of the party as you would if you were writing a check to this party. • Fill in any of the other optional fields as necessary. Remember, the more information you enter, the more helpful the record will be for you at a critical time. • Click SAVE to save this recipient to the RECIPIENT field in the INPUT EXPENSE window, or click CANCEL to exit the window without saving your entries. b. If the Recipient appears on the list, click on the name using the left mouse button. If you do not see the name but you believe it is on the list, click the down arrow icon until the name appears, then click on it using the left mouse button. Account # – Enter the account number, if any, for this expense. This can be a bank account number, credit card number, or an account number from a utility or finance company. If you are entering information concerning a credit card bill and have security concerns, remember that this is your application, designed to improve your life. In this case, we would suggest only entering as much of the account number as you deem necessary to recall this particular expense. A good example would be the last four digits of the account number. If you are particularly concerned that the information might be read by unwelcome parties, leave the ACCOUNT # field blank for this expense. We only suggest putting it here if it will make paying your expenses easier – for example, writing the account number on your check. Purpose – Type in two or three words explaining the expense; examples could be “rent”, “electricity bill”, or “VISA card”. 22 First Due Date – Use the three down-arrows to enter the Month, Day, and Year that this expense is due each month. If the expense due date varies by each month, enter the earliest date that you could expect the bill to be due. Example: You are entering an expense which has been due on the 17th, 19th, and 22nd of the month in the past. You enter 17 as the day. Cost Type – Click the down arrow and select (click) either Fixed or Variable. Fixed – The expense is always the same amount every month. Variable – The expense changes from month to month, even if by only a dollar or less. Duration Type – Click the down arrow Cycle, or Old Debt. to the far right and select Onetime, Installments, Onetime – The bill is a one-time payment that you do not expect to pay again after the first payment. In this case, the box to the left of this field is inaccessible since there will only be one payment. Installments – If you select this option, the box to the left of this field becomes accessible, defaulting to a value of 12. Click the down arrow next to this number box and select the number of expected payments (if the number is not 12). This Duration Type is best used with an expense such as a car payment or mortgage. You can also use it in the instance where you have an expense, such as a credit card, that you are paying off in planned installments. Installments is the only Duration Type that allows access to the number box. All the other Duration Types assume that the bill is either payable only once, or continuously until paid off or you cancel the account. Cycle – The bill is not a one-time payment, and has no set number of payments; you pay this bill every month until the account is either paid off or canceled. Old Debt – Use this option if this expense is old debt that is not governed by a bill cycle; an example would be a hospital bill that you intend to pay but at varying amounts as your expenses allow. Frequency – Click the first (left) down arrow and select the amount of times this expense is due during the selected time period. Then click the second (right) down arrow and select the time period. Example: you are entering an expense that is due once per month. The first value would be 1, and the second value would be Month(s). Example 2: The expense you are entering is a semi-annual payment such as a property tax. The first value would be 2, and the second value would be Year. Grace Period – Click the down arrow and select (click) the number of days, if any, that the creditor to whom the expense is being paid will allow the payment to be late before assessing any kind of penalty. If the creditor has no grace period, select the value 0. 9. Click SAVE to save the expense to the new Expense List, or click CANCEL to close the window without saving. 10. Repeat steps through for every additional expense you want to add to this Expense List. 22 Opening an Existing Expense List To open an existing Expense List: 1. From the Simple Bill Manager main menu, select FILE > OPEN or press ALT + O. A window displays (Figure 6). Figure 6: Open an Existing Expense List 2. In the window, click the down arrow in the field named Choose File Name and click the Expense List you want to load (Figure 7). Figure 7: Choose an Expense List to Open You can create a brand new Expense List from the above window simply by clicking the NEW button. Afterwards, follow the instructions on page 10. 3. Type the password you use to access this expense list into the PASSWORD field, then click LOAD. The Help window displays. 4. From here, click the EXPENSE EXPLORER button to access the Expense List you just loaded. 22 Editing an Expense within an Existing Expense List To edit (change) an expense within an existing Expense List: 1. Open the Expense List that contains the expense you want to edit (see Opening an Existing Expense List on page 14). 2. From the Expense List, click EDIT on the bill you wish to change. You can also click VIEW to see the same information as you would if you clicked EDIT, except you are not able to change expense information in VIEW mode. Figure 8: Existing Expense List 3. In the EDIT EXPENSE window (Figure 9 on page 16), note that you can only change the ACCOUNT NUMBER and the PURPOSE information. To change any other information about this bill, you’ll need to DEACTIVATE the expense in the EXPENSE LIST (see Figure 8 on page 17), then re-enter the bill as a new expense (see step on page 11). 22 Figure 9: Edit Expense Window 4. Once you have changed the information you want to change, click SAVE to save your changes, or click CANCEL to cancel your changes. 22 Deactivating an Expense on the Expense List When you use the DEACTIVATE feature on the Expense List to deactivate an existing bill, you accomplish two tasks: a. You keep the bill off of all future reports, so that you will not be reminded to pay it, and b. Simple Bill Manager will allow you to re-enter the information as a new bill, if you so wish. If you have previously entered an expense and made a mistake, one of Simple Bill Manager’s features keeps you from deleting the expense in the event that you want to call the data back, which is why the DEACTIVATE feature was created. It is the same as deleting an expense, but the data is still there. To deactivate an expense on an existing Expense List: 1. Open the Expense List that contains the expense you want to deactivate (see Opening an Existing Expense List on page 14). 2. From the Expense List, click DEACTIVATE on the bill you wish to deactivate. The DEACTIVATE EXPENSE window () displays. Figure 10: Deactivate Expense 3. Click the DEACTIVATE button to confirm this action, or click CANCEL to cancel the deactivation. Adding a Note to an Expense List To add a note to an Expense List: 1. Open the Expense List that you want to add a note to (see Opening an Existing Expense List on page 14). 2. In the NOTE section at the bottom left corner of the Expense List window, type in the information. 3. Click UPDATE NOTE to save the addition. 4. You can always type anything into the NOTE box; just be sure to click UPDATE NOTE each time after adding or changing text. 22 Bill Report Overview Use Simple Bill Manager’s Bill Report feature to generate a single report detailing all unpaid, upcoming, and future expenses. You can omit or add bill detail to a bill report using this feature. The Bill Report window also has a Budget Analyzer feature at the bottom portion of the window that allows you to compare your future net income with your future bills using search criteria. Generating a Bill Report To generate a bill report: 1. From anywhere in the Simple Bill Manager program, press F1 to access the Help window. 2. From the Help window, click BILL REPORT. A report window (Figure 11) displays. Note that the PAY feature is disabled for bills that you have already paid (in gray). Figure 11: Bill Report Window 3. Select the range of time covering the bills you want to display in the report. First, click the down arrows for and select the FROM date (bills from this date forward will display in the report). Next, click the down arrows for and select the TO date (bills after this date will not display in the report). You can also check the FIRST BILL and/or LAST BILL boxes to select the first and last bills in your Expense List. These bills and any other bills in between will display in the report, and ignore the dates entered. 22 4. If you do want certain bills to appear in the report, click the appropriate box as explained below. You may check more than one box, but you are not required to check any. Paid – If this box is checked, bills you have designated as paid will not display in the report. The PAID box is automatically checked by default when you first access the report window from the Help window. If you want to see bills you have paid previously in the report, uncheck (click) this box prior to generating the report. Past Due – If this box is checked, unpaid bills dated before today’s date will not display on the report. Old Debt – If this box is checked, bills (paid or unpaid) that you have designated as Old Debt will not display in the report (see Duration Type on page 12). Future Day(s) – If this box is checked, future expenses due after the number of days you designate in the box to the right (up to 60 days) will not display in the report. 5. Click SEARCH to update the criteria contained in the bill report. Each bill is assigned a color according to its status (see Figure 11 on page 18 for an example): Red – Delinquent. The bill’s due date is more than 30 days in the past. Orange – Overdue. The bill’s due date has passed but is 30 days or less in the past. Yellow – Upcoming. Bill is due within 14 days or less. Green – Future. Bill is due on a date greater than 14 days from today. Gray – Paid. Bill has been paid. Note that the PAY feature for any paid bill is disabled, since you don’t need to pay the same bill twice. Saving a Bill Report as a File To save a bill report as a file (HTML or text): 1. Just above the BUDGET ANALYZER heading (bottom), type a name for this report into the REPORT NAME field. The name must be between 1 and 25 characters in length. A bill report Name is required. 2. Under the BUDGET ANALYZER heading (bottom), enter the total pay you will receive during the entire time frame covered by the report. For example, if your report includes expenses dating from October 15, 2010 until January 15, 2011 (ninety days), you would enter your total net pay for that time period into the PAY AMOUNT field. This step is optional. 3. Under the BUDGET ANALYZER heading, enter the date of your first paycheck for the time period being covered by the report. Using the example from step 7, you would enter the date of your first paycheck (or other income source) following October 15 using the dropdown arrows to enter month, day, and year. This step is optional. 4. To the left of the REPORT NAME field is a dropdown menu button ( ). Click this button and select the file type you would like to save the report as – TEXT or HTML. Simple Bill Manager saves text reports in Rich Text Format (*.rtf). 22 5. When you have entered all the criteria for this report, click CREATE REPORT just above the BUDGET ANALYZER heading. The bill is generated and saved, according to the report name provided in step , to a folder called Reports under wherever you installed the Simple Bill Manager application (default path is C:\SimpleBillManager\Reports). If you share the Simple Bill Manager application with other users (such as on a shared network), you may wish to consider moving your reports from the default Reports folder to another folder that only you are aware of. If you save your report in HTML format, it will have the file extension of *.html. Using Windows Explorer, you can click and hold on this file, then drag and drop it directly into an open internet browser, and it will automatically display as a webpage. 6. To print a report, go to the location on your hard drive where the report was sent, and open the report using your preferred text editor. From there, you can use the print feature of this program to send the report to a printer. 22 Index Add Expense................................................................................................................................................7 Bill Report...................................................................................................................................................... generating..............................................................................................................................................18 overview of............................................................................................................................................18 Saving....................................................................................................................................................19 Bill Report window........................................................................................................................................ picture of...............................................................................................................................................18 Deactivate Expense window.......................................................................................................................... picture of...............................................................................................................................................17 Edit Expense window..................................................................................................................................... picture of...............................................................................................................................................16 Expense......................................................................................................................................................... deactivating within the Expense List.....................................................................................................17 editing within the Expense List..............................................................................................................15 Expense Explorer.........................................................................................................................................7 6.Expense List..............................................................................................................................................7 Creating.................................................................................................................................................10 new (picture).........................................................................................................................................10 opening..................................................................................................................................................14 Help.............................................................................................................................................................5 Help Window................................................................................................................................................. picture of...............................................................................................................................................10 Input Expense..............................................................................................................................................7 Input Recipent.............................................................................................................................................8 Input Recipient window................................................................................................................................. picture of...............................................................................................................................................12 New Expense List.........................................................................................................................................7 Quick Start...................................................................................................................................................7 22