1
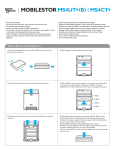
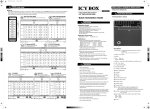
MOBILESTOR MS4UM+(B)
•
•
•
•
•
Follow all instructions.
Do not place this device near water and clean only with dry cloth.
Do not block any ventilation openings.
Install in accordance with Sans Digital’s instructions.
Do not place near any heat sources such as radiators, heat registers, stoves,
or the devices (including amplifiers) that produce heat.
• Protect the power cord from being walked on or pinched particularly at
plugs, convenience receptacles, and the point where they exit from the
apparatus.
• Only use attachments/accessories specified by Sans Digital.
• Unplug this during lightning storms or when unused for long periods of time.
• Refer all servicing to Sans Digital Technical Support. Servicing is required when the
devices has been damaged in any way, such as power-supply cord or plug is
damaged, liquid has been spilled or objects have fallen into the devices.
• Carefully read and follow the Quick Installation Guide and User Manual.
• Do not drop or shake the device.
• Do not move the device when it is powered on.
• Do not overload wall outlets.
Hard Drive Installation
1) Use the enclosed handles to secure the 4 HDDs with screws in the
given direction indicators.
4) Take the paper drive bay holder out of the device.
2) Push the tab on the front cover downward to open the cover.
5) Slide 4 HDDs into the chassis and make sure they are securely installed
in the order from top to bottom. (Make sure the HDD1 is securely
installed first at all times. Otherwise the PC may not recognize the device.)
HDD 1
HDD 2
HDD 3
HDD 4
3) Press down the tab located on the top of the metal frame to remove
the frame.
6) Reinstall the metal frame that was removed in Step 3. Make sure the
bottom of the frame is locked inside the track before closing the cover.
7) Connect the power supply to the device, plug in USB or eSATA cable in
the rear panel and power on the device.
8) Please format the HDD via OS if the HDD is unformatted. Refer to OS
manual for detailed instructions on how to format HDD.
9) To take the HDD out from the device, slightly press down the handle
and pull it out.
Diagrams
1) FRONT PANEL
1) Blue - Power on
Orange - Sleep
2) eSATA - Link interface use
3) USB - Link interface use
4) Power button - It needs to be pressed and held for 3 secs to power off. (This
design prevents accidental power off.)
5) Interface button.
6) Synchronization mode button (refer to SYNC LED for details)
7) Smart fan button - auto, manual and fan speed from level 1 to level 3.
8) eSATA - Link interface option.
9) USB - Link interface option.
10) Smart fan automatic mode
11) Smart fan manual mode
12) Fan speed - level 1
13) Fan speed - level 2
14) Fan speed - level 3
15) SYNC LED comes in 3 modes:
Blue - When PC is off, the device goes off in 15 secs.
Orange - When PC is off, the device goes to sleep mode.
Off - synchronization is off.
16 - 19) HDD1 / HDD2 / HDD3 / HDD4
Blue - Active
Purple - Access
2) REAR PANEL
3) RIGHT SIDE PANEL
4) HDD HANDLE
5) METAL FRAME
Fan
e-SATA Port
(Port Multiplier)
USB 3.0 Port
Power
Connector
Notes
1) To remove the cooling fan, unscrew the four screws located on
each corner of the fan. Unplug the cable connecting the fan to the unit.
2) Operating Environment: Temperature 0 - 50 Celsius / Humidity 0% 90%.
3) USB port of your PC must support power-off function so that the
device would go to sleeping mode. Setting up motherboard's (power
management) in S3 is strongly recommended. For more details, please
refer to user guide of motherboard BIOS setting.
4) Smart fan is controlled by the built-in thermal sensor, and it comes
with 2 modes (auto / manual) and 3 levels of speed:
Level 1: higher than 55°C
2,500rpm - 3,500rpm
Level 2: 45°C - 54°C
1,800rpm - 2,500rpm
Level 3: below 45°C
1,200rpm - 1,800rpm
5) Press the power button to power on the device or press the button
for 3 seconds to power off the device.