1
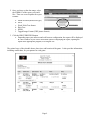
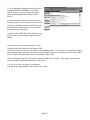
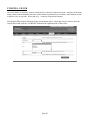
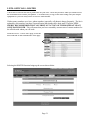
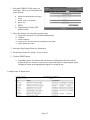
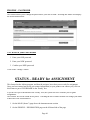
Arbiter User Manual prepared for Austin Baseball Umpires Association Austin Chapter, TASO-Baseball IMPORTANT THINGS TO DO FOR FIRST TIME USERS 1. Log in to the ARBITER system using the password provided to you by the Chapter Secretary a. http://www.arbitersports.com 2. Go to the PROFILE – INFORMATION Section (See page 42 for instructions) and enter/change a. Your personal information b. Your address c. Your EMAIL account d. Your PHONE NUMBERS 3. Go to the BLOCKS – DATES Section (See page 17 for instructions) a. BLOCK OUT dates and/or time you CANNOT work games on the Calendar 4. Go to the BLOCKS – TEAMS Section (See page 37 for instructions) a. BLOCK OUT Teams for which you do not desire or cannot work games (Conflict of Interest, etc.) 5. Go to BLOCKS – TRAVEL LIMITS Section (See page 25 for instructions) a. Set your Travel Limits for each day of the week b. Change the Zip Code, if necessary for workdays versus other days 6. SET YOUR STATUS AS READY TO BE ASSIGNED a. This can be set from one of two places (setting in one automatically set the other as well) i. Profile – Information – Status (See page 43 for instructions) ii. Main Page Menu – at the top of the page (See page 6 for instructions) INDEX Overview.................................................................................................................................................................... 1 Home Page (Main Menu) .......................................................................................................................................... 6 Schedule Calendar........................................................................................................................................................ 7 Self Assign.................................................................................................................................................. 10 Attach.......................................................................................................................................................... 11 Evaluations Evaluate Officials ....................................................................................................................................... 13 View Responses.......................................................................................................................................... 14 Select Games .............................................................................................................................................. 14 Payments RefPay ........................................................................................................................................................ 15 Pay Sheets................................................................................................................................................... 15 Invoices....................................................................................................................................................... 16 Blocks Dates ........................................................................................................................................................... 17 Teams.......................................................................................................................................................... 22 Partners ....................................................................................................................................................... 24 Travel Limits .............................................................................................................................................. 25 Summary..................................................................................................................................................... 27 Lists Officials ...................................................................................................................................................... 28 Contacts ...................................................................................................................................................... 33 Sites ............................................................................................................................................................ 35 Teams.......................................................................................................................................................... 37 Forms .......................................................................................................................................................... 39 My Referee My Referee ................................................................................................................................................. 40 Profile ......................................................................................................................................................... 40 Profile Preferences.................................................................................................................................................. 41 Information ................................................................................................................................................. 42 Password ..................................................................................................................................................... 46 Settings Ready (for assignment)............................................................................................................................... 46 Arbiter Sports (http://www.arbitersports.com) Go to the login screen (http://www.arbitersports.com) and you will see the screen below. Enter you email address and the initial password you received from the chapter secretary. CHANGE YOUR PASSWORD after logging in the first time to ensure security of your account !! After logging in, you will see the screen shown below. This is where you select your account. If you have more than one account in Arbiter (e.g.: multiple sports), then you can select which group or account type you wish to enter. You can change accounts at any time by using the “SWITCH VIEW” link at the top of the screen. Page 1 After selecting the account type and/or sport, you will be taken to the MAIN screen. This is the “home” page from which you can access various functions and information within the Arbiter website. These will be covered in further detail on the following pages. On the MAIN screen, you will see any announcements posted by the assigners or administrators. Important messages are often posted here during the season, especially during inclement weather. Page 2 Arbiter Menu Overview At the top of the screen are eight (8) tabs that provide access to various parts of the Arbiter site. MAIN – This is the “home page”. Announcements are posted here for members to read when they first log in. SCHEDULE - there are three functions available in this section and is the area that you will use most often in Arbiter Calendar – Displays YOUR schedule, both pending and accepted games. You MUST use this function to ACCEPT or DECLINE games. You must also SUBMIT your schedule when you finished accepting/declining pending games. Self Assign – During the year, the secretary will post games that you can “self-assign” if you are available. Games are posted as they become available, so check this often. These games go quickly. Attach – Allows you “attach” one or more teams to your account. You can then see their entire schedule or just certain games. You will also be notified of any changes in those games. NOTE: If you are “attached” to a game, you may be considered unavailable for other assignment during that time period. EVALUATIONS – There are three functions available in this section. Evaluation Officials – ABUA members can provide Peer Feedback to officials with whom they have worked games through this page. View Responses – ABUA members can read summary reports of the Peer Feedback provided through the Evaluations page, or evaluation reports from Observers and ABUA evaluators. Select Game – This function is limited to personnel who are designated as observers and evaluators PAYMENTS – There are three functions available in this section RefPay – Not used by our association Pay sheets – We use pay sheets during the “summer ball” season. If pay sheets have been generated, you can view and/or print them from this section. Invoices – If invoices have been generated, you can view and/or print them from this section. Page 3 BLOCKS – There are five functions available in this section and this is one of the MOST IMPORTANT sections that you will use Dates – This gives you a means to block out dates or times that you cannot work games. Times can be blocked as All Day or Partial Day. If something changes, blocked times can be “unblocked”. This page also provides you with a visual description of your game schedule and all blocks. THE SECRETARY RELIES ON THIS FUNCTION TO ASSIGN GAMES !! Teams – This allows you to block certain teams for whom you do not desire, or cannot, call games. (e.g.: your child is in XYZ school, block XYZ school from your schedule to avoid a potential conflict of interest) Travel limits – This allows you to set travel limits you do want to exceed. It can be different for each day of the week. (e.g.: your work location during the week and home on the weekends). Be careful…..setting allowable miles too low can limit your assignments. Partners – This allows you to block specific chapter umpires with whom you do not want to work. Summary – This provides a printout of you blocked dates/times, teams, and partners. LISTS – There are four functions available in this section, which provide lists of contact information for various people or organizations Officials – Contact information for chapter umpires. Printed contact list can be obtained from this function Contacts – An alphabetical listing of non-umpire contacts (coaches, etc.) Sites - Contact information for specific locations or fields Teams – Contact information for specific teams/schools Forms – If forms are available, they will be listed here MY REFEREE – There are two functions in this section My Referee – A wealth of resource information material is provided by NASO and Referee magazine at no additional charge to the Arbiter users Profile – Your official’s profile (sports called, level called, etc.) PROFILE – There are three functions available in this section, which allow you to keep YOUR information current, change your password, etc. Preferences – Allows you set some basic user preferences (time zone, etc.) Information – Provides a means of keeping your address and contact information current VERY IMPORTANT !! Password – Allows you to change your password Page 4 IMPORTANT: Whenever you have moved to a different screen in Arbiter, ALWAYS hit the “EXIT” button to return to the prior page. If you use the “back” button on your browser, you will end up with multiple pages open ! Page 5 MAIN PAGE This is the “home page” and contains tabbed menus at the top of the page that provides access to other features of the Arbiter system. It also contains announcements, notices, and other important information provided by the Board. Always check the “Announcements” section when you log on for current notices. It is one of two places where you can change your status to READY TO BE ASSIGNED. Tabbed Menu Announcements Section Page 6 Checkbox for READY TO BE ASSIGNED SCHEDULE TAB SCHEDULE – CALENDAR The Schedule function displays YOUR current schedule of games. It shows games that are pending, accepted, declined, rained out, cancelled, etc. It is VITALLY IMPORTANT that you check this on a regular basis to ensure that you accept or decline new games that have been added to your schedule. All games are ACCEPTED or DECLINED from this screen !! Accept or Decline the game and the click on SUBMIT If you select a particular game, by clicking on the game number (as shown below), then you will be able to determine who your partner is for that game, if one has been assigned. You will also be provided with contact information for your partner on the screen. Page 7 By clicking on the REPORTS-SCHEDULE link on the left side of the page, you can get a printed report of your schedule. It can be obtained in one of several formats. It is highly advised to keep an up-to-date printed copy of your schedule at all times. Computers and websites being what they are, there may be times when the web or website is unavailable. Even so, YOU ARE RESPONSIBLE FOR ANY GAMES YOU HAVE ACCEPTED !! Clicking on the Schedule feature will display the screen shown below; 1. Set the date range for which you wish to obtain a printed report. The default is the current month. Page 8 2. Once you have set the date range, select the FORMAT of the report you would like. There are several options for report formats: a. b. c. d. e. f. Adobe Acrobat (default file type) Excel Word / Rich Text format Plain Text HTML Tagged Image Format (TIFF picture format) 3. Click the PRINT PREVIEW button a. Depending upon your software and web browser configuration, the report will be displayed in a new window or you will be offered the option of displaying the report, opening the report in the appropriate program, or saving the file. The printed copy of the schedule shows date, time, and location of the game. It also provides information, including contact data, for your partner for each game. \ Page 9 SCHEDULE – SELF ASSIGN The Austin Chapter makes extensive use of the Self-Assign function. If a game has not been accepted or has been turned back, especially on short notice, the secretary can put the game into the “self-assign” database and umpires who are available for that game can assign themselves to that game. This saves a great deal of time and allows available umpires to obtain additional games. Check this section frequently as it is updated frequently. Click on SEARCH to see a list of available games. If games are available for self assignment, they will be displayed for selection. To select a game, click on GO. You are then assigned to the game. There may be a limit (see left side of the screen) on the number of games which you can self-assign on any given day. Page 10 SCHEDULE – ATTACH The Attach function allows you to keep track of a particular team throughout the year. To use this function, click on the “attach” link. Once the page is displayed, you must select a “SPORT” in which you are interested, if there is more than one option. You should then select a “LEVEL” for the sport selected. (The “level” in which that team plays) Page 11 After selecting the level, you then select the specific team in which you are interested. Once a selection is made, then a screen will be displayed with all of the available information concerning that team. You can then “attach” yourself to one or more games by putting a checkmark in the box on the right hand side of the page. Then click the SUBMIT button to finalize the “attachment”. If you later decide you no longer with to be attached to a particular game or games, just remove the checkmark and click on the SUBMIT button. Page 12 EVALUATIONS TAB EVALUATIONS – EVALUATE OFFICIALS Selecting the Evaluate Officials tab will open the page shown below. The Austin Baseball Umpires Association has established a Peer Feedback system to allow officials to provide to other officials with whom they have called games. All responses are anonymous. Reports are compiled twice during the high school season for review by the officials to whom the feedback was provided. Clicking on PEER FEEDBACK will open the page shown on the right. The default date range is the past week from the current date. You can change the date range by changing the dates on the left hand side of the page and then clicking on GO (just below the date range). If there are games for which you can provide feedback, they will be listed as shown on the right. To provide feedback to another official, click on the red A+ on the right side of the game information. This will bring up the Peer Evaluation form. Page 13 Complete the form with your feedback. NOTE: Written comments are generally much more meaningful than just simply putting numerical scores for each of the criteria. Clicking on any criteria names will cause a popup window to appear with additional information about that criteria (ratings, more detailed description of what it means, etc.) EVALUATIONS – VIEW RESPONSES Responses are generally compiled by the evaluation committee twice during the high school season, and once or twice during the “summer” season. If not enough feedback forms have been completed to ensure the anonymity of the feedback providers, no reports will be compiled. If reports are ready for your review, they will be listed on this page. Selecting the Evaluation Report Name will allow you to see the report with additional details, including all comments provide by other officials. EVALUATIONS – SELECT GAMES Use of this section is limited to those members who are designated as Observers or Evaluators. Page 14 PAYMENTS TAB PAYMENTS – REFPAY If RefPay is used, you will be able to log in here. RefPay is not used by the ABUA. PAYMENTS – PAY SHEETS Pay sheets are used primarily for “summer ball”. To assist the officials and leagues, the ABUA collects the game fees from the leagues and passes it on to the members. A pay sheet is created each month to detail which games were worked, how the games were paid (paid at the plate or paid through ABUA), the amount of dues which the official owes, and any travel fees due to the official. These pay sheets can be reviewed by the official by going to the Payments – Pay Sheets page, as shown below. Page 15 Individual pay sheets can be reviewed by selecting either the DATE view ( ) or the LEVEL View ( ) icon on the right hand side of the screen. The DATE view is a detailed game-by-game accounting of your games worked. The LEVEL view is a summary accounting of your games worked by Sport and Level only. Pay sheets can be printed out by placing a checkmark in the box on the left side of the screen next to each pay sheet you want to print. When you have finished selecting the pay sheets you want to print, click the PRINT PAYSHEETS button. PAYMENTS – INVOICES Invoices are shown on this page, if any have been generated. Invoices might be generated for money owed for dues, fines, equipment, or other items. If invoices have been generated, they can be viewed and printed from this page. Page 16 BLOCKS TAB BLOCKS – DATES The DATES section is the MOST IMPORTANT feature of Arbiter for umpires !!! The Assigner relies on this function to assign games and to determine who is available if an umpire is needed on short notice. Your calendar can be modified at any time, and the changes are effective immediately. This means that you can keep your availability current as events change in your life or work. IT IS CRITICAL THAT YOU KEEP YOUR CALENDAR CURRENT !! When you click on the DATES link, you will see the screen below. There are several items of importance on this page concerning how you input data and change your schedule. Page 17 First, you must make sure you are looking at the correct month that you want to view/change. (The default is the current month). To change the month, click on the MONTH tab and then select the month you want view/change. When the correct month is displayed, you will see color-coded displays of your calendar. The legend for these codes in located on the left side of the screen. The calendar shows games accepted, games pending, “attached” games (games/teams in which you have a special interest, but are not assigned), partial and full-day blocks, and days for which you are unassigned and available (open days). ACTION The ACTION section is where you can make changes to your availability. You will use this section often, so learn how to use it. PAY PARTICULAR ATTENTION TO THE NEXT SEVERAL SECTIONS AS IT IS EASY TO FOUL UP YOUR SCHEDULE IF YOU ARE NOT CAREFUL WITH HOW YOU MAKE CHANGES !! There are four “actions” available. View Schedule (look by month or day, but no changes are made) Block All Day (when this box is checked, EACH day you click on is blocked for the entire 24-hour period) Block Part Day (when this box is checked, EACH day you click on is blocked for the time period shown in the “TIME RANGE” Clear Blocks (when this box is checked, EACH day you click on will have all blocks DELETED. Once deleted, you have to re-enter them……..there is NOT an “undo” feature) Add Notes (when this box is checked, a “notes” form is displayed each time you click on a day to add a block.) NOTE: Just above the “Time Range” is an indicator of what “Action” is going to be taken if you click on a date. Check this BEFORE you click on a date to make sure the correct action is being taken !! Page 18 BLOCK ALL DAY This function is generally used when you are out-of-town or can’t work that day at all (anniversaries, birthdays, etc.). To block a date ALL DAY: 1. Click on BLOCK ALL DAY 2. Click on the appropriate date a. The date will turn RED, indicating that you do not want an assignment that day, regardless of the time BLOCK PART DAY This function is used to block out times when you cannot work, but show you as available for other times during the day. For example, you can block out all or part of your workday so you don’t get morning or early afternoon games during tournament season, but still remain available for games later in the day or evening. You could also block out an evening when you have something else to do, but want to remain available for a game earlier in the day. It is probably the MOST USED section of the calendar. To block out a partial day: 1. Click on Block Part Day 2. Set the Time Range you want to BLOCK a. The default is 8:00am to 5:00pm b. If you click on a date BEFORE changing this time, you will block out the default time 3. Click on the date for which you want to block out specific times a. The date will turn ORANGE to indicate a partial day block 4. If you make a mistake a. Click on the Trashcan to the left of the blocked time you want to remove b. Set the Time Range to the time you DO want to block, and click on the date again. 5. It is possible to block multiple times during a day (e.g.: 8:00am to 11:00am and 6:00pm to 9:00pm) a. Click on Block Part Day b. Set the Time Range to the first time you want to block in the Time Range and click on the appropriate date c. Set the Time Range to the second time you want to block and click on the date again d. Both times will now show as blocked CLEAR BLOCKS There are two ways to clear blocks. 1. Under VIEW SCHEDULE, select the day for which you want to remove the blocks. a. Click on the trashcan for the block you want to remove 2. Click on the CLEAR BLOCKS feature a. Each time you click on a date, ALL blocks for that day will be removed Page 19 BLOCK or UNBLOCK MULTIPLE DAYS/DATES It is possible to block out (or clear blocks) for an entire range of days or dates in Arbiter. 1. Click on the function (Block All Day, Block Partial Day, or Clear Blocks) that you wish to perform. a. If it is a Partial Day Block, set the Time Range that you wish to block 2. Set the Date Range (From and To) that you want to block out dates or clear all blocks a. Click on the calendar icon at the left side of the FROM or TO field 3. Select the DAYS OF THE WEEK you want to block or clear blocks within the time period selected a. All seven days for vacations, etc. b. Monday through Friday for standard work week c. Just certain days (for school, work schedules, etc.) 4. Click the APPLY button a. The dates and days selected will be blocked or cleared of all blocks, depending upon your selection of “Actions” REPORTS The reports function allows you print out a report of your calendar showing games accepted, games pending, and all blocked dates and times. This is especially useful for reviewing your blocks before you make changes, or after you have made changes to make sure you got them entered correctly !! Page 20 To obtain a printed report, select the “Calendar” function under Reports. The following screen will then be displayed. 1. Set the date range for which you wish to obtain a printed report. The default is the current month. 2. Once you have set the date range, select the FORMAT of the report you would like. There are several options for report formats: b. c. d. e. f. g. Adobe Acrobat (default file type) Excel Word / Rich Text format Plain Text HTML Tagged Image Format (TIFF picture format) 3. Click the PRINT button Depending upon your software and web browser configuration, the report will be displayed in a new window or you will be offered the option of displaying the report, opening the report in the appropriate program, or saving the file. These reports do not print out a calendar, but simply show the dates and blocked times for each date. This allows you to verify the accuracy of what you entered. Page 21 BLOCKS - TEAMS This function is used to block out teams for whom you do not desire, or cannot, call games. The TASO Conflict of Interest policy sets out 5 specific reasons for an official to NOT call games for certain schools. If you meet the criteria for ANY of these reasons, you should BLOCK OUT all of that school’s teams (JV, Freshman, and Varsity) to avoid any hint of conflict of interest. We have plenty of other schools to which we can send you. When you select BLOCK – TEAMS, you will see the screen shown below. This screen allows you manage your team blocks including adding and deleting teams. To ADD a team 1. Click on “SHOW ALL” at the RIGHT side of the columns row. 2. This will bring up a team list screen. Page 22 3. You can navigate to a specific team/school name by clicking on the first letter of their name at the bottom of the list. 4. You can navigate to the next page, or a specific page, by clicking on the page number at the bottom of the screen. 5. Place a checkmark by the team and level (Varsity, JV, Freshman) that you wish to block. If a school has MORE than one team, you will need to follow this procedure for EACH team (e.g.: JV & Varsity) that they have. 6. Once you have selected teams to block, click on SAVE to apply the block. 7. Blocked teams will now be shown on the initial screen and will be at the top of the page when you put a checkmark in SHOW ALL. 8. Follow this procedure if you need to add blocks for teams at any time during the season. To DELETE or EDIT a Block for a Team 1. Open the BLOCK – TEAMS page. 2. To DELETE a Block, remove the checkmark beside the team name(s) and level on the left side of the columns. Then click SAVE 3. To EDIT a Block – You can change whether you block both Home and Away games (default), or just Home OR Away games. Remove/Add the checkmark as needed and then click SAVE Page 23 BLOCKS – PARTNER This function allows you to block (scratch) a specific official with whom you do NOT want to call games. Selecting the Blocks-Partner function brings up the screen shown below. To ADD a partner to the block (scratch) list 1. Put a checkmark in the SHOW ALL box on the right side of columns listing. 2. This will bring up the list of officials for this association 3. Place a checkmark next to the name of any official with whom you do NOT want to call games. 4. You can navigate through the list by using the numbers (to scroll from page to page or go to a specific page) or the letters (to go to a list of officials whose last name begins with that letter). 5. Once you have selected the officials you wish to scratch (block), click on SAVE to apply the block. Page 24 To DELETE a Block for an official 1. Open the BLOCK – PARTNERS page. 2. To DELETE a Block, remove the checkmark beside the official’s name(s) on the left side of the columns. Then click SAVE BLOCKS – TRAVEL LIMITS This feature works in conjunction with the Calendar feature for assignment of games. It allows you to set mileage limits (that is travel no more than XXX miles from your point of departure) to get to a game. Setting this limit too low can, however, limit the number of game assignments that you may receive. A setting of 999 means you will go anywhere we have a game. Departure points are by ZIP CODE rather than a specific address and do NOT take into account travel routes. They are “direct line” (as the crow flies) from the departure zip code to the destination zip code. You can set departure zip codes differently for each day of the week. This allows you to use your home zip code for days off and your office zip code for work days. It is highly advisable to set the zip codes by day of the week for where you expect to be on those days to facilitate game assignment. Selecting the Travel Limits function will bring up the screen shown below: Page 25 To EDIT Travel Limits 1. Click on the Pencil on the left side of the DAY OF THE WEEK that you want to edit 2. This will put that day of the week in the EDIT mode 3. Change the ZIP CODE and/or DISTANCE as desired 4. Click on the Checkmark on the left side to save the change, click on the X to cancel the changes. 5. You can make changes to all or a selected group of days at once by using the check boxes on the left side of the days list. a. You can enter/change a zip code (same as “postal code”) and apply it to all checked boxes by clicking on APPLY b. You can enter/change the distance you are willing to travel by entering the distance and then clicking APPLY. 6. You can set the parameters by each day of the week. They do NOT have to be the same for all days. For example, you may live in one zip code, but work in another on certain days. If you would be leaving from a game from your workplace, you can use your workplace zip code for those days, and your home zip code for days when you will be leaving from home. Page 26 BLOCKS – SUMMARY This feature creates a written report of all of you blocks. It use very useful for reviewing before and after you make any changes. Selecting the Summary feature will bring up the screen shown below: 1. Select the FORMAT of the report you would like. There are several options for report formats: a. b. c. d. e. f. Adobe Acrobat (default file type) Excel Word / Rich Text format Plain Text HTML Tagged Image Format (TIFF picture format) 2. Click the PRINT PREVIEW button a. Depending upon your software and web browser configuration, the report will be displayed in a new window or you will be offered the option of displaying the report, opening the report in the appropriate program, or saving the file. 3. A report of ALL blocks you have entered will be printed. Page 27 LISTS TAB LISTS – OFFICIALS This feature provides contact information for the umpires in the Austin Chapter. The list provides phone numbers, email address, and an address as entered by each member. Each member is responsible for keeping their information up-to-date so that they can be contacted by their partners for assigned games. Selecting this Officials feature will bring up the screen shown below. To send an EMAIL to an official, click on the email next to their name. This will bring up a new email using the email program on YOUR computer. Many members use email rather than phone calls to contact their partners for assigned games. Page 28 To view additional information about an official, including PHONE NUMBERS, click on the official’s name. A popup window will open showing the additional information for that official. The phone numbers displayed on this screen are in priority order as set by the official. You should always use the phone numbers listed in the order in which they are listed when you try to contact your partner by calling them. Clicking on the VIEW MAP link will open a new tab or window with a map showing the official’s address An email can be sent from the popup screen by clicking on the email address at the bottom of the screen. The default for the list is all umpires, sorted alphabetically. If you want to see a particular umpire, and you know his/her last name, then you can go that umpire quickly by clicking on the first letter of their LAST NAME on the alphabetic letters at the bottom of the screen. This will bring up a page(s) of all umpires starting with the letter selected. Then simply scroll down or select the umpire whose information you need to view. You can view each of the pages of contacts by clicking on the page numbers at the bottom of the screen. Page 29 UTILITIES - FILTER The Filter feature is basically a tool to search the list of officials in the association. Searches can be done using various criteria including last name (whole name or partial name), first name, email address (whole or partial), city, or zip code. Wild cards (e.g.: *son) are accepted for searches. Selecting the Filter feature will bring up the screen shown below. Once this screen is shown, enter the search criteria and click the “Get Results” button on the right hand side of the screen. Page 30 LISTS- OFFICIALS - ROSTER A ROSTER of all officials can be printed out for your files. There may be times when you cannot access the web and need to contact your partner. You should carry a copy of the roster along with your umpire equipment so you will always have access to it when needed. With as many members as we have, phone numbers (especially cell phones) change frequently. The list is updated by each member, but there is no notification that changes have been made. Therefore, IT IS HIGHLY RECOMMENDED THAT YOU PRINT OUT A COPY OF THE ROSTER AT LEAST ONCE EACH MONTH. This will ensure that you have reasonably current roster of contact numbers for the officials with whom you will work. From the LISTS – OFFICIALS page, select the ROSTER link on the left hand side of the page Selecting the ROSTER function brings up the screen shown below. Page 31 1. Select the FORMAT of the report you would like. There are several options for report formats: h. i. j. k. l. m. Adobe Acrobat (default file type) Excel Word / Rich Text format Plain Text HTML Tagged Image Format (TIFF picture format) 2. Select the features you want printed on the report a. Name (Not an option, it is included automatically) b. Address c. Phone Number d. Email (NOT AVAILABLE as an option at this time) e. Page Header & Footer 3. Select the Page Setting (Portrait or Landscape) 4. Set the Page Format for “Merge” if you so desire 5. Click the PRINT button a. Depending upon your software and web browser configuration, the report will be displayed in a new window or you will be offered the option of displaying the report, opening the report in the appropriate program, or saving the file. A sample roster is shown below. Page 32 LISTS – CONTACTS The Contacts feature provides an alphabetical list of contact persons for the various schools, baseball camps, and/or baseball facilities. It works very similar to the List-Officials feature. Selecting the Contacts feature will bring up the screen shown below. The phone number displayed on this screen is the primary contact number as set by the individual listed. You should always use this number FIRST when you try to contact that individual. Additional contact number, if any, can be seen by clicking on the arrow to the right of the displayed phone number. The default for the list is all contacts, sorted alphabetically. If you want to see a particular contact, and you know his/her last name, then you can go that umpire quickly by clicking on the first letter of their LAST NAME on the alphabetic letters at the bottom of the screen. This will bring up a page(s) of all contacts starting with the letter selected. Then simply scroll down or select the contact whose information you need to view. Page 33 You can scroll through all of the pages of contacts by clicking on the page numbers at the bottom of the screen. UTILITIES - FILTER The Filter feature is basically a tool to search the list of contacts. Searches can be done using various criteria including last name (whole name or partial name), first name, email address (whole or partial), city, or zip code. Wild cards (e.g.: *son) are accepted for searches. Selecting the Filter feature will bring up the screen shown below. Once this screen is shown, enter the search criteria and click the “Get Results” button on the right hand side of the screen. REPORTS There are no reports or rosters that can be printed from this feature. Page 34 LISTS - SITE/CONTACTS This feature provides contacts for specific facilities and fields where games are worked. Selecting the Sites/Contact feature brings up the screen shown below. If there is a contact for a particular school or field, then the number of contacts will be displayed in the last column. If the number in the last column is 0, then there is no contact name or number on file for that site. NOTE: The address shown in the address field, especially for schools, is generally the address of the school, NOT NECESSARILY THE BASEBALL FIELD. If you click on the address, you will be provided with a map to that address or location through Map Quest. DO NOT RELY ON THESE MAPS TO GET YOU TO THE BASEBALL FIELDS !! USE THE MAPS PROVIDED BY THE CHAPTER FOR THIS PURPOSE. Baseball fields for several of the schools are nowhere close to the school. Page 35 To select a contact, click on the NUMBER at the end of the Site name. This will bring up the contact information, as shown in the example below. UTILITIES – FILTER The Filter feature is basically a tool to search the list of sites in the database. Searches can use various criteria including site name (whole name or partial name), phone (whole or partial), city, or zip code. Wild cards (e.g.: *son) are accepted for searches. Selecting the Filter feature will bring up the screen shown below. Once this screen is shown, enter the search criteria and click the “Get Results” button on the right hand side of the screen. REPORTS There are no reports or rosters that can be printed from this feature. Page 36 LISTS – TEAMS/CONTACTS This feature will display a list of baseball teams and the contact or coach for that team, if that information is available. Selecting this feature will bring up the screen shown below. The list shows the Team name, Sport & Level, Mileage Limits (this ties into the Mileage Limits that YOU set under the BLOCKS feature). If there is a contact for a particular team, then the number of contacts will be displayed in the last column. If the number in the last column is 0, then there is no contact name or number on file for that site. Page 37 To select a contact, click on the NUMBER at the end of the Team name. This will bring up the contact information, as shown in the example below. UTILITIES – FILTER The Filter feature is basically a tool to search the list of teams in the database. Searches can use various criteria including Team name (whole name or partial name), Sport Level of Competition, Strength, Site (drop down list of all sites) and Bill To (we do not use this feature). Wild cards (e.g.: *son) are accepted for searches. Selecting the Filter feature will bring up the screen shown below. Once this screen is shown, enter the search criteria and click the “Get Results” button on the right hand side of the screen. REPORTS There are no reports or rosters that can be printed from this feature. Page 38 LIST – FORMS . If your organization has online forms, they will be listed here for use or downloading. Page 39 MYREFEREE TAB MYREFEREE – MY REFEREE My Referee is a service provided by Arbiter to its users at no additional cost. It gives sports officials the chance to access content customized to their needs. Along with relevant articles selected by sport, MyReferee includes a searchable database containing Referee magazine articles. It also includes sports-specific news, updates, quizzes, and other features. MYREFEREE – PROFILE This page allows you to create a profile of your sports officiating background and affiliations to better enable MyReferee to tailor content that is suited for your needs. Completing this form is entirely optional. Page 40 PROFILE TAB PROFILE - PREFERENCES This feature allows you to set some basic changes in how information is displayed. There are two sections that need to be checked, and one that needs changing only on an annual basis. Selecting this option will display the screen shown below. CHANGE to “Time Zone” to the time zone in which you are located (e.g.: Central Time) SET the “Date Range” from January 1st to December 31st of the current year (or whatever your season may be). This only needs to be done once each year. If you do NOT set this date range, then you may see data or schedules from whatever date range IS entered in this field and have to manually change the date range in many other parts of the program. Page 41 PROFILE – INFORMATION This feature provides you with the ability to keep your contact information current. Selecting the feature will display the screen shown below. Each field on this page can be edited. The ADDRESS section has an option to allow everyone to see your address, or to restrict to Board Members only. To allow all contacts to see your address, check the box on the right hand side of the ADRESS label. Unchecking this box will restrict access to the address to assigners only. NOTE: It is CRITICAL that you keep your email updated. This is the primary means of communication for the Austin Chapter !! Page 42 IMPORTANT – IMPORTANT – IMPORTANT – IMPORTANT Under the STATUS section of the menu, there is a check box that says “READY”. This box tells the database that you are ready to be assigned. YOU MUST CHECK THE BOX INDICATING THAT YOU ARE READY TO BE ASSIGNED OR THE SYSTEM WILL NOT CONSIDER YOU FOR GAMES !! INFORMATION – PHONES This feature allows you to enter and edit phone numbers at which you can be contacted by members of the chapter. It is crucial that you keep these numbers updated if they change, especially your cell phone number. Selecting this feature will bring up the screen shown below. To ADD a phone number 1. Click on the PLUS sign on the left side of the column title bar 2. This will bring up the phone entry screen 3. First select the TYPE of phone number that you wish to enter a. Click on the arrow on the right side of the TYPE field, and then select the phone type you wish to enter. Page 43 b. Your choices are i. Home ii. Work iii. Fax iv. Cellular v. Pager vi. Security vii. Other 4. Enter the phone number, extension, and any notes (for yourself, no one else sees this). Leave the box that says “PUBLIC” checked, or other official will NOT be able to see the phone number when they need to contact you. 5. Follow the above procedure until all phone numbers have been entered. 6. Once you have entered all of your contact phone numbers, you can arrange them in the order that you would like your partners to use when they need to contact you. The numbers are displayed in the Lists – Officials feature in the order that they are shown in the phone entry list. 7. To re-arrange the number list, use the arrows to the right of the phone number list to move the number either up or down in the list. To DELETE a phone number 1. Click on the Trashcan on the left hand side of the phone number to be deleted. To EDIT a phone number 1. Click on the Pencil on the left hand side of the phone number to be changed. This will put that number into “edit mode”. 2. When you are finished, click on the Check Mark to accept the changes, or the X to cancel the change Once you have completed entering, editing, or deleting phone numbers, click on the EXIT button to return to the main Information page. Click on the SAVE button to save the changes you have made. Page 44 Custom Fields This field is NOT editable. It displays your TASO Identification number, which you will need for various purposes including access to the Members Only section of the TASO website. Selecting this feature will display the screen shown below. PICTURE This feature allows you to upload an image or photograph to associate with your user account. Selecting this feature will display the screen shown below. To ADD an image 1. Follow the instructions on the screen as to maximum size of the image and other restrictions. 2. Enter the location of the image (or use to “browse” button to locate the image) a. A word of caution about photographs. Be selective about what you image you choose. Coaches, officials, and other contacts will be able to see it, so make sure it is an appropriate image. 3. Click the “UPLOAD” button. Page 45 PROFILE – PASSWORD This feature allows you to change the password for your user account. Selecting this feature will display the screen shown below. To CHANGE your PASSWORD 1. Enter your OLD password 2. Enter your NEW password 3. Confirm your NEW password Click on the “Change” button STATUS – READY for ASSIGNMENT This feature lets the Arbiter program, and thus the assigner, know that you are ready for assignment. Once you have entered and saved your contact information (so your partners can contact you), click on this feature to put a CHECKMARK in the “Ready” box. If you do NOT put a checkmark in the “Ready” box, the system will NOT consider you for game assignments. The READY box can be found in two places. Checking the box in either location will change your status to READY FOR ASSIGNMENT 1. On the MAIN (“home”) page above the Announcements section 2. On the PROFILE – INFORMATION page on the left hand side of the page Page 46