1
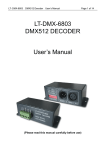
328 3 Star LED Fiber Optic Star Ceiling Kit With Dimming Feature
A. Safety Instructions:
1. Make sure the Light Engine and Power Source have the same voltage
2. Keep out of rain or moist areas to avoid shock hazards.
3. Avoid use in high temperatures (< 40ºC or < 104°F).
4. Keep Light Engine in ventilated area.
B. Technical Data
Power consumption: 12 Watts
Twinkle Wheel (Installed)
(Optional) Color Wheel or Color Twinkle Wheel Colors:
White, Sky-Blue, Green, Yellow, Blue, Purple
Light Source: 5 Watts LEDs
Estimated Life of LEDs: 50000 hours
Fiber Quantity: 400 pcs at 0.75mm fiber per port
Size: L125 x W103 x H 80mm ( L 4.92 in x 4.05 in x 3.15 in)
Net weight of Light Engine: 0.6 Kg (1.4 lbs)
Fiber: 328 Strands of
240 .75mm, 80 1.0mm, 8 1.5mm
Fiber Bundle 13 feet long.
Max. Quantity for Fiber
Connection:
400 X 0.75mm fiber optic per port
C. Installation
The installation dimension of the Light Engine. (See Fig. 1).
D. Installation of Fiber Optic Cables.
1. Cut the fiber to the specified length.
2. Peel off 4-10 cm of protection over of the fiber optic. (If there is no
protection cover or “jacket” then there is no need peel of any fiber optic
cable.)
Note: Take caution not to damage the Fiber Optic Cable.
3. Collect all the fibers into one bundle. Then wrap all the fiber at 10cm
from the fiber end with electrical tape. Insert the wrapped fiber optic
cables into the light engine’s connector and screw the waterproof connector tightly.
Cut the fiber optic smoothly along with light engine’s connector with a
hot knife ( sold separately ).
4. Insert the whole light engine connector into the fiber fixing set.
Wiedamark.com • 4016 Harry Hines Blvd, Dallas, Texas 75219 • 800.893.9787
328 3 Star LED Fiber Optic Star Ceiling Kit With Dimming Feature
5. Installation of the fiber Ends.
Drill holes on the panel or ceiling you wish to install the fiber optic
cables.
Pull the fibers through the holes and use glue (we recommend using
Elmer’s All Multipurpose White Glue) to secure the fibers in place.
For more tips on fiber installation visist our website and view our
Installation Videos page.
D. Light Engine Settings.
Color change speed of this engine is controlled by the DIP switches. You can
find the DIP switches on the rear of the panel. (See Fig. 1). Number 1-3 DIP
switch address. Number 4-5 as blank and Number 6 as remote. Please see settings as follow.
Manual Control For 6 Color Wheel:
1. Color Change speed. Use the dip switches to select from 6 different speed levels. For the slowest speed dip
switches 2 & 3 should be on and the other switches off.
2. Color Selection. Turn dip switches 2 & 3 on and when the color wheel cycles to the color desired, turn all dip
switches to off and that will stop the color wheel.
Remote Control Mode for 6 Color Wheel:
1. Set dip switch number 6 to the ON position.
2. As the color wheel turns, press the lock button on the controller to stop it on a fixed color.
3. The speed of the color wheel is controlled manually with the dip switches.
4. On/Off button to turn on the light engine.
5. Use arrow buttons to adjust the brightest up or down at 8 levels of light brightness.
Manual Control for Twinkle Wheel:
1. Twinkle Wheel speed. Use the dip switches to select from 6 different speed levels. For the slowest speed dip
switches 2 & 3 should be on and the other switches off.
2. Twinkle Wheel Off. Turn all the dip switches to off and the twinkle wheel will stop turning.
Remote Control Mode for Twinkle Wheel.
1. Set dip switch number 6 to the ON position.
2. As the twinkle wheel turns, press the lock button turn off the twinkle wheel and have solid stars.
3. The speed of the twinkle wheel is controlled manually via the dip switches.
4. On/Off button to turn on the light engine.
5. Use arrow buttons to adjust the brightest up or down at 8 levels of light brightness.
Wiedamark.com • 4016 Harry Hines Blvd, Dallas, Texas 75219 • 800.893.9787