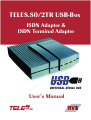
1
TELES.S0/2TR USB-Box
ISDN Adapter &
ISDN Terminal Adapter
User’s Manual
a
The hardware and software described in this publication is protected by international copyright law. Use of the software is intended solely for the legitimate owner of
a copy thereof, after having registered with TELES AG. Unauthorized distribution
or use may result in civil and criminal penalties and will be prosecuted. All rights
reserved by TELES AG.
The information in this publication has been compiled with great attention to detail.
Nonetheless, inaccuracies and typographical errors cannot be entirely avoided.
For this reason, TELES provides this information "as is", without warranty of any
kind, either expressed or implied.
The information and products described herein are subject to change without
notice.
© Copyright 1999 TELES AG Berlin. All rights reserved.
TELES®, IntraSTAR®, Intra*® and iSWITCH® are registered trademarks of TELES
AG. All other trademarks used are the property of their respective owners.
Article number: 560.100.157
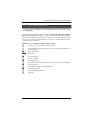
Introduction
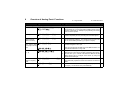
Contents
1 Introduction ............................................................................................................ 1
1.1 TELES.S0/2TR USB Box Features at a Glance ............................................... 2
1.2 System Requirements ...................................................................................... 4
1.3 Package Contents ............................................................................................ 4
2 Installing the TELES.S0/2TR USB Box ................................................................. 5
2.1 Installation Overview ......................................................................................... 5
2.2 Connecting the TELES.S0/2TR USB Box ........................................................ 5
3 Setting up the TELES.S0/2TR USB Box ............................................................... 6
3.1 Setting the PIN .................................................................................................. 7
3.2 Assigning Phone Numbers (MSN) .................................................................... 7
3.3 Setting Device IDs for Each TELES ISDN Device ............................................ 8
4 TELES.S0/2TR USB Box as Full-featured PBX .................................................... 9
4.1 Setting Flash Time for Analog Telephones ....................................................... 9
4.2 Hold, Transfer and Alternate ........................................................................... 10
4.3 Three-Party Conference Calls ........................................................................ 10
4.4 Comfortable Call Transfer ............................................................................... 11
4.5 Completion of Calls to Busy Subscriber (CCBS) ............................................ 12
4.6 Call Forwarding ............................................................................................... 13
4.6.1 Call Forwarding via Central Office ........................................................... 13
4.6.2 Call Forwarding via USB Box .................................................................. 14
4.7 Call Distribution ............................................................................................... 15
4.8 Sending Codes to a PBX or to the Central Office ........................................... 15
4.9 Blocking .......................................................................................................... 16
4.10 Remote Administration ................................................................................. 17
4.11 Personal Callback ......................................................................................... 18
5 TELES.ISDN Device Manager ............................................................................. 19
5.1 The TELES.ISDN Device Manager User Interface ......................................... 19
5.2 Getting Started ................................................................................................ 19
5.3 Settings for Analog Ports ................................................................................ 20
6 Troubleshooting ................................................................................................... 23
6.1 Setting Service Indicators for Analog Ports .................................................... 24
7 Customer Service ................................................................................................ 25
7.1 Checklist for Hotline Contacts ......................................................................... 26
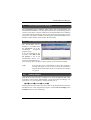
8 Overview of Analog Ports’ Functions
............................................................ 27
TELES.S0/2TR USB Box - Rear View ....................................................Cover
TELES.S0/2TR USB Box - Front View - LED Display ...........................Cover
Specifications ..........................................................................................Cover
Acoustic Signals .....................................................................................Cover
©1999 by TELES AG Berlin, Version 2.00/S0USBTR-e/10.08, Issue: October 1999
Page i
Contents
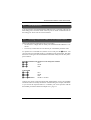
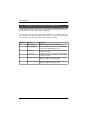
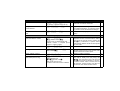
Pictograms
Pictogram
Meaning
D
Replace receiver
U
Lift receiver
N
Key in call number or any series of numbers
0....9
Key in certain number series
P
Key in 5-digit PIN
Q
OK tone
*
Star key
#
Pound key
R
Flash button. Sometimes labeled differently.
G
Call in progress
K
Three-party conference in progress
For Your Safety
The TELES.S0/2TR USB box is intended for operation on a Basic Rate Interface.
Please note that the ISDN driver (CAPI) is capable of different D channel protocols. The box’s PBX features, however, are only suited to Euro ISDN (based on a
D channel protocol referred to as DSS1 or ETSI).
The box may not be altered in its construction or its safety features without the explicit prior consent of the manufacturer. Any alterations exempt the manufacturer
from liability for damages resulting thereby.
Please ensure that no liquids enter the box case. This could cause short circuits or
electric shocks.
Keep smoke, dust, vibrations and moisture from the device. Avoid extreme temperatures, direct sunlight and powerful electromagnetic fields.
Place the box on an even and stable surface, or mount it securely to the wall.
Page ii
©1999 by TELES AG Berlin, Version 2.00/S0USBTR-e/10.08, Issue: October 1999
Introduction
1
Introduction
The TELES.S0/2TR USB Box is a combination of ISDN adapter for your PC and
terminal adapter for your analog devices.
As terminal adapter...
... the TELES.S0/2TR USB Box provides you with two ports for analog devices.
This means that you can take advantage of ISDN while still using your traditional
telephones. This feature works whether you use your PC or not. Plus, you have
access to functions that are usually only available to full-featured PBXs.
As ISDN adapter...
... the TELES.S0/2TR USB Box connects your PC to ISDN, providing you with the same performance as an internal TELES.BRI board. The TELES.RVS PowerPack
software includes the programs and interface for PC-supported telephony, internet access, data transmission, etc.
Simply connect the adapter to your computer’s USB port.
As a member of the TELES.Family ...
... the TELES.S0/2TR USB Box can be
combined with other TELES ISDN devices.
All TELES BRI products exploit a patented
technology that lets you profit from further
possibilities with even more power and
comfort: Though you need no additional
wiring or extra charges, all TELES ISDN
devices connected to the same BRI can
communicate with each other. In contrast to
other manufacturers’ ISDN products, this
technology allows you to transfer calls to and from all your ISDN devices without
paying charges. This is also true for a TELES ISDN device you may have attached
to the box’s ISDN socket, e.g. the full-featured ISDN telephone TELES.FON.
©1999 by TELES AG Berlin, Version 2.00/S0USBTR-e/10.08, Issue: October 1999
Page 1
Introduction
1.1
TELES.S0/2TR USB Box Features at a Glance
General TELES.S0/2TR USB Box Features
• Provides you with the same performance as an internal BRI board. The
TELES.RVS PowerPack software allows you to use all the advantages of PC
supported telephony, internet, data transmission, faxing, etc.
•
Plug&Play driver installation when first connected to the PC.
•
Hotplugging lets you easily plug the box in and out while your PC is running.
•
Features power management.
•
Flash-ROM easily updates the firmware without having to replace any hardware components.
•
Supports the DSS1 protocol.
•
Connects to all analog terminal devices (telephones, fax machines, answering
machine) supporting touchtone dialing (DTMF). Internal connections
between the analog devices are free of charge.
•
An additional ISDN device can be attached to one of the box’s ISDN sockets.
Calls between this device and the analog devices are external communications and are charged. However, thanks to the TELES.Family concept you
can transfer calls to or from this device, thus avoiding charges. This is the
result of a process designed and patented by TELES, which coordinates all
TELES.ISDN terminal devices. Other brands allow call transfer on the same
BRI bus only via parking (for details see Chapter 4.4, page 11).
•
Two ISDN channels can be active at the same time. You can make a telephone call and receive a fax or surf the internet at the same time. Or you can
make telephone calls on both analog ports at the same time.
•
Several TELES.S0/2TR USB Boxes can be attached to one BRI bus.
•
There are two ways to control the analog ports’ functions: from your PC
using the TELES.ISDN Device Manager, or by using the DTMF-capable telephones attached. If you have a TELES ISDN device connected to the same
BRI please note that different key commands are applicable. Please refer to
the manual delivered with the device or simply use the TELES ISDN Manager.
•
4 LEDs are provided to indicate operating status and analog port usage.
Page 2
©1999 by TELES AG Berlin, Version 2.00/S0USBTR-e/10.08, Issue: October 1999
Introduction
Features specific to the analog ports
• Each analog port can be assigned a number of its own (MSN). A third MSN
can be programmed for remote control.
•
The flash button on the telephone allows you to set up a call (internal or external) while in the course of another one. One party is put on hold and you can
switch back and forth between both parties. You can also transfer an
external call to an extension on the other port without waiting for the called
party to pick up the call. If supported by your ISDN line you can make use of
3 party conference calls.
•
Calls can be parked to be picked up from another extension or from an ISDN
line connected to the same ISDN line.
•
The TELES.S0/2TR USB Box allows two different approaches to configure
Call forwarding: a) Call forwarding unconditional via the box. This is used
to forward calls immediately to the box’s other analog port or to an external
line. b) Call forwarding via ISDN switch. This feature must be subscribed
with your phone company. As a rule, you can take advantage of three types of
Call forwarding: unconditional, no reply, call forwarding when busy.
•
Statistics on all connections and charges analysis are performed in a clear
and simple manner by the TELES ISDN Device Manager.
•
The analog ports feature several types of call blocking: To control your telephone bill you can set up a charge account or configure various block types.
Unwanted calls can be rejected.
•
When calling a busy phone, do not hang up, but use the callback on busy feature (CCBS = Completion of calls to busy subscriber).
•
Direct Call (or baby call) is the feature that allows a preset number be dialed
automatically by simply lifting the receiver – useful for small children who
are not able to dial numbers.
•
To prevent unauthorized use, a PIN is needed for all important functions.
•
Some functions can be controlled from a remote location, e.g. you can activate call forwarding by calling the box. This means that you can always be
reached and therefore miss no important calls.
•
Personal Callback: You can allow certain persons to use your outside line.
Use this feature if you want to pay the charges for an employee or a family
member.
©1999 by TELES AG Berlin, Version 2.00/S0USBTR-e/10.08, Issue: October 1999
Page 3
Introduction
1.2
System Requirements
Before installing your TELES.S0/2TR USB Box, check that your computer meets
the following requirements:
•
PC equipped with at least a 166 MHz Pentium and 16 MB of RAM
•
Windows 98 or Windows 95b OSR 2.1
•
Graphics card with at least VGA resolution (800 x 600 pixels, 16 colors)
•
Hard disk space: 40 MB
•
Your PC must be equipped for USB support:
- Windows support for USB devices must be active. Check for the Universal
serial bus controller category in the Windows Device Manager. You
should see the USB Host Controller and USB Root Hub entries when you
click the plus sign ("+") for this category.
- Windows 98 is fully USB-ready. Under Windows 95b OSR 2.1, you may
need to install the Microsoft USB Supplement (usbsupp.exe). This
supplement is currently included on Windows CDs marked "USB-support". The installation of this supplement requires you to restart your computer. After restarting, proceed with the TELES.S0/2TR USB Box
installation.
•
ISDN line: Point-to-multipoint access or internal BRI provided by a PBX
- To display charges, the ISDN line must support advice of charges.
1.3
•
•
•
•
•
•
•
Package Contents
TELES.S0/2TR USB Box
Power supply unit
ISDN connecting cable with an RJ-45 connector on either end
USB cable
User’s manual "TELES.S0/2TR USB Box"
User’s manual " TELES ISDN Adapter + TELES.RVS PowerPack"
CD ROM with ISDN driver and TELES.RVS PowerPack applications software
Page 4
©1999 by TELES AG Berlin, Version 2.00/S0USBTR-e/10.08, Issue: October 1999
Installing the TELES.S0/2TR USB Box
2
Installing the TELES.S0/2TR USB Box
2.1
Installation Overview
The following steps are necessary to install the TELES.S0/2TR USB Box:
1. Connect the box to the ISDN line and the power supply.
2. Connect the analog devices. If available, connect your ISDN device as well.
After these steps have been completed, you can make and receive calls on the analog devices attached. However, it is advisable to complete the following steps:
3. Connect the TELES.S0/2TR USB Box to the PC’s USB port.
4. Install the ISDN driver software and, if required, the user software
TELES.RVS PowerPack. For instructions refer to the installation manual
"TELES.ISDN Adapter + TELES.RVS PowerPack".
5. Change the PIN required for configuring the analog ports.
6. Assign numbers (MSN).
7. Adjust flash time on your analog telephones.
2.2
Connecting the TELES.S0/2TR USB Box
•
Plug the power supply into the 220V/230V wall outlet. Connect the other
end of the power supply cable to the socket marked 12V. Connect the
TELES.S0/2TR USB Box to the ISDN line with the RJ-45 connector cable
supplied. The TELES.S0/2TR USB Box performs a self-test. Each of the
LEDs lights up briefly. When the test is completed, the red LED lights up,
indicating that the box is operational.
•
Connect the analog devices to the two
analog ports on the back of the
TELES.S0/2TR USB Box. These
ports are in the form of 6-pin RJ-11
jacks, according to international
standards. The letters a and b in the
figure mark the pins assigned.
Left: RJ-11 connector cable typically
used for analog equipment, such as
telephones, modems, fax machines.
Right: Analog jack on the back of
the box. The letters a and b mark
the pins assigned.
©1999 by TELES AG Berlin, Version 2.00/S0USBTR-e/10.08, Issue: October 1999
Page 5
Setting up the TELES.S0/2TR USB Box
•
An additional ISDN device can be attached to the remaining ISDN jack.
Please note that this is not an extra ISDN port but only an "extension" passed
through from your BRI, similar to a Y connector.
•
Use the USB cable to connect the box to your PC. The box will automatically be displayed as a new hardware component. Insert your TELES.RVS
PowerPack CD and follow the screen messages to set up the ISDN driver as
described in the installation manual "TELES.ISDN Adapter + TELES.RVS
PowerPack".
3
Setting up the TELES.S0/2TR USB Box
There are several ways to program the TELES.S0/2TR USB Box:
A) The easiest way is to program your TELES.S0/2TR USB Box from your PC,
using the TELES.ISDN Device Manager. Please refer to Chapter 5, page 19ff,
for details.
B) Alternatively, use the connected telephones.
- To program the two analog ports, key in the commands listed in Chapter
8, page 27ff. Be sure your analog telephones can generate DTMF tones. If
your telephones are set to the pulse mode, check the manual supplied to see
if you can switch from pulse to tone dialing. Pulse dial phones cannot be
used to program the box. (However, you can use them to make calls). All
commands begin with * and end with #. Be sure your telephones have
these keys.
If a function has been correctly set, you will hear the OK tone (short, regular tone).
If a function could not be activated, you will hear the error tone (repetitive, piercing tone).
- If you have an ISDN device connected, use the commands described in the
manual supplied with it. If your ISDN device is a TELES product, you can
take advantage of the TELES ISDN Device Manager as well.
C) For the two analog ports, you can also use your answering machine remote
control.
Page 6
©1999 by TELES AG Berlin, Version 2.00/S0USBTR-e/10.08, Issue: October 1999
Setting up the TELES.S0/2TR USB Box
3.1
Setting the PIN
To configure the analog ports you have to set a PIN. The PIN is a 5-digit
number. When shipped from the factory, the PIN is set to 00000 which allows you
to perform only one configuration command – changing the PIN. For instructions,
please refer to Chapter 8, page 27ff.
The PIN can only be set by using one of the connected analog telephones, not by
the Device Manager. The new PIN must be entered twice, to avoid errors.
Note:
Make careful note of the new PIN, because you cannot configure
your box without it. If you lose the PIN, you will have to return
the box to the manufacturer, who will delete the PIN. Costs will
be billed to you.
This PIN is not applicable to the ISDN device you may have connected to your
box. If you use a TELES ISDN product refer to the manual supplied with it.
3.2
Assigning Phone Numbers (MSN)
Your phone company will usually assign you 3 MSNs for a point-to-multipoint
line configured for Euro-ISDN. MSN (Multiple Subscriber Number) is the complete phone number without the local prefix.
To assign phone numbers to the analog ports:
• Each analog port can be assigned a phone number of its own.
• If you do not assign phone numbers to either analog port, all connected analog telephones will ring simultaneously when one of your ISDN line’s
number is being called.
• If you set a phone number to one analog port only, the port without a number
cannot accept incoming calls. Nevertheless, you can configure this port to
ring as well. To activate this mode use the *69*PIN*1# command. This
may be useful if you have not enough phone numbers left for all devices or
applications you want to use over your ISDN line.
• To take advantage of the remote control and Personal CallBack features, one
of your ISDN line’s phone numbers should be reserved for this purpose.
Refer to Chapter 8, page 27ff, for all key combinations needed.
To assign a phone number to the ISDN device:
Refer to the device’s manual for instructions on how to set phone numbers. If you
use a TELES product you can take advantage of the TELES.ISDN Device Manager.
©1999 by TELES AG Berlin, Version 2.00/S0USBTR-e/10.08, Issue: October 1999
Page 7
Setting up the TELES.S0/2TR USB Box
3.3
Setting Device IDs for Each TELES ISDN Device
Device IDs are only necessary if you have several TELES ISDN devices connected to one BRI line and and if you want to take advantage of the functions offered by the TELES.Family patent, i.e.
• comfortable call transfer (see Chapter 4.4, page 11)
• programming devices with the TELES ISDN Device Manager (see Chapter
5.1, page 19ff).
If you only have one TELES ISDN device on the ISDN line and only want to program the box using the Device Manager, device IDs are of no relevance. You need
not make any changes.
Each single TELES ISDN device should be assigned a device ID, whether it is attached directly to the ISDN network terminator or to the ISDN socket of your
TELES.S0/2TR USB Box.
The device ID is a one-digit number between 1 and 8. The factory default setting
for every TELES.ISDN device is ID 1.
Note:
The device ID you allocate to the box will refer to port 1 only.
Port 2 will automatically be assigned the next ID. As a result, this
ID should be skipped when assigning IDs to other devices.
Like the PIN, the device ID can only be set by using one of the
connected telephones, not by the TELES.ISDN Device Manager.
The box’s device ID is displayed in the title bar of the TELES.ISDN Device Manager. In contrast to that, you can neither view nor
edit the second device ID.
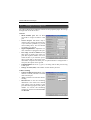
Example:
Page 8
If you assign e.g. ID 3 to the box, port 2 is automatically addressable by ID 4. For a TELES.FON attached to the box, you may
now use any other ID except 3 and 4.
©1999 by TELES AG Berlin, Version 2.00/S0USBTR-e/10.08, Issue: October 1999
TELES.S0/2TR USB Box as Full-featured PBX
4
TELES.S0/2TR USB Box as Full-featured PBX
This chapter describes the PBX features provided by the two analog ports. All
key combinations for setting these features are summed up in Chapter 8, page
27ff. Functions requiring more explanation are detailed below.
Please be aware that the second ISDN socket of your TELES.S0/2TR USB Box is
only an "extension" of your BRI. Therefore, the box’s PBX functionality will not
cover any additional ISDN device connected to your box or to your ISDN network terminator. However, thanks to the TELES Family concept you can profit
from the Comfortable Call Transfer feature uniquely offered by TELES (see
Chapter 4.4, page 11).
4.1
Setting Flash Time for Analog Telephones
The different hold and transfer functions are initiated via a signal that is transmitted to the system by pressing the flash button. The analog telephones connected
must be equipped with this button. Throughout this manual, the flash button is referred to as the R key. It may be labeled differently on your own phones.
The TELES.S0/2TR USB Box flash time is set to 90 ms. Be sure the connected
analog telephones are configured to the same time.
To adjust the flash time, follow the operating instructions for your phone (there is
no key combination provided by the box). If your phones are set to another mode,
the hold and transfer functions will not be available to you.
©1999 by TELES AG Berlin, Version 2.00/S0USBTR-e/10.08, Issue: October 1999
Page 9
TELES.S0/2TR USB Box as Full-featured PBX
4.2
Hold, Transfer and Alternate
Ask the first party to hold the line. Press the flash key to put the call on hold. Listen
for the dial tone and call another internal or external party. Once the call is answered you will be connected with this party.
You now have the following options:
• To transfer the call on hold: This option can only be used for passing internal
to external parties or vice versa. This means transferring calls between two
internal parties or two external parties would not work.
• To alternate between the two parties: Press the flash button to switch back
and forth. Each conversation is private and cannot be heard by the on-hold
party.
• To disconnect the "active" call do not hang up but press ##R. You can
continue to talk to the party who was on hold at this moment.
• To terminate either call: Simply hang up.
4.3
Three-Party Conference Calls
Your TELES.S0/2TR USB Box allows you to hold a three-way conversation. This
feature can only be used if supported by your ISDN line. Your two counterparts
must be external parties.
To set up a conference:
Ask the first party to hold the line. Press the flash key to put the call on hold. Listen
for the dial tone and dial the third party’s phone number. Once the call is answered
press *# to allow everybody to listen and speak to one another.
While the conference is in progress, you have the following options:
• You can easily switch back and forth between the two parties by pressing
*#. This is useful if you wish a private conversation with one of the them.
• To disconnect the third party, press ##R. You are only connected with the
party on hold.
• To disconnect both calls, simply hang up.
Page 10
©1999 by TELES AG Berlin, Version 2.00/S0USBTR-e/10.08, Issue: October 1999
TELES.S0/2TR USB Box as Full-featured PBX
4.4
Comfortable Call Transfer
If you have other TELES.ISDN devices attached to your ISDN line, e.g. an ISDN
telephone attached
• to the second ISDN port on the box,
• or to your ISDN network terminator,
you can take advantage of a transfer function specially developed by TELES:
Transferring calls to other ISDN terminal devices on the same BRI line. This allows you to transfer calls between your analog telephones and your ISDN telephone without paying any charges.
This function is available to you if each TELES ISDN device has its own device
ID.
To transfer calls from an analog phone (connected to the box) to a TELES
ISDN device (connected to the same ISDN line / to the box):
G
**
N
You have a call which you want to transfer.
Press the star key twice.
Key in the ID of the TELES ISDN device to which you want to transfer
the call.
When you hear the OK tone, you can put the receiver down. The ISDN device
which you dialed has 60 seconds to take the call.
If you keyed in the wrong device ID, or the line is busy, you will hear the error
tone. You are still connected to the original caller.
If the device you dialed does not take the call, you have 60 seconds to take the
call back by lifting your receiver and keying in *#. Otherwise, the original caller will get the busy signal after 60 seconds have elapsed.
To transfer a call from the ISDN phone to the analog phones on the box:
The device manual will tell you how to activate this function. The TELES.FON,
for example, comes with a special key for this purpose. To transfer a call to port 1
of the TELES.S0/2TR USB Box, just dial the box’s ID. To transfer a call to port 2,
dial the box’s ID number plus 1 (for details on device IDs see Chapter 3.3, page 8).
Example:
Your box is set to device ID 3. To transfer calls from an ISDN
telephone to port 1 of your box, dial device ID 3. To transfer calls
to port 2, dial device ID 4.
©1999 by TELES AG Berlin, Version 2.00/S0USBTR-e/10.08, Issue: October 1999
Page 11
TELES.S0/2TR USB Box as Full-featured PBX
4.5
Completion of Calls to Busy Subscriber (CCBS)
With your TELES.S0/2TR USB Box, you can profit from this feature no matter
whether you have subscribed to CCBS with your phone company. If not subscribed, your box uses an automatic redial function.
To use CCBS with your analog telephones connected to the box:
The number you dial is busy. Do not hang up yet, but press # while you still hear
the busy tone. Then put the receiver down. As soon as the called party is free again
your telephone rings. All you have to do is lift the receiver and you are then connected to the called party.
To deactivate CCBS lift the receiver and press R#.
To use CCBS with an ISDN phone connected to the box:
Your ISDN phone must by capable of CCBS. For instructions refer to the manual
supplied. Most of the TELES ISDN Devices support CCBS. TELES.FON even
has a special button that makes CCBS easy to use.
Page 12
©1999 by TELES AG Berlin, Version 2.00/S0USBTR-e/10.08, Issue: October 1999
TELES.S0/2TR USB Box as Full-featured PBX
4.6
Call Forwarding
To set Call Forwarding you can either
• take advantage of the functions integrated into your TELES.S0/2TR USB
Box (see Chapter 4.6.2, page 14)
• or use the service provided by your central office. This is usually based on
two different approaches depending on the standards used by your phone
company:
- Euro-ISDN standard (see Chapter 4.6.1, page 13)
- national standards (see Chapter 4.8, page 15)
Each option requires different codes to activate and deactivate call forwarding.
Your TELES.S0/2TR USB Box complies with Euro-ISDN and supports a variety
of national call forwarding standards, allowing you to benefit from either approach.
4.6.1
Call Forwarding via Central Office
In contrast to call forwarding by the box, this service needs to be activated for each
of your ISDN line’s call numbers. This gives you the flexibility to use it for any
device connected to your BRI. Some phone companies offer voicebox services
which can only be used in conjunction with call forwarding via the central office.
Having call forwardings switched through your central office keeps free your own
B-channels. On the other hand, subscription costs and forwarding charges may be
incurred. In contrast to call forwarding via the TELES.S0/2TR USB Box the service cannot be controlled from remote locations.
The type of call forwarding - if at all - supported by the ISDN line, depends on the
services the carrier offers. Your box supports the following CF types:
• Unconditional call forwarding (CFU) – forwards calls immediately
• Call forwarding no reply (CFNR) – forwards calls if no one answers the
phone after a certain number of rings
• Call forwarding when busy (CFB) – forwards calls if your line is busy.
For the Euro ISDN compliant type of call forwarding use the codes ranging from
*31* to *36* as listed in Chapter 8, page 27. To avail of national variations,
follow the instructions outlined in Chapter 4.8, page 15.
©1999 by TELES AG Berlin, Version 2.00/S0USBTR-e/10.08, Issue: October 1999
Page 13
TELES.S0/2TR USB Box as Full-featured PBX
4.6.2
Call Forwarding via USB Box
You may want to forward calls even though you haven’t subscribed to call forwarding with your phone company. To do so, simply use the call forwarding feature provided by your USB box. Note that the TELES.S0/2TR USB Box supports
only the unconditional type of call forwarding (CFU), i.e. all calls are forwarded
immediately to the other number.
If you know that the phones on a port
will not be attended for some time,
you can have the calls forwarded immediately to another phone. The
phones originally dialed do not ring.
Note that both B-channels are used
while a call is being forwarded. The
connection set up to the CFU destination will be charged to your ISDN line.
The TELES.S0/2TR USB Box offers two ways to set CFU:
A) Enter source and destination number. This function requires you to key in
the complete phone numbers and the box’s PIN. Therefore, it is ideally
suited for remote control from the public network. Key combination:
*06*PIN*source*destination#.
B) Only set the destination number. Applicable only to the port on which you
set the function. Destination may be an external phone or just the other port’s
number. Key combinations:
*07*destination#
*07**port number#
To delete the destination enter the same command without entering a destination.
(applies to A and B).
You also have the option of simply activating or deactivating call forwarding.
After you have set the destination, use the *08*1 or 0 key combination to activate/deactivate the function. This applies to both types of call forwarding.
Page 14
©1999 by TELES AG Berlin, Version 2.00/S0USBTR-e/10.08, Issue: October 1999
TELES.S0/2TR USB Box as Full-featured PBX
4.7
Call Distribution
You can program your TELES.S0/2TR USB Box to have incoming calls ring on
both analog ports, no matter which of the two ports is called. Set this function on
the analog port whose calls are to be forwarded.
4.8
Sending Codes to a PBX or to the Central Office
Observe the following instructions only if you wish to
• set functions in a larger PBX to which your TELES.S0/2TR USB Box is connected
• avail of any central office service that may be controlled by national codes.
To quit the box’s command level, lift the receiver and press the # button. You
can now enter any command specific to your PBX or local central office. The table
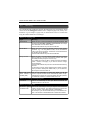
below lists some typical local switchboard commands widely used in many European countries.
Common national codes used in several European countries
CFU
CFNR
CFB
*21*
*61*
*67*
Netherlands
*210*
*610*
*670*
*670*0842333
CFU
CFNR
CFB
CFNR to voicebox
Contact your carrier to find out which other supplementary services are available
and which codes are actually needed. For call forwarding, for example, ask whether you can use the steps listed above, or whether your carrier operates with the
Euro ISDN procedures outlined in Chapter 4.6.1, page 13.
©1999 by TELES AG Berlin, Version 2.00/S0USBTR-e/10.08, Issue: October 1999
Page 15
TELES.S0/2TR USB Box as Full-featured PBX
4.9
Blocking
The TELES.S0/2TR USB Box supports the following types of blocking, which
can be set for the analog ports. Please refer to Chapter 8, page 27ff, for key combinations, or go to Chapter 5, page 19ff, for information on how to set functions
using the TELES.ISDN Device Manager.
Blocks on outgoing calls
Type
Meaning
Global block
When set, port 1 and 2 are blocked. The preset numbers, 110
and 112, and five other numbers of your choice are exempt
from this block and can still be dialed.
Internal calls between the ports are not affected.
Partial Block
When set, port 1 and 2 are blocked. Used to block certain
numbers: e.g. 0 for long-distance calls, 00 for international
calls, or toll service numbers. A maximum of 5 numbers/series
of numbers can be blocked.
Internal calls between the ports are not affected.
Charge account
When set, port 1 and 2 are blocked. Allows calls up to a preset
limit of units only. As soon as the limit is reached, both ports
are totally blocked (except for 110 and 112).
Your ISDN line must be able to transmit charge information
(AOC = Advice of charges), if you want to use the charge
account feature.
Internal calls between the ports are not affected because they
are free.
To set up the account, simply determine the number of charge
units you want to allow (max. 99999 units). If you set this at 0,
the charge account is turned off.
Direct Call (some- Can be set individually for each port. When you lift the
times referred to receiver a preset number will be automatically dialed. A special dial tone is played for 3 seconds before the call is placed.
as Baby Call)
To deactivate, enter the command within the 3 sec.
Blocks on incoming and outgoing calls
Total block
Can be set individually for each port. Blocks all internal and
external calls incl 110 and 112.
Blocks on incoming calls
Protection against
unwanted calls
Page 16
Can be set individually for each port. Rejects calls made from
certain, preset numbers. The caller hears the busy signal. This
can only function if the calling number is transmitted.
On each port, you can block calls from up to 5 unwanted numbers. This function is deactivated if no numbers are entered.
©1999 by TELES AG Berlin, Version 2.00/S0USBTR-e/10.08, Issue: October 1999
TELES.S0/2TR USB Box as Full-featured PBX
4.10
Remote Administration
You can control several features from a remote location. This applies only to the
two analog ports.
To avail of this function you have to reserve one of your ISDN line numbers
(MSN) for remote access (Chapter 3.2, page 7). This number has to be dialed before the key combinations necessary to set the functions. All functions that can be
set by remote control are marked with an ’X’ in the ’R’ column of the "Overview
of Analog Ports’ Functions".
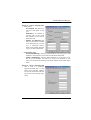
Example: To set Call Forwarding by remote control
U
N
Lift the receiver. You will hear the dial tone.
*
06
*
P
*
N
*
N
#
Q
D
Press the star key.
Dial the MSN reserved for remote access. You will hear a Ready tone
(one short beep).
Key in 06.
Press the star key.
Key in your PIN.
Press the star key.
Enter the complete number of the port whose calls are to be forwarded.
Press the star key.
Enter the destination number for the calls.
Press the pound key.
You will hear the OK tone.
Hang up.
©1999 by TELES AG Berlin, Version 2.00/S0USBTR-e/10.08, Issue: October 1999
Page 17
TELES.S0/2TR USB Box as Full-featured PBX
4.11
Personal Callback
The MSN reserved for remote administration is also used as the dial-in number
for Personal Callback. The caller uses this number to dial into the TELES.S0/
2TR USB Box. After hearing the Ready tone for remote access he/she keys in the
*99* command followed by the 5-digit access code and #, and hangs up. The
box calls the preset callback number associated with this specific access code,
the caller hears a dial tone, and can now dial the number desired. Charges for both
calls will be made to your line, not to the caller.
The remote access number (Chapter 3.2, page 7), the 5-digit access code and the
callback number must be configured in advance. The callback number is the
phone number of the caller’s location.
If the person is travelling around the callback number needs to be modified. The
number can be updated by remote control. Note that the *89* code will delete
all callback numbers. To change only a specific callback number use *87*.
The caller can set up several calls without hanging up. To do so, he/she ends a Personal CallBack call by pressing *# and waits a few seconds until he/she hears
the dial tone once again.
While a Personal CallBack call is in progress, both analog ports are used. As a result, you cannot make another call from one of the connected phones. When you
lift the receiver you will not hear the dial tone, but the yellow LED lights up.
Note:
In this release of TELES.RVS PowerPack, the 5-digit access
code is referred to as Callback in the TELES.ISDN Device Manager (see Chapter 5.1, page 19ff).
Page 18
©1999 by TELES AG Berlin, Version 2.00/S0USBTR-e/10.08, Issue: October 1999
TELES.ISDN Device Manager
5
TELES.ISDN Device Manager
The TELES.ISDN Device Manager makes child’s play of programming your
TELES.S0/2TR USB Box. You can program almost every function using your PC
instead of your phone’s keypad. Furthermore, the TELES.ISDN Device Manager
counts all incoming and outgoing calls on each port and registers charges for outgoing calls. This chapter includes a short description of the TELES.ISDN Device
Manager. Further details can be found in the online help.
5.1
The TELES.ISDN Device Manager User Interface
The TELES.ISDN Device
Manager is accessible from
the Accessories icon in the
TELES.RVS
PowerPack
program group.
If you are installing for the
first time, select File | Look
for Devices. A list of all
TELES.ISDN devices connected to your ISDN line appears, showing device ID, device name, software version and serial number.
Note:
5.2
If several devices are connected but no device IDs assigned, a
message will appear on your screen. Set an ID for each device,
using the phone connected to the device in question. See Chapter
3.3, page 8.
Getting Started
Mark the device that you want to configure. You will be prompted to enter a PIN.
If the PIN is still set to the default 00000, you will not be able to make any configurations. Use your telephone to change the PIN. Key in:
*90*oldPIN*newPIN*newPIN#.
When the PIN has been entered correctly, data can be transmitted from the TELES.ISDN device to the configuration program. Click the Device Settings and/or
Statistics buttons to enter the dialogs.
©1999 by TELES AG Berlin, Version 2.00/S0USBTR-e/10.08, Issue: October 1999
Page 19
TELES.ISDN Device Manager
5.3
Settings for Analog Ports
The TELES.ISDN Device Manager consists of five properties pages. We will go
through each one in this section.
General
• Phone number port 1/2: Use these
two fields to assign an MSN to each
port.
• Service ID port 1/2: Refers only to
outgoing calls. Change this setting only
if you encounter problems (e.g. errors
when sending faxes). For more details
see Chapter 5.3, page 20.
• Signal Amplification: Adjusts the volume of the devices plugged to this port.
• Port rings even if no number is set:
This option is useful if one of the two
ports has no phone number of its own.
Check the box if you want this port to
ring as well when a call comes in for
the number assigned to the other port. If a phone number is configured for a
each port, this option can be ignored.
• Call Distribution: If set for e.g. port 1, incoming calls for this port will ring
at both ports.
• Charge Account (units): The number of units that may be used.
Call Forwarding
• Call forwarding target port 1/2: Destination to which you want to forward
calls from this port.
• Active: Tick this to activate the call forwarding.
• Internal Port: If the call forwarding
destination is one of the box’s internal
ports simply enter the number of the
port rather than typing the entire phone
number. To activate call forwarding
tick the two check boxes labeled active
and internal.
Page 20
©1999 by TELES AG Berlin, Version 2.00/S0USBTR-e/10.08, Issue: October 1999
TELES.ISDN Device Manager
Block (1) - refers to outgoing calls
• Port 1 or 2:
- Port blocked: Tick this box to
activate a total block on this
port.
WARNING: No internal or
external calls can be made.
The numbers 110 and 112 are
blocked as well.
- Number for child call: Tick
this box and enter the number
to be dialed directly from this
port. A connection will be
made to this number when the
receiver is lifted off the hook.
•
Both analog ports:
- Partial Call Blocking: Activates partial block on both analog ports. The
numbers to be blocked are to be entered in the fields underneath.
- Global Call Blocking: Activates global blocking on both analog ports.
The two preset numbers 110 and 112 as well as five numbers of your
choice are exempt from blocking. Enter these numbers in the fields underneath.
Block (2) - refers to incoming calls
• This is used as a protection
against unwanted calls, i.e. calls
made from particular numbers
are rejected, or blocked. This feature can be set for each port separately.
©1999 by TELES AG Berlin, Version 2.00/S0USBTR-e/10.08, Issue: October 1999
Page 21
TELES.ISDN Device Manager
Personal CallBack
• Dial-in number: The number
reserved for Remote Configuration
and Personal Callback.
• Callback: 5-digit access code to
identify authorized callers.
• Callback number: This is the
number that will be called back by
the box, i.e. the caller’s number.
Viewing statistics
• Counters for port 1/2:
The sum of all outgoing
and incoming calls.
• Total: The total amount
of charges incurred on
the port.
• Counters for Personal
Callback: Lists number
of incoming calls made to
the number, and number
and cost of outgoing calls
made to the numbers
called.
• Clear call counters: Resets the counters to 0.
• Clear charge counter: Resets the total charge to 0.
Note:
Statistic display can only be done by the Device Manager. It cannot be called up by telephone.
Page 22
©1999 by TELES AG Berlin, Version 2.00/S0USBTR-e/10.08, Issue: October 1999
Troubleshooting
6
Troubleshooting
You can often solve minor problems during operation of the TELES.S0/2TR USB
Box by yourself. Before calling the hotline for assistance, try to fix the problem
by going through the following steps:
You lift the receiver but you don’t hear the dial tone. Does the green status
LED light up?
Yes:
Your phone is properly attached. Check the cable to the ISDN line.
No:
a) Check that the RJ-11 cable is securely plugged into the TELES.S0/2TR USB Box and the telephone.
b) Refer to RJ-11 plug figure in Chapter 2.2, page 5 and check that
the pin assignment is correct.
When you lift the receiver, you do not hear a dial tone:
Cause:
A Personal CallBack connection or Call Forwarding is in progress.
The yellow LED is on.
Solution:
Wait until the connection has been terminated and try again.
Telephone does not ring for incoming calls; outgoing calls are possible:
Cause:
You’ve entered the incorrect number for your own number.
Solution:
Re-enter the number from your local telephone company documents.
No connection can be set up when you press the flash button for hold, transfer
or conference calls:
Cause:
The connected phone is either set to "ground" or a wrong hookflash time.
Solution:
Set flash time to 90 ms. For instructions see the phone’s manual.
©1999 by TELES AG Berlin, Version 2.00/S0USBTR-e/10.08, Issue: October 1999
Page 23
Troubleshooting
6.1
Setting Service Indicators for Analog Ports
The table below lists the various services supported by the analog ports. By default, both ports are set to type 1 (ISDN telephony).
We recommend changing the default setting ONLY if you encounter problems
with outgoing calls. This may happen when you try to reach fax machines that
have not been correctly set for the type of fax being sent to them.
Indicator
Service
Meaning
1
ISDN telephony
Default setting. Usually applicable.
2
Analog telephony
Use this option only when you encounter problems with the ISDN telephony mode.
3
Group 2 fax
To call fax machines connected to PBXs capable
of Group 2 fax only.
4
Group 3 fax
To call fax machines connected to PBXs capable
of Group 3 fax only.
5
Option 1 telephony
Used to set up connections to PBXs that are not
capable of ISDN or analog telephony.
6
Option 2 telephony
Used to set up connections to PBXs that are not
capable of ISDN or analog telephony.
Page 24
©1999 by TELES AG Berlin, Version 2.00/S0USBTR-e/10.08, Issue: October 1999
Customer Service
7
Customer Service
International Help Desk
TELES Ireland Ltd.
Phone*)
Unit 3, Distribution Centre,
Shannon Airport Free Zone,
Co. Clare
E-Mail Support:
IRELAND
E-Mail Sales:
World Wide Web:
+353 (61) 716 716
[email protected]
[email protected]
http://www.teles.ie
Local Help Desks
TELES AG
Dovestrasse 2–4
10587 Berlin
GERMANY
Phone*)
Fax:
World Wide Web:
0190/871101
(3.63 DM/min Germany only)
+49 (30) 399 28 01
http://www.teles.de
TELES Benelux BV
De Lasso 70
NL-2371 GZ
Roelofarendsveen
THE NETHERLANDS
Phone*)
Fax:
World Wide Web:
0900 2027777 (105 cpm)
+31 (71) 331 7174
http://www.teles.nl
TELES Italia SRL
Via die Platani 6
I-20020 Arese (MI)
ITALY
Phone*)
Fax:
World Wide Web:
+39 (02) 93777 100
+39 (02) 93777 101
http://www.telesitalia.it
BCS Oslo
NORWAY
Phone*)
820 70 240 (12 nok/min)
*) Available Monday through Friday from 9.00 a.m. to 5.30 p.m.
Return Material Authorization (RMA)
Returned goods are accepted only if an RMA number is attached. TELES assigns
these numbers on (written) request after evaluation of the validity of the return. Goods
must be packed appropriately.
Cost compensation option for hardware checking
TELES may ask for compensation of hardware checks, if for example a hardware
check has been ordered but no error could be found. In this case, TELES may bill for
the costs (labor etc.) that occur while checking the hardware.
©1999 by TELES AG Berlin, Version 1.61/RVSPP-e/10.08, Issue: October 1999
Page 25
7.1
Checklist for Hotline Contacts
If problems occur during operation, have the following information at hand when you
contact the TELES Hotline for assistance.
Operating System:
=Windows 98
TELES.RVS PowerPack:
Version ___________
CAPI:
Version ___________
TELES.Firmware of box:
(on the bottom of the box)
Version ___________
Serial number of box:
(on the bottom of the box
beneath bar the code)
____________________
=Windows 95
ISDN Line Configuration:
=Euro-ISDN (DSS1)
=Point-to-multipoint line
=Point-to-point line
=First number:
=Second number:
=Third number:
Only if your TELES.S0/2TR USB Box is connected to another PBX:
Outside line:
Which terminal devices are attached to your TELES.S0/2TR USB Box?
=Analog telephone
Type:
Manufacturer:
=Fax
Type:
Manufacturer:
Answering machine
Type:
Manufacturer:
=Modem
Type:
Manufacturer:
©1999 by TELES AG Berlin, Version 2.00/S0USBTR-e/10.08, Issue: October 1999
Page 26
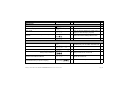
8
Overview of Analog Ports’ Functions
Function
P = Page number
R = Remote Control
Keys
P
Explanation
R
To set PIN
U*90*P(oldPIN)*P(newPIN)
*P(newPIN)#D
7
5-digit code necessary to prevent unauthorized use. Default PIN is 00000. Set your own PIN when installing the box for the
first time. Otherwise any attempts at programming the analog
ports would be rejected.
To assign MSN
U*01*P*N(MSN)#D
7
The phone numbers provided by your phone company. Set the numbers separately at each port using the connected phone.
To assign Remote
access number
(Dial-in number)
U*02*P*N(MSN)#D
17
Necessary if you want to take advantage of remote admistra- tion and Personal Callback. The remote access number must
be one of the MSNs provided by your phone company.
7
Port that has no MSN of its own rings when a call comes in for the MSN assigned to other port.
Basic configuration
Allow / do not allow U*69*P*1#D
port without MSN
to accept incoming
call
U*69*P*0#D
To set device ID
(1 - 8)
U*92*P*N(ID)#D
Only the port assigned an MSN rings if this MSN is dialed. The
port without MSN does not ring at all.
8
11
To set Service Indi- U*04*P*N(indicator no.)#D
cator for outgoing
calls
To set volume
U*09*Number#D
©1999 by TELES AG Berlin, Version 2.00/S0USBTR-e/10.08, Issue: October 1999
1-digit number. Only necessary if you have several TELES ISDN devices connected to your BRI. Identifying each device,
IDs will allow you to transfer calls between different TELES
ISDN devices and to configure each device by using the
TELES Device Manager.
24
This number is to identify the type of service to be sent on the port. Particularly important to reach fax machines connected to
PBXs.
-
Determines the volume of the voice signal 1(low), 2 (medium) or 3 (high) - can be set for each port individually.
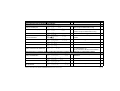
Page 27
Keys
P
Explanation
R
Call another port
U*N(port)
-
Calls one of your extensions
-
Call external party
UN(destination)
-
Calls external number
-
Pick up call
U**G
-
Pick up call from another port (while phone is ringing or call is already in progress)
Completion of Calls to Busy Subscriber (CCBS):
Activate
While you hear busy 12
tone: #D
If the no. you dial is busy, your phone or ISDN switch will continue dialing until line is free.
CCBS: Deactivate
UR#D
12
Stops CCBS mode.
Function
Making Calls
-
Hold and Transfer Calls, Alternate, Conference Call
Hold a call and alternate
GR
10
Puts call on hold. You hear dial tone and can call third party. You can switch back and forth.
Hold one call and call another internal extension
GR*N(port)G
10
Put active call on hold and dial other extension -
Hold one call and call an external party
GRN(destination)G
10
As above for external number
-
Disconnect active call
G##R
K##R
10
10
Completely disconnects active call (third
party) and returns to on-hold call
-
Transfer a call to another TELES ISDN device connected to same BRI as USB Box
G**N(deviceID)
11
Only if connected to same BRI as USB Box. Device ID must be set.
Three-party conference
(if subscribed with your phone company)
After having set up call
to 3rd party: G*#K
10
To connect all the 3 parties in a conference.
during alternate call:
during 3-way conference:
©1999 by TELES AG Berlin, Version 2.00/S0USBTR-e/10.08, Issue: October 1999
-
Page 28
Function
Keys
P
Explanation
R
Call Forwarding (CF) via TELES.S0/2TR USB Box
Set call forwarding unconditional
(CFU) to another port
U*07**1 or 2#D
14
Forwards calls immediately to another internal port. The phone dialed does not ring.
Set CFU to external party
U*07*N(destination)#D
14
Forwards calls immediately to an external number. The phone dialed does not ring.
Delete the above CFU
U*07*#D
14
Deletes the CFU set by *07 command.
Set CFU for another port to an
external destination
U*06*P*N(source)*N(destination)#D
14
Used to set CFU for either port from remote X
location.
Delete this CFU
U*06*P*N(source)*#D
14
Deletes CFU set by *06 command.
X
Deactivate CFU
U*08*0#D
14
Deactivates CFU without deleting it.
X
Reactivate CFU
U*08*1#D
14
Reactivates CFU after it was deactivated
X
Call distribution on/off
(ACD = Automatic call distribution)
U*94*1 or 0#D
15
1 = Both ports will ring when a call comes in.
0 = Call distribution off
Set on port whose calls are to be forwarded.
-
-
Call Forwarding via exchange switch (if subscribed with phone company and commands are supported by switch)
Call forwarding unconditional
(CFU): Set destination
U*34*P*N(destination)#D
13
Forwards calls immediately to an external destination
Activate/deactivate CFU
U*31*P*1 or 0 #D
-
1 = CFU on, 0 = CFU off
Delete CFU
U*34*P*#D
-
Call forwarding no reply (CFNR):
Set destination
U*36*P* N(destination)#D
13
©1999 by TELES AG Berlin, Version 2.00/S0USBTR-e/10.08, Issue: October 1999
-
Forwards calls if the phone is not answered
-
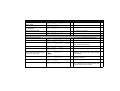
Page 29
Function
Keys
P
Explanation
R
Activate/deactivate CFNR
U*33*P*1or 0#D
-
1 = CFNR on, 0 = CFNR off
-
Delete CFNR
U*36*P*#D
-
Call forwarding when busy (CFB):
Set destination
U*35*P* N(destination)#D
13
Forwards calls if line is busy
-
Activate/deactivate CFB
U*32*P*1 or 0#D
-
1 = CFB on, 0 = CFB off
-
Delete CFB
U*35*P*#D
-
Partial block: Set numbers
U*51 ...55*P*N(number)#D
16
Blocks up to 5 numbers/number series.
X
Partial block: Activate/deactivate
U*96*P*1 or 0#D
-
1 = on, 0 = off
X
Global block: Set numbers
U*61...65*P* N(number)#D
16
To set up to 5 numbers which can be dialed X
while a global block is active
Global block: Activate/deactivate
U*96*P*2 or 0#D
-
2 = on, 0 = off
Total block: Activate/deactivate
U*97*P*1 or 0#D
16
1 = on (completely blocks both ports), 0 = off
Block unwanted calls:
Set numbers to be rejected (up to 5
numbers for each ports)
U*71...75*P*N(no. incl. prefix)#D
16
Rejects calls from the numbers set. Caller X
gets busy tone. Works only if caller’s number
is transmitted.
Deactivate unwanted call block
U*71...75*P*#D
-
You can deactivate the block on any number X
previously blocked.
Direct Call: Set destination
U*03*P*N(destination)#D
16
Must be set on the port itself. Activate with 93. -
Direct Call: Activate
U*93*P*1#D
16
If activated: When you lift the receiver, a dial tone is played for 3 sec before the box automatically dials the preset number.
-
-
Blocking
©1999 by TELES AG Berlin, Version 2.00/S0USBTR-e/10.08, Issue: October 1999
X
Page 30
Function
Keys
P
Explanation
Direct Call: Deactivate
UQ*93*P*0#D (Key in dur-
16
Must be done on the port itself. You have 3 seconds to enter the command.
ing dial tone, otherwise call is set up)
R
Charge Account: Set max. number
of units allowed
U*95*P*N(units)#D
16
Applies to port 1 and 2 together, not available X
for individual extensions. To check the remaining amount use the TELES Device Manager.
Charge Account: Activate/deactivate
U*98*P*1 or 0#D
16
1 = on, 0 = off (outgoing calls can be made X
again)
18
Allows up to 5 authorized persons to use your X
telephone line from a remote location. Callers
must know the remote access number (set
with *02..). Furthermore, a specific access
code and the callback number must be preset
for each caller.
Personal Callback
Personal Callback: Set access U*81...85*P*N(access code)
code and callback number.
*N(callback number)#D
Access code = 5-digit personal code.
Callback number = complete phone
number of caller’s location.
Delete access code
U*81...85*P*#D
18
Deletes access code.
Change callback number
U*87*N(access code)*N(callback number)#D
18
Changes only the callback number associated X
with this personal access code. Useful if caller
wants to dial in from another place.
Delete callback numbers
U*89*P*P#D
18
Deletes all callback numbers.
To use Personal Callback
(authorized persons only)
UN(remote access number).
Wait for Ready tone.
*99*N(access code)#
Wait for OK tone from box.
Put down receiver and wait for callback.
18
Use the remote access number to dial into the X
box, wait for Ready tone (long beep), dial
*99*, enter personal access code and quit
with # which must be followed by OK tone.
Put down receiver. After a moment, the box
will call back. Lift the receiver now, listen for
the dial tone and dial the desired number.
©1999 by TELES AG Berlin, Version 2.00/S0USBTR-e/10.08, Issue: October 1999
X
X
Page 31
Keys
Function
Set up next
connection
Personal Callback G*# Wait for next dial tone.
P
Explanation
R
18
Disconnects current call and gives you
another line. Useful for subsequent calls.
-
Returns to default settings: PIN = 00000; no MSNs; Device ID = 1; no CF via box; no call
distribution, volume = 2.5 dB; Service indicator
= 1; no blockings; no charge account; no settings for Personal Callback.
15
Quits the box’s command level. Useful if box is attached to the BRI of a larger PBX or if you
want to set services/functions provided by
your central office (e.g. Call forwarding, Voicebox etc.). Commands to follow depend on
PBX or exchange switchboard.
Reset
Reset all analog port settings
U*00*P*#D
Other functions
Enter commands of another system U#
(keypads)
Park
(applies to external calls only)
G*N(park ID)*D
-
"Parks" a call temporarily to your local exchange switchboard. In contrast to Hold you
can put down the receiver. Useful for picking
up the call from another phone (e.g. other port
or ISDN device connected to same ISDN line).
Pick up a parked call
U*(park ID)*G
-
To pick up the parked call dial the same Park ID as was used to put the call on hold. You will
hear a brief OK tone before actually being
connected with the caller.
(Choose any park ID from 3...9)
(Same park ID as above)
©1999 by TELES AG Berlin, Version 2.00/S0USBTR-e/10.08, Issue: October 1999
Page 32
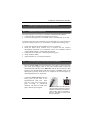
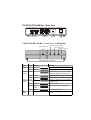
TELES.S0/2TR USB Box - Rear View
2
1
Analog ports
ISDN
USB
ISDN jacks
USB cable
+
-
12V=
Power
supply
TELES.S0/2TR USB Box - Front View - LED Display
Power supply (red)
LED internal activity (yellow)
LED Port 2 (green)
LED Port 1 (green)
Wall mounting slots / feet: 118 mm
LED
Color
Display
Meaning
Power
red
on
Box properly attached to power source.
red
blinking
Charge account active for Port 1 and 2
yellow
on
Both B channels busy (Call forwarding
or Personal CallBack currently in use)
yellow
blinking
Partial block active
yellow
flashing
Global block active
on
Receiver is off-hook, but no connection
has been made.
green
blinking
Connection made
green
blinks
briefly
Calls to this port will be forwarded.
green
flashing
Direct call (baby call) on.
all blinking
Update failed. Please try again or load
backup
Internal
activity
Port 1 or green
Port 2
ALL
LEDs
Specifications
External power supply
12 Volts, 500mA
Dimensions
l x b x h:138 x 132 x 40 mm; Weight: 270g
D channel protocol
DSS1
ISDN line type
Point-to-multipoint
Terminal devices supported
(Note that only two devices can be
active at the same time)
Analog devices: telephone, fax, answering
machine, modem. Max. 3 devices on each
port. One of the analog ports can be used for
an analog PBX.
Radio interference suppression
Complies with CE 0681X
Acoustic Signals
Tone
Meaning
Dial tone
You are in the public network.
You can dial now.
Ringing tone
The number you dialed is free
and is being called.
Busy signal
The line is busy or not
reachable.
On-hold tone
The line is on-hold
Beeps
T
T
T
T T T T T T
either:
T T
or: The party on hold hears an
announcement
from
the
exchange switchboard.
Error tone
Command rejected
OK tone
Command is carried out
Ready tone (for
You can now enter another
remote access only) command.
Dial tone for Direct
call (Baby call)
Rapid, sharp tone
T
T
T
Special tone you hear when ca. 3 seconds
you lift the receiver while
T
Direct call is active. After 3
seconds, the box will automatically dial the preset destination.
You can deactivate Direct call
within these 3 seconds by
pressing * 93, PIN, 0 #.
T