1
USER MANUAL
RFID SYSTEM
SET-UP
IN PROFIBUS-DP
All brand and product names are trademarks or registered trade marks of the owner
concerned.
Edition 12/08
© Hans Turck GmbH, Mülheim an der Ruhr
All rights reserved, including those of the translation.
No part of this manual may be reproduced in any form (printed, photocopy, microfilm or any
other process) or processed, duplicated or distributed by means of electronic systems
without written permission of Hans Turck GmbH & Co. KG, Mülheim an der Ruhr.
Subject to alterations without notice.
0
About this manual
Concept of documentation.................................................................................................................0-2
Explanations of used symbols ...........................................................................................................0-2
General information ............................................................................................................................0-3
Intended use ...................................................................................................................................0-3
Instructions for project planning / installation of product...............................................................0-3
1
The TURCK BL ident ®-system
Schematic diagram of the identification system BL ident ®...............................................................1-2
Support for BL ident ®-projects ......................................................................................................1-2
Networking with BL ident ®-systems ..............................................................................................1-3
Identification systems with radio frequency technology (RFID) .......................................................1-3
Performance characteristics and applications of the BL ident ®-system..........................................1-4
Protection class ..............................................................................................................................1-4
Life cycle.........................................................................................................................................1-4
Transfer frequency..........................................................................................................................1-4
Models ............................................................................................................................................1-5
Speed of data carrier to read/write head........................................................................................1-5
Read range / Write range................................................................................................................1-6
Compatibility...................................................................................................................................1-7
Applications (examples):.................................................................................................................1-7
2
Mounting and installation
Interfaces with the protection class IP20 ..........................................................................................2-2
Diagrams and designs of the interface modules ............................................................................2-2
Supply voltage ................................................................................................................................2-3
Fieldbus connection .......................................................................................................................2-3
Addressing......................................................................................................................................2-5
Service interface .............................................................................................................................2-6
Connections of read/write heads ...................................................................................................2-8
Diagnostics via LEDs ....................................................................................................................2-11
Diagnostic messages and parameterization of the gateway........................................................2-15
Parameterization of the BL20-2RFID-A/BL20-2RFID-S-modules ................................................2-15
Diagnostic messages of BL ident ®-channels...............................................................................2-15
Technical data ..............................................................................................................................2-17
Interfaces with the protection class IP67 ........................................................................................2-22
Diagrams and designs of the interface modules ..........................................................................2-22
Supply voltage ..............................................................................................................................2-23
Fieldbus connection .....................................................................................................................2-24
Addressing....................................................................................................................................2-25
Service interface ...........................................................................................................................2-26
Connections of read/write heads .................................................................................................2-27
Diagnostics via LEDs ....................................................................................................................2-31
Diagnostic messages and parameterization of the gateway........................................................2-36
Parameterization of the BL67-2RFID-A/BL67-2RFID-S-modules ................................................2-36
Diagnostic messages of BL ident ®-channels...............................................................................2-36
Technical data ..............................................................................................................................2-37
D101579 1208 - BL ident ® PROFIBUS-DP
i
3
Startup of a TURCK BL ident ®-system
DPV1 startup example for A-modules with STEP7 and PIB .............................................................3-3
Hardware description of the project example ................................................................................3-3
Memory requirements for a BL ident ®-startup...............................................................................3-3
Memory requirements for the hardware example ..........................................................................3-4
Uploading the project example and downloading the active GSD-file...........................................3-4
Start of the S7-software and upload of the project example .........................................................3-5
Hardware configuration and I/O-addresses ...................................................................................3-5
Setting up the function component PIB .........................................................................................3-6
Read of UID from data carrier / Channel 1 ...................................................................................3-13
Write to data carrier / Channel 1...................................................................................................3-15
Read from data carrier / Channel 1 ..............................................................................................3-17
DPV0 startup example for C-modules with STEP7 and PIB ...........................................................3-21
Hardware description of the project example ..............................................................................3-21
Memory requirements for a BL ident ®-startup.............................................................................3-21
Memory requirements for the hardware-example ........................................................................3-22
Upload of the project example and download of the active GSD-file5 ........................................3-22
Start of the S7-software and upload of the project example .......................................................3-22
Hardware-configuration and I/O-addresses.................................................................................3-23
Setting up the function component PIB .......................................................................................3-24
Read of UID from data carrier / Channel 1 ...................................................................................3-31
Write to the data carrier / Channel 1 ............................................................................................3-33
Read from the data carrier / Channel 1 ........................................................................................3-35
Flow diagram of PIB functionality ....................................................................................................3-39
Definitions within the command and diagnostics levels.................................................................3-40
Write-Config..................................................................................................................................3-41
Read-Config .................................................................................................................................3-42
Inventory .......................................................................................................................................3-42
Physical_Read ..............................................................................................................................3-42
Physical_Write ..............................................................................................................................3-42
Mem-Status ..................................................................................................................................3-42
Dev-Status ....................................................................................................................................3-42
Next ..............................................................................................................................................3-43
Get ................................................................................................................................................3-43
Other commands ..........................................................................................................................3-44
Startup example for S-modules with STEP7 ...................................................................................3-45
Hardware description of the project example ..............................................................................3-45
Download of the active GSD-file ..................................................................................................3-45
Start of the STEP7-software and creating a new project .............................................................3-45
Hardware configuration ................................................................................................................3-46
Compiling the variable tables for the process data ......................................................................3-47
Activating the read/write head......................................................................................................3-49
Initialization/RESET Channel 1 .....................................................................................................3-50
Reading of UID from the data carrier / Channel 1 ........................................................................3-51
Write to data carrier / Channel 1...................................................................................................3-52
Read from the data carrier / Channel 1 .......................................................................................3-53
Error messages via the input data ................................................................................................3-56
DPV1-diagnostic messages .........................................................................................................3-57
Parameterization...........................................................................................................................3-57
Flowchart diagram of command execution BL67-2RFID-S/BL20-2RFID-S-Module.....................3-58
ii
D101579 1208 - BL ident ® PROFIBUS-DP
Process image of BL67-2RFID-S/BL20-2RFID-S-Module ..............................................................3-59
Process input data........................................................................................................................3-59
Process output data .....................................................................................................................3-62
Parameter .....................................................................................................................................3-65
Diagnostics ...................................................................................................................................3-67
Warnings and error messages .........................................................................................................3-68
IEC-conform error messages .......................................................................................................3-71
User data ranges of the data carrier versions .................................................................................3-75
Access to the data ranges of the data carriers.............................................................................3-75
Overview of the Turck data carriers..............................................................................................3-75
4
Excerpt from the specifications
1 General information .........................................................................................................................4-2
1.6 Functional requirements ...........................................................................................................4-2
2 Modelling the Proxy Ident Block (PIB) ............................................................................................4-5
2.1 Principles of modelling .............................................................................................................4-5
2.2 General PIB-model ...................................................................................................................4-5
2.3 Representation .........................................................................................................................4-5
3 Definition of Proxy-Ident-Blocks (PIB)............................................................................................4-6
4 Communication between PIB and device ....................................................................................4-31
4.5 Data access within field device ..............................................................................................4-31
5 Identification- & maintenance functions (I&M-functions).............................................................4-35
5.1 PROFILE_ID ............................................................................................................................4-35
5.2 Channel related Information ...................................................................................................4-35
Appendix A - Compliance table .......................................................................................................4-36
Appendix B - Elementary data types used within this specification ..............................................4-38
5
Glossary
D101579 1208 - BL ident ® PROFIBUS-DP
iii
iv
D101579 1208 - BL ident ® PROFIBUS-DP
Safety instructions!
Prior to installation work
Switch device to zero voltage
Protect device from restart
Determine voltage free state
Earth and short-circuit
Cover or construct a barrier around neighboring parts/components under voltage
Please follow the respective instructions for mounting the device.
Only staff appropriately qualified per EN 50 110-1/-2 (VDE 0105 Section 100) may handle
the device/system.
When performing the installation, please pay heed to the requirement of conducting a
statical discharge on your person prior to touching the device.
The function earth (FE) must be connected to the protective earth (PE) or the potential
equalization. The builder is responsible for the design of this connection.
Connection -and signal lines are to be installed in such a way that inductive and capacitive
controls may not have a diminishing impact on automation functions.
Automation engineering equipment and its service components are to be installed in such
a way that they are protected from accidental operation.
In order to prevent that a line or wire breakage on the signal side does not lead to
undefined states in the automation equipment, respective safety measures are to be
implemented on the hard- and software side during the I/O coupling operation.
Please ensure a safe, electrical isolation of the low voltage with a 24 volt supply. Only use
power supplies that meet the requirements per
IEC 60 364-4-41 or rather HD 384.4.41 S2 (VDE 0100 Section 410).
Variations or rather deviations of the supply voltage from the nominal value may not
exceed the tolerance limits specified in the technical data, otherwise function errors and
dangerous conditions can not be ruled out.
EMERGENCY STOP per IEC/EN 60 204-1 must remain active in all operational states of
the automation equipment. Unlocking the EMERGENCY STOP feature must not initiate a
restart operation.
Built-in devices for housings or cabinets may only be operated or serviced when they are
installed, and table devices or portables only when the housing is closed.
Precautions are to be made so that a program may be correctly restarted after it has been
interrupted by voltage drops and power failures. Here dangerous operating conditions
must not occur also short-term. If need be, force EMERGENCY STOP.
At locations where occurring failures of the automation equipment may cause injury to
persons or damage to property, external measures must be taken that also guarantee or
rather force a safe operational status in case of error or breakdown (for example, with the
help of independent limit value switches, mechanical locks, etc.).
The electrical installation must be done per the respective instructions (for example, line
diameter, fuse protection, earthing equipment conductor).
Only qualified, expert staff may complete all work related to transport, installation, startup
and maintenance. (Follow IEC 60 364 or rather HD 384 or DIN VDE 0100 and national
accident prevention regulations).
Keep all covers and doors closed during operation.
D101579 1208 - BL ident ® PROFIBUS-DP
v
vi
D101579 1208 - BL ident ® PROFIBUS-DP
0
About this manual
Concept of documentation...................................................................................................2
Explanations of used symbols..............................................................................................2
General information .............................................................................................................3
Intended use ...................................................................................................................................... 3
Instructions for project planning / installation of product.................................................................. 3
D101579 1208 - BL ident ® PROFIBUS-DP
0-1
About this manual
Concept of documentation
The first chapter of this manual provides an overview of the TURCK BL ident ®-system.
The second chapter contains all information for mounting and installation.
The first part of the third chapter contains instructions for the start-up of a BL ident ®-system
with the help of the standard function component "Proxy Ident Function Block". The second
part contains a start-up instruction diagram of the interface-module with the accessory "-S".
A SIMATIC S7/-300 Station (Siemens) is used to demonstrate the sample start-ups. The
SIMATIC basic software STEP 7 is used.
The fourth chapter includes an excerpt of the "Proxy Ident Function Block" specifications.
Explanations of used symbols
Warning
This symbol appears next to an alert which points to a source of danger. This may
refer to injury of persons and damage to systems (hard- and software).
For the user this symbol means: Please, proceed with extreme caution.
Attention
This symbol appears next to an alert which points to a potential source of danger.
This may refer to possible injury of persons and damage to systems (hard- and
software) and installations.
Note
This symbol appears next to general instructions which point out important
information concerning the procedure for one or more operational steps.
The relevant instructions may facilitate the work and may help prevent redundancy
caused by incorrect operational steps, for example.
0-2
D101579 1208 - BL ident ® PROFIBUS-DP
General information
Attention
Please, consider it mandatory to read this chapter because safe handling of
electrical devices should not be left to chance.
This manual contains the required information for the start-up of the TURCK BL ident ®system.
The concept was specifically created for qualified staff with the necessary technical knowhow.
Intended use
Warning
The devices described in this manual must be used only in the intended applications
found in this manual and the respective technical description, and only together with
certified external devices and -components.
The correct and safe operation of the devices is based on the prerequisite of proper transport,
storage, assembly and mounting, as well as carefully operation and maintenance.
Instructions for project planning / installation of product
Warning
It is imperative that the instructions be followed for the safety and accident
prevention for the respective application.
D101579 1208 - BL ident ® PROFIBUS-DP
0-3
About this manual
0-4
D101579 1208 - BL ident ® PROFIBUS-DP
1
The TURCK BL ident ®-system
Schematic diagram of the identification system BL ident ®.................................................. 2
Support for BL ident ®-projects ......................................................................................................... 2
Networking with BL ident ®-systems ................................................................................................. 3
Identification systems with radio frequency technology (RFID) ...........................................3
Performance characteristics and applications of the BL ident ®-system ..............................4
Protection class ................................................................................................................................. 4
Life cycle............................................................................................................................................ 4
Transfer frequency............................................................................................................................. 4
Models ............................................................................................................................................... 5
– Data carriers ................................................................................................................................... 5
– Read/write heads ........................................................................................................................... 5
Speed of data carrier to read/write head........................................................................................... 5
Read range / Write range................................................................................................................... 6
Compatibility...................................................................................................................................... 7
Applications (examples):.................................................................................................................... 7
D101579 1208 - BL ident ® PROFIBUS-DP
1-1
The TURCK BL ident ®-system
Schematic diagram of the identification system BL ident ®
The TURCK BL ident ®-system has multiple levels. Each level offers opportunities for
variation. An application that is adjusted to the complete system is possible.
Figure 1:
System
overview
SPS/PC for startup
Interface module for integration
in fieldbus systems
IP67
IP20
Read/write device
Air interface
Mobile data carrier
Support for BL ident ®-projects
The following software and documents will provide additional support for project planning,
installation and startup:
For simulation and optimization of an application, please access the internet and go to
http://www.turck.com...for a free "BL ident ®-simulator".
D101583 - "Installation of the BL ident ®-system" - This manual contains the technical
details of the available TURCK-data carriers and the TURCK read/write devices.
D101581 - "Interface module for fieldbus connection". This manual describes the
professional operation of the BL ident ®-interface modules.
D101607 - This manual contains a software description of a so-called "handheld"
(programming device) which allows Read and Write access of data independent of
location.
D101585 - This manual contains a hardware description of a so-called "handheld"
(programming device) which allows Read and Write access of data independent of
location.
D101640 - "Startup of the CoDeSys for programmable gateways"
D101642 - "Startup with DeviceNetTM"
D101644 - "Startup with EtherNet/IPTM"
D101648 - "Startup in PROFINET"
The list of manuals may be downloaded from the internet.
1-2
D101579 1208 - BL ident ® PROFIBUS-DP
Networking with BL ident ®-systems
Based on the possibility to integrate BL ident ®-systems in (existing) bus-systems, the
opportunity exists to network together multiple BL ident ®-systems.
Valid are the guidelines for the maximum extension of the respective, active bus system.
A PROFIBUS-DP-system with no repeater may include, for example, a max. 31 stations and
1 master.
Identification systems with radio frequency technology (RFID)
RFID is an abbreviation for radio frequency identification.
A RFID-system consists of a data carrier, a device for Read and Write access to the data
carrier, as well as other devices used for data transfer and processing.
The transfer of data from the data carrier to the read/write head occurs contact-free with the
help of electromagnetic waves. The type of transmission is insensitive to dirt and temperature
fluctuations.
The data carriers may be directly affixed to a product. This is why the term "mobile data
memory" is used as well. Other terms for the data carrier are TAG or transponder. The data
content may consist of production and manufacturing data. The data that identifies the
product is important here. This is where the description "identification system" comes from.
Further reaching possibilities are a result of the fact that the data content can be changed by
writing to the data carrier. Because of this production-/manufacturing processes can be
retraced. Logistics/distribution may be optimized.
The "identification systems" may be integrated into (existing) fieldbus automation systems
(for example PROFIBUS-DP). The connection to the respective fieldbus system is done with
suitable interface modules.
Standardized software components (for example, the Proxy Ident Function Block PROFIBUSDP) make system integration and startup easy.
D101579 1208 - BL ident ® PROFIBUS-DP
1-3
The TURCK BL ident ®-system
Performance characteristics and applications of the BL ident ®-system
To meet the requirements of a variety of applications, the TURCK BL ident ®-system offers
multiple possibilities for combining data carriers and read/write heads, as well as interface
modules to connect automation systems (for example, PROFIBUS-DP). Software
components make integration and startup easy.
Performance characteristics of the TURCK BL ident ®-system are as follows:
Protection class
Some data carriers, as well as the applicable read/write heads have a high mechanical
protection class (for example,IP67) and therefore may be used in the toughest industrial
applications.
The read/write heads are also available in IP69K (wash-down design).
Connection to the fieldbus-system is realized with suitable TURCK interface modules. The
interface-modules for CANopen are available in the protection class IP20. TURCK connection
cables with the suitable protection class complement the identification system.
Temperature-resistant data carriers up to 210°C are available for the high temperature range.
Life cycle
The life cycle is a result of the possible Read/Write operations to the data carrier.
FRAM data carriers can provide for an unlimited number of Read operations and 1010 Write
operations.
EEPROM data carriers can provide for an unlimited number of Read operations and 104 or
105 Writer operations.
The data carriers do not require batteries.
Transfer frequency
The TURCK BL ident ®-system operates with a transfer frequency of 13.56 MHz in the HFband or with a country-specific transfer frequency in the UHF-range (860-960 MHz) between
the data carriers and the read/write heads.
HF: Systems that operate with this transfer frequency are to a large extent insensitive to
electromagnetic interferences. Therefore the 13.56 MHz transfer frequency has developed
into the standard in many RFID applications.
UHF: Systems in this frequency band gain higher read/write ranges compared to HF, typically
several meters. The carrier frequencies are country-specific, and in Europe, for example, they
are between 865 and 868 MHz.
1-4
D101579 1208 - BL ident ® PROFIBUS-DP
Models
Data carriers
HF: For the HF-operating frequency, TURCK supplies round, flat data carriers, for example,
with 16, 20, 30 and 50 mm diameters.
The high temperature data carriers have a cylindric design (for example, 22 x 125 mm).
Inlays and adhesive labels have a foil thickness (size, for example, 43 x 43 mm).
Special designs are suitable for installation in and mounting on metal. Other designs are data
carriers in a glass cylinder housing or as a flat bank card format. Some data carriers have
holes so that they may be affixed with screws.
UHF: Data carriers for UHF have different designs and mounting possibilities and are
optimized for either small housing dimensions or large data transfer ranges. Data carriers with
high protection class, also for the application in the field, are available, as well as data carriers
for direct mounting on metal or imprinted tags.
TURCK supplies customer-specific data carrier solutions upon request.
Read/write heads
HF: Read/write heads are available in different designs, from the standard unified threads
M18 and M30 to cuboid designs Q14, CK40, Q80, S32XL including Q80L400 and Q350 for
long distances of up to 500 mm.
UHF: Different cuboid designs are available, for example as compact read/write head in a
housing with approx. 100 mm x 80 mm x 35 mm edge length (L x W x D) or in dimensions
approx. 240 mm x 240 mm x 40 mm for high data transfer ranges of several meters. The read/
write heads have protection class IP67 and are suitable for the application in the field. The
quality of the air-data transfer between data carrier and read/write head is continuously
checked, also when in operation. Each disturbance of the air interface is immediately
diagnosed and signalled per LED-chain.
Memory slot
The memory capacity of the data carrier for the HF-range is 64 or 128 byte (48 or 112 byte
user data) with an EEPROM-memory and 2 or 8 kbyte (2000 or 8000 byte user data) with a
FRAM-memory. For the UHF-range there is an EEPROM-data carrier with 110 byte (94 byte
user data).
FRAM: (Ferroelectric Random Access Memory), non-volatile, longer life cycle because of a
greater number of Read/Write operations and faster Write operations compared to EEPROM.
EEPROM: (Electrically eraseable programmable read only memory), non-volatile.
The data carrier for the HF-operating frequency meet the communication standard ISO
15693.
The data carriers in the UHF-frequency band meet the communication standard ISO 180006C and EPCglobal Class 1 Gen 2.
Speed of data carrier to read/write head
Note
The speed with which the data carrier can pass by the read/write head is influenced
by the data volume to be processed and varies according to the respective
combination of read/write head and data carrier that is being used.
This is why numerical data for max. speed and data volumes can only be seen as
examples!
D101579 1208 - BL ident ® PROFIBUS-DP
1-5
The TURCK BL ident ®-system
The speed with which the data carrier can pass by the read/write head may be increased, for
example, with the data carrier TW-R50-K2 and the read/write head
TN-CK40-H1147 to up to 2.5 m/s for 8 bytes at a distance of 36 mm. With the help of the "BL
ident ®-simulator" (see below) the application parameters "speed", "data volume" and "range"
can be changed. The optimum combination read/write head and data carrier for the
respective application is apparent in the simulator.
The simulator is online at http://www.turck.com.. In any case, please follow the instructions
including limits in this chapter.
Note
Next to the data processing time in the read/write head, the processing time within
the complete installation of the identification system must also be taken under
consideration.(„System overview” page 1-2). Depending on the application, the time
for data transfer and processing within the complete installation may vary!
If your application requires a fast sequence of data carriers, it may be necessary to
decrease the speed with which the data carrier passes by the read/write head.
When in doubt, we recommend to empirically determine the possible speed!
Note
The transfer curves (max. read/write distance, length of transfer zone) only
represent typical values and test lab conditions.
Because of component tolerances, installation situation of the application, ambient
conditions and interferences caused by materials (especially metals) the distances
that can be reached may differ up to 30 %.
This is why it is absolutely necessary to test the application (especially during Read
and Write when movement occurs) under real conditions!
In addition, the recommended distance from data carrier to read/write head should
be complied with if possible in order to gain errorless read/write operations despite
of possible discrepancies.
Depending on the actual transfer curve of the respective application, the parameters
of reachable pass over speeds (Read and Write on the Fly) and the max. transferable
data volume also change.
Read range / Write range
The reachable read/write distances depend on the respective combination of data carrier and
read/write head. The possible read/write distance is influenced by the data volume to be
written and to be read, and by the speed with which the data carrier passes by the read/write
head. The read/write heads that use UHF-operating frequencies will reach a distance of
several meters. Read/write heads that operate with 13.56 MHz (HF) transfer frequencies will
reach shorter distances. Here the longest distance (approx. 500 mm) will be reached with the
model TNLR-Q350-H1147 if a round data carrier with a 50 mm diameter is used.
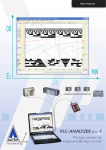
With the help of the software "BL ident ®-simulator" the application parameters "speed",
"range" and "data volume" may be changed. Therefore an optimum combination read/write
head and data carrier may be selected for the appropriate application.
You may find the simulator online at http://www.turck.com..
1-6
D101579 1208 - BL ident ® PROFIBUS-DP
Performance characteristics and applications of the BL ident ®-system
Figure 2:
BL ident ®simulator
Compatibility
All technical data refer to the BL ident ®-system, this means to the combination of BL ident ®data carriers, read/write heads and interface modules. Entirely different values may be valid
for data carriers of other manufacturers. This is why external products may only be used after
they have been released by TURCK.
Applications (examples):
The performance characteristics described in the prior chapter support the application of a
TURCK BL ident ®-system in the following industries:
Automobile
Transport and handling
Machine building
Food and beverages
Chemical industry
Pharmaceutical and petrochemical industries
D101579 1208 - BL ident ® PROFIBUS-DP
1-7
The TURCK BL ident ®-system
The application in all areas is possible here, like:
Assembly lines
Materials handling
Industrial manufacturing
Inventory and storage
Logistics
Distribution
Consignment
Transport logistics
1-8
D101579 1208 - BL ident ® PROFIBUS-DP
2
Mounting and installation
Interfaces with the protection class IP20 ............................................................................2
Diagrams and designs of the interface modules ............................................................................... 2
Supply voltage ................................................................................................................................... 3
Fieldbus connection .......................................................................................................................... 3
Addressing......................................................................................................................................... 5
Service interface ................................................................................................................................ 6
– Connection with BL20-cable .......................................................................................................... 6
Connections of read/write heads ...................................................................................................... 8
– Ready-made connection cables .................................................................................................... 8
– Connection cables for installing a coupling ................................................................................... 9
– Connection terminals when using the connection cables RK4.5T... and WK4.5T.. ..................... 10
– Connection terminals when using the connection cables FB4.5T... ............................................ 10
Diagnostics via LEDs ....................................................................................................................... 11
– LEDs of the fieldbus side ............................................................................................................. 11
– LEDs for the RFID-connections ................................................................................................... 14
Diagnostic messages and parameterization of the gateway........................................................... 15
Parameterization of the BL20-2RFID-A/BL20-2RFID-S-modules ................................................... 15
– BL20-2RFID-A .............................................................................................................................. 15
– BL20-2RFID-S .............................................................................................................................. 15
Diagnostic messages of BL ident ®-channels.................................................................................. 15
Technical data ................................................................................................................................. 17
– Approvals and testing of the interface module ............................................................................ 17
– Gateway connection level ............................................................................................................ 18
– Connection level of read/write head ............................................................................................ 20
Interfaces with the protection class IP67 ..........................................................................22
Diagrams and designs of the interface modules ............................................................................. 22
– Principle switching diagram ......................................................................................................... 23
Supply voltage ................................................................................................................................. 23
Fieldbus connection ........................................................................................................................ 24
– M12-bus connection .................................................................................................................... 24
– Bus termination ............................................................................................................................ 25
Addressing....................................................................................................................................... 25
Service interface .............................................................................................................................. 26
Connections of read/write heads .................................................................................................... 27
– Ready-made connection cables with coupling and connector ................................................... 27
– Ready-made connection cables with coupling ............................................................................ 28
– Connection cables for installing a connector and a coupling ...................................................... 29
– Connection level of the base module BL67-B-2M12 ................................................................... 29
Diagnostics via LEDs ....................................................................................................................... 31
– LEDs of the fieldbus side ............................................................................................................. 31
– LEDs for the RFID-connections ................................................................................................... 35
Diagnostic messages and parameterization of the gateway........................................................... 36
Parameterization of the BL67-2RFID-A/BL67-2RFID-S-modules ................................................... 36
– BL67-2RFID-A .............................................................................................................................. 36
– BL67-2RFID-S .............................................................................................................................. 36
Diagnostic messages of BL ident ®-channels.................................................................................. 36
Technical data ................................................................................................................................. 37
– Approvals and testing of the interface module ............................................................................ 37
– Gateway connection level ............................................................................................................ 38
– Connection level of read/write head ............................................................................................ 39
D101579 1208 - BL ident ® PROFIBUS-DP
2-1
Mounting and installation
Interfaces with the protection class IP20
Diagrams and designs of the interface modules
The BL ident ®-PROFIBUS-interface is available with 2, 4, 6, 8 channels. Interface modules
with the add-on "S" (Simple) stand for a user-friendly startup opportunity. With a Write or
Read command 8 byte can be transferred. Interface modules without the add-on "S" offer a
higher number of possible commands and a large data transfer volume per command.
Figure 3:
BL ident ®Interface
modules with
the protection
class IP20
(2- and 8channeled)
Table 1:
BL ident ®Interface
modules with
the protection
class IP20
2-2
Product description
Identnummer
TI-BL20-DPV1-2
1545004
TI-BL20-DPV1-4
1545005
TI-BL20-DPV1-6
1545006
TI-BL20-DPV1-8
1545007
TI-BL20-DPV1-S-2
1545074
TI-BL20-DPV1-S-4
1545075
TI-BL20-DPV1-S-6
1545076
TI-BL20-DPV1-S-8
1545077
D101579 1208 - BL ident ® PROFIBUS-DP
Interfaces with the protection class IP20
Supply voltage
The supply of the BL ident ®-interface module is done via both connection terminals UL and
USYS (field supply and system supply). A voltage in the range 18 to 30 VDC (nominal value
24 VDC) is connected to each of the 2-pole screw terminals.
In the transformed state the system supply is 5 VDC (from 24 VDC) and can supply a max.
1.5 A. This voltage is internally transmitted with the wire pair of the 7-wire module bus and
serves to supply the module electronics on the module bus side.
The field supply voltage is 24 VDC and can supply a max. 10 A. This voltage is led through
the interface module via a conductor line. The module electronics on the fieldbus side and the
connected read/write device are fed by the field supply voltage ("Connections of read/write
heads" page 2-8).
Figure 4:
Supply of the BL
ident ®-interface
module
5 VDC
Trafo
FeldverUL U
sorgung
L
24 VDC
24 VDC
SystemversorgungUU
SYS
SYS
24 VDC
USYS
Fieldbus connection
A SUB-D-connection supports the communication of the gateways via the fieldbus
PROFIBUS-DP.
Figure 5:
PROFIBUS
SUB-Dconnection
D101579 1208 - BL ident ® PROFIBUS-DP
2-3
Mounting and installation
Attention
A SUB-D-connector with special shield and certified per PROFIBUS-standard is
needed for fieldbus transfer because of the high transfer speed!
Attention
If the BL ident ®-interface module is used as the first or last participant in the bus
communication, the use of a special bus connector with built-in or shiftable
terminating resistance is mandatory!
Ready-made PROFIBUS-cables from TURCK with a connector type certified per PROFIBUSstandard can be found in the TURCK-catalog "Fieldbus Technology" D301052.
If the BL ident ®-interface module is used as the first or last participant in the bus
communication (at one end of the bus segment), a connection of type D9T451-xM* must be
used. The SUB-D-connectors of these connector types have an integrated terminating
resistance and a connected PROFIBUS-cable.
The SUB-D-connectors for the TURCK-connections of type D9-451-xM-xM* have an
integrated terminating resistance and two PROFIBUS-connectors.
*x indicates the length of the connected PROFIBUS-cable(s).
As an example, the pin assignment of the female connector is displayed here:
Figure 6:
SUB-D female
connector (top
view)
5
4
9
Table 2:
Pin
assignment
SUB-D female
connector on
gateway
3
8
2
7
1
6
Pin No.
Signal name
Description
1
PE
Shield connection/function earth
2
not-assigned
3
RxD/TxD-P
Received-/Send Data-P
4
CNTR-P/RTS
Request to send
5
DGND
Data reference potential
6
VP
+ 5 VDC for the external bus connection
7
not-assigned
8
RxD/TxD-N
9
not-assigned
Received-/Send Data-P
Attention
No equalizing current must flow across the shield. For this purpose a safe system
must be created for potential equalization!
2-4
D101579 1208 - BL ident ® PROFIBUS-DP
Interfaces with the protection class IP20
Addressing
Addressing is done via the two decimal rotary switches on the fieldbus side (gateway) of the
fieldbus interface.
Both switches are housed together with the service interface under a cover.
Figure 7:
Decimal rotary
switch for
addressing on
PROFIBUS-DP
Attention
A max. 99 addresses (01 to 99) can be assigned with the switch ADDRESS. Each
address can only be assigned once in the entire bus structure. Bus address 00 must
not be used.
Other participants of the entire bus structure can also be assigned to addresses
from 100 to 125. The bus addresses 000, 126 and 127 must never be assigned!
The rotary switches are marked with H for High (higher value point) and L for Low (lower value
point).
BL20-GW-DPV1:
Switch L is used to set L x100 (L = 0 to 9).
Switch H is used to set H x 101 (H = 0 to 9).
Note
After addressing the protective cover above the decimal rotary switches must be
closed again.
Attention
If the BL ident ®-interface module is used as the first or last participant in the bus
communication, the use of a special bus connector with built-in or shiftable
terminating resistance is mandatory!
D101579 1208 - BL ident ® PROFIBUS-DP
2-5
Mounting and installation
Service interface
The service interface connects the BL ident ®-interface module with the PC. With the software
I/O-ASSISTANT the interface module can be projected and diagnostic messages can be
indicated.
A special ready-made cable must be used to connect the service interface to the PC.
BL20-connection cable (I/O-ASSISTANT-ADAPTERCABLE-BL20/BL67)
Connection with BL20-cable
The BL20-cable has a PS/2-connector (connection of female connector to gateway) and a
SUB-D female connector (connection of connector to PC).
Figure 8:
PS/2-connector
on the
connection
cable to the
gateway (top
view)
4 3
5
2
6
5
Figure 9:
9-pole SUB-D
female
connector on
the connection
cable to the PC
(top view)
Table 3:
Pin
assignment
PS/2- and
SUB-Dinterface
2-6
1
4
9
3
8
2
7
1
6
Pin
BL20 Gateway - PS/2 female
connector
Sub-D-interface on PC
Pin
1
CLK
DTR, DSR
4, 6
2
GND
GND
5
3
DATA
–
–
4
n.c. (DATA2)
RxD
2
5
+5 V
RTS
7
6
n.c. (CLK2)
TxD
3
D101579 1208 - BL ident ® PROFIBUS-DP
Interfaces with the protection class IP20
Figure 10:
Connection
between PC
and BL20gateway via the
BL20connection
cable
b
B
c
C
a
A
A SUB-D female connector
B BL20-connection cable
C PS/2-connector
D101579 1208 - BL ident ® PROFIBUS-DP
2-7
Mounting and installation
Connections of read/write heads
Ready-made connection cables
The following table displays ready-made connection cables with a coupling to connect the
read/write head and an open end to connect to the spring-type terminals of the interface
module. The spring-type terminal connection to the interface module is explained in
paragraphs "Connection terminals when using the connection cables RK4.5T... and
WK4.5T.." page 2-10 and "Connection terminals when using the connection cables FB4.5T..."
page 2-10.
Table 4:
Ready-made
connection
cables (BL20)
Type description
(Identnummer)
CouplingA)
RK4.5T-2/S2500
(8035244)
g
RK4.5T-5/S2500
(6699206)
g
RK4.5T-10/S2500
(6699207)
g
RK4.5T-25/S2500
(6699421)
g
RK4.5T-50/S2500
(6699422)
g
WK4.5T-2/S2500
(8035245)
a
WK4.5T-5/S2500
(6699208)
a
WK4.5T-10/S2500
(6699209)
a
WK4.5T-25/S2500
(6699423)
a
WK4.5T-50/S2500
(6699424)
a
2m
5m
10 m
25 m
50 m
straight = g
angled = a
x
x
x
x
x
x
x
x
x
x
For the food and beverage range (FB = Food and Beverage) - IP69K
FB-RK4.5T-5/S2502
(8036404)
g
FB-RK4.5T-10/S2502
(8036405)
g
x
x
FB-RK4.5T-25/S2502
(8037011)
x
A The "Coupling" is used to connect the read/write head
2-8
D101579 1208 - BL ident ® PROFIBUS-DP
Interfaces with the protection class IP20
Characteristics of the connection cables of type RK.. and WK...
Shielded
PUR outer jacket, PVC-, silicone- and halogen-free
Highly flexible
Crosslinked by irradiation, resistant to weld flash, oils
High mechanical durability
ApprovalÍ
Characteristics of connection cables of type FB....
Shielded
PVC outer jacket
ApprovalÍ, È
Connection cables for installing a coupling
The cable "CABLE-BLIDENT-100M" suitable for BL ident ® can be assembled by the user. For
this purpose please install the M12-coupling "B8151-0/9" (6904604) to connect the read/write
head.
Note
When connecting the coupling, please note the column "Color Mapping RK4.5T...
and WK4.5T.." of "Pin assignment for connection cables:" page 2-30!
Note
Please close the open end of the connection cable per the following two
paragraphs!
D101579 1208 - BL ident ® PROFIBUS-DP
2-9
Mounting and installation
Connection terminals when using the connection cables RK4.5T... and WK4.5T..
Figure 11:
Connection of
read/write head
(transceiver) for
connection
cables RK4.5T...
and WK4.5T...
Data- 0 (BK)
Data+ 0 (WH)
Transceiver
11
21
12
22
13
23
14
24
GND (BU)
GND (3 BU)
+24 VDC (BN)
+24 VDC (1 BN)
Transceiver
Data- 1 (2 BK)
Data+ 1 (4 WH)
Table 5:
Color
mapping of
the
connection
cables
RK4.5T... and
WK4.5T...
Signal
Color mapping
Vr/w head
Brown (BN)
GND
Blue (BU)
Data-
Black (BK)
Data+
White (WH)
Connection terminals when using the connection cables FB4.5T...
Figure 12:
Connection of
read/write head
(transceiver) for
connection
cables FB4.5T...
Data- 0 (BU)
Data+ 0 (WH)
Transceiver
11
21
GND (BK)
GND (3 BK)
12
22
13
23
14
24
+24 VDC (RD)
+24 VDC (1 RD)
Transceiver
Data- 1 (2 BU)
Data+ 1 (4 WH)
2-10
D101579 1208 - BL ident ® PROFIBUS-DP
Interfaces with the protection class IP20
Table 6:
Color
mapping of
the
connection
cables
FB4.5T...
Signal
Color mapping
Vr/w head
Red (RD)
GND
Black (BK)
Data+
White (WH)
Data-
Blue (BU)
Diagnostics via LEDs
LEDs of the fieldbus side
Table 7:
Fieldbus side
LED
Status
Meaning
Remedy
GW
green
5 VDC operating voltage
present, firmware active,
gateway ready for
operation and sending
–-
green
blinking,
1 Hz
and LED
IOs: red
Firmware inactive
– Re-upload the firmware! Please call
your TURCK-contact person.
green
blinking,
4 Hz
Firmware active,
hardware of gateway
defective.
– Replace the gateway.
green
blinking,
1 Hz
USYS: Undervoltage or
overvoltage
UL: Undervoltage
– Please check whether the voltage
supply is within the allowed range.
green
Configured constellation
of the module bus
participant corresponds
to the real one;
communication is
active.
–-
green
blinking,
1 Hz
Station is in the Force
mode of the I/OASSISTANT.
– Please deactivate the Force mode
of the I/O-ASSISTANT
red and LED
"GW" OFF
Controller is not ready
for operation or Vcclevel is not in the
required range
– Please check the bus refreshing
module at the right side next to the
gateway and its wiring. When the
power supply voltage is wrongly
connected, please call your TURCK
contact person.
red
Module bus not
ready for operation.
– Please check whether the single
BL20 modules are correctly
installed.
IOs:
D101579 1208 - BL ident ® PROFIBUS-DP
2-11
Mounting and installation
Table 7:
(cont.)
Fieldbus side
LED
DIA
Bus
2-12
Status
Meaning
Remedy
red blinking,
1 Hz
Inadaptable
modification of the real
constellation of the
module bus participant
– Please compare the projection of
your BL20 station to the real
constellation.
– Please check the assembly of your
BL20 station for defective or
wrongly plugged electronic
modules.
red/green
blinking,1 Hz
Adaptable modification
of the real constellation
of the module bus
participant
– Please check the BL20 station for
pulled or new modules that are not
projected.
red blinking,
4 Hz
No communication via
the module bus
– Please check whether the
guidelines for supply module
applications have been followed.
OFF
Gateway does not send
diagnostics
–-
red blinking,
1 Hz
Gateway sends
expanded diagnostics.
– Please check the single electronic
modules of your BL20 station for
diagnostic messages.
– Please check the diagnostic
messages of your PLC-software.
red
Gateway generates
static diagnostics.
– Please check the single electronic
modules of your BL20 station for
diagnostic messages.
– Please check the diagnostic
messages with your PLC-software.
OFF
Fieldbus not in
operation.
– Please wait until the firmware
download is completed.
– After completion of the download:
Hardware error, replace the
gateway.
green
Communication
between gateway and
PROFIBUS-DP master is
error-free.
–-
D101579 1208 - BL ident ® PROFIBUS-DP
Interfaces with the protection class IP20
Table 7:
(cont.)
Fieldbus side
LED
Status
Meaning
Remedy
red
Bus error on gateway.
– Please check whether the
PROFIBUS-DP is terminated with
an active terminating resistance
when the BL20 gateway is the last
participant in the bus topology.
– Please check the PROFIBUS-DP
connector for tight fit, or rather
check the direct wiring
connections. All connections must
be correct, and they must have a
tight fit.
– Please check the cable to the
PROFIBUS-DP master for
damages and correct connection.
– Please check whether the correct
bit transfer rate is set in the PLC
master.
– Please compare the projection of
the station to the existing module
list.
red blinking,
1 Hz
Invalid station
addresses
set.
– Please set the correct station
address via the hex-rotary switch/
decimal rotary switch.
D101579 1208 - BL ident ® PROFIBUS-DP
2-13
Mounting and installation
LEDs for the RFID-connections
Table 8:
RFIDconnections
LED
Status
Meaning
DIA
OFF
Normal data exchange
red
Module bus
communication failure
red blinking,
0.5 Hz
Diagnostics present
OFF
No Tag in received
range
green
Tag in received range
green blinking,
1 Hz
Data transfer from / to
Tag
red
Error in read/write head
red blinking,
2 Hz
Short circuit read/write
head supply
RW 0
RW 1
2-14
Remedy
Please check whether more than
two neighboring electronic
modules were pulled.
Relevant are those modules which
are positioned between the
gateway and this particular module.
D101579 1208 - BL ident ® PROFIBUS-DP
Interfaces with the protection class IP20
Diagnostic messages and parameterization of the gateway
A full description of the gateway diagnostic messages and the parameterization possibilities
can be found in the manuals:
"BL20-PROFIBUS-DP" D300822
"BL67/BL20 - DPV1-Gateway" D300955 Updated Manual for DPV1
Parameterization of the BL20-2RFID-A/BL20-2RFID-S-modules
BL20-2RFID-A
At this time parameterization is not needed.
BL20-2RFID-S
The only parameter "Bridging Time Kx[n*4ms]" must only be changed/adjusted when a
certain error message appears at startup ("Parameter" page 3-65):
Diagnostic messages of BL ident ®-channels
Possible software diagnostic messages (I/O-ASSISTANT):
Table 9:
Diagnostics of
Ident-module
Diagnostic byte
and bit
Description I/O-ASSISTANT
DPV1-Errorcode
Diagnostic-channel 1
0
1
0
reserved
1
reserved
2
"Overload" (Ident Overcurrent - the supply of the
read/write head (transceiver) is switched off).
3 to 7
reserved
0
"Hardware failure" (Transceiver hardware error)
1 to 2
reserved
3
"Undervoltage" (Transceiver voltage supply error)
4 to 7
reserved
D101579 1208 - BL ident ® PROFIBUS-DP
4
21
2
2-15
Mounting and installation
Table 9:
(cont.)
Diagnostics of
Ident-module
Diagnostic byte
and bit
Description I/O-ASSISTANT
DPV1-Errorcode
Diagnostic-channel 2
2
3
2-16
0
reserved
1
reserved
2
"Overload" (Ident Overcurrent - the supply of the
read/write head (transceiver) is switched off).
3 to 7
reserved
0
"Hardware failure" (Transceiver hardware error)
1 to 2
reserved
3
"Undervoltage" (Transceiver voltage supply error)
4 to 7
reserved
4
21
2
D101579 1208 - BL ident ® PROFIBUS-DP
Interfaces with the protection class IP20
Technical data
Warning
This device may cause radio interference in living quarters and small industry
(living-, business- and commercial areas, small business). In this case the user may
be asked to implement respective measures at his own expense.
Attention
The auxiliary supply must meet the requirements of the safety low voltage (SELV =
Safety extra low voltage) per IEC 364-4-41.
Approvals and testing of the interface module
Table 10:
Approval and
testing per
EN 61131-2
Approvals
Ó
È
Í
Ambient temperature
Operating temperature
0 to +55 °C /32 to 131 °F
Storage temperature
-25 to +85 °C / -13 to 185 °F
relative humidity
5 to 95 % (internal), Level RH-2,
no condensation (at 45 °C storage)
Vibration test
per EN 61131
Shock test
per IEC 68-2-27
Dumping and falling
per IEC 68-2-31 and free fall per
IEC 68-2-32
Electromagnetic compatibility
Protection class
per EN 61131-2
IP20
Reliability
Lifespan MTBF
120000 h
Pull/plug cycles of electronic modules
20
Note
Additional technical specifications for the tests and for TURCK products of the BL20
product family can be found in the catalog "BL20 - Modular I/O Bus Terminal
System" (D300417) and the Manual "BL20 - PROFIBUS-DP Hardware and
Projection" (D300822).
D101579 1208 - BL ident ® PROFIBUS-DP
2-17
Mounting and installation
Gateway connection level
Table 11:
Technical
data of the
fieldbus side
Description
Field supply ULA)
Value
("Supply voltage" page 2-3)
UL Nominal value (range)
24 VDC (per 61131-2)
IL Max. field supply current
10 A
Current from field supply per 2-channel
RFID-module (no actuator/sensor
supply)C)
100 mA
Current from field supply to feed read/
write heads (for details please refer to
technical data for read/write heads)
< 250 mA
Isolation voltage
– UL against USYS
– UL against fieldbus
– UL against FE
500 Vrms
Connection technology
2-pole screw terminal
System supply USYSB)
("Supply voltage" page 2-3)
USYS nominal value (range)
24 VDC (18 to 30 VDC)
ISYS (at IMB = 1,2 A / USYS = 18 VDC)
max. 900 mA
Nominal current from USYS to supply
gateways
430 mA
Nominal current from USYS to supply a 2channel RFID-moduleC)
30 mA
Isolation voltage (USYS against UL / USYS
against fieldbus / USYS against FE)
500 Vrms
Physical interfaces
2-18
Transfer speed fieldbus
9,6 kbps to 12 Mbps
Connection technology fieldbus
SUB-D female connector
Fieldbus termination
external
Address range fieldbus
1...99
Address range fieldbus
2 rotary switches
Service interface
PS/2 female connector for I/O-ASSISTANT
Connection technology power supply
Screw connection
Passive LWL-adaptors are connectable
Current consumption max. 100 mA
D101579 1208 - BL ident ® PROFIBUS-DP
Interfaces with the protection class IP20
Table 11:
(cont.)
Technical
data of the
Description
Value
Isolation voltage
– Fieldbus against USYS
– Fieldbus against UL
– Fieldbus against FE
500 Vrms
Fieldbus shield connection
Via SUB-D connector
A The current consumption from the field supply UL is the sum of:
Current consumption read/write head × number of read/write heads
+
current consumption per 2-channel RFID-module × number of modules
B The current consumption from the system supply USYS is the sum of:
Current consumption of the gateway
+
current consumption per 2-channel RFID-module × number of modules
C To supply the RFID-module electronics current is used from the field supply UL as well as the system
supply USYS.
D101579 1208 - BL ident ® PROFIBUS-DP
2-19
Mounting and installation
Connection level of read/write head
Table 12:
Technical
data
Description
Value
Number of channels
2
Nominal voltage from supply terminal
24 VDC
Nominal current from field supply
≤ 100 mA
Nominal current from module bus
≤ 30 mA
Power loss, typical
≤1 W
Inputs/Outputs
Transfer rate
115.2 kbps
Cable length
50 m
Cable impedance
120 Ω
Potential isolation
Isolation of electronics and field level via
optocoupler
Utilization factor
1
Sensor supply
250 mA per channel, short circuit protected
Sum current (via both channels)
Number of diagnostic byte
500 mA
4 (BL67-2RFID-A, BL67-2RFID-S)
Number of parameter byte
8 (BL67-2RFID-A, BL67-2RFID-S)
Number of input byte
4 (BL67-2RFID-A)
24 (BL67-2RFID-S)
Number of output byte
4 (BL67-2RFID-A)
24 (BL67-2RFID-S)
Transfer type
serial differential transfer to read/write head
Data buffer receive/send
8/8 kbyte
Connection technology read/write heads
Spring-type terminal
Protection class
IP 20
Stripped isolation length
8 mm
max. terminal range
0.5 to 2.5 mm2
Conductor suitable for clamping
2-20
"e" one-wire H 07V-U
0.5 to 2.5 mm2
"f" fine-wire H 07V-K
0.5 to 1.5 mm2
"f" with wire end sleeves per DIN 46228/1
(wire end sleeves crimped on gas-tight)
0.5 to 1.5 mm2
D101579 1208 - BL ident ® PROFIBUS-DP
Table 12:
(cont.)
Technical
data
Description
Plug gauge per IEC 947-1/1988
Value
A1
Measuring data per VDE 0611 Part 1/8.92/IEC 947-7-1/1989
Measuring voltage
250 V
Measurement current
17.5 A
Measurement diameter
1.5 mm2
Measurement surge voltage
4 kV
Degree of pollution
2
D101579 1208 - BL ident ® PROFIBUS-DP
2-21
Mounting and installation
Interfaces with the protection class IP67
Diagrams and designs of the interface modules
The BL ident ®-PROFIBUS-DP-interface is available with 2, 4, 6, 8 channels.
Interface-Module with the add-on "-S" (Simple) stand for a user-friendly startup opportunity.
With a Write or Read command 8 byte can be transferred. Interface modules without the addon "S" offer a higher number of possible commands and a large data transfer volume per
command.
Figure 13:
BL ident ®interface
modules with
the protection
class IP67
Table 13:
Designs of the
BL ident ®interface
modules with
the protection
class IP67
2-22
Product description
Identnummer
TI-BL67-DPV1-2
1545028
TI-BL67-DPV1-4
1545029
TI-BL67-DPV1-6
1545030
TI-BL67-DPV1-8
1545031
TI-BL67-DPV1-S-2
1545106
TI-BL67-DPV1-S-4
1545107
TI-BL67-DPV1-S-6
1545108
TI-BL67-DPV1-S-8
1545109
D101579 1208 - BL ident ® PROFIBUS-DP
Interfaces with the protection class IP67
Principle switching diagram
The following diagram shows among other things how the voltages VI(Pin 4) and VO (Pin 5)
from the programmed Ethernet-gateways are used and then transmitted:
Figure 14:
Principle
switching
diagram of the
interface
module
BL67system bus
service
interface
mC
memory
PS/2
communication
bus
DP
interface
DP OUT
module bus
interface
DP IN
5
1
2
3
4
V0
5 VDC
Vi
24 VDC
power
bus
short circuit
protection
Vr/w head
PE
GND
Supply voltage
The interface module is supplied via the 7/8"-connector with the imprint "Power".
Figure 15:
7/8"-connector
1
5
2
4
3
Table 14:
Pin
assignment of
the 7/8"connector
PinNr.
Color
7/8"
1
black
GND
2
blue
GND
3
green/
yellow
PE
Protective earth
4
brown
VI (UB)
Feeding in of nominal voltage for inputs (sensor
supply VS/L-head); from it the system supply is won.
5
white
VI (UB)
Feeding in of nominal voltage for outputs
(in case of the BL67-2RFID-module supplies the
microcontroller at the fieldbus side).
D101579 1208 - BL ident ® PROFIBUS-DP
Description
2-23
Mounting and installation
The "Principle switching diagram of the interface module" page 2-23 shows how the voltages
VI (4) and VO (5) are used by the interface module and then transmitted.
The read/write heads are supplied via the voltages VS/L-head (VI). This connection is overloadand short circuit protected.
The LED "VI" page 2-33 indicates when an error occurs with this voltage.
Ready-made cables for PROFIBUS-DP can be found in the appendix of the TURCK catalog
"Fieldbus Technology" D301052.
Fieldbus connection
M12-bus connection
The BL ident ®-interface module is connected to the PROFIBUS-DP via M12 x 1-connector,
5-pole, inverse coded.
M12 x 1-connector to connect to the arriving bus line:
2
Figure 16:
PBDPconnector - "DP
IN"
1
3
4
5
M12 x 1-female connector to connect the exiting bus cable:
2
Figure 17:
PBDP-female
connector - "DP
OUT"
5
Table 15:
Pin
assignment of
M12 x 1connector
3
1
4
Pin-No.
M12 x 1
Description
1
5V
Supply of external devices
2
A
(+)-Data cable; Received-/Send-Data-P; green
3
GND
Data reference potential
4
B
(–)-Data cable; Received-/Send-Data-N; red
5
Shield
Shield connection/function earth
Attention
No equalizing current must flow across the shield. For this purpose a safe system
must be created for potential equalization!
2-24
D101579 1208 - BL ident ® PROFIBUS-DP
Interfaces with the protection class IP67
Bus termination
If the BL ident ®-interface module is used as first or last participant in the bus communication
(at the end of a bus segment), the fieldbus must be terminated. The gateway itself offers no
opportunity to terminate the fieldbus. The female connector that connects to the exiting bus
cable (DP-OUT) must be terminated with a connector with integrated terminating resistance
(for example RSS4.5-PDP-TR, Ident-No. 6601590 as passive terminating resistance or PDPTRA, Ident-No.: 6825346 as active terminating resistance).
Note
The bus termination is done externally with a connector with integrated terminating
resistance.
Addressing
Addressing of the BL ident ®-interface module on the PROFIBUS-DP is done via three decimal
rotary switches next to the service interface.
Figure 18:
Decimal rotary
switches for
setting the
PROFIBUS-DP
address
9 0 1
2
8
3
7
X 100
6 5 4
9 0 1
8
2
7
3
X 10
6 5 4
9 0 1
2
8
3
7
X1
6 5 4
Attention
A max. 125 addresses (001 to 125) can be issued. Each address can only be issued
once in the entire bus structure.
Bus addresses 000, 126 and 127 must not be used.
Attention
After addressing the protective cover above the switches must be tightly screwed
on again.
Please pay attention to the seal of the protective cover to protect it from damage or
from moving out of place.
The protection class IP67 can only be guaranteed when the cover is correctly
closed.
D101579 1208 - BL ident ® PROFIBUS-DP
2-25
Mounting and installation
Service interface
The service interface connects the BL ident ®-interface module to a PC. With the software
I/O-ASSISTANT the interface module can be projected and diagnostic messages can be
indicated.
The service interface must be connected to the PC with a special, ready-made cable to be
used for this purpose.
TURCK connection cable (I/O-ASSISTANT-cable BL20/BL67; Ident No.: 6827133)
The cable has a PS/2-connector (for connecting the female connector to gateway) and a
SUB-D female connector (for connecting the connector to the PC).
Figure 19:
PS/2-connector
on the
connection
cable to the
gateway (top
view)
4 3
5
2
6
5
Figure 20:
9-pole SUB-D
female
connector on
the connection
cable to the PC
(top view)
4
9
Figure 21:
Connection
between PC
and BL67interface
module with the
TURCK
connection
cable
1
3
8
2
7
1
6
B
C
A
2-26
D101579 1208 - BL ident ® PROFIBUS-DP
Interfaces with the protection class IP67
Pin assignment
The table shows the pin assignment when using the PS/2-cable:
Table 16:
Pin
assignment
with PS/2cable
PS/2
9-pole serial interface on
PC
PinNo.
Standard
PS/2-connector
BL67 gateway PS/2female connector
PinNo.
Connector
1
CLK
+5 V (from gateway)
4, 6
DTR, DSR
2
GND
GND
5
GND
3
DATA
not protected
–
–
4
n.c. (DATA2)
TxD
2
RxD
5
+5 V
/CtrlMode
7
RTS
6
n.c. (CLK2)
RxD
3
TxD
Connections of read/write heads
Ready-made connection cables with coupling and connector
Table 17:
Ready-made
connection
cables (BL67)
Type description
CouplingA)
ConnectorB)
(Ident-No.)
straight = g
angled = a
straight = g
RK4.5T-2-RS4.5T/S2500
(6699200)
g
g
RK4.5T-5-RS4.5T/S2500
(6699201)
g
g
RK4.5T-10-RS4.5T/S2500
(6699202)
g
g
WK4.5T-2-RS4.5T/S2500
(6699203)
a
g
WK4.5T-5-RS4.5T/S2500
(6699204)
a
g
WK4.5T-10-RS4.5T/
S2500
(6699205)
a
g
Type description
(Ident-No.)
CouplingA)
ConnectorB)
straight = g
angled = a
straight = g
RK4.5T-0.3-RS4.5T/
S2500
(6699210)
g
g
RK4.5T-25-RS4.5T/S2500
(6699211)
g
g
D101579 1208 - BL ident ® PROFIBUS-DP
2m
5m
10 m
x
x
x
x
x
x
0.3 m
25 m
50 m
x
x
2-27
Mounting and installation
RK4.5T-50-RS4.5T/S2500
(8035246)
g
g
WK4.5T-25-RS4.5T/
S2500
(6638425)
a
g
WK4.5T-50-RS4.5T/
S2500
(6638426)
a
g
x
x
x
A The "Coupling" is used to connect the read/write head
B The "Connector" is plugged into the interface module.
Ready-made connection cables with coupling
The "Coupling" is used to connect the read/write head. M12-connectors BS8151-0/9
(6904613) are used to connect the interface module.
Note
When installing the connectors, please pay attention to "Pin assignment for
connection cables:" page 2-30!
Table 18:
Ready-made
connection
cables (BL67)
2-28
Type description
(Ident-No.)
CouplingA)
RK4.5T-2/S2500
(8035244)
s
RK4.5T-5/S2500
(6699206)
s
RK4.5T-10/S2500
(6699207)
s
RK4.5T-25/S2500
(6638421)
s
RK4.5T-50/S2500
(6638422)
s
WK4.5T-2/S2500
(8035245)
a
WK4.5T-5/S2500
(6699208)
a
WK4.5T-10/S2500
(6699209)
a
WK4.5T-25/S2500
(6699423)
a
2m
5m
10 m
25 m
50 m
straight = s
angled = a
x
x
x
x
x
x
x
x
x
D101579 1208 - BL ident ® PROFIBUS-DP
Interfaces with the protection class IP67
Table 18:
Ready-made
connection
cables (BL67)
Type description
(Ident-No.)
CouplingA)
WK4.5T-50/S2500
(6638424)
a
2m
5m
10 m
25 m
50 m
straight = s
angled = a
x
For the food and beverage range (FB = Food and Beverage) - IP69K
FB-RK4.5T-5/S2502
(8036404)
s
FB-RK4.5T-10/S2502
(8036405)
s
FB-RK4.5T-25/S2502
(8037011)
s
x
x
x
A The "Coupling" is used to connect the read/write head
Connection cables for installing a connector and a coupling
The BL ident ® suitable cable "CABLE-BLIDENT-100M" can be self-assembled. For this
purpose install the M12-connector "BS8151-0/9" (6904613) to connect the interface module,
and the M12-coupling "B8151-0/9" (6904604) to connect the read/write head.
Note
When installing the connector and the coupling, please pay attention to "Pin
assignment for connection cables:" page 2-30!
Connection level of the base module BL67-B-2M12
Figure 22:
Connection
level
D101579 1208 - BL ident ® PROFIBUS-DP
2-29
Mounting and installation
Pin assignment for connection cables:
Figure 23:
Pin assignment
connector (left)
and coupling
(right)
Table 19:
Pin
assignment of
BL67-2RFID
2
3
4
2
1
1
5
5
Channel
Pin
assignment of
the
BL67-B-2M12
Pin
assignment of
the
connector
SignalB)
1
0.1
1
0.3
2
3
4
Color mapping
A)
RK4.5T... and
WK4.5T..
Color
mapping
FB4.5T..
VS/L-headB)
Brown
Red
3
GND
Blue
Black
0.2
2
Data-
Black
Blue
0.4
4
Data+
White
White
1.1
1
VS/L-headB)
Brown
Red
1.3
3
GND
Blue
Black
1.2
2
Data-
Black
Blue
1.4
4
Data+
White
White
A)
A These specifications correspond to the BL ident ® ready-made TURCK-connectors.
B "Supply voltage" page 2-23
2-30
D101579 1208 - BL ident ® PROFIBUS-DP
Interfaces with the protection class IP67
Diagnostics via LEDs
LEDs of the fieldbus side
Table 20:
LED-displays
LED
Status
Meaning
Remedy
GW
off
CPU is not supplied by
voltage.
Please check the supply voltage
of the system connected to the
gateway.
green
Firmware active, gateway
ready for operation and
sending.
-
green blinking,
1 Hz
Firmware inactive
If LED "IOs" red, firmware
download needed.
green blinking,
4 Hz
Firmware active, hardware
of gateway defective.
Replace the gateway.
red and
LED "IOs" OFF
Controller is not ready for
operation or VCC-level is
not in the required range →
possible causes:
– too many modules on
gateway
– short circuit in connected
module
– gateway defective
Please check the supply voltage
of the system connected to the
gateway and the wiring.
Pull surplus modules.
Replace the gateway if needed.
D101579 1208 - BL ident ® PROFIBUS-DP
2-31
Mounting and installation
Table 20:
(cont.)
LED-displays
LED
Status
Meaning
Remedy
IOs:
OFF
CPU is not supplied by
voltage.
Please check the supply voltage
of the system connected to the
gateway.
green
Configured constellation
of the module bus
participant corresponds to
the real one;
communication is active.
-
green blinking,
1 Hz
Station is in the Force
mode of the
I/O-ASSISTANT.
Please deactivate the Force
mode of the
I/O-ASSISTANT
green blinking,
4 Hz
The allowed max. number
of modules connected to
the gateway has been
exceeded.
Please check the number of
modules connected to the
gateway and pull surplus
modules if needed.
red and
LED "GW" OFF
Controller is not ready for
operation or VCC-level is
not in the required range →
possible causes:
– too many modules on
gateway
– short circuit in connected
module
– gateway defective
– Please check the supply
voltage of the system
connected to the gateway and
the wiring.
– Pull surplus modules.
– Replace the gateway if
needed.
red blinking,
1 Hz
Not adaptable
Modification of the real
constellation of the module
bus participant.
– Please compare the projection
of your BL67 station to the real
constellation.
– Please check the assembly of
your BL67 station for defective
or wrongly plugged in
electronic modules.
red blinking,
4 Hz
No communication
via the module bus
– At least 1 electronic module
must be plugged in and able to
communicate with the
gateway.
red/green
blinking,1 Hz
Adaptable modification of
the real constellation of the
module bus participant.
– Please check the BL67 station
for pulled or new modules that
are not projected.
-
CPU is not supplied.
– Please check the system
supply on the gateway.
green
Module bus and CPU o.k.
-
VCC
2-32
D101579 1208 - BL ident ® PROFIBUS-DP
Interfaces with the protection class IP67
Table 20:
(cont.)
LED-displays
LED
Status
Meaning
Remedy
VO
green
Supply of outputs o.k.
-
green
blinking,1 Hz
Undervoltage VO; system
is running.
green blinking,
4 Hz
Overvoltage VO;
system is running.
– Please check the supply
voltage of the system
connected to the gateway.
OFF
Voltage supply missing
green
VI o.k.
-
green blinking,
1 Hz
Undervoltage VI; system is
running.
green blinking,
4 Hz
Overvoltage VI;
system is running.
– Please check the supply
voltage of the system
connected to the gateway.
red
Short circuit or overload on
sensor supply VS/L-head →
switching off the sensor
supply
– An automatic restart occurs as
soon as the error no longer
exists.
OFF
Voltage supply missing
– Please check the supply
voltage of the system
connected to the gateway.
OFF
Gateway does not send
diagnostics.
–
red
Gateway sends
static diagnostics.
– Replace the gateway
(hardware error).
red blinking,
1 Hz
Gateway sends expanded
diagnostics.
– Please check the single
electronic modules of your
BL67 station for diagnostic
messages.
– Please check the diagnostic
messages of your PLCsoftware.
VI
DIA
D101579 1208 - BL ident ® PROFIBUS-DP
2-33
Mounting and installation
Table 20:
(cont.)
LED-displays
2-34
LED
Status
Meaning
Remedy
Bus
OFF
Fieldbus not in operation.
– Please wait until the firmware
download is completed.
– After completion of the
download: Hardware error,
replace the gateway.
green
Communication between
gateway and PROFIBUSDP master is error-free.
–
red
Bus error on gateway;
there is no data exchange.
– Please check whether the
address that was issued for
the station in the project of the
control software matches the
address set on the module.
– Please check whether the
PROFIBUS-DP is terminated
with an active terminating
resistance when the BL67
gateway is the last participant
in the bus topology.
– Please check the PROFIBUSDP-connector for tight fit.
– Please check the cable to the
PROFIBUS-DP master for
damages and correct
connection.
– Please check whether the
correct baud rate is set in the
PLC master.
– Please compare the projection
of the station to the existing
module list.
red blinking,
1 Hz
A PROFIBUS-DP address
that is not allowed has
been set on the gateway.
– Please check the PROFIBUSDP address set on the
gateway.
No allowed are: 000 and
addresses > 125.
Please refer to Chapter
"Addressing" page 2-25.
D101579 1208 - BL ident ® PROFIBUS-DP
Interfaces with the protection class IP67
LEDs for the RFID-connections
The LEDs are positioned on the modules above the connection level.
Table 21:
RFIDconnections
LED
Status
Meaning
D
OFF
Normal data
exchange
red
Module bus
communication
failure
red blinking,
0.5 Hz
Diagnostics present
OFF
No Tag in received
range
green
Tag in received range
green
blinking,1 Hz
Data transfer from / to
Tag
red
Error in read/write
head
red blinking,
2 Hz
Short circuit
read/write head
RW 0
RW 1
D101579 1208 - BL ident ® PROFIBUS-DP
Remedy
Please check whether more
than two neighboring electronic
modules were pulled.
Relevant are those modules
which are positioned between
the gateway and this particular
module.
2-35
Mounting and installation
Diagnostic messages and parameterization of the gateway
A full description of the gateway diagnostic messages and the parameterization possibilities
can be found in the manuals:
"BL67 User Manual for PROFIBUS-DP" D300570 for DPV0
"BL67/BL20 - DPV1-Gateway" D300955 Updated Manual for DPV1
Parameterization of the BL67-2RFID-A/BL67-2RFID-S-modules
BL67-2RFID-A
At this time parameterization is not needed.
BL67-2RFID-S
The only parameter "Bridging Time Kx[n*4ms]" must only be changed/adjusted when a
certain error message appears at startup "Parameter" page 3-65.
Diagnostic messages of BL ident ®-channels
Possible software diagnostic messages (I/O-ASSISTANT):
Table 22:
Diagnostics of
Ident-module
Diagnostic
byte and
bit
Description I/O-ASSISTANT
DPV1-Errorcode
Diagnostic-channel 1
0
1
0
reserved
1
reserved
2
"Overload" (Ident Overcurrent - the supply of the read/
write head (transceiver) is switched off).
3 to 7
reserved
0
"Hardware failure" (Transceiver hardware error)
1 to 2
reserved
3
"Undervoltage" (Transceiver voltage supply error)
4 to 7
reserved
4
21
2
Diagnostic-channel 2
2
3
2-36
0
reserved
1
reserved
2
"Overload" (Ident Overcurrent - the supply of the read/
write head (transceiver) is switched off).
3 to 7
reserved
0
"Hardware failure" (Transceiver hardware error)
1 to 2
reserved
3
"Undervoltage" (Transceiver voltage supply error)
4 to 7
reserved
4
21
2
D101579 1208 - BL ident ® PROFIBUS-DP
Interfaces with the protection class IP67
Technical data
Warning
This device may cause radio interference in living quarters and small industry (living,
business- and commercial areas, small business). In this case the user may be
asked to implement respective measures at his own expense.
Attention
The auxiliary supply must meet the requirements of the safety low voltage (SELV =
Safety extra low voltage) per IEC 364-4-41.
Approvals and testing of the interface module
Table 23:
Approvals and
testing per
EN 61131-2
Description
Value
Approvals
Ó
È
Í
Ambient temperature
Operating temperature
0 to +55 °C /32 to 131 °F
Storage temperature
-25 to +85 °C / -13 to 185 °F
relative humidity
5 to 95 % (internal), Level RH-2,
no condensation (at 45 °C storage)
Vibration test
per IEC 61131-2
Shock test
per IEC 68-2-27
Dumping and falling
per IEC 68-2-31 and free fall per
IEC 68-2-32
Electromagnetic compatibility
per IEC 61131-2
Protection class
IP 67
Reliability
Lifespan MTBF
min. 120000 h
Pull/plug cycles of electronic
modules
20
D101579 1208 - BL ident ® PROFIBUS-DP
2-37
Mounting and installation
Note
Additional technical specifications for testing TURCK products of the BL67 product
family can be found in the catalog "BL67 - Modular I/O Bus Terminal System in
IP67" (BL67_D_d300574) and the manual "BL67–User Manual for PROFIBUS-DP"
(D300570).
Gateway connection level
Table 24:
Technical
data of the
fieldbus side
Description
Supply for outputs
Value
("Supply voltage" page 2-23)
VO (UL) nominal value (range)
24 VDC (18 to 30 VDC)
Max. field supply
10 A
Supply for inputs (also read/write heads)
and system supply (transformed to 5 VDC)
VI (UB) nominal value (range)
24 VDC (18 to 30 VDC)
IVI (Safeguarding supply for inputs
against overload and short circuit)
4A
Current from VI to supply the gateway
650 mA
Current from VI to supply the 2-channel
RFID-connection
130 mA
Current from VI to supply the read/write
heads (for details please refer to
technical data for read/write heads)
< 250 mA
System supply (5 VDC from VI)
IMB (Max. output current of module bus
supply)
1.5 A
Physical interfaces
2-38
Transfer speed fieldbus
9,6 kbps to 12 Mbps
Connection technology fieldbus
2 × M12, 5-pole, inverse coded
Fieldbus termination
external
Address range fieldbus
1...125
Address range fieldbus
3 decimal rotary switches
Service interface
PS/2 female connector for I/O-ASSISTANT
Connection technology power supply
5-pole 7/8"-connector
D101579 1208 - BL ident ® PROFIBUS-DP
Interfaces with the protection class IP67
Connection level of read/write head
Table 25:
Technical
data for
connection
level to read/
write heads
Inputs/Outputs
Number of channels
2
Transfer type
serial differential transfer to read/write head
Data buffer receive/send
8/8 kbyte
Transfer rate
115.2 kbps
Cable length
50 m
Cable impedance
120 Ω
Potential isolation
via optocoupler
Connection technology read/write heads
M12-coupling
Supply of read/write heads from VI
500 mA per channel, short circuit protected
Sum current (via both channels)
500 mA
Nominal voltage VI
24 VDC
Isolation voltage
Module bus against field side
1000 VDC
Supply of read/write heads against data
cables
0 VDC
Field supply against supply of read/write
heads
0 VDC
D101579 1208 - BL ident ® PROFIBUS-DP
2-39
Mounting and installation
2-40
D101579 1208 - BL ident ® PROFIBUS-DP
3
Startup of a TURCK BL ident ®-system
DPV1 startup example for A-modules with STEP7 and PIB..................................................3
Hardware description of the project example ................................................................................... 3
Memory requirements for a BL ident ®-startup.................................................................................. 3
– Basic memory requirements .......................................................................................................... 3
– Memory requirements per PIB-instance (Channel) ........................................................................ 3
– Memory requirements for the Read and Write data ....................................................................... 3
Memory requirements for the hardware example ............................................................................. 4
Uploading the project example and downloading the active GSD-file.............................................. 4
Start of the S7-software and upload of the project example ............................................................ 5
Hardware configuration and I/O-addresses ...................................................................................... 5
Setting up the function component PIB ............................................................................................ 6
– PIB variable table with the FB10 .................................................................................................... 8
– Observation and control with the help of the variable table, vartable_pibX .................................. 9
– Activation and deactivation of the read/write head using configuration data .............................. 11
– Initialization of the first channel .................................................................................................... 12
Read of UID from data carrier / Channel 1 ...................................................................................... 14
Write to data carrier / Channel 1...................................................................................................... 15
Read from data carrier / Channel 1 ................................................................................................. 18
DPV0 startup example for C-modules with STEP7 and PIB ...............................................21
Hardware description of the project example ................................................................................. 21
Memory requirements for a BL ident ®-startup................................................................................ 21
– Basic memory requirements ........................................................................................................ 21
– Memory requirements per PIB-instance (Channel) ...................................................................... 21
– Memory requirements for the Read and Write data ..................................................................... 21
Memory requirements for the hardware-example ........................................................................... 22
Upload of the project example and download of the active GSD-file5 ........................................... 22
Start of the S7-software and upload of the project example .......................................................... 23
Hardware-configuration and I/O-addresses.................................................................................... 24
Setting up the function component PIB .......................................................................................... 25
– PIB variable table with the FB10 10 ............................................................................................. 26
– Observation and control with the help of the variable table, vartable_pibX ................................ 27
– Activation and deactivation of the read/write head using configuration data .............................. 29
– Initialization of the first channel .................................................................................................... 30
Read of UID from data carrier / Channel 1 ...................................................................................... 32
Write to the data carrier / Channel 1 ............................................................................................... 33
Read from the data carrier / Channel 1 ........................................................................................... 36
Flow diagram of PIB functionality ......................................................................................39
Definitions within the command and diagnostics levels ....................................................40
Write-Config..................................................................................................................................... 41
– Example for configuration data .................................................................................................... 41
Read-Config .................................................................................................................................... 42
Inventory .......................................................................................................................................... 42
Physical_Read ................................................................................................................................. 42
Physical_Write ................................................................................................................................. 42
Mem-Status ..................................................................................................................................... 42
Dev-Status ....................................................................................................................................... 42
– Example: ...................................................................................................................................... 43
Next ................................................................................................................................................. 43
Get ................................................................................................................................................... 43
Other commands ............................................................................................................................. 44
D101579 1208 - BL ident ® PROFIBUS-DP
3-1
Startup of a TURCK BL ident ®-system
Startup example for S-modules with STEP7 ......................................................................45
Hardware description of the project example ................................................................................. 45
Download of the active GSD-file ..................................................................................................... 45
Start of the STEP7-software and creating a new project ................................................................ 45
Hardware configuration ................................................................................................................... 46
Compiling the variable tables for the process data ......................................................................... 47
Activating the read/write head......................................................................................................... 49
Initialization/RESET Channel 1 ........................................................................................................ 50
Reading of UID from the data carrier / Channel 1 ........................................................................... 51
Write to data carrier / Channel 1...................................................................................................... 52
Read from the data carrier / Channel 1 .......................................................................................... 53
Error messages via the input data ................................................................................................... 56
DPV1-diagnostic messages ............................................................................................................ 57
Parameterization.............................................................................................................................. 57
Flowchart diagram of command execution BL67-2RFID-S/BL20-2RFID-S-Module ............58
Process image of BL67-2RFID-S/BL20-2RFID-S-Module ...................................................59
Process input data........................................................................................................................... 59
– Significance of the Status-Bits ..................................................................................................... 60
Process output data ........................................................................................................................ 62
– Significance of the Command-Bits/Control-Bits ......................................................................... 63
Parameter ........................................................................................................................................ 65
– Determination of the parameter value "bypass time Kx [n*4ms]:" ............................................... 66
Diagnostics ...................................................................................................................................... 67
Warnings and error messages ...........................................................................................68
IEC-conform error messages .......................................................................................................... 71
User data ranges of the data carrier versions....................................................................75
Access to the data ranges of the data carriers................................................................................ 75
Overview of the Turck data carriers................................................................................................. 75
3-2
D101579 1208 - BL ident ® PROFIBUS-DP
DPV1 startup example for A-modules with STEP7 and PIB
The startup of a BL ident ®-system using the SIMATIC basic software Step 7 and the standard
software component "Proxy Ident Function Block" (PIB) for interface modules with "A"-discs
(for example, TI-BL20-DPV1-2) is described below.
A first startup should be easy, and it should be possible to do this with no programming skills.
For this purpose, TURCK provides a project example. You may order the CD "BL IDENT-CD"
with the project example directly from TURCK: Ident-No. 1545052
Hardware description of the project example
These hardware components were used for the following startup example:
S7-control "CPU 315-2DP" (DPV1-capable CPU)
BL ident ®-Interface-module "TI-BL67-DP1-2"
BL ident ®-read/write head "TN-CK40-H1147"
Data carrier "TW-R50-B128" (user data = 112 byte)
Please download D101583 which you may find in the download area of the TURCK website
if you have questions or if you desire clarification concerning the read/write heads and the
data carriers.
Memory requirements for a BL ident ®-startup
Basic memory requirements
The basic memory requirements for the startup of the BL ident ®-system using the Proxy Ident
Function Block is:
14 kilobyte
Memory requirements per PIB-instance (Channel)
An instance of the Proxy Ident Function Block is created for each channel.
In addition to the basic memory requirements, each channel will need
0.6 kilobyte.
Memory requirements for the Read and Write data
The Proxy Ident Function Block (PIB) occupies one memory range as a send- and receivebuffer. The size of the memory range must be laid out according to the data volume when
reading and writing.
With the BL ident ®-system TURCK supplies PIB-versions to accommodate the different data
volumes when reading and writing:
PIB_1KB
PIB_16K
PIB_32K
The following calculation rule shows how the memory requirements for Read and Write are
being calculated. Prerequisite is that the buffer is being used by multiple channels / instances.
The memory requirements will significantly increase when each instance is assigned its own
buffer. Upon completion of the calculation, you may select the function component suitable
for your application.
D101579 1208 - BL ident ® PROFIBUS-DP
3-3
Startup of a TURCK BL ident ®-system
The total data volume is the result of the following sum:
Data volume which is read via all active channels and stored in a new "Only-Read Memory
Range"
Once it has been determined that the Read operation on the individual channels always
occurs with an adequately long time offset, the memory range may be shared by the
channels.
Data volume which is read via all active channels and stored in a new "Only-Read Memory
Range"
Once it has been determined that the Read operation on the individual channels always
occurs with an adequately long time offset, the memory range may be shared by the
channels.
Data volume which can repeat Read as well as Write data. The memory range is alternately
used as Write memory range and Read memory range. The needed memory range may be
reduced to half.
Note
Please ensure that in any case there is adequate time to hand off the data when you
use the Read or Write memory for multiple channels and/or alternately for reading
and writing.
Memory requirements for the hardware example
"Hardware description of the project example" page 3-3 offers two channels for connecting
one read/write head each. The Read range and the Write range should have a separate layout.
The used data carrier may store max. 128 byte (112 byte user data). For the calculation max.
200 byte Read memory and 200 byte Write memory are factored in. Each channel then
occupies 400 byte. Both channels 800 byte.
For the total memory requirements the "Basic memory requirements" page 3-3 and the
"Memory requirements per PIB-instance (Channel)" page 3-3 times two are added to
800 byte:
Total memory requirements
= 14 kilobyte + (2 x 0.6 kilobyte) + 800 byte = 16 kilobyte
Uploading the project example and downloading the active GSD-file
With the project example provided by TURCK you may simulate a first startup with ease.
TURCK provides the project example on the CD "BL IDENT-CD" with the Ident-No.1545052
The project example is available as a ZIP-file. Please keep a copy of the ZIP format and log
the file location.
You will need the active GSD-file to realize the configuration of the BL ident ®-interface
module. Please locate the active GSD-file at:
http://www.turck.com....
(Download > Direct search: "BL67-GW-DPV1"...)
You will be able to start up differing applications as well with the help of operating instructions
provided in this document.
3-4
D101579 1208 - BL ident ® PROFIBUS-DP
DPV1 startup example for A-modules with STEP7 and PIB
Start of the S7-software and upload of the project example
If need be, please actualize the GSD-file (prior or after start). Start the "SIMATIC basic
software Step 7". After the start, the window of the "SIMATIC Manager" will become active.
Figure 24:
After the start of
the SIMATIC
Manger
Please open the project example with the
File > Retrieve
Select from your directory the TURCK example file:
"BL_ID_A.zip"
The SIMATIC Manager will suggest a file location (end directory) for your BL ident ®-test
project. You may acknowledge it or change it. Acknowledge "Do you want to open these
now?".
Hardware configuration and I/O-addresses
When double-clicking on "SIMATIC" in the file directory tree in the left side of the window,
"Hardware" appears among others in the right side of the window. Here you may adjust the
configuration settings when your hardware setup differs from the project example. By doubleclicking on the PROFIBUS-DP-station (here BL67) you may see the hardware configuration.
You may change the I/O-addresses suggested by the SIMATIC Manager. Concerning the
example it is beneficial if you keep the I- or rather Q-addresses "2...5" as recommended.
Note
When using the function block PIB it is necessary to choose the same value for input
and output addresses.
Transfer the configuration data to the automation system (PLC > Download).
Confirm the request for the module to be restarted..
D101579 1208 - BL ident ® PROFIBUS-DP
3-5
Startup of a TURCK BL ident ®-system
Figure 25:
Hardwareconfigurator
Setting up the function component PIB
In the project example the basic settings have been selected.
The following explanations will add to a more thorough understanding so that you may start
up differing applications based on this project example as well.
Close the hardware-configurator if it remains open.
In the left window of the project tree, open the file "Blocks" (bottom point in the project tree).
The component OB1 represents the top program level which is being cyclically processed by
the CPU.
By double-clicking on OB1 you may see the program structure.
3-6
D101579 1208 - BL ident ® PROFIBUS-DP
DPV1 startup example for A-modules with STEP7 and PIB
Figure 26:
Top program
level
The master program OB1 mainly accesses the FB10. Close the OB1 and double-click on
FB10 in the Components file.
D101579 1208 - BL ident ® PROFIBUS-DP
3-7
Startup of a TURCK BL ident ®-system
PIB variable table with the FB10
The FB10 assigns to the variables per the specifications (formal parameters) the variables for
the PIB-instance of a channel.
The explanations for all variables in this component are in "3 Definition of Proxy-Ident-Blocks
(PIB)" page 4-6
In the TURCK project example 2 channels are available for a BL ident ®-communication, and
this is why two "instances" of the Proxy Ident Function Block are created.
The PIB-instance to the first channel is identified with "0". All variable names to the first
instance also contain a "0".
The second channel is accordingly identified by "1", etc.
Figure 27:
Variables to the
first instance
Variables per specifications
First instance for Channel 1
3-8
D101579 1208 - BL ident ® PROFIBUS-DP
DPV1 startup example for A-modules with STEP7 and PIB
Observation and control with the help of the variable table, vartable_pibX
Close the FB10 and open the variable table, vartable_pib0 with the help of the Components
file. This table belongs to the first instance of the PIB and therefore to Channel 1.
In order to read the status values and to upload the control values, activate the online
connection to your control (PLC > Connect to > Direct CPU). The Mode "RUN" is displayed
green at the bottom right of the window.
Please adjust the values that are described in the legend in points A through D in the column
Control Values when your application differs from the project example.
Note
Load the values to your control (Variable modify)
and ensure with the help of
the column Status Values (Variable monitor)
that the control has accepted the
values!
Figure 28:
Entries into
vartable_pib0
A
B
C
D
E
F
G
H
D101579 1208 - BL ident ® PROFIBUS-DP
3-9
Startup of a TURCK BL ident ®-system
A This is the start address for the BL ident ®-process data of the first module. The "ID" (start address)
for a second module must be "6", for a third "10" and for a fourth "14". The address range for each
individual channel is first determined with the help of the Offset (legend point C).
B The index "111" indicates that the next execution will cause a data transfer (also parameter data) to
Channel 1. The index "112" refers to Channel 2. This is the case for each BL ident ®-module of the
station. Differing indices (for example, "113") create an error message"DW#16#E7FE06xx" page
3-70. These indices are being used universally (also parameter transfer data). The indices 101 and
102 which are to be specifically selected for parameter data transfer per the specifications are no
longer used.
C This Offset is added to the start address (A). The calculated address refers to the process data of the
channel. Here the Offset is "0" because vartable_pib0 belongs to the first channel. The process data
for one BL ident ®-channel contain 2 byte. The respective Offset in the vartable_pib1 which belongs
to the second channel is "2".
D Here the buffer range for the Read and Write data for the first instance (first channel) is displayed.
The "Memory requirements for the Read and Write data" page 3-3 is limited with the selection of a
PIB-1KB to a total of 1 kilobyte. Here it is indicated that the send buffer for the first channel occupies
Range 1. The receive buffer occupies the Range 201 to 400
for the second channel the Ranges 401 to 600 and 601 to 800 are being occupied respectively
(compare vartable_pib1). The opportunity to use the memory range of multiple channels when an
adequate time offset is present or to use Read and Write was not taken advantage off here.
E Here you may enter 1, 2 or 3 if only one of three possible commands (see vartable_pibX: Commando
1, WriteConfig (INIT), Commando 2, for example, Inventory...) is to be executed. If initially only the
Write-Config-Command ("Write-Config" page 4-26) is to be executed, "1" has already been entered
here.
F The hexadecimal coding for the command "Write-Config" is 0×78.
G A configuration data change may be executed per the specifications ("Config" page 4-26)
with the help of a Reset (0×01) (like in example),
or
with a combination of Reset and new configuration data (0×03).
H The number of configuration data to be written.
(Here it is 3 configuration data to the data carrier which will be explained more closely in the next
paragraph).
3-10
D101579 1208 - BL ident ® PROFIBUS-DP
DPV1 startup example for A-modules with STEP7 and PIB
Activation and deactivation of the read/write head using configuration data
By entering the values in E to H ( page 3-9) you may prepare for Send Configuration Values.
In the TURCK project example the configuration values are already stored in "Send Data
Field" of vartable_pib0. The Send Data Field is below the command range of vartable_pibX
(here X = 0).
Only the value of the third configuration byte is of significance. Activation/Deactivation of
read/write head is requested using this value and with the next initialization. An active read/
write head creates an electromagnetic field (a signal is transferred with 13.56 MHz, for
example). The command "Write-Config" page 3-41 is executed when initialization takes
place.
After the initialization has been completed, activation and deactivation of read/write head is
executed with the command "Write-Config" page 3-41 (0×78) and a "positive edge" of the
control variables "APPL0_DB".EXECUTE". For executing the command, please follow the
same instructions for Read and Write (for example, B"Write to data carrier / Channel 1" page
3-15).
Note
Load the values to your control (Variable modify)
and ensure with the help of
the column Status Values (Variable monitor)
that the control has accepted the
values!
Figure 29:
Send buffer of
vartable_pib0
A
B
C
A and
B It is not necessary to adjust these data fields. Initially the fields were available for entries concerning
number of blocks and number of byte per block of the data carrier. Keep value 0×00. The value of
the actively used data carriers are internally read and processed.
C The value 0x01 activates the transmitter (antenna) of the read/write head. The value 0x00 deactivates
the transmitter.
D101579 1208 - BL ident ® PROFIBUS-DP
3-11
Startup of a TURCK BL ident ®-system
Initialization of the first channel
In the Chapter "Setting up the function component PIB" page 3-6 you have been introduced
to the settings (control values) relevant for initialization. In case your BL ident ®-project differs
from the project example, an adjustment of the control values took place.
Note
Load into your control (Variable modify) all values which were described in the prior
chapters
! With the help of the column Status Values (Variable monitor)
please ensure that the control has accepted the values!
Now start initialization. Please note that the online connection to your control must be active.
The Mode "RUN" is displayed green at the bottom right of the window.
The command "Initialization" is executed with a "positive edge" of the control variable
"APPL0_DB".INIT. You will create the positive edge by setting the variable from "false" to
"true". Enter "1" or "true" as control value.
Figure 30:
Control field of
vartable_pib0
A
A Initialization takes place with the positive edge (switch from false-> true or 0->1)
With:
Variable > Modify or
the command "Initialization" is executed.
3-12
D101579 1208 - BL ident ® PROFIBUS-DP
DPV1 startup example for A-modules with STEP7 and PIB
You may observe the command execution in the Status Field of the vartable_pib0.
Figure 31:
Status Field of
vartable_pib0
For a short period of time, the status variable "APPL0_DB".DONE switches to the status
"Busy" and then continues to display "Command Executed". Error-free execution is
acknowledged with "APPL0_DB".ERROR = false.
The descriptions of some error codes of the status variables "APPL0_DB".STATUS especially
in regards to the BL ident ® specific errors you will find in"Warnings and error messages" page
3-68.
A complete description of the status data can be found in "Warnings and error messages"
page 3-68 and"3.1.3 Error and Warning Concept" page 4-13.
Reset the variable "APPL0_DB".INIT to "false" after successful initialization.
With:
Variable > Modify or
"false" again becomes status value.
Read of UID from data carrier / Channel 1
Each RFID-data carrier receives a "UID" page 5-4 (unique identifier) by the manufacturer. The
UID reproduces a worldwide unique TAG-ID No. and has 8 byte. Chapter "Access to the data
ranges of the data carriers" page 3-75 shows the memory structure of the different data
carriers.
Read of the UID is executed with the command "Inventory". In the TURCK project example,
the command code 0x69 to inventory has been already entered into the field "Command 2".
The comprehensive description of the command code is at "Inventory" page 4-29.
Figure 32:
Command 2 of
vartable_pib0
Please note that the online connection to your control must be active. The Mode "RUN" is
displayed green at the bottom right of the window.
Most likely the control value "APPL0_DP".CMDSEL of the vartable_pib0 still has the value "1"
because you have executed "Initialization" with command 1 as the final step.
Now enter "2" for this control value to select the command 2.
D101579 1208 - BL ident ® PROFIBUS-DP
3-13
Startup of a TURCK BL ident ®-system
Figure 33:
Control Field of
vartable_pib0
Note
Load all values to your control (Variable modify)
and ensure with the help of the
column Status Values (Variable monitor)
that the control has accepted the
values!
The command "Initialization" is displayed with a "positive edge" of the control variable
"APPL0_DB".EXECUTE". You will create the positive edge by setting the variable from "false"
to "true". Enter "1" or "true" as control value.
Figure 34:
Control Field of
vartable_pib0
A
A "Inventory" takes place with the positive edge (switch from false-> true or 0->1)
With:
Variable > Modify or
the command "Inventory" is executed.
You may observe the command execution in the Status Field of the vartable_pib0.
For a short period of time, the status variable "APPL0_DB".DONE switches to the status
"Busy" and then continues to display "Command Executed"="true". Error-free execution is
acknowledged with "APPL0_DB".ERROR = false.
At "Inventory" 8 UID data byte are received. Here the transferred data is "APPL0_DB".TRLEN
= "12" long.
You may find a complete description of the status data in "Warnings and error messages"
page 3-68 and "3.1.3 Error and Warning Concept" page 4-13.
Now you may read the "Unique Identifier / UID" in the received data field of the vartable_pib0.
Figure 35:
The UID in the
received data
field
A
3-14
D101579 1208 - BL ident ® PROFIBUS-DP
DPV1 startup example for A-modules with STEP7 and PIB
A The 8 byte comprising UID is stored in the received data buffer starting with byte 5. Byte 5
reflects the MSB and byte 12 the LSB of the UID. Byte 1 and 2 always display 0×0001 for
BL ident ®. Bulk reading systems will indicate here which of the data carriers has been actively read
from the "Bulk". Together byte 3 and 4 display the length of the UID (here: 0×0008).
Reset the variable "APPL0_DB".EXECUTE to "false" after the successful reading of the UID.
With:
Variable > Modify or
"false" again becomes status value.
Write to data carrier / Channel 1
This chapter explains the writing of 32 byte data with discretionary content to your RFID data
carrier.
Writing to the data carrier of the first channel is possible after "Initialization of the first channel"
page 3-12 has been completed.
In this example we have selected data which can be easily recognized during the following
"Read from data carrier / Channel 1" page 3-17.
Writing of data is executed with the command "Physical_Write" (dt.: physical writing). Enter
the command code 0x71 for Physical_Write into the field "Command 3" of the vartable_pib0.
A full description of this command code is at "Physical_Write" page 4-25.
Please note that the online connection to your control must be active. The Mode "RUN" is
displayed green at the bottom right of the window.
Now enter "3" for the control value "APPL0_DB".CMDSEL of the vartable_pib0 to select the
command 3.
In the send data field enter 32 byte as hexadecimal numbers. Following writing we will explain
reading. We enter the number series: 1, 2, 3, 4, 5, 6, 7, 8, 9, A, B... 20 which will be easily
recognizable for us.
You may enter the hexadecimal digits as single-digits or double digits and without additional
format instructions (B#16#..). The SIMATIC Manager adapts to the suitable format.
D101579 1208 - BL ident ® PROFIBUS-DP
3-15
Startup of a TURCK BL ident ®-system
Figure 36:
Preparations of
the
vartable_pib0
for writing.
A
B
C
D
E
F
A Here the code is entered for the command which is to be executed next with command 3. You may
find an overview of all possible commands at "3.1.4 Commands" page 4-23.
The command code 0×71 is used for the command to write to a physically present TAG
"Physical_Write".
B This data field has 8 byte and may contain an UID. This UID is always compared to the UID of the
TAG when values ≠ 00 have been entered here.
Ensure that here all 8 byte have the value "00" if you do not wish to execute the UID comparison
function.
C Here you may enter the number of byte which are to be transferred from the send data field. The
number of possible byte depends on the size of the send data field (page 3-10) and the memory
capacity of the used TAGs. In this TURCK example 32 byte are written to the TAG (112 byte). The
size of the send data field is 200 byte.
D With the help of this address, each byte on the TAG may be explicitly accessed as start address. In
this example the start address L#0 is selected. If you use a different data carrier than the one in this
project example, please pay attention to the paragraph "User data ranges of the data carrier
versions" page 3-75.
E With these "Attributes" some commands may be specified more closely. This value is not
considered with the Write and Read command.
In "3.1.4 Commands" page 4-23 you will find an overview for all possible commands and the
possibilities to more closely specify them via "Attributes". In any case, please also pay attention to
"Definitions within the command and diagnostics levels" page 3-40.
F Into this send data field, enter the data which you would like to use to write to your TAG with.
Note
Load all the field values "Control", "Command 3" and "Send Data Field" into your
control (Variable modify)
and ensure with the help of the column Status Values
(Variable monitor)
that the control has accepted the values!
3-16
D101579 1208 - BL ident ® PROFIBUS-DP
DPV1 startup example for A-modules with STEP7 and PIB
The command "Physical Write" is realized with a "positive edge" of the control variable
"APPL0_DB".EXECUTE. You will create the positive edge by setting the variable from "false"
to "true". Enter "1" or "true" as control value.
Figure 37:
Control Field of
vartable_pib0
A
A "Physical_Write" takes place with the positive edge (switch from false-> true or 0->1)
With:
variable >modify or
the command "Physical_Write" is executed.
You may observe the command execution in the Status Field of the vartable_pib0.
Figure 38:
Status Field of
vartable_pib0
For a short period of time, the status variable "APPL0_DB".DONE switches to the status
"Busy" and then continues to display "Command Executed"="true". Error-free execution is
acknowledged with "APPL0_DB".ERROR = false.
You may find a complete description of the status data in "Warnings and error messages"
page 3-68 and "3.1.3 Error and Warning Concept" page 4-13.
Reset the variable..."APPL0_DB".EXECUTE to "false" after the write operation was
successful.
With:
Variable > Modify or
"false" again becomes status value.
Read from data carrier / Channel 1
This chapter explains the reading of 32 byte data with discretionary content from your RFID
data carrier.
Reading from the data carrier of the first channel is possible after "Initialization of the first
channel" page 3-12 has been completed.
D101579 1208 - BL ident ® PROFIBUS-DP
3-17
Startup of a TURCK BL ident ®-system
In the prior chapter you wrote data (arbitrary) to the data carrier with the command
"Physical_Write". In this chapter you will read the same data with the "Physical_Read"command (dt.: physical reading) from the data carrier.
Enter the command code 0x70 for Physical_Read into the field "Command 3" of the
vartable_pib0. A full description of this command code is at "Physical_Read" page 4-24.
Please note that the online connection to your control must be active. The Mode "RUN" is
displayed green at the bottom right of the window.
Now enter "3" for the control value "APPL0_DB".CMDSEL of the vartable_pib0 to select the
command 3.
Figure 39:
Preparations of
the
vartable_pib0
for reading
A
B
C
D
E
A Here the code is entered for the command which is to be executed next with command 3. You may
find an overview of all possible commands at "3.1.4 Commands" page 4-23.
The command code 0×71 is used for the command to read from a physically present TAG
"Physical_Read".
B This data field has 8 byte and may contain an UID. This UID is always compared to the UID of the
TAG when values ≠ 00 have been entered here.
Ensure that here all 8 byte have the value "00" if you do not wish to execute the UID comparison
function.
C Here you may enter the number of byte which are to be transferred into the send data field. The
number of possible byte depends on the size of the received data field (page 3-10) and the memory
capacity of the used TAGs. In this TURCK example 32 byte are written to the TAG (112 byte). The
size of the received data field is 200 byte.
D With the help of this address, each byte on the TAG may be explicitly accessed as start address. The
start address L#0 is selected in this example. If you use a different data carrier than the one in this
project example, please follow Chapter "User data ranges of the data carrier versions" page 3-75.
E With these "Attributes" some commands may be specified more closely. This value is not
considered with the Write and Read command.
In "3.1.4 Commands" page 4-23 you will find an overview for all possible commands and the
possibilities to more closely specify them via "Attributes". In any case, please also pay attention to
"Definitions within the command and diagnostics levels" page 3-40.
Note
Load all the field values "Control" and "Command 3" into your control (Variable
modify)
and ensure with the help of the column Status Values (Variable
monitor)
that the control has accepted the values!
The command "Physical Read" is realized with a "positive edge" of the control variable
"APPL0_DB".EXECUTE. You will create the positive edge by setting the variable from "false"
to "true". Enter "1" or "true" as control value.
3-18
D101579 1208 - BL ident ® PROFIBUS-DP
DPV1 startup example for A-modules with STEP7 and PIB
Figure 40:
Control field of
vartable_pib0
A
A "Physical_Read" takes place with the positive edge (switch from false-> true or 0->1)
With:
Variable > Modify or
the command "Physical_Read" is executed.
You may observe the command execution in the Status Field of the vartable_pib0.
D101579 1208 - BL ident ® PROFIBUS-DP
3-19
Startup of a TURCK BL ident ®-system
Figure 41:
Status Field of
vartable_pib0
For a short period of time, the status variable "APPL0_DB".DONE switches to the status
"Busy" and then continues to display "Command Executed"="true". Error-free execution is
acknowledged with "APPL0_DB".ERROR = false.
Here the received data size is "APPL0_DB".TRLEN = "32".
You may find a full description of the status data in "Warnings and error messages" page 3-68
and "3.1.3 Error and Warning Concept" page 4-13.
In the received data field of the vartable_pib0 you may find the data read by the TAG:
Figure 42:
Received data
field of the
vartable_pib0
after successful
reading.
Reset the variable..."APPL0_DB".EXECUTE to "false" after the read operation was
successful.
With:
Variable > Modify or
"false" again becomes status value.
3-20
D101579 1208 - BL ident ® PROFIBUS-DP
DPV0 startup example for C-modules with STEP7 and PIB
The startup of a BL ident ®-system using the SIMATIC basic software Step 7 and the standard
software component "Proxy Ident Function Block" (PIB) for interface modules with "C"-discs
(for example, TI-BL20-DPV0-2) is described below.
A first startup should be easy, and it should be possible to do this with no programming skills.
For this purpose, TURCK provides a project example. You may order the CD "BL IDENT-CD"
with the project example directly from TURCK: Ident-No. 1545052
Hardware description of the project example
These hardware components were used for the following startup example:
S7-control "CPU 315-2DP"
BL ident ®-Interface-module "TI-BL67-DP0-2"
BL ident ®-read/write head "TN-CK40-H1147"
Data carrier "TW-R50-B128"
Please download D101583 which you may find in the download area of the TURCK website
if you have questions or if you desire clarification concerning the read/write heads and the
data carriers.
Memory requirements for a BL ident ®-startup
Basic memory requirements
The basic memory requirements for the startup of the BL ident ®-system using the Proxy Ident
Function Block is:
22 kilobyte
Memory requirements per PIB-instance (Channel)
An instance of the Proxy Ident Function Block is created for each channel.
In addition to the basic memory requirements, each channel will need
1.8 kilobyte.
Memory requirements for the Read and Write data
The Proxy Ident Function Block (PIB) occupies one memory range as a send- and receivebuffer. The size of this memory range must be laid out according to the data volume when
reading and writing.
With the BL ident ®-system TURCK supplies PIB-versions to accommodate the different data
volumes when reading and writing:
PIB_001KB_CYC
PIB_016KB_CYC
PIB_032KB_CYC
D101579 1208 - BL ident ® PROFIBUS-DP
3-21
Startup of a TURCK BL ident ®-system
The following calculation rule shows how the memory requirements for Read and Write are
being calculated. Prerequisite is that the buffer is being used by multiple channels / instances.
The memory requirements will significantly increase when each instance is assigned its own
buffer. Upon completion of the calculation, you may select the function component suitable
for your application. The total data volume is the result of the following sum:
Data volume which is read via all active channels and stored in an "Only Read Memory
Range".
Data volume which is written via all active channels and stored in an "Only Write Memory
Range".
Data volume which can repeat Read as well as Write data. The memory range is alternately
used as Write memory range and Read memory range. The needed memory range may be
reduced to half.
Memory requirements for the hardware-example
"Hardware description of the project example" page 3-21 offers two channels for connecting
one read/write head each. The Read range and the Write range should have a separate layout.
The used data carrier can store max. 128 byte. For the calculation max. 200 byte Read
memory and 200 byte Write memory are factored in. Each channel then occupies 400 byte.
Both channels 800 byte.
For the total memory requirements the "Basic memory requirements" page 3-21 and the
"Memory requirements per PIB-instance (Channel)" page 3-21 times two are added to
800 byte:
Total memory requirements
= 22 kilobyte + (2 x 1.8 kilobyte) + 800 byte = 26.4 kilobyte
Upload of the project example and download of the active GSD-file5
With the project example provided by TURCK you may simulate a first startup with ease.
TURCK provides the project example on the CD "BL IDENT-CD" with the Ident-No.1545052
The project example is available as a ZIP-file. Please keep a copy of the ZIP format and log
the file location.
You will need the active GSD-file to realize the configuration of the BL ident ®-interface
module. Please locate the active GSD-file at:
http://www.turck.com....
(Download > Direct search: "BL67-GW-DPV"...)
You will be able to start up differing applications as well with the help of operating instructions
provided in this document.
Start of the S7-software and upload of the project example
If need be, please actualize the GSD-file (prior or after start). Start the "SIMATIC basic
software Step 7". After the start, the window of the "SIMATIC Manager" will become active.
3-22
D101579 1208 - BL ident ® PROFIBUS-DP
DPV0 startup example for C-modules with STEP7 and PIB
Figure 43:
After the start of
the SIMATIC
Manger
Please open the project example with the
File > Retrieve
Select from your directory the TURCK example file:
"BL_ID_C.zip"
The SIMATIC Manager will suggest a file location (end directory) for your BL ident ®-test
project. You may acknowledge it or change it. Acknowledge "Do you want to open these
now?"..
Hardware-configuration and I/O-addresses
When double-clicking on "SIMATIC" in the file directory tree in the left side of the window,
"Hardware" appears among others in the right side of the window. Here you may adjust the
configuration settings when your hardware setup differs from the project example. By doubleclicking on the PROFIBUS-DP-station (here BL67) you may see the hardware configuration.
You may change the I/O-addresses suggested by the SIMATIC Manager. Concerning the
example it is beneficial if you keep the I- or rather the Q-addresses "2...33" as suggested.
Note
When using the function block PIB it is necessary to choose the same value for input
and output addresses.
Transfer the configuration data to the automation system (PLC > Download).
Confirm the request for the module to be restarted.
D101579 1208 - BL ident ® PROFIBUS-DP
3-23
Startup of a TURCK BL ident ®-system
Figure 44:
Hardwareconfigurator
Setting up the function component PIB
In the project example the basic settings have been selected.
The following explanations will support the comprehensive understanding so that you may
also start up differing applications based on this project example.
Close the hardware-configurator if it remains open.
In the left window of the project tree, open the file "Blocks" (bottom point in the project tree).
The component OB1 represents the top program level which is being cyclically processed by
the CPU.
By double-clicking on OB1 you may see the program structure.
3-24
D101579 1208 - BL ident ® PROFIBUS-DP
DPV0 startup example for C-modules with STEP7 and PIB
Figure 45:
Top program
level
The master program OB1 mainly accesses the FB10. Close the OB1 and double-click on
FB10 in the Components file.
D101579 1208 - BL ident ® PROFIBUS-DP
3-25
Startup of a TURCK BL ident ®-system
PIB variable table with the FB10 10
The FB10 assigns to the variables per the specifications (formal parameters) the variables for
the PIB-instance of a channel.
The explanations for all variables in this component are in "3 Definition of Proxy-Ident-Blocks
(PIB)" page 4-6
In the TURCK project example 2 channels are available for a BL ident ®-communication, and
this is why two "instances" of the Proxy Ident Function Block are created.
The PIB-instance to the first channel is identified with "0". All variable names to the first
instance also contain a "0".
The second channel is accordingly identified by "1", etc.
Figure 46:
Variables to the
first instance
Variables per specifications
First instance for Channel 1
3-26
D101579 1208 - BL ident ® PROFIBUS-DP
DPV0 startup example for C-modules with STEP7 and PIB
Observation and control with the help of the variable table, vartable_pibX
Close the FB10 and open the variable table, vartable_pib0 with the help of the Components
file. This table belongs to the first instance of the PIB and therefore to Channel 1.
In order to read the status values and to load the control values, activate the online connection
to your control (PLC > Connect to > Direct CPU). The Mode "RUN" is displayed green at the
bottom right of the window.
Please adjust the values that are described in the legend in points A through D in the column
Control Values when your application differs from the project example.
Note
Load the values to your control (Variable modify)
and ensure with the help of
the column Status Values (Variable monitor)
that the control has accepted the
values!
Figure 47:
Entries into
vartable_pib0
A
B
C
D
E
F
G
H
D101579 1208 - BL ident ® PROFIBUS-DP
3-27
Startup of a TURCK BL ident ®-system
A This is the start address for the BL ident ®-process data of the first module. The process data for a
BL ident ®-module in the cyclic data exchange comprise 32 byte in total. The "ID" (start address) for
a second module must be therefore "34" here, for a third "66" and for a fourth "98". The address
range for the channel relevant 2 byte process data of the respective channel is only determined with
the Offset (legend point C).
B The index "111" indicates that the next execution will cause a data transfer (also parameter data) to
Channel 1. The index "112" refers to Channel 2. This is the case for each BL ident ®-module of the
station. Differing indices (for example, "113") create an error message"DW#16#E7FE06xx" page
3-70. These indices are being used universally (also parameter transfer data). The indices 101 and
102 which are to be specifically selected for parameter data transfer per the specifications are no
longer used.
C This Offset is added to the start address (A). The calculated address refers to the process data that
belongs to one channel. Here the Offset is "0" because vartable_pib0 belongs to the first channel.
The respective Offset in the vartable_pib1 which belongs to the second channel is always "2".
D The buffer range for the Read and Write data for the first instance (first channel) is displayed here.
The "Memory requirements for the Read and Write data" page 3-3 is limited with the selection of a
PIB_001KB_CYC to a total of 1 kilobyte. Here it is indicated that the send buffer for the first channel
occupies Range 1. The receive buffer occupies the Range 201 to 400
for the second channel the Ranges 401 to 600 and 601 to 800 are being occupied respectively
(compare vartable_pib1).
E Here you may enter 1, 2 or 3 if only one of three possible commands (see vartable_pibX: Command
1, WriteConfig (INIT), Command 2, for example, Inventory...) is to be executed. If initially only the
Write-Config-Command ("Write-Config" page 4-26) is to be executed, "1" has already been entered
here.
F The hexadecimal coding for the command "Write-Config" is 0×78.
G The configuration data change may be executed per the specification ("Config" page 4-26)
via a Reset (0×01),
via writing of the new data (0×02)
with a combination of Reset and new configuration data (0×03) (like in the example).
H The number of configuration data to be written.
(here it is 3 configuration data to the data carrier which will be explained more closely in the next
paragraph).
3-28
D101579 1208 - BL ident ® PROFIBUS-DP
DPV0 startup example for C-modules with STEP7 and PIB
Activation and deactivation of the read/write head using configuration data
By entering the values in E to H (Figure 47:, page 3-27) you have made the preparations for
sending the configuration values.
In the TURCK project example the configuration values are already stored in "Send Data
Field" of vartable_pib0. The Send Data Field is below the command range of vartable_pibX
(here X = 0).
Only the value of the third configuration byte is of significance. Activation/Deactivation of
read/write head is requested using this value and with the next initialization. An active read/
write head creates an electromagnetic field (a signal is transferred with 13.56 MHz, for
example). The command "Write-Config" page 3-41 is executed during initialization.
After the initialization has been completed, activation and deactivation of read/write head is
executed with the command "Write-Config" page 3-41 (0×78) and a "positive edge" of the
control variables "APPL0_DB".EXECUTE. For executing the command, please follow the
same instructions for Read and Write (for example, B"Write to the data carrier / Channel 1"
page 3-33).
Note
Load all values to your control (Variable modify)
and ensure with the help of the
column Status Values (Variable monitor)
that the control has accepted the
values!
Figure 48:
Send Data Field
of vartable_pib0
A
B
C
A and
B It is not necessary to adjust these data fields. Initially the fields were available for entries concerning
number of blocks and number of byte per block of the data carrier. Keep value 0×00. The value of
the actively used data carriers are internally read and processed.
C The value 0x01 activates the transmitter (antenna) of the read/write head. The value 0x00 deactivates
the transmitter.
D101579 1208 - BL ident ® PROFIBUS-DP
3-29
Startup of a TURCK BL ident ®-system
Initialization of the first channel
In the Chapter "Setting up the function component PIB" page 3-6 you have been introduced
to the settings (control values) relevant for initialization. In case your BL ident ®-project differs
from the project example, an adjustment of the control values took place.
Note
Load into your control (Variable modify) all values which were described in the prior
chapters
! With the help of the column Status Values (watch variable)
please
ensure that the control has accepted the values!
Now start initialization. Please note that the online connection to your control must be active.
The Mode "RUN" is displayed green at the bottom right of the window.
The command "Initialization" is executed with a "positive edge" of the control variable
"APPL0_DB".INIT. You will create the positive edge by setting the variable from "false" to
"true". Enter "1" or "true" as control value.
Figure 49:
Control field of
vartable_pib0
A
A Initialization takes place with the positive edge (switch from false-> true or 0->1)
With:
Variable > Modify or
the command "Initialization" is executed.
3-30
D101579 1208 - BL ident ® PROFIBUS-DP
DPV0 startup example for C-modules with STEP7 and PIB
You may observe the command execution in the Status Field of the vartable_pib0.
Figure 50:
Status Field of
vartable_pib0
For a short period of time, the status variable "APPL0_DB".DONE switches to the status
"Busy" and then continues to display "Command Executed"="true". Error-free execution is
acknowledged with "APPL0_DB".ERROR = false.
The descriptions of some error codes of the status variables "APPL0_DB".STATUS especially
in regards to the BL ident ® specific errors can be found in "Warnings and error messages"
page 3-68.
A complete description of the status data can be found in "Warnings and error messages"
page 3-68 and"3.1.3 Error and Warning Concept" page 4-13.
Reset the variable "APPL0_DB".INIT to "false" after successful initialization.
With:
Variable > Modify or
"false" again becomes status value.
Read of UID from data carrier / Channel 1
Each RFID-data carrier receives a "UID" page 5-4 (unique identifier) by the manufacturer. The
UID repeats a worldwide unique TAG-ID No. and has 8 byte.
Read of the UID is executed with the command "Inventory" (dt.: Inventory). In the TURCK
project example, the command code 0x69 to inventory has been already entered into the field
"Command 2". The comprehensive description of the command code is at "Inventory" page
4-29.
Figure 51:
Command 2 of
vartable_pib0
Please note that the online connection to your control must be active. The Mode "RUN" is
displayed green at the bottom right of the window.
Most likely the control value "APPL0_DB".CMDSEL of the vartable_pib0 still has the value "1"
because you have executed Initialization with "Command 1" as the final step.
Now enter "2" for this control value to select the command 2.
D101579 1208 - BL ident ® PROFIBUS-DP
3-31
Startup of a TURCK BL ident ®-system
Figure 52:
Control Field of
vartable_pib0
Note
Load all values to your control (Variable modify)
and ensure with the help of the
column Status Values (Variable monitor)
that the control has accepted the
values!
The command "Initialization" is displayed with a "positive edge" of the control variable
"APPL0_DB".EXECUTE. You will create the positive edge by setting the variable from "false"
to "true". Enter "1" or "true" as control value.
Figure 53:
Control field of
vartable_pib0
A
A "Inventory" takes place with the positive edge (switch from false-> true or 0->1)
With:
Variable > Modify or
the command "Inventory" is executed.
You may observe the command execution in the Status Field of the vartable_pib0.
For a short period of time, the status variable "APPL0_DB".DONE switches to the status
"Busy" and then continues to display "Command Executed"="true". Error-free execution is
acknowledged with "APPL0_DB".ERROR = false.
At "Inventory" 8 UID data byte are received. Here the transferred data is "APPL0_DB".TRLEN
= "12" long.
You may find a full description of the status data in "Warnings and error messages" page 3-68
and "3.1.3 Error and Warning Concept" page 4-13.
Now you may read the "Unique Identifier / UID" in the received data field of the vartable_pib0.
3-32
D101579 1208 - BL ident ® PROFIBUS-DP
DPV0 startup example for C-modules with STEP7 and PIB
Figure 54:
The UID in the
received data
field
A
A The 8 byte comprising UID is stored in the received data buffer starting with byte 5. Byte 5 repeats
the MSB and byte 12 the LSB of the UID. Byte 1 and 2 always display 0×0001for BL ident ®. "Bulk
reading" systems will indicate here which of the data carriers has been actively read from the "Bulk".
Together byte 3 and 4 display the length of the UID (here: 0×0008).
Reset the variable "APPL0_DB".EXECUTE to "false" after the successful reading of the UID.
With:
Variable > Modify or
"false" again becomes status value.
Write to the data carrier / Channel 1
This chapter explains the writing of 32 byte data with discretionary content to your RFID data
carrier.
Writing to the data carrier of the first channel is possible after "Initialization of the first channel"
page 3-12 has been completed.
In this example we have selected data which can be easily recognized during the following
"Read from data carrier / Channel 1" page 3-17.
Writing of data is executed with the command "Physical_Write" (dt.: physical writing). Enter
the command code 0x71 for Physical_Write into the field "Command 3" of the vartable_pib0.
A full description of this command code is at "Physical_Write" page 4-25.
Please note that the online connection to your control must be active. The Mode "RUN" is
displayed green at the bottom right of the window.
Now enter "3" for the control value "APPL0_DB".CMDSEL of the vartable_pib0 to select the
command 3.
In the send data field enter 32 byte as hexadecimal numbers. Following writing we will explain
reading. We enter the number series: 1, 2, 3, 4, 5, 6, 7, 8, 9, A, B... 20 which will be easily
recognizable for us.
You may enter the hexadecimal digits as single-digits or double digits and without additional
format instructions (B#16#..). The SIMATIC Manager adapts to the suitable format.
D101579 1208 - BL ident ® PROFIBUS-DP
3-33
Startup of a TURCK BL ident ®-system
Figure 55:
Preparing the
vartable_pib0
for writing
A
B
C
D
E
F
A Here the code is entered for the command which is to be executed next with command 3. You may
find an overview of all possible commands at "3.1.4 Commands" page 4-23.
The command code 0×71 is used for the command to write to a physically present TAG
"Physical_Write".
B This data field has 8 byte and may contain an UID. This UID is always compared to the UID of the
TAG when values ≠ 00 have been entered here.
Ensure that here all 8 byte have the value "00" if you do not wish to execute the UID comparison
function.
C Here you may enter the number of byte which are to be transferred from the send data field. The
number of possible byte depends on the size of the send data field (page 3-10) and the memory
capacity of the used TAGs. In this TURCK example 32 byte are written to the TAG (112 byte). The
size of the send data field is 200 byte.
D With the help of this address, each byte on the TAG may be explicitly accessed as start address. The
start address L#0 is selected in this example. If you use a different data carrier than the one in this
project example, please follow Chapter "User data ranges of the data carrier versions" page 3-75.
E With these "Attributes" some commands may be specified more closely. This value is not
considered with the Write and Read command.
In "3.1.4 Commands" page 4-23 you will find an overview for all possible commands and the
possibilities to more closely specify them via "Attributes". In any case, please also pay attention to
"Definitions within the command and diagnostics levels" page 3-40.
F Into this send data field, enter the data which you would like to use to write to your TAG with.
Note
Load all the field values "Control", "Command 3" and "Send Data Field" into your
control (Variable modify)
and ensure with the help of the column Status Values
(Variable monitor)
that the control has accepted the values!
3-34
D101579 1208 - BL ident ® PROFIBUS-DP
DPV0 startup example for C-modules with STEP7 and PIB
The command "Physical Write" is realized with a "positive edge" of the control variable
"APPL0_DB".EXECUTE. You will create the positive edge by setting the variable from "false"
to "true". Enter "1" or "true" as control value.
Figure 56:
Control field of
vartable_pib0
A
A "Physical_Write" takes place with the positive edge (switch from false-> true or 0->1)
With:
Variable > Modify or
the command "Physical_Write" is executed.
You may observe the command execution in the Status Field of the vartable_pib0.
Figure 57:
Status Field of
vartable_pib0
For a short period of time, the status variable "APPL0_DB".DONE switches to the status
"Busy" and then continues to display "Command Executed"="true". Error-free execution is
acknowledged with "APPL0_DB".ERROR = false.
32 data are sent during "Physical_Write"; this is why the length of the transferred data is
"APPL0_DB".TRLEN = "32".
You may find a full description of the status data in "Warnings and error messages" page 3-68
and "3.1.3 Error and Warning Concept" page 4-13.
Reset the variable..."APPL0_DB".EXECUTE to "false" after the write operation was
successful.
With:
Variable > Modify or
"false" again becomes status value.
Read from the data carrier / Channel 1
This chapter explains the reading of 32 byte data with discretionary content from your RFID
data carrier.
Reading from the data carrier of the first channel is possible after "Initialization of the first
channel" page 3-12 has been completed.
D101579 1208 - BL ident ® PROFIBUS-DP
3-35
Startup of a TURCK BL ident ®-system
In the prior chapter you wrote data (arbitrary) to the data carrier with the command
"Physical_Write". In this chapter you will read the same data with the "Physical_Read"command from the data carrier.
Enter the command code 0x70 for Physical_Read into the field "Command 3" of the
vartable_pib0. A full description of this command code is at "Physical_Read" page 4-24.
Please note that the online connection to your control must be active. The Mode "RUN" is
displayed green at the bottom right of the window.
Now enter "3" for the control value "APPL0_DB".CMDSEL of the vartable_pib0 to select the
command 3.
Figure 58:
Preparing the
vartable_pib0
for reading
A
B
C
D
E
A Here the code is entered for the command which is to be executed next with command 3. You may
find an overview of all possible commands at "3.1.4 Commands" page 4-23.
The command code 0×70 is used for the command to read from a physically present TAG
"Physical_Read".
B This data field has 8 byte and may contain an UID. This UID is always compared to the UID of the
TAG when values ≠ 00 have been entered here.
Ensure that here all 8 byte have the value "00" if you do not wish to execute the UID comparison
function.
C Here you may enter the number of byte which are to be transferred into the send data field. The
number of possible byte depends on the size of the received data field (page 3-10) and the memory
capacity of the used TAGs. In this TURCK example 32 byte are written to the TAG (112 byte). The
size of the received data field is 200 byte.
D With the help of this address, each byte on the TAG may be explicitly accessed as start address. The
start address L#0 is selected in this example. If you use a different data carrier than the one in this
project example, please follow Chapter "User data ranges of the data carrier versions" page 3-75.
E With these "Attributes" some commands may be specified more closely. This value is not
considered with the Write and Read command.
In "3.1.4 Commands" page 4-23 you will find an overview for all possible commands and the
possibilities to more closely specify them via "Attributes". In any case, please also pay attention to
"Definitions within the command and diagnostics levels" page 3-40.
Note
Load all the field values "Control" and "Command 3" into your control (Variable
modify)
and ensure with the help of the column Status Values (Variable
monitor)
that the control has accepted the values!
The command "Physical Read" is realized with a "positive edge" of the control variable
"APPL0_DB".EXECUTE. You will create the positive edge by setting the variable from "false"
to "true". Enter "1" or "true" as control value.
3-36
D101579 1208 - BL ident ® PROFIBUS-DP
DPV0 startup example for C-modules with STEP7 and PIB
Figure 59:
Control field of
vartable_pib0
A
A "Physical_Read" takes place with the positive edge (switch from false-> true or 0->1)
With:
Variable > Modify or
the command "Physical_Read" is executed.
You may observe the command execution in the Status Field of the vartable_pib0.
Figure 60:
Status Field of
vartable_pib0
For a short period of time, the status variable "APPL0_DB".DONE switches to the status
"Busy" and then continues to display "Command Executed"="true". Error-free execution is
acknowledged with "APPL0_DB".ERROR = false.
Here the received data is "APPL0_DB".TRLEN = "32" long.
You may find a full description of the status data in "Warnings and error messages" page 3-68
and "3.1.3 Error and Warning Concept" page 4-13.
In the received data field of the vartable_pib0 you may find the data read by the TAG:
D101579 1208 - BL ident ® PROFIBUS-DP
3-37
Startup of a TURCK BL ident ®-system
Figure 61:
Received data
field of the
vartable_pib0
after successful
reading.
Reset the variable..."APPL0_DB".EXECUTE to "false" after the read operation was
successful.
With:
Variable > Modify or
"false" again becomes status value.
3-38
D101579 1208 - BL ident ® PROFIBUS-DP
Flow diagram of PIB functionality
The following flowchart shows the functionality of the PIB at a glance
Additional support for an appropriate programming is provided by the "Excerpt from the
specifications" page 4-1 and the following chapters.
Figure 62:
Flow diagram
PIB
INITIALISATION / RESET
Buffer [1*].CMD = 78h
Buffer [1*].Config = 1
CMDSEL = 1*
INITIALISATION / RESET
INIT = 1
EXECUTE = 0
else
DONE = 1?
ERROR = 0?
ERROR = 1
DONE = 1
ERROR = 0
COMMANDS (Example:)
Buffer [3**].CMD = 70h
Buffer [3**].Length = 8
Buffer [3**].Startadress = 16
CMDSEL = 3**
COMMANDS (Example:)
INIT = 0
EXECUTE = 1
else
DONE = 1?
ERROR = 0?
ERROR = 1
ERROR
ERROR_CODE = STATUS
ERROR ACTION
DONE = 1
ERROR = 0
EXECUTE = 0
* must be 0
** can be 3
Note
Please note that query of parameters DONE, ERROR, TP etc. always relates to a
signal change (edge).
D101579 1208 - BL ident ® PROFIBUS-DP
3-39
Startup of a TURCK BL ident ®-system
Definitions within the command and diagnostics levels
The startup of the TURCK BL ident ®-system with the "Proxy Ident Function Block" involves
some discrepancies from "Excerpt from the specifications" page 4-1 (PROFIBUSspecifications). The discrepancies involve the command and diagnostics levels.
The following conformity table shows the commands and status or rather diagnostic
messages of the complete specifications of BL ident ® that are not supported:
Table 26:
Conformity
table
Name
Type
Additional information
concerning the TURCK
specific design
conform?
(Y/N)
In regards to Point 3.1.4 of the PROFIBUS-specifications
Read
Command
N
Get
Command
Y
Physical_Read
Command
Y
Write
Command
N
Put
Command
N
Physical_Write
Command
Y
Format
Command
N
Create
Command
N
Delete
Command
N
Clear
Command
N
Update
Command
N
Next
Command
Y
Get-Directory
Command
N
Set-Attribute
Command
N
Get-Attribute
Command
N
Write-Config
Command
Y
Read-Config
Command
Y
Mem-Status
Command
Y
Dev-Status
Command
Y
Inventory
Command
Y
Read-Bar-Code
Command
N
In regards to Point 4.2.1 of the PROFIBUS-specifications
3-40
Reading-Gate
Control-Bit
N
Repeat-Command
Control-Bit
N
Soft-Reset
Control-Bit
Y
D101579 1208 - BL ident ® PROFIBUS-DP
Table 26:
(Forts.)
Conformity
table
Name
Type
Additional information
concerning the TURCK
specific design
conform?
(Y/N)
In regards to Point 4.2.2 of the PROFIBUS-specifications
Target_Presence_Chan
ged
Status Bit
Y
Target_Present
Status Bit
Y
Soft_Reset_Active
Status Bit
Y
Repeat_
Command_Active
Status Bit
N
Busy
Status Bit
Y
Error
Status Bit
Y
UIN3
Status Bit
UIN2
Status Bit
UIN1
Status Bit
Data of Tag complete read
to read/write head
Y
UIN0
Status Bit
Read/write head is
activated (also see
WriteConfig)
Y
Read/write head connected
Y
N
The following commands show discrepancies from the PROFIBUS-specifications:
Write-Config
This command is initiated in PIB via INIT and supports Config = 1 (only Reset) and Config = 3
(write data and Reset). 3 byte of Config-data can be written. With the Config-data there is the
possibility to switch the transmitter of the read/write head on and off. The on and off switching
of the transmitter can be used to prevent a mutual interference of closely positioned read/
write heads.
Table 27:
Configuration
data
Byte
Bit
Significance
0
0..7
Reserved, must be 0
1
0..7
Reserved, must be 0
2
0
1 = Transmitter On / 0 = Transmitter Off, (default = 1)
1..7
Reserved, must be 0
Example for configuration data
"0×00, 0×00, 0×01"
D101579 1208 - BL ident ® PROFIBUS-DP
3-41
Startup of a TURCK BL ident ®-system
Read-Config
The command reads the Config-data described under Write-Config.
Possible command-specific STATUS-values after erroneous execution:
Table 28:
STATUSvalue
STATUS
Error description
DW#16#E4FE82xx
No read/write head is connected.
Inventory
Only the parameter Attributes =0 is supported. ("Inventory" page 4-29)
Physical_Read
The parameters StartAddress and Length (+StartAddress) must be within the address range
of the Tag. ("Physical_Read" page 4-24)
Physical_Write
The parameters StartAddress and Length (+StartAddress) must be within the address range
of the Tag. ("Physical_Write" page 4-25)
Mem-Status
With the command Mem-Status the Attribute 0×0×40 (physical status information) is
supported.
The response of the Tag is transferred as data to a GET_SYSTEM_INFORMATION-Command
per ISO/IEC15693-3:
Byte 0 = Series No. (UID), LSB
.
.
Byte 7 = Series No. (UID), MSB
Byte 8 = Data Carrier Format (DSFID)
Byte 9 = Application ID. (AFI)
Byte 10 = Memory Size: Block No.-1
Byte 11 = Memory Size: Byte/Block-1
Byte 12 = IC-identification
Dev-Status
Only the parameter Attributes = 0×04 is supported. A data-record per I&M-specifications
I&M0 is returned. The connected read/write head is being written to. ("Dev-Status" page 4-28)
3-42
D101579 1208 - BL ident ® PROFIBUS-DP
Definitions within the command and diagnostics levels
Example:
Table 29:
Example for
Dev-Status
From byte
to byte
Field
Content
0
9
Manufacturer specific header
0, 0, 0, 0, 0,0,0,0,0,0
10
11
MANUFACTURER_ID
0×0B12 (299 =
TURCK)
12
31
ORDER_ID
‚TN-CK40-H1147’,
0×00,
0×20, 0×20, 0×20,
0×20, 0×20, 0×20
32
47
SERIAL_NUMBER
(not supported)
48
49
HARDWARE_REVISION
0×0003
50
53
SOFTWARE_REVISION
‚V’ (0×56), 0×01,
0×03, 0×00 (= V1.3.0)
54
55
REVISION_COUNTER
(not supported)
56
57
PROFILE_ID
0×5B00 (identification
system, PIB profile)
58
59
PROFILE_SPECIFIC_TYPE
0×0000
60
61
IM_VERSION
0×01, 0×01 (= I&M
V1.1)
62
63
IM_SUPPORTED
0×01, I&M0 supported
Next
Only the parameter NextMode = 0 or 1 is supported. ("Next" page 4-25)
Get
This command is used to set the write protection of a block of a Tag.
In order to set write protection it is necessary to know the organization of the memory of the
used tag (number and size of the blocks). The organization of the memory is shown in chapter:
"Access to the data ranges of the data carriers" page 3-75.
Attention
Setting of write protection for a block can not be reversed!
D101579 1208 - BL ident ® PROFIBUS-DP
3-43
Startup of a TURCK BL ident ®-system
Table 30:
Send data
field for
command
"Get"
Byte in send data field
Content
0
0×02
1
UID of tag, UID = 0 -> arbitrary
2
UID of tag
3
UID of tag
4
UID of tag
5
UID of tag
6
UID of tag
7
UID of tag
8
UID of tag
9
0×67
10
Block No. of the block to be switched to writeprotected
(0×00 = 1. Block, 0×FF = 256. Block)
When successful, the following data is returned:
Table 31:
Received data
Byte in received data field
Content
0
0×02
1
0×67
2
Command index
If an error occurs, there will be a respective display in STATUS.
Other commands
An overview of additional commands can be found in "3.1.4 Commands" page 4-23. To
execute the commands follow the same process as with Write and Read.
3-44
D101579 1208 - BL ident ® PROFIBUS-DP
Startup example for S-modules with STEP7
Hardware description of the project example
These hardware components were used for the following startup example:
S7-control "CPU 315-2DP" (DPV1-capable CPU)
BL ident ®-Interface-module "TI-BL67-DP1-S-2"
BL ident ®-read/write head "TN-CK40-H1147"
Data carrier "TW-R50-B128" (user data = 112 byte)
Suitable connection lines
Please download D101583 which you may find in the download area of the TURCK website
if you have questions or if you desire clarification concerning the read/write heads and the
data carriers.
Download of the active GSD-file
You will need the active GSD-file to realize the configuration of the BL ident ®-interface
module. Please locate the active GSD-file at:
http://www.turck.com....
(Download > Direct search: "BL67-GW-DPV1"...)
Start of the STEP7-software and creating a new project
If need be, please actualize the GSD-file (prior or after start). Start the "SIMATIC basic
software Step 7". After the start, the window of the "SIMATIC Manager" will become active.
Use file > New to open a new project and assign the project name, here "TI-BL67-DPV1-S2", for example. Right-click on the project name and then "Insert New Project" to select the
control.
Figure 63:
Add control to
the project
D101579 1208 - BL ident ® PROFIBUS-DP
3-45
Startup of a TURCK BL ident ®-system
Hardware configuration
To configure the hardware open the hardware-configurator by double-clicking.
. In
the hardware-configurator in the upper window area double-click on "Insert Object" and then
SIMATIC 300 > RACK-300 > profile track. In the right window area select from the catalog the
CPU type (here: GES7 315-2AF02-0AB0) for your control and insert it with drag-and-drop. In
the window "Parameter" that is opening to the interface select "new" for "Subnet" and
acknowledge the suggested name (for example, PROFIBUS (1)).
Configure the interface module by first dragging the gateway and dropping it into the window
with the graphic diagram in order to move it to the system. The gateway can be found in the
device overview at the right side of the window under PROFIBUS-DP > Additional field
devices > IO > TURCK > BL67 > BL67-GW-DPV1.
Figure 64:
Gateway
configuration
Enter as gateway parameter the address that you had set on the gateway housing with the
address switch.
Figure 65:
GatewayAddress
3-46
D101579 1208 - BL ident ® PROFIBUS-DP
Startup example for S-modules with STEP7
The module "BL67-2RFID-S" is in the same file as the gateway. Move the module with
drag-and-drop to the BL67-GW-DPV1 table.
Figure 66:
BL67-2RFID-SModule
configuration
Transfer the configuration data to the automation system (PLC > Download).
Confirm the request for the module to be restarted..
Compiling the variable tables for the process data
Switch the "SIMATIC Manager" range to compile a variable table for the process data. Mark
"S7-Program" and select "Insert New Object" > "Variable Table".
Figure 67:
Insert variable
table
Assign symbolic names for the variable tables (for example, input- and output data).
Create the table. As orientation, use the structure of the "Process input data" page 3-59 and
the "Process output data" page 3-62.
D101579 1208 - BL ident ® PROFIBUS-DP
3-47
Startup of a TURCK BL ident ®-system
Figure 68:
Structure of the
variable table
"Input_data"
To make orientation easier, you may assign names (here: symbols) for the individual variables.
Open "OB1" and select "Extras" > "Symbol Table". For this example the descriptions from
tables "Process input data" page 3-59 and "Process output data" page 3-62 were adopted.
Figure 69:
Symbols
(descriptions)
for the output
data
3-48
D101579 1208 - BL ident ® PROFIBUS-DP
Startup example for S-modules with STEP7
Activating the read/write head
You may access the process data and their functions via both variable tables.
Open the variable table "Output_data" to activate the read/write head. An active read/write
head creates an electromagnetic field (the signal is transferred with 13.56 MHz, for example).
In order to read the status values and to download the control values, activate the online
connection to your control (PLC > Connect to > Direct CPU). The Mode "RUN" is displayed
with a green mark at the bottom right of the window.
You will receive the active values of the process output data via (Monitor Variable)
.
In the column "Modify value" set the variable "XCVR" to 1 (true).
Figure 70:
The read/write
head variable
"XCVR"
Note
Download the changed value into your control (Variable modify)
and ensure
with the help of the column Status Values (Variable monitor)
that the control has
accepted the value!
Note
Ensure that the read/write head is connected and activated before setting additional
control- and command bits via the process output data.
D101579 1208 - BL ident ® PROFIBUS-DP
3-49
Startup of a TURCK BL ident ®-system
Figure 71:
read/write head
is connected
and activated.
Initialization/RESET Channel 1
Initialization should be executed after it has been ensured that the read/write head is
connected and switched on.
The command to execute initialization is initiated by changing the respective command value
from 0 to > 1. Ensure with the help of (Variable monitor)
that the variable "RESET" and all
other variables have the active output value "false" (0) starting with Bit 0.0 to 0.6. In the
column "Modify value" set the variable "RESET" to 1 (true).
Note
Download the changed value into your control (Variable modify)
and ensure
with the help of the column Status Values (Variable monitor)
that the control has
accepted the value!
The variable "RESET" may be reset to "false" now or after execution. The chapter "Flowchart
diagram of command execution BL67-2RFID-S/BL20-2RFID-S-Module" page 3-58 shows
how the process flow effects the status messages.
With:
Variable > Modify or
"false" again becomes status value.
3-50
D101579 1208 - BL ident ® PROFIBUS-DP
Startup example for S-modules with STEP7
Reading of UID from the data carrier / Channel 1
The command to read the UID from a data carrier is executed by changing the respective
command value from 0 to > 1. Ensure with the help of (Variable monitor)
that the variable
"TAG_ID" and all other variables have the active output value "false" (0) starting with Bit 0.0
to 0.6. In the column "Modify value" set the variable "TAG_ID" to 1 (true).
Figure 72:
Command to
read the UID via
the variable
"TAG_ID"
Note
Download the changed value into your control (Variable modify)
and ensure
with the help of the column Status value (Variable monitor)
that the control has
accepted the value!
The variable "TAG_ID" may be reset to "false" now or after execution. The chapter "Flowchart
diagram of command execution BL67-2RFID-S/BL20-2RFID-S-Module" page 3-58 shows
how the process flow effects the status messages.
With:
Variable > Modify or
"false" again becomes status value.
D101579 1208 - BL ident ® PROFIBUS-DP
3-51
Startup of a TURCK BL ident ®-system
After the "Unique Identifier / UID" has been read, it will be indicated via the variables
READ_DATE_1 to READ_DATA_8 of the variable table "Input_data".
Figure 73:
UID in the
variable table
"Input_data"
Write to data carrier / Channel 1
The command to write to a data carrier can be executed after changing the respective
command value "WRITE" from 0 to > 1. Ensure with the help of (Variable monitor)
that
the variable "WRITE" and all other variables have the active output value "false" (0) starting
with Bit 0.0 to 0.6. The Bit "XCVR" must remain "true". In the column "Modify value" set the
variable "WRITE" to 1 (true).
As an example 8 byte should be transmitted here. With ByteCount0 to ByteCount2 the value
8-1= 7=111binary must be displayed. Set the Bits to "1" (true).
With the data carrier TW-R30-B128 the user data range starts at "0"; other data carriers may
have differing user data ranges. Please observe chapter "Overview of the Turck data carriers"
page 3-75. With the variables "AddrHi" and "AddrLo" the range on the data carrier is
accessed.
In this example, the variables WRITE_DATA_1 to WRITE_DATA_8 will receive the values:
1,2,3,4,5,6,7,8.
3-52
D101579 1208 - BL ident ® PROFIBUS-DP
Figure 74:
Values in the
variable table
"Output Data"
to write to a data
carrier
The variable "WRITE" may be reset to "false" now or after execution. The chapter "Flowchart
diagram of command execution BL67-2RFID-S/BL20-2RFID-S-Module" page 3-58 shows
how the process flow effects the status messages.
Note
Download the changed value into your control (Variable modify)
and ensure
with the help of the column Status Values (Variable monitor)
that the control has
accepted the value!
Read from the data carrier / Channel 1
The command to read from a data carrier can be executed after changing the respective
command value "READ" from 0 to > 1. Ensure with the help of (Variable monitor)
that the
variable "READ" and all other variables have the active output value "false" (0) starting with
Bit 0.0 to 0.6. In the column "Modify value" set the variable "READ" to 1 (true).
As an example 8 byte should be read here. With ByteCount0 to ByteCount2 the value 8-1=
7=111binarymust be displayed. Set the Bits to "1" (true).
D101579 1208 - BL ident ® PROFIBUS-DP
3-53
Startup of a TURCK BL ident ®-system
With the data carrier TW-R30-B128 the user data range starts at "0"; other data carriers may
have differing user data ranges. Please observe chapter "Overview of the Turck data carriers"
page 3-75. With the variables "AddrHi" and "AddrLo" the range on the data carrier is
accessed.
The variable "READ" may be reset to "false" now or after execution. The chapter "Flowchart
diagram of command execution BL67-2RFID-S/BL20-2RFID-S-Module" page 3-58 shows
how the process flow effects the status messages.
Note
Download the changed value into your control (Variable modify)
and ensure
with the help of the column Status Values (Variable monitor)
that the control has
accepted the value!
The following diagram displays the status data after the command Bit has been reset again
prior to command execution.
Figure 75:
Input data prior
to command
execution
If a data carrier is in the detection range of the read/write head, the user range of the data
carrier is automatically and fully read. During this process, TFR=0 and changes to TFR=1 after
the read operation is fully completed. Only after the detection range has been evacuated, TFR
again becomes "0". This automatic read operation is interrupted by all user commands; the
TFR-Bit keeps its active value. The process is restarted when no other commands exist and
when TP=1. Read commands can directly access already stored data via TFR=1.
After command execution, the read data are in READ_DATA_1 to READ_DATA_8.
3-54
D101579 1208 - BL ident ® PROFIBUS-DP
Startup example for S-modules with STEP7
Figure 76:
Input data after
command
execution
The explanations for the status messages can be found in "Significance of the Status-Bits"
page 3-60.
D101579 1208 - BL ident ® PROFIBUS-DP
3-55
Startup of a TURCK BL ident ®-system
Error messages via the input data
Occurring errors are displayed with the input data via the Accumulative Error Bit "ERROR".
More detailed information for cause of error are provided by the two bytes "ERR_LSB" and
"ERR-MSB"
In the table "Status values" page 3-68 the two digital values in bold correspond to the first
and the second error byte of the input data.
Figure 77:
Error display
"No read/write
head
Connection".
3-56
D101579 1208 - BL ident ® PROFIBUS-DP
Startup example for S-modules with STEP7
DPV1-diagnostic messages
To display "Diagnostics" page 3-67 change to the hardware-configurator. Create the online
connection with
. Double-click on the assembly diagram to open the subitem "Assembly
Status". The standard diagnostics of the slave are displayed in the top field on the register
card "DP-slave Diagnostics" The diagnostic data of the BL67-2RFID-S-module are displayed
below in the area "Channel-specific Diagnostics".
Figure 78:
DPV1diagnostic
messages
Parameterization
Parameterization of the BL67-2RFID-S-module is only needed when at startup the error
ERR_LSB=1 and ERR_MSB=02 was sent with the error byte of the input data. In this case the
parameter "bypass time Kx [n*4ms]:"" is available per channel.
Parameter setting is done in the "Hardware-configurator" in "Offline Mode". Click on the
assembly diagram to open the slot list. Select the subitem "Object Properties" by right
clicking on the BL67-2RFID-S-module in this list. The parameter is set with "Device-specific
Parameters" on the register card "Parameter assignment". Read the chapters "Parameter"
page 3-65 and "Determination of the parameter value "bypass time Kx [n*4ms]:"" page 3-66
if you would like to change the value "bypass time Kx [n*4ms]:".
D101579 1208 - BL ident ® PROFIBUS-DP
3-57
Startup of a TURCK BL ident ®-system
Flowchart diagram of command execution BL67-2RFID-S/BL20-2RFID-S-Module
The values of the command Bits (TAG-ID, READ, WRITE...) can be reset to the output value
"0" prior or after command execution. The two following diagrams show the status messages
depending on the procedural sequence:
Figure 79:
Resetting of
command Bit
after execution
CMD 0
1
DONE = 1
BUSY = 0
CMD 1
DONE = 0
BUSY = 1
0
DONE = 0
BUSY = 1
command is done
by transceiver
Figure 80:
Resetting of
command Bit
prior to
execution
CMD 0
DONE = 1
BUSY = 0
command is done
by transceiver
1
DONE = 0
BUSY = 1
CMD 1
3-58
DONE = 0
BUSY = 0
0
D101579 1208 - BL ident ® PROFIBUS-DP
Process image of BL67-2RFID-S/BL20-2RFID-S-Module
Process input data
Bit
Table 32:
Input data
bytes
7
6
5
4
3
2
1
0
BUSY
ERROR
XCVR_
CON
XCVR_
ON
TP
TFR
res.
Channel 1
0A)
DONE
1
2 byte error code
("Warnings and error messages" page 3-68)
2
MSB
3
res.
4
8 byte read data
res.
LSB
res.
res.
res.
res.
res.
res.
ERROR
XCVR_
CON
XCVR_
ON
TP
TFR
res.
5
6
7
8
9
10
11
Channel 2
12
DONE
13
BUSY
2 byte error code
("Warnings and error messages" page 3-68)
14
MSB
15
res.
res.
D101579 1208 - BL ident ® PROFIBUS-DP
res.
res.
res.
res.
LSB
res.
res.
3-59
Startup of a TURCK BL ident ®-system
Bit
Table 32:
Input data
bytes
7
16
6
5
4
3
2
1
0
8 byte read data
17
18
19
20
21
22
23
A Byte-No.
Significance of the Status-Bits
The following table provides the significance of the status Bits of the process data indicated
above:
Table 33:
Significance
of the StatusBits
3-60
Description
Significance
DONE
1: At this time the system is not processing a command and is ready to
receive the next command.
0: All arriving commands are ignored except the RESET-command.
DONE only switches to status "1" when all command Bits
(READ,WRITE ..) are "0".
"Flowchart diagram of command execution BL67-2RFID-S/BL202RFID-S-Module" page 3-58
BUSY
1: The system is actively executing a command.
0: Command execution was terminated.
BUSY is not the inversion of DONE and possibly can not be used with
a handshake-operation. Use the variable DONE to set up a handshakeoperation.
ERROR
1: An error occurred during command execution. If this flag follows a
write command (WRITE), for example, the data of the send-buffer were
not written to the data carrier. If this flag follows a read command, no
data was read from the data carrier and no new data was stored in the
received data buffer.
0: The last write or read command was successfully executed. The
received data buffer contains valid data.
Detailed information is provided via the two byte error code. The table
"Status values" page 3-68 provides the meaning for the error code.
D101579 1208 - BL ident ® PROFIBUS-DP
Table 33:
Significance
of the StatusBits
Description
Significance
XCVR_CON
1: The read/write head is correctly connected to the BL67-2RFID-Smodule.
0: The read/write head is not yet correctly connected to the BL672RFID-S-module.
XCVR_ON
1: Transfer with 13.56 MHz between read/write head and data carrier is
active.
0: Transfer with 13.56 MHz between read/write head and data carrier is
not active.
TP
(Tag present)
1: A data carrier is within the detection range of the read/write head and
is recognized by the read/write head.
0: No data carriers are within the detection range of the read/write head
or the read/write head has not recognized the data carrier.
TFR
(Tag fully read)
1: All data ranges of the data carrier were fully read by the
BL ident ®-system, and the data carrier still is within the detection range
(TP=1). Automatic reading always occurs when a data carrier is within
the detection range of the read/write head. The time between TP=1 and
TFR=1 can not be seen as reference time for a read and write
command. If only few bytes are read or written with a Read or write
command, the command is being executed significantly faster than the
full reading of a 2000 byte data carrier, for example. With TFR=1 read
commands can directly access already stored data
0: The BL ident ®-system has not fully read all data ranges of the data
carrier or the data carrier is within the detection range of the read/write
head.
This automatic read operation is interrupted by all user commands; the
TFR-Bit keeps its active value. The process is restarted if no other
commands exist and TP=1.
Note
Depending on the system and in many cases, the status bit "BUSY" can not be used
for a handshake operation!
Note
Decoding of the 2-byte error code is described in Chapter "Warnings and error
messages" page 3-68.
D101579 1208 - BL ident ® PROFIBUS-DP
3-61
Startup of a TURCK BL ident ®-system
Process output data
Bit
Table 34:
Output data
bytes
7
6
5
4
3
2
1
0
Channel 1
0A)
XCVR
NEXT
TAG-ID
READ
WRITE
TAG
_INFO
XCVR
_INFO
RESET
1
res.
res.
res.
res.
res.
Byte
Count2
Byte
Count1
Byte
Count0
2
MSB
AddrHi
LSB
3
MSB
AddrLo
LSB
4
8 byte write data
5
6
7
8
9
10
11
Channel 2
12
XCVR
NEXT
TAG-ID
READ
WRITE
TAG
_INFO
XCVR
_INFO
RESET
13
res.
res.
res.
res.
res.
Byte
Count2
Byte
Count1
Byte
Count0
14
MSB
AddrHi
LSB
15
MSB
AddrLo
LSB
16
8 byte write data
17
18
19
20
21
22
23
A Byte-No.
3-62
D101579 1208 - BL ident ® PROFIBUS-DP
Process image of BL67-2RFID-S/BL20-2RFID-S-Module
Significance of the Command-Bits/Control-Bits
Note
If more than one command bit has been set via TAG_ID, READ, WRITE,
TRANSCEIVER_INFO or TAG_INFO, the BL67-2RFID-S-module will generate an
error message! The Bit "XCVR" must always be set to execute a command so that
the read/write head remains active!
The following table provides the significance of the command Bits of the process output data
shown above.
Table 35:
Significance
of the
command
Bits
Description
Significance
XCVR
1: The read/write head is activated (the signal is transferred e. g. with
13.56 MHz).
0: The read/write head is deactivated (no signal is transferred).
First the read/write head must be activated before another command
can be initiated with a following process image.
If XCVR = 0 is set during the time the BL ident ®-system is busy with the
command execution, the command will be executed first. The read/
write head is only switched off when the Status-Bit is "DONE = 1".
NEXT
1: Exactly one command can be executed with the same data carrier. If
an additional command is initiated with the same data carrier, the
Status Bit BUSY = 1 remains. The BL ident ®-system must be reset
(RESET) or the command must be executed with another data carrier.
0: Function is not used.
TAG_ID
0 -> 1: The command to read the UID is initiated with the rising edge.
The command is executed when a data carrier is within the detection
range of the read/write head. ("UID" page 5-4)
0: Function is not used.
READ
0 -> 1: The read command is initiated with the rising edge. The
command is executed when a data carrier is within the detection range
of the read/write head.
The byte number "ByteCount0..ByteCount2" is read from the data
carrier address "AddrLo, AddrHi".
0: Function is not used.
WRITE
0 -> 1: The write command is initiated with the rising edge. The
command is executed when a data carrier is within the detection range
of the read/write head.
The byte number "ByteCount0..ByteCount2" is written to the data
carrier address "AddrLo, AddrHi".
0: Function is not used.
D101579 1208 - BL ident ® PROFIBUS-DP
3-63
Startup of a TURCK BL ident ®-system
Table 35:
Significance
of the
command
Bits
3-64
Description
Significance
TAG_INFO
0 -> 1: The command TAG_INFO (data carrier information) is initiated
with the rising edge. The command is executed when a data carrier is
within the detection range of the read/write head.
With the process input data, the data carrier information in the area
read-data are sent with the following 8 byte:
Byte 0: Number of blocks-1 of the data carrier (this means 27 ->
28 blocks)
Byte 1: Number of bytes-1 per block (this means 3 -> 4 bytes per block)
Byte 2: Is not supported (DSFID-data carrier format)
Byte 3: Is not supported (AFI - application recognition)
Byte 4: Is not supported (ICID - IC-recognition (is not supported)
Byte 5 to byte 7:" "0"
0: Function is not used.
TRANSCEIVER
_INFO
0 -> 1: The command TRANSCEIVER_INFO (read/write head
information) is initiated and executed with the rising edge.
With the process input data, the information is sent to the read/write
head in the area read-data with 8 byte:
The content of the information is configurable. The content of the
information is selected with "AddrHi, AddrLo".
0×00F0:
The first 8 byte of the ORDER_ID (here: product description) are sent,
for example "TNER-Q80" = 0×54 4E 45 52 2D 51 38 30(ASCII-table)
0×00F1:
The first 8 byte of the ORDER_ID (here: product description) are sent,
for example: "-H1147\0\0" = 0×2D 48 31 31 34 37 5C 00 5C 00
0×00F2:
The third 8 byte of the ORDER_ID (here: product description) are sent.
0×00F3:
The fourth 8 byte of the ORDER_ID (here: product description) are sent.
0×00F4:
The hardware- and firmware versions of the read/write head are sent.
Byte 0: Part x of hardware-versionx.y.
Byte 1: Part y of hardware-version x.y.
Byte 2: Letter V = 0×56 of the firmware version Vx.y.z.
Byte 3: Part x of the firmware version Vx.y.z.
Byte 4: Part y of the firmware version Vx.y.z.
Byte 5: Part z of the firmware version Vx.y.z.
Byte 6 to byte 7: is not used.
RESET
0 -> 1: A "Reset" of the BL ident ®-system is done with the rising edge.
When the status bit "BUSY" is set, the execution of the active command
is interrupted and the status bit "DONE" is set. The status bit "ERROR"
and the two bytes error message (error code) of the process input data
are deleted.
ByteCount0..2
Number of byte-1 which still need to be read (READ) or written (WRITE).
111 (0×7) -> 8 byte still must be read/written.
D101579 1208 - BL ident ® PROFIBUS-DP
Process image of BL67-2RFID-S/BL20-2RFID-S-Module
Table 35:
Significance
of the
command
Bits
Description
Significance
AddrHi, AddrLo
Array of the length 2 byte. Repeats the start address of the memory
range in the data carrier which is to be accessed via the Write or Read
command.
The writable and readable start addresses of the data carrier can be ≠ 0.
The Chapter "Overview of the Turck data carriers" page 3-75 provides
information in regards to the writable/readable start address of the data
carrier versions.
WRITE_DATA
Write-data array of the length 8 byte.
Parameter
At this time only the parameter "bypass time K1 [n*4ms]:" and "bypass time K2 [n*4ms]:" are
transferred with the 8 byte parameter data image.
Bit
Table 36:
Parameter
data bytes
7
0A)
6
5
4
3
2
1
0
reserved
1
2
3
4
5
"bypass time K1 [n*4ms]:"
6
reserved
7
"bypass time K2 [n*4ms]:"
A Byte-No.
Keep the default setting "=0" of this parameter when a startup has occurred without the error
message "Dwell period of the tag in the detection range was not sufficient for successful
command processing." page 3-68.
If the error message "Dwell period of the tag in the detection range was not sufficient for
successful command processing." page 3-68 is indicated, check whether your application
supports the "Adherence to Recommended Distances" (minimum distances), a decrease in
speed or data volume. The specification "recommended" and "maximum distance" can be
found in the manual D101583 in the section "Operating Data".
In case the recommended distances can not be adhered to, or in case the error indication
concerning the recommended distances continues due to external interferences, the
parameter "bypass time Kx [n*4ms]:"" must be set to a suitable value.
D101579 1208 - BL ident ® PROFIBUS-DP
3-65
Startup of a TURCK BL ident ®-system
Determination of the parameter value "bypass time Kx [n*4ms]:"
The parameter "bypass time Kx [n*4ms]:"" is the result of the used components, the
distances, the speed of the data carrier to the read/write head and other external
interferences.
Therefore measure all needed bridging times directly on location. The following diagram
shows the typical run of the detection range:
Figure 81:
Detection range
of a read/write
head
35
30
A
mm
25
20
15
C
10
5
0
B0
5
10
15
20
25
mm
30
A Distance bridged by the data carrier when passing by the read/write head
B Center of the read/write head
C Section of the distance that needs to be bridged.
For the section "C" in the above diagram the data carrier must use maximum the "bypass time
K1 [n*4ms]:". The data carrier must be within the detection range before the bridging time
elapses so that the transfer can continue.
Additional diagrams for the detection ranges of different read/write heads and data carriers
are shown in the manual D101583 in the Chapter "Pass Over Paths".
The LEDs of the Write-Read head or rather the status bit "TP" of the process input data
indicate if the data carrier is within the detection range or not.
3-66
D101579 1208 - BL ident ® PROFIBUS-DP
Process image of BL67-2RFID-S/BL20-2RFID-S-Module
Diagnostics
There are three diagnostics for read/write head with 2 byte for each channel. These
diagnostics are also displayed with the ERROR-byte of the process input data.
Bit
Table 37:
Diagnostic
Data byte
7
6
5
4
3
2
1
0
Channel 1
0A)
Overload
1
Error
Hardware
error
Channel 2
2
Overload
3
Error
Hardware
error
A Byte-No.
Table 38:
Significance
of the error
Bits
Description
Significance
Overload
The voltage supply of the read/write head was switched off
because of overcurrent ("DW#16#E4FE01xx" page 3-68).
Hardware error
There is a hardware error of the read/write head
("DW#16#E4FE81xx" page 3-69).
Undervoltage
The voltage supply of the read/write head is not in the required
range ("DW#16#E4FE88xx" page 3-69).
D101579 1208 - BL ident ® PROFIBUS-DP
3-67
Startup of a TURCK BL ident ®-system
Warnings and error messages
At the startup of an interface module type "TI-BLxx-DP1-x" or "TI-BLxx-DP0-x" and the
"Proxy Ident Function Block" an error- and warning code is sent with the variables
"APPLO_DB.STATUS".
Figure 82:
The variable
APPLO_DB.
STATUS
At the startup of an interface module type "TI-BLxx-DPV1-S-x" the error- and warning code
is displayed with two byte of the process input data.
Figure 83:
Two error byte
of the process
input data
The following table explains the significance of STATUS values.
Table 39:
Status values
Status value of
"APPLO_DB.STATUS"
Significance of error code
RFID standard profile
3-68
DW#16#E1FE82xx
Tag memory error (for example, CRC error)
DW#16#E1FE82xx
Dwell period of the tag in the detection range was not
sufficient for successful command processing.
Information for the possible cause and correction of
this error can be found in "Determination of the
parameter value "bypass time Kx [n*4ms]:"" page 3-66
for the BLxx-2RFID-S-Module.
DW#16#E1FE82xx
The indicated address range or command does not
match to the used tag type.
DW#16#E1FE82xx
Tag is defective and must be replaced.
DW#16#E1FE82xx
Tag in the detection range does not have the expected
UID.
DW#16#E1FE82xx
Tag does not support the active command.
DW#16#E1FE82xx
At least one part of the indicated range in the tag is
write protected.
DW#16#E4FE01xx
Supply of read/write head was switched off because of
increases current consumption, for example short
circuit.
DW#16#E4FE82xx
Antenna or rather transmitter of the read/write head is
switched off. WriteConfig needed ("Write-Config" page
4-26, page 3-10, page 3-41).
D101579 1208 - BL ident ® PROFIBUS-DP
Warnings and error messages
Table 39:
(Forts.)
Status values
Status value of
"APPLO_DB.STATUS"
Significance of error code
DW#16#E4FE82xx
The requested data volume exceeds the capacity of
the internal memory.
DW#16#E4FE82xx
A parameter of the active command is not supported.
DW#16#E4FE82xx
An error with no details was indicated by the cyclic
status word (for example, antenna out of service). The
error is independent of the active command.
BL ident ® specific error codes
DW#16#E4FE80×x
No read/write head is connected.
DW#16#E4FE81xx
The read/write head is defective.
DW#16#E4FE84xx
Telegram content is invalid (for tags of type TW-R22HT-B64). Range is write protected or not present.
DW#16#E4FE88xx
The read/write head is not sufficiently supplied.
DW#16#E4FE89xx
The read/write head sends permanent CRC-errors on
the RS485-line. EMV-problem?
DW#16#E4FE8Axx
The Ident-unit indicates permanent CRC-errors on the
RS485-line. EMV-problem?
DW#16#E4FE90×x
The read/write head does not recognize a command
sent via Get.
RFID standard profile
DW#16#E5FE82xx
The Ident-unit indicates a wrong sequence No. (SN).
DW#16#E5FE82xx
The PIB-FB indicates a wrong sequence No.
DW#16#E5FE82xx
The Ident-unit indicates an invalid data block No.
DW#16#E5FE82xx
The PIB-FB indicates an invalid data block No.
DW#16#E5FE82xx
The PIB-FB indicates an invalid data block length.
DW#16#E5FE82xx
The Ident unit executes a hardware reset (Init_Active is
set to "1"), Init (Bit 15 within the cyclic "Control Word")
is expected by the PIB.
DW#16#E5FE0Axx
The command code "CMD" and the respective
command acknowledgement do not match. Involved is
a software or synchronization error which is not
permitted during normal operation.
DW#16#E5FE0Bxx
The sequence of the telegram for receipt
acknowledgement is wrong.
DW#16#E5FE0Cxx
Synchronization error
(Distance of step of AC_H/AC_L and CC_H/CC_L in
the cyclic "Control Word" is wrong). A new initialization
must be done.
DW#16#E6FE82xx
Invalid command.
D101579 1208 - BL ident ® PROFIBUS-DP
3-69
Startup of a TURCK BL ident ®-system
Table 39:
(Forts.)
Status values
Status value of
"APPLO_DB.STATUS"
Significance of error code
DW#16#E6FE82xx
The Ident-unit indicates an invalid command-index.
DW#16#E6FE82xx
The Ident-unit indicates that at this time only Write
commands (Write-Config) are allowed.
BL ident ® specific error codes
DW#16#E6FE80×x
No previous tag was recognized, no UID was stored (at
Next).
DW#16#E6FEFFxx
Unknown error
RFID standard profile
3-70
DW#16#E7FE82xx
Only command INIT is permitted in this state (indicated
by PIB).
DW#16#E7FE82xx
CMDSEL > CMDDIM or command code "CMD" not
permitted.
DW#16#E7FE82xx
The PIB indicates:
Parameter "Length" of command is too long for the
global data range which is reserved within TXBUF.
DW#16#E7FE82xx
RXBUF Overrun (more data was received than can be
stored in the memory RXBUF).
DW#16#E7FE82xx
In any case, the next command must be the "INIT"command. All other commands are rejected.
DW#16#E7FE06xx
The index is outside the range 111/112 and therefore
wrong.
DW#16#E7FE82xx
BLxx-2RFID-y does not respond to the INITcommand. Check whether the right ID is set!
DW#16#E7FE82xx
Timeout during initialization.
DW#16#E7FE82xx
Repeating the command is not supported by PIB*.
DW#16#E7FE0Axx
Error during determination of data package size within
the PIB.
D101579 1208 - BL ident ® PROFIBUS-DP
IEC-conform error messages
The following tables show the design of the IEC-conform error messages. The error messages
appear as 6-digit hexadecimal digital values. The error's meaning consists of 4 information
pieces which can be retrieved from the following three tables.
Table 40:
Digits 1 and 2
of the hexerror code
Digits 1 and 2 of the hexadecimal error
code
Significance
0×40
reserved
0×41
Get_Master_Diag
0×42
Start_Seq
0×43
Download
0×44
Upload
0×45
End_Seq
0×46
Act_Para_Brct
0×47
Act_Param
0×48
Idle
0×49 to 0×50
reserved
0×51
Data_Transport
0×52 to 0×55
reserved
0×56
RM
0×57
Initiate
0×58
Abort
0×59
reserved
0×5A
reserved
0×5B
reserved
0×5C
Alarm_Ack
0×5D
reserved
0×5E
Read
0×5F
Write
0×C0
reserved
0×C1
FE
0×C2
NI
0×C3
AD
0×C4
EA
D101579 1208 - BL ident ® PROFIBUS-DP
3-71
Startup of a TURCK BL ident ®-system
Table 40:
Digits 1 and 2
of the hexerror code
3-72
Digits 1 and 2 of the hexadecimal error
code
Significance
0×C5
LE
0×C6
RE
0×C7
IP
0×C8
SC
0×C9
SE
0×CA
NE
0×CB
DI
0×CC
NC
0×CD
TO
0×CE
CA
0×CF to 0×D0
reserved
0×D1
Error Data_Transport
0×D2 to 0×D6
reserved
0×D7
Error Initiate
0×D8
reserved
0×D9
reserved
0×DA
reserved
0×DB
reserved
0×DC
Error Alarm_Ack
0×DD
reserved
0×DE
Error Read
0×DF
Error Write
D101579 1208 - BL ident ® PROFIBUS-DP
Warnings and error messages
Table 41:
Digits 3 and 4
of the hexerror code
Table 42:
Digits 5 and 6
of the hexerror code
Digits 3 and 4 of the hexadecimal error
code
Significance
0×00 to 0×7F
reserved
0×80
DPV1
0×81 to 0×FD
reserved
0×FE to 0×FF
PROFILE_SPECIFIC
Digit 5 of the
Significance
hexadecimal error
code
Digit 6 of the
hexadecimal
error code
Significance
0×A
10 (decimal)
1010 (binary)
0×0 (0000)
read error
0×1 (0001)
write error
0×2 (0010)
module failure
0×3 to 0×6
not specific
0×7 (0111)
busy
0×8 (1000)
version conflict
0×9 (1001)
feature not supported
0×A to 0×F
User specific
0×0 (0000)
invalid index
0×1 (0001)
write length error
0×2 (0010)
invalid slot
0×3 (0011)
type conflict
0×4 (0100)
invalid area
0×5 (0101)
state conflict
0×6 (0110)
access denied
0×7 (0111)
invalid range
0×8 (1000)
invalid parameter
0×9 (1001)
invalid type
0×A (1010)
backup
0×B to 0×F
User specific
0×B
11 (decimal)
1011 (binary)
application
access
D101579 1208 - BL ident ® PROFIBUS-DP
3-73
Startup of a TURCK BL ident ®-system
Table 42:
Digits 5 and 6
of the hexerror code
Digit 5 of the
Significance
hexadecimal error
code
Digit 6 of the
hexadecimal
error code
Significance
0×C
12 (decimal)
1100 (binary)
0×0 (0000)
read constrain conflict
0×1 (0001)
write constrain conflict
0×2 (0010)
resource busy
0×3 (0011)
resource unavailable
0×4 to 0×7
not specific
0×8 to 0×F
user specific
-
-
0×D to 0×F
13 to 15 (decimal)
1101 to 1111
(binary)
3-74
resource
User specific
D101579 1208 - BL ident ® PROFIBUS-DP
User data ranges of the data carrier versions
Access to the data ranges of the data carriers
Use a different data carrier as indicated in "Hardware description of the project example"
page 3-3, or if you would like to access certain ranges of the data carrier, you will need to
change the values "Start Address" for "Preparations of the vartable_pib0 for writing." page
3-16/Seite 3-34 or for "Preparations of the vartable_pib0 for reading" page 3-18/Seite 3-36.
The value "Start Address" is marked there with the legend point D and explained.
Figure 84:
Preparations of
the
vartable_pib0
for writing.
Overview of the Turck data carriers
The data carriers type I-Code SL2 are writable and readable starting with the byte No. 0 to
byte No. 111.
The "Start Byte No." is part of the command structure "Physical_Read" page 4-24 and
"Physical_Write" page 4-25 and is called "Start Address".
The table explains the data structure of the data carrier.
TW-I14-B128
TW-L43-43-F-B128
TW-L82-49-P-B128
TW-R16-B128
TW-R20-B128
TW-R30-B128
TW-R50-B128
TW-R50-90-HT-B128
...
D101579 1208 - BL ident ® PROFIBUS-DP
3-75
Startup of a TURCK BL ident ®-system
Table 43:
Data structure
of I-Code
SL2-data
carrier
Byte No.
(StartAddress)
Content
Access
Block No.
-16 to -9
UID
Read only via
"Inventory" page
4-29
-4 to -3
-8 to -5
Tag information
-2
-4 to -1
Conditions for Write
access
Read only via
specific commands
0 to 111
User data range
Read / write via
"Physical_Read"
page 4-24 and
"Physical_Write"
page 4-25
0 to 27
(one block has 4
byte)
-1
The data carriers type I-Code SL1 are writable and readable starting with the byte No. 18 to
byte No. 63.
The "Start Byte No." is part of the command structure "Physical_Read" page 4-24 and
"Physical_Write" page 4-25 and is called "Start Address".
The table explains the data structure of the data carrier.
TW-R16-B64
TW-R22-HT-B64
...
Table 44:
Data structure
of I-Code
SL1-data
carrier
3-76
Byte No.
(StartAddress)
Content
Access
Block No.
0 to 7
UID
Read only via
"Inventory" page 4-29
0 to 1
8 to 11
Conditions for Write
access
Read only via specific
command
2
12 to 15
Special functions (for
example, EAS /
QUIET)
Read/Write only via
specific commands
3/4
16
family code
17
application identifier
18 to 63
User data range
Read / write via
"Physical_Read" page
4-24 and
"Physical_Write" page
4-25
4/5 to 15
(one block has 4
byte)
D101579 1208 - BL ident ® PROFIBUS-DP
User data ranges of the data carrier versions
The data carriers type FRAM are writable and readable starting with the byte No. 0 to
byte No. 1999.
The "Start Byte No." is part of the command structure "Physical_Read" page 4-24 and
"Physical_Write" page 4-25 and is called "Start Address".
The table explains the data structure of the data carrier.
TW-R20-K2
TW-R30-K2
TW-R50-K2
TW-R50-90-HT-K2
...
Table 45:
Data structure
of the FRAMdata carriers
Byte No.
(StartAddress)
Content
Access
Block No.
0 to 1999
User data range
Read / write via
"Physical_Read"
page 4-24 and
"Physical_Write"
page 4-25
0 to 249
2000 to 2007
UID
Read only via
"Inventory" page
4-29
250
2008 to 2015
AFI, DSFID, EAS
Read/Write (with
limitations) via
specific command
251
2016 to 2047
Special functions
(for example, EAS
/ QUIET)
Read only via
specific command
252 to 255
(one block has 8
byte)
D101579 1208 - BL ident ® PROFIBUS-DP
3-77
Startup of a TURCK BL ident ®-system
3-78
D101579 1208 - BL ident ® PROFIBUS-DP
4
Excerpt from the specifications
1 General information ..........................................................................................................2
1.6 Functional Requirements............................................................................................................. 2
– 1.6.1 General requirements ............................................................................................................ 2
– 1.6.2 Requirements coming from the use of Radio Frequency Identification Systems ................. 3
2 Modelling the Proxy Ident Block (PIB) ...............................................................................5
2.1 Principles of Modelling ................................................................................................................ 5
2.2 General PIB-model ...................................................................................................................... 5
2.3 Representation ............................................................................................................................ 5
3 Definition of Proxy-Ident-Blocks (PIB) ...............................................................................6
– 3.1.1 Block Definition ..................................................................................................................... 6
– 3.1.2 Parameters ............................................................................................................................ 7
– 3.1.3 Error and Warning Concept ................................................................................................ 13
– 3.1.4 Commands .......................................................................................................................... 23
– 3.1.6. PIB Timing .......................................................................................................................... 30
4 Communication between PIB and device........................................................................31
4.5 Data access within field device ................................................................................................. 31
– 4.5.1 General device model ......................................................................................................... 31
– 4.5.2 Block mapping for cyclic PROFIBUS-DP data transfer ...................................................... 31
– 4.5.3 Block Mapping for Acyclic PROFIBUS-DP Data Transfer .................................................. 32
– 4.5.4 Ident channel definition ....................................................................................................... 33
5 Identification- & maintenance functions (I&M-functions)................................................35
5.1 PROFILE_ID ............................................................................................................................... 35
5.2 Channel related Information ...................................................................................................... 35
Appendix A - Compliance table ..........................................................................................36
Appendix B - Elementary data types used within this specification ..................................38
D101579 1208 - BL ident ® PROFIBUS-DP
4-1
Excerpt from the specifications
1 General information
TURCK publishes this excerpt of the PROFIBUS Specification "Profile for Identification
Systems, Proxy Ident Function Block" (Version 1.20, June 2007) by courtesy of the PNO
(PROFIBUS Nutzer Organisation).
Please also note "Definitions within the command and diagnostics levels" page 3-40.
1.6 Functional requirements
This sub clause defines the functional requirements coming from the application of RFID and
BR systems. They define the restrictions/limitations for the design of the PIB and the
corresponding functions to be realized within the field device. As there are different functions
regarding RFID and BR they are described in parallel.
1.6.1 General requirements
The basic idea is to adapt existing RFID and BR systems to PROFIBUS technology enabling
integration into existing systems and to ease the use in new systems (refer to figure below).
Figure 85:
Basic design
IEC 61131-3
Comm-FB
IEC 61131-3
PROFIBUS-DPV1
Air interface
acyclic: file transfer
PIB
cyclic: control and status word
Interrogator/
Barcode reader
TAG
Buffer
Application
program
(not modified)
TAG
As existing proprietary solutions have to overcome there are certain restrictions to be
considered in addition to the conformance to PROFIBUS technology.
It is required that:
Integration of RFID and BR systems do interfere with existing Profibus systems to a
minimum extend.
Control flow is done with cyclic communication
Data transfer is done with acyclic communication
Application programs are kept independent from introducing PIB
Fragmentation, Defragmentation of data packages is kept inside the PIB
4-2
D101579 1208 - BL ident ® PROFIBUS-DP
1 General information
1.6.2 Requirements coming from the use of Radio Frequency Identification
Systems
Regarding RFID systems actually standardization activities are under progress. These
activities are targeted on defining the air interface (ISO/IEC 18000) as well as the file format
and handling of files (ISO/IEC 15962) as illustrated below.
This profile specification explicitly focuses on data transfer via industrial networks based on
PROFIBUS as well as on the integration into programmable controller systems.
Figure 86:
Relevant
standardization
activities
Application
Interrogator
AIR Interface
decoder
logical
memory
map
encoder
application
commands
application
responses
command/
response unit
tag driver
and
mapping
rules
logical
memory
data protocol
processor
RF Tag
tag physical memory
physical
interrogator
ISO/IEC 15961 ISO/IEC 15962 ISO/IEC 15962
Annexes
commands
responses
Note: the logical memory map
in the tag physical memory is
given by the tag architecture and
the mapping rules in the tag driver.
All the information in the logical
memory is represented in the
logical memory map
ISO/IEC 18000
Because of these ongoing processes it seems not to be needed to consider these subjects
within this document. Later on, if the standardization within IEC is finished the related
documents can be referenced. Consequently this document will not consider:
Air interface,
File format,
File handler,
User data coding.
Currently it is usual to consider data as a packet that is interpreted by both applications the
one in the Ident Unit and the one within the PLC using the PIB (see figure below).
D101579 1208 - BL ident ® PROFIBUS-DP
4-3
Excerpt from the specifications
Figure 87:
Data transfer
Air interface
Interrogator / barcode reader
IEC 61131-3
Comm-FB
PROFIBUS-DPV1
physical
Slaveinterface
PIB*
TAG
IEC 61131-3
PIB
Application
program
4-4
exchange of data containers
logical
exchange of application data
TAG
logical
D101579 1208 - BL ident ® PROFIBUS-DP
2 Modelling the Proxy Ident Block (PIB)
2.1 Principles of modelling
The following principles of modelling for the Proxy Ident Block (PIB) have to be met:
To fit into the existing PLC systems, e.g. using the existent addressing concept.
To be efficient and without overhead; that means the model shall be performance oriented.
To enable an easy application program portation between different PLC systems.
To use directly the existing Comm FBs.
To apply good programming style is to avoid dependencies of the hardware configuration
data such as addressing in the application program.
2.2 General PIB-model
The PIB is modeled as a Proxy FB representing a complete Ident Unit. It follows the basic
concepts of Proxy FB modeling as described in [4].
Figure 88:
Using CommFB and ProxyFB for PIBmodelling
PLC: DP-Master
Class1
IEC 61131-3
Program
Proxy FB
Proxy FB
FB_Field Device Control
DevID
One Proxy FB
represents a
field device
METHOD
WRREC
Comm FB
inside a
Proxy FB
data_m1
result_m1
data_m2
result_m2
RDREC
Local Instance Data
2.3 Representation
The representation of the interface of function block types is given in graphical and textual
form according IEC 61131-3. The behavior of the function blocks is presented as a graphical
state diagram with tables for the transitions and the actions.
D101579 1208 - BL ident ® PROFIBUS-DP
4-5
Excerpt from the specifications
3 Definition of Proxy-Ident-Blocks (PIB)
This chapter provides the specification of the Proxy Ident Block following the guidelines as
stated within [4].
Note
In case several PIB instances are operated by an application program in parallel it
must be guarantied that individual instances do not block each other.
3.1.1 Block Definition
The following figure provides a graphical presentation for the interface of the PIB.
Figure 89:
Graphical
Presentation of
the PIB
Interface
4-6
BOOL
DWORD
INT
INT
BOOL
BOOL
BOOL
BOOL
BOOL
BOOL
BOOL
BOOL
INT
INT
ARRAY[1..10]
Para
of CMD_STRUCT
INT
INT
ARRAY[1..N]
Data
of BYTE
INT
INT
ARRAY[1..N]
of BYTE
EXECUTE
ID
INDEX
OFFSET
RPTCMD
SRESET
INIT
UOUT0
UOUT1
UOUT2
UOUT3
RDGATE
CMDDM
CMDSEL
CMDREF
TXBUFLEN
TXSTART
TXREF
RXBUFLEN
RXSTART
RXREF
ID
RDREC
STATUS
ID
WRREC
STATUS
SETIO_PART
ID
STATUS
GETIO_PART
ID
STATUS
PIB
DONE
ERROR
STATUS
BOOL
BOOL
DWORD
WARNING
BUSY
BOOL
BOOL
RPTACT
ERR_IREQ
TPC
TP
UIN0
UIN1
UIN2
UIN3
CMDREF
BOOL
BOOL
BOOL
BOOL
BOOL
BOOL
BOOL
BOOL
ARRAY[1..10]
of CMD_STRUCT
TXREF
TRLEN
RXREF
ARRAY[1..N]
of BYTE
INT
ARRAY[1..N]
of BYTE
Data
D101579 1208 - BL ident ® PROFIBUS-DP
3 Definition of Proxy-Ident-Blocks (PIB)
3.1.2 Parameters
Table 46:
PIBParameter
description
Name
Description
EXECUTE
The user (application program) can start the operation of a block instance
by setting this input parameter of type BOOL to TRUE. Before starting the
block operation the command and its associated parameters have to be
put to the memory associated to the CMDREF parameter. Also the
CMDSEL parameter has to be set properly. This parameter is activated
with the rising edge.
ID*
The value of this input parameter is used as a unique identifier for
addressing a single device or a slot within a device. The detailed
description is given in [4]. In combination with the parameter "INDEX" it
addresses an individual Ident Unit.
INDEX*
The value of this input parameter is used to identify a single ident channel
within a slot of a device. The use of the parameter corresponds to the
definition of the address parameter "Index" within [1] and [2].
OFFSET*
The value of this input parameter is used to identify the channel related I/
O data as transferred cyclically as subpart of the data associated to a slot
(module).
RPTCMD*
This parameter forces the Ident Unit to repeat the command currently
executed or next to be executed as long as the parameter is set to "1".
The parameter is mapped to the "Repeat_Command" bit of the cyclic
control word (see chapter 4.2.1)
SRESET*
If this input parameter is set to "1" the command currently processed
within the Ident Unit will become cancelled. The parameter is mapped to
the "Soft_Reset" bit of the cyclic control word (see chapter 4.2.1). This
parameter is activated with the rising edge.
INIT*
This input parameter forces, if set from "0" to "1", the Ident Unit to restart
its operation except the communication interface. Local Ident Unit
operations done within this procedure are manufacturer specific. The
parameter is mapped to the "Init" bit of the cyclic control word (see
chapter 4.2.1). After the sequence "Init_Active=0 Init_Active=1
Init_Active=0" (cyclic status word) has been completed the PIB has to
send automatically a Write-Config command to the Ident Unit. This
parameter is activated with the rising edge.
UOUT0*
This parameter of type BOOL represents the user specific bit 0 as defined
to be transferred within the cyclic control word (see chapter 4.2.1). The
parameter is mapped to bit 0 of the cyclic control word.
UOUT1*
This parameter of type BOOL represents the user specific bit 1 as defined
to be transferred within the cyclic control word (see chapter 4.2.1). The
parameter is mapped to bit 1 of the cyclic control word.
*The user program has the task to reset and change all input parameters.
D101579 1208 - BL ident ® PROFIBUS-DP
4-7
Excerpt from the specifications
Table 46:
(cont.)
PIBParameter
description
Name
Description
UOUT2*
This parameter of type BOOL represents the user specific bit 2 as defined
to be transferred within the cyclic control word (see chapter 4.2.1). The
parameter is mapped to bit 2 of the cyclic control word.
UOUT3*
This parameter of type BOOL represents the user specific bit 3 as defined
to be transferred within the cyclic control word (see chapter 4.2.1). The
parameter is mapped to bit 3 of the cyclic control word.
RDGATE*
This parameter of type BOOL represents the optional bit 8 as defined to
be transferred within the cyclic control word (see chapter 4.2.1). If set to
"1" means start operation.
CMDDIM*
In order to write a more efficient user application several Commands can
be stored within the memory. The number of commands stored influences
the range of memory to be instantiated for this PIB instance. The input
parameter CMDDIM defines the number of command parameter
structures "CMD_STRUCT".
CMDSEL*
As there may be a certain number of commands stored in parallel there
must be a selector for a single command to be executed. The input
parameter CMDSEL is used for this purpose. It references one of the
predefined commands. The first CMD_STRUCT is reserved for
parameters associated to the command "Write_Config".
CMDREF*
This In_Out parameter references a global memory range. This memory
range is used to store commands and their associated parameters. The
max. number of commands stored in association with a single PIB
instance shall not exceed 10. Chapter 3.1.4 defines the commands
supported by the profile version.
supported by the profile-version.
TXBUFLEN*
This input parameter specifies the number of bytes used by this instance
of the PIB for storing data to be send. The number is calculated starting
from the relative position within the memory range defined by the
TXSTART parameter. For consistency reasons it is recommended not to
modify this parameter after the PIB is instantiated.
TXSTART*
The input parameter TXSTART indicates the relative position of the
"TXBUF" within the global memory area referenced by the parameter
"TXREF". This is the starting point of memory assigned to the PIB
instance. For consistency reasons it is recommended not to modify this
parameter after the PIB is instantiated.
TXREF*
This In_Out parameter is a reference to a global memory area used by
several blocks. The PIB instance may share the memory with several
other blocks.
*The user program has the task to reset and change all input parameters.
4-8
D101579 1208 - BL ident ® PROFIBUS-DP
3 Definition of Proxy-Ident-Blocks (PIB)
Table 46:
(cont.)
PIBParameter
description
Name
Description
RXBUFLEN*
This input parameter specifies the number of bytes used by this instance
of the PIB for storing data received. The number is calculated starting
from the relative position within the memory range defined by the
RXSTART parameter. For consistency reasons it is recommended not to
modify this parameter after the PIB is instantiated.
RXSTART*
The input parameter RXSTART indicates the relative position of the
"RXBUF" within the global memory area referenced by the parameter
"RXREF". This is the starting point of memory assigned to the PIB
instance. For consistency reasons it is recommended not to modify this
parameter after the PIB is instantiated.
RXREF*
This In_Out parameter is a reference to a global memory area used by
several blocks. The PIB instance may share the memory with several
other blocks.
TRLEN
This output parameter indicates the number of user bytes transmitted
(sent or received – depending on the command executed) after the
command succeeded. It counts the number of data transferred starting at
the position referenced by (TXSTART + OffsetBuffer) or (RXSTART +
OffsetBuffer).
DONE
This output parameter indicates, if set to "TRUE", that a command has
been executed with a positive result. The application program should
check this flag before calculating the data transferred while executing the
command.
ERROR
This output parameter is used to indicate, if set to "TRUE" that an error
has been recognized. The error may be recognized local (within the host)
or re-mote (within the Ident Unit). Detailed error information is provided by
the "STATUS" parameter. The flag is set by the PIB internally depending
on the Error bit within the acknowledgement frame (Bit 0 of CI). The flag
is reset to "FALSE" by the PIB instance after a new call of a command.
WARNING
This output parameter is used to indicate, if set to "TRUE" that a warning
has been recognized. The warning may be recognized local (within the
host) or remote (within the Ident Unit). Detailed warning information is
provided by the "STATUS" parameter. The flag is set by the PIB internally
depending on the warning bits within the acknowledgement frame (Bit
1..7 of CI - one or more bits are set to 1). The flag is reset to "FALSE" by
the PIB instance after a new call of a command. Note: In case of
WARNING all user data associated to a command may be transferred
correctly (if ERROR is not set). In this case the data buffer contains valid
values.
*The user program has the task to reset and change all input parameters.
D101579 1208 - BL ident ® PROFIBUS-DP
4-9
Excerpt from the specifications
Table 46:
(cont.)
PIBParameter
description
Name
Description
STATUS
The output parameter "STATUS" provides detailed error information or/
and warning information for the last command that has been executed
with a negative result or warning indication. The value changes not before
the next appearance of a warning or error. Coding depends on the source
of the warning or error which may be reported from the embedded
CommFBs, functions to access cyclic data, the Ident Unit, tag or from the
PIB internal functions.
BUSY
This output parameter indicates, if set to "TRUE", that the PIB is "busy"
and a command will no be accepted to become started (except "INIT" and
"SRESET"). The parameter is intended to indicate the user that the PIB is
still operating.
RPTACT
This output parameter indicates, if set to "TRUE", that the PIB* accepted
the request for repeating the current command. It is mapped from the
"Repeat_Command_Active" bit of the cyclic input data. The output
parameter remains active as long as the bit within the cyclic telegram is
set. The PIB* provides data following a command execution as long as
this output parameter is set – the user shall read command result.
ERR_REQ
This output parameter indicates, if set to "TRUE", that the PIB* noticed a
fatal error. It is mapped from the Error_Flag of the cyclic input data. The
output parameter remains active as long as the bit within the cyclic
telegram is set. The PIB remains in the current state (state machine). After
noticing that this parameter is "TRUE" the user has to set the INIT input
parameter of the PIB or send a Dev-Status command (if possible).
UIN0
This output parameter of type BOOL represents the user specific bit 0 as
defined to be transferred within the cyclic status word (see chapter 4.2.2).
UIN1
This output parameter of type BOOL represents the user specific bit 1 as
defined to be transferred within the cyclic status word (see chapter 4.2.2).
UIN2
This output parameter of type BOOL represents the user specific bit 2 as
defined to be transferred within the cyclic status word (see chapter 4.2.2).
UIN3
This output parameter of type BOOL represents the user specific bit 3 as
defined to be transferred within the cyclic status word (see chapter 4.2.2).
TP
This output parameter indicates, if set to "1", that a target is in the range
of the Ident Unit. The parameter corresponds to the "Target_Present" bit
of the cyclic status word (see chapter 4.2.2). It becomes reset in case
there is no target in the range of the Ident Unit. In case an Ident Unit does
not support this feature the parameter is set to "0". This parameter is not
used for bar-code reader.
TPC
This output parameter indicates, if set to "1", that a new target is in the
range of the Ident Unit. The parameter corresponds to the "Target_Presence_Changed" bit of the cyclic status word (see chapter 4.2.2).
The parameter is reset to "0" after the next "Inventory" command
succeeded. In case an Ident Unit does not support this feature the
parameter is set to "0". This parameter is not used for barcode reader.
*The user program has the task to reset and change all input parameters.
4-10
D101579 1208 - BL ident ® PROFIBUS-DP
3 Definition of Proxy-Ident-Blocks (PIB)
Table 47:
Features of
PIBparameters
Name
Data type
Range
User
conditions
m=
mandatory,
o = optional
EXECUTE
BOOL
When DONE≠O or ERROR≠O, a
change from "0" to "1" of the
parameter EXECUTE forces the
function block to execute a
command. (if DONE=0 and
ERROR=0 the PIB has not been
initialized or a command is in
process)
m
ID*
DWORD
0×00000000 .... 0×FFFFFFFF
(please see [4])
m
INDEX
INT
101...108, 111...118,201...254
m
OFFSET
INT
0...244
m
RPTCMD
BOOL
0 = No Repeat_Command
1 = Repeat_Command
o
SRESET
BOOL
Change from "0" to "1" forces
the function block to execute
the SRESET command
(termination of the last actual
command).
m
INIT
BOOL
Change from "0" to "1" forces
the function block to execute
the initialization procedure.
m
UOUT0
BOOL
Bit 0 = 0/1
o
UOUT1
BOOL
Bit 0 = 0/1
o
UOUT2
BOOL
Bit 0 = 0/1
o
UOUT3
BOOL
Bit 0 = 0/1
o
RDGATE
BOOL
0 = reading gate is not active
1 = reading gate is active
o
CMDDIM
INT
2 ... 10
m
CMDSEL
INT
1 ...10
m
CMDREF
ARRAY[2.. CMDDIM]
from CMD_STRUCT
CMDDIM x 42
m
TXBUFLEN
INT
0 ... 32768
m
TXSTART
INT
0 ... 32768
m
RXBUFLEN
INT
0 ... 32768
m
*The user program has the task to reset and change all input parameters.
D101579 1208 - BL ident ® PROFIBUS-DP
4-11
Excerpt from the specifications
Table 47:
(cont.)
Features of
PIBparameters
4-12
Name
Data type
Range
User
conditions
m=
mandatory,
o = optional
RXSTART
INT
0 ... 32768
m
RXREF
ARRAY
[1..N]of
BYTE
N
m
TRLEN
INT
0 ... 32768
m
DONE
BOOL
0 = command not completed or
last command finished with
error
1 = command completed
m
ERROR
BOOL
0 = last command not
completed or finished without
error
1 = last command finished with
error
m
WARNING
BOOL
0 = no warning information
available
1 = warning information
available
m
STATUS
DWORD
Refer to chapter 3.1.3
m
BUSY
BOOL
0 = PIB currently does not execute a command
1 = command currently
executed by the PIB
m
RPTACT
BOOL
0 = no repeat command
function active at the PIB*
1 = repeat command function
active at the PIB*
o
ERR_REQ
BOOL
0 = no error indicated from the
PIB*
1 = error indicated by the PIB*
m
UINO
BOOL
Bit 0 = 0/1
o
UIN1
BOOL
Bit 0 = 0/1
o
UIN2
BOOL
Bit 0 = 0/1
o
UIN3
BOOL
Bit 0 = 0/1
o
TP
BOOL
0 = no target present
1 = target present
o
(not used for
barcode
reader)
D101579 1208 - BL ident ® PROFIBUS-DP
3 Definition of Proxy-Ident-Blocks (PIB)
Table 47:
(cont.)
Features of
PIBparameters
Name
Data type
Range
User
conditions
m=
mandatory,
o = optional
TPC
BOOL
0 = no target changed
1 = target changed
o
(not used for
barcode
reader)
*The user program has the task to reset and change all input parameters.
To ease the access to individual elements of the command structure a common structure has
been defined to be used for every command independent of the use of single parameters. The
use of a parameter depends on the definition of the command itself.
The parameters are defined in chapter 3.1.4.
Figure 90:
Data type
definition of the
PIB-command:
3.1.3 Error and Warning Concept
The PIB indicates if the requested command was performed successfully or not. The error
indication is typically used for two purposes:
1 To change the reaction to the process i.e. to implement a substitute reaction e.g. to repeat
the request at another time or another place or to abort the process task.
2 To issue an alarm message to a HMI system by the application program or by the PLC
system automatically.
Note
In case 1, only very few different reactions dependent on the indicated error are
typical. Detailed error information is hardly used.
As the PIB encapsulates other FB’s (Communication FB’s) and functions, the STATUS
parameter represents status information generated by several sources.
Also the parameter STATUS can be used to provide warning information.
Optionally to the use of the STATUS parameter it is possible to transmit error and warning
information within diagnostic data (refer to chapter 4.4).
D101579 1208 - BL ident ® PROFIBUS-DP
4-13
Excerpt from the specifications
The STATUS output has the data type DWORD which is interpreted as a packed array of four
bytes as described in the following table.
Table 48:
Structure of
STATUSoutput
Byte
Name
Definition
Data type
0
Function_Num
Please see Table 49:
Byte
1
Error_Decode
Please see Table 50:
Byte
2
Error_Code_1
Please see Table 51:
Byte
3
Error_Code_2
Warnings of manufacturerspecific errors
Byte
The Function_Num byte definition is based on /2/ and extends the additions made in [4]. It is
used for grouping of failures and warnings.
Table 49:
Values of byte
Function_
Num
4-14
Frame
Select or
(Bit 7),
decimal
PDU Indicator
(Bit 5 to 6),
decimal
Error_Code_2 is
used for warnings
(Bit 4)*
Function_
Code /
Error_Code
(Bit 0 to 3)
decimal
Description per this
profile
0
0... 3
0/1
0 ... 15
No error
1
0, 1
0/1
0 . . . 15
Error not related to
DP protocol and not
defined for this
profile
1
2
0/1
0 . . . 15
Error message
regarding DP
protocol, refer to /2/
and [4]
1
3
0/1
0
vendor specific
coding of
Error_Code_1 and
Error_Code_2
1
3
0/1
1
Error_Code_1
provides error
information related to
Tag/Transponder/
Barcode vendor
specific coding of
Error_Code_2
1
3
0/1
2
Error_Code_1 sends
error information to
air-interface
manufacturerspecific coding of
Error_Code_2
D101579 1208 - BL ident ® PROFIBUS-DP
3 Definition of Proxy-Ident-Blocks (PIB)
Table 49:
(cont.)
Values of byte
Function_
Num
Frame
Select or
(Bit 7),
decimal
PDU Indicator
(Bit 5 to 6),
decimal
Error_Code_2 is
used for warnings
(Bit 4)*
Function_
Code /
Error_Code
(Bit 0 to 3)
decimal
Description per this
profile
1
3
0/1
3
Error_ Code _1
provides error
information related to
file system vendor
specific coding of
Error_Code_2
1
3
0/1
4
Error_Code_1
provides error
information related to
Ident Unit (Interrogator/Barcode Reader)
vendor specific
coding of Error_
Code _2
1
3
0/1
5
Error_Code_1
provides error
information
regarding
communication
between PIB and
Ident Unit (except DP
error) vendor specific
coding of
Error_Code_2
1
3
0/1
6
Error_ Code _1
provides command
specific error
information vendor
specific coding of
Error_Code_2
1
3
0/1
7
Error_Code_1
provides error
information
generated internally
by PIB vendor
specific coding of
Error_Code_2
1
3
0/1
8 ... 15
Not defined here
* Bit 4 = 0: Error_Code_2 contains vendor specific information, Bit 4 = 1: Error_Code_2
contains warning information (Byte 5 (Cl) of acknowledge frame)
The Error_Decode-Byte is used to define the meaning of Function_Num, Error Code 1 and
Error Code 2.
D101579 1208 - BL ident ® PROFIBUS-DP
4-15
Excerpt from the specifications
Table 50:
Values from
Byte Error
Decode
Error_Decode
Source
Meaning
0×00
PLC
No error, no warnings
0×01 .. 0×7F
PLC
Warning (not used for this profile)
0×80
DP V1
Error reported according to IEC 61158-6 /2/
0×81 .. 0×8F
PLC
0x8x reports an error according the x-th
parameter of the call of the Comm FB as defined
0×90 .. 0×FD
reserved
0×FE
Profile (PIB,
Ident-device)
Profile-specific error
0×FF
Profile (PIB,
Ident-device)
Reserved for future use
The Error_Code_1 provides a number detailing the error or warning. Within the following table
Error_Decode is fixed to 0xFE.
Table 51:
Values from
Byte Error
Code 1
4-16
Function _Code/ Error_Code_1
Error_Code*
(decimal)
Sent by
Meaning
mandatory /
optional
1
1
IG
Tag memory error (e.g.
CRC error).
o
1
2
IG
Presence error
(indicated by Ident
Unit), tag has left the
transmission window.
o
1
3
IG
Address or command
does not fit the tag
characteristics
(memory size)
(indicated by Ident
Unit).
o
1
4
IG
Tag is defective.
(replace tag or battery)
o
1
5
IG
Tag memory overflow.
o
1
6
IG
Unformatted tag.
o
1
7
IG
Inconsistent tag data
structure. Reformat
tag.
o
D101579 1208 - BL ident ® PROFIBUS-DP
3 Definition of Proxy-Ident-Blocks (PIB)
Table 51:
(cont.)
Values from
Byte Error
Function _Code/ Error_Code_1
Error_Code*
(decimal)
Sent by
Meaning
mandatory /
optional
1
8
IG
Tag within the
transmission window
does not have the
expected UID (indicated
by Ident Unit).
o
1
9
IG
Command not
supported by the Tag.
o
1
10
IG
Access violation (e.g.
block locked) refer to
ISO18000-x.
o
1
11..127
IG
Reserved for future
profile use.
o
1
128..255
IG
Vendor specific.
o
2
1
IG
Communication timeout at air interface
(indicated by Ident
Unit)
o
2
2
IG
More tags/barcodes
within transmission
window than allowed.
(indicated by Ident
Unit)
o
2
3..127
IG
Reserved for future
profile use.
o
2
128..255
IG
Vendor specific
o
3
1
IG
Incorrect file name
(indicated by Ident
Unit)
o
3
2
IG
File does not exist
(indicated by Ident
Unit)
o
3
3
IG
The Tag type is
incorrect or unsuitable
for the selected mode
of operation. No file
system available on
tag. (indicated by Ident
Unit)
o
3
4
IG
Create command; no
more directory entries
available. (indicated by
Ident Unit)
o
D101579 1208 - BL ident ® PROFIBUS-DP
4-17
Excerpt from the specifications
Table 51:
(cont.)
Values from
Byte Error
4-18
Function _Code/ Error_Code_1
Error_Code*
(decimal)
Sent by
Meaning
mandatory /
optional
3
5
IG
Create command; file
already exists in directory. (indicated by
Ident Unit)
o
3
6
IG
Access right violation.
(indicated by Ident
Unit)
o
3
7
IG
File length overflow
(indicated by Ident
Unit)
o
3
8
IG
File not accessible
(corrupted) (indicated
by Ident Unit)
o
3
9..127
IG
Reserved for future
profile use
o
3
128..255
IG
Vendor specific
o
4
1
IG
Power supply failure
(indicated by Ident
Unit)
o
4
2
IG
Hardware failure within
Ident Unit (indicated by
Ident Unit)
o
4
3
IG
Antenna not operating
(indicated by Ident
Unit); e.g. switched off
or disconnected
o
4
4
IG
Command buffer
overflow within Ident
Unit (indicated by Ident
Unit)
o
4
5
IG
Data buffer overflow
within Ident Unit (indicated by Ident Unit)
o
4
6
IG
Command in this mode
not supported by Ident
Unit. (indicated by
Ident Unit)
o
D101579 1208 - BL ident ® PROFIBUS-DP
3 Definition of Proxy-Ident-Blocks (PIB)
Table 51:
(cont.)
Values from
Byte Error
Function _Code/ Error_Code_1
Error_Code*
(decimal)
Sent by
Meaning
mandatory /
optional
4
7
IG
Ident Unit reports an
unspecific error
indicated by the cyclic
Status Word (e.g.
antenna does not work,
…) This error is not
related to a specific
command.
o
4
8..127
IG
Reserved for future
profile use.
o
4
128..255
IG
Vendor specific
o
5
1
IG
Wrong sequence
number (SN) indicated
by Ident Unit.
m
5
2
PIB
Wrong sequence
number (SN) indicated
by PIB.
m
5
4
IG
Invalid data block
number DBN indicated
by Ident Unit.
m
5
5
PIB
Invalid data block
number DBN indicated
by PIB.
m
5
6
IG
Invalid data block
length DBL indicated
by Ident Unit.
o
5
7
PIB
Invalid data block
length DBL indicated
by PIB.
m
5
8
IG
Command from
another user being
processed (indicated
by Ident Unit).
o
5
9
PIB
The Ident Unit
proceeds a hardware
reset (Init_Active set to
"1"), Init (Bit 15 within
the cyclic control word)
is expected from the
PIB.
m
D101579 1208 - BL ident ® PROFIBUS-DP
4-19
Excerpt from the specifications
Table 51:
(cont.)
Values from
Byte Error
4-20
Function _Code/ Error_Code_1
Error_Code*
(decimal)
Sent by
Meaning
mandatory /
optional
5
10
PIB
The command code
"CMD" and the
respective
acknowledgement do
not correspond. This is
a software or
synchronization error
that cannot occur in
normal operation.
m
5
11
PIB
Wrong sequence of
acknowledge
telegrams (TDB/DBN).
m
5
12
PIB
Synchronization error
(increment of AC_H/
AC_L and CC_H/CC_L
in cyclic control word is
wrong), INIT needed to
be performed.
m
5
13..127
IG
Reserved for future
profile use (must not be
used).
o
5
128..255
IG
Vendor specific
o
6
1
IG
Invalid CMD
m
6
2
IG
Invalid command index
CI indicated by Ident
Unit.
m
6
3
IG
Invalid command
parameter (e.g. data
range) indicated by
Ident Unit.
o
6
4
IG
Wrong synchronization
between application
program and Tag. A
command expected is
missing. (Object detect
error).
o
6
5
IG
Only Write-Config
command permissible
in this state. (indicated
by Ident Unit)
m
6
6..127
IG
Reserved for future
profile use
o
6
128..255
IG
Vendor specific
o
D101579 1208 - BL ident ® PROFIBUS-DP
3 Definition of Proxy-Ident-Blocks (PIB)
Table 51:
(cont.)
Values from
Byte Error
Function _Code/ Error_Code_1
Error_Code*
(decimal)
Sent by
Meaning
mandatory /
optional
7
1
PIB
Only INIT command
permissible in this
state. (indicated by
PIB)
m
7
2
PIB
Command code
"CMD" not
permissible.
m
7
3
PIB
Parameter "Length" of
the command too long,
does not fit the global
data reserved within
the TXBUF. (indicated
by PIB).
m
7
4
PIB
RXBUF overflow (more
data received than
memory in RXBUF
available).
m
7
5
PIB
This indication tells the
user that only a "INIT"
is permitted as the next
command. All other
commands will be
rejected.
m
7
6
PIB
Wrong Index (out of
range: 101 .. 108)
m
7
7
PIB
Ident Unit does not
respond to INIT
(Init_Active expected in
cyclic status message).
m
7
8
PIB
Time-out during Init (60
seconds as defined by
TC3WG9)
m
7
9
PIB
Command repetition
not supported by the
PIB*
o
7
10
PIB
Error during packet
size adoption within
PIB.
7
11..127
PIB
Reserved for future
profile use.
o
7
128..255
PIB
Vendor specific
o
*) Bit 0 to 3 (decimal coded) of Function_Num IU … Ident Unit
D101579 1208 - BL ident ® PROFIBUS-DP
4-21
Excerpt from the specifications
The Error_Code_2 provides either warning information (if Bit 4 of Function_Num is set "1") or
optional vendor specific number detailing the error (if Bit 4 of Function_Num is reset "0"). The
warnings are mapped from the acyclic acknowledge telegram Byte 5 (CI).
Table 52:
Coding of
warnings
4-22
Error_Decode Error_Code_2
(Bit position)
Source
Meaning
0×FE
0
Ident Unit
Bit is fixed to "0".
0×FE
1
Ident Unit
Vendor specific
0×FE
2
Ident Unit
Vendor specific in case of Ident Unit
being a Barcode Reader.
Low Battery in case of Ident Unit
being a RFID.
0×FE
3
Ident Unit
Vendor specific
0×FE
4
Ident Unit
Vendor specific
0×FE
5
Ident Unit
Vendor specific
0×FE
6
Ident Unit
Vendor specific
0×FE
7
Ident Unit
Vendor specific
D101579 1208 - BL ident ® PROFIBUS-DP
3 Definition of Proxy-Ident-Blocks (PIB)
3.1.4 Commands
This chapter describes the commands supported by the PIB and their associated parameters.
The following restrictions apply to the use of commands:
Cyclic control flow is of higher priority in relation to acyclic transmitted commands.
"INIT" and "SRESET" are aborting the execution of a command within the Ident Unit.
After sending a cyclic control message (INIT, SRESET) the consecutive change of
parameter "DONE" is related to the cyclic control message and not to the command
interrupted by INIT or SRESET.
"INIT" resets communication (cyclic control and status flow, acyclic commands) between
PIB and Ident Unit. For this procedure first "Init" is sent within cyclic control word. After
the "Init_Active" bit within the status word is reset a "Write-Config" command is generated
and sent to the Ident Unit. This requires that the user is providing "Write-Config"
parameters within the command area before requesting "INIT". (see chapter 4.2.3)
"Write-Config" resets all functions within the Ident Unit except communication.
"SRESET" terminates the last command.
D101579 1208 - BL ident ® PROFIBUS-DP
4-23
Excerpt from the specifications
Table 53:
Description of
the PIBcommand
Name
Description
Get
This is the command to read manufacturer specific data located at the Ident
Unit. The TXBUF is used as manufacturer specific area for parameter data
(optional send data). Received data are stored within the RXBUF starting at the
beginning of the RXBUF. The parameter TRLEN of the PIB indicates the
number of bytes received.
Physical_
Read
4-24
VAR
CMD : BYTE
END_VAR
: = 0×62;
Parameter
Description
OffsetBuffer
This parameter specifies the relative offset within the
RXBUF. It specifies the first address within the memory
area where the first byte of data received has to be stored.
All following bytes have to be stored at incremented
addresses.
Length
This parameter specifies the number of bytes to be sent to
the Ident Unit starting at the address indicated by the
parameter Offset Buffer. The range is: 0 … 226.
(* b *)
This is the command to read data from a transponder using a physical start
address and the length of data to be read. The parameter TRLEN of the PIB
indicates the number of bytes received.
VAR
CMD : BYTE
END_VAR
: = 0×70;
Parameter
Description
OffsetBuffer
This parameter specifies the relative offset within the
RXBUF. It specifies the first address within the memory
area where the first byte of data received has to be stored.
All following bytes have to be stored at incremented
addresses.
UID
This parameter identifies a single transponder.
UID = 0: Any (no specific)
The tag currently present is read.
Length
This parameter specifies the number of bytes to be read
from transponder starting at the address indicated by the
parameter StartAddress.
Start
Address
This parameter specifies a physical address within the
trans-ponder memory.
(* p *)
D101579 1208 - BL ident ® PROFIBUS-DP
3 Definition of Proxy-Ident-Blocks (PIB)
Table 53:
(cont.)
Description of
the PIBcommand
Name
Description
Physical_
Write
This command permits writing to a data carrier of data that is defined via a
physical start address and the length of the data to be written.
VAR
CMD : BYTE
END VAR
Next
: = 0×71;
(* q *)
Parameter
Description
OffsetBuffer
This parameter determines the relative Offset in the
TXBUF. With it the first address in the memory range is set
in which the first byte of the parameter data to be sent will
be stored.
UID
This parameter identifies a single data carrier.
UID = 0:
Arbitrary (no specific data carrier)
The active, present tag is read.
Length
This parameter specifies the number of bytes to be send to
the transponder starting at the address indicated by the
parameter StartAddress.
Start
Address
This parameter specifies a physical address within the
trans-ponder memory.
This is the command to finish operations regarding one transponder. The next
command will be executed when the next transponder is recognized/
indicated.
VAR
CMD : BYTE
END VAR
: = 0×6E;
(* n *)
Parameter
Description
UID
This parameter identifies a single transponder.
UID = 0:
Any (no specific)
The tag currently present is read.
NextMode
valid values:
NextMode = 0 (The next command can be applied to each
(another or the same) tag)
NextMode = 1 (only a different tag will become handled)
D101579 1208 - BL ident ® PROFIBUS-DP
4-25
Excerpt from the specifications
Table 53:
(cont.)
Description of
the PIBcommand
Name
Description
WriteConfig
This service is used to modify operation of the Ident Unit except interruption of
the communication. It is possible to send new parameters to the Ident Unit
(ConfigData). Also a reset can be initiated requesting the Ident Unit to restart
operation. The TXBUF is used as manufacturer specific area for config data.
Config data are manufacturer specific. Normally Write-Config is executed
automatically by the PIB during INIT. Optionally Write-Config may be started
with EXECUTE.
Mandatory operation to be supported:
Config = 1
Optional to be supported:
Config = 2 or Config = 3
VAR
CMD : BYTE
END VAR
: = 0×78;
(* x *)
Parameter
Description
OffsetBuffer
This parameter specifies the relative offset within the
TXBUF. It specifies the first address within the memory
area where the first byte of data to be sent is to be stored.
Length
This parameter specifies the number of config data byte to
be written to the Ident Unit.
Config
Config = 0...not allowed
Config = 1...Reset, no ConfigData
Config = 2...no Reset, ConfigData to be send
Config = 3 ... Reset, ConfigData to be send
Config > 3 ... reserved
Definition of sub-parameters delivered within the response:
MaxPacketSize
4-26
This parameter is transmitted from the PIB* to the PIB and
provides information about the max. length of the Ident
PDU (Ident header + data) the slave device is able to
receive or send. The PIB checks the PDU length supported
by the PIB* dynamically within the initialization phase
(INIT). PIB adapts the internal algorithm for packaging data
and align the PDU size.
00 = Default (corresponds to 240 Byte)
64…240 = max. permitted PDU size of within the PIB*
01…63 = reserved
241…255 = reserved
D101579 1208 - BL ident ® PROFIBUS-DP
3 Definition of Proxy-Ident-Blocks (PIB)
Table 53:
(cont.)
Description of
the PIBcommand
Name
Description
ReadConfig
This service is used to read config data out of the Ident Unit. The RXBUF is
used as manufacturer specific area for config data. Config data are
manufacturer specific. The parameter TRLEN of the PIB indicates the number
of bytes received.
VAR
CMD : BYTE
END VAR
MemStatus
: = 0×61;
(* a *)
Parameter
Description
OffsetBuffer
This parameter specifies the relative offset within the
RXBUF. It specifies the first address within the memory
area where the first byte of data read is to be stored.
This service is used to read the status of a tag (battery condition, memory size,
type of tag, available capacity, …). The RXBUF is used as manufacturer
specific area for status data. Status data are manufacturer specific. The
parameter TRLEN of the PIB indicates the number of bytes received.
VAR
CMD : BYTE
END VAR
: = 0×73;
(* s *)
Parameter
Description
UID
This parameter identifies a single transponder.
UID = 0:
Any (no specific)
The tag currently present is read.
Attributes
This parameter is used to specify the class of information
to be read. Valid values are:
0×00...reserved
0×01...warning detail
0×02...reserved
0×03...reserved
0×04...physical status information (man. Spec. details)
0×05...file system related status information (man. Spec.
details)
0×06 - 0×7F reserved
0×80 - 0×FF manufacturer specific.
OffsetBuffer
This parameter specifies the relative offset within the
RXBUF. It specifies the first address within the memory
area where the first byte of data read is to be stored.
D101579 1208 - BL ident ® PROFIBUS-DP
4-27
Excerpt from the specifications
Table 53:
(cont.)
Description of
the PIBcommand
Name
Description
DevStatus
This service is used to read the status of an Ident Unit. The RXBUF is used as
manufacturer specific area for status data. Status data are manufacturer
specific. The parameter TRLEN of the PIB indicates the number of bytes
received.
VAR
CMD : BYTE
END VAR
4-28
: = 0×74;
(* t *)
Parameter
Description
Attributes
This parameter is used to specify the class of information
to be read. Valid values are:
0x00… reserved
0x01… warning detail (man. Spec. details)
0x02… error history (man. Spec. details)
0x03… command history (man. Spec. details)
0x04… channel related I&M information (data record I&M0)
0x05… channel related I&M information (data record I&M1)
0x06… channel related I&M information (data record I&M2)
0x07… channel related I&M information (data record I&M3)
0x08… channel related I&M information (data record I&M4)
0x09 – 0x7F reserved
0x80 – 0xFF manufacturer specific
OffsetBuffer
This parameter specifies the relative offset within the
RXBUF. It specifies the first address within the memory
area where the first byte of data read is to be stored.
D101579 1208 - BL ident ® PROFIBUS-DP
3 Definition of Proxy-Ident-Blocks (PIB)
Table 53:
(cont.)
Description of
the PIBcommand
Name
Description
Inventory
This command is used to request a list of all UID’s currently accessible within
the antenna lobe. Vendor specific it is possible to deliver additional
information. The RXBUF is structured as follows. Following an example is given
to illustrate the construction of the data transferred. It is not intended to be
used as Structured Text code within the PLC program. The example
represents the transmission of 5 objects (ObjectNumber = 5) and ObjectLength
= 16
VAR CONSTANT
ObjectNo. : INT : = 5;
ObjectLength : INT : = 16;
END_VAR
TYPE
UID_STRUCT
STRUCT
UID : ARRAY[1..8] OF BYTE;
Data : ARRAY[1.. (ObjectLength-8) ]
END STRUCT;
END_TYPE
TYPE
UidList: ARRAY[1..ObjectNo.]
END_TYPE
VAR
CMD : BYTE
END VAR
: = 0×69;
OF BYTE;
OF UID _STRUCT;
(* i *)
Parameter
Description
Attributes
This parameter is used to specify the information to be
read. Valid values are:
0x00…all UID’s are read (without additional information)
0x01 – 0x7F reserved
0x80 – 0xFF manufacturer specific
OffsetBuffer
This parameter specifies the relative offset within the
RXBUF. It specifies the first address within the memory
area where the first byte of data read is to be stored.
D101579 1208 - BL ident ® PROFIBUS-DP
4-29
Excerpt from the specifications
Table 53:
(cont.)
Description of
the PIBcommand
Name
Description
Definition of sub-parameters delivered within the response:
Parameter
Description
Object
No.
This parameter specifies the number of UID‘s delivered
within the acknowledge.
Object
Length
This parameter specifies the number of bytes associated
to a single UID (length of UID + additional data). In case of
Attributes =0x00 the following applies: ObjectLength = 8.
UidList
This optional parameter contains a list of manufacturer
specific information associated to the UID’s currently
accessible within the antenna lobe.
3.1.6. PIB Timing
The following diagram represents the general timing of the PIB.
Figure 91:
General timely
control of PIB
EXECUTE,
SRESET
or INIT
1
2
3
DONE
BUSY
ERROR
1 The EXECUTE/INIT/SRESET input remains 1 until the function block invocation has
completed, it is reset by the user after DONE gets 1.
2 The user pulses the EXECUTE/INIT/SRESET input only for one invocation. The request is
not aborted.
3 Like case 1, but an error occurred.
4-30
D101579 1208 - BL ident ® PROFIBUS-DP
4 Communication between PIB and device
4.5 Data access within field device
4.5.1 General device model
A PROFIBUS device is whether a compact or a modular device (see figure below). In case it
is a modular device it is constructed of a head station and a number of modules. It may
optionally have binary inputs and outputs. The granularity of devices and modules may vary.
Figure 92:
General Device
Model
#2
MS0 (cyclic operation)
#2
I1 I2
O1 O2
Output-Telegram
Module
0
BL67
Head station
Input-Telegram
1
D
BL67
PROFIBUS-D
I3
2
D
BL67
3
D
BL67
Slave #2
n
D
BL67
D
0
0
0
0
1
1
1
1
0
0
0
0
1
1
1
1
2
2
2
2
3
3
3
3
Head station
The head station contains the interface to PROFIBUS and the according parameters. The
head station can be redundant. In this case, the redundant head station may occupy a
backplane slot different from 0.
Module
A module usually contains a logical or physical combination of channels. The modules are
inserted into the slots, or are otherwise stacked. A module may contain several channels.
Modules are counted continuously, starting with the module next to the head station.
Modules can exist, which do not contain channels (e.g. power supply). A module is logically
identified by a slot number as shown in the figure above. The slot number is used for
addressing purpose.
Channel
A channel contains all hard- and software components used to produce a measurement value
(input channel) or to create a physical output signal (output channel). Thus, the ident channels
represent the Ident Unit. Channels are counted separately for each module, starting with first
channel 1. A module may contain up to 8 ident channels.
4.5.2 Block mapping for cyclic PROFIBUS-DP data transfer
The output values from master to the slave and the input values from the connected sensors
are transferred as cyclic data. Cyclic data will be transferred via the Data_Exchange service
("...cyclic exchange of the I/O data with the DP-Master (Class 1)..."). The input and output
values are mapped into the cyclic data stream. This mapping is device-global. The principle
is shown in figure 30. The mapping relies on the modular structure of the GSD [7]. The
modules in a device are defined using the Module/EndModule keywords. The assignment to
a slot is controlled by the values inside the SlotDefinition/EndSlotDefinition keywords. The
assignment of modules to physical slots is done by the configuration device.
D101579 1208 - BL ident ® PROFIBUS-DP
4-31
Excerpt from the specifications
4.5.3 Block Mapping for Acyclic PROFIBUS-DP Data Transfer
The acyclic PROFIBUS read and write services are based on slot – index address
combinations. Within this profile a mapping is defined between the device structure and the
slots. The device block is always assigned to slot number 0 (zero). Every module of a device
is mapped to one slot. Each parameter of a module has to be mapped to an index in order to
be accessible by MS1/MS2 services.
Figure 93:
Mapping of
input and output
values to cyclic
communication
PROFIBUS-DP
Index
Index
Basic unit Module 1 Module 2 Module 3 Module 4
Index
0...254
0
Index
0...254
Index
0...254
1
Index
0...254
2
Index
0...254
3
Data Set up to 240 Bytes
254
0
...
...
2
0
1
2
1
0
1
2
0
0
1
3
...
238 239
4
Slot_Number
ascending from
left to right
In case several channels are assigned to one module, they will share the addressing space of
the related slot. All parameters, independent from the channel they are assigned to, have to
become addressed by an individual index as illustrated below.
Figure 94:
Assignment of
parameters and
addresses
PROFIBUS-DP
Index
Index
Basic unit Module 1 Module 2 Module 3 Module 4
Index
0...254
Index
0...254
Index
0...254
Index
0...254
Index
0...254
Channel n
Channel 2
Channel 1
0
1
2
3
254
.
.
.
y
.
.
.
.
.
c
.
.
b
a
.
.
.
0
Parameter n.0i
Parameter n.02
Parameter n.01
Parameter 1.0i
Parameter 1.02
Parameter 1.01
4
Slot_Number
ascending from
left to right
4-32
D101579 1208 - BL ident ® PROFIBUS-DP
4.5.4 Ident channel definition
This chapter describes the mapping of ident channels to modules. Basically it is possible that
up to 8 ident channels may be assigned to an individual module. Module 0 is not used to
support an ident channel. For each of the ident channels two indices are used for acyclic
communication:
Index 10x ("x" representing the channel number)
Indices 101 to 108 are used to parameterize one ident channel. Only the Write_Config
command is allowed to be transferred through these indices. After the module starts up,
a Write-Config must be sent to each ident channel. The channel is not ready for operation
until this is done. A Write-Config is also accepted during normal operation. Write-Config
interrupts a running command. The user receives no further acknowledgment for the
interrupted command.
Index 11x ("x" representing the channel number)
Indices 111 to 118 are used for sending the actual commands and related
acknowledgments (all commands except Write_Config).
Note
BL ident ®-Modules have 2 channels per module. This only allows the use of Indices
111 to 112!
Other indices only carry error messages"DW#16#E7FE06xx" page 3-70!
The indices of a module are used as follows:
Table 54:
Indices of a
module
Index
Use
0 ... 100
reserved
101
Parameterization Channel 1 (CHL = 1)
102
Parameterization Channel 2 (CHL = 2)
103
Parameterization Channel 3 (CHL = 3)
104
Parameterization Channel 4 (CHL = 4)
105
Parameterization Channel 5 (CHL = 5)
106
Parameterization Channel 6 (CHL = 6)
107
Parameterization Channel 7 (CHL = 7)
108
Parameterization Channel 8 (CHL = 8)
109, 110
reserved
111
Data transfer Channel 1 (CHL = 1)
112
Data transfer Channel 2 (CHL = 2)
113
Data transfer Channel 3 (CHL = 3)
114
Data transfer Channel 4 (CHL = 4)
115
Data transfer Channel 5 (CHL = 5)
116
Data transfer Channel 6 (CHL = 6)
D101579 1208 - BL ident ® PROFIBUS-DP
4-33
Excerpt from the specifications
Table 54:
Indices of a
module
4-34
Index
Use
117
Data transfer Channel 7 (CHL = 7)
118
Data transfer Channel 8 (CHL = 8)
119 ... 200
reserved
201 ... 254
Manufacturer specific
255
I&M-functions
D101579 1208 - BL ident ® PROFIBUS-DP
5 Identification- & maintenance functions (I&M-functions)
The main purpose of the I&M functions is to support the end user during various scenarios of
a device's life cycle be it configuration, commissioning, parameterization, diagnostics, repair,
firmware update, asset management, audit trailing, and alike. Well-defined uniform
parameters and rules should enable the manufacturers to offer devices that behave in a
uniform manner and that should enable the end user to act quick and straight. Information
provided by the I&M function may be related to the complete device, to an individual module
within a device ar a channel associated to a module. Data structures and access mechanisms
for device and module related I&M functions are defined in "PROFIBUS Profile Guideline, Part
1, Identification and Maintenance Functions" [5]. Addressing of channel related I&M functions
is currently under discussion within TC3 of PNO. The next version of the "PROFIBUS Profile
Guideline, Part 1, Identification and Maintenance Functions" will define how to access these
information. As it is the intention of TC3 WG9 not to define a proprietary version of channel
related I&M functions this new version of "PROFIBUS Profile Guideline, Part 1, Identification
and Maintenance Functions" shall become applicable here.
5.1 PROFILE_ID
The Profile ID’s used for the profile "PROFIBUS Proxy Ident Function Blocks acc. to IEC
61131-3" are:
5B00H for RFID systems and
5B10H for barcode readers.
Assignment of Profile ID’s is managed by PNO.
5.2 Channel related Information
For each channel it is possible to provide channel related I&M functions. Thus, a device may
contain as many channel related information, as channels may be implemented in the
individual modules. The scope of this information is restricted to an individual channel. The
semantic meaning of the channel related I&M information is the same as of those related to a
complete device or module. They are represented by the data types described in [5].
D101579 1208 - BL ident ® PROFIBUS-DP
4-35
Excerpt from the specifications
Appendix A - Compliance table
The following table lists the permitted "Implementation dependant features" of the PIB. A
manufacturer which claims to be compliant with this PNO specification shall provide a list in
the format of this table and shall identify all compliant features of the PIB supported.
Table 55:
Implementation
dependant
features for
the PIB
Clause
Feature
Implementation
chosen
3
Maximum memory size supported for the TXBUF
3
Maximum memory size supported for the RXBUF
3
Maximum number of commands to be stored within
the CMDREF
The following table lists the communication related features of the Ident Unit relevant to this
profile specification. A manufacturer of an Ident Unit which claims to be able to communicate
with an instance of a PIB shall provide a list in the format of this table and shall identify all
compliant features of the Ident Unit supported.
Table 56:
Conformance
table for
Ident-devices
4-36
Clause Feature
Explanation
3.1.3
Read
Command
3.1.3
Get
Command
3.1.3
Physical_Read
Command
3.1.3
Write
Command
3.1.3
Put
Command
3.1.3
Physical_Write
Command
3.1.3
Format
Command
3.1.3
Create
Command
3.1.3
Delete
Command
3.1.3
Clear
Command
3.1.3
Update
Command
3.1.3
Next
Command
3.1.3
Get-Directory
Command
Implementation
specific additional
information
compliant?
(Y/N)
D101579 1208 - BL ident ® PROFIBUS-DP
Table 56:
(cont.)
Conformance
table for
Ident-devices
Clause Feature
Explanation
3.1.3
Set-Attribute
Command
3.1.3
Get-Attribute
Command
3.1.3
Write-Config
Command
3.1.3
Read-Config
Command
3.1.3
Mem-Status
Command
3.1.3
Dev-Status
Command
3.1.3
Inventory
Command
3.1.3
Read-BarCode
Command
4.2.1
Reading_Gate
Control Bit
4.2.1
Command
repetition
Control Bit
4.2.2
Target_Presence_
Changed
Status Bit
4.2.2
Target_Present
Status Bit
MaxPacketSize
Max. Ident
PDU size
supported
D101579 1208 - BL ident ® PROFIBUS-DP
Implementation
specific additional
information
compliant?
(Y/N)
4-37
Excerpt from the specifications
Appendix B - Elementary data types used within this specification
This informative annex provides the data type definitions used for this specific profile
specification.
Table 57:
Data types
Name
Definition
Source
BOOL
Boolean (The possible values of variables of
this data type shall be 0 and 1, corresponding
to the keywords FALSE and TRUE,
respectively.)
IEC 61131-3
DWORD
Bit string of length 32
IEC 61131-3
WORD
Bit string of length 16
IEC 61131-3
INT
Integer (The range of values for variables of this
data type is from – (216-1) to (216-1)-1.)
IEC 61131-3
ANY
IEC 61131-3
DINT
Double integer (The range of values for
variables of this data type is from – (232-1) to
((232-1)-1).
IEC 61131-3
BYTE
Bit string of length 8
IEC 61131-3
ARRAY[1..x] of Data
Type
CMD_
STRUCT
4-38
IEC 61131-3
TYPE
CMD STRUCT
STRUCT
CMD : BYTE;
Config BYTE;.
OffsetBuffer : INT;
UID : ARRAY[1..8] OF BYTE;
FileName : ARRAY[1..8] OF BYTE;
Offset : DINT;
Length : INT;
StartAddress : DINT;
Attributes : BYTE;.
NextMode : BYTE;.
Timeout : INT;
ObjectNumber : INT;
FileType : Word;
END STRUCT;
END TYPE
D101579 1208 - BL ident ® PROFIBUS-DP
Table 57:
(cont.)
Data types
Name
Definition
DIRELEMENTS_
STRUCT
TYPE
DIRELEMENTS_STRUCT
STRUCT
FileName : ARRAY[1..8] OF BYTE;
UsedLength : DINT;
Attributes : BYTE;
FileLength : DINT;
FileType : WORD;
END STRUCT;
END_TYPE
DIRLIST_
STRUCT
Whereas this structure is defined in ST
notation it is not intended to become copied
into a ST program as it contains an array of
dynamic length, which is not conform to IEC
61131-3 (ST). ST has only been chosen for
consistency reason within the document.
Source
TYPE
DIRLIST_ STRUCT
STRUCT
UID1 : ARRAY[1..8] OF BYTE;
TagName : ARRAY[1..8] OF BYTE;
FreeUserMem : DINT;
Checksum : WORD;
FileCount : INT;
FileList : ARRAY[1..FileCount] of DIRELEMENTS_STRUCT;
END STRUCT;
END TYPE
UID_STRUCT
Whereas this structure is defined in ST
notation it is not intended to become copied
into a ST program as it contains an array of
dynamic length, which is not conform to IEC
61131-3 (ST). ST has only been chosen for
consistency reason within the document.
TYPE
ObjectLength : INT;
END_TYPE
TYPE
UID STRUCT
STRUCT
UID : ARRAY[1..8] OF BYTE;
Data : ARRAY[1..(ObjectLength-8)] OF BYTE;
END_STRUCT;
END_TYPE
D101579 1208 - BL ident ® PROFIBUS-DP
4-39
Excerpt from the specifications
Table 57:
(cont.)
Data types
Name
Definition
Source
UidList
Despite the fact that this structure is defined
in the ST-language it must not be copied into
a ST-program because it contains an array
(field) with a dynamic length that does not
meet IEC 61131-3 (ST) ST was only selected
in the document based on reasons of
consistency.
TYPE
ObjectNumber : INT;
END TYPE
TYPE
UldList: ARRAY[1..ObjectNumber] OF UID_STRUCT;
END TYPE
The encoding of UID is defined within Technical Report ISO/IEC /TR 15963, Automatic
identification – Radio Frequency Identification for item management – Unique identification
for RF tags, Annex A as follows:
Table 58:
AC (Allocation Class)
UID issuer Registration
Number
Serial number
8 Bit
Size defined by AC value
Size defined by AC value
Encoding of
UID
MSB
Table 59:
AC-values
4-40
LSB
AC-value
Class
UID issuer
identifier size
Serial Number Registration
size
authority (of "UID
issuer Registration
Number"
'11100000'
7816-6
8 Bit
48 Bit
APACS
(ISO/IEC 7816-6
registration authority)
'11100001'
14816
perNEN
perNEN
NEN (ISO 14816
registration authority)
'11100010'
EAN.UCC
per EAN.UCC
per EAN.UCC
EAN.UCC
000×xxxx
INCITS 256
per ANS
INCITS 256
per ANS
INCITS 256
ANSI ASC INCITS T6
'11100011' to
'11101111'
RFU
N/A
N/A
Reserved for future
use by ISO
D101579 1208 - BL ident ® PROFIBUS-DP
5
A
Glossary
Automation device
Control device with inputs and outputs that is connected to a technical process. Programmable controllers (SPC)
are a special group of automation devices.
B
Bulk capture
Simultaneous, unequivocal recognition of multiple RFID data carriers which are directed around a read/write head
(transceiver).
Bus
Bus system for the data transfer between hardware components (for example, CPU, memory, I/O-level). A bus may
consist of multiple parallel cables for the transfer of data (addressing, control and power supply).
Bus system
The total of all devices that communicate with each other via a bus.
C
Configuration
Systematic mapping of a station's I/O-modules.
CPU
English abbr. for "Central Processing Unit". Central device for data processing, the core of the processor.
D
Distribution
Distribution involves all activities concerning the transfer of goods between economic entities.
DIN
Abbr. for "German Institute for Standardization Membership Corporation".
DP-Master Class 1
The automation system (SPC) which mainly executes cyclic data processing. The DPV1-functions may be used in
addition/or as an option. (also DPM1/DPC1).
DP-Master Class 2
Only acyclic demand data are transferred. This data transfer may be executed with the help of an engineering tool
(PC user program), for example.
DPV1
Expansion of functions for PROFIBUS-DP. In addition to the cyclic process data, demand data may be transferred
via acyclic communication functions. The acyclic services are chronologically processed in parallel, and in addition
to the cyclic process data transfer, they are completed with low priority.
E
Earth
In electrical engineering the term for conductive earth of which its electrical potential is zero at each point. Within
the vicinity of grounding equipment the electrical potential of the earth may differ from zero; in this case the term
"common ground reference potential" is used.
Earth electrode
One or more components which have direct and good contact with the earth.
EEPROM - Electrically Erasable Programmable Read-Only Memory
EEPROM describes a non-volatile, electronic memory component. An EEPROM consists of a field effect transistor
matrix with insulated floating gate in which each transistor represents a bit.
D101579 1208 - BL ident ® PROFIBUS-DP
5-1
Glossary
EMC
Electromagnetic compatibility (EMC) identifies the generally desirable state in which technical devices are not
interfering with each other based on unintentional electric or electromagnetic effects.
F
Fieldbus
Data network at sensor-/actuator level. A fieldbus connects the devices in the field with a control device. High
transfer safety and real time behavior are characteristic for the fieldbus.
FRAM - Ferroelectric Random Access Memory
FRAM describes a non-volatile electronic memory type based on crystals with ferroelectric features.
G
Grounding
Connecting an electrically conductive part to the earth electrode via a piece of grounding equipment.
GSD - General Station Description
(Formerly master file) The GSD file describes the device features which are used in PROFIBUS-DP. The GSD file is
a readable text file and is provided in different languages. Project planning tools require the device information for
configuration and start-up. The content of the GSD file typically consists of general information (for example,
manufacturer name and version), and for modular devices it consists of communication characteristics (for
example module names, texts for diagnostic messages, parameterization possibilities and parameter names) of
the individual modules.
H
Hexadecimal
Number system with the basis 16. The count starts at 0 to 9 and continues with the letters A, B, C, D, E and F.
LI
IEC 61131
IEC 61131 is an international standard which covers the basics for programmable controllers.
Initialization
At initialization the required memory (for example, variables, code, buffer) is reserved and filled with start values.
IP - International Protection
The protection class (IP) identifies the suitability of electrical operating devices (for example, devices, installation
material) in regards to different ambient conditions, also the protection of people against potential dangers when
the electric operating devices are being used.
K
L
Logistics
Logistics involves the teachings of comprehensive planning, control, execution, allocation, optimization and
control of processes for the movement from one location to another of goods, data, energy and persons as well as
the needed means of transport.
LSB
English abbr. for "Least Significant Bit". Bit with the least significance.
M
Master
The Master controls access of a master-slave operation in the fieldbus range.
MSB
Abbr. for "Most Significant Bit". Bit with the most significance.
P
Parameterization
Setting of parameters of the individual bus participants or rather their modules in the configuration software of the
DP-Master.
5-2
D101579 1208 - BL ident ® PROFIBUS-DP
PIB
Abbr. for "Proxy Ident Function Block". This function block represents an Ident system in the control. This is why
there exists a uniform program interface for the actual application.
PLC
Abbr. for Programmable Logic Controller.
R
Read/write head
The read/write head (also read/write device) creates an electromagnetic high-frequency field. This is how data is
transferred and the data carrier (transponder) is supplied with power. The data is displayed with the help of
modulation of the electromagnetic field.
Repeater
In the field of digital communication technology, the repeater is a signal regenerator which receives a signal in the
bit physical layer then regenerates it and resends it. Noise as well as jitter of the run time and the pulse format are
removed from the received signal during this type of regeneration.
RFID
Radio Frequency Indentification
RFID-Technology
This technology supports a contact free transfer of data with the help of an electromagnetic alternating field. This
type of transfer is also called radio frequency technology. A Tag is used as data carrier.
S
Station
Function block of the assembly, consisting of multiple components.
STEP 7
STEP 7 is the current programming software of the Simatic-S7-SPS-family of the company Siemens AG and is the
sequence to STEP 5.
T
Tag
RFID-tags are small transponders in an application suitable enclosure, for example, sticker, chip card, tag.
Transceiver
Sender and receiver combination
The RFID technology uses transceivers in form of so-called "Readers". These devices send a signal first which the
transponder (for example, RFID-tag) acknowledges by sending a response which in turn is received by the
transceiver and sent to a (computer) system for further processing.
Transponder
(Transmitter + Responder)
Response-sending device. A transponder consists of a microchip (with an unique identification No.), a send-/
receive-antenna and an enclosure. Data is transferred between a read-device and a transponder via
electromagnetic waves.
Transponder-Technology
(also „RFID-Technology“)
U
UHF - Ultra High Frequency
This frequency range belongs to the microwave range. RIFD functions in Europe with 865..868 MHz / USA 902..928
MHz / Japan 955MHz / China 840..845 MHz and 920..925 MHz.
D101579 1208 - BL ident ® PROFIBUS-DP
5-3
Glossary
UID
English abbr. for "Unique Identifier". The UID is an unique serial No. for transponders. As address it refers to the
data belonging to the transponder rather the tagged product. This data may be stored in a data base, for example.
5-4
D101579 1208 - BL ident ® PROFIBUS-DP
Support RFID
Tel. +49 (0) 208 4952-4666
E-Mail [email protected]
Hans Turck GmbH & Co. KG
Witzlebenstraße 7
45472 Mülheim an der Ruhr
Germany
Tel. +49 (0) 208 4952-0
Fax +49 (0) 208 4952-264
E-Mail [email protected]
Internet www.turck.com
D101579 1208
www.turck.com