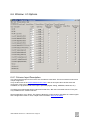
1
Manual 2.21 INTELLIMIX® Manual 2.21 Yellowtec 2002 Page 1 1 BRIEF DESCRIPTION......................................................................................... 6 2 PRIOR TO BEGINNING ...................................................................................... 7 2.1 Manual conventions.......................................................................................... 7 2.1.1 2.1.2 Using the screen .................................................................................................................... 7 Printout................................................................................................................................... 7 2.2 Unpacking......................................................................................................... 8 2.3 Scope of delivery .............................................................................................. 8 2.4 Safety instructions ............................................................................................ 9 GETTING STARTED WITH INTELLIMIX®........................................................ 10 3 3.1 Electrical connection....................................................................................... 10 3.2 Activation / Standby mode .............................................................................. 10 3.3 Preparation for the first operation ................................................................... 11 3.4 First operation................................................................................................. 12 3.5 Starting the configuration software quickly ..................................................... 14 3.5.1 3.5.2 Connection to the computer................................................................................................. 14 Installing the software .......................................................................................................... 15 3.5.2.1 3.5.2.2 3.5.3 4 Installing the CD-ROM ............................................................................................................... 15 Installation as an update ............................................................................................................ 15 First steps ............................................................................................................................ 16 CONTROL UNIT ................................................................................................ 18 4.1 Fader .............................................................................................................. 18 4.2 Fader Start indicator ....................................................................................... 18 4.3 Source Selector / PFL..................................................................................... 19 4.4 Level indicator................................................................................................. 19 4.5 Source/Status display ..................................................................................... 19 4.6 Attention indicator ........................................................................................... 20 4.7 Out Of Phase indicator ................................................................................... 20 4.8 Monitor Control ............................................................................................... 20 4.9 Monitor Source display ................................................................................... 20 4.10 Speaker/Headphone indicator.................................................................... 20 INTELLIMIX® Manual 2.21 Yellowtec 2002 Page 2 5 BASE UNIT........................................................................................................ 21 5.1 Front panel...................................................................................................... 21 5.2 Back panel...................................................................................................... 22 5.2.1 5.2.2 Power supply ....................................................................................................................... 22 Inputs/Outputs ..................................................................................................................... 22 5.3 Technical data ................................................................................................ 23 5.4 Information on the connections....................................................................... 24 5.4.1 5.4.2 5.4.3 6 Trigger outputs (GPOs) ....................................................................................................... 24 Trigger inputs (GPIs) ........................................................................................................... 24 Microphone inserts .............................................................................................................. 24 SOFTWARE....................................................................................................... 25 6.1 Program start .................................................................................................. 25 6.2 Menu: File ....................................................................................................... 26 6.2.1 6.2.2 6.2.3 6.2.4 6.2.5 6.2.6 6.3 Submenu: New .................................................................................................................... 26 Submenu: Open................................................................................................................... 26 Submenu: Save ................................................................................................................... 26 Submenu: Save as .............................................................................................................. 26 Submenu: Change Password .............................................................................................. 27 Submenu: Exit ..................................................................................................................... 27 Menu: Unit ...................................................................................................... 28 6.3.1 6.3.2 6.3.3 6.3.4 6.3.5 6.4 Note ..................................................................................................................................... 28 Submenu: Save to Unit........................................................................................................ 28 Submenu: Load from Unit.................................................................................................... 28 Submenu: Save to SmartCard............................................................................................. 28 Submenu: Load from SmartCard......................................................................................... 28 Menu: Firmware Update ................................................................................. 29 6.4.1 6.4.2 6.4.3 6.5 Note 1 .................................................................................................................................. 29 Note 2 .................................................................................................................................. 29 Firmware update instructions............................................................................................... 29 Menu: Help ..................................................................................................... 31 6.5.1 6.5.2 6.6 Submenu: Help F1.............................................................................................................. 31 Submenu: About .................................................................................................................. 31 Window: I-O Options....................................................................................... 32 6.6.1 6.6.2 6.6.3 Column: Input Description ................................................................................................... 32 Column: Label...................................................................................................................... 33 Column / window: Input Setup ............................................................................................. 33 6.6.3.1 6.6.3.2 6.6.3.3 6.6.3.4 6.6.4 6.6.5 6.6.6 Range: Input Gain (Phantom Power) ......................................................................................... 34 Range: SubSonic Filter .............................................................................................................. 34 Range: EQ Adjust ...................................................................................................................... 34 Range: Source Selector with Shift.............................................................................................. 35 Column: Disable Source Selection ...................................................................................... 35 Column: Disable Monitor Selection ..................................................................................... 36 Column: Always Mono ......................................................................................................... 36 INTELLIMIX® Manual 2.21 Yellowtec 2002 Page 3 6.6.7 6.7 Column: Flash Monitor Display............................................................................................ 36 Window: Control Logic.................................................................................... 37 6.7.1 Range: Trigger Outputs ....................................................................................................... 37 6.7.1.1 6.7.1.2 6.7.2 6.7.3 Range: Pulse Duration......................................................................................................... 39 Range: Trigger Inputs .......................................................................................................... 39 6.7.3.1 6.8 Trigger Input Actions .................................................................................................................. 39 Window: General Options 1 ............................................................................ 41 6.8.1 6.8.2 6.8.3 6.8.4 6.8.5 6.8.6 6.8.7 6.8.8 6.8.9 6.8.10 6.9 Range: Synchronisation....................................................................................................... 41 Range: SmartCard............................................................................................................... 42 Range: Shift + Talk button ................................................................................................... 42 Range: Standby function ..................................................................................................... 43 Range:Select Input Line #5 ................................................................................................. 43 Range: Output Channel status information ......................................................................... 43 Range: Output Limiter.......................................................................................................... 43 Range: Talkback .................................................................................................................. 44 Range: Mix-Minus Assignment / PPM ................................................................................. 44 Range: ON AIR Logic....................................................................................................... 45 Window: General Options 2 ............................................................................ 46 6.9.1 6.9.2 Range: Default Source ........................................................................................................ 46 Range: Monitor Mix Out (Pre/Post) ..................................................................................... 46 6.10 Window: Expert Options ............................................................................ 47 6.10.1 6.11 Range: External Router.................................................................................................... 47 Window: Personal Parameters................................................................... 49 6.11.1 6.11.2 6.11.3 6.11.4 6.11.5 6.11.6 6.11.7 6.11.8 6.11.9 6.11.10 6.11.11 7 Trigger Output Functions ........................................................................................................... 38 Trigger Output Actions ............................................................................................................... 39 Range: Level Indicator ..................................................................................................... 49 Range: Display................................................................................................................. 50 Range: Shift (Application Level-2) ................................................................................... 50 Range: Option for Stereo Fader (Balance) ...................................................................... 50 Range: PFL (Prefade Listen) ........................................................................................... 51 Range: SmartLevel .......................................................................................................... 51 Range: Monitoring Level .................................................................................................. 52 Range: PFL Options for Loudspeakers............................................................................ 52 Range: PFL Options for Headphones .............................................................................. 52 Range: Dim Level............................................................................................................. 53 Range: Option for Headphones ....................................................................................... 53 TECHNICAL DRAWINGS/DESCRIPTIONS...................................................... 54 7.1 Technical data ................................................................................................ 54 7.2 Block diagram ................................................................................................. 55 7.3 Pin-out table.................................................................................................... 56 7.4 GPI/GPO circuit examples.............................................................................. 59 7.5 Measurements Control-Unit ............................................................................ 60 8 UPDATING INTELLIMIX® .................................................................................. 61 INTELLIMIX® Manual 2.21 Yellowtec 2002 Page 4 8.1 Prior to beginning............................................................................................ 61 8.2 Installing as CD-ROM ..................................................................................... 61 8.3 Installing as ZIP-File ....................................................................................... 61 8.4 The software components of INTELLIMIX® ................................................... 61 8.5 Performing the firmware update...................................................................... 62 8.6 Compatibility ................................................................................................... 64 8.7 Checking version numbers ............................................................................. 64 TIPS ................................................................................................................... 65 9 9.1 9.1.1 9.1.2 9.1.3 9.2 9.2.1 9.2.2 9.2.3 9.2.4 10 Application information ................................................................................... 65 MIC1+2 as Stereo................................................................................................................ 65 EQ........................................................................................................................................ 65 Saving parameters............................................................................................................... 66 Solving problems ............................................................................................ 67 Noise on the microphone inputs .......................................................................................... 67 Headset................................................................................................................................ 67 Software update................................................................................................................... 67 Saving setups ...................................................................................................................... 67 MISCELLANEOUS......................................................................................... 68 10.1 Warranty .................................................................................................... 68 10.2 CE conformity declaration .......................................................................... 69 INTELLIMIX® Manual 2.21 Yellowtec 2002 Page 5 1 BRIEF DESCRIPTION ® INTELLIMIX is a digital audio-mixer, providing extreme flexibility and a variety of functions as well as digital and analog interfacing. INTELLIMIX® offers an essentially larger variety of functions than can be expected from the control unit with its 3 faders and the few other operator controls and display elements. INTELLIMIX® features - 14 audio inputs (analog and digital, incl. two analog microphone inputs with phantom power) - 5 audio outputs (mix, mix-minus-A, mix-minus-B, headphone, monitor; in addition all mix outputs are multiply analog/digital) - extensive editing and control capabilities. The software allows the settings of e.g. source selection, gain, EQ, monitor selection and a great number of other functions including interfacing to external logic. All settings are comprised to form a setup. Once your setup has been transferred to INTELLIMIX®, the operation of the accessible functions is very easy. Since a setup is stored in INTELLIMIX®’ non-volatile memory, INTELLIMIX® can operate completely independent. Also, you may store setups to SmartCard(s). When you plug a SmartCard with a stored setup into the control unit, INTELLIMIX® will give priority to the SmartCard settings. Thus, INTELLIMIX® may be completely reconfigured as quickly as possible without any PC. In addition, SmartCard allows a personalisation of settings. A working place may thus be configured just by a staff member plugging in “his/her” SmartCard. You may “create” setups on a working place equipped with a PC and “transfer” these settings to a lot of other working places that are not equipped with a PC. Setups may be transferred back into a PC from a SmartCard. They may be edited there and rewritten again. If you store your setup in your PC as a file, you may send setups by e-mail etc.. Work simply and properly on your - editorial station - cutting station - copying station - post-production / re-editing station - mobile commentary station ... and/or equip several workstations in your networked periphery in a technically demanding manner: to do so, INTELLIMIX® can even provide the capability of controlling digital routers. Of course, INTELLIMIX® is even the right thing for mobile applications (a special model for battery supply is available). INTELLIMIX® is equally at home in the analog and digital world. You do not require any external converters since INTELLIMIX® already provides versatile interface converters. In addition to the unique INTELLIMIX® operating approach, you may use the advantage of covering numerous application with one device: - no compatibility problems minimum staff training optimized service INTELLIMIX® Manual 2.21 Yellowtec 2002 Page 6 2 PRIOR TO BEGINNING 2.1 Manual conventions 2.1.1 Using the screen This manual was prepared, using Adobe Acrobat. To be able to use this manual, you must have Acrobat Reader 3.x or higher installed on your computer. Acrobat Reader is contained on the supplied CD-ROM. Follow the installation instructions from Adobe to install the Acrobat Reader. If you are not familiar with the use of Acrobat Reader, use the integrated Adobe online help. We recommend the screen use of this manual. The file name is: imx_manual.pdf Double click on the file symbol on your Windows PC to open the manual (the manual may also be started from the online help of the INTELLIMIX® configuration software). Activate the Navigation window and the View bookmark in Acrobat Reader. The left screen margin shows the table of contents and provides an overview of the entire document. Clicking on the Plus (+) and/or Minus (-) character you may decide how many sub-ordinated headline levels to be displayed. Using a mouse click on a headline directly calls the appropriate text. The part of the table of contents associated with the text which can be just viewed on the screen is highlighted. Thus, you may safely navigate through the document. Furthermore, the text contains numerous links. A link appears in blue colour and is underscored. Moving the mouse pointer over a link changes the pointer symbol to a pointing hand (hand with an extended forefinger). Now, click on the link to directly call the part of the text and/or the headline to which the link refers to. For quick navigation, Acrobat Reader provides convenient tools for paging, jumping backwards/forwards, toggling between the different View options etc.. Some links refer to our website (www.yellowtec.com). If your PC system is equipped appropriately, you may establish an Internet connection to our website by clicking on one of these links. 2.1.2 Printout Also, the manual can be printed out. The page layout is designed for the DIN A4 paper format. The detailed table of contents appears at the start of the document in the printout so that you are safely guided through the document even in the hardcopy version. If a printout is not made in colour, the links can be identified only by their underscores. Except for links, underscores are normally only used for special information such as Note: and/or Important: so that the links can also be identified in a black/white printout. INTELLIMIX® Manual 2.21 Yellowtec 2002 Page 7 2.2 Unpacking INTELLIMIX® is delivered in two separate cartons. Unpack the cartons carefully. The slipcase padding of foamed material for the control unit is fixed by an adhesive strip only and may be drawn off easily. Remember our environment and dispose of the parts of foamed material and the cartons separately. 2.3 Scope of delivery The INTELLIMIX® scope of delivery includes: 1. Base unit (19“ housing) 2. Control unit (on-desk control unit) 3. Interconnecting cable to the control unit (approx. 5m) 4. Interconnecting cable to the computer (RS232) 5. Bypass connector for microphone inserts (2 pieces) 6. Power supply cable (not for all countries) 7. Brief instructions “Prior to beginning” with CD-ROM (including configuration software and electronic user manual and YELLOWTEC SmartCard ® (1 piece) Please contact your dealer in case of questions. INTELLIMIX® Manual 2.21 Yellowtec 2002 Page 8 2.4 Safety instructions 1. 2. 3. 4. 5. 6. 7. 8. 9. 10. 11. 12. 13. 14. 15. 16. Before installation or operation of equipment read all safety instructions warnings and operating instructions. Heed all warnings on the equipment. Follow the operating instructions. Keep operating instructions for future reference. Never use the equipment in the immediate vicinity of water. Ensure that water or damp cannot get into the equipment. Only install or fit the equipment in accordance with the manufacturers recommendations. Ensure adequate ventilation when installing. Never install or fit the equipment in the immediate vicinity of sources of heat such as boilers, heating units and other equipment which generates heat. (Including amplifiers and other electronic equipment.) When connecting to a power supply ensure that it is the correct voltage and only use cables as specified by the manufacturer in the operating instructions, or, as shown on the connector panel of the equipment. Only connect the equipment to a legally approved, earthed, mains power supply. Position the power cable or cord in such a way that it cannot be walked upon or come into contact with any object or thing that could damage the cable or cord. Attention should be given to the point where the cable is attached to the equipment, and, where the cable connects to the approved supply. Ensure that foreign objects and liquids cannot get into the equipment. Only clean the equipment as recommended by the manufacturer. Disconnect the power cable or cord from the power supply if the equipment will be out of use for a prolonged period. In any situation where an incident occurs which could render the equipment unsafe, for example · Damage to the power cable or cord · Entry of foreign objects or liquids (including water) into the equipment · The equipment has been dropped or the casing has been damaged in any way · Any apparent change in performance have the equipment checked immediately by a person technically qualified to make such checks. Never carry out any work on the equipment other than as specified in the operating manual. INTELLIMIX® Manual 2.21 Yellowtec 2002 Page 9 3 GETTING STARTED WITH INTELLIMIX® 3.1 Electrical connection First of all, connect the INTELLIMIX® control unit to the base unit. Please use only the long interconnecting cable identified by control unit! Plug it to the lower side of the control unit and carefully thread it through the strain relief so that INTELLIMIX® can firmly stand on the table surface. Place the control unit such that the operator controls and display elements are accessible at a convenient angle. Now, connect the base unit to your local mains voltage. INTELLIMIX® is equipped with switch-mode power supply unit and may be operated with 90 to 240 V AC without the need to select. (Refer to the current information in http://www.yellowtec.com/ for the special version for a 12-24 V DC power supply unit). Always follow the local safety regulations! Also, read the safety information below! 3.2 Activation / Standby mode Now switch on the power for INTELLIMIX®, using the mains switch (on the rear side of the base unit). The displays will show the power-up process, and a lamp check will be performed. Your INTELLIMIX® is now ready for use with the parameters set in the factory. INTELLIMIX® can be switched to standby mode so that you can turn all functions off. To enter standby, press SHIFT and TALK simultaneously for approx. 4 seconds. The device will switch off. Use the same key combination for re-activating INTELLIMIX® (later, you may change these settings via the configuration software). Please note that power can only be removed completely from INTELLIMIX® by operation of the mains switch on the rear side of the base unit. In any case, unplug the mains plug before opening the housing! INTELLIMIX® Manual 2.21 Yellowtec 2002 Page 10 3.3 Preparation for the first operation For an implementation of a variety of outputs and inputs in the most confined space, sub-D connectors are used for most of the signals. For a first (test) operation you may normally manage without any cable adapter if you use the following inputs and outputs: Mic1 / Mic2 Headphones Line In 5 (digital) Line In 6 (analog) Mix Out (analog) XLR sockets on the front panel. 6.3mm stereo jack on the front panel TOS link optical connector on the back panel can be transferred by the software to SP-DIF/cinch on the back panel Stereo cinch inputs on the front panel (unsymmetrical consumer format) Cinch outputs on the front panels (unsymmetrical consumer format) The other signals (process professional formats, analog symmetrical studio level, digital AES/EBU) are connected via sub-D connectors. Do not hesitate to contact us if you require cable adapters. We have adapters for the common connectors on stock or manufacture them according to your specifications. Important: Make sure that the bypass plugs are plugged into the microphone inserts (back panel) if you do not wish to connect a device to the inserts. Otherwise, the flow of signals will be interrupted. Also refer to microphone inserts). Refer to the INTELLIMIX® PinOut table for an assignment of the connectors for connecting audio signals and control signals. INTELLIMIX® Manual 2.21 Yellowtec 2002 Page 11 3.4 First operation Now, you may work with audio signals. INTELLIMIX® provides a non-volatile memory and will restore the setup stored last during activation. The monitor volume is transferred to a defined state on activation for reasons of safety. After a power-up, the three displays will show the labels of the selected sources. Now, make your first attempts! Turning a Source Selector/PFL rotary button steps you through the available sources (only when fader is in the off-position). The labels can later be adapted to your personal requirements with the configuration software! All three channels are entirely identical, and there are no predefined microphone or line channels. Pressing Source Selector/PFL activates PFL (prefade listening) The Source display will flash to indicate this status. Press the Monitor control rotary button for a switchover between listening via monitor (loudspeaker) output or headphones output. The Speaker/Headphone indicator indicates this selection. You may also shift the supplied YELLOWTEC SmartCard ® once into the Card slot to see how simply your personal setup is called up. IMPORTANT: Proceed as follows when sliding in the SmartCard … INTELLIMIX® Manual 2.21 Yellowtec 2002 Page 12 The following figures show connecting examples for the first operation. Input for MiniDisk (or any other external audio source) Optical cable (to connect equipment with optical output connection) Connection example SPDIF Cable Refer to the chapter BASE UNIT in this manual for detailed information on the inputs/outputs and connector assignments and for information on the technical data and the socket assignments. INTELLIMIX® Manual 2.21 Yellowtec 2002 Page 13 3.5 Starting the configuration software quickly 3.5.1 Connection to the computer You may use the INTELLIMIX® configuration software to create setups of your own for INTELLIMIX® on your PC. First of all, establish a connection between your PC and INTELLIMIX®. Use the short enclosed interconnecting cable. Use the connector 9 (RS232) on the base unit and a free serial interface on your PC. Connection between Intellimix Base Unit and Laptop/PC INTELLIMIX® Manual 2.21 Yellowtec 2002 Page 14 3.5.2 Installing the software To do so, a PC with Windows 95 or higher is required. 3.5.2.1 Installing the CD-ROM Insert the CD-ROM into the drive and start the (INSTALL.EXE) installation routine. The software will guide you conveniently through the installation process. All required data is copied to your computer. No parameters of your computer will be modified. Note: For trouble free operation you need at least the following elements: - IMX.EXE IMXVxxx.IMU IMX.HLP IMX.CFG 3.5.2.2 configuration software firmware for base unit (xxx stands for version number) help file for online-help configuration file for first program start (strongly recommended, but not absolutely necessary) Installation as an update Please refer to our website http://www.yellowtec.com/ for the latest INTELLIMIX® software version for a download at no cost. Read UPDATING INTELLIMIX® for questions concerning updates, describing how to find out the version number of the software you use. Never perform an update without refering to UPDATING INTELLIMIX® first. (See Chapter TECHNICAL DRAWINGS/DESCRIPTIONS) Note: For trouble free operation you need at least the following elements: - IMX.EXE IMXVxxx.IMU IMX.HLP IMX.CFG configuration software firmware for base unit (xxx stands for version number) help file for online-help configuration file for first program start (strongly recommended, but not absolutely necessary) INTELLIMIX® Manual 2.21 Yellowtec 2002 Page 15 3.5.3 First steps Start the IMX.EXE program. (The short-cut automatically generated by the installation routine for the IMX.EXE program is named Intellimix.) Starting the program causes the configuration software to search for a connected INTELLIMIX® at the serial interfaces of your PC. If no INTELLIMIX® is found, the following dialog will appear (the text may vary depending on the PC). Clicking on the YES button starts the configuration software offline. In the offline mode you may, for example, edit setups stored in your PC and store them again. In addition, this mode is suitable for a familiarisation or for demonstration purposes. If you wish to work with INTELLIMIX®, click on NO and check the connection between INTELLIMIX® and the PC. Then, restart the configuration software. If a connected INTELLIMIX® is found, the configuration software will be called up directly, and the following window opens: The configuration software provides a password protection. The password in the delivery state is imx. Enter imx and click on OK INTELLIMIX® Manual 2.21 Yellowtec 2002 Page 16 The graphical user interface of the configuration software provides 4 menus and 6 pages in a register card format. The 4 menus provide the Basic functions, and the 6 pages in the register card format allows parameter settings for INTELLIMIX®. Take your time to view the user interface of the software. Most of the settings are self-explaining. Settings are performed with the mouse or via the keys. Attempt to modify the settings. As long as the Save to Unit command is not selected, your settings will not be transferred to INTELLIMIX®. To return to the basic settings, you may exit and restart the program at any time. The software provides a context sensitive online help which can be called up by pressing the function key F1. Read the Tips on online help at the start of the help text. All functions are explained clearly on the online help. The SOFTWARE chapter in this manual details all functions and settings. The software (and/or the update) includes the imx.cfg file. During the start the configuration software refers to the default settings stored in this file (the file must be in the same folder as the configuration software). We recommend, especially if you are not well familiar with the configuration software, the use of these basic settings as the starting base for your setup to avoid malfunctions by wrong or missing entries. All labels for a selection of the input sources have values which allow a simple assignment: - Microphone inputs with a text „MIC1“ „MIC2“ „MIC1+2“ - All other inputs numbered from 1...12 with the addition “A” for analog or “D” for digital - Inputs 5 and 6 with the addition “co” for consumer format. The default source selection has been tailored for a first test operation which can normally be performed without any cable adapter: Fader 1: Microphone 1 (XLR input on the front panel) Fader 2: Input 5, digital consumer format, preset to TOS link optical (TOS link connector on the back panel) Fader 3: Input 6, analog consumer format (cinch connector on the front panel) Monitor: Mix signal for listening Note: Depending on the software version, other basic settings may be provided in the delivery state. IMPORTANT: When working with the configuration software, be aware that your settings are not transferred to INTELLIMIX® unless the Save to Unit command has been selected. INTELLIMIX® Manual 2.21 Yellowtec 2002 Page 17 4 CONTROL UNIT 4.1 Fader INTELLIMIX® provides three 100mm faders. The identification in the upper third can be used as a 0dB reference. The control range from the identification to the maximum setting is approx. 8 dB. In addition to the level setting, INTELLIMIX® also uses the fader setting to evaluate a switching function (Fader Start) at the lower fader end (off-) position. This is displayed by the Fader Start indicator and available for internal controls: Refer to ON-AIR Logic. Refer to Trigger Outputs for external controls. Other setting options linked to the fader: PFL (Prefade Listen) 4.2 Fader Start indicator Each fader includes a Fader Start indicator in the form of a red LED at the lower fader end (Off-) position. It will light up if the respective fader is not in its Off position. As described under Fader, INTELLIMIX® will evaluate the fader position for the Fader Start function. Refer to Fader for an explanation and the links. INTELLIMIX® Manual 2.21 Yellowtec 2002 Page 18 4.3 Source Selector / PFL Each fader includes a Source Selector in form of a rotary transducer with a pushbutton function. Turn the Source Selector to select the desired input source for the respective channel. Note: The Source Selector function will only by active when the fader is in its Off position to protect the Source selection against an inadvertent misadjustment during the current operation. Keeping the Shift key pressed while the Source Selector is turned changes its function. Now, select the mode for the stereo channel (stereo/mono/L/R) or the balance for the mono channels. Refer to the options for Stereo fader (balance). Optionally, you may control other parameters. Refer to Source Selector with Shift. Other topics linked to the Source Selector: Disable Source Selection, Default Source, Source/Status Display, Shift (Application Level-2) Press the Source Selector and activate PFL (Prefade Listen) which is shown by a blinking of the Source/Status display. The Pushbutton function may also be used for external controls. Refer to Trigger Outputs. 4.4 Level indicator Each fader includes a level indicator. This LED chain is normally used as a level trend display. Refer to Level Indicator for explanations and options. It is also used as a trend display for the optional Balance and Input Trim Source Selector functions. Refer to Source Selector with Shift. Here, the LED under the arrow in the middle is used as a “zero position”. 4.5 Source/Status display Each fader includes a Source/Status display. This 4-digit alphanumeric display normally shows the selected source. Refer to Label. Keeping the Shift button pressed displays the Shift function of the Source Selector, i.e. stereo/mono/L/R, panorama or balance. The display changes to the blinking mode once PFL (Prefade Listen) is selected. Refer to Display for the options. INTELLIMIX® Manual 2.21 Yellowtec 2002 Page 19 4.6 Attention indicator Each fader includes an Attention indicator, an LED beside a warning triangle symbol. It lights up to draw your attention to unusual settings or settings deviating from the zero position. It can be deactivated as required. Refer to Display for the functions and options. 4.7 Out Of Phase indicator Each fader includes an Out Of Phase indicator in the form of an LED with a phase symbol (circle with a dash). INTELLIMIX® evaluates the phase angle of stereo signals and will signalise “out-of-phase”. The display can be deactivated as required. Refer to Display for the functions and options. 4.8 Monitor Control Turning monitor control sets the listening volume of INTELLIMIX®. Pressing the button toggles between the monitor output and the headphone output. Refer to SmartLevel Monitoring Level DIM-Level Option for Headphones for the respective settings. Turning monitor control while the Shift key is pressed allows a selection of the monitor source. Refer to Disable Monitor Selection for the settings. 4.9 Monitor Source display This 4-digit alphanumeric display shows the selected source. Refer to Label. Refer to Flash Monitor Display for the options. 4.10 Speaker/Headphone indicator Two LEDs beside the respective symbols show whether the headphone output or the monitor output (for connecting the loudspeaker amplifier) has been selected. The LED assigned to the monitor output will be blinking if this output has been selected, but is muted. Refer to PFL Options for Loudspeakers PFL Options for Headphones Option for Headphones for the settings. INTELLIMIX® Manual 2.21 Yellowtec 2002 Page 20 5 BASE UNIT 5.1 Front panel The INTELLIMIX® front panel only contains elements which are useful for the user for a direct access. 1. 2. 3. 4. 5. 6. 7. 8. 9. 10. Headphone connection, stereo jack, 6.3mm Mic 1 input, XLR, 3-pin Mic 2 input, XLR, 3-pin Line In 6 Left, cinch Line In 6 Right, cinch Potentiometer for setting the input amplification for the line in 6 inputs Mix Out Left, cinch Mix Out Right, cinch Green Status LED, signalising readiness of operation, blinking in the Standby Mode Red Reset LED, signalising the Reset mode or a malfunction. Refer to the INTELLIMIX® Pinout Table for the connections and the exact pin assignments. Refer to Technical Data for the connection specifications. INTELLIMIX® Manual 2.21 Yellowtec 2002 Page 21 5.2 Back panel 5.2.1 Power supply A. Mains inlet connector B. Mains switch Refer to the Safety information and the information on the electrical connections (special instructions are enclosed for the special version with a 12 – 24 V DC power supply). 5.2.2 Inputs/Outputs 1. Monitor/External ... (25-pin. sub-D, analog audio: Monitor Out, Mix Out, External In; digital audio: Mix Out, External In) 2. Line In 7 / Out (15-pin. sub-D, analog audio: Line In 7 / Mix Out) 3. Line In 9 (9-pin. sub-D, analog audio: Line In 9) 4. Mix Minus A (9-pin. sub-D, analog audio, digital audio: Mix Minus A Out) 5. Mix Minus B (9-pin. sub-D, analog audio, digital audio: Mix Minus B Out) 6. Insert Mic 1 (9-pin. sub-D, analog audio: Mic 1 Insert Send/Return) jumper plug required! 7. Insert Mic 2 (9-pin. sub-D, analog audio: Mic 2 Insert Send/Return) jumper plug required! 8. Line In 5 (cinch socket, digital audio: Line In 5) 9. RS232 (9-pin. sub-D) serial interface for a computer connection 10. Control In/Out (25-pin. sub-D, logic signal) Trigger In/Out; GPI/GPO-Ports 11. Line In 8 / Out (15-pin. sub-D, analog audio: Line In 8 / Mix Out) 12. Line In 10 (9-pin. sub-D, analog audio: Line In 10) 13. Line In 1 / Out (9-pin. sub-D, digital audio: Line In 1 / Mix Out) 14. Line In 2 / Out (9-pin. sub-D, digital audio: Line In 2 / Mix Out) 15. Line In 3 / Out (9-pin. sub-D, digital audio: Line In 3 / Mix Out) 16. Line In 4 / Out (9-pin. sub-D, digital audio: Line In 4 / Mix Out) 17. Line In 5 (TOS-Link optical socket, digital audio: Line In 5) 18. Remote (9-pin. sub-D) serial interface for a control unit connection All sub-D type connectors are receptacles (female connectors). Refer to the Software > General Options 1 > Select Input Line #5 for the connectors 8 and 15. Refer to the INTELLIMIX® Pinout Table for all connections and the exact pin assignments. Refer to the Technical Data for the connection specifications. INTELLIMIX® Manual 2.21 Yellowtec 2002 Page 22 5.3 Technical data Number of inputs 14 Microphone inputs 24 Bit A/D, adjustable Gain +70 to -20 dB by 1 dB steps, (2 x) Input Impedance >5 k ohms (balanced), individual 48V Phantom Power, Patch Points @ 4/6 dBu Analog Line inputs 24 Bit A/D, adjustable Gain +20 to -20 dB by 1 dB steps, (5 x Stereo, balanced) Input Impedance >8kohms (balanced), Nominal Level +4/6 dBu Analog Line outputs 24 Bit A/D, adjustable Gain +20 to -20 dB by 1 dB steps, (1 x Stereo, unbalanced) Input Impedance >10 k ohms (unbalanced), Nominal Level -11 to +9 dBu adjustable on Base Unit Front Panel Digital Line inputs Adjustable Gain +20 to -20 dB by 1 dB steps, (5 x AES/EBU) Input Transformer Impedance 110 ohms (AES/EBU), individual SRCs Digital Line outputs Adjustable Gain +20 to -20 dB by 1 dB steps, (1 x SPDIF by software Input Impedance 75 ohms (SPDIF), SRC selectable to TOS Link) Analog stereo outputs 24 Bit D/A, Output Impedance <40 ohms (balanced), (all designed identical, max. Level +15 dBu (+9 dBu for RCA) incl. Patch Points) Digital stereo outputs Output Transformer Impedance 110 ohms (AES/EBU) individual SRCs Frequency response 20 – 20.000 Hz ±0.5 dB Sample rate Internal 48/44.1 kHz or External Sync incl. Varispeed Serial interface for the configuration software RS232 @ 19.2 Kbit/s Electrical connections 90 – 260 Volts AC, 50/60 Hz, typical <20 Watts Weight Base Unit 3.9 kg / Control Unit 1.2 kg Further information The drawing “block diagram” gives you a detailed overview about the technical structure of ® INTELLIMIX . See Chapter TECHNICAL DRAWINGS/DESCRIPTIONS > block diagram INTELLIMIX® Manual 2.21 Yellowtec 2002 Page 23 5.4 Information on the connections 5.4.1 Trigger outputs (GPOs) The outputs are of the OPEN COLLECTOR type. If the output is active it will switch to 0V and has a high resistance in an inactive state. Only connect loads whose current is limited to max. 50mA and whose voltage is in the range from 0V...30V. INTELLIMIX® makes available the auxiliary voltages 5V and 12V for simple control applications. These voltages can be used for such purposes with restrictions. IMPORTANT: Max. 100mA may be taken from the auxiliary voltages. Do not use these auxiliary voltages to control loads which might return noise to the device. Do not transmit these auxiliary voltages over long cable ways. IMPROPER HANDLING OF THE AUXILIARY VOLTAGES OR A SHORT CIRCUIT MAY RESULT IN FUNCTIONAL FAULTS AND DAMAGES TO YOUR INTELLIMIX® OR THE CONNECTED DEVICE. ® Connection examples you find on the drawing Connection of INTELLIMIX GPI/GPO in the chapter TECHNICAL DRAWINGS/DESCRIPTIONS 5.4.2 Trigger inputs (GPIs) The inputs are C-MOS compatible. If the input is to be activated the connection to 0V must be established, or a voltage lower than +1V must be applied. If the input remains open or a voltage between +3.5V … +12V is applied, the input will not be active. IMPORTANT: Only voltages within the range from 0V … +15V must be applied. NON-COMPLIANCE WITH THE ADMISSIBLE INPUT VOLTAGE MAY RESULT IN FUNCTIONAL FAULTS AND DAMAGE TO YOUR INTELLIMIX® OR THE CONNECTED DEVICE. ® Connection examples you find on the drawing Connection of INTELLIMIX GPI/GPO in the chapter TECHNICAL DRAWINGS/DESCRIPTIONS 5.4.3 Microphone inserts First of all, the microphone input signals are transmitted from the XLR connectors to an analog, digitally controlled preamplifier. Then, the signals are transmitted from the output of this amplifier to the insert connectors on the back panel. If required, you may insert analog equipment. The signals will then be transmitted from the insert to the AD converter. IMPORTANT: Always make sure that the insert bypass connectors are plugged in if the inserts are not used. The signal path will be interrupted if the insert connectors are open. INTELLIMIX® Manual 2.21 Yellowtec 2002 Page 24 6 SOFTWARE 6.1 Program start Start the IMX.EXE program. (The short-cut automatically generated by the installation routine for the IMX.EXE program is named Intellimix.) During the start of the program the configuration software searches for a connected INTELLIMIX® at the serial interfaces of your PC. If no INTELLIMIX® is found, the following dialog will appear (the text may vary depending on the PC). Clicking on the YES button starts the configuration software offline. For example, you may edit your setups already stored in your PC and store them again in the offline mode. In addition, this mode is useful for a familiarisation or demonstration purposes. If you wish to work with INTELLIMIX®, click on NO and check the connection between INTELLIMIX® and the PC. Then, restart the configuration software. If a connected INTELLIMIX® was found, the configuration software is called up directly, opening the following window: The configuration software provides a password protection. The password is imx in the delivery state. Enter imx and click on OK INTELLIMIX® Manual 2.21 Yellowtec 2002 Page 25 6.2 Menu: File 6.2.1 Submenu: New Select new for creating a new configuration (= Setup). If a configuration has already been opened, it will be closed by the program. If a new configuration is created, the values stored in the imx.cfg default configuration file will be loaded as output settings. Note 1: Since the current configuration is closed during a selection of New, do not forget to save modifications before (> Save; > Save as). Note 2: The imx.cfg configuration must be in the same folder as the configuration software. Otherwise, the new configuration will be created without values or with random values. If you are not familiar with the software, we strongly recommend the use of the default configuration as the basic setting for your own configurations. 6.2.2 Submenu: Open Use this submenu to open an existing configuration file in the imx format (*.imx). The normal Windows dialog will appear for finding this file. 6.2.3 Submenu: Save Save the current configuration. If this configuration is saved for the first time, the “Save as …” The normal Windows dialog will appear. Enter a name for the configuration and determine the storage location. 6.2.4 Submenu: Save as Entering this command causes the Save as… The normal Windows dialog will appear. Enter a name for the configuration and determine the storage location. Note: Use this command to save a configuration under several names or to different storage locations. INTELLIMIX® Manual 2.21 Yellowtec 2002 Page 26 6.2.5 Submenu: Change Password INTELLIMIX® provides a password protection for the configuration software. You will be prompted to enter a password during each start of the program. !!! The password is imx in the delivery state !!! Use the Change Password command to change the password. Once your new password is entered, you must confirm it by a repeated entry. If you wish to use INTELLIMIX® without any password, leave the two entry lines in the Change Password window blank. A password will no longer be asked from the next program start. 6.2.6 Submenu: Exit Exits the configuration software. Do not forget to save modifications to the current configuration before. INTELLIMIX® Manual 2.21 Yellowtec 2002 Page 27 6.3 Menu: Unit 6.3.1 Note The functions in this menu refer to the data exchange between INTELLIMIX® and the PC. If the configuration software cannot find a link to an INTELLIMIX® during the start, these functions will not be available, and the menu shows grey colour. If required, establish a connection between INTELLIMIX® and the PC. Restart the configuration software. (Refer to Computer connection) 6.3.2 Submenu: Save to Unit This command transfers the parameters set in your configuration software to INTELLIMIX®. Your configuration will be saved in the internal non-volatile INTELLIMIX® read-only memory. The data saved before will be overwritten. Note: If no SmartCard is plugged on the control unit, the transferred settings will be activated at once. If a Smart Card has been plugged in, the configuration stored there will have priority, and the transmitted settings will not be activated until the SmartCard is drawn. 6.3.3 Submenu: Load from Unit Loads a configuration stored in the non-volatile INTELLIMIX® read-only memory to the configuration software where it can be edited and reloaded, if required. Also, the configuration may be saved as a file and/or to SmartCard. 6.3.4 Submenu: Save to SmartCard Saves your current configuration to the SmartCard plugged to the control unit. Note 1: Not all parameters may be saved on the SmartCard (refer to Saving Parameters) Note 2: Your configuration is saved independently of the settings in SmartCard (General Options 1) 6.3.5 Submenu: Load from SmartCard Loads a configuration from the SmartCard to the configuration software where it can be edited and reloaded, if required. Also, the configuration may be saved as a file or to other SmartCards. INTELLIMIX® Manual 2.21 Yellowtec 2002 Page 28 6.4 Menu: Firmware Update 6.4.1 Note 1 The function in this menu refers to a data exchange between the INTELLIMIX® and the PC. If the configuration software has no link to an INTELLIMIX® during the start, this function will not be available, and the menu shows grey colour. If required, establish a connection between INTELLIMIX® and the PC and restart the configuration software. 6.4.2 Note 2 Refer to UPDATING INTELLIMIX® in this manual (Chapter TECHNICAL DRAWINGS/ DESCRIPTIONS) for detailed update instructions. Refer to our http://www.yellowtec.com website for the current state. We strictly recommend a firmware update only after these update instructions in UPDATING INTELLIMIX® have been read completely. 6.4.3 Firmware update instructions The software and the firmware have been matched. If new software is used, strictly load the associated firmware to your base unit. Select Firmware Update. INTELLIMIX® Manual 2.21 Yellowtec 2002 Page 29 A warning text will appear in the Update window for your safety. Note: The transmission of improper or faulty data or interruptions during the data transmission to the base unit may result in permanent inoperability of INTELLIMIX®. In this case the device can only be set to operation by the manufacturer. Enter the file name (see below) of the new firmware to be transmitted into the text line, e.g. IMXV999.IMU (this designation is only an example). If the firmware is in the same folder as the active configuration software the entry of the file name will suffice. If the firmware is not in the same folder as the active configuration software, enter the complete path, e.g. C:\Yellowtec\Software\IMXV999.IMU (only an example). Click on the YES button if you are sure that your entries are legal. The transmission is displayed (window: Processing...) Never interrupt this process. INTELLIMIX® Manual 2.21 Yellowtec 2002 Page 30 6.5 Menu: Help 6.5.1 Submenu: Help F1 Selecting this submenu calls the online help. Instead, you may press the F1 key. 6.5.2 Submenu: About Calls the Info window, displaying the software and firmware version numbers. Software: Configuration Software ... (the first 3 digits with a period behind the first digit prevail, e.g. 2.21) Firmware: IMX Base Unit Software ... IMPORTANT: The information will only be updated during the start of the configuration software. If you wish to check the version number after a firmware update, exit the configuration software. Restart it and open the Info window. Here, you will find our contact and web address in addition to the exact product designation. Note: On start-up, the displays of the INTELLIMIX Control-Unit show for a short time a default reading, e.g. „IMX Ver. 1.07 2000“ (just an example). This reading is not related to the version numbers of Configuration-Software or Firmware. The reading only relates to the functionalitiy of the Control-Unit which cannot be changed or updated. INTELLIMIX® Manual 2.21 Yellowtec 2002 Page 31 6.6 Window: I-O Options 6.6.1 Column: Input Description This column lists all input sources which are accesible to each fader. The terms used here serve as a unique assignment. They are also used in the INTELLIMIX® PinOut Table and as an imprint above and/or below the connectors of the base unit. In addition, the physical format of the input is specified (digital, analog, AES/EBU, balanced, etc.). The last three entries designate the internal sums Mix Out , Mix minus A and Mix minus B. They are only available for the monitor selection. Special case MIC1+2 as Stereo: This function allows the control of MIC1 and MIC2 as a stereo signal with a single fader. Refer to TIPS, chapter user information MIC1+2 as Stereo. INTELLIMIX® Manual 2.21 Yellowtec 2002 Page 32 6.6.2 Column: Label Enter a unique name for the input sources you use into the Label entry field. Your name may have a maximum of 4 characters (letters or numbers). For that, the limited alphanumeric character set of the display is available in upper and lower case. Note 1: We recommend labelling all inputs uniquely or retaining the default values (from the first program start). When selecting an input which is not provided with a label, the Source Display will remain dark. Then, a unique assignment will no longer be possible. In addition, the label identifications are used for the Default Source and the Trigger Output selection. Note 2: Not all ASCII characters can be displayed. 6.6.3 Column / window: Input Setup The buttons in this column allow an access to the Input Setup window to set Input Gain, Phantom Power, SubSonic Filter, EQ and the Shift Function. The set value of Input Gain is shown on the button for brief information. If MIC1+2 as Stereo is used, refer to TIPS, chapter user information MIC1+2 as Stereo. INTELLIMIX® Manual 2.21 Yellowtec 2002 Page 33 6.6.3.1 Range: Input Gain (Phantom Power) The input gain for the microphone inputs can be set from –20dB ... +70dB, and the setting range for the line inputs is from –20dB...+20dB. To modify the gain, click on the controller symbol with the mouse and use the Cursor Up or Cursor Down key in 1 dB steps to control the desired value. Alternatively, you may also click on the controller symbol and move the mouse to the left or right side while the left mouse button is pressed. The selected gain is then displayed in dB. If the selected input is one of the microphone inputs, a checkbox for Phantom Power 48V will be shown below the gain controller symbol. Activate the 48V Phantom supply for condenser microphones which require 48V phantom powering. Note: Before activating the 48V Phantom supply, check whether the connected microphone and/or headset is designed for this mode. WARNING: In the case of mismatches your microphone and/or headset may be damaged. 6.6.3.2 Range: SubSonic Filter Clicking on the checkbox activates the SubSonic filter. Frequencies below 80Hz are attenuated in order to suppress low-frequency noise or interference. This may be caused by the speaker (e.g. so called plops when the consonant “P” is pronounced) or may enter the microphone from the environment of the speaker (e.g. as subsonic noise or as parasitic noise of an air-conditioning system). 6.6.3.3 Range: EQ Adjust Use this field to set the EQ parameters. Enter a sound accent for the input signals or compensate flaws. To this effect, use the extensive setting capabilities: First off all, determine the characteristic in the pulldown menu: - Bell or - Shelving High or - Shelving Low or - Notch Below, there is the setting button for - Gain. The setting range is from –15dB ... +15dB in 1 dB increments. Use the mouse to click on the controller symbol and control the desired value, using the Cursor Up or Cursor Down key. Alternatively, you may click on the controller symbol and move the mouse to the left and right side while the left mouse button is pressed to set the desired value. Proceed similarly for the setting of - Frequency, the setting range is from 22Hz ... 18kHz in 60 increments and; - Quality (e.g. Bandwith), the setting range is from 0,1 ... 3 octaves in 30 increments. Note: If Notch is selected, the notch is permanently set to the maximum attenuation. Gain control is not possible. The EQ ON symbol shows red colour when the gain setting is higher or lower than 0dB. Note: The EQ ON symbol also shows red colour when the EQ Gain is selected under the SourceSelector with Shift function. INTELLIMIX® Manual 2.21 Yellowtec 2002 Page 34 6.6.3.4 Range: Source Selector with Shift Adjust the operating capabilities on the control unit according to your needs. Keeping the Shift button pressed makes available a second function level while the Source selector is turned. Select among three alternatives: Standard - controls the L R Panorama for microphone inputs - selects between the Stereo/Left/Right/Mono modes for stereo inputs - controls the L R balance for stereo inputs if Balance was selected from the Personal Parameters under Option for Stereo Fader. Note for L R balance: This control is intended for a compensation of L-R level inequalities. Turning the input selector clockwise decreases the level of the left channel by 0.25dB per step and increases the right channel by 0.25dB. This process is reversed for a rotation counterclockwise. The control range is +/-5dB and/or 41 steps. Input Trim Allows a direct access to the Input Gain which is normally permanently set in the Input Setup window. The control range of the Trim function is +/- 15 dB. EQ Gain Allows a direct access to the EQ-Gain which is normally set permanently in the Input Setup window under EQ Adjust. The value set in the EQ Adjust window is accepted and then changed by turning the Source Selector. Note 1: Settings performed with the Source Selector while the Shift key is pressed cannot be saved. Note 2: An access to the second functional level can be disabled. Refer to Personal Parameters > Shift (Application Level-2). 6.6.4 Column: Disable Source Selection Turning the Source Selectors allows an assignment of any source to each fader. Double assignments will be suppressed. If a source has already been selected, it is no longer available to the the other Source Selectors. Clicking on one or more Disable Source Selection checkboxes excludes the appropriate input source(s) from selection, i.e. this source will be skipped when the Source Selectors are turned. Use this setting if - not all input sources are used and you wish a clear user interface - you wish to prevent the adjusted setup from accessing certain sources. All other parameters assigned to this source are retained. Note: In factory default condition access to the function MIC #1+2 as Stereo is disabled. Please refer to the corresponding section(s) of the user manual in case you want to use MIC#1+2 as Stereo. INTELLIMIX® Manual 2.21 Yellowtec 2002 Page 35 6.6.5 Column: Disable Monitor Selection ® INTELLIMIX provides an integrated monitor matrix which offers comprehensive monitoring facilities. Generally, all inputs can be selected for monitoring. In some applications, however, you may want to restrict the selection in the interest of operational safety. Clicking on one or more of the Disable Monitor Selection checkboxes excludes this (these) source(s) from the monitor matrix selection. Turning the monitor control button on the control unit while the Shift key is pressed skips the excluded sources. Use these settings if - not all input sources are used. - only certain input sources are used for direct monitoring. - the current setup must be prevented from accessing certain sources. Note 1: The exclusion of a source from the monitor matrix does not mean that this source cannot be selected as an input signal. Note 2: The monitor matrix also gives access to the microphone inputs for checking. For technical reasons MIC#1 appears on the right monitor channel and MIC#2 on the left monitor channel. Note 3: In factory default condition access to the function MIC #1+2 as Stereo is disabled. Please refer to the corresponding section(s) of the user manual in case you want to use MIC#1+2 as Stereo. 6.6.6 Column: Always Mono In case you wish to use certain inputs permanently with a mono source (i.e. ANG) it may be useful to select the Always Mono function. ® Sources with Always Mono selected will be processed by INTELLIMIX as a mono signal and can no ® longer be used as a stereo signal individually (on the INTELLIMIX Control Unit). Only the signal of the left input will be processed. Sources not defined as Always Mono are still available for individual mono settings on the Control Unit: Turning the source selector of the corresponding channel while pressing the Shift button you can select the modes Stereo, Left, Right and Mono. (But it is not possible to save values entered by turning the source selector knob with the shift button held down.) Note: Please note that the Level Indicator always shows the input signal(s), independently of the fact whether only the left or right channel is transmitted. 6.6.7 Column: Flash Monitor Display You may wish that the monitor display should show the characters in a blinking manner for a selection of certain sources. This function which is designed as a warning or reminder can be selected in the Flash Monitor Display checkbox. If, for example, Mix is used as the normal monitoring source and input sources are only briefly selected for checking purposes use Flash Monitor Display to mark the input sources. The blinking speed can be set (refer to Personal Parameters > Display). INTELLIMIX® Manual 2.21 Yellowtec 2002 Page 36 6.7 Window: Control Logic 6.7.1 Range: Trigger Outputs INTELLIMIX® provides 12 trigger outputs (GPOs). The trigger outputs allow commands to be send to other devices, or signal lamps, relays, optocouplers etc. to be triggered. Select one of the functions available in the Trigger pulldown menu for each output. A variety of logic combinations with external applications will result. Refer to the Trigger Output Functions list below for the available functions. Note: Sometimes it may be useful to use a trigger output as a feed for a trigger input (refer to Trigger Inputs) of the same device to obtain a certain combination. Select the signal shape (e.g. Pulse or Tally) suitable for your application in the Action pulldown menu. Refer to the Trigger Output Actions list below for the available signal shapes. Also refer to: Technical data and connection information, trigger outputs (GPOs) INTELLIMIX® Manual 2.21 Yellowtec 2002 Page 37 6.7.1.1 Trigger Output Functions List of the functions in the Trigger pulldown menu. Disable disables a control function on this output. Fader start generates a fader start control signal. The Fader Start signal for the selected source is always applied to this output, independently of the fact on which channel of the INTELLIMIX® control unit this source is used. ON AIR Logic This function provides a control signal for red light on the output. If a microphone fader is open, this output will be active. Refer to: General Options 1 > ON-AIR Logic Upper Button activates the control output when the SHIFT key is pressed. Lower Button activates the control output when the TALK key is pressed. Upper + Lower Button activates the control output when the TALK key is pressed and the SHIFT key is kept pressed at the same time. Refer to: Shift + Talk Button Increment #1 activates the control output when the Source Selector/PFL 1 is pressed. Increment #2 activates the control output when the Source Selector/PFL 2 is pressed. Increment #3 activates the control output when the Source Selector/PFL 3 is pressed. Increment #4 activates the control output when Monitor Control is pressed. PFL On activates the control output if PFL is active on any channel. Attention #1 activates the control output when the attention indicator 1 lights up (warning triangle) Attention #2 activates the control output when the attention indicator 2 lights up (warning triangle) Attention #3 activates the control output when the attention indicator 3 lights up (warning triangle) Attention #1#2#3 activates the control output when one or several attention indicators light up (logic OR) Out-of-Phase #1 activates the control output when the Out Of Phase 1 indicator 1 lights up. Out-of-Phase #2 activates the control output when the Out Of Phase 2 indicator 1 lights up. Out-of-Phase #3 INTELLIMIX® Manual 2.21 Yellowtec 2002 Page 38 activates the control output when the Out Of Phase 3 indicator 1 lights up. Out-of-Phase #1#2#3 activates the control output when one or several Out Of Phase indicators light up (logic OR). 6.7.1.2 Trigger Output Actions List of the signal shapes in the Action pulldown menu. Tally the control signal is active during the entire function duration. Pulse On activating the function generates a pulse. The pulse width can be set in Pulse Duration. Pulse Off terminating this function generates a pulse. The pulse width can be set in Pulse Duration. Pulse On/Off activating and deactivating the function generates a pulse. The pulse width can be set in Pulse Duration. 6.7.2 Range: Pulse Duration Adjust the pulse duration for all trigger outputs (if pulse action is selected) in this pulldown. Available time constants are: - 50 ms - 100 ms - 1000 ms 6.7.3 Range: Trigger Inputs INTELLIMIX® provides 8 trigger inputs (GPIs). The trigger inputs allow commands to be received from other devices to initiate actions and/or functions in INTELLIMIX®. Thus, certain functions of your INTELLIMIX® may be “remote controlled”. Select one of the functions available in the Action pulldown menu for each input. A variety of logic combinations with external applications will result. Refer to the Trigger Input Actions list below for the available functions. Note: Sometimes it may be useful to use a trigger output (refer to Trigger Outputs) as a feed for a trigger input of the same device to obtain a certain combination. Also refer to: Technical data and connection information, trigger inputs (GPIs) 6.7.3.1 Trigger Input Actions List of the actions and/or function in the Action pulldown menu Disabled ignores a control signal on this input Monitor Mute mutes the INTELLIMIX® monitor output Monitor Dim attenuates the INTELLIMIX® monitor output (according to the Dim Level setting in the Personal Parameters) INTELLIMIX® Manual 2.21 Yellowtec 2002 Page 39 Monitor Line In #11 (DIM) attenuates the selected monitor signal and adds the Line In #11 input Monitor Line In #12 (DIM) attenuates the selected monitor signal and adds the Line In #12 input Monitor Line In #11 replaces the selected monitor signal with the Line In #11 input signal. Thus, it is possible to send a signal (e.g. from a communication unit) to the monitor path by an external control signal. Monitor Line In #12 replaces the selected monitor signal with the Line In #12 input signal. Thus, it is possible to send a signal (e.g. from a communication unit) to the monitor path by an external control signal. Loudspeak Pulse activates a listening via monitor (loudspeaker) output (Toggle mode). The monitor toggle on the control unit remains active. Headset Pulse activates a listening via headphones (Toggle mode). The monitor toggle on the control unit remains active. Monitor Tally activates the listening via the monitor (loudspeaker) output or headphones output and retains this status. The monitor toggle by pressing monitor control is ignored. Switch Unit to Standby switches INTELLIMIX® to standby (Toggle mode). INTELLIMIX® may be activated again on the control unit. Switch Unit On switches INTELLIMIX® on (ON). INTELLIMIX® may be switched off on the control unit. Standby Tally switches INTELLIMIX® on or to standby. The INTELLIMIX® status cannot be changed on the control unit (forced switching). Cough Mic 1 mutes Mic 1 (application example: connect an external cough key or mute switch). Cough Mic 2 mutes Mic 2 (application example: connect an external cough key or mute switch). Talk to Mix-Minus A activates the Talkback function with the basic setting from General Options 1 > Talkback Exception: The talkback signal is always switched to MIX-MINUS A regardless of the presetting. Talk to Mix-Minus B activates the Talkback function with the basic setting from General Options 1 > Talkback Exception: The talkback signal is always switched to MIX-MINUS B regardless of the presetting. Talk to Mix-Minus A+B activates the Talkback function with the basic setting from General Options 1 > Talkback Exception: The talkback signal is always switched to both MIX-MINUS A and MIX-MINUS B regardless of the presetting. INTELLIMIX® Manual 2.21 Yellowtec 2002 Page 40 6.8 Window: General Options 1 6.8.1 Range: Synchronisation Here, set the clock frequency to be used for an INTELLIMIX® synchronisation. INTELLIMIX® provides SCRS on each digital input. However, a synchronisation via an external in-house clock is also possible. Internal 48 KHz INTELLIMIX® synchronizes to the internal 48 kHz clock generator Internal 44,1 KHz INTELLIMIX® synchronizes to the internal 44,1 kHz clock generator Line In #12 digital (External B) ® INTELLIMIX synchronizes to an external AES/EBU signal/clock, connected to input Line In #12 INTELLIMIX® Manual 2.21 Yellowtec 2002 Page 41 6.8.2 Range: SmartCard ® Define here whether and how you wish to use the YELLOWTEC SmartCard . Note: Determine whether and which parameters are to be read from the SmartCard. These setting do not influence the storage process (menu Unit >Save to SmartCard). SmartCard always disabled ® basically ignores all parameters of a plugged in YELLOWTEC SmartCard SmartCard enabled for Personal Parameters ® if the YELLOWTEC SmartCard is shifted in, this uses only parameters which were set in the Personal Parameters window. SmartCard enabled for all Parameters ® if the YELLOWTEC SmartCard is plugged in, this uses all parameters stored on the card. Note: When using this option, make sure that no unintended setups are produced when the SmartCard is used! Refer to Saving Parameters 6.8.3 Range: Shift + Talk button Pressing the Talk button while the Shift key is pressed the Set System Standby function can be initiated after a time delay (refer to Standby Function below.) Independently of this, the key combination may also be used for generating a trigger output signal. Refer to the window Control Logic > Trigger Outputs > Pulldown Trigger > Selection Upper+Lower Button. Select in the pulldown menu Disabled no function 1 sec Standby function and/or Upper+Lower button trigger after 1 sec 2 sec Standby function and/or Upper+Lower button trigger after 2 sec 3 sec Standby function and/or Upper+Lower button trigger after 3 sec 4 sec Standby function and/or Upper+Lower button trigger after 4 sec 5 sec Standby function and/or Upper+Lower button trigger after 5 sec INTELLIMIX® Manual 2.21 Yellowtec 2002 Page 42 6.8.4 Range: Standby function Standby switches INTELLIMIX® unfunctional, but does not deenergize it! If INTELLIMIX® is to be deenergized, use the mains switch on the rear side of the base unit! In the Standby status all displays and other indications are off. Only the Status LED on the front panel of the base unit shows the Standby status by occasional flashes. You may use the control unit or an external control to switch INTELLIMIX® to Standby. An external control can be performed via a trigger input. Perform the appropriate setting in the Control Logic window (refer to Control Logic >Trigger Inputs >Switch Unit to Standby). To transfer INTELLIMIX® to Standby via the control unit, click on the Set System Standby on pressing SHIFT + TALK checkbox. Now, INTELLIMIX® can be switched unfunctional by pressing TALK while the SHIFT key is kept pressed. To “wake up” INTELLIMIX® from the Standby status, you may use the radio button to select from two possibilities. Resume System Standby on pressing SHIFT + TALK INTELLIMIX® can only be activated when TALK is pressed and the SHIFT button is kept pressed. Resume System Standby on pressing any Key INTELLIMIX® may be activated by any press of a button. Note: Observe the setting in the Shift+Talk Button range for all settings performed within this range. 6.8.5 Range: Select Input Line #5 Use this radio button to define whether a SPDIF signal or a TOS-Link signal (optical) is to be applied to the Line In #5 input. Only one of these possibilities is available at a time. 6.8.6 Range: Output Channel status information Use this radio button to set the AES-EBU digital outputs to professional or consumer format. 6.8.7 Range: Output Limiter INTELLIMIX® provides a digital limiter on its mix outputs. In the delivery state the threshold value is set to 0 dBFS. You may change the threshold value of the limiter according to your needs. To modify this setting, use the mouse to click on the controller symbol and control the desired value, using the Cursor Up or Cursor Down key in 1 dB increments. Alternatively, you may also click on the controller symbol and move the mouse to the left and right side while the left mouse button is pressed. The selected threshold value is displayed in dBFS. INTELLIMIX® Manual 2.21 Yellowtec 2002 Page 43 6.8.8 Range: Talkback INTELLIMIX® provides an intelligent talkback system. A microphone connected to one of the normal microphone inputs may be selected for talkback. INTELLIMIX® routes that microphone signal independently of the source selection and the fader setting. To talk directly to a return feed of a connected ANG or Codec is thus possible in a simple manner. The following options can be selected by clicking on the appropriate checkboxes: Talk to MIX-MINUS A applies a selected microphone signal to the n-1 output A Talk to MIX-MINUS B applies a selected microphone signal to the n-1 output B Select MIC-1 for Talkback selects the microphone connected to the MIC input 1 as a talkback microphone Select MIC-2 for Talkback selects the microphone connected to the MIC input 2 as a talkback microphone DIM Monitor during Talkback click on this checkbox if the monitor (loudspeaker) output is to be attenuated while TALKBACK is pressed. 6.8.9 Range: Mix-Minus Assignment / PPM INTELLIMIX® provides two separated n-1 mixes. Assign the source which shall be removed from the mix. A selection is made via the Assign Mix Minus (A/B) pulldown menus. Activating the Set Mix Minus (A/B) Output to Mono checkboxes allows a determination as to whether or not a mono formation is basically desired for the respective n-1 output. This is useful, if, for example, the back supply for an ANG is to be formed. Another function may be selected as an alternative for Mix Minus B: Clicking on the Output Mix Minus B as PPM Output checkbox applies the complete mix signal tapped before the output limiter (pre limiter) to the output. Thus, the output is suitable for connecting a Master PPM. INTELLIMIX® Manual 2.21 Yellowtec 2002 Page 44 6.8.10 Range: ON AIR Logic Select how the monitor (loudspeaker) output is to behave when the fader is moved up from its off position for the microphone channels (red light logic). ON-AIR Logic depends on ... Defines whether the microphone channels 1 or 2 or both channels (with OR logic) activate the On Air status. Refer to note 2 below. ON-AIR Status will cause Monitor Mute selecting this radio buttons causes the ON-AIR status to mute the monitor (loudspeaker) output, displayed by a blinking Speaker Indicator LED ON-AIR Status will cause Monitor DIM selecting this radio button causes the ON-AIR status to attenuate the monitor output, shown by a blinking Speaker Indicator-LED ON-AIR Status will not affect Monitor When selecting this radio button the monitor output will not be affected by the ON AIR Status Note 1: The headphones output is not affected by this option. Note 2: It may be necessary to include other faders in the ON-AIR Logic. If, for example, the speaker microphone is not directly connected to INTELLIMIX®, but to a VIPdigital, the signal will be transmitted to INTELLIMIX® via one of the digital inputs. In this case use the available controls provided by Trigger Outputs and Trigger-Inputs (Control Logic). INTELLIMIX® Manual 2.21 Yellowtec 2002 Page 45 6.9 Window: General Options 2 6.9.1 Range: Default Source Default Source Select in the pulldown menus the default values for the input and the monitor selection when INTELLIMIX® is switched on. Note: Check the entered values for plausibility. For example, avoid the same sources for two faders or an input of values disabled in the I-O Options (Disable Source Selection, Disable Monitor Selection). Freeze Selection to Default Value In the interest of operational safety it may be useful to define the input and/or monitor source(s). Activating this option does not allow an individual source selection on the control unit, i.e. only the signal selected as default will be used. 6.9.2 Range: Monitor Mix Out (Pre/Post) Use the radio buttons to define whether the mix signal to be heard in the monitor is to be tapped before (PRE) or after the output limiter (POST). Note: Refer to General Options 1 Output Limiter for the limiter settings. INTELLIMIX® Manual 2.21 Yellowtec 2002 Page 46 6.10 Window: Expert Options 6.10.1 Range: External Router This option exclusively addresses users who wish to use INTELLIMIX® for controlling an external router. Note: This option reserves a Fader and the associated Source Selector for the external router. The appropriate Fader and Source Selector will then no longer be available for a selection and editing of the local sources. INTELLIMIX® can control digital matrix routers. If you feed an input of your INTELLIMIX® from your router, you may access all signal sources of a complex studio without additional cabling. Connect the matrix router to the INTELLIMIX® input Line In #1 digital (AES/EBU) input. INTELLIMIX® controls the router, using the user bits of the AES/EBU format. The source IDs required must be entered in the Routing Configuration range (see below). For the label identifications only the restrictions as described under I-O Options >Label apply. During operation the source selection can be controlled by the Source Selector associated with the selected Fader. The label identifications are shown in the source display. The source IDs can be obtained from the manufacturer of your matrix router or from us. INTELLIMIX® Manual 2.21 Yellowtec 2002 Page 47 Yellowtec can provide the current information about available source IDs, control logs and connection possibilities under [email protected] Fader Assignment Select a fader for controlling the external router. This selection is used to activate the option. Selecting None makes the External Router option unfunctional. Routing Configuration To define a new source, click on the Add Source button. A new line in the display field appears. Then, click on the automatically generated label identification. Now, the values for Label (max. 4 characters as for all IMX labels), Left Source ID (5 characters) and Right Source ID (5 characters) can be entered below in the entry fields. To delete the sources, click on the associated label identification(s) and then on the Delete Selection button. Note: The settings for the external router are not saved to the SmartCard. Thus, INTELLIMIX® can only be configured for external routers from the PC. If a SmartCard with any setup is plugged in, the reserved Fader and/or Source Selector will retain its External Router function. The setting stored on the SmartCard for this fader will be skipped. INTELLIMIX® Manual 2.21 Yellowtec 2002 Page 48 6.11 Window: Personal Parameters 6.11.1 Range: Level Indicator The level indicators are not designed as complete level indicators, but are a level trend display. External instruments are suitable for precise measurements. INTELLIMIX® provides a level trend display for each channel. The level indicator records the applied signals directly at the input (before the fader and stereo/mono/balance setting). Select in the Level Indicator Characteristics pulldown menu whether or not to use the level indicator. Disable Level Indication No display VU Characteristics Shows the level conditions of the respective channel with VU characteristic; a change to red is made at approx. 5 db headroom. Peak Characteristics Shows the level conditions of the respective channel with peak characteristics. A change to red is made at approx. 9 dB headroom. INTELLIMIX® Manual 2.21 Yellowtec 2002 Page 49 6.11.2 Range: Display Here, different display options may be set. Flashing Speed of Alpha-Readout Use the Fast or Slow radio buttons to determine the blinking frequency of the text display. Note: The monitor display blinks if you click on the appropriate input in the Flash Monitor Display column in the I-O Options. A channel display blinks if the PFL function is active for the corresponding channel. Attention Indicator Click on the checkbox to activate the Attention Indicator. The Attention Indicator in the shape of a warning triangle above the text display provides information as a precaution about the fact that unusual states for the selected input were set. It provides information that a non-centred panorama position has been set or a line input mono has been set for the microphone signal. If the Input Trim or EQ Gain selection is activated under Source Selector with Shift, the indicator will light up for settings deviating from the zero position. Warning Indicator for Out-Of-Phase Signals Click on the checkbox to activate the Warning Indicator. INTELLIMIX® evaluates the phase relationship of stereo signals and reports Out-of-phase. Thus, you have permanent control which, above all, is useful for feedings from outside sources. 6.11.3 Range: Shift (Application Level-2) Click on the Disable Shift Function checkbox to disable the second user layer (application level 2). Functions which are only accessible by pressing the Shift key simultaneously can now no longer be selected. This may be useful for increasing the user friendliness and/or for restricting the operator access. 6.11.4 Range: Option for Stereo Fader (Balance) Use the radio button to determine the mode for stereo inputs. Stereo, Left, Right, Mono Turning the input selector while the Shift key is pressed toggles between the Stereo, Left, Right and Mono modes. Stereo The left channel is added to the left mix sum and/or monitor selection, the right channel is added to the right mix sum and/or monitor selection. Left The left channel is added to the left as well as the right mix sum and/or monitor selection, the right channel is switched off. Right The right channel is added to the left as well as the right mix sum and/or monitor selection, the left channel is switched off. Mono The left and right input are summed in a -3dB matrix and are fed as a mono signal to the left as well as the right mix sum and/or monitor selection. Balance Turning the input selector while the Shift key is pressed controls the L R balance. This control is intended for a compensation of L-R level inequalities. Turning the input selector clockwise decreases the level of the left channel by 0.25dB per step and increases the right channel by 0.25dB. This process is reversed for a rotation counterclockwise. The control range is +/-5dB and/or 41 steps. Note: refer to Level Indicator INTELLIMIX® Manual 2.21 Yellowtec 2002 Page 50 6.11.5 Range: PFL (Prefade Listen) Use the Set PFL Trigger pulldown menu to select your PFL options. Disabled The PFL function is switched off. However, pressing the Source Selector / PFL button is still available for the Trigger Output function Toggle Pressing the Source Selector activates PFL and keeps this status until another press. Hold Activates PFL as long as the Source Selector is pressed. Time Toggle When the Source Selector is pressed briefly, this function behaves as Toggle, and when pressed for a longer time it behaves like Hold. Deactivate PFL by Moving Fader Up When you select this option, the PFL status of all channels selected for PFL is automatically terminated as soon as any fader is moved up from its off position. Deselect the checkbox if PFL is to be maintained independently of the fader movements. 6.11.6 Range: SmartLevel INTELLIMIX® provides an intelligent control system for the listening volume. Since there is only one common volume control for the monitor output and headphones output, INTELLIMIX® saves the listening level at a switchover. The set level conditions are individually saved and restored when switched back. Thus, the volume control functions as it does via two separated controllers. SmartLevel Enabled Click on the checkbox to activate the SmartLevel function to protect yourself from unintentional level changes when listening in the upper volume range. If the set monitoring level is lower than the level predefined with Set SmartLevel, the circuit will behave as described above. If the set monitoring level is higher than the value predefined by Set SmartLevel, SmartLevel will jump to this value during each changeover. Set SmartLevel Set the desired volume for the SmartLevel function. The preset value is -15dB. To modify the value, use the mouse to click on the controller symbol and control the desired value, using the Cursor Up or Cursor Down key in 1dB steps. Alternatively, you may click on the controller symbol and move the mouse to the left and right side, keeping the left mouse button pressed. The selected attenuation is displayed in dB. Note: The level for SmartLevel must be lower than the lowest level for Monitoring Level. INTELLIMIX® Manual 2.21 Yellowtec 2002 Page 51 6.11.7 Range: Monitoring Level Set Maximum Level for Loudspeakers To protect your loudspeaker and/or to prevent undesired high monitoring volumes (e.g. in open editorial offices), you may here define the maximum monitoring level for the monitor (loudspeaker) output. The setting cannot be exceeded by the monitor control. The preset value is 0dB. To modify the volume, use the mouse to click on the controller symbol and control the desired value, using the Cursor Up or Cursor Down key in 1dB steps. Alternatively, you may click on the controller symbol and move the mouse to the left and right side, keeping the left mouse button pressed. The selected gain is displayed in dB. Set Maximum Level for Headphones For the required hearing protection, you may define here a maximum listening level for the headphones output. The setting cannot be exceeded by the monitor control on the control unit. The preset value is 0dB. To modify the volume, proceed similarly as described above for Set Maximum Level for Loudspeakers. Note: Once the Monitoring Level has been modified, you should check the SmartLevel setting and adjust it, if necessary. 6.11.8 Range: PFL Options for Loudspeakers PFL overwrites Monitor (Monitor Mute) Activate this option if you wish the monitor signal to be muted when PFL is active. Please note that a deviating option may be activated for the headphones output! PFL mixes with Monitor (Monitor DIM) Activate this option if you wish to continue to listen to the monitor signal when PFL is active. The current monitor signal is then attenuated by the value set in DIM Level. Please note that a deviating option may be activated for the headphones output! 6.11.9 Range: PFL Options for Headphones PFL follows Loudspeakers Activate this option if you wish PFL to perform the same way on the headphones output as on the monitor (loudspeaker) output. PFL activates Split Can Mode Activate this option if, when PFL is active, the PFL signal is to be heard on the left ear and the current monitor signal on the right ear of the headphones (Split Can Mode). INTELLIMIX® Manual 2.21 Yellowtec 2002 Page 52 6.11.10 Range: Dim Level Set DIM -Level Set the attenuation value for all DIM functions here. To modify the attenuation, use the mouse to click on the controller symbol and control the desired value in 1dB steps, using the Cursor Up or Cursor Down key. Alternatively, you may click on the controller symbol and move the mouse to the left and right side, keeping the left mouse button pressed. The selected attenuation is displayed in dB. 6.11.11 Range: Option for Headphones Pressing monitor control normally toggles between the monitor (loudspeaker) output and headphones output. If the Headphones always on checkbox is clicked, the headphones output will always remain activated. Thus, pressing monitor control only switches the monitor (loudspeaker) output on/off. INTELLIMIX® Manual 2.21 Yellowtec 2002 Page 53 7 TECHNICAL DRAWINGS/DESCRIPTIONS 7.1 Technical data Number of inputs 14 Microphone inputs 24 Bit A/D, adjustable Gain +70 to -20 dB by 1 dB steps, (2 x) Input Impedance >5 k ohms (balanced), individual 48V Phantom Power, Patch Points @ 4/6 dBu Analog line inputs 24 Bit A/D, adjustable Gain +20 to -20 dB by 1 dB steps, (5 x Stereo, balanced) Input Impedance >8kohms (balanced), Nominal Level +4/6 dBu Analog line outputs 24 Bit A/D, adjustable Gain +20 to -20 dB by 1 dB steps, (1 x Stereo, unbalanced) Input Impedance >10 k ohms (unbalanced), Nominal Level -11 to +9 dBu adjustable on Base Unit Front Panel Digital line inputs Adjustable Gain +20 to -20 dB by 1 dB steps, (5 x AES/EBU) Input Transformer Impedance 110 ohms (AES/EBU), individual SRCs Digital line outputs Adjustable Gain +20 to -20 dB by 1 dB steps, (1 x SPDIF by software Input Impedance 75 ohms (SPDIF), SRC selectable to TOS Link) Analog stereo outputs 24 Bit D/A, Output Impedance <40 ohms (balanced), (all designed identical, max. Level +15 dBu (+9 dBu for RCA) incl. Patch Points) Digital stereo outputs Output Transformer Impedance 110 ohms (AES/EBU) individual SRCs Frequency response 20 – 20.000 Hz ±0,5 dB Sample rate Internal 48/44,1 kHz or External Sync incl. Varispeed Serial interface for the configuration software RS232 @ 19,2 Kbit/s Electrical connection 90 – 260 Volts AC, 50/60 Hz, typical <20 Watts Weight Base Unit 3.9 kg / Control Unit 1.2 kg INTELLIMIX® Manual 2.21 Yellowtec 2002 Page 54 Insert Mic 1 Preamp dig. controlled Insert Mic 2 Preamp dig. controlled 24 Bit AES/ EBU Line In 1 digital SRC AES/ EBU Line In 2 digital Talk Mic Digital Encoder 1 Sum SRC AES/ EBU Line In 4 digital Switch Stereo/Mono Mix-Minus A DSP-Fader Talk to Mix-Minus SRC AES/ EBU Line In 3 digital Switch Stereo/Mono Digital Encoder 2 Mix-Minus digital A L R 24 Bit Talk to Mix-Minus Mix-Minus B DSP-Fader AES/ EBU D/A AES/ EBU D/A SRC Line In 5 SP/DIF digital Mix-Minus A analog Mix-Minus digital B L R Mix-Minus analog B 24 Bit Limiter SPDIF SRC Line In 5 Optical Link TOS digital Digital Encoder 3 Mix DSP-Fader AES/ EBU D/A Line In 6 analog (RCA/Cinch) L R Line In 7 analog L R Line In 8 analog L R Line In 9 analog L R Line In 10 analog L R Line In 11 analog (External A) Yellowtec Intellimix A/D A/D A/D 24 Bit A/D PFL 24 Bit A/D Digital Encoder 4 Volume Monitor 24 Bit L R Digital Encoder 4 D/A Monitor PFL/ Selector 24 Bit D/A Headph. 24 Bit Mix Out analog (RCA/Cinch) L R Mix Out analog B L R Mix Out analog C L R Mix Out analog D L R Monitor Out analog L R 24 Bit Headphone Out Volume Headph. AES/ EBU Line In 12 digital (External B) Monitor/ Headph. A/D A/D L R 24 Bit 24 Bit 24 Bit Mix Out digitalA...E SRC External Sync. Sync. 44,1 kHz 48 kHz DSP GPI 8x Control In CMOS Remote Control Unit (Serial Link; Power) Configuration PC (PC-Link) RS232 GPO RS232 Control 12x Control Out Open Collector INTELLIMIX Pinout Table V2.4 Front XLR 3f 1 2 3 Chassis 1/4" Jack Tip Ring Shell RCA/Cinch Center Ring Center Ring MIC #1 GND MIC + MIC GND Mic 1 MIC #2 XLR 3f 1 2 3 Chassis GND MIC + MIC GND RCA/Cinch Center Ring Center Ring L+ GND R+ GND Mic 2 HEADPHONES (HP) LEFT RIGHT GND Headphone LINE IN #6 L+ GND R+ GND Line In 6 analog, -10 dBu MIX OUT Mix Out analog, -10 dBu Backplane Con 1 MONITOR / EXTERNAL ... Pin 1 2 14 15 16 3 4 5 17 18 19 6 7 8 20 21 22 9 10 11 23 24 25 12 13 Chassis Signal R+ RGND L+ LGND R+ RGND L+ LGND R+ RGND L+ LGND AES/EBU+ AES/EBUGND AES/EBU+ AES/EBUGND GND GND Monitor Out (analog) Line In 11 (analog) External A Mix Out (analog D) Line In 12 (digital) External B Mix Out (digital E) Ground IMX Rev 2.4 / 26SEP2001 - Page 1 of 3 Con 10 CONTROL IN/OUT (GPI/GPO) Pin 1 2 3 4 5 6 7 8 9 10 11 12 13 14 15 16 17 18 19 20 21 22 23 24 25 Chassis Signal CMOS 1 In 1 CMOS 2 In 2 CMOS 3 In 3 CMOS 4 In 4 CMOS 5 In 5 CMOS 6 In 6 CMOS 7 In 7 CMOS 8 In 8 GND Ground Open Collector 1 Out 1 Open Collector 2 Out 2 Open Collector 3 Out 3 Open Collector 4 Out 4 Open Collector 5 Out 5 Open Collector 6 Out 6 Open Collector 7 Out 7 Open Collector 8 Out 8 Open Collector 9 Out 9 Open Collector 10 Out 10 Open Collector 11 Out 11 Open Collector 12 Out 12 GND Ground Vcc +5V For Test Only +12V For Test Only GND Ground GND INTELLIMIX Pinout Table V2.4 Con 2 LINE IN #7 / MIX OUT Con 11 Pin 1 2 9 10 11 3 4 5 12 13 14 6 7 8 15 Chassis Signal Pin 1 2 9 10 11 3 4 5 12 13 14 6 7 8 15 Chassis R+ RGND L+ LGND R+ RGND L+ LGND n/c n/c GND GND Con 3 Pin 1 2 6 7 8 3 4 5 9 Chassis Con 7 Pin 1 2 6 7 8 3 4 5 9 Chassis Line In 7 (analog) Mix Out (analog B) Ground LINE IN #9 Con 12 Signal Pin 1 2 6 7 8 3 4 5 9 Chassis R+ RGND L+ LGND n/c n/c GND GND Line In 9 (analog ) Ground INSERT MIC #2 Con 6 Signal Pin 1 2 6 7 8 3 4 5 9 Chassis RETURN + RETURN GND SEND + SEND GND n/c n/c GND GND Insert 2 Ground IMX Rev 2.4 / 26SEP2001 - Page 2 of 3 LINE IN #8 / MIX OUT Signal R+ RGND L+ LGND R+ RGND L+ LGND n/c n/c GND GND Line In 8 (analog) Mix Out (analog C) Ground LINE IN #10 Signal R+ RGND L+ LGND n/c n/c GND GND Line In 10 (analog ) Ground INSERT MIC #1 Signal RETURN + RETURN GND SEND + SEND GND n/c n/c GND GND Insert 1 Ground INTELLIMIX Pinout Table V2.4 Con 13 LINE IN #1 / MIX OUT Con 14 Pin 1 2 6 7 8 3 4 5 9 Chassis Signal Pin 1 2 6 7 8 3 4 5 9 Chassis IN+ IN GND OUT + OUT GND n/c n/c GND GND Line In 1 (AES/EBU) Mix Out (AES/EBU A) Ground Con 15 LINE IN #3 / MIX OUT Con 16 Pin 1 2 6 7 8 3 4 5 9 Chassis Signal IN + IN GND OUT + OUT GND n/c n/c GND GND Pin 1 2 6 7 8 3 4 5 9 Chassis Con 8 LINE IN #5 (SP/DIF) Line In 3 (AES/EBU) Mix Out (AES/EBU C) Ground SP/DIF Con 4 Pin 1 2 6 7 8 3 4 5 9 Chassis Con 5 Signal Pin 1 2 6 7 8 3 4 5 9 Chassis R+ RGND L+ LGND OUT + OUT GND GND n/c RX TX GND GND n/c n/c Vcc Vcc GND MIX-Minus (A) analog MIX-Minus (A) digital REMOTE Con 9 Signal Pin 1 2 3 4 5 6 7 8 9 Chassis Serial Link and Power to Control Unit IMX Rev 2.4 / 26SEP2001 - Page 3 of 3 Signal IN + IN GND OUT + OUT GND n/c n/c GND GND Line In 2 (AES/EBU) Mix Out (AES/EBU B) Ground LINE IN #4 / MIX OUT Signal IN + IN GND OUT + OUT GND n/c n/c GND GND Line In 4 (AES/EBU) Mix Out (AES/EBU D) Ground LINE IN #5 (OPTICAL) TOS Link Line In 5 alt. MIX-MINUS A Con 18 Pin 1 2 3 4 5 6 7 8 9 Chassis Con 17 LINE IN #2 / MIX OUT Line In 5 alt. MIX-MINUS B Signal R+ RGND L+ LGND OUT + OUT GND GND MIX-Minus (B) analog MIX-Minus (B) digital RS 232 Signal n/c RX TX n/c GND n/c n/c n/c n/c GND PC-Link 1 2 3 4 5 6 Examples for GPO - Connections from GPO + Before using the control ports specified in this drawing, read the associated chapters in the user manual. Improper use may lead to damage of your INTELLIMIX and/or the equipment connected to the GPIs/GPOs. A opt. Schutzdiode 1. Relays 1. Switches/Relays 5V/12V/24V to GPI Relais 5V/12V/24V Gnd Switch on: activates GPI GPO active: Relais triggered B All examples imply the connection of external voltages: e.g. 5V, 12V or 24V or 0V (Ground). Provided that you consider the restrictions described in the user manual, you may as well use the auxiliary voltages or the Ground Pin of your INTELLIMIX. 8 Examples for GPI - Connections IMPORTANT - A 7 2. Optocouplers B 2. Optocouplers 5V/12V/24V from GPO to GPI 470*/ 5V 1,5k*/ 12V 3,3k*/ 24V (*see below) Gnd GPO active: Optocoupler triggered C Optocoupler triggered: activates GPI Control Input Ports: GPI 1...8 Control Output Ports: GPO 1...12 C 3. TTL - Logic from Pin23 GPI1... ...GPI8 1 Gnd GPO1... <1V: activates GPI >3,5V (max 15V): de-activates GPI 1k from GPO 13 14 to GPI GPI GPO active: <1V GPO not active: >2V 12V D 3. External Logic (5V) D 25 5V ...GPO12 4. CMOS - Logic Gnd GPO from Pin24 12V 5V *The resistor-values are suitable for commonly used optocouplers. It is essential to check whether they match to the type you are using. (12V) 2,2k Gnd from GPO GPO active: <1V GPO not active: >3,5V E E Diese Zeichnung ist unser Eigentum. Jede Vervielfältigung oder Mitteilung ist strafbar und kann gerichtlich verfolgt werden. (Urheberrechtsgesetz, Gesetz gegen unlauteren Wettbewerb, BGB) Technische Änderungen vorbehalten. 1 2 3 Heinrich Hertz Str. 1-3 D-40789 Monheim Tel.: 02173 / 9673-0 4 5 6 Connection of Intellimix GPI und GPO YELLOWTEC - Intellimix - Base Unit IMX_GPIO_en Datei: 7 8 103mm / 4,05in (Höhe ab Tischplatte ohne SmartCard; height from table without SmartCard) 18 0m m Heinrich-Hertz-Str. 1-3 D-40789 Monheim Tel.: 02173 / 96 73 -0 www.thummahr.de 28 7m m /1 1, 30 in m 5m 6 2 in ,43 0 /1 /7 ,09 in Alle Maße +/- 1mm Intellimix® Control Unit All measurements +/- 0,04in Maße / Measurements (typische Werte, Änderungen vorbehalten) (typical values, subject to change without notice) www.yellowtec.com M.Zaehl 20.03.02 8 UPDATING INTELLIMIX® 8.1 Prior to beginning If there is a (older) version of the INTELLIMIX® Software installed on your PC, please perform the following steps before updating the software: - Save your configuration files (*.imx) in a separate folder - Delete, relocate or rename short cuts which belong to the older version(s) of the INTELLIMIX® software - If there are configurations stored in your INTELLIMIX® units which have not yet been saved as files on your PC, you should do this now, prior to the update! (LOAD FROM UNIT) 8.2 Installing as CD-ROM Insert the CD-ROM into the drive and start the INSTALL.EXE or SETUP.EXE installation routine. The software will guide you conveniently through the installation process. All required data is copied to your computer, new folders and new short cuts are created during the installation process. No parameters of your computer will be modified. 8.3 Installing as ZIP-File If you receive the INTELLIMIX® software as a ZIP file (e.g. as a download from our website http://www.yellowtec.com/), you can open the ZIP file using the software WinZip (which should be installed on your Windows PC as a part of Windows). Normally WinZip is started by double clicking a ZIP file. WinZip will extract all files into a new folder. Find the SETUP.EXE file in this folder. A double click on SETUP.EXE starts the installation program, which will lead you automatically through the installation process. If required a new folder and new short cuts will be created during the installation process. The update of your Windows PC is finished when SETUP.EXE is completed. 8.4 The software components of INTELLIMIX® designation file name location function Configuration-Software IMX.EXE Windows PC create setups for INTELLIMIX® default configuration imx.cfg Windows PC factory defaults Online Help IMX.HLP Windows PC Online-Help file manual IMX_manual.pdf Windows PC manual as pdf format imxV221.imu Base Unit DSP program file firmware (*221* stands for version number 2.21; might differ when using another program version) The Configuration-Software creates configuration files (*.imx), in which your settings (Save ... or Save as ...) are saved. Only by using all components of the same program version the whole functional range of INTELLIMIX® can be achieved. Proceed by updating the firmware of your INTELLIMIX® base unit. INTELLIMIX® Manual 2.21 Yellowtec 2002 Page 61 8.5 Performing the firmware update First connect a serial port of your PC to the RS232 connector on the back panel of your INTELLIMIX®. Use the standard RS232 cable that is included in delivery. Now start the Configuration-Software IMX.EXE. Note: A check routine scans the serial ports of your PC for a connected INTELLIMIX® base-unit. If it is not found, the following window appears (depending on your PC, the contents of the text area may differ): Click on „NO“ and check the connection between your PC and INTELLIMIX®. Also check whether your INTELLIMIX® is switched on. Start the Configuration-Software again (IMX.EXE checks the serial ports only during the start-up.). After IMX.EXE has successfully connected to your INTELLIMIX®, the password test appears: Type in your password. Even after the update your familiar password will be accepted. (The default password is imx) The Configuration-Software is launched. Select the Firmware Update menu. INTELLIMIX® Manual 2.21 Yellowtec 2002 Page 62 The update window opens with a warning for your safety. Note: Read the warning carefully. Fill in the exact filename of the new firmware, e.g. imxV221.imu (this is only an example). If the firmware file is not located in the same folder as the Configuration-Software, it is mandatory to fill in the full path name, too. e.g. C:\Yellowtec\Software\ imxV221.imu (this is only an example) Click on YES The transmission is indicated in the processing window: In no case interrupt the transmission. After the transmission is finished, IMX.EXE closes the processing window and the update window. Your update is complete. INTELLIMIX® Manual 2.21 Yellowtec 2002 Page 63 8.6 Compatibility Previously saved setups (either as IMX-Files or on SmartCard) will usually work with the new software. After you finished the update procedure decribed above, open your IMX-File. Especially check the settings of the new functions, which where not existing in the previous software version. Then save the setup as new IMX-File. Setups on SmartCards should be loaded to the Configuration-Software ( >Unit >Load from SmartCard) and treated the same way. Then save them back to SmartCard ( >Unit >Save to SmartCard). However, some setups may not be compatible in certain cases. Particularly, if an update offers a lot of new features, this cannot be avoided for technical reasons. When you have a problem using your “old” setup, please contact us. In most cases a solution can be found. If you notice problems after an update, there is an easy way to find out whether the reason is a compatibility problem: Leave the file IMX.CFG in the same folder as the Configuration-Software. Start the Configuration-Software without opening an IMX File, so the factory defaults are used. Now change this setup „by hand“ and check out the function that didn’t work properly. If it works, you can save the setup and use it instead of the old one. Note: As mentioned in the beginning of this chapter it is mandatory to save a configuration stored in the ® INTELLIMIX base-unit before the update. The reason is, that a configuration has to be saved using the same software/firmware version that it has been created by. 8.7 Checking version numbers Check the version numbers of the Configuration-Software and the Firmware you are using: Exit the Configuration-Software and start it again. Go to the Help-Menu an then to About. The version numbers will appear in the Info-Window. The Info-window is only updated when the Configuration-Software is started, therefore it is neccesary to exit the program and start it again. Example: Info window of Version 2.21 (only the first three numbers with a dot after the first number are relevant) Configuration Software 2.21 ... IMX Base-Unit Software 2.21 (stands for firmware version) On start-up, the displays of the INTELLIMIX Control-Unit show for a short time a default reading, e.g. „IMX Ver. 1.07 2000“ (just an example). This reading is not related to the version numbers of Configuration-Software or Firmware. The reading only relates to the functionalitiy of the Control-Unit which cannot be changed or updated. INTELLIMIX® Manual 2.21 Yellowtec 2002 Page 64 9 TIPS 9.1 Application information 9.1.1 MIC1+2 as Stereo Use this function if you wish to control the microphone signal 1 and 2 as a stereo signal with asingle fader. Please observe the following items: Settings in the Input Setup window The settings within the Input Gain range must be performed identically for MIC1, MIC2 and MIC1+2 since they are directly related to the microphone preamplifier, i.e. the same gain setting (e.g. 50dB) must be performed in all three windows. The same applies to Phantom Power, either all on or all off. The other settings are independent. For example, you may select MIC1+2 as Stereo for one fader, MIC1 for another fader. However, the other settings may deviate. L-R assignment For technical reasons, MIC1 appears in the right channel and MIC2 in the left channel for the stereo assignment. The same applies to the monitor source selection: you hear MIC1 on the right side and MIC2 on the left side. 9.1.2 EQ Setting An EQ is assigned to each input. All parameters of this 1-band equalizer can be set conveniently in the Input Setup window. The main application range is to balance line problems (e.g. for ANGs) or to improve poor technical performance of sound sources. - for example, selectively boost mid frequencies to enhance the understanding of speech (bell) - attenuate a noise frequencies in a narrow band (notch) - influence the entire frequency response (shelving) This EQ is not so much intended to give e.g. a typical unique sound to a speaker microphone. Normally, this cannot be provided by a 1-band EQ. (NOTE ! http://www.yellowtec.com/ VIPdigital) Saving parameters Corresponding to the application, EQ settings are not saved to the SmartCard, but only in INTELLIMIX®. An input-related setting is thus always retained. Modify this setting only via the EQ Gain option of SOURCE SELECTOR WITH SHIFT. Then, you may directly access the EQ gain. However, modifications to the settings will not be saved. Note: If it is important for your application to call different EQ settings via the SmartCard, this can only be done if not all inputs of your INTELLIMIX® are assigned. In this case assign the same signal to two inputs and use the SmartCards to toggle between the inputs – and thus the input-related settings. INTELLIMIX® Manual 2.21 Yellowtec 2002 Page 65 9.1.3 Saving parameters Not all parameters are saved! - Settings performed with the Source Selector with Shift functions are intended to allow the operator an access during current operation. During standby or when a new setup is loaded (even if another SmartCard is plugged in), INTELLIMIX® will return to the previously saved settings. - Settings for External Router are not saved to the SmartCard. Thus, INTELLIMIX® can only be configured for external routers from the PC. If a SmartCard is plugged in for any setup, the reserved fader and/or source selector will retain its external router function. The setting saved to the SmartCard will be skipped for this fader. - Refer to the SmartCard topic. You may select how to use the data saved to the SmartCard. - EQ settings performed in the Input Setup window will only be saved for INTELLIMIX®, but not to the SmartCard. Refer to the user information, EQ INTELLIMIX® Manual 2.21 Yellowtec 2002 Page 66 9.2 Solving problems 9.2.1 Noise on the microphone inputs Open microphone inputs are susceptible to pick up noise signals. If you selected one of the microphone inputs, but no microphone is plugged in, noise may be heard in dependence of the set gain. This is the normal behaviour of an “open input”. When a microphone or a dummy plug with a termination resistor is plugged in, the input will be “quiet” again. Noise may be picked up if your microphone is in the vicinity of your computer monitor. In this case try to use another microphone with a better shielding. Do not position your microphone in the immediate vicinity of possible noise sources. 9.2.2 Headset The microphone and the earphone capsules are close to each other in the headset. Even the lines transmitting the signals are housed in confined space. Simple models often lack an efficient shielding, or the directivity of the microphone inset is insufficient. Feedbacks may occur if the sensitive microphone and/or the microphone line is acoustically or magnetically influenced by the headphones signal whose level is amplified up to 10,000 times. If such problems occur, first of all check whether the monitor volume or the microphone gain is set too high. If not, we recommend the use of another headset and/or a check of your headset for a correct shielding. 9.2.3 Software update The INTELLIMIX® software consists of two parts: - configuration software running on your PC under Windows - base unit software, also called firmware, which runs on the base unit invisibly for you Both must be matched to each other. Thus, an update also includes a transmission of the new firmware to the base unit. Proceed carefully to avoid problems. Strictly proceed step by step according to the UPDATE INTELLIMIX® instructions (chapter TECHNICAL DRAWINGS/DESCRIPTIONS). Read the document completely before starting the update process. 9.2.4 Saving setups Check whether a SmartCard is plugged in when you transmit a new setup form the PC to INTELLIMIX®. If a SmartCard is plugged, INTELLIMIX® will load the new setup, but will then return to the SmartCard setup. The new setup transmitted by the PC is saved, but will not be activated until the SmartCard is drawn out (the SmartCard has always priority!). INTELLIMIX® Manual 2.21 Yellowtec 2002 Page 67 10 MISCELLANEOUS 10.1 Warranty Limited Warranty Duration The duration of limited warranty for YELLOWTEC Intellimix is one year according to the terms and conditions of warranty of the manufacturer (see Notice Of Warranty). Notice of Warranty The terms and conditions of the Warranty applying to the Product accompanying this Notice of Warranty are found exclusively in the Notice of Warranty. To the extent there is any inconsistency of conflict between the terms and conditions of the Notice of Warranty and the terms and conditions found anywhere else, including the Manual accompanying this Product, the terms and conditions of this Notice of Warranty are superseding and control. This Warranty covers „the Products“, which are defined as the various audio equipment, parts, software and accessories manufactured, sold and/or distributed by Thum + Mahr GmbH (hereinafter „T+M“). With the exception of software-only items, the Products are warranted to be free from defects in material and workmanship for a period of one year from the date of receipt by the end-user. Softwareonly items are warranted to be free from defects in material and workmanship for a period of 90 days from the date of receipt by the end-user. The terms and conditions of T+M‘s warranty in effect at the time of shipment shall apply. In order to invoke this Warranty, notice of a warranty claim must be received by T+M within the above-stated warranty period and warranty coverage must be authorized by T+M. Notice of a warranty claim may be made orally by telephoning (++49-2173-967300) or in writing sent by facsimile (++49-2173-967400) to or by e-mail ([email protected]). If T+M authorizes the performance of warranty service and if T+M will be performing the warranty service, the defective Product must be delivered, shipping prepaid, to: T+M, Heinrich-Hertz-Str. 1-3, D-40789 Monheim, Germany. If T+M authorizes the performance of warranty service and if it authorizes another entity to perform that warranty service, the Product must be delivered, shipping prepaid, to that entity, whose address will be provided by T+M. T+M (or its designee) at its option will either repair or replace the Product and such action shall be the full extent of T+M‘s obligation, and buyer’s sole remedy, under this Warranty. After the Product is repaired or replaced, T+M (or its designee) will return it to the party that sent the Product and T+M will pay for the cost of shipping. T+M will have no responsibility under this Warranty for any Products subject to: Acts of God, including (without limitation) lightning; improper installation or misuse, including (without limitation) the failure to use telephone and power line surge protection devices; accident; neglect or damage. T+M‘s dealers are not authorized to assume for T+M any additional obligations or liabilities in connection with the dealers‘ sale of the Products. EXCEPT FOR THE ABOVE-STATED WARRANTY, T+M MAKES NO WARRANTIES, EXPRESS OR IMPLIED (INCLUDING IMPLIED WARRANTIES OF MERCHANTABILITY AND FITNESS FOR A PARTICULAR PURPOSE). In no event will T+M, its employees, agents or authorized dealers be liable for incidental or consequential damages, or for loss, damage, or expense directly or indirectly arising from the use of any Product or the inability to use any Product either separately or in combination with other equipment or materials, or from any other cause. INTELLIMIX® Manual 2.21 Yellowtec 2002 Page 68 10.2 CE conformity declaration EU Declaration of Conformity (EN 61000) Product Audio mixer for digital and analog signals Product name YELLOWTEC Intellimix Manufacturer THUM + MAHR GmbH Heinrich-Hertz.Str. 1-3 D-40789 Monheim am Rhein Germany Safety Basic standard EN 60950 EN 50081 – 1 EN 50082 – 2 Radio interference EN 55103-1 class B EN 55103-2 class B IEC 1000 – 4 – 2 IEC 1000 – 4 – 4 IEC 1000 – 4 – 5 Noise emission RF Interference Immunity (EMC) The manufacturer declares that the unit described here is in compliance with all technical specifications mentioned and assumes operational conditions and typical equipment working environment as described in the handbook. Monheim, January 17, 2000 Peter Thum INTELLIMIX® Manual 2.21 Yellowtec 2002 Page 69