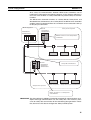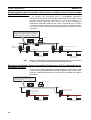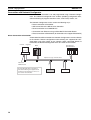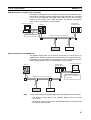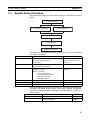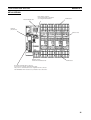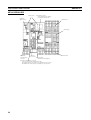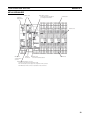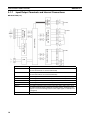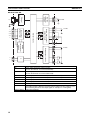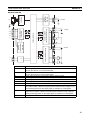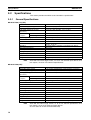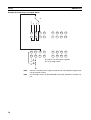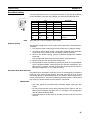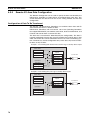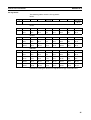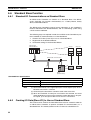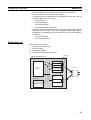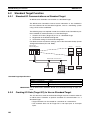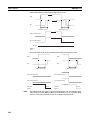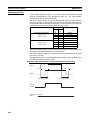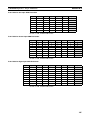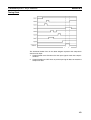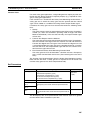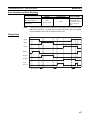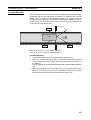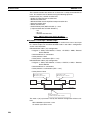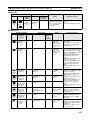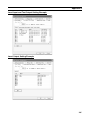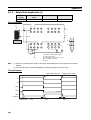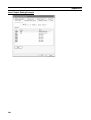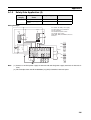
1
Cat. No. Z906-E1-07 DeviceNet Safety NE1A Series: NE1A-SCPU01(-V1)(-EIP)/ -SCPU02(-EIP) Safety Network Controller OPERATION MANUAL NE1A Series Safety Network Controller: NE1A-SCPU01(-V1)(-EIP)/-SCPU02(-EIP) Operation Manual Revised July 2009 iv Notice: OMRON products are manufactured for use according to proper procedures by a qualified operator and only for the purposes described in this manual. The following conventions are used to indicate and classify precautions in this manual. Always heed the information provided with them. Failure to heed precautions can result in injury to people or damage to property. !WARNING Indicates a potentially hazardous situation which, if not avoided, will result in minor or moderate injury, or may result in serious injury or death. Additionally, there may be significant property damage. Indicates general prohibitions for which there is no specific symbol. Indicates general mandatory actions for which there is no specific symbol. OMRON Product References All OMRON products are capitalized in this manual. The word “Unit” is also capitalized when it refers to an OMRON product, regardless of whether or not it appears in the proper name of the product. The abbreviation “PLC” means Programmable Controller. “PC” is used, however, in some Programming Device displays to mean Programmable Controller. Visual Aids The following headings appear in the left column of the manual to help you locate different types of information. IMPORTANT Indicates important information on what to do or not to do to prevent failure to operation, malfunction, or undesirable effects on product performance. Note Indicates information of particular interest for efficient and convenient operation of the product. 1,2,3... 1. Indicates lists of one sort or another, such as procedures, checklists, etc. v Trademarks and Copyrights CIP, EtherNet/IP, DeviceNet, and DeviceNet Safety are registered trademarks of the Open DeviceNet Vendors Association. Other product names and company names in this manual are trademarks or registered trademarks of their respective companies. OMRON, 2005 All rights reserved. No part of this publication may be reproduced, stored in a retrieval system, or transmitted, in any form, or by any means, mechanical, electronic, photocopying, recording, or otherwise, without the prior written permission of OMRON. No patent liability is assumed with respect to the use of the information contained herein. Moreover, because OMRON is constantly striving to improve its high-quality products, the information contained in this manual is subject to change without notice. Every precaution has been taken in the preparation of this manual. Nevertheless, OMRON assumes no responsibility for errors or omissions. Neither is any liability assumed for damages resulting from the use of the information contained in this publication. vi TABLE OF CONTENTS PRECAUTIONS . . . . . . . . . . . . . . . . . . . . . . . . . . . . . . . . . . . xvii 1 Intended Audience . . . . . . . . . . . . . . . . . . . . . . . . . . . . . . . . . . . . . . . . . . . . . . . . . . . . . . . . . xviii 2 General Precautions . . . . . . . . . . . . . . . . . . . . . . . . . . . . . . . . . . . . . . . . . . . . . . . . . . . . . . . . xviii 3 Safety Precautions . . . . . . . . . . . . . . . . . . . . . . . . . . . . . . . . . . . . . . . . . . . . . . . . . . . . . . . . . xx 4 Precautions for Safe Use . . . . . . . . . . . . . . . . . . . . . . . . . . . . . . . . . . . . . . . . . . . . . . . . . . . . xxi 5 Additional Precautions According to UL 1604 . . . . . . . . . . . . . . . . . . . . . . . . . . . . . . . . . . . xxii 6 Regulations and Standards. . . . . . . . . . . . . . . . . . . . . . . . . . . . . . . . . . . . . . . . . . . . . . . . . . . xxiii 7 Unit Versions of NE1A-series Controllers . . . . . . . . . . . . . . . . . . . . . . . . . . . . . . . . . . . . . . xxiii SECTION 1 Overview of the NE1A-series Safety Network Controllers . 1 1-1 About NE1A-series Safety Network Controllers . . . . . . . . . . . . . . . . . . . . . . . . . . . . . . . . . 2 1-2 System Configuration . . . . . . . . . . . . . . . . . . . . . . . . . . . . . . . . . . . . . . . . . . . . . . . . . . . . . . 7 1-3 System Setup Procedure . . . . . . . . . . . . . . . . . . . . . . . . . . . . . . . . . . . . . . . . . . . . . . . . . . . . 17 SECTION 2 Specifications and Nomenclature . . . . . . . . . . . . . . . . . . . . . 19 2-1 Nomenclature and Functions . . . . . . . . . . . . . . . . . . . . . . . . . . . . . . . . . . . . . . . . . . . . . . . . . 20 2-2 Specifications. . . . . . . . . . . . . . . . . . . . . . . . . . . . . . . . . . . . . . . . . . . . . . . . . . . . . . . . . . . . . 34 SECTION 3 Installation and Wiring . . . . . . . . . . . . . . . . . . . . . . . . . . . . . 37 3-1 Installation . . . . . . . . . . . . . . . . . . . . . . . . . . . . . . . . . . . . . . . . . . . . . . . . . . . . . . . . . . . . . . . 38 3-2 Wiring . . . . . . . . . . . . . . . . . . . . . . . . . . . . . . . . . . . . . . . . . . . . . . . . . . . . . . . . . . . . . . . . . . 47 SECTION 4 DeviceNet Communications Functions . . . . . . . . . . . . . . . . . 63 4-1 Initial Setting . . . . . . . . . . . . . . . . . . . . . . . . . . . . . . . . . . . . . . . . . . . . . . . . . . . . . . . . . . . . . 64 4-2 Network Status Indication . . . . . . . . . . . . . . . . . . . . . . . . . . . . . . . . . . . . . . . . . . . . . . . . . . . 67 4-3 Remote I/O Allocations . . . . . . . . . . . . . . . . . . . . . . . . . . . . . . . . . . . . . . . . . . . . . . . . . . . . . 68 4-4 Safety Master Function . . . . . . . . . . . . . . . . . . . . . . . . . . . . . . . . . . . . . . . . . . . . . . . . . . . . . 82 4-5 Safety Slave Function . . . . . . . . . . . . . . . . . . . . . . . . . . . . . . . . . . . . . . . . . . . . . . . . . . . . . . 88 4-6 Standard Slave Function . . . . . . . . . . . . . . . . . . . . . . . . . . . . . . . . . . . . . . . . . . . . . . . . . . . . 92 SECTION 5 EtherNet/IP Communications . . . . . . . . . . . . . . . . . . . . . . . . 97 5-1 Connecting to Ethernet . . . . . . . . . . . . . . . . . . . . . . . . . . . . . . . . . . . . . . . . . . . . . . . . . . . . . 98 5-2 Standard Target Function. . . . . . . . . . . . . . . . . . . . . . . . . . . . . . . . . . . . . . . . . . . . . . . . . . . . 102 vii TABLE OF CONTENTS SECTION 6 Explicit Message Communications . . . . . . . . . . . . . . . . . . . . 107 6-1 Receiving Explicit Messages . . . . . . . . . . . . . . . . . . . . . . . . . . . . . . . . . . . . . . . . . . . . . . . . . 108 6-2 Sending Explicit Messages . . . . . . . . . . . . . . . . . . . . . . . . . . . . . . . . . . . . . . . . . . . . . . . . . . 112 SECTION 7 I/O Control . . . . . . . . . . . . . . . . . . . . . . . . . . . . . . . . . . . . . . . 115 7-1 Common Functions . . . . . . . . . . . . . . . . . . . . . . . . . . . . . . . . . . . . . . . . . . . . . . . . . . . . . . . . 116 7-2 Safety Inputs . . . . . . . . . . . . . . . . . . . . . . . . . . . . . . . . . . . . . . . . . . . . . . . . . . . . . . . . . . . . . 123 7-3 Test Outputs . . . . . . . . . . . . . . . . . . . . . . . . . . . . . . . . . . . . . . . . . . . . . . . . . . . . . . . . . . . . . . 128 7-4 Safety Outputs . . . . . . . . . . . . . . . . . . . . . . . . . . . . . . . . . . . . . . . . . . . . . . . . . . . . . . . . . . . . 129 SECTION 8 Programming . . . . . . . . . . . . . . . . . . . . . . . . . . . . . . . . . . . . . 133 8-1 Outline of Programming . . . . . . . . . . . . . . . . . . . . . . . . . . . . . . . . . . . . . . . . . . . . . . . . . . . . 134 8-2 Function Block Overview . . . . . . . . . . . . . . . . . . . . . . . . . . . . . . . . . . . . . . . . . . . . . . . . . . . 137 8-3 Function Block Editing . . . . . . . . . . . . . . . . . . . . . . . . . . . . . . . . . . . . . . . . . . . . . . . . . . . . . 138 8-4 Command Reference: Logic Functions . . . . . . . . . . . . . . . . . . . . . . . . . . . . . . . . . . . . . . . . . 143 8-5 Command Reference: Function Blocks . . . . . . . . . . . . . . . . . . . . . . . . . . . . . . . . . . . . . . . . . 154 SECTION 9 Other Functions . . . . . . . . . . . . . . . . . . . . . . . . . . . . . . . . . . . 203 9-1 Configuration Lock . . . . . . . . . . . . . . . . . . . . . . . . . . . . . . . . . . . . . . . . . . . . . . . . . . . . . . . . 204 9-2 Reset . . . . . . . . . . . . . . . . . . . . . . . . . . . . . . . . . . . . . . . . . . . . . . . . . . . . . . . . . . . . . . . . . . . 205 9-3 Access Control with Password . . . . . . . . . . . . . . . . . . . . . . . . . . . . . . . . . . . . . . . . . . . . . . . 207 SECTION 10 Operating Modes and Power Supply Interruptions . . . . . . 209 10-1 NE1A-series Controller Operating Modes . . . . . . . . . . . . . . . . . . . . . . . . . . . . . . . . . . . . . . 210 10-2 Behavior for Power Supply Interruptions . . . . . . . . . . . . . . . . . . . . . . . . . . . . . . . . . . . . . . . 215 SECTION 11 Remote I/O Communications Performance and Local I/O Response Time . . . . . . . . . . . . . . . . . . . . . . . . . . . . 217 viii 11-1 Outline . . . . . . . . . . . . . . . . . . . . . . . . . . . . . . . . . . . . . . . . . . . . . . . . . . . . . . . . . . . . . . . . . . 218 11-2 Operational Flow and Cycle Time. . . . . . . . . . . . . . . . . . . . . . . . . . . . . . . . . . . . . . . . . . . . . 219 11-3 Startup Time . . . . . . . . . . . . . . . . . . . . . . . . . . . . . . . . . . . . . . . . . . . . . . . . . . . . . . . . . . . . . 220 11-4 I/O Refresh Cycle Time and Network Reaction Time. . . . . . . . . . . . . . . . . . . . . . . . . . . . . . 222 11-5 Reaction Time . . . . . . . . . . . . . . . . . . . . . . . . . . . . . . . . . . . . . . . . . . . . . . . . . . . . . . . . . . . . 225 TABLE OF CONTENTS SECTION 12 Troubleshooting . . . . . . . . . . . . . . . . . . . . . . . . . . . . . . . . . . . 231 12-1 Error Categories. . . . . . . . . . . . . . . . . . . . . . . . . . . . . . . . . . . . . . . . . . . . . . . . . . . . . . . . . . . 232 12-2 Confirmation of Error State . . . . . . . . . . . . . . . . . . . . . . . . . . . . . . . . . . . . . . . . . . . . . . . . . . 233 12-3 Indicator/Display Status and Corrective Actions for Errors . . . . . . . . . . . . . . . . . . . . . . . . . 234 12-4 Error History . . . . . . . . . . . . . . . . . . . . . . . . . . . . . . . . . . . . . . . . . . . . . . . . . . . . . . . . . . . . . 241 12-5 Errors When Downloading . . . . . . . . . . . . . . . . . . . . . . . . . . . . . . . . . . . . . . . . . . . . . . . . . . 248 12-6 Errors When Resetting. . . . . . . . . . . . . . . . . . . . . . . . . . . . . . . . . . . . . . . . . . . . . . . . . . . . . . 251 12-7 Errors When Changing Modes . . . . . . . . . . . . . . . . . . . . . . . . . . . . . . . . . . . . . . . . . . . . . . . 252 12-8 Connection Status Tables. . . . . . . . . . . . . . . . . . . . . . . . . . . . . . . . . . . . . . . . . . . . . . . . . . . . 253 SECTION 13 Maintenance and Inspection . . . . . . . . . . . . . . . . . . . . . . . . . 259 13-1 Inspection. . . . . . . . . . . . . . . . . . . . . . . . . . . . . . . . . . . . . . . . . . . . . . . . . . . . . . . . . . . . . . . . 260 13-2 NE1A-series Controller Replacement . . . . . . . . . . . . . . . . . . . . . . . . . . . . . . . . . . . . . . . . . . 261 Appendix . . . . . . . . . . . . . . . . . . . . . . . . . . . . . . . . . . . . . . . . . 263 Glossary . . . . . . . . . . . . . . . . . . . . . . . . . . . . . . . . . . . . . . . . . . 289 Index. . . . . . . . . . . . . . . . . . . . . . . . . . . . . . . . . . . . . . . . . . . . . 293 Revision History . . . . . . . . . . . . . . . . . . . . . . . . . . . . . . . . . . . 297 ix x About this Manual: This manual describes the installation and operation of the NE1A-series Safety Network Controllers. Please read this manual carefully and be sure you understand the information provided before attempting to install or operate the NE1A-series Controller. Be sure to read the precautions provided in the following section. Definition of NE1A-series Controllers In this manual, “NE1A-series Controllers” refers to the following Controllers CPU Units without EtherNet/IP NE1A-SCPU01(-V1) NE1A-SCPU02 CPU Units with EtherNet/IP NE1A-SCPU01-EIP NE1A-SCPU02-EIP Related Manuals The following manuals provide information on the DeviceNet and DeviceNet Safety. DeviceNet Safety NE1A Series Safety Network Controller Operation Manual (this manual) (Z906) This manual describes the specifications, functions, and usage of the NE1A-SCPU01 and NE1ASCPU02. DeviceNet Safety System Configuration Manual (Z905-E1-07 or higher) This manual explains how to configure the DeviceNet Safety system using the Network Configurator. DeviceNet Safety Safety I/O Terminal Operation Manual (Z904) This manual describes the DST1-series Slave models, specifications, functions, and application methods in detail. EtherNet/IP-DeviceNet Router Operation Manual (Z912) This manual describes the specifications, functions, and application methods of the EtherNet/IPDeviceNet Router in detail. DeviceNet Operation Manual (W267) This manual describes the construction and connection of a DeviceNet network. It provides detailed information on the installation and specifications of cables, connectors, and other peripheral equipment used in the network, and on the supply of communications power. Obtain this manual and gain a firm understanding of its contents before using a DeviceNet system. !WARNING Failure to read and understand the information provided in this manual may result in personal injury or death, damage to the product, or product failure. Please read each section in its entirety and be sure you understand the information provided in the section and related sections before attempting any of the procedures or operations given. xi xii Read and Understand this Manual Please read and understand this manual before using the product. Please consult your OMRON representative if you have any questions or comments. Warranty and Limitations of Liability WARRANTY OMRON's exclusive warranty is that the products are free from defects in materials and workmanship for a period of one year (or other period if specified) from date of sale by OMRON. OMRON MAKES NO WARRANTY OR REPRESENTATION, EXPRESS OR IMPLIED, REGARDING NONINFRINGEMENT, MERCHANTABILITY, OR FITNESS FOR PARTICULAR PURPOSE OF THE PRODUCTS. ANY BUYER OR USER ACKNOWLEDGES THAT THE BUYER OR USER ALONE HAS DETERMINED THAT THE PRODUCTS WILL SUITABLY MEET THE REQUIREMENTS OF THEIR INTENDED USE. OMRON DISCLAIMS ALL OTHER WARRANTIES, EXPRESS OR IMPLIED. LIMITATIONS OF LIABILITY OMRON SHALL NOT BE RESPONSIBLE FOR SPECIAL, INDIRECT, OR CONSEQUENTIAL DAMAGES, LOSS OF PROFITS OR COMMERCIAL LOSS IN ANY WAY CONNECTED WITH THE PRODUCTS, WHETHER SUCH CLAIM IS BASED ON CONTRACT, WARRANTY, NEGLIGENCE, OR STRICT LIABILITY. In no event shall the responsibility of OMRON for any act exceed the individual price of the product on which liability is asserted. IN NO EVENT SHALL OMRON BE RESPONSIBLE FOR WARRANTY, REPAIR, OR OTHER CLAIMS REGARDING THE PRODUCTS UNLESS OMRON'S ANALYSIS CONFIRMS THAT THE PRODUCTS WERE PROPERLY HANDLED, STORED, INSTALLED, AND MAINTAINED AND NOT SUBJECT TO CONTAMINATION, ABUSE, MISUSE, OR INAPPROPRIATE MODIFICATION OR REPAIR. xiii Application Considerations SUITABILITY FOR USE OMRON shall not be responsible for conformity with any standards, codes, or regulations that apply to the combination of products in the customer's application or use of the products. At the customer's request, OMRON will provide applicable third party certification documents identifying ratings and limitations of use that apply to the products. This information by itself is not sufficient for a complete determination of the suitability of the products in combination with the end product, machine, system, or other application or use. The following are some examples of applications for which particular attention must be given. This is not intended to be an exhaustive list of all possible uses of the products, nor is it intended to imply that the uses listed may be suitable for the products: • Outdoor use, uses involving potential chemical contamination or electrical interference, or conditions or uses not described in this manual. • Nuclear energy control systems, combustion systems, railroad systems, aviation systems, medical equipment, amusement machines, vehicles, safety equipment, and installations subject to separate industry or government regulations. • Systems, machines, and equipment that could present a risk to life or property. Please know and observe all prohibitions of use applicable to the products. NEVER USE THE PRODUCTS FOR AN APPLICATION INVOLVING SERIOUS RISK TO LIFE OR PROPERTY WITHOUT ENSURING THAT THE SYSTEM AS A WHOLE HAS BEEN DESIGNED TO ADDRESS THE RISKS, AND THAT THE OMRON PRODUCTS ARE PROPERLY RATED AND INSTALLED FOR THE INTENDED USE WITHIN THE OVERALL EQUIPMENT OR SYSTEM. PROGRAMMABLE PRODUCTS OMRON shall not be responsible for the user's programming of a programmable product, or any consequence thereof. xiv Disclaimers CHANGE IN SPECIFICATIONS Product specifications and accessories may be changed at any time based on improvements and other reasons. It is our practice to change model numbers when published ratings or features are changed, or when significant construction changes are made. However, some specifications of the products may be changed without any notice. When in doubt, special model numbers may be assigned to fix or establish key specifications for your application on your request. Please consult with your OMRON representative at any time to confirm actual specifications of purchased products. DIMENSIONS AND WEIGHTS Dimensions and weights are nominal and are not to be used for manufacturing purposes, even when tolerances are shown. PERFORMANCE DATA Performance data given in this manual is provided as a guide for the user in determining suitability and does not constitute a warranty. It may represent the result of OMRON's test conditions, and the users must correlate it to actual application requirements. Actual performance is subject to the OMRON Warranty and Limitations of Liability. ERRORS AND OMISSIONS The information in this manual has been carefully checked and is believed to be accurate; however, no responsibility is assumed for clerical, typographical, or proofreading errors, or omissions. xv xvi PRECAUTIONS 1 2 3 4 5 6 7 Intended Audience . . . . . . . . . . . . . . . . . . . . . . . . . . . . . . . . . . . . . . . . . . . . . General Precautions . . . . . . . . . . . . . . . . . . . . . . . . . . . . . . . . . . . . . . . . . . . . Safety Precautions. . . . . . . . . . . . . . . . . . . . . . . . . . . . . . . . . . . . . . . . . . . . . . Precautions for Safe Use . . . . . . . . . . . . . . . . . . . . . . . . . . . . . . . . . . . . . . . . . Additional Precautions According to UL 1604. . . . . . . . . . . . . . . . . . . . . . . . Regulations and Standards . . . . . . . . . . . . . . . . . . . . . . . . . . . . . . . . . . . . . . . Unit Versions of NE1A-series Controllers . . . . . . . . . . . . . . . . . . . . . . . . . . . xviii xviii xx xxi xxii xxiii xxiii xvii 1 Intended Audience 1 Intended Audience This manual is intended for the following personnel, who must have knowledge of electrical systems (an electrical engineer or the equivalent). • Personnel in charge of introducing FA and safety systems into production facilities • Personnel in charge of designing FA and safety systems • Personnel in charge of managing FA facilities • Personnel who have the qualifications, authority, and obligation to provide safety during each of the following product phases: mechanical design, installation, operation, maintenance, and disposal 2 General Precautions The user must operate the product according to the performance specifications described in the operation manuals. Before using the product under conditions which are not described in the manual or applying the product to nuclear control systems, railroad systems, aviation systems, vehicles, combustion systems, medical equipment, amusement machines, safety equipment, and other systems, machines, and equipment that may have a serious influence on lives and property if used improperly, consult your OMRON representative. Make sure that the ratings and performance characteristics of the product are sufficient for the systems, machines, and equipment, and be sure to provide the systems, machines, and equipment with double safety mechanisms. This manual provides information for programming and operating the Unit. Be sure to read this manual before attempting to use the Unit and keep this manual close at hand for reference during operation. !WARNING It is extremely important that a PLC and all PLC Units be used for the specified purpose and under the specified conditions, especially in applications that can directly or indirectly affect human life. You must consult with your OMRON representative before applying a PLC System to the above-mentioned applications !WARNING This is the Operation Manual for the NE1A-series Safety Network Controllers. Heed the following items during system construction to ensure that safetyrelated components are configured in a manner that allows the system functions to sufficiently operate. • Risk Assessment The proper use of the safety device described in this Operation Manual as it relates to installation conditions and mechanical performance and functions is a prerequisite for its use. When selecting or using this safety device, risk assessment must be conducted with the aim of identifying potential danger factors in equipment or facilities in which the safety device is to be applied, during the development stage of the equipment or facilities. Suitable safety devices must be selected under the guidance of a sufficient risk assessment system. An insufficient risk assessment system may lead to the selection of unsuitable safety devices. • Typical related international standards: ISO 14121, Safety of Machinery -- Principles of Risk Assessment xviii 2 General Precautions • Safety Measures When using this safety device to build systems containing safety-related components for equipment or facilities, the system must be designed with the full understanding of and conformance to international standards, such as those listed below, and/or standards in related industries. • Typical related international standards: ISO/DIS 12100, Safety of Machinery -- Basic Concepts and General Principles for Design IEC 61508, Safety Standard for Safety Instrumented Systems (Functional Safety of Electrical/Electronic/Programmable Electronic Safety-related Systems) • Role of Safety Device This safety device is provided with safety functions and mechanisms as stipulated in relevant standards, but suitable designs must be used to allow these functions and mechanisms to operate properly inside system constructions containing safety-related components. Build systems that enable these functions and mechanisms to perform properly, based on a full understanding of their operation. • Typical related international standards: ISO 14119, Safety of Machinery -- Interlocking Devices Associated with Guards -- Principles of Design and Selection • Installation of Safety Device The construction and installation of systems with safety-related components for equipment or facilities must be performed by technicians who have received suitable training. • Typical related international standards: ISO/DIS 12100, Safety of Machinery -- Basic Concepts and General Principles for Design IEC 61508, Safety Standard for Safety Instrumented Systems (Functional Safety of Electrical/Electronic/Programmable Electronic Safety-related Systems) • Complying with Laws and Regulations This safety device conforms to the relevant regulations and standards, but make sure that it is used in compliance with local regulations and standards for the equipment or facilities in which it is applied. • Typical related international standards: IEC 60204, Safety of Machinery -- Electrical Equipment of Machines • Observing Precautions for Use When putting the selected safety device to actual use, heed the specifications and precautions in this Operation Manual and those in the Instruction Manual that comes with the product. Using the product in a manner that deviates from these specifications and precautions will lead to unexpected failures in equipment or devices, and to damages that result from such failures, due to insufficient operating functions in safety-related components. • Moving or Transferring Devices or Equipment When moving or transferring devices or equipment, be sure to include this Operation Manual to ensure that the person to whom the device or equipment is being moved or transferred will be able to operate it properly. • Typical related international standards: ISO/DIS 12100 ISO, Safety of Machinery -- Basic Concepts and General Principles for Design IEC 61508, Safety Standard for Safety Instrumented Systems (Functional Safety of Electrical/ Electronic/ Programmable Electronic Safety-related Systems) xix 3 Safety Precautions 3 Safety Precautions !WARNING Serious injury may possibly occur due to loss of required safety functions. Do not use the NE1A-series Controller's test outputs as safety outputs. Serious injury may possibly occur due to loss of required safety functions. Do not use DeviceNet standard I/O data, EtherNet/IP standard I/O data or explicit message data as safety data. Serious injury may possibly occur due to loss of required safety functions. Do not use indicators or 7-segment display on the NE1A-series Controller for safety operations. Serious injury may possibly occur due to breakdown of safety outputs or test outputs. Do not connect loads beyond the rated value to the safety outputs and test outputs. Serious injury may possibly occur due to loss of required safety functions. Wire the NE1A-series Controller properly so that the 24-VDC line does NOT touch the outputs accidentally or unintentionally. Serious injury may possibly occur due to loss of required safety functions. Ground the 0-V line of the power supply for external output devices so that the devices do NOT turn ON when the safety output line or the test output line is grounded. Serious injury may possibly occur due to loss of required safety functions. Clear previous configuration data before connecting the devices to the network. Serious injury may possibly occur due to loss of required safety functions. Set suitable node addresses and a suitable baud rate before connecting the devices to the network. Serious injury may possibly occur due to loss of required safety functions. Perform user testing and confirm that all of the device configuration data and operation is correct before starting system operation. Serious injury may possibly occur due to loss of required safety functions. When replacing a device, configure the replacement device suitably and confirm that it operate correctly. Serious injury may possibly occur due to loss of required safety functions. Use appropriate components or devices according to the requirements given in the following table. Control device Emergency stop switch Door interlocking switch or limit switch Safety sensor Relay with forcibly guided contacts xx Requirements Use approved devices with a direct opening mechanism compliant with IEC/ EN 60947-5-1. Use approved devices with a direct opening mechanism compliant with IEC/ EN 60947-5-1 and capable of switching micro-loads of 4 mA at 24 VDC. Use approved devices compliant with the relevant product standards, regulations, and rules in the country where they are used. Use approved devices with forcibly guided contacts compliant with EN 50205. For feedback signals, use devices with contacts capable of switching micro-loads of 4 mA at 24 VDC. 4 Precautions for Safe Use Control device Contactor Requirements Use contactors with a forcibly guided mechanism and monitor the auxiliary NC contact to detect contactor failures. For feedback signals, use devices with contacts capable of switching micro-loads of 4 mA at 24 VDC. Evaluate whether devices used are appropriate to satisfy the requirements of the safety category level. Other devices 4 Precautions for Safe Use ■ Handling with Care Do not drop the NE1A-series Controller or subject it to excessive vibration or mechanical shock. The NE1A-series Controller may be damaged and may not function properly. ■ Installation and Storage Environment Do not use or store the NE1A-series Controller in any of the following locations: • Locations subject to direct sunlight • Locations subject to temperatures or humidity outside the range specified in the specifications • Locations subject to condensation as the result of severe changes in temperature • Locations subject to corrosive or flammable gases • Locations subject to dust (especially iron dust) or salts • Locations subject to water, oil, or chemicals • Locations subject to shock or vibration Take appropriate and sufficient measures when installing systems in the following locations. Inappropriate and insufficient measures may result in malfunction. • Locations subject to static electricity or other forms of noise • Locations subject to strong electromagnetic fields • Locations subject to possible exposure to radioactivity • Locations close to power supplies ■ Installation and Mounting • Use the NE1A-series Controller within an enclosure with IP54 protection or higher according to IEC/EN 60529. • Use DIN rail (TH35-7.5/TH35-15 according to IEC 60715) to install the NE1A-series Controller into the control panel. Mount the NE1A-series Controller to the DIN rail using PFP-M End Plates (not included with the NE1A-series Controller) to prevent it falling off the DIN rail because of vibration. • Space must be provided around the NE1A-series Controller, at least 5 mm from its side and at least 50 mm from its top and bottom surfaces, for ventilation and wiring. ■ Installation and Wiring • Use the following to wire external I/O devices to the NE1A-series Controller. Solid wire 0.2 to 2.5 mm2 (AWG 24 to AWG 12) Stranded (flexible) wire 0.34 to 1.5 mm2 (AWG 22 to AWG 16) xxi Additional Precautions According to UL 1604 5 • Disconnect the NE1A-series Controller from the power supply before starting wiring. Devices connected to the NE1A-series Controller may operate unexpectedly. • Properly apply the specified voltage to the NE1A-series Controller inputs. Applying an inappropriate DC voltage or any AC voltage will cause the NE1A-series Controller to fail. • Be sure to separate the communications cables and I/O cables from near high-voltage/high-current lines. • Be cautious not to get your fingers caught when attaching connectors to the plugs on the NE1A-series Controller. • Tighten the DeviceNet connector screws correctly (0.25 to 0.3 N·m). • Incorrect wiring may lead to loss of safety functions. Wire conductors correctly and verify the operation of the NE1A-series Controller before using the system in which the NE1A-series Controller is incorporated. • After wiring is completed, be sure to remove label for wire clipping prevention on the NE1A-series Controller to enable heat to escape or proper cooling. ■ Power Supply Selection Use a DC power supply satisfying the following requirements. • The secondary circuits of the DC power supply must be isolated from the primary circuit by double insulation or reinforced insulation. • The DC power supply must satisfy the requirements for class 2 circuits or limited voltage/current circuits given in UL 508. • The output hold time must be 20 ms or longer. ■ Periodic Inspections and Maintenance • Disconnect the NE1A-series Controller from the power supply before replacing the Controller. Devices connected to the NE1A-series Controller may operate unexpectedly. • Do not disassemble, repair, or modify the NE1A-series Controller. Doing so may lead to loss of safety functions. ■ Disposal • Be cautions not to injure yourself when dismantling the NE1A-series Controller. 5 Additional Precautions According to UL 1604 The NE1A-series Controller is suitable for use in Class I, Div. 2, Group A, B, C, D or Non-Hazardous Location Only. WARNING - Explosion Hazard - Substitution of Components May Impair Suitability For Class I, Div. 2. WARNING - Explosion Hazard - Do Not Disconnect Equipment Unless Power Has Been Switched OFF or the Area Is Known To Be Non-Hazardous. WARNING - Explosion Hazard - Do Not Disconnect USB Connector Unless Power Has Been Switched OFF or the Area Is Known To Be Non-Hazardous. xxii 6 Regulations and Standards 6 Regulations and Standards The following certifications have been obtained for the NE1A-SCPU01, NE1ASCPU01-V1, NE1A-SCPU02, NE1A-SCPU01-EIP, and NE1A-SCPU02-EIP. Certifying organization TÜV Rheinland UL 7 Standards IEC 61508 part 1-7/12.98-05.00, EN ISO 13849-1:2006 EN 954-1:1996 (ISO 13849-1:1999) EN ISO 13849-2:2003, IEC 61131-2:2007, EN 60204-1:2006, EN 61000-6-2:2005, EN 61000-6-4:2007, EN ISO 13850: 2006 (EN 418:1992) NFPA 79-2007, ANSI RIA 15.06-1999, ANSI B11.19-2003 UL 1998, UL 508, UL 1604, NFPA 79, IEC 61508, CSA 22.2 No. 142, CSA 22.2 No. 213 Unit Versions of NE1A-series Controllers Checking the Unit Version A “unit version” has been introduced to manage NE1A-series Safety Network Controllers according to differences in functionality accompanying Unit upgrades even though the model numbers are the same. The unit version can be checked on the product itself or using the Network Configurator. Note The Network Configurator maintains a revision number to manage device functions for DeviceNet and EtherNet/IP. Refer to Checking the Unit Version with the Network Configurator on page xxiv for the relationship between NE1A-series Controller unit versions and the revisions. Checking the Unit Version on the Product Nameplate The unit version (Ver. @.@) is listed near the lot number on the nameplate of the products for which unit versions are being managed, as shown below. • Unit versions for the NE1A-SCPU01 and NE1A-SCPU02 start at unit version 1.0. • Controllers that do not have a unit version listed on the label are called Pre-Ver. 1.0 Controllers. • Unit versions for the NE1A-SCPU01-EIP and NE1A-SCPU02-EIP start at unit version 1.0. xxiii 7 Unit Versions of NE1A-series Controllers Product Nameplate The unit version is listed here. (Example: Ver. 1.0) Checking the Unit Version with the Network Configurator The following procedure can be used to check the unit version from the Network Configurator. 1,2,3... 1. Select Network - Upload to upload the configuration information. The device icons will be displayed, as shown in the following diagram. 2. Right-click on a device icon to display the popup menu shown below and select Property from the menu. xxiv Unit Versions of NE1A-series Controllers 7 The following Property Dialog Box will be displayed. The device name and revision are given in the Property Dialog Box. The NE1A-series Controllers supported by Network Configurator version 2.2@ are listed in the following table. xxv 7 Unit Versions of NE1A-series Controllers ■ CPU Units without EtherNet/IP Model NE1A-SCPU01 NE1A-SCPU01-V1 NE1A-SCPU01-V1 NE1A-SCPU02 NE1A-SCPU02 ■ CPU Device name NE1A-SCPU01 NE1A-SCPU01-V1 NE1A-SCPU01-V1 NE1A-SCPU02 NE1A-SCPU02 Revision 1.01 1.01 2.01 1.01 2.01 Unit version Pre-Ver. 1.0 1.0 2.0 1.0 2.0 Revision 1.01 1.01 Unit version Units with EtherNet/IP Model NE1A-SCPU01-EIP NE1A-SCPU02-EIP Device name NE1A-SCPU01-EIP NE1A-SCPU02-EIP 1.0 1.0 Checking the Unit Version with the Unit Version Label The following unit version labels are provided with the Controller. These labels can be attached to the front of the Controllers to differentiate between Controller with different unit versions from the front of the Controller. xxvi 7 Unit Versions of NE1A-series Controllers Function Support by Unit Version Model Unit version Function Logic operations Maximum program size (total number of function blocks) Added function blocks • RS Flip-flop • Multi Connector • Muting • Enable Switch • Pulse Generator • Counter • Comparator Selection of the rising edge of the reset condition for the Reset and Restart Function Blocks Use local I/O status in user programming Use the Unit's general status in user programming Waiting for safety I/O communications to start before starting program execution I/O control functions Contact Operation Counter Total ON Time Monitor DeviceNet communications functions Number of safety I/O connections at the Safety Master Selection of operation of safety I/O communications after a communications error Add local output status to send data during Slave operation. Add local input monitoring to send data during Slave operation. Communications with devices on other networks (off-link connections) NE1ASCPU01 Pre-Ver. 1.0 NE1ANE1ANE1ASCPU01-V1 SCPU02 SCPU01-EIP Ver. 1.0 or 2.0 Ver. 1.0 or 2.0 Ver. 1.0 NE1ASCPU02-EIP Ver. 1.0 128 254 254 254 254 --- Supported Supported Supported Supported --- Supported Supported Supported Supported ----- Supported Supported Supported Supported Supported Supported Supported Supported --- Supported (Unit version 2.0 only) Supported (Unit version 2.0 only) Supported Supported ----- Supported Supported Supported Supported Supported Supported Supported Supported 16 32 32 32 32 --- Supported Supported Supported Supported --- Supported Supported Supported Supported --- Supported Supported Supported Supported --- Supported (Unit version 2.0 only) Supported (Unit version 2.0 only) Supported Supported Supported Supported Supported Supported Supported Supported Supported Supported ----- ----- Supported Supported Supported Supported ----- ----- Supported Supported Supported Supported Functions supporting system startup and error recovery Saving non-fatal error history in non-vola- --tile memory Added function block errors to error his- --tory. EtherNet/IP communications I/O communications --Message communications --Routing between DeviceNet and EtherNet/IP I/O routing --Message routing --- Note In this manual, any functionality that is supported by unit version 1.0 or later or unit version 2.0 or later is also supported by CPU Units with EtherNet/IP. xxvii 7 Unit Versions of NE1A-series Controllers Unit Versions and Programming Devices Network Configurator version 2.0@ or higher must be used when using a NE1A-SCPU01-V1 or NE1A-SCPU02 Safety Logic Controller with unit version 2.0. Network Configurator version 2.2@ or higher must be used when using a CPU Unit that supports EtherNet/IP. The following table shows the relationship between unit versions and Network Configurator versions. Model number Ver. 1.3@ Can be used. NE1A-SCPU01 Pre-Ver. 1.0 NE1A-SCPU01-V1 with unit version 1.0 NE1A-SCPU02 with unit version 1.0 NE1A-SCPU01-V1 with unit version 2.0 NE1A-SCPU02 with unit version 2.0 NE1A-SCPU01-EIP NE1A-SCPU02-EIP Ver. 1.5@ Can be used. Network Configurator Ver. 1.6@ Ver. 2.0@/2.1@ Ver. 2.2@ Can be used. Can be used. Can be used. Cannot be used. Cannot be used. Can be used. Can be used. Can be used. Cannot be used. Cannot be used. Can be used. Can be used. Can be used. Cannot be used. Cannot be used. Can be used. (See note 1.) Cannot be used. Cannot be used. Can be used. (See note 1.) Cannot be used. Cannot be used. Cannot be used. Cannot be used. Cannot be used. Cannot be used. Can be used. Can be used. Can be used. Can be used. Note Cannot be used. Can be used. Cannot be used. Can be used. (1) Can be used as a Controller with unit version 1.0. (2) Network Configurator version 1.5@ or lower can be upgraded to version 1.6@ free of charge. (3) When using Network Configurator version 1.6@, there are no operational differences in the NE1A-SCPU01-V1 and NE1A-SCPU02 Safety Logic Controllers that derive from the unit version. Unit Versions and Configuration Data The following table shows the relationship between unit versions of NE1Aseries Controllers in Network configuration files created with Network Configurator version 2.2@ and the unit version of NE1A-series Controllers to which configuration files are downloaded. NE1A-series CPU Unit to which configuration file is downloaded Pre-Ver. 1.0 CPU CPU Unit with unit CPU Unit with unit CPU Unit with unit Unit version 1.0 that version 2.0 version 1.0 that does not support supports EtherNet/ EtherNet/IP IP Pre-Ver. 1.0 CPU Unit Downloading is pos- Not possible. Not possible. Not possible. sible. (See note 1.) (See note 1.) (See note 1.) CPU Unit with unit version 1.0 Not possible. Downloading is pos- Downloading is pos- Not possible. that does not support Ethersible. sible. (See note 2.) (See note 1.) Net/IP CPU Unit with unit version 2.0 Not possible. Not possible. Downloading is pos- Not possible. sible. (See note 1.) CPU Unit with unit version 1.0 Not possible. Not possible. Not possible. Downloading is posthat supports EtherNet/IP sible. Unit versions of NE1A-series CPU Unit in Network configuration files created with Network Configurator version 2.2@ Note (1) Downloading is possible if the device type is changed using the function provided in Network Configurator version 2.2@. For details, refer to NE1A-series Controller Upgrade Procedure on page xxix. (2) Only functions CPU Units with unit version 1.0 can be used. xxviii 7 Unit Versions of NE1A-series Controllers IMPORTANT The Configuration data created with unit version 1.0 can be downloaded to a NE1A-series Controller with unit version 2.0. The data will be subsequently treated as unit version 2.0 data if it is uploaded. NE1A-series Controller Upgrade Procedure Functions are added and functionality is expanded in various ways for the NE1A-series Controllers. The device type in an existing network configuration file can be changed to a higher version so that the new functionality can be used. The following table shows the NE1A-series Control device types in network configuration files and the device types that they can be upgraded to. Device type before change NE1A-SCPU01 Pre-Ver. 1.0 NE1A-SCPU01-V1 Unit Ver. 1.0 NE1A-SCPU02 Unit Ver. 1.0 NE1A-SCPU01-V1 Unit Ver. 2.0 NE1A-SCPU02 Unit Ver. 2.0 NE1A-SCPU01-EIP Unit Ver. 1.0 NE1A-SCPU02-EIP Unit Ver. 1.0 Device type after change NE1A-SCPU02 NE1A-SCPU01-V1 Unit Ver. 1.0 OK Unit Ver. 2.0 OK Unit Ver. 1.0 OK Unit Ver. 2.0 OK NE1ASCPU01-EIP Unit Ver. 1.0 OK NE1ASCPU02-EIP Unit Ver. 1.0 OK --- OK OK OK OK OK Not possible Not possible --- OK Not possible OK Not possible --- Not possible OK OK OK Not possible Not possible Not possible --- Not possible OK Not possible Not possible Not possible Not possible --- OK Not possible Not possible Not possible Not possible Not possible --- 1. Reading Configuration Data Use the following procedure to read the configuration data with the Network Configurator. • Read the saved configuration data. • Use network uploading to read configuration data from devices on the network. The following screen will be displayed when reading has been completed. 2. Converting Configuration Data In the data read with the Network Configurator, right-click the NE1A-SCPU01 that is to be changed to the NE1A-SCPU01-V1 or NE1A-SCPU02 and select Change Device Type from the pop-up menu. xxix Unit Versions of NE1A-series Controllers 7 Next, select the new device in the New Device and press the OK Button. After a moment, the model number will change and the configuration data for the new device will be completed. 3. Expansion Configuration When the data configuration is converted, all expanded functionality will be set to the default values. Set the configuration for all expanded functionality to be used. IMPORTANT xxx (1) When changing the device type using Network Configurator version 1.61, open the Edit Device Parameters Dialog Box of the Controller, select a connection on the Safety Connection Tab Page, and click the Update Button. Unit Versions of NE1A-series Controllers 7 (2) When changing the device type using Network Configurator version 2.@ or higher, the connection information will be updated automatically. xxxi SECTION 1 Overview of the NE1A-series Safety Network Controllers 1-1 1-2 1-3 About NE1A-series Safety Network Controllers . . . . . . . . . . . . . . . . . . . . . . 2 1-1-1 Introduction to the NE1A-series Safety Network Controllers . . . . . 2 1-1-2 Features of the NE1A-series Controllers . . . . . . . . . . . . . . . . . . . . . 3 1-1-3 Functional Overview. . . . . . . . . . . . . . . . . . . . . . . . . . . . . . . . . . . . . 4 1-1-4 Functions Improved in the Unit Version 2.0 Upgrade . . . . . . . . . . . 6 1-1-5 Functions Added for Controllers that Support EtherNet/IP . . . . . . . 6 1-1-6 Comparison of the I/O Capacity of the NE1A-SCPU01(-V1)(-EIP) and NE1A-SCPU02(-EIP). . . . . . . . . . . . . . . . . . . . . . . . . . . . . . . . . . . . 6 System Configuration . . . . . . . . . . . . . . . . . . . . . . . . . . . . . . . . . . . . . . . . . . . 7 1-2-1 DeviceNet Safety System Overview. . . . . . . . . . . . . . . . . . . . . . . . . 7 1-2-2 Example System Configurations . . . . . . . . . . . . . . . . . . . . . . . . . . . 8 System Setup Procedure . . . . . . . . . . . . . . . . . . . . . . . . . . . . . . . . . . . . . . . . . 17 1 Section 1-1 About NE1A-series Safety Network Controllers 1-1 1-1-1 About NE1A-series Safety Network Controllers Introduction to the NE1A-series Safety Network Controllers The NE1A-series Safety Network Controllers provide various functions, such as safety logic operations, safety I/O control, and a DeviceNet Safety protocol. The NE1A-series Controller allows the user to construct a safety control/network system that meets the requirements for Safety Integrity Level (SIL) 3 according to IEC 61508 (Functional Safety of Electrical/Electronic/ Programmable Electronic Safety-related Systems) and the requirements for Safety Category 4 according to EN 954-1. In the example system shown below, the safety control system implemented with an NE1A-series Controller and the monitoring system implemented with a Standard PLC are realized on the same network. • As a Safety Logic Controller, the NE1A-series Controller executes safety logic operations and controls local I/O. • As a DeviceNet Safety Master, the NE1A-series Controller controls the remote I/O of DeviceNet Safety Slaves. • As a DeviceNet Standard Slave, the NE1A-series Controller communicates with the DeviceNet Standard Master. Safety Logic Operations and Safety I/O Control Network Configurator Standard PLC Standard Master NE1A Safety Master Standard Slave Standard Slave Non-safety-related Control (Standard Control) The PLC system monitors the NE1A (i.e., the safety control system) using DeviceNet I/O communications and explicit messages. 2 DST1 series Safety Slave Safety related Control The DeviceNet Safety System controls remote I/O. About NE1A-series Safety Network Controllers 1-1-2 Section 1-1 Features of the NE1A-series Controllers Safety Logic Operations In addition to basic logic functions, such as AND and OR, function blocks such as Emergency Stop or Safety Gate Monitoring that enable various safety applications are supported. Local Safety I/O • In the NE1A-SCPU01(-V1)(-EIP), a total of 24 local safety I/O points are supported: 16 inputs and 8 outputs. • In the NE1A-SCPU02(-EIP), a total of 48 local safety I/O points are supported: 40 inputs and 8 outputs. • Faults in external wiring can be detected. • Dual Channel Mode can be set for pairs of related local input terminals. When Dual Channel Mode is set, an NE1A-series Controller can evaluate the input data patterns and the time discrepancy between input signals. • Dual Channel Mode can be set for pairs of related local output terminals. When Dual Channel Mode is set, an NE1A-series Controller can evaluate the output data patterns. DeviceNet Safety Communications • As a Safety Master, Pre-Ver. 1.0 Controllers can perform safety I/O communications with up to 16 connections using up to 16 bytes per connection. • As a Safety Master, an NE1A-series Controller with unit version 1.0 or later (including Controllers that support EtherNet/IP) can perform safety I/O communications with up to 32 connections using up to 16 bytes per connection. • As a Safety Slave, the NE1A-series Controllers can perform safety I/O communications with a maximum of four connections using up to 16 bytes per connection. DeviceNet Standard Communications As a Standard Slave, the NE1A-series Controllers can perform standard I/O communications with one Standard Master for up to two connections using up to 16 bytes per connection. EtherNet/IP Standard Communications (Only Controllers that Support EtherNet/IP) As an EtherNet/IP target, an NE1A-series Controller can perform standard I/O communications with up to two connections with a single EtherNet/IP originator, using up to 128 bytes for input and 16 bytes for output per connection. DeviceNet Communications Disable (Standalone) Setting An NE1A-series Controller can be used as a Standalone Controller by disabling its DeviceNet communications. Configuration with a Graphical Tool • A graphical tool is provided for both network configuration and user programming. It enables easy configuration and programming. • A Logic Editor can be activated from the Network Configurator. • Configuration data can be downloaded and uploaded, and devices can be monitored online via DeviceNet, USB, EtherNet/IP, or the peripheral interface of an OMRON PLC. 3 Section 1-1 About NE1A-series Safety Network Controllers System Startup and Error Recovery Support • The error information can be checked by using the Network Configurator or the indicators on the front of the NE1A-series Controller. • The NE1A-series Controller’s internal status information can be monitored from a Standard PLC by allocating the information in the Standard Master. In the same way, monitoring with a Safety PLC is possible by allocating information in the Safety Master. • An NE1A-series Controller's internal status information can be allocated in an EtherNet/IP originator and monitored by a Standard PLC. (Possible only for Controllers that support EtherNet/IP.) Access Control with a Password • The NE1A-series Controller’s configuration data is protected by a password set in the Controller. • The Network Configurator controls access to each project file with a password. 1-1-3 Functional Overview Function Logic Operations Logic operations Safety I/O I/O comments Overview SECTION 8 Basic logic operations, such as AND and OR, and function blocks, such as Emergency Stop (ESTOP) and Safety Gate Monitoring (SGATE), are supported. In the Pre-Ver. 1.0 Controllers, up to 128 logic functions and function blocks can be used in programming. In the Controllers with unit version 1.0 or later (including Controllers that support EtherNet/IP), up to 254 logic functions and function blocks can be used in programming. The user can store any name for each I/O terminal using a maximum of 32 characters (ASCII). I/O power monitoring The NE1A-series Controllers can detect whether I/O power is supplied within the normal voltage range. Safety inputs The NE1A-SCPU01(-V1)(-EIP) supports a 16 safety inputs. The NE1A-SCPU02(-EIP) supports a 40 safety inputs. Input circuit diagnosis Test pulses are used to check the NE1A-series Controller’s internal circuits, external devices, and external wiring. Input ON/OFF delays Input time constants between 0 and 126 ms in multiples of the Controller’s cycle time can be set for Controller’s inputs. Setting input ON/OFF delays helps reduce influence from chattering or external noise. Dual Channel Mode Time discrepancies in changes in data or input signals between two paired local inputs can be evaluated. Test pulse outputs The NE1A-SCPU01(-V1)(-EIP) supports four independent test outputs. The NE1A-SCPU02(-EIP) supports eight independent test outputs. These are normally used in combination with safety inputs. They can also be set for use as signal output terminals. Current monitoring for The NE1A-SCPU01(-V1)(-EIP) can detect a disconnection at the T3 muting lamp (T3, T7 ter- terminal. minal only) The NE1A-SCPU02(-EIP) can detect disconnections at the T3 and T7 terminals. Overcurrent detecAn output is blocked when an overcurrent is detected to protect the tion/protection circuit. 4 Details 7-1-1 7-1-2 7-2 7-3 Section 1-1 About NE1A-series Safety Network Controllers Function Safety outputs Overview Details The NE1A-SCPU01(-V1)(-EIP) and NE1A-SCPU02(-EIP) both sup- 7-4 port eight safety outputs. Output circuit diagnosis Test pulses are used to check the NE1A-series Controller’s internal circuits, external devices, and external wiring. Overcurrent detecTo protect the circuit, the output is cut off when an overcurrent is tion/protection detected. Dual Channel Mode Both of two paired outputs can be set into a safety state when an error occurs in either of the two paired local outputs without depending on the user program. DeviceNet Communications Safety Master A master-slave relationship is established for each connection on the DeviceNet Safety Network separate from the Master-Slave communications on the DeviceNet Standard Network. This enables the NE1A-series Controller to be the safety master to control the connections. Safety Slave An NE1A-series Controller can also operate as a DeviceNet Safety Slave, and the Controller’s internal status information as well as a specified area of I/O can be allocated in the Safety Master. Safety I/O communications The operating mode to use for safety I/O communications when a operating mode for commu- communications error occurs can be selected. nications errors • Automatic recovery (previous function). • Stop only the connection where the error occurred. • Stop all connections. Standard Slave An NE1A-series Controller can also operate as a Standard Slave, and the Controller’s internal status information as well as a specified area of I/O can be allocated in the Standard Master. Explicit messages Explicit messages can be used to read an NE1A-series Controller’s status information. In addition, explicit messages set from the Network Configurator can be sent from the user program. Automatic baud rate detec- The NE1A-series Controller’s baud rate can be set automatically to tion match the baud rate of the network master. DeviceNet Communications Disable (Standalone) DeviceNet communications An NE1A-series Controller can be used as a Standalone Controller disable (Standalone) setby disabling the Controller’s DeviceNet communications. ting System Startup/Error Recovery Functions Error history Errors detected by the NE1A-series Controller are recorded along with the Controller’s total operating time at the point that the error was detected. Online monitoring The NE1A-series Controller’s internal status information and I/O data can be monitored online from the Network Configurator. Other Functions Configuration lock Reset Password 4-4 4-5 4-4 4-6 SECTION 6 4-1-1 4-1-2 12-4 System Configuration Manual, Section 7 The configuration data stored in the NE1A-series Controller can be 9-1 locked to protect the data after it has been downloaded and verified. The NE1A-series Controller can be reset from the Network Configu- 9-2 rator. A password can be set to prevent unintended or unauthorized 9-3 access to the NE1A-series Controller. 5 Section 1-1 About NE1A-series Safety Network Controllers 1-1-4 Functions Improved in the Unit Version 2.0 Upgrade The following table outlines the changes made in the unit version 2.0 upgrade. Function Logic operations Program execution delay 1-1-5 Summary Reference This function enables waiting for safety I/O communications to start 10-1-6 before executing the program. Even if this function is used, however, program execution may start before safety I/O communications and logic errors may occur for function blocks under some circumstances. This function can be enable to prevent certain logic errors. Functions Added for Controllers that Support EtherNet/IP For Controllers that support EtherNet/IP, the following functions have been added to those of the NE1A-SCPU01(-V1) and NE1A-SCPU02. Function Overview Details EtherNet/IP Communications (Tag Data Link) Functions I/O communications The Controller can perform I/O communications as an EtherNet/IP target. SECTION 5 Not only specified I/O areas but NE1A-series Controller internal status information and DeviceNet Safety I/O connection information can be allocated in the originator. Explicit message communications NE1A-series Controller status information can be read by services using explicit message communications. Routing between DeviceNet and EtherNet/IP I/O routing DeviceNet Safety I/O connection information can be routed to an EtherNet/IP I/O connection. Message routing Explicit message can be routed between DeviceNet and EtherNet/IP. 1-1-6 SECTION 5 SECTION 5 Comparison of the I/O Capacity of the NE1A-SCPU01(-V1)(-EIP) and NE1A-SCPU02(-EIP) Item Number of I/O points Safety inputs Test outputs Safety outputs 6 SECTION 6 NE1A-SCPU(-V1)(-EIP) 16 4 8 NE1A-SCPU02(-V1)(-EIP) 40 8 8 Details 2-1 2-1 2-1 Section 1-2 System Configuration 1-2 1-2-1 System Configuration DeviceNet Safety System Overview DeviceNet is an open-field, multi-vendor, multi-bit network, which combines the controls in the machine and line control levels with information. The DeviceNet Safety network adds safety functions to the conventional DeviceNet standard communications protocol. The DeviceNet Safety concept has been approved by a third-party organization (TÜV Rhineland). Just as with DeviceNet, DeviceNet Safety-compliant devices from third-party vendors can be connected to a DeviceNet Safety network. Also, DeviceNetcompliant devices and DeviceNet Safety-compliant devices can be combined and connected on the same network. By combining DeviceNet Safety-compliant products, a user can construct a safety control/network system that meets the requirements for Safety Integrity Level (SIL) 3 according to IEC 61508 (Functional Safety of Electrical/Electronic/Programmable Electronic Safety-related Systems) and the requirements for Safety Category 4 according to EN 954-1. Safety Control as a Safety Network Controller - Safety I/O Communications Standard Control and Monitoring as a Standard PLC Network Configurator - Standard I/O communications - Explicit message communications Safety Network Controller - Safety Master - Standard Slave Standard PLC/Standard Master Safety configuration Standard configuration Safety communications Safety Terminal - Safety Slave - Standard Slave Standard communications Safety Network Controller Standard Slave - Safety Slave - Standard Slave 7 Section 1-2 System Configuration 1-2-2 Example System Configurations The following examples illustrate safety control systems using NE1A-series Controllers. • Safety Control System with an NE1A-series Safety Master • System Combining an NE1A-series Safety Control System and a Standard PLC Monitoring Control System • System Combining a Distributed Safety Control System with Multiple NE1A-series Controllers and a Centralized Monitoring System Using Standard PLCs • Standalone NE1A-series Controller System • Connection with a Network Configurator Safety Control System with an NE1A-series Safety Master This system uses the NE1A-series Controller as a Safety Master and establishes a Safety Remote I/O System with Safety Slaves. The Pre-Ver. 1.0 Controllers can perform safety I/O communications as a Safety Master for a maximum of 16 connections (16 Slaves) with up to 16 bytes per connection. Controllers with unit version 1.0 or later (including Controllers that support EtherNet/IP) can perform safety I/O communications as a Safety Master for a maximum of 32 connections (32 Slaves) with up to 16 bytes per connection. The NE1A-series Controllers support two protocols, single cast and multicast (broadcast), for safety I/O connections. NE1A Safety Master Safety connections (logic communications paths) Either single-cast or multicast 16 connections maximum 32 connections maximum (unit version 1.0 or later) DST1 Safety Slave 8 Safety Slave by other manufacturer Safety Slave by other manufacturer Section 1-2 System Configuration System Combining a Safety Control System and a PLC Monitoring Control System This system uses the NE1A-series Controller as a Safety Master and establishes a Safety Remote I/O System with Safety Slaves. The NE1A-series Controller is used as a Standard Slave and standard I/O communications are performed with the Standard Master. The NE1A-series Controller simultaneously functions as the Safety Master and a Standard Slave. As a Standard Slave, the NE1A-series Controller enables standard I/O communications for a maximum of two connections with up to 16 bytes per connection. Four protocols (i.e., Poll, Bitstrobe, COS and Cyclic) are supported for I/O connections. The NE1A-series Controller cannot operate as a Standard Master. The Safety Control System can be monitored using a Standard PLC by allocating the NE1A-series Controller’s status information (general status, local I/O error status, or other information) or logic operation results in the Standard PLC for standard I/O communications. A Safety System and a Monitoring System can be combined and established on the same network by using standard devices and safety devices. Monitoring System Standard PLC Standard Master NE1A Safety Master Standard Slave Safety Control System Safety I/O communications Standard I/O communications and explicit messages DST1 Safety Slave Safety Slaves by other manufacturers IMPORTANT The data attributes handled by standard I/O communications and explicit message communications are non-safety data. The necessary measures for safety data are not taken for this data during data generation. Therefore, do not use this data to configure the Safety Control System. A maximum total of 64 standard nodes and safety nodes can be connected on the same DeviceNet network. 9 Section 1-2 System Configuration System Combining a Distributed Safety Control System with Multiple NE1A-series Controllers and a Centralized Monitoring System This system uses each NE1A-series Controller as a Safety Master and establishes a Safety Remote I/O System with Safety Slaves. Each NE1A-series Controller also simultaneously functions as a Standard Slave and standard I/O communications are performed with the Standard Master. The Safety Control System can be monitored using a Standard PLC by allocating the NE1A-series Controller’s status information (general status, local I/O error status, or other information) or logic operation results in the Standard PLC. In the DeviceNet Safety System, multiple Safety Masters can be connected on the same network. Therefore, the distributed safety control blocks can be monitored centrally on the same network. Monitoring System Safety Control System A NE1A #1 Safety Master Standard Slave Standard PLC Standard Master Safety I/O communications Standard I/O communications or explicit messages DST1 Safety Slave Safety Slaves by other manufacturers NE1A #2 Safety Master Standard Slave Safety I/O communications DST1 Safety Slave Safety Control System B 10 Safety Slaves by other manufacturers Section 1-2 System Configuration Also, safety I/O communications between NE1A-series Controllers can be performed as illustrated in the following diagram. In the diagram, NE1A #2 is set as the slave of NE1A #1 safety connections to perform safety I/O communications. The NE1A-series Controller functions as a Safety Master, Safety Slave, and Standard Slave simultaneously. As a Safety Slave, the NE1A-series Controller enables safety I/O communications for a maximum of four connections with up to 16 bytes per connection. Monitoring System Standard PLC Standard Master Safety Control System A NE1A #1 Safety Master Standard Slave NE1A #1 functions as the Safety Master for NE1A #2. DST1 Safety Slave NE1A #2 Safety Master Safety Slave Standard Slave Safety Control System B Safety Slaves by other manufacturers Safety I/O communications DST1 Safety Slave Safety Slaves by other manufacturers NE1A #2 functions as a Safety Slave under NE1A #1. IMPORTANT The data attributes handled by DeviceNet standard I/O communications and explicit message communications are non-safety data. The necessary measures for safety data are not taken for this data during data generation. Therefore, do not use this data to configure the Safety Control System. 11 Section 1-2 System Configuration Monitoring DeviceNet or DeviceNet Safety Systems via Ethernet from Controller Made by Other Manufacturers If the networks are constructed using an NE1A-EDR01 EtherNet/IPDeviceNet Router, devices on DeviceNet or DeviceNet Safety network can be accessed from general-purpose controllers (e.g., PLCs or computers) in an Ethernet network using the UDP service. This enables monitoring a DeviceNet or DeviceNet Safety control system via Ethernet from a machine controller or monitor computer that does not support a DeviceNet interface. This can be used to easily add a DeviceNet Safety control system to an existing system. Safety controls can be monitored by accessing devices on the DeviceNet Safety network using the UDP service from a general-purpose controller on the Ethernet network (e.g., a PLC or computer). PLC (OMRON or other maker) Computer OR Ethernet Command via UDP Socket service (UDP) Command via UDP ED Router (NE1A-EDR01) NE1A Safety Network Controller DeviceNet Safety DeviceNet Safety DeviceNet Safety DST1-series Slaves Note DeviceNet Safety DST1-series Slaves Refer to the EtherNet/IP-DeviceNet Router Operation Manual (Cat. No. Z912) for details on the NE1A-EDR01 EtherNet/IP-DeviceNet Router. Monitoring a DeviceNet Safety (or DeviceNet) System from a PLC or Controller on an EtherNet/IP Network As shown in the following diagram, a DeviceNet Safety (or DeviceNet) system can be monitored using EtherNet/IP Standard Target I/O from a PLC or Controller on an EtherNet/IP network via an NE1A-series Controller that supports EtherNet/IP. Devices on a DeviceNet Safety network can be accessed from a general-purpose Controller (such as a PLC or personal computer) on Ethernet, and safety control can be monitored. OMRON PLC or PLC from another maker Personal computer or Ethernet NE1A-series Controller (supporting EtherNet/IP) DeviceNet Safety DST1-series DeviceNet Safety Slaves 12 NE1A-series Controller (supporting EtherNet/IP) DeviceNet Safety DST1-series DeviceNet Safety Slaves Section 1-2 System Configuration NE1A-series Controller DeviceNet Communications Disable (Standalone) Setting When only a few I/O points are required for safety control, the NE1A-series Controller's DeviceNet communications can be disabled so that it can be used as a Standalone Controller. Use the Network Configurator to disable the DeviceNet communications (standalone). Emergency stop buttons Door switches Two-hand switches NE1A (Standalone) USB communications Network Configurator Contactors IMPORTANT Use a USB port connection to disable the DeviceNet communications (standalone). With Controllers that support EtherNet/IP, either the USB port or EtherNet/IP can be used. DeviceNet communications are stopped after DeviceNet communications are disabled (standalone), so the setting cannot be made from the DeviceNet port. 13 Section 1-2 System Configuration Connection with Network Configurator The NE1A-series Controller is set and programmed using a Network Configurator. The Network Configurator also enables uploading configuration data, online monitoring of program execution status, error history checks, etc. The Network Configurator can be used in the following ways: • Direct connection to DeviceNet • USB connection to the NE1A-series Controller • Serial connection to an OMRON PLC • Connection from Ethernet using an EtherNet/IP-DeviceNet Router • Direct connection to EtherNet/IP (for Controllers that support EtherNet/IP) Direct Connection to DeviceNet A DeviceNet Board/Card enables the Network Configurator to connect directly to the network. Remote configuration and monitoring are supported for standard nodes and safety nodes on the network. When connected directly to DeviceNet, the Network Configurator forms one node on the network. Network Configurator Standard PLC Standard Master NE1A Explicit message communications PCI Board PCMCIA Card Downloading/uploading configuration data and monitoring are supported from the Network Configurator for devices on the network via DeviceNet. 14 Safety Slave Standard Slave Section 1-2 System Configuration USB Connection to an NE1A-series Controller The Network Configurator can be used by connecting to the USB port on the NE1A-series Controller. Remote configuration and monitoring are supported for not only the Controller connected to the USB port but also for other devices on the network. For a USB connection, the Network Configurator does not use a node address on the network. Network Configurator Standard PLC Standard Master NE1A USB communications Explicit message communications Safety Slave Standard Slave Serial Connection to an OMRON PLC The Network Configurator can be used by connecting to a serial port on an OMRON PLC. Remote configuration and monitoring are supported for standard nodes and safety nodes on the network. For a PLC connection, the Network Configurator does not use a node address on the network. Standard PLC Standard Master NE1A Explicit message communications Safety Slave Note Network Configurator Serial communications (Host Link or Peripheral bus (toolbus)) Standard Slave Check the following when downloading from a Standard Master to the NE1A. • The timeout monitor time for the Standard Master must be at least 15 seconds. • Remote I/O communications from the Standard Master to the NE1A must be stopped (disconnected). 15 Section 1-2 System Configuration Connecting via an EtherNet/IP-DeviceNet Router If the networks are built using an NE1A-EDR0 EtherNet/IP-DeviceNet Router, a Network Configurator connected at any point can be used to access the NE1A Safety Network Controllers through the EtherNet/IP-DeviceNet Router. The Network Configurator can be at any of the following locations. • Connected via to a USB port on a Safety Network Controller on a different DeviceNet Safety network (See note 1.) • Connected to an EtherNet/IP network • Connected to a different DeviceNet Safety network NE1A Safety Network Controllers can be accessed through the EtherNet/IP-DeviceNet Router from a Network Configurator at any of the following locations. 1) Connected via to a USB port on a Safety Network Controller on a different DeviceNet Safety network 2) Connected to an EtherNet/IP network 3) Connected to a different DeviceNet Safety network 2) Network Configurator Ethernet (EtherNet/IP) 1) Network Configurator ED Router (NE1A-EDR01) NE1A Safety Network Controller 3) Network Configurator USB DeviceNet Safety DeviceNet Safety DeviceNet Safety DST1-series Slaves Note DeviceNet Safety DST1-series Slaves (1) The NE1A-SCPU01-V1 with unit version 2.0 or later (including Controllers that support EtherNet/IP) or NE1A-SCPU02 with unit version 2.0 or later (including Controllers that support EtherNet/IP) is required. NE1A Safety Network Controllers cannot be accessed through a EtherNet/IPDeviceNet Router from a Network Configurator connected to the USB port on the NE1A-SCPU01-V1 with unit version 1.0, or the NE1ASCPU02 with unit version 1.0 or earlier. (2) Refer to the EtherNet/IP-DeviceNet Router Operation Manual (Cat. No. Z912) for details on the NE1A-EDR01 EtherNet/IP-DeviceNet Router. Direct Connection to EtherNet/IP (for Controllers that Support EtherNet/IP) Remote configuration and monitoring are enabled for standard and safety devices on both EtherNet/IP and DeviceNet networks. Remote configuration and monitoring are enabled for standard and safety devices on both EtherNet/IP and DeviceNet networks, using the Network Configurator. Network Configurator EtherNet/IP NE1A-series Controller (supporting EtherNet/IP) DeviceNet NE1A-series Controller (supporting EtherNet/IP) DeviceNet Safety DST1-series DeviceNet Safety Slaves 16 Section 1-3 System Setup Procedure 1-3 System Setup Procedure The general working phases until the Safety System is operational are shown below. 1. System Design 3. Installation and Wiring 2. Programming 4. Configuration 5. User Testing 6. System Operation The NE1A-series Controller information required in each phase is described in the following sections. Working phase System design Required information • System overview and example configurations • Specifications and functions • Performance Programming • Programming guidelines • Function block specifications • Node address and baud rate settings • Installation location • Device connections • Power supply wiring • Connection with I/O devices • Wiring for DeviceNet • EtherNet/IP wiring • Configuration method • Error classification and error history • Maintenance and inspection Installation and wiring Configuration User test System operation Details Section 1 Section 2, Section 4 to 10 Section 11 Section 8 Section 4-1 Section 3 Section 9 Section 12 Section 13 Refer to the following manuals for information on DeviceNet and EtherNet/IP installation, DeviceNet Safety System construction, Network Configurator operation, Programming Device operation, and other devices used in the safety system. Item Installation of DeviceNet Installation of EtherNet/IP Manual name Cat. No. DeviceNet User’s Manual W379 NE1A-series DeviceNet Safety Network Control- Z906-E1-07 ler Operation Manual or higher 17 System Setup Procedure Section 1-3 Item Manual name Cat. No. Construction of a DeviceNet DeviceNet Safety System Configuration Manual Z905 Safety System Network Configurator Operation (WS02-CFSC1-E) Programming Device Operation Installation of Safety I/O Ter- DeviceNet Safety I/O Terminal Operation Man- Z904 minals ual 18 SECTION 2 Specifications and Nomenclature 2-1 2-2 Nomenclature and Functions . . . . . . . . . . . . . . . . . . . . . . . . . . . . . . . . . . . . . 20 2-1-1 Nomenclature . . . . . . . . . . . . . . . . . . . . . . . . . . . . . . . . . . . . . . . . . . 20 2-1-2 Indicator/Display Areas . . . . . . . . . . . . . . . . . . . . . . . . . . . . . . . . . . 24 2-1-3 Switch Settings . . . . . . . . . . . . . . . . . . . . . . . . . . . . . . . . . . . . . . . . . 28 2-1-4 DeviceNet Communications Connector . . . . . . . . . . . . . . . . . . . . . . 29 2-1-5 USB Communications Connector. . . . . . . . . . . . . . . . . . . . . . . . . . . 29 2-1-7 Input/Output Terminals and Internal Connections . . . . . . . . . . . . . . 30 Specifications . . . . . . . . . . . . . . . . . . . . . . . . . . . . . . . . . . . . . . . . . . . . . . . . . 34 2-2-1 General Specifications . . . . . . . . . . . . . . . . . . . . . . . . . . . . . . . . . . . 34 2-2-2 DeviceNet Communications Specifications . . . . . . . . . . . . . . . . . . . 35 2-2-3 EtherNet/IP Communications Specifications (Controllers That Support EtherNet/IP) . . . . . . . . . . . . . . . . . . . . . . 35 I/O Specifications . . . . . . . . . . . . . . . . . . . . . . . . . . . . . . . . . . . . . . . 36 2-2-4 19 Section 2-1 Nomenclature and Functions 2-1 Nomenclature and Functions This section describes the part names and functions of the NE1A-series Controllers. 2-1-1 Nomenclature NE1A-SCPU01 (-V1) Indicator/display area Node address switches: Sets the DeviceNet node address as a 2-digit decimal number. Terminal area Indicator area USB port (B connector) Terminal area Baud rate switch: Sets the DeviceNet baud rate. DeviceNet communications connector: Connects to the network communications cable. The power for communications is also supplied from this connector. The XW4G-05C1-H1-D Connector is provided for node connections. 20 Section 2-1 Nomenclature and Functions NE1A-SCPU02 Indicator/display area Node address switches: Sets the DeviceNet node address as a 2-digit decimal number. Terminal area USB port (B connector) Indicator area Baud rate switch: Sets the DeviceNet baud rate. Terminal area DeviceNet communications connector: Connects to the network communications cable. The power for communications is also supplied from this connector. The XW4G-05C1-H1-D Connector is provided for node connections. 21 Section 2-1 Nomenclature and Functions NE1A-SCPU01-EIP Indicator areas Node address switches Set the DeviceNet node address as a 2-digit decimal number. IP address display switch Terminal area Indicator area EtherNet/IP communications connector Terminal area USB port B connector Baud rate switch Sets the DeviceNet baud rate. DeviceNet communications connector Connects to the network communications cable. The communications power supply is also supplied from this connector. The XW4G-05C1-H1-D Connector is provided for node connections. 22 Section 2-1 Nomenclature and Functions NE1A-SCPU02-EIP Indicator areas IP address display switch Node address switches Set the DeviceNet node address as a 2-digit decimal number. Terminal area Indicator area EtherNet/IP communications connector USB port B connector Baud rate switch Sets the DeviceNet baud rate. Terminal area DeviceNet communications connector Connects to the network communications cable. The communications power supply is also supplied from this connector. The XW4G-05C1-H1-D Connector is provided for node connections. 23 Section 2-1 Nomenclature and Functions 2-1-2 Indicator/Display Areas Status Indicators The following LED indicators show the status of the NE1A-series Controller, network, and I/O circuits. • MS (module status) • NS/NS D (DeviceNet network status) • LOCK (configuration lock status) • COMM/COMM U (USB communications status) • IN 0 to 15 (local input status, NE1A-SCPU01(-V1)) • IN 0 to 39 (local input status, NE1A-SCPU02) • OUT 0 to 7 (local output status) • NS E (EtherNet/IP network status) • COMM E (Ethernet communications status) • 100M (100Base-TX link status) • 10M (10Base-T link status) Indicator name MS Color Green Status Meaning Operation status Idle status Red Critical error status Abort status Green/red NS (NS D for Controllers that support EtherNet/IP) Green Waiting for TUNID setting during self-diagnosis or waiting for configuration. Power is not supplied. Online connection has been established. Online connection has not been established. Red Unable to communicate. I/O communications error LOCK Green/red Waiting for TUNID setting. - Not online or DeviceNet communications disabled (Standalone Mode). Lock has been completed with a valid configuration. Yellow Lock has not been completed with a valid configuration. Yellow COMM (COMM U for Controllers that support EtherNet/IP) (USB) IN 0, 1, 2, …15 Yellow OUT 0, 1, 2, …7 Red (NE1A-SCPU01(-V1)(-EIP)) IN 0, 1, 2 …39 OUT 0, 1, 2 …7 (NE1A-SCPU02(-EIP)) - 24 No valid configuration data Data transmission/reception in progress. No data transmission/reception in progress. I/O signal is ON. Error detected in I/O circuits. Discrepancy error has occurred in an input set for Dual Channel Mode. Dual channel violation has occurred in an output set for Dual Channel Mode. Error detected in the other I/O circuit set for Dual Channel Mode (no error in this I/O circuit). I/O signal is OFF. Section 2-1 Nomenclature and Functions Indicator name NS E Color Green Status Meaning Online connection has been established. Online connection has not been established. Red Fatal communications error Non-fatal communications error Green Not online. Data transmission/reception in progress. 100M Red No data transmission/reception in progress. Ethernet has established a 100Base-TX link. 10M Red Ethernet has not established a 100Base-TX link. Ethernet has established a 10Base-T link. COMM E Ethernet has not established a 10Base-T link. : ON : Flashing : OFF 25 Section 2-1 Nomenclature and Functions Seven-segment Display The 7-segment display indicates the NE1A-series Controller’s node address during normal conditions, and the error code and the node address of the error during error conditions. Also, “nd” is displayed during normal conditions if DeviceNet communications are disabled (i.e., Standalone Mode). For Controllers that support EtherNet/IP, the error code “n4” is displayed if an error occurs in EtherNet/IP. In addition, the EtherNet/IP IP address can be displayed by pressing the IP address display switch. Status Normal conditions with Operating mode: RUN mode DeviceNet enabled Safety I/O communications: Operating or not set. Operating mode: RUN mode Safety I/O communications: Not operating Operating mode: Self-testing, configuring, or idle Normal conditions with Operating mode: RUN mode DeviceNet disabled Operating mode: Self-testing, configuring, or idle Error conditions Critical error Abort Nonfatal error Display Shows the NE1ALit series Controller’s node address Flashing (00 to 63). Flashing Lit Flashing “nd” Indefinite Only error code Lit Only error code Lit Alternates between displaying the error code and the node address where the error occurred. • IP Address Display Example: When the IP Address is 192.200.200.2 The IP address is displayed from right to left after the display type. • Display Type: EtherNet/IP IP Address • Display Type: EtherNet/IP IP Address when BOOTP is Set 300 ms 50 ms OFF 300 ms 50 ms OFF 300 ms 500 ms OFF 26 50 ms 300 ms OFF 50 ms OFF Nomenclature and Functions Section 2-1 !WARNING Serious injury may possibly occur due to loss of required safety functions. Do not use the NE1A-series Controller's indicators for safety operations. Note The errors are indicated by the combination of the MS indicator, NS indicator, and the 7-segment display. For further details on specific meanings, refer to SECTION 12 Troubleshooting. 27 Section 2-1 Nomenclature and Functions 2-1-3 Switch Settings Node Address Switches Set the DeviceNet node address using the rotary switches on the front of the NE1A-series Controller. Method Two-digit decimal number 0 to 63 Range Note The node address is set to 63 at the factory. Any node address in the setting range can be used as long as the same address is not used by another node. If a value between 64 and 99 is set on the rotary switches, the node address can be set using a software setting on the Network Configurator. IMPORTANT • Turn OFF power to the NE1A-series Controller before setting the rotary switches. • Do not change the rotary switches while the power is ON. The Controller will detect this as a change in the configuration and will switch to ABORT State. • A node address duplication error will occur if the same address is set for more than one node. Communications will not start if this error occurs. Note • Use a small flat-blade screwdriver to set the rotary switches, being careful not to scratch them. • Refer to 4-1 Initial Setting for software setting procedures. Baud Rate Switch The DeviceNet baud rate is set using the DIP switch on the front of the NE1Aseries Controller. The baud rate settings are shown in the following table: 1 OFF ON OFF ON ON or OFF ON or OFF Note Note 28 2 OFF OFF ON ON ON or OFF ON or OFF Pin 3 OFF OFF OFF OFF ON ON or OFF Baud rate 4 OFF OFF OFF OFF OFF ON 125 kbit/s 250 kbit/s 500 kbit/s Software setting Automatic baud rate detection The baud rate is set to 125 kbit/s at the factory. Refer to 4-1 Initial Setting for software setting procedures. Section 2-1 Nomenclature and Functions IP Address Display Switch (Only Controllers that Support EtherNet/IP) Press the IP address display switch for 1 second or longer to display at the 7segment display the EtherNet/IP IP address that is set. For details, refer to the information on the 7-segment display in 2-1-2 Indicator/Display Areas. IP ADR 2-1-4 DeviceNet Communications Connector Stickers are placed on the communication connectors based on the color of each communications wire. By matching the communications wire colors with the unit sticker colors, you can check to see if wires are in the correct locations. The colors of the wires are as follows: Color Red White Blue Black Description V+ Signal (CAN H) (SHIELD) Signal (CAN L) V− Refer to the DeviceNet User’s Manual (W379) for details on communications specifications and wiring. IMPORTANT Turn OFF the power supply to the NE1A-series Controller and all nodes on the network before starting any wiring operations. 2-1-5 USB Communications Connector Connect the USB communications connector with a computer when a Network Configurator is to be used. The NE1A-series Controllers support the USB version 1.1 standard. Use a commercially available USB-A to USB-B Male/Male cable for the connection. 2-1-6 Ethernet Connector The Ethernet connector is used to connect Ethernet twisted-pair cable. • Electrical characteristics: Conforms to IEEE 802.3 specifications. • Connector structure: RJ45 8-pin modular connector (Conforms to ISO 8877.) 29 Section 2-1 Nomenclature and Functions 2-1-7 Input/Output Terminals and Internal Connections NE1A-SCPU01(-V1) DC-DC converter isolated G0 V1 G1 V2 G2 IN0 to IN15 T0 to T3 OUT0 to OUT7 30 Safety output circuits Terminal name V0 Safety input and test output circuits DC-DC converter not isolated USB Internal circuits DeviceNet physical layer SHIELD 24 VDC 24 VDC 24 VDC Description Power supply terminal for internal circuits The two V0 terminals are connected internally. Power supply terminal for internal circuits The two G0 terminals are connected internally. Power supply terminal for external input devices and test outputs Power supply terminal for external input devices and test outputs Power supply terminal for external output devices Power supply terminal for external output devices Safety input terminals Test output terminals used to connect with safety inputs IN0 to IN15. Each test output terminal outputs a different test pulse pattern. Terminal T3 also supports a current monitoring function for the output signal, for example, for a muting lamp. Safety output terminals Section 2-1 Nomenclature and Functions NE1A-SCPU02 DC-DC converter isolated Safety input and test output circuits Safety output circuits DC-DC converter not isolated Internal circuits DeviceNet physical layer SHIELD 24 VDC 24 VDC 24 VDC Terminal name Description V0 Power supply terminal for internal circuits The two V0 terminals are connected internally. G0 Power supply terminal for internal circuits The two G0 terminals are connected internally. V1 Power supply terminal for external input devices and test outputs G Power supply terminal for external input devices and test outputs V2 Power supply terminal for external output devices G Power supply terminal for external output devices IN0 to IN39 Safety input terminals T0 to T3 Test output terminals used to connect with safety inputs IN0 to IN19. Each test output terminal outputs a different test pulse pattern. Terminal T3 also supports a current monitoring function for the output signal, for example, for a muting lamp. T4 to T7 Test output terminals used to connect with safety inputs IN20 to IN39. Each test output terminal outputs a different test pulse pattern. Terminal T7 also supports a current monitoring function for the output signal, for example, for a muting lamp. OUT0 to OUT7 Safety output terminals 31 Section 2-1 Nomenclature and Functions NE1A-SCPU01-EIP DC-DC converter isolated FG Ethernet physical layer RJ45 V0 24 VDC G0 V1 V− USB D− 24 VDC G1 T0 T3 IN0 IN15 V2 Safety output circuits DC-DC converter not isolated D+ Internal circuits SHIELD CAN L Safety input and test output circuits CAN H DeviceNet physical layer V+ 24 VDC G2 L OUT0 L OUT7 Terminal name Description V0 Power supply terminal for internal circuits The two V0 terminals are connected internally. G0 Power supply terminal for internal circuits The two G0 terminals are connected internally. V1 Power supply terminal for external input devices and test outputs G1 Power supply terminal for external input devices and test outputs V2 Power supply terminal for external output devices G2 Power supply terminal for external output devices IN0 to IN15 Safety input terminals T0 to T3 Test output terminals used to connect with safety inputs IN0 to IN15. Each test output terminal outputs a different test pulse pattern. Terminal T3 also supports a current monitoring function for the output signal, for example, for a muting lamp. OUT0 to OUT7 Safety input terminals 32 Section 2-1 Nomenclature and Functions NE1A-SCPU02-EIP DC-DC converter isolated FG Ethernet physical layer RJ45 V0 24 VDC G0 V1 V− USB D− 24 VDC G T0 T3 IN0 IN39 V2 Safety output circuits DC-DC converter not isolated D+ Internal circuits SHIELD CAN L Safety input and test output circuits CAN H DeviceNet physical layer V+ 24 VDC G L OUT0 L OUT7 Terminal name Description V0 Power supply terminal for internal circuits The two V0 terminals are connected internally. G0 Power supply terminal for internal circuits The two G0 terminals are connected internally. V1 Power supply terminal for external input devices and test outputs G Power supply terminal for external input devices and test outputs V2 Power supply terminal for external output devices G Power supply terminal for external output devices IN0 to IN39 Safety input terminals T0 to T3 Test output terminals used to connect with safety inputs IN0 to IN19. Each test output terminal outputs a different test pulse pattern. Terminal T3 also supports a current monitoring function for the output signal, for example, for a muting lamp. T4 to T7 Test output terminals used to connect with safety inputs IN20 to IN39. Each test output terminal outputs a different test pulse pattern. Terminal T7 also supports a current monitoring function for the output signal, for example, for a muting lamp. OUT0 to OUT7 Safety input terminals 33 Section 2-2 Specifications 2-2 Specifications This section provides the NE1A-series Controller’s specifications. 2-2-1 General Specifications NE1A-SCPU01(-V1)(-EIP) Item DeviceNet supply voltage Device supply voltage V0 (See note.) I/O supply voltages V1 and V2 (See note.) Current conDeviceNet sumption Internal logic circuits Overvoltage category EMC Vibration resistance Specifications 11 to 25 VDC (Supplied from communications connector.) 20.4 to 26.4 VDC (24 VDC, −15% to 10%) 20.4 to 26.4 VDC (24 VDC, −15% to 10%) Shock resistance 150 m/s2 for 11 ms DIN Track (TH35-7.5/TH35-15 according to IEC 60715) −10 to 55°C 10% to 95% (with no condensation) −40 to 70°C IP20 USB Ver. 1.1 460 g max. (NE1A-SCPU01-EIP: 570 g max.) Mounting Operating temperature Humidity Storage temperature Degree of protection Serial interface Weight Note 15 mA at 24 VDC 230 mA at 24 VDC (NE1A-SCPU01-EIP: 280 mA) II (according to IEC 61131-2: 4.4.2) Compliant with IEC 61131-2. 0.35 mm at 10 to 57 Hz, 50 m/s2 at 57 to 150 Hz V0 to G0: For internal logic circuits, V1 to G1: For external input devices and test outputs, V2 to G2: For external output devices. NE1A-SCPU02(-EIP) Item DeviceNet supply voltage Device supply voltage V0 (See note.) I/O supply voltages V1 and V2 (See note.) Current conDeviceNet sumption Internal logic circuits Overvoltage category EMC Vibration resistance Specifications 11 to 25 VDC (Supplied from communications connector.) 20.4 to 26.4 VDC (24 VDC,−15% to 10%) 20.4 to 26.4 VDC (24 VDC, −15% to 10%) Shock resistance 150 m/s2 for 11 ms DIN Track (TH35-7.5/TH35-15 according to IEC 60715) −10 to 55°C 10% to 95% (with no condensation) −40 to 70°C IP20 USB Ver. 1.1 690 g max. (NE1A-SCPU02-EIP: 800 g max.) Mounting Operating temperature Humidity Storage temperature Degree of protection Serial interface Weight Note 34 15 mA at 24 VDC 280 mA at 24 VDC (NE1A-SCPU02-EIP: 330 mA) II (according to IEC 61131-2: 4.4.2) Compliant with IEC 61131-2. 0.35 mm at 10 to 57 Hz, 50 m/s2 at 57 to 150 Hz V0 to G0: For internal logic circuits, V1 to G: For external input devices and test outputs, V2 to G: For external output devices. G or V1 and G of V2 are connected internally. Section 2-2 Specifications 2-2-2 DeviceNet Communications Specifications Item Communications protocol Connection method Baud rate Communications medium Communications distance Specifications Conforms to DeviceNet. The multidrop and T-branch connections can be combined (for main line and branch lines). 500 kbits/s, 250 kbits/s, 125 kbits/s Special cable with 5 lines (2 communications lines, 2 power lines, 1 shield line) Baud rate Maximum network length Branch length 500 kbits/s 100 m max. (100 m max.) 6 m max. 250 kbits/s 250 m max. (100 m max.) 6 m max. 125 kbits/s 500 m max. (100 m max.) 6 m max. The numbers in parentheses are the lengths when Thin Cable is used. 11 to 25 VDC Total length 39 m max. 78 m max. 156 m max. Communications power supply Connected nodes 63 nodes max. Safety I/O Safety Master Function: communications • Maximum number of connections: 16 (Pre-Ver. 1.0 Controllers) • Maximum data size: 16 bytes input or 16 bytes output (per connector) • Connection type: Single-Cast, Multi-Cast Safety Slave Function: • Maximum number of connections: 4 • Maximum data size: 16 bytes input or 16 bytes output (per connector) • Connection type: Single-Cast, Multi-Cast Safety Master Function: Safety I/O communications • Maximum number of connections: 32 (Controllers with unit ver• Maximum data size: 16 bytes input or 16 bytes output (per connector) sion 1.0 or later) • Connection type: Single-Cast, Multi-Cast (including Controllers that support EtherNet/ Safety Slave Function: IP) • Maximum number of connections: 4 • Maximum data size: 16 bytes input or 16 bytes output (per connector) • Connection type: Single-Cast, Multi-Cast Standard I/O Standard Slave Function communications • Maximum number of connections: 2 • Maximum data size: 16 bytes input and/or 16 bytes output (per connector) • Connection type: Poll, Bit-strobe, COS, Cyclic Message communicaMaximum message length: 552 bytes tions 2-2-3 EtherNet/IP Communications Specifications (Controllers That Support EtherNet/IP) Item Media access method Modulation method Transmission path type Baud rate Transmission medium Transmission distance Number of cascade connections Specifications CSMA/CD Baseband Star topology 10Base-T: 10 Mbits/s 100Base-TX: 100 Mbits/s Twisted-pair cable (shielded: STP): Category 5, 5e 100 m (distance between hub and nodes) There is no limit when a switching hub is used. 35 Section 2-2 Specifications Item Specifications Number of CIP connections 2 (Class 1 connection) Maximum data size: 128 input bytes or 16 output bytes per connection Connection type: Point-to-point or multicast 3,000 pps (See note.) Allowable Unit communications bandwidth Explicit message communications Note 2-2-4 Maximum message length for class 3 connection: 502 bytes Maximum message length for UCMM connection: 502 bytes Number of connections: 4 total for Class 3 and UCMM “pps” means “packets per second.” It indicates the number of send or receive packets that can be processed per second. I/O Specifications Safety Inputs Item Specifications Current sinking (PNP) 11 VDC min. between each input terminal and G 5 VDC max. between each input terminal and G 1 mA max. 4.5 mA Item Specifications Current sourcing (PNP) 0.5 A per output 1.2 V max. between each output terminal and V2 0.1 mA max. Input type ON voltage OFF voltage OFF current Input current Safety Outputs Output type Rated output current Residual voltage Leakage current IMPORTANT If a safety output is set as a safety pulse output, an OFF pulse signal (pulse width: 580 µs) will be output to diagnose the output circuit when the safety output turns ON. Check the input response time of the control device connected to the NE1A-series Controller to be sure that this output pulse will not cause malfunctions. Test Outputs Item Output type Rated output current Residual voltage Leakage current Note Specifications Current sourcing (PNP) 0.7 A max. per output (See notes 1 and 2.) 1.2 V max. between each output terminal and V1 0.1 mA max. (1) Total simultaneous current: 1.4 A max. (T0 to T3: NE1A-SPCPU01(-V1)(-EIP), T0 to T7: NE1A-SCPU02)(-EIP) (2) Connectable external indicator (T3: NE1A-SCPU01(-V1)(-EIP), T3 and T7: NE1A-SCPU02)(-EIP): 24 VDC, 15 to 400 mA 36 SECTION 3 Installation and Wiring 3-1 3-2 Installation. . . . . . . . . . . . . . . . . . . . . . . . . . . . . . . . . . . . . . . . . . . . . . . . . . . . 38 3-1-1 Requirements for Installation and Wiring . . . . . . . . . . . . . . . . . . . . 38 3-1-2 Mounting to the Control Panel . . . . . . . . . . . . . . . . . . . . . . . . . . . . . 39 3-1-3 Dimensions and Weight . . . . . . . . . . . . . . . . . . . . . . . . . . . . . . . . . . 43 Wiring . . . . . . . . . . . . . . . . . . . . . . . . . . . . . . . . . . . . . . . . . . . . . . . . . . . . . . . 47 3-2-1 General Instructions on Wiring. . . . . . . . . . . . . . . . . . . . . . . . . . . . . 47 3-2-2 Wiring the Power Supply and I/O Lines. . . . . . . . . . . . . . . . . . . . . . 48 3-2-3 Wiring I/O Devices . . . . . . . . . . . . . . . . . . . . . . . . . . . . . . . . . . . . . . 50 3-2-4 DeviceNet Wiring . . . . . . . . . . . . . . . . . . . . . . . . . . . . . . . . . . . . . . . 57 3-2-5 Wiring the USB Connector. . . . . . . . . . . . . . . . . . . . . . . . . . . . . . . . 57 3-2-6 Ethernet (EtherNet/IP) Network Installation . . . . . . . . . . . . . . . . . . 58 37 Section 3-1 Installation 3-1 3-1-1 Installation Requirements for Installation and Wiring Consider the following for installation and wiring to improve the reliability of the NE1A-series Safety Network Controller System and to fully exploit the system’s capabilities. Installation and Storage Environment Do not use or store the NE1A-series Controller in any of the following locations. • Locations subject to direct sunlight • Locations subject to temperatures or humidity outside the ranges specified in the specifications • Locations subject to condensation as the result of severe changes in temperature • Locations subject to corrosive or flammable gases • Locations subject to dust (especially iron dust) or salts • Locations subject to water, oil, or chemicals • Locations subject to shock or vibration Take appropriate and sufficient measures when installing systems in the following locations. Inappropriate and insufficient measures may result in malfunction. • Locations subject to static electricity or other forms of noise • Locations subject to strong electromagnetic fields • Locations subject to possible exposure to radioactivity • Locations close to power supplies 38 Section 3-1 Installation 3-1-2 Mounting to the Control Panel • Use the NE1A-series Controller in an enclosure with IP54 protection or higher according to IEC/EN 60529. • Use DIN Track (TH35-7.5/TH35-15 according to IEC 60715) to mount the NE1A-series Controller in the control panel. Mount the Controller to the DIN Track using PFP-M End Plates (not included with the NE1A-series Controller) to prevent it from falling off the DIN Track because of vibration. • Provide sufficient space around the NE1A-series Controller, at least 5 mm at the sides and at least 50 mm at the top and bottom, for ventilation and wiring. Wiring duct 50 mm min. 5 mm min. 5 mm min. 35-mm DIN Track End Plate Model: PFP-M 50 mm min. Wiring duct Note The NE1A-series Controller can be mounted only to DIN Track. Do not screw the Controller to the control panel. 39 Section 3-1 Installation Mounting To ensure proper ventilation, mount the NE1A-series Controller as shown in the following diagram. Top p Bottom Do not mount the NE1A-series Controller as in the following diagrams. Top Top Bottom Bottom Top Top Bottom Bottom 40 Section 3-1 Installation ■ DIN Track Mounting Bracket Position for the NE1A-SCPU01(-V1) DIN Track Mounting Bracket ■ DIN Track Mounting Bracket Position for the NE1A-SCPU02 DIN Track Mounting Brackets 41 Section 3-1 Installation ■ DIN Track Mounting Bracket Position for the NE1A-SCPU01-EIP DIN Track Mounting Bracket ■ DIN Track Mounting Bracket Position for the NE1A-SCPU02-EIP DIN Track Mounting Brackets 42 Section 3-1 Installation 3-1-3 Dimensions and Weight Dimensions ■ NE1A-SCPU01(-V1) 131.4 (114.1) 99.4 (99) 111.1 43 Section 3-1 Installation ■ NE1A-SCPU02 131.4 (114.1) 135.6 (99) 111.1 44 Section 3-1 Installation ■ NE1A-SCPU01-EIP (113.6) 131.4 (114.4) 113 (99) 111.1 45 Section 3-1 Installation ■ NE1A-SCPU02-EIP (113.6) 131.4 (114.4) 158.2 (99) 111.1 Weight Model NE1A-SCPU01(-V1) NE1A-SCPU02 NE1A-SCPU01-EIP NE1A-SCPU02-EIP 46 Weight 460 g max. 690 g max. 570 g max. 800 g max. Section 3-2 Wiring 3-2 3-2-1 Wiring General Instructions on Wiring Precaution: • To prevent wire clippings from getting into the NE1A-series Controller, do not remove the label on the Controller before wiring has been completed. • After wiring has been completed, be sure to remove the label from the Controller to enable heat dissipation for proper cooling. Label prevents wire clippings from entering. • Disconnect the NE1A-series Controller from the power supply before starting any wiring operations. Devices connected to the Controller may operate unexpectedly if wiring is performed with the power supply connected. • Be careful not to get your fingers caught when attaching connectors to the plugs on the NE1A-series Controller. !WARNING Serious injury may possibly occur due to loss of required safety functions. Wire the conductors correctly and verify the operation of the NE1A-series Controller before using the Controller system in actual operation. 47 Section 3-2 Wiring 3-2-2 Wiring the Power Supply and I/O Lines Wire Sizes Use the following wires to connect external I/O devices to the NE1A-series Controller. Solid wire 0.2 to 2.5 mm2 (AWG 24 to AWG 12) Stranded (flexible) wire 0.34 to 1.5 mm2 (AWG 22 to AWG 16) Recommended Materials and Tools ■ Insulated Pin Terminals Use a pin terminal with an insulated cover compliant with the DIN 46228-4 standard. Pin terminals similar in appearance but not compliant with the standard may not match the terminal block on the NE1A-series Controller. (The wiring dimensions are rough standards. Confirm the dimensions beforehand.) Use wires of the same diameter if two-wire pin terminals are used. Note • When wiring with pin terminals, be sure to insert pin terminals all the way into the terminal block. • When using two-wire pin terminals, use wires of the same diameter. • When using two-wire pin terminals, insert the pin terminal so that metal portion of the pin terminal is inserted straight into the terminal block, i.e., so that the long sides of the insulating cover are vertical. 48 Section 3-2 Wiring Reference Specifications (Product Specifications for Phoenix Contact) Two-wire pin terminals One-wire pin terminals Wire dimensions Crosssectional area of conductor (mm2) 0.34 0.5 0.75 1.0 1.5 2 x 0.75 AI 0,34-8TQ AI 0,5-10WH AI 0,75-10GY AI 1-10RD AI 1,5-10BK AI-TWIN 2 x 0,75-10GY AI-TWIN 2 x 1- 2 x 1 10RD AWG Pin terminal specifications Stripped length of insulation (mm) Inner Inner Overall Length of metal diameter of diameter of length L1 part L2 conductor insulative (mm) D1 (mm) cover D2 (mm) (mm) 22 20 18 18 16 − 10 10 10 10 10 10 12.5 16 16 16 18 17 8 10 10 10 10 10 0.8 1.1 1.3 1.5 1.8 1.8 2.0 2.5 2.8 3.0 3.4 2.8/5.0 − 10 17 10 2.05 3.4/5.4 *1: One-wire Pin Terminal Dia. D2 *1 *2 *2: Two-wire Pin Terminal Insulation Cover Dia. D2 L2 L2 L1 L1 Insulated cover Dimensions Model of pin terminal Dia. D1 Dia. D1 ■ Terminal Crimping Tool Manufacturer Phoenix Contact Model CRIMPFOX UD6 or CRIMPFOX ZA3 Power Supply Selection Use a DC power supply satisfying the following requirements. • The secondary circuits of the DC power supply must be isolated from the primary circuit by double insulation or reinforced insulation. • The DC power supply must satisfy the requirements for class 2 circuits or limited voltage/current circuits defined in UL 508. • The output hold time must be 20 ms or longer. 49 Section 3-2 Wiring 3-2-3 Wiring I/O Devices Wiring Input Devices Refer to the following information for input device selection and wiring. ■ Devices with Mechanical Contact Outputs Examples: Emergency stop buttons and safety limit switches These devices use both a safety input terminal and test output terminal. A safety input terminal inputs the test output signal (pulse output) of the NE1Aseries Controller via a contact output device. V1 4.5 mA typical Tx NE1A-series Controller INx Minimum applicable load: 4 mA, 24 VAC 24 VDC G1 ■ Devices with PNP Semiconductor Outputs (Current Sourcing) Example: Light curtains A PNP semiconductor output signal from this type of device is input to the NE1A-series Controller’s safety input terminal. 4.5 mA typical V1 24 VDC Tx NE1A-series Controller OSSDx INx 24 VDC GND G1 !WARNING Serious injury may possibly occur due to loss of required safety functions. Use appropriate components or devices according to the requirements given in the following table. 50 Section 3-2 Wiring Controlling devices Emergency stop switch Door interlocking switch or limit switch Safety sensor Relay with forcibly guided contacts Contactor Other devices Requirements Use approved devices with a direct opening mechanism compliant with IEC/ EN 60947-5-1. Use approved devices with a direct opening mechanism compliant with IEC/ EN 60947-5-1 and capable of switching micro-loads of 4 mA at 24 VDC. Use approved devices compliant with the relevant product standards, regulations, and rules in the country where they are used. Use approved devices with forcibly guided contacts compliant with EN 50205. For feedback, use devices with contacts capable of switching micro-loads of 4 mA at 24 VDC. Use contactors with a forcibly guided mechanism and monitor the auxiliary NC contact to detect contactor failures. For feedback, use devices with contacts capable of switching micro-loads of 4 mA at 24 VDC. Evaluate whether devices used are appropriate to satisfy the requirements of the safety category level. IMPORTANT • Properly apply the specified voltage to the NE1A-series Controller’s inputs. Applying an inappropriate DC voltage or any AC voltage may cause reduced safety functions, damage to the NE1A-series Controller, or a fire. • Be sure to separate I/O cables from high-voltage/current lines. • Use a total I/O communications cable length of 30 m or less. • Do not apply the power supply to the test output terminals. Doing so may result in product damage or burning. Wiring Output Devices Refer to the following diagram for selection and wiring of output devices. V2 0.5 A max. 24 VDC OUTx NE1A-series Controller L G2 51 Section 3-2 Wiring !WARNING Serious injury may possibly occur due to breakdown of outputs. Do not connect loads beyond the rated value to the safety outputs and the test outputs. Serious injury may possibly occur due to loss of required safety functions. Wire the NE1A-series Controller properly so that 24-VDC lines do NOT touch the safety outputs and the test outputs accidentally or unintentionally. Serious injury may possibly occur due to loss of required safety functions. Ground the 0V line of the power supply for external output devices so that the devices do NOT turn ON when the safety output line or the test output line is grounded. Serious injury may possibly occur due to loss of required safety functions. Use appropriate components or devices according to the requirements given in the following table. Controlling Devices Contactor Other devices Requirements Use contactors with a forcibly guided mechanism and monitor the auxiliary NC contact to detect contactor failures. For feedback, use devices with contacts capable of switching micro-loads of 4 mA at 24 VDC. Evaluate whether devices used are appropriate to satisfy the requirements of safety category level. IMPORTANT • Be sure to separate I/O cables from high-voltage/current lines. • Use I/O cables of 30 m or less. • Do not apply the power supply to the test output terminals. Doing so may result in product damage or burning. 52 Section 3-2 Wiring Examples of I/O Device Connections Example of Connecting an Emergency Stop Button I0 I2 I4 I6 I8 I10 I12 I14 I1 I3 I5 I7 I9 I11 I13 I15 KM1-NC KM2-NC 11 21 S2 12 22 S1 KM1 V1 G1 V2 G2 T0 T2 O0 O2 O4 O6 KM2 T1 O1 T3 O3 O5 O7 KM2 KM1 M E2 E1 and E2: 24-VDC power supplies S1: Emergency stop switch S2 Reset switch KM1 and KM2: Contactors M: Motor E1 Note Connect a 24-VDC power supply to terminals V0 and G0 (power supply terminals for internal circuits). Note This example shows an NE1A-SCPU01(-V1)(-EIP) Controller’s terminal layout. Example of Connecting Limit Switches (for a Safety Gate) Open S1 I0 I2 I4 I6 I8 I10 I12 I14 I1 I3 I5 I7 I9 I11 I13 I15 KM1-NC KM2-NC S2 KM1 V1 G1 T0 T2 O0 O2 O4 O6 KM2 V2 G2 T1 T3 O1 O3 O5 O7 KM2 E2 E1 Note KM1 M E1 and E2: 24-VDC power supplies S1: Safety limit switch S2: Limit Switch (NO Contact) KM1 and KM2: Contactors M: Motor Connect a 24-VDC power supply to terminals V0 and G0 (power supply terminals for internal circuits). 53 Section 3-2 Wiring Note This example shows an NE1A-SCPU01(-V1)(-EIP) Controller’s terminal layout. Example of Connecting Two-hand Switches S11 I0 I2 I4 I6 I8 I10 I12 I14 I1 I3 I5 I7 I9 I11 I13 I15 KM1-NC KM2-NC S12 KM1 V1 G1 T0 T2 O0 O2 O4 O6 KM2 V2 G2 T1 T3 O1 O3 O5 O7 KM2 E2 E1 54 KM1 M E1 and E2: 24-VDC power supplies S11 and S12: Two-hand switches KM1 and KM2: Contactors M: Motor Note Connect a 24-VDC power supply to terminals V0 and G0 (power supply terminals for internal circuits). Note This example shows an NE1A-SCPU01(-V1)(-EIP) Controller’s terminal layout. Section 3-2 Wiring Example of Connecting a Light Curtain Receiver - OSSD1 (Green) Receiver - OSSD2 (White) I2 I0 I6 I4 I8 I10 I14 I12 KM1- NC I3 I1 I5 I9 I7 I11 I13 I15 KM2- NC KM1 V1 G1 G2 V2 T0 T1 T2 T3 O0 O2 O1 O3 O4 O6 O5 O7 KM2 Emitter: +24 V (Brown) Receiver: +24 V (Brown) KM2 E2 KM1 M E1 Emitter: 0 V (Blue), shield Receiver: 0 V (Blue), shield S2 Rest input (Yellow) Light Curtain: OMRON F3SN-A RS-485 (Gray) S1 External relay monitor (Red) RS-485 (Pink) Red: Open Interlock (White) Auxiliary output (Yellow) Test input (Green) Emitter Receiver E1 and E2: 24 VDC power supplies S1: External test switch S2: Lockout reset switch KM1 and KM2: Contactors M: Motor Note Connect a 24-VDC power supply to terminals V0 and G0 (power supply terminals for the internal circuits). Note This example shows an NE1A-SCPU01(-V1)(-EIP) Controller’s terminal layout. 55 Section 3-2 Wiring Example of Connecting a User Mode Switch S1 I0 I2 I4 I6 I8 I10 I12 I14 I1 I3 I5 I7 I9 I11 I13 I15 V1 G1 T0 T2 O0 O2 O4 O6 V2 G2 T1 T3 O1 O3 O5 O7 E2 E1 and E2: 24 VDC power supplies S1: User mode switch E1 56 Note Connect a 24-VDC power supply to terminals V0 and G0 (power supply terminals for internal circuits). Note This example shows an NE1A-SCPU01(-V1)(-EIP) Controller’s terminal layout. Section 3-2 Wiring 3-2-4 DeviceNet Wiring Wire the DeviceNet communications cable as shown in the following diagram. Stickers are placed on the communication connectors based on the color of each communications wire. By matching the communications wire colors with the connector sticker colors, you can check to see if wires are in the correct locations. The colors of the wires are as follows: Color Red White Blue Black IMPORTANT Description V+ Signal (CAN H) Drain Signal (CAN L) V− • Turn OFF the power supply to the NE1A-series Controller, to all nodes on the network, and to communications lines before starting any wiring operations. • Tighten the DeviceNet connector to the appropriate torque (0.25 to 0.3 N·m). • Separate the DeviceNet communications cables from high-voltage/current lines. Note 3-2-5 Refer to the DeviceNet Operation Manual (W267) for further information on wiring. Wiring the USB Connector A computer is connected to use the Network Configurator. Use a commercially available USB-A to USB-B Male/Male cable to make the connection. IMPORTANT Use a USB cable of 3 meters max. 57 Section 3-2 Wiring 3-2-6 Ethernet (EtherNet/IP) Network Installation Basic Installation Precautions • Take the greatest care when installing the Ethernet System, being sure to follow ISO 8802-3 specifications. You must obtain a copy of these specifications and be sure you understand them before attempting to install an Ethernet System. • Unless you are already experienced in installing communications systems, we strongly recommend that you employ a professional to install your system. • Do not install Ethernet equipment near sources of noise. If a noisy environment is unavoidable, take adequate measures against noise interference, such as installing network components in grounded metal cases or using optical cable in the system. Recommended Network Devices The following table shows the devices recommended for use with the NE1Aseries Controller. Part Maker Switching Hub OMRON Model number W4S1-03B W4S1-05B W4S1-05C Consult the manufacturer. Consult the manufacturer. Consult the manufacturer. Cisco Systems, Inc. Contec USA, Inc. Phoenix Contact Twisted-pair 100BASE-TX cable Fujikura F-LINK-E 0.5mm × 4P EtherNet/IP compliant cable Connectors STP Plug (Modular plug) Panduit Corporation MPS588 Boots Tsuko Company MK boot (IV) LV Note Inquires OMRON Corporation Cisco Systems, Inc. Main Corporate HQ CONTEC USA Inc. Phoenix Contact USA Customer Service Fujikura America, Inc. --Panduit Corporation US Headquarters Tsuko Company Japan Headquarters • Ask the switching hub manufacturer for setting procedures for the switching hub. • Install the switching hub so that its environmental resistance capabilities are not exceeded. Ask the switching hub manufacturer for information on the environmental resistance of the switch hub. Precautions Precautions on Laying Twisted-pair Cable • Noise resistance may be reduced by ground loops, which can occur due to improper shield connections and grounding. Ground the shield at one location, as shown in the following diagram. • Do not connect a shield at the NE1A-series Controller connector. • If a cable connects two hubs, connect the shields at only one end. 58 Section 3-2 Wiring Hub Connector Hub Connector Connector GR Connector Connect shield. Connector Do not connect shield. GR ED Router STP Connector STP FG terminal (Shield) (Shield) ED Router STP Connector FG terminal (Shield) • Press the cable connector in firmly until it locks into place at both the switching hub and the NE1A-series Controller. • Do not lay the twisted-pair cable together with high-voltage lines. • Do not lay the twisted-pair cable near devices that generate noise. • Do not lay the twisted-pair cable in locations subject to high temperatures or high humidity. • Do not lay the twisted-pair cable in locations subject to excessive dirt and dust or to oil mist or other contaminants. Switching Hub Installation Environment Precautions • Do not ground the switching hub in the same location as a drive-system component such as an inverter. • Always use a dedicated power supply for the switching hub’s power supply. Do not use the same power supply used for other equipment, such as an I/O power supply, motor power supply, or control power supply. • Before installation, check the switching hub’s environment-resistance specifications, and use a switching hub appropriate for the ambient conditions. Contact the switching hub manufacturer for details on switching hub’s environment-resistance specifications. Switching Hub Connection Methods • Connect two hubs to each other as follows: Connect an MDI port to an MDI-X port with a straight cable; connect two MDI ports with a cross cable; and connect two MDI-X ports with a cross cable. Note It is very difficult to distinguish cross cables and straight cables by appearance. Incorrect cables will cause communications to fail. We recommend using cascade connections with straight cables whenever possible. MDI-X port (cross) MDI ports : Straight cable : Cross cable Switching Hub Switching Hub Switching Hub Switching Hub • Some switching hubs can automatically distinguish between MDI and MDI-X. When this kind of switching hub is being used, straight cable can be used between switching hubs. 59 Section 3-2 Wiring Note NE1A-series Controller Switching hub Auto-negotiation 10 Mbps Full Half 100 Mbps Full Half NE1A-series Controller link settings must match the communications mode settings of connected switching hubs. If they do not match, links will be unstable and normal communications will not be possible. For EtherNet/IP I/O communications (tag data link communications) with an EtherNet/IP standard originator, it is recommended that auto-negotiation or 100M full-duplex communications be set for the Controller and the switching hubs. Autonegotiation Recommended Not connectible Connectible Not connectible Connectible Ethernet Connectors 10 Mbps 100 Mbps Full Half Full Half Not connectible Connectible Not connectible Not connectible Not connectible Connectible Not connectible Connectible Not connectible Not connectible Not connectible Not connectible Not connectible Recommended Not connectible Connectible Not connectible Not connectible Not connectible Connectible The following standards and specifications apply to the connectors for the Ethernet twisted-pair cable. • Electrical specifications: Conforming to IEEE802.3 standards. • Connector structure: Connector pin 1 2 3 4 5 6 7 8 Hood Note RJ45 8-pin Modular Connector (conforming to ISO 8877) Signal name Transmission data + Transmission data – Reception data + Not used. Not used. Reception data – Not used. Not used. Frame ground Abbr. TD+ TD– RD+ ----RD– ----FG Signal direction Output Output Input ----Input ------- The NE1A-series Controller Ethernet ports support the auto-MDI/MDI-X functionality, so either a straight or cross cable can be used. Connecting the Cable !Caution Turn OFF the power to the NE1A-series Controller before connecting or disconnecting twisted-pair cable. !Caution Allow enough space for the bending radius of the twisted-pair cable as shown in below. 60 Section 3-2 Wiring NE1A 35 mm 1,2,3... 1. Lay the twisted-pair cable. 2. Connect the cable to the switching hub. Be sure to press in the cable until it locks into place. This procedure should only be performed by qualified personnel. 3. Connect the twisted-pair cable to the connector on the NE1A-series Controller. Be sure to press the connectors (both the switching hub side and Ethernet side) until they lock into place. 61 SECTION 4 DeviceNet Communications Functions 4-1 Initial Setting. . . . . . . . . . . . . . . . . . . . . . . . . . . . . . . . . . . . . . . . . . . . . . . . . . 64 4-1-1 Hardware Setup . . . . . . . . . . . . . . . . . . . . . . . . . . . . . . . . . . . . . . . . 64 4-1-2 Software Settings . . . . . . . . . . . . . . . . . . . . . . . . . . . . . . . . . . . . . . . 66 4-2 Network Status Indication. . . . . . . . . . . . . . . . . . . . . . . . . . . . . . . . . . . . . . . . 67 4-3 Remote I/O Allocations . . . . . . . . . . . . . . . . . . . . . . . . . . . . . . . . . . . . . . . . . 68 4-4 4-3-1 Remote I/O Area Allocation Overview . . . . . . . . . . . . . . . . . . . . . . 68 4-3-2 Remote I/O Area Attributes . . . . . . . . . . . . . . . . . . . . . . . . . . . . . . . 69 4-3-3 Remote I/O Area Data Configuration. . . . . . . . . . . . . . . . . . . . . . . . 70 Safety Master Function . . . . . . . . . . . . . . . . . . . . . . . . . . . . . . . . . . . . . . . . . . 82 4-4-1 Safety I/O Communications as Safety Master . . . . . . . . . . . . . . . . . 82 4-4-2 Safety I/O Connection Settings . . . . . . . . . . . . . . . . . . . . . . . . . . . . 83 Stopping/Resetting Communications after an Error Unit Ver. 1.0 or Later . . . . . . . . . . . . . . . . . . . . . . . . . . . Safety Slave Function . . . . . . . . . . . . . . . . . . . . . . . . . . . . . . . . . . . . . . . . . . . 85 4-5-1 Safety I/O Communications as Safety Slave . . . . . . . . . . . . . . . . . . 88 4-5-2 Creating I/O Data (Safety Slave I/O) to Use as Safety Slave . . . . . . 89 4-4-3 4-5 4-6 88 Standard Slave Function . . . . . . . . . . . . . . . . . . . . . . . . . . . . . . . . . . . . . . . . . 92 4-6-1 Standard I/O Communications as Standard Slave . . . . . . . . . . . . . . 92 4-6-2 Creating I/O Data (Slave I/O) to Use as Standard Slave . . . . . . . . . 92 63 Section 4-1 Initial Setting 4-1 4-1-1 Initial Setting Hardware Setup Node Address Setting Set the DeviceNet node address using the rotary switches on the front of the NE1A-series Controller. Method Range Note Two-digit decimal number 0 to 63 The node address is set to 63 at the factory. Any node address in the setting range can be used as long as the same address is not used by another node. If a value between 64 and 99 is set on the rotary switches, the node address can be set using a software setting on the Network Configurator. Software Setting Use the following procedure to set the node address using the Network Configurator. 1. Turn OFF the power and then set the rotary switches to a number between 64 and 99 (software setting). 2. Turn ON the power. The NE1A-series Controller will operate using the previous node address (factory set to 63). 3. Reset to the default settings using the Network Configurator’s RESET command. The configuration information held in the device will be initialized. 4. Set the node address from the Network Configurator. From here on, the NE1A-series Controller will operate with the node address set in the software setting. IMPORTANT • Turn OFF power to the NE1A-series Controller before setting the node addresses. • Do not change the rotary switches while the power is ON. The NE1Aseries Controller will detect this as a change in the configuration and will switch to Abort State. • A node address duplication error will occur if the same address is set for more than one node. Communications will not start if this error occurs. Note 64 Use a small flat-blade screwdriver to set the rotary switches, being careful not to scratch them. Section 4-1 Initial Setting Baud Rate Setting The DeviceNet baud rate is set using the DIP switch on the front of the NE1Aseries Controller. The baud rates settings are shown in the following table: Pin Note 1 2 OFF ON OFF ON ON or OFF ON or OFF OFF OFF ON ON ON or OFF ON or OFF Baud rate 3 4 OFF OFF OFF OFF ON OFF OFF OFF OFF OFF 125 kbit/s 250 kbit/s 500 kbit/s Software setting ON or OFF ON Automatic baud rate detection The baud rate is set to 125 kbit/s at the factory. Software Setting The Network Configurator can be used to set the baud rate. The procedure is as follows: 1. Turn OFF the power and change the DIP switch to the “software setting.” 2. Turn ON the power. When power is turned ON, the NE1A-series Controller will operate at the previous baud rate (default setting: 125 kbit/s). 3. Reset to the default settings using the Network Configurator’s RESET command. The configuration information held in the device will be initialized. 4. Set the baud rate from the Network Configurator. 5. Reset the NE1A-series Controller by cycling the power or using the NE1Aseries Controller RESET command from the Network Configurator. The NE1A-series Controller will then operate with the baud rate set from the Network Configurator, i.e., the software setting. Automatic Baud Rate Detection The NE1A-series Controller’s baud rate can be set automatically to match the baud rate of the master on the network. The baud rate must be set in at least one Safety Master or Standard Master on the network. After turning ON the power, the baud rate is set when establishing communications, and the baud rate setting is stored until the next time power is turned ON. IMPORTANT • Turn OFF power to the NE1A-series Controller before setting the DIP switch. • Do not change the DIP switch setting while the power supply is ON. The NE1A-series Controller will detect this as a change in the configuration and will switch to ABORT State. • The baud rate must be the same for all nodes (masters and slaves) on the network. 65 Section 4-1 Initial Setting 4-1-2 Software Settings Disabling DeviceNet Communications (Standalone) When DeviceNet Communications are disabled, the NE1A-series Controller stops all DeviceNet communications and operates as a Standalone Controller. The default is to have DeviceNet communications enabled (normal mode). Make the setting from the Network Configurator. After the setting has been made, a reset command will be sent from the Network Configurator to the NE1A-series Controller to enable the setting. Setting Enabled (Normal Mode) Disabled (Standalone Mode) Description DeviceNet communications enabled. DeviceNet communications disabled. The SNC will operate as a Standalone Controller. “nd” will be displayed on the 7-segment display. IMPORTANT • When DeviceNet communications are disabled, connect the NE1A-series Controller to the Network Configurator via a USB connection or via EtherNet/IP (for Controllers that support EtherNet/IP). • When DeviceNet communications are disabled, operation using the Network Configurator can be performed via a USB connection or via EtherNet/IP (for Controllers that support EtherNet/IP). 66 Section 4-2 Network Status Indication 4-2 Network Status Indication Network status is displayed on the NS/NS D indicator on the NE1A-series Controller. Refer to 2-1-2 Indicator/Display Areas for details. Note Error contents are shown through combinations of the MS and NS indicators, and seven-segment display. For the meanings of displays, refer to SECTION 12 Troubleshooting. 67 Section 4-3 Remote I/O Allocations 4-3 4-3-1 Remote I/O Allocations Remote I/O Area Allocation Overview The remote I/O areas used in Safety Masters/Slaves and Standard Masters/ Slaves are automatically allocated in the NE1A-series Controller’s I/O memory according to settings made from the Network Configurator. I/O of the destination communications slave and the I/O area for an NE1A-series slave are displayed as I/O tags. Using I/O tags allows a user to program without being conscious of the NE1A-series Controller’s memory addresses. I/O of the registered slave is displayed as I/O tags. Programming with I/O tags 68 Section 4-3 Remote I/O Allocations 4-3-2 Remote I/O Area Attributes Remote I/O Area Attributes The NE1A-series Controller’s remote I/O area has the following attributes. All values in the safety remote I/O area will be cleared if the operating mode is changed. If a communications error occurs, all data for the connection for which the error occurred will be cleared. Safety remote I/O area (DeviceNet Safety) Standard remote I/O area (DeviceNet) Note Mode change RUN RUN or Idle to Configuration to Idle Cleared Cleared (safety state) (safety state) Depends on Slave I/O area hold setting. Cleared Communications error Power ON Cleared for connection (safety state) Depends on Slave I/O area hold setting. Cleared (safety state) Cleared Refer to SECTION 10 Operating Modes and Power Supply Interruptions for details on each operating mode. Slave I/O Area Hold Setting Setting Clear Description The slave output area (inputs to a user application program) is cleared when a communications (connection) error occurs. Default Clear Validity When power supply is cycled The slave input area (outputs to a Standard Master) is cleared when the operating mode is changed to IDLE Mode. Hold The last data in the slave output area (inputs to a user application program) is held when a communications (connection) error occurs. The last data in the slave input area (outputs to a Standard Master) is held when the operating mode is changed to IDLE Mode. Values are cleared, however, when a critical error or abort occurs or when the power supply is turned ON again. 69 Section 4-3 Remote I/O Allocations 4-3-3 Remote I/O Area Data Configuration The Network Configurator can be used to specify the data transferred by the NE1A-series Controller as Safety Slave or Standard Slave input data. This section describes the data that can be set, the setting method, and the data configuration. Configuration of Data To Be Transferred The Pre-Ver. 1.0 NE1A-series Controllers can combine status data and I/O data and transfer them as remote I/O data. NE1A-series Controllers with unit version 1.0 or later (including Controllers that support EtherNet/IP) can combine status data, local I/O monitor data, and I/O data and transfer them as remote I/O data. The data that is transferred is determined by the configuration. The data is normally configured of status data, local I/O monitor data, and I/O data, in that order. The status data can be collected in the PLC to create a monitoring system. The data can also be configured of only status data, only local I/O monitor data, or only I/O data. Sample 1: Transmitting both Status Data and I/O Tags as Safety Slave Inputs Status Data Status A Status B Status C Status D Input Data Safety Slave Inputs Status A Status C I/O Tag X I/O Tag Y I/O Tag Z Connection I/O Tag X I/O Tag Y I/O Tag Z Sample 2: Transmitting Only I/O Tags as Safety Slave Inputs Status Data Status A Status B Status C Status D Input Data I/O Tag X I/O Tag Y I/O Tag Z 70 Safety Slave Inputs Connection I/O Tag X I/O Tag Y I/O Tag Z Section 4-3 Remote I/O Allocations Sample 3: Transmitting Only Status Data as Standard Slave Inputs Status Data Status A Status B Status C Standard Slave Inputs Connection Status A Status C Status D Input Data Not set up Data That Can Be Set and Example Arrangements The following table shows the data that can be set. • Pre-Ver. 1.0 NE1A-series Controllers Data type Status I/O tags Name/format Data size General Status Byte Setting method using Network Configurator Set using checkbox. Attribute Local Input Status Local Output Status Test Output/Muting Lamp Status Word Byte Byte Set using checkbox. Set using checkbox. Set using checkbox. BOOL I/O Tags BYTE I/O Tags WORD I/O Tags Byte Byte Word User registered. User registered. User registered. Nonsafety Safety Safety Nonsafety Safety Safety Safety DWORD (Double Word) I/O Tags Double word User registered. Safety • NE1A-series Controllers with Unit Version 1.0 or Later (Including Controllers that Support EtherNet/IP) Data type Status General Status Byte Setting method using Network Configurator Set using checkbox. Byte Set using checkbox. Byte Byte Set using checkbox. Set using checkbox. Safety Nonsafety Local I/O monitor Local I/O Status 1 to N (See note 1.) Local Output Status Test Output/Muting Lamp Status 1 to M (See note 1.) Local Input Monitor 1 to N (See note 1.) Local Output Monitor BOOL I/O Tags BYTE I/O Tags WORD I/O Tags DWORD (Double Word) I/O Tags Byte Set using checkbox. Safety Byte Byte Byte Word Double word Set using checkbox. User registered. User registered. User registered. User registered. Safety Safety Safety Safety Safety I/O tags Name/format Data size Attribute Nonsafety Safety 71 Section 4-3 Remote I/O Allocations IMPORTANT (1) For the NE1A-SCPU01-V1(-EIP), N = 2 and M = 1. For the NE1ASCPU02(-EIP), N = 5 and M = 2. The sizes of the local input status, test output/muting lamp status, and local input monitor status data can be specified in bytes. (2) The measures required for handling data as safety data in the data generation process will not be executed for status and I/O tag data items with a non-safety attribute. Therefore do not use those items to configure a safety system. Moreover, even if the attribute for an item is “safety,” it will become “nonsafety” for data input using standard I/O communications or for I/O tags connected with standard devices. Therefore, those items must also not be used to configure a safety system. If the above data is combined, the I/O data will be configured as follows: 1. When status data is set, the status is allocated at the beginning of the remote I/O area in the order shown below. (Status areas that are not set are not reserved, i.e., no unassigned areas are left.) General Status ↓ Local Input Status ↓ Local Output Status ↓ Test Output/Muting Lamp Status 2. When the local I/O monitor data is set (Controllers with unit version 1.0 or later only, including Controllers that support EtherNet/IP), the local I/O monitor data is attached after the other status data in the following order. (When local I/O monitor data is not set, the data will be shifted forward and that local I/O monitor area will not be reserved. This area does not exist in Pre-Ver. 1.0 Controllers.) Local Input Monitor ↓ Local Output Monitor 3. After the status data and local I/O monitor data, user-registered I/O tags are allocated in the remote I/O area in the order of registration. At this time, free areas are not reserved and all valid data is allocated with no unassigned areas. Examples of settings from the Network Configurator are shown below, along with the remote I/O area arrangements. 72 Section 4-3 Remote I/O Allocations Settings from Network Configurator (Unit Version 1.0 or Later, Including Controllers that Support EtherNet/IP) The following table shows the remote I/O area arrangement when the above settings are made. Byte 0 1 2 3 4 5 6 7 Bit 7 Bit 6 Bit 5 Bit 4 Bit 3 Bit 2 General Status (1 byte) Local Input Status 1 (1 byte) Local Input Status 2 (1 byte) Local Output Status (1 byte) Test Output/Muting Lamp Status (1 byte) Byte A (1 byte) Word B (2 bytes) Bit 1 Bit 0 Setting Example 2: Settings from Network Configurator (Unit Version 1.0 or Later, Including Controllers that Support EtherNet/IP) 73 Section 4-3 Remote I/O Allocations The following table shows the remote I/O area arrangement when the above settings are made. Byte 0 1 2 3 4 5 6 7 Bit 7 Bit 6 Bit 5 Bit 4 Bit 3 Bit 2 Local Input Status 1 (1 byte) Local Input Status 2 (1 byte) Local Output Status (1 byte) Bool C (1 byte) Dword D (4 bytes) Bit 1 Bit 0 Setting Example 3: Settings from Network Configurator (Controllers with Unit Version 1.0 or Later, Including Controllers that Support EtherNet/IP) Byte 0 1 2 3 4 5 6 7 8 9 74 Bit 7 Bit 6 Bit 5 Bit 4 Bit 3 Bit 2 Local Input Status 1 (1 byte) Local Input Status 3 (1 byte) Local Input Status 5 (1 byte) Local Output Status (1 byte) Local Input Monitor 1 (1 byte) Local Input Monitor 3 (1 byte) Local Input Monitor 5 (1 byte) Local Output Monitor (1 byte) Bool E (1 byte) Byte F (1 byte) Bit 1 Bit 0 Section 4-3 Remote I/O Allocations Bit Arrangements for Each Type of Data The bit arrangements for status data and I/O tag settings are shown below. Status Details The following tables show the status details. General Status (1 Byte) Bit 0 1 2 Content Input Power Supply Voltage Status OFF: Normal power supply is ON. ON: Power supply voltage error or power supply is OFF. Output Power Supply Voltage Status OFF: Normal power supply is ON. ON: Power supply voltage error or power supply is OFF. Standard I/O Communications Error Status OFF: No error ON: Error 3 Standard I/O Communications Status OFF: I/O communications stopped or error ON: I/O communications in progress 4 Safety I/O Communications Error Status OFF: No error ON: Error 5 Run Status OFF: Not RUN Mode ON: RUN Mode Attribute: Non-safety Data Description Indicates the status of the power supply voltage for inputs. This bit is OFF when local input power supply voltage (V1, G1) is being applied normally, or when local inputs are not being used. Indicates the status of the power supply voltage for outputs. This bit is OFF when local output power supply voltage (V2, G2) is being applied normally, or when local outputs are not being used. Indicates if there is any error in standard I/O communications. “Error” indicates that an error has been detected in one or more connections. This bit is OFF when communications are not established or when normal communications are in progress. For Controllers that support EtherNet/IP, the status of this bit is an OR of the DeviceNet or EtherNet/IP standard communications status. Indicates whether standard I/O communications are in progress. This bit is ON if normal communications are in progress for all connections. Example: This bit is ON when two Slave I/O blocks are set and communications are established for only one of them and not the other. This bit is OFF, however, when communications are normal for one and a communications error occurs for the other. For Controllers that support EtherNet/ IP, the status of this bit is an AND of the DeviceNet or EtherNet/IP standard communications status. Indicates if there is any error in Safety I/O communications. This bit is OFF when communications are not established (i.e., when d@ is not displayed at the 7-segment display) or while normal communications are in progress. ON when a communications error occurs at even one connection (i.e., when d5, d6, or dA is displayed at the 7-segment display). Indicates the operating mode of the NE1A-series Controller. When the NE1A-series Controller is Operating as a Safety Master Only This bit is OFF when a communications error occurs at even one connection (i.e., when d5, d6, or dA is displayed at the 7-segment display). This bit is ON when all Safety Master I/ O communications are normal. When the NE1A-series Controller is Operating as a Safety Master and a Safety Slave This bit is ON when all Safety Master I/O communications are normal and there is no error in any Safety Slave communications (i.e., when dA is not displayed at the 7-segment display). OFF at all other times. 75 Section 4-3 Remote I/O Allocations Bit 6 7 Content Description Normal Status OFF: Error ON: Normal NE1S Status OFF: Error ON: Normal Indicates the status of the NE1A-series Controller. This flag will indicate an error when an error indicated in the error details (10-4-2 Error Information Details) occurs. Indicates when one of the errors listed in 12-4-2 Error Information Details occurs. Example: Monitoring NE1A-series Controller Standard I/O Communications Error and Status Flags from the PLC First connection Controller mode change Communications error at first connection Error cleared Second connection Communications error at second connection only Error cleared Bit 2 Bit 3 When the NE1A-series Controller is Operating as a Safety Master Only • Example: Monitoring NE1A-series Controller Safety I/O Communications Error and Status Flags from the PLC (when a dA Error Occurs) Controller mode change Communications established at all Safety Master connections Safety Master Error communications error cleared occurs Bit 4 Bit 5 • Example: Monitoring NE1A-series Controller Safety I/O Communications Error and Status Flags from the PLC (when d5 and d6 Errors Occur) Controller mode change d5 error at Safety Master connection Communications established at Safety Communications d6 error at Safety Master connection established at all where d6 error Master Safety Master occurred. connection connections. Bit 4 Bit 5 When the NE1A-series Controller is Operating as a Safety Master and a Safety Slave • Example: Monitoring NE1A-series Controller Safety I/O Communications Error and Status Flags from the PLC (when a dA Error Occurs) 76 Section 4-3 Remote I/O Allocations Controller mode change Communications established at all Safety Slave connections. Communications established at all Safety Master connections. Safety Master communications error occurs. Error cleared Safety Slave communications error occurs. Error cleared Bit 4 Bit 5 • Example: Monitoring NE1A-series Controller Safety I/O Communications Error and Status Flags from the PLC (when d5 and d6 Errors Occur) Controller mode change d5 error at Safety Master connection Communications established at Safety Master connection where d6 error occurred. d6 error at Safety Master connection Communications established at all Safety Master connections. Bit 4 Bit 5 Example: Monitoring NE1A-series Run Status and Normal Status Flags from the PLC Controller error occurs Error cleared Controller mode change Controller Error error occurs cleared Bit 6 Bit 7 Idle to RUN Error remains in effect Error remains in effect Note Be careful when monitoring general status from a Standard PLC, because all bits are regarded as OFF from the PLC ladder program before communications are established or while a communications error is in effect. Example: Monitoring NE1A-series Run Status Flags from the PLC Standard I/O communications error Controller mode change Standard I/O communications error Error cleared Bit 6 77 Section 4-3 Remote I/O Allocations Local Input Status (2 Bytes, Pre-Ver. 1.0 Controllers) Byte 0 1 Bit 7 Bit 6 Safety Safety input input terminal 7 terminal 6 status status Safety Safety input input terminal terminal 14 15 status status Bit 5 Safety input terminal 5 status Safety input terminal 13 status Bit 4 Safety input terminal 4 status Safety input terminal 12 status Bit 3 Safety input terminal 3 status Safety input terminal 11 status Attribute: Safety Data Bit 2 Safety input terminal 2 status Safety input terminal 10 status Bit 1 Safety input terminal 1 status Safety input terminal 9 status Bit 0 Safety input terminal 0 status Safety input terminal 8 status ON: Normal, OFF: Error Local Input Status 1 (1 Byte, Controllers with Unit Version 1.0 or Later, Including Controllers that Support EtherNet/IP) Attribute: Safety Data Byte 0 Bit 7 Safety input terminal 7 status Bit 6 Safety input terminal 6 status Bit 5 Safety input terminal 5 status Bit 4 Safety input terminal 4 status Bit 3 Safety input terminal 3 status Bit 2 Safety input terminal 2 status Bit 1 Safety input terminal 1 status Bit 0 Safety input terminal 0 status ON: Normal, OFF: Error Local Input Status 2 (1 Byte, Controllers with Unit Version 1.0 or Later, Including Controllers that Support EtherNet/IP) Attribute: Safety Data Byte 0 Bit 7 Safety input terminal 15 status Bit 6 Safety input terminal 14 status Bit 5 Safety input terminal 13 status Bit 4 Safety input terminal 12 status Bit 3 Safety input terminal 11 status Bit 2 Safety input terminal 10 status Bit 1 Safety input terminal 9 status Bit 0 Safety input terminal 8 status ON: Normal, OFF: Error Local Input Status 3 (1 Byte, NE1A-SCPU02(-EIP)) Byte 0 Bit 7 Safety input terminal 23 status Bit 6 Safety input terminal 22 status Bit 5 Safety input terminal 21 status Bit 4 Safety input terminal 20 status Bit 3 Safety input terminal 19 status Attribute: Safety Data Bit 2 Safety input terminal 18 status Bit 1 Safety input terminal 17 status Bit 0 Safety input terminal 16 status ON: Normal, OFF: Error Local Input Status 4 (1 Byte, NE1A-SCPU02(-EIP)) Byte 0 Bit 7 Safety input terminal 31 status Bit 6 Safety input terminal 30 status Bit 5 Safety input terminal 29 status Bit 4 Safety input terminal 28 status Bit 3 Safety input terminal 27 status Attribute: Safety Data Bit 2 Safety input terminal 26 status Bit 1 Safety input terminal 25 status Bit 0 Safety input terminal 24 status ON: Normal, OFF: Error Local Input Status 5 (1 Byte, NE1A-SCPU02(-EIP)) Byte 0 Bit 7 Safety input terminal 39 status Bit 6 Safety input terminal 38 status Bit 5 Safety input terminal 37 status Bit 4 Safety input terminal 36 status ON: Normal, OFF: Error 78 Bit 3 Safety input terminal 35 status Attribute: Safety Data Bit 2 Safety input terminal 34 status Bit 1 Safety input terminal 33 status Bit 0 Safety input terminal 32 status Section 4-3 Remote I/O Allocations Local Output Status (1 Byte) Byte 0 Bit 7 Safety output terminal 7 status Bit 6 Safety output terminal 6 status Bit 5 Safety output terminal 5 status Attribute: Safety Data Bit 4 Safety output terminal 4 status Bit 3 Safety output terminal 3 status Bit 2 Safety output terminal 2 status Bit 1 Safety output terminal 1 status Bit 0 Safety output terminal 0 status ON: Normal, OFF: Error Test Output/Muting Lamp Status (1 Byte) (Pre-Ver. 1.0) Byte 0 Bit 7 Test output terminal 3 disconnection detected status Bit 6 Bit 5 Reserved Bit 4 Bit 3 Test output terminal 3 status Attribute: Non-safety Bit 2 Test terminal 2 status Bit 1 Bit 0 Test output terminal 1 status Test output terminal 0 status ON: Normal, OFF: Error Test Output/Muting Lamp Status 1 (1 Byte) (Unit Version 1.0 or Later, Including Controllers that Support EtherNet/IP) Attribute: Non-safety Byte 0 Bit 7 Test output terminal 3 disconnection detected status Bit 6 Bit 5 Reserved Bit 4 Bit 3 Test output terminal 3 status Bit 2 Test output terminal 2 status Bit 1 Test output terminal 1 status Bit 0 Test output terminal 0 status ON: Normal, OFF: Error Test Output/Muting Lamp Status 2 (1 Byte) (NE1A-SCPU02(-EIP)) Attribute: Non-safety Byte 0 Bit 7 Test output terminal 7 disconnection detected status Bit 6 Bit 5 Reserved Bit 4 Bit 3 Test output terminal 7 status Bit 2 Test output terminal 6 status Bit 1 Test output terminal 5 status Bit 0 Test output terminal 4 status ON: Normal, OFF: Error Local Input Monitor 1 (1 Byte, Controllers with Unit Version 1.0 or Later, Including Controllers that Support EtherNet/IP) Attribute: Safety Data Byte 0 Bit 7 Safety input terminal 7 monitor Bit 6 Safety input terminal 6 monitor Bit 5 Safety input terminal 5 monitor Bit 4 Safety input terminal 4 monitor Bit 3 Safety input terminal 3 monitor Bit 2 Safety input terminal 2 monitor Bit 1 Safety input terminal 1 monitor Bit 0 Safety input terminal 0 monitor ON: ON, OFF: OFF 79 Section 4-3 Remote I/O Allocations Local Input Monitor 2 (1 Byte, Controllers with Unit Version 1.0 or Later, Including Controllers that Support EtherNet/IP) Attribute: Safety Data Byte 0 Bit 7 Bit 6 Bit 5 Bit 4 Bit 3 Bit 2 Safety Safety Safety Safety Safety Safety input input input input input input terminal terminal 14 terminal terminal terminal terminal 15 monitor 13 monitor 12 monitor 11 monitor 10 monitor monitor Bit 1 Safety input terminal 9 monitor Bit 0 Safety input terminal 8 monitor ON: ON, OFF: OFF Local Input Monitor 3 (1 Byte, NE1A-SCPU02(-EIP)) Byte 0 Attribute: Safety Data Bit 7 Bit 6 Bit 5 Bit 4 Bit 3 Bit 2 Bit 1 Bit 0 Safety Safety Safety Safety Safety Safety Safety Safety input input input input input input input input terminal terminal 22 terminal terminal terminal terminal terminal terminal 23 monitor monitor 21 monitor 20 monitor 19 monitor 18 monitor 17 monitor 16 monitor ON: ON, OFF: OFF Local Input Monitor 4 (1 Byte, NE1A-SCPU02(-EIP)) Byte 0 Attribute: Safety Data Bit 7 Bit 6 Bit 5 Bit 4 Bit 3 Bit 2 Bit 1 Bit 0 Safety Safety Safety Safety Safety Safety Safety Safety input input input input input input input input terminal terminal 30 terminal terminal terminal terminal terminal terminal 31 monitor monitor 29 monitor 28 monitor 27 monitor 26 monitor 25 monitor 24 monitor ON: ON, OFF: OFF Local Input Monitor 5 (1 Byte, NE1A-SCPU02(-EIP)) Byte 0 Attribute: Safety Data Bit 7 Bit 6 Bit 5 Bit 4 Bit 3 Bit 2 Bit 1 Bit 0 Safety Safety Safety Safety Safety Safety Safety Safety input input input input input input input input terminal terminal terminal terminal terminal terminal terminal 38 terminal 37 monitor 36 monitor 35 monitor 34 monitor 33 monitor 32 monitor monitor 39 monitor ON: ON, OFF: OFF Local Output Monitor (1 Byte) Byte 0 Bit 7 Safety output terminal 7 monitor Bit 6 Safety output terminal 6 monitor Bit 5 Safety output terminal 5 monitor Attribute: Safety Data Bit 4 Safety output terminal 4 monitor Bit 3 Safety output terminal 3 monitor Bit 2 Safety output terminal 2 monitor Bit 1 Safety output terminal 1 monitor Bit 0 Safety output terminal 0 monitor ON: ON, OFF: OFF Note 80 The results of appraising input data is given for the local input monitor status. The status may not be the same as the status of the connected input device if channel mode is set or an error occurs. Section 4-3 Remote I/O Allocations I/O Tag Details The following tables show the I/O tag details. BOOL Byte 0 Bit 7 Bit 6 Bit 5 Bit 4 Open (=0) Bit 3 Bit 2 Bit 1 Bit 0 User data Bit 0 BYTE Byte 0 Bit 7 User data Bit 7 Bit 6 User data Bit 6 Bit 5 User data Bit 5 Bit 4 User data Bit 4 Bit 3 User data Bit 3 Bit 2 User data Bit 2 Bit 1 User data Bit 1 Bit 0 User data Bit 0 Bit 5 User data Bit 5 User data Bit 13 Bit 4 User data Bit 4 User data Bit 12 Bit 3 User data Bit 3 User data Bit 11 Bit 2 User data Bit 2 User data Bit 10 Bit 1 User data Bit 1 User data Bit 9 Bit 0 User data Bit 0 User data Bit 8 WORD Byte 0 1 Bit 7 User data Bit 7 User data Bit 15 Bit 6 User data Bit 6 User data Bit 14 DWORD Byte 0 1 2 3 Bit 7 User data Bit 7 User data Bit 15 Bit 6 User data Bit 6 User data Bit 14 Bit 5 User data Bit 5 User data Bit 13 Bit 4 User data Bit 4 User data Bit 12 Bit 3 User data Bit 3 User data Bit 11 Bit 2 User data Bit 2 User data Bit 10 Bit 1 User data Bit 1 User data Bit 9 Bit 0 User data Bit 0 User data Bit 8 User data Bit 23 User data Bit 31 User data Bit 22 User data Bit 30 User data Bit 21 User data Bit 29 User data Bit 20 User data Bit 28 User data Bit 19 User data Bit 27 User data Bit 18 User data Bit 26 User data Bit 17 User data Bit 25 User data Bit 16 User data Bit 24 Unused bits among the above user-registered I/O tags will be fixed at 0. 81 Section 4-4 Safety Master Function 4-4 4-4-1 Safety Master Function Safety I/O Communications as Safety Master Safety I/O communications are used to exchange data automatically with Safety Slaves without user programming. To perform safety I/O communications with other slaves, the following items are required: 1. Registration of slave devices in the NE1A-series Controller. 2. Safety I/O connection settings. NE1A Safety Master Safety I/O connection Safety I/O communications DST1 Safety Slave Safety Slave by other manufacturer Safety Slave by other manufacturer Safety Master Specifications Safety I/O Connections Number of connections Maximum data size Connection type Pre-Ver. 1.0 Controllers: 16 max. Controllers with unit version 1.0 or later, including Controllers that support EtherNet/IP: 32 max. 16 bytes of input or 16 bytes of output (per connection) Single cast or multicast Safety Slave Allocations Safety Slaves that communicate with the NE1A-series Controller are allocated automatically in the Controller’s I/O memory based on the settings made from the Network Configurator. In the Logic Editor, slave I/O is displayed as I/O tags. Using these I/O tags allows a user to program without being aware of specific memory addresses in the NE1A-series Controller. 82 Section 4-4 Safety Master Function 4-4-2 Safety I/O Connection Settings Safety connections must be set in order to perform safety I/O communications between the NE1A-series Controller and the Safety Slaves. A “connection” is a logical communications path for a master and slave to communicate with each other. Safety I/O connection settings include the following settings: 1. I/O connection settings (Selecting I/O data used in the slave.) 2. Open type setting 3. Connection type setting 4. EPI (data expected packet interval) setting (1) Select I/O data for each slave. Safety Input Slave NE1A (Safety Master) Safety Output Slave I/O memory (inputs) Data A Data B Data C Data F Data B Data D I/O memory (outputs) Data F Safety Input Slave Data D Data E (2) Network Configurator automatically allocates Safety Slaves (3) Select safety connection and set network parameters for each connection 83 Section 4-4 Safety Master Function I/O Connection Settings Some slaves have multiple I/O data (I/O assembly data) internally and the data to be communicated from them can be selected. Here, the data to allocated in the NE1A-series Controller can be specified from the data in the registered Safety Slave. NE1A I/O data Connection Data A Data B Safety Slave Open Type Setting Select the open type that the NE1A-series Controller uses when establishing a connection. Open type Configure the Safety Slave Check the Safety Signature Open Only Description Configures the Safety Slave when establishing the connection. Checks that the configuration of the Safety Slave is correct by checking the safety signature when establishing the connection. Does not check that the configuration of Safety Slave is correct when establishing the connection. !WARNING Serious injury may possibly occur due to loss of required safety functions. Serious injury may possibly occur due to loss of required safety functions. Always be sure that the Safety Master or Safety Slave has the correct configuration before setting the open type to Open Only. Connection Type Setting Select the safety connection type to use with Safety Slaves. Either of the following two safety connections can be selected. Connection type Multi-cast Connection Single-cast Connection 84 Description Multicast connections can be selected only for Safety Input Slaves. When a multicast connection is selected, the Safety Input Slave can transmit the input data to a maximum of 15 NE1A-series Safety Masters in multicast mode. NE1A-series Safety Masters that have the same I/O data type specified for I/O connections and the same EPI value are handled as the same multicast group. It is possible to select this connection even for just one NE1A-series Safety Master. With a Single cast connected, the Safety Master and Safety Slave perform 1:1 Safety I/O communications. Section 4-4 Safety Master Function EPI (Data Expected Packet Interval) Setting Set the interval to communicate safety data between the NE1A-series Safety Master and Safety Slaves. Devices that transmit data to network are monitored to confirm they can transmit the data within the set time interval and devices that receive data are monitored to confirm they can receive normal data within the data transmission interval using timers. If the data is not received, the connection is disconnected and a switch is made to the safety state. Note • The time set here affects the network reaction time. Refer to SECTION 11 Remote I/O Communications Performance and Local I/O Response Time and to Section 2 Constructing a Safety Network in the DeviceNet Safety System Configuration Manual (Cat. No. Z905) for information on the network reaction time. • The minimum set for the EPI is either the cycle time of the Safety Network Controller or the cycle time of the Safety Slaves (always 6 ms), whichever is greater. The minimum setting for the EPI will therefore be affected if the cycle time of the Safety Network Controller is longer then 6 ms. 4-4-3 Stopping/Resetting Communications after an Error Unit Ver. 1.0 or Later With Controllers with unit version 1.0 or later (including Controllers that support EtherNet/IP), the user can specify whether to stop or continue I/O communications after the connection times out during safety I/O communications with the safety slave. If I/O communications are stopped because of a timeout error, the communications can be restarted from the user program or a Network Configurator. With Pre-Ver. 1.0 Controllers, I/O communications are continued (automatic recovery). Setting the Operating Mode after a Communications Error One of the following modes can be selected to specify the Controller’s operation when there is a connection timeout during safety I/O communications with the safety slave. Mode after communications error Automatic recovery Description Specify this mode to re-establish the safety I/O connection for a connection in which a safety I/O communications error has occurred. If the cause of the communications error is eliminated, safety I/O communications will restart automatically. 85 Section 4-4 Safety Master Function Mode after communications error Description Stop only the connection where the error occurred. Specify this mode to keep safety I/O communications stopped on a connection in which a safety I/O communications error has occurred. I/O communications will continue for normal connections. To restart safety I/O communications for connections in which I/O communications have been stopped, use the Network Configurator to send a command to restart communications. It is also possible to write a logic routine in the user program in advance to turn ON the specified Safety I/O Communications Restart Flag and restart communications with a specified trigger bit. Specify this mode to stop safety I/O communications with all safety slaves stopped after a safety I/O communications error has occurred. To restart safety I/O communications with the safety slaves after I/O communications have been stopped, use the Network Configurator to send a command to restart communications. It is also possible to write a logic routine in the user program in advance to turn ON all of the Safety I/O Communications Restart Flags and restart communications with a specified trigger bit. This function is enabled when safety I/O communications are established with all Safety Slaves. Stop all connections Resetting a Connection Stopped due to a Communications Error When I/O communications have stopped in a connection due to a connection timeout, I/O communications can be restarted in the stopped connection by turning ON the Communications Reset Flag from the user program or sending a Communications Restart command from the Network Configurator. If the Controller communications mode is set to stop all connections after a communications error, communications cannot be restarted in a specified stopped connection. In this case, restart communications in all connections. 1. Restarting I/O Communications from the Network Configurator After connecting online with the Network Configurator, select the Safety Master, right-click to display the popup menu, and select Monitor to display the Device Monitor Window. The following window will appear when the safety connection is selected. Communications can be restarted in a connection where an error occurred (evident from the connection status) by selecting that connection and clicking the Resume Button. If the Resume All Button is clicked, I/O communications will restart in all Slaves with which communications were stopped. 86 Safety Master Function Section 4-4 2. Restarting I/O Communications from the User Program When the safety connection is set, the following user program output tags will be displayed for the connection. Communications restart tags for specific connections Communications restart tag for all connections When these tags have been set in the user program in advance as I/O communications restart conditions, I/O communications can be restarted with these tags by turning ON (OFF → ON) the specified condition. 87 Section 4-5 Safety Slave Function 4-5 4-5-1 Safety Slave Function Safety I/O Communications as Safety Slave An NE1A-series Controller can function as a Safety Slave. One NE1A-series Controller can function simultaneously as a Safety Master, Safety Slave, and Standard Slave. The following steps are required in order for the NE1A-series Controller to perform safety I/O communications as a Safety Slave. 1. Creation of I/O data (safety slave I/O) to use as a Safety Slave 2. Registration in the Safety Master 3. Safety I/O connections settings in the Safety Master Safety PLC Safety Master IN Area OUT Area Safety I/O communications Safety Slave IN Safety Slave OUT NE1A (Safety Slave) Safety Slave Specifications Safety I/O Connections Number of connections Maximum data size Connection type Note 88 4 max. 16 bytes of input or 16 bytes of output (per connection) Single cast or multicast (See note.) Up to 15 masters total can be communicated with for one multicast connection. Section 4-5 Safety Slave Function 4-5-2 Creating I/O Data (Safety Slave I/O) to Use as Safety Slave The I/O data to be used by the Safety Slave must be created in order for the NE1A-series Controller to perform safety I/O communications as a Safety Slave. The memory block for this I/O data is called Safety Slave I/O. • Up to four types of Safety Slave I/O can be created. • The maximum data size for Safety Slave I/O is 16 bytes. • The following status information can be included in I/O data if the I/O type of the Safety Slave I/O is Slave IN. • General Status • Local Input Status • Local Output Status • Test Output/Muting Lamp Status • If the I/O type of the Safety Slave I/O is set to Slave IN for a NE1A-series Controller with unit version 1.0 or later (including Controllers that support EtherNet/IP), the following local I/O monitor data can also be included in the I/O data. • Local Input Monitor • Local Output Monitor NE1A (Safety Slave) Safety Master A I/O Memory (input area) Safety Slave IN (1) General status Safety I/O connection General status IN data 1 IN data 1 IN data 2 IN data 2 I/O Memory (output area) Safety Slave OUT Safety I/O connection OUT data 1 OUT data 1 Safety Slave IN (2) Safety Master B Local input monitor I/O Memory (input area) IN data 3 Safety I/O connection Safety Slave IN (3) Local input monitor IN data 3 General status Safety Master C Safety I/O connection I/O Memory (input area) Local output monitor 89 Section 4-5 Safety Slave Function Safety Slave I/O Setting Set the Safety Slave I/O as follows: 1. Select the I/O type. 2. Set the I/O tags. 3. Set additional status. 4. Set additional local I/O monitor data. Safety Slave I/O NE1A (Safety Slave) Safety Slave IN Status A Connection Status B User program Input data Safety Slave OUT Connection Status data Output data Selecting the I/O Type I/O type Safety Slave IN Safety Slave OUT Description Data input from the network to the Safety Master. Data output to the network from the Safety Master. Setting I/O Tags Set the input data blocks and output data blocks to use in the program for the Safety Slave I/O. Multiple data blocks can be set for Safety Slave I/O. The size of the data block can be selected from BOOL (1 byte), BYTE (1 byte), WORD (2 bytes), or DWORD (4 bytes). A maximum of 16 bytes, however, can be set for Safety Slave I/O. I/O tags defined for data blocks can be used in the Logic Editor. Using I/O tags enables the user to program without being aware of the NE1A-series Controller’s specific memory addresses. Setting Additional Status When the I/O type of the Safety Slave I/O is Slave IN, the following status information can be added to the first line of the transmission data. Refer to 43-3 Remote I/O Area Data Configuration for details on each status. Pre-Ver. 1.0 Controllers Tag name General Status Local Input Status Local Output Status Test Output/Muting Lamp Status 90 Data size Byte Word Byte Byte Attribute Non-safety Safety Safety Non-safety Section 4-5 Safety Slave Function Controllers with Unit Version 1.0 or Later, Including Controllers that Support EtherNet/IP Tag name General Status Local Input Status 1 to N (See note.) Local Output Status Test Output/Muting Lamp Status 1 to M (See note.) Note Byte Byte Data size Attribute Non-safety Safety Byte Byte Safety Non-safety For the NE1A-SCPU01-V1(-EIP), N = 2 and M = 1. For the NE1A-SCPU02(EIP), N = 5 and M = 2. The sizes of the local input status and test output/muting lamp status data can be specified in bytes. Setting Local I/O Monitor Data If the I/O type of the Safety Slave I/O is set to Slave IN for a NE1A-series Controller with unit version 1.0 or later (including Controllers that support EtherNet/IP), the following local I/O monitor information can be added to the transmission data after the status information. Refer to 4-3-3 Remote I/O Area Data Configuration for details on the local I/O monitor information. Local I/O Monitor Local Input Monitor 1 to N (See note.) Local Output Monitor Note Data size Byte Byte Attribute Safety Non-safety For the NE1A-SCPU01-V1(-EIP), N = 2. For the NE1A-SCPU02(-EIP), N = 5. The size of the local input monitor data can be specified in bytes. !WARNING Serious injury may possibly occur due to loss of required safety functions. The necessary measures for safety data are not taken for data with the non-safety data attribute from NE1A-series Controller's internal status information allocated to the Safety Master. Therefore, do not use this data to configure the Safety Control System. 91 Section 4-6 Standard Slave Function 4-6 4-6-1 Standard Slave Function Standard I/O Communications as Standard Slave An NE1A-series Controller can function as a Standard Slave. One NE1Aseries Controller can function simultaneously as a Safety Master, Safety Slave, and Standard Slave. The NE1A-series Controller’s internal status information is also included in the data allocated to the Standard Master, and so a monitoring system using a PLC can be established. The following steps are required in order for an NE1A-series Controller to perform standard I/O communications as a Standard Slave. 1. Creation of I/O data (slave I/O) to use as a Standard Slave 2. Registration in the Standard Master 3. Connection settings in the Standard Master Standard PLC Standard Master IN Area OUT Area Slave IN Slave OUT Standard I/O communications NE1A (Standard Slave) Standard Slave Specifications Standard I/O Connections Number of connections 2 max. Maximum data size 16 input bytes or 16 output bytes (per connection) (See note 1.) Connection type Poll, Bitstrobe, COS, or Cyclic Note (1) The maximum data size is eight input bytes or zero outputs bytes when a Bitstrobe connection is selected. (2) COS and cyclic connections cannot be used at the same time. (3) When two Poll/COS or Poll/Cyclic connections are selected, the same output destination is used, so the maximum output data size is 16 bytes. For inputs, up to 32 bytes of data can be set for 2 connections. 4-6-2 Creating I/O Data (Slave I/O) to Use as Standard Slave The I/O data to be used for the DeviceNet Slave must be created in order for an NE1A-series Controller to perform standard I/O communications as a Standard Slave. The memory blocks for this I/O data are called Slave I/O. 92 Section 4-6 Standard Slave Function • Slave I/O blocks can be created for a maximum of 2 connections. • The maximum data size for Slave I/O is 16 bytes. • The following status information can be included in I/O data when the I/O type of the Slave I/O is slave input. • General Status • Local Input Status • Local Output Status • Test Output/Muting Lamp Status • If the I/O type of the Safety Slave I/O is set to Slave IN for a NE1A-series Controller with unit version 1.0 or later (including Controllers that support EtherNet/IP), the following local I/O monitor data can also be included in the I/O data. • Local Input Monitor • Local Output Monitor Setting Slave I/O Set the Slave I/O as follows: 1. Select the connection type. 2. Set the I/O tags. 3. Set additional status. 4. Set additional local I/O monitor data. Slave I/O NE1A (Standard Slave) IN Status A Status B User program Input data Connection OUT Status data Output data 93 Section 4-6 Standard Slave Function Selecting Connection Type Any of the following 4 connection types can be selected. Output data cannot be set for Bitstrobe data because Bitstrobe data cannot be output from the Standard Master. Also, the maximum data size for Bitstrobe data input to Standard Master is 8 bytes. COS and cyclic connections cannot be used at the same time. • Poll • Bitstrobe • COS • Cyclic Setting I/O Tags Set the input data blocks and outputs data block to use for the selected connection. Multiple data blocks can be set for Slave I/O. The data block size can be selected from BOOL (1 byte), BYTE (1 byte), WORD (2 bytes), or DWORD (4 bytes). A maximum of 16 bytes, however, can be set for Slave I/O. I/O tags defined for data blocks can be used in the Logic Editor. Using I/O tags enables the user to program without being aware of the specific memory addresses in the NE1A-series Controller. Setting Additional Status When the I/O type of a Slave I/O is Slave IN, the following status information can be added to the first line of the transmission data. Refer to 4-3-3 Remote I/O Area Data Configuration for details on each status. Pre-Ver. 1.0 Controllers Tag Name General Status Local Input Status Local Output Status Test Output/Muting Lamp Status Data Size Byte Word Byte Byte Controllers with Unit Version 1.0 or Later, Including Controllers that Support EtherNet/IP Tag Name General Status Local Input Status 1 to N (See note.) Local Output Status Test Output/Muting Lamp Status 1 to N (See note.) Note Data Size Byte Byte Byte Byte For the NE1A-SCPU01-V1(-EIP), N = 2 and M = 1. For the NE1A-SCPU02 (-EIP), N = 5 and M = 2. The sizes of the local input status and test output/ muting lamp status data can be specified in bytes. Setting Local I/O Monitor Data If the I/O type of the Safety Slave I/O is set to Slave IN for a NE1A-series Controller with unit version 1.0 or later (including Controllers that support EtherNet/IP), the following local I/O monitor information can be added to the transmission data after the status information. Refer to 4-3-3 Remote I/O Area Data Configuration for details on the local I/O monitor information. Local I/O Monitor Local Input Monitor 1 to N (See note.) Local Output Monitor 94 Data size Byte Byte Standard Slave Function Section 4-6 Note For the NE1A-SCPU01-V1(-EIP), N = 2. For the NE1A-SCPU02(-EIP), N = 5. The sizes of the local input status and local input monitor status data can both be specified in bytes. !WARNING Serious injury may possibly occur due to loss of required safety functions. The data attributes handled by standard I/O communications are non-safety data. The necessary measures for safety data are not taken for this data during data generation. Therefore, do not use this data to configure the Safety Control System. 95 SECTION 5 EtherNet/IP Communications 5-1 5-2 Connecting to Ethernet . . . . . . . . . . . . . . . . . . . . . . . . . . . . . . . . . . . . . . . . . . 98 5-1-1 Setting the IP Address . . . . . . . . . . . . . . . . . . . . . . . . . . . . . . . . . . . 98 5-1-2 TCP/IP Settings . . . . . . . . . . . . . . . . . . . . . . . . . . . . . . . . . . . . . . . . 99 Standard Target Function . . . . . . . . . . . . . . . . . . . . . . . . . . . . . . . . . . . . . . . . 102 5-2-1 Standard I/O Communications as Standard Target. . . . . . . . . . . . . . 102 5-2-2 Creating I/O Data (Target I/O) to Use as Standard Target . . . . . . . . 102 97 Section 5-1 Connecting to Ethernet 5-1 5-1-1 Connecting to Ethernet Setting the IP Address You can use either of the following methods to set the IP address for an NE1A-series Controller that supports EtherNet/IP. Method 1: Acquiring the IP Address from a BOOTP Server (This is the default mode for NE1A-series Controllers that support EtherNet/IP.) Use this setting method when it is possible to connect a BOOTP server to the network. Method 2: Using the Network Configurator to Make the TCP/IP Settings An NE1A-series Controller that supports EtherNet/IP will operate in the state shown below when power is turned ON while the IP address display switch is pressed. Setting IP address Subnet mask Default gateway Preferred DNS server Alternate DNS server Host name Domain name Baud rate Operating status 192.168.250.1 255.255.255.0 (Class C mask status) None (IP routing disabled) None None None None Auto-detect Use this setting method when it is not possible to connect a BOOTP server to the network. Method 1: Acquiring the IP Address from a BOOTP Server The default mode for NE1A-series Controllers that support EtherNet/IP is for the Controller to be started with the IP address acquired from a BOOTP server. In this mode, the IP address can be automatically acquired from the BOOTP server. Obtaining a BOOTP Server Running on a Personal Computer The Rockwell Interactive BOOTP/DHCP Utility is the BOOTP server recommended by ODVA. It can be downloaded from the following site: http://www.ab.com/networks/bootp.html The MAC address may be required to set the BOOTP server. The MAC address is given on the nameplate on the front of the Unit. Method 2: Using the Network Configurator to Make the TCP/IP Settings When an NE1A-series Controller that supports EtherNet/IP is started with the IP address switch pressed, the default is for the Controller to be given a starting IP address of 192.168.250.1. After the Controller has started with this IP address, the Network Configurator can be used to make the TCP/IP settings, including the IP address. For details, refer to 5-1-2 TCP/IP Settings. 98 Section 5-1 Connecting to Ethernet IMPORTANT When an NE1A-series Controller that supports EtherNet/IP is started with the IP address switch pressed, the Controller will be given a fixed starting IP address of 192.168.250.1. When starting the Controller in this mode, set the IP address before executing any other operations. 5-1-2 TCP/IP Settings Using the Network Configurator to Make the Settings 1,2,3... 1. Select Programs - OMRON Network Configurator for DeviceNet Safety - Network Configurator from the Windows Start Menu. The Network Configurator will start. 2. Connect the Network Configurator online. (Select Option - Select - Interface to set the interface, and then select Network - Connect.) 3. Select EtherNet/IP in the Network Configuration Window. (Example: Click the EtherNet/IP_1 Tab.) 4. Select Tools - TCP/IP Settings. The Setup TCP/IP Configuration Dialog Box will be displayed. The default settings are given in the dialog box shown below. 5. In the Target IP Address, set the present IP address for the applicable NE1A-series Controller. 99 Section 5-1 Connecting to Ethernet 6. To change the IP address, select the Use the following IP address Option and set the IP address. 7. Click the Set to the Device Button. The NE1A-series Controller will automatically begin using the updated settings for operation. IMPORTANT Before downloading, confirm the device that is to be connected. If the node address (the IP address) is not set correctly, an unintended device may be connected and incorrect device parameters may be set. IMPORTANT DNS is not supported for NE1A-series Controllers. In the TCP/IP settings, the Do not use DNS Option must be selected. TCP/IP Setting Details The NE1A-series Controller’s TCP/IP Configuration settings include the following settings. • IP address • Subnet mask • Default gateway • Baud rate IP Address Sets the NE1A-series Controller’s local IP address. Default IP address = 192.168.250.1 Subnet Mask For the subnet mask, all bits corresponding to the bits in the IP address used as either the net number or the subnet number are set to 1, and the bits corresponding to the host number are set to 0. These settings must be made when using an address conversion method other than the IP address table method. If no subnet mask is set, or if an illegal value is set, the following values will be used depending on the IP address class. Class Class A Class B Class C Subnet mask 255.0.0.0 255.255.0.0 255.255.255.0 With the default setting (0.0.0.0), a subnet mask corresponding to the IP address class is used. 100 Section 5-1 Connecting to Ethernet The following table shows the various Unit settings when only the IP Address Display/Setting Area is set, and the other TCP/IP Configuration settings are left at their default values. Setting IP address Subnet mask Default gateway Preferred DNS server Alternate DNS server Host name Domain name Baud rate Operating status Set with the Network Configurator. Set with the Network Configurator. None (IP routing disabled) None None None None Auto-detect Default Gateway Sets the default gateway’s IP address. When not using the default gateway, set 0.0.0.0. Link Setting Sets the communications baud rate. Setting Auto (default) 10 Mbps, Half Duplex 10 Mbps, Full Duplex 100 Mbps, Half Duplex 100 Mbps, Full Duplex Note NE1A-series Controller Switching hub Auto-negotiation 10 Mbps Full Half 100 Mbps Full Half Meaning The baud rate with the switching hub is detected automatically. If possible, the Unit operates in 100BASE-T (full duplex). Operates in 10BASE-T, half duplex. Operates in 10BASE-T, full duplex. Operates in 100BASE-TX, half duplex. Operates in 100BASE-TX, full duplex. Adjust the link settings of the NE1A-series Controller to match the communications settings of the connected switching hub. If the settings do not match, the link will become unstable and prevent normal communications. For EtherNet/IP I/O communications (tag data link communications) with an EtherNet/ IP standard originator, it is recommended that auto-negotiation or 100M fullduplex communications be set for the Controller and the switching hubs. Autonegotiation Recommended Not connectible Connectible Not connectible Connectible 10 Mbps 100 Mbps Full Half Full Half Not connectible Connectible Not connectible Not connectible Not connectible Connectible Not connectible Connectible Not connectible Not connectible Not connectible Not connectible Not connectible Recommended Not connectible Connectible Not connectible Not connectible Not connectible Connectible 101 Section 5-2 Standard Target Function 5-2 5-2-1 Standard Target Function Standard I/O Communications as Standard Target An NE1A-series Controller can function as a Standard Target. The NE1A-series Controller’s internal status information is also included in the data allocated to the Standard Originator, and so a monitoring system using a PLC can be established. The following steps are required in order for an NE1A-series Controller to perform standard I/O communications as a Standard Target. 1. Creation of I/O data (Target I/O) to use as a Standard Target 2. Registration in the Standard Originator 3. Connection settings in the Standard Originator For details on how to make the settings, refer to the DeviceNet Safety System Configuration Manual (Cat. No. Z905). Standard PLC Standard Originator IN Area OUT Area Slave IN Slave OUT Standard I/O communications NE1A (Standard Target) Standard Target Specifications Standard I/O Connections Number of connections Maximum data size Connection type 2 max. 128 input bytes or 16 output bytes per connection Point-to-point or multicast IMPORTANT For an NE1A-series Controller, do not set a connection through an open network. 5-2-2 Creating I/O Data (Target I/O) to Use as Standard Target The I/O data to be used for the Standard Target must be created in order for an NE1A-series Controller to perform standard I/O communications as a Standard Target. • Target I/O blocks can be created for a maximum of 2 connections. • The maximum data size for Target I/O is 128 input bytes or 16 output bytes. 102 Section 5-2 Standard Target Function • The following status information can be included in I/O data when the I/O type of the Target I/O is input. • General Status • Local Input Status • Local Output Status • Test Output/Muting Lamp Status • Local Input Monitor • Local Output Monitor • When the I/O type of a Target I/O is Target IN, data for communications between this Unit and a Safety Slave performing DeviceNet Safety communications can be included in the I/O data. IMPORTANT When connected to an OMRON CS/CJ-series EtherNet/IP Communications Unit, I/O communications for EtherNet/IP are set in 2-byte increments. When creating an odd number of bytes of I/O data, add one byte to the I/O tag to make it an even number. 103 Section 5-2 Standard Target Function Setting Target I/O Set the Target I/O as follows: 1. Select the connection type. 2. Set the I/O tags. 3. Set additional status. 4. Set additional local I/O monitor data. 5. Set Safety I/O routing. Target I/O NE1A (Standard Target) IN Status A Status B User program Input data Connection Slave data A1 Slave data D2 Status data OUT Output data Safety Input Slave Data A Safety Input Slave data Connection Data A Data D Data B Connection Safety Input Slave Data C Data D IMPORTANT If Safety Input Slave data is to be handled by the Originator using Target I/O communications, the data must be set for DeviceNet Safety I/O communications. For details on making the settings, refer to 4-4-2 Safety I/O Connection Settings. 104 Section 5-2 Standard Target Function Selecting the I/O Type Any of the following 2 connection types can be selected. • Point-to-point • Multicast Setting Additional Status When the I/O type of a Target I/O is Target IN, the following status information can be added to the first line of the transmission data. The contents of the status is the same as for DeviceNet communications. Refer to 4-3-3 Remote I/O Area Data Configuration for details on each status. Tag Name Data Size General Status Byte Byte Local Input Status 1 to N*1 Local Output Status *1 Test Output/Muting Lamp Status 1 to M Byte Byte *1 For the NE1A-SCPU01-EIP, N = 2 and M = 1. For the NE1A-SCPU02-EIP, N = 5 and M = 2. The sizes of the local input status and test output/muting lamp status data can be specified in bytes. Setting Local I/O Monitor Data If the I/O type of the Target I/O is set to Target IN for a NE1A-series Controller the following local I/O monitor information can be added to the transmission data after the status information. Refer to 4-3-3 Remote I/O Area Data Configuration for details on the local I/O monitor information. Local I/O Monitor Local Input Monitor 1 to N Local Output Monitor *1 Data size Byte Byte *1 For the NE1A-SCPU01-EIP, N = 2. For the NE1A-SCPU02-EIP, N = 5. The sizes of the local input status and local input monitor status data can both be specified in bytes. Setting I/O Tags Set the input data blocks and outputs data block to use for the selected connection. Multiple data blocks can be set for Target I/O. The data block size can be selected from BOOL (1 byte), BYTE (1 byte), WORD (2 bytes), or DWORD (4 bytes). A maximum of 16 input bytes or 16 output bytes, however, can be set for the Target I/O. I/O tags defined for data blocks can be used in the Logic Editor. Using I/O tags enables the user to program without being aware of the specific memory addresses in the NE1A-series Controller. Setting Safety I/O Routing When the I/O type of a Target I/O is Target IN, data for communications between with a Safety Slave performing DeviceNet Safety communications can be added after the I/O tags. !WARNING Serious injury may possibly occur due to loss of required safety functions. The data attributes handled by standard I/O communications are non-safety data. The necessary measures for safety data are not taken for this data during data generation. Therefore, do not use this data to configure the Safety Control System. 105 SECTION 6 Explicit Message Communications 6-1 6-2 Receiving Explicit Messages . . . . . . . . . . . . . . . . . . . . . . . . . . . . . . . . . . . . . 108 6-1-1 Overview. . . . . . . . . . . . . . . . . . . . . . . . . . . . . . . . . . . . . . . . . . . . . . 108 6-1-2 NE1A-series Controller I/O Area Read . . . . . . . . . . . . . . . . . . . . . . 108 Sending Explicit Messages . . . . . . . . . . . . . . . . . . . . . . . . . . . . . . . . . . . . . . . 112 6-2-1 Overview. . . . . . . . . . . . . . . . . . . . . . . . . . . . . . . . . . . . . . . . . . . . . . 112 6-2-2 Procedure . . . . . . . . . . . . . . . . . . . . . . . . . . . . . . . . . . . . . . . . . . . . . 112 6-2-3 Restrictions . . . . . . . . . . . . . . . . . . . . . . . . . . . . . . . . . . . . . . . . . . . . 113 107 Section 6-1 Receiving Explicit Messages 6-1 6-1-1 Receiving Explicit Messages Overview Sending explicit messages from the Standard Master to the NE1A-series Controller enables reading or writing any specified data or parameters of the Controller. The Controller operates according to the command sent from the master and returns a response. This function can be used with both DeviceNet and EtherNet/IP. The following example describes the I/O area read service provided by the Controller. Refer to Appendix 3: Explicit Messages for details on the services that are available. The format shown here for explicit messages is the format used on the network. Refer to the operation manual of the Standard Master for specific setting methods for each Standard Master. 6-1-2 NE1A-series Controller I/O Area Read Reads the NE1A-series Controller’s local I/O or the Safety Slave I/O area allocated to the Controller from the master. Command Format Lower Upper Lower Upper Lower Upper Lower Upper byte byte byte byte byte byte byte byte Class ID Instance ID = 0306 (hex) Offset address Service code = 4B (hex) Data size Data Response Format • Normal Response to Explicit Message Byte 0 Byte n-2 Byte 1 Read data Service code = CB (hex) • Error Response to Explicit Message Lower Upper byte byte Error code Service code = 94 (hex) 108 Byte n-1 Section 6-1 Receiving Explicit Messages Service Code (Command/Response) For commands, 4B hex is specified. For responses, the upper bit is turned ON, and CB hex is returned. Class ID (Command) 0306 hex. Instance ID (Command) Read Local Input Area Explicit message Service Read Instance ID 0001 hex Read Local Output Area Read 0002 hex Read Safety Remote Input Area Read 0005 hex Read Safety Remote Output Area Read 0006 hex Data (Command) Offset size Specifies the address from which to start reading. This is an offset in bytes from the first line of the area. Data size Specifies in number of bytes to read (1 to 48 bytes) Range Local Input Area: 0 or 1 (Pre-Ver. 1.0 Controllers) 0 or 1 (NE1A-SCPU01-V1(-EIP)) 0 to 4 (NE1A-SCPU02(-EIP)) Local Output/Test Output Area: 0 or 1 Safety Remote Input Area: 0 to 511 Safety Remote Output Area: 0 to 511 The I/O addresses of memory information that has been read can be checked on the Memory Info. Tab Page of the Edit Device Parameters Dialog Box for the NE1A-series Controller. I/O name I/O address 109 Section 6-1 Receiving Explicit Messages Read Data (Response) The I/O data from the specified area is returned. The address offsets and bit assignments for reading the local inputs, local outputs, and test outputs are given in the following tables. • Local Inputs (5 Bytes) Offset (bytes) 0 Bit 7 Bit 6 Bit 5 Bit 4 Bit 3 Bit 2 Bit 1 Bit 0 Safety input terminal No.7 Safety input terminal No.15 Safety input terminal No.6 Safety input terminal No.14 Safety input terminal No.4 Safety input terminal No.12 Safety input terminal No.3 Safety input terminal No.11 Safety input terminal No.2 Safety input terminal No.10 Safety input terminal No.1 Safety input terminal No.0 Safety input terminal No.9 Safety input terminal No.8 2 Safety input terminal No.23 3 Safety input terminal No.31 Safety input terminal No.39 Safety input terminal No.22 Safety input terminal No.30 Safety input terminal No.38 Safety input terminal No.5 Safety input terminal No.13 Safety input terminal No.21 Safety input terminal No.29 Safety input terminal No.37 Safety input terminal No.20 Safety input terminal No.28 Safety input terminal No.36 Safety input terminal No.19 Safety input terminal No.27 Safety input terminal No.35 Safety input terminal No.18 Safety input terminal No.26 Safety input terminal No.34 Safety input terminal No.17 Safety input terminal No.25 Safety input terminal No.33 Safety input terminal No.16 Safety input terminal No.24 Safety input terminal No.32 1 4 Note For the NE1A-SCPU01 or NE1A-SCPU01-V1(-EIP), status can be read for 16 terminals, i.e., safety input terminals No. 0 to 15. For the NE1A-SCPU02 (-EIP), status can be read for 40 terminals, safety input terminals No. 0 to 39. • Local Outputs and Test Outputs (2 Bytes) Offset (bytes) 0 1 Note 110 Bit 7 Bit 6 Bit 5 Bit 4 Bit 3 Bit 2 Bit 1 Bit 0 Safety output terminal No.7 Test output terminal No.7 Safety output terminal No.6 Test output terminal No.6 Safety output terminal No.5 Test output terminal No.5 Safety output terminal No.4 Test output terminal No.4 Safety output terminal No.3 Test output terminal No.3 Safety output terminal No.2 Test output terminal No.2 Safety output terminal No.1 Test output terminal No.1 Safety output terminal No.0 Test output terminal No.0 For the NE1A-SCPU01 or NE1A-SCPU01-V1(-EIP), test output status can be read for 4 terminals, i.e., test output terminals No. 0 to 3. For the NE1ASCPU02(-EIP), test output status can be read for 8 terminals, i.e., test output terminals No. 0 to 7. Section 6-1 Receiving Explicit Messages Error Code (Response) The following error codes defined in DeviceNet may be returned. Response code 08FF 13FF 15FF 16FF 20FF Error name Service not supported Not enough data Too much data Object does not exist Cause Error in the service code. The data is shorter than the specified size. The data is longer than the specified size. The specified class ID or instance ID is not supported. Invalid parameter The specified operation command data is not supported. 111 Section 6-2 Sending Explicit Messages 6-2 6-2-1 Sending Explicit Messages Overview An NE1A-series Controller can send explicit messages from a user program. This function can be used only with DeviceNet. User-registered messages are sent over the network when user-specified trigger conditions are met. This can be used to notify monitoring and control devices or as a method for specifying outputs to display devices. When sending an explicit message, set the send conditions in the Logic Editor. With an NE1A-series Controller, up to 32 bytes of explicit message data can be sent, as shown below. Explicit Message Data Format Parameter name Destination node address Service code Class ID Instance ID Service data Data size 1 byte 1 byte 2 bytes 2 bytes 0 to 26 bytes For information on service codes, class IDs, instance IDs, and service data, refer to the manual for the destination device of the message. 6-2-2 Procedure Set the conditions using the following procedure. 1. Trigger Address Setting Set the condition for sending the explicit message. The explicit message will be sent when the set address turns ON. 2. Send Condition Setting Set the send conditions for the explicit message. The number of retries can also be set. 3. Creating a Send Message Check the object specifications at the destination node and create a send message based on the explicit message format. 112 Section 6-2 Sending Explicit Messages 6-2-3 Restrictions • One address can be set in the user program for the trigger address. • The NE1A-series Controller’s internal I/O memory is sent as a response to an explicit message. Explicit messages can be sent from a user program in the Controller, but internal information in the Controller cannot be used as send message data. • Response data to explicit messages cannot be used in an NE1A-series Controller’s user programs. • Sending an explicit message command is possibly to the nodes on the same DeviceNet network. !WARNING Serious injury may possibly occur due to loss of required safety functions. Do not use explicit message data as safety data. The necessary measures for safety communications are not taken for explicit message communications. Note Refer to DeviceNet specifications for details on explicit message parameters. 113 SECTION 7 I/O Control 7-1 Common Functions . . . . . . . . . . . . . . . . . . . . . . . . . . . . . . . . . . . . . . . . . . . . . 116 7-1-1 I/O Comment Function . . . . . . . . . . . . . . . . . . . . . . . . . . . . . . . . . . . 116 7-1-2 I/O Power Monitor . . . . . . . . . . . . . . . . . . . . . . . . . . . . . . . . . . . . . . 117 7-1-3 Contact Operation Counter Unit Ver. 1.0 or Later . . . . . . . . . . . . Total ON Time Monitor Function Unit Ver. 1.0 or Later . . . . . . . 117 119 Safety Inputs . . . . . . . . . . . . . . . . . . . . . . . . . . . . . . . . . . . . . . . . . . . . . . . . . . 123 7-2-1 Overview. . . . . . . . . . . . . . . . . . . . . . . . . . . . . . . . . . . . . . . . . . . . . . 123 7-2-2 Input Channel Mode Setting. . . . . . . . . . . . . . . . . . . . . . . . . . . . . . . 124 7-2-3 Test Source Setting . . . . . . . . . . . . . . . . . . . . . . . . . . . . . . . . . . . . . . 124 7-2-4 Input ON/OFF Delays. . . . . . . . . . . . . . . . . . . . . . . . . . . . . . . . . . . . 124 7-2-5 Dual Channel Mode Setting . . . . . . . . . . . . . . . . . . . . . . . . . . . . . . . 125 7-2-6 Error Handling . . . . . . . . . . . . . . . . . . . . . . . . . . . . . . . . . . . . . . . . . 127 Test Outputs . . . . . . . . . . . . . . . . . . . . . . . . . . . . . . . . . . . . . . . . . . . . . . . . . . 128 7-1-4 7-2 7-3 7-4 7-3-1 Test Output Mode Setting . . . . . . . . . . . . . . . . . . . . . . . . . . . . . . . . . 128 7-3-2 Error Handling . . . . . . . . . . . . . . . . . . . . . . . . . . . . . . . . . . . . . . . . . 128 Safety Outputs. . . . . . . . . . . . . . . . . . . . . . . . . . . . . . . . . . . . . . . . . . . . . . . . . 129 7-4-1 Overview. . . . . . . . . . . . . . . . . . . . . . . . . . . . . . . . . . . . . . . . . . . . . . 129 7-4-2 Output Channel Mode Setting . . . . . . . . . . . . . . . . . . . . . . . . . . . . . 129 7-4-3 Dual Channel Mode Setting . . . . . . . . . . . . . . . . . . . . . . . . . . . . . . . 129 7-4-4 Error Handling . . . . . . . . . . . . . . . . . . . . . . . . . . . . . . . . . . . . . . . . . 130 115 Section 7-1 Common Functions 7-1 7-1-1 Common Functions I/O Comment Function An optional name consisting of up to 32 characters can be registered in the NE1A-series Controller for each I/O terminal using the Network Configurator. These I/O comments can be used in the Function List of the Logic Editor as I/O tags, enabling easy conceptualization of what is actually being controlled and simplifying programming. Set the I/O comments. The set comments are registered as I/O tags in the Function List of the Logic Editor. Programming is possible using I/O tags. 116 Section 7-1 Common Functions 7-1-2 I/O Power Monitor The I/O power supply input can be monitored to confirm if it is normal. If an I/O terminal on the NE1A-series Controller is set to any setting other than Not Used and the normal power supply voltage is not input, the following items will be displayed on the 7-segment display: • Power supply for input not input normally: P4 • Power supply for output not input normally: P5 I/O power supply status can also be monitored in the General Status in DeviceNet I/O communications. 7-1-3 Contact Operation Counter Unit Ver. 1.0 or Later Overview This function can be used with Controllers with unit version 1.0 or later (including Controllers that support EtherNet/IP). It counts the number of OFF → ON operations at a local input, test output, or local output and stores the count internally in non-volatile memory. • Count range: 0 to 4,294,967,295 operations (stored as 00000000 to FFFFFFFF Hex) • Count units: Operations • Resolution: Depends on the cycle time. Operations I/O power supply Output device (such as a relay) Counting the output's OFF ON operations: This information can be monitored using the Network Configurator or explicit messaging. Note (1) The Contact Operation Counter function (Count) and Total ON Time Monitor function (Time) cannot be used simultaneously on one bit. Select one of these functions with the Maintenance Counter Mode Choice setting. (2) When the Maintenance Counter Mode Choice setting is changed, the collected data (operations count or total ON time) will be cleared. (3) These functions do not operate when the I/O power supply is OFF. Setting the Contact Operations Alarm Threshold with the Network Configurator The maintenance mode (Maintenance Counter Mode Choice) and alarm threshold (Threshold Maintenance Counter) can be set for each local input, test output, and local output terminal. 117 Section 7-1 Common Functions If the alarm threshold (Threshold Maintenance Counter) is set to 0, the Controller will not compare the count or time PV to the alarm threshold SV. Monitoring Operations from the Network Configurator Any of the following methods can be used to monitor the number of contact operations in the local input status, test output status, or local output status. 1. Select the device and select Device – Maintenance information from the menu bar. 2. Select the device and click the toolbar’s Maintenance Button. 3. Select the device, right-click that device, and select Maintenance information from the popup menu. 4. Select the device, select Device – Monitor from the menu bar, and click the Maintenance Tab in the displayed window. 5. Select the device, click the toolbar’s Device Monitor Button, and click the Maintenance Tab in the displayed window. 6. Select the device, right-click that device, select Monitor from the popup menu, and click the Maintenance Tab in the displayed window. 118 Section 7-1 Common Functions Each I/O point’s accumulated contact operations count can be cleared. To clear the count, select the contact operations count to be cleared and click the Clear Value Button. 7-1-4 Total ON Time Monitor Function Unit Ver. 1.0 or Later Overview This function can be used with Controllers with unit version 1.0 or later (including Controllers that support EtherNet/IP). It times how long a local input, test output, or local output is ON and stores that total ON time internally in non-volatile memory. • Count time: 0 to 4,294,967,295 s (stored as 00000000 to FFFFFFFF hex) • Count units: Seconds Total ON time I/O power supply Sensor Total ON time Connected device This information can be monitored using the Network Configurator or explicit messaging. 119 Section 7-1 Common Functions Note (1) The Total ON Time Monitor function (Time) and Contact Operation Counter function (Count) cannot be used simultaneously on one bit. Select one of these functions with the Maintenance Counter Mode Choice setting. (2) When the Maintenance Counter Mode Choice setting is changed, the collected data (operations count or total ON time) will be cleared. (3) These functions do not operate when the I/O power supply is OFF. (4) The Total ON Time Monitor function checks whether the connected device is ON at about 1-s intervals. This function may not count the total ON time precisely if the device is ON for intervals of less than 1 second. ■ Calculating the Total ON Time with 0.5-s ON Pulses In figure A, the bit is actually ON for 0.5 s × 3 = 1.5 s, but the bit is ON just once when the status is checked, so the total ON time is measured as 1 s. Measured about 1 time/second ON OFF 0.5 s Figure A In figure B, the bit is actually ON for 0.5 s × 3 = 1.5 s, but the bit is ON twice when the status is checked, so the total ON time is measured as 2 s. Measured about 1 time/second ON OFF 0.5 s Figure B ■ Calculating the Total ON Time with 1.5-s ON Pulses In figure C, the bit is actually ON for 1.5 s × 2 = 3 s, but the bit is ON four times when the status is checked, so the total ON time is measured as 4 s. Measured about 1 time/second ON OFF 1.5 s Figure C 120 Section 7-1 Common Functions Setting the Total ON Time Alarm Threshold with the Network Configurator The maintenance mode (Maintenance Counter Mode Choice) and alarm threshold (Threshold Maintenance Counter) can be set for each local input, test output, and local output terminal. If the alarm threshold (Threshold Maintenance Counter) is set to 0, the Controller will not compare the count or time PV to the alarm threshold SV. 121 Section 7-1 Common Functions Monitoring the Total ON Time from the Network Configurator Any of the following methods can be used to monitor the total ON time in the local input status, test output status, or local output status. 1. Select the device and select Device – Maintenance information from the menu bar. 2. Select the device and click the toolbar’s Maintenance Button. 3. Select the device, right-click that device, and select Maintenance information from the popup menu. 4. Select the device, select Device – Monitor from the menu bar, and click the Maintenance Tab in the displayed window. 5. Select the device, click the toolbar’s Device Monitor Button, and click the Maintenance Tab in the displayed window. 6. Select the device, right-click that device, select Monitor from the popup menu, and click the Maintenance Tab in the displayed window. Each I/O point’s accumulated total ON time can be cleared. To clear the time, select the total ON time to be cleared and click the Clear Value Button. 122 Section 7-2 Safety Inputs 7-2 7-2-1 Safety Inputs Overview The NE1A-SCPU01(-V1)(-EIP) is equipped with 16 safety input terminals. The NE1A-SCPU02(-EIP) is equipped with 40 safety input terminals. By selecting the setup and wiring based on the types of input devices to be connected or the safety level to be achieved, the NE1A-series Controller can flexibly handle various applications. For example, an NE1A-series Controller’s safety inputs can be used as described below. Connecting to Contact Output Safety Devices The NE1A-series Controller’s test output signal (a pulse output) is input by connecting to a contact output device. Input signal line errors can then be detected by inputting the test output signal. • Short circuits to the power supply line (positive side) • Earth faults • Short circuits between input signals T0 T1 11 21 12 22 IN0 IN1 Connecting Semiconductor Output Safety Devices The output from a 24-VDC semiconductor, such as the OSSD output from a Light Curtain, is input. Errors in the OSSD output signal line (i.e., the NE1Aseries Controller’s input signal line) is detected at the external connection device. Light Curtain OSSD1 Sourcing output (PNP) IN0 OSSD2 Sourcing output (PNP) IN1 123 Section 7-2 Safety Inputs 7-2-2 Input Channel Mode Setting The input channel mode of local safety inputs is set based on the type of external device to be connected. Channel Mode Not used Test pulse from test output Used as a safety input Used as a standard input 7-2-3 Description Input not connected to an external device. Connects a contact output safety device with a test output. When this mode is selected, select the test output terminal to use as the test source and set the test output mode to Pulse Test Output. This enables detection of short circuits with the power supply line (positive side), earth faults, and short circuits with other input signal lines. Used when connecting to safety devices with a semiconductor output, such as a Light Curtain. Input connected to a standard (non-safety) device. Test Source Setting Select the test output terminal to use as the test source for the safety input when the input channel mode is set to Test pulse from test output. If short circuit detection between input wiring lines is necessary, specify a different test output terminal. Examples: T0 T1 T0 11 21 11 21 12 22 12 22 IN0 IN0 IN1 Circuit in Which Short Circuit Detection between Input Signals Is Required. Note 7-2-4 IN1 Circuit in Which Short Circuit Detection between Input Signals Is Not Required. With the NE1A-SCPU02(-EIP), terminals T0 to T3 can be selected as the test sources for IN0 to IN19. Terminals T4 to T7 can be selected as the test sources for IN20 to IN39. Input ON/OFF Delays For the NE1A-series Controller’s local safety inputs, input ON/OFF delays can be set in increments of multiples of the Controller’s cycle time between 0 and 126 ms. Setting a larger value helps to reduce influence from external device chattering. Safety input, e.g. limit switch I/O tag T ON-delay 124 T OFF-delay Section 7-2 Safety Inputs IMPORTANT Both input ON delays and OFF delays must be added to the I/O response performance. This will affect the safety distance calculation. For further details, refer to SECTION 11 Remote I/O Communications Performance and Local I/O Response Time. 7-2-5 Dual Channel Mode Setting An NE1A-series Controller’s local safety input terminals can be set to Dual Channel Mode. Setting Dual Channel Mode enables the following. • The status of the two inputs can be evaluated and reflected in I/O tags. • The discrepancy time between changes in the status of the two inputs can be evaluated. Channel mode Single Channel Dual Channel Equivalent Description Used as an independent safety input terminal. Used as a Dual Channel Equivalent Input with the paired safety input. Dual Channel Complemen- Used as a Dual Channel Complementary Input with the paired tary safety input. Reflecting Input Status in Input I/O Tags The status input to the safety input terminals is reflected in the I/O tags according to the channel mode as shown in the following tables. Channel mode Single Channel Input to safety input terminal IN (x) 0 1 Input Tag Meaning of status IN (x) 0 1 Inactive (OFF) Active (ON) X = 0 to 15 (NE1A-SCPU01(-V1)(-EIP)) X = 0 to 39 (NE1A-SCPU02(-EIP)) Channel Mode Dual Channel Equivalent Dual Channel Complementary Input to safety input terminal IN (n) IN (n+1) 0 0 1 1 0 0 1 1 0 1 0 1 0 1 0 1 Input Tag IN (n) 0 0 0 1 0 0 1 0 IN (n+1) 0 0 0 1 1 1 0 1 Meaning of status Inactive (OFF) Discrepant Discrepant Active (ON) Discrepant Inactive (OFF) Active (ON) Discrepant n = Even number Input Discrepancy Time Evaluation For two inputs set in Dual Channel Mode, the time is monitored from a change in the value of one input to a change in the value of the other input (discrepancy time). When the value of the other input does not change within the set discrepancy, it is regarded as an error. The set discrepancy time can be set in increments of 10 ms between 0 (invalid) and 65,530 ms. The discrepancy time cannot be set in Single Channel Mode. 125 Section 7-2 Safety Inputs Normal Operation for Dual Channel Equivalent Inputs IN0 IN1 Discrepancy time Discrepancy time IN0 evaluated value IN1 evaluated value Normal IN0, IN1 status Error Operation for Dual Channel Equivalent Inputs (Discrepancy error) IN0 IN0 IN1 IN1 Discrepancy time Discrepancy time IN0 evaluated value IN0 evaluated value IN1 evaluated value IN1 evaluated value Normal IN0, IN1 Status Note 126 Normal Error IN0, IN1 Status Error The NE1A-series Controllers supports function blocks with functionality equivalent to Dual Channel Mode. If Dual Channel Mode is set in a function block, then the safety input terminal can be set to Single Channel Mode. Section 7-2 Safety Inputs 7-2-6 Error Handling Behavior on Error Detection Behavior in Single Channel Mode The following operations are performed if an error is detected during self-diagnosis. • I/O tags corresponding to safety input terminals for which errors have been detected are made inactive. • The LED indicator of the safety input terminal with the error lights red. • The error appears in the error history. • The NE1A-series Controller continues to operate. Behavior in Dual Channel Mode The following operations are performed if a discrepancy error is detected. • I/O tags corresponding to safety input terminal pairs for which errors have been detected are made inactive. • Both LED indicators of the safety input terminals with the error light red. • The errors appear in the error history. • The NE1A-series Controller continues to operate. The following operations are performed if an error is detected in one of the two inputs. • I/O tags corresponding to safety input terminal pairs for which errors have been detected are made inactive. • The LED indicator of the safety input with the error lights red, and the LED indicator of the other input flashes red. • The errors appear in the error history. • The NE1A-series Controller continues to operate. Error Latch Time Setting The time to latch the error state when an error occurs in a safety input circuit can be set. The error state will continue until the error latch time passes even if the cause of the error is momentarily removed. When monitoring errors from a monitoring system, take the monitoring interval into account when setting the error latch time. The error latch time can be set in increments of 10 ms between 0 and 65,530 ms. The default is 1,000 ms. Resetting Errors All conditions below are necessary to recover from an error that has occurred in a safety input. • The cause of the error must be removed. • The error latch time must have passed. • The input signal must return to an inactive state and there must be no error condition detected. (e.g., by pressing the emergency stop button or opening a door). 127 Section 7-3 Test Outputs 7-3 7-3-1 Test Outputs Test Output Mode Setting The NE1A-SCPU01(-V1)(-EIP) is equipped with four test output terminals. The NE1A-SCPU02(-EIP) is equipped with eight test output terminals. The following settings are supported for the test outputs. Channel mode Not used Standard output Pulse test output Muting lamp output 7-3-2 Description The corresponding test output terminal is not used. Connected to the input for indicator light or a PLC. Used as a monitor output. Connected in combination with a safety input terminal and contact output device. The test output terminal outputs a pulse for circuit diagnosis. Pulses are output to each test output terminal at a different time. Can be set as the output for a muting lamp. When the output is ON, disconnection of the muting lamp can be detected. With the NE1A-SCPU01(-V1)(-EIP), only the T3 terminal can be set to this mode. With the NE1A-SCPU02(-EIP), the T3 or T7 terminal can be set to this mode. Error Handling Behavior on Error Detection The following operations are performed if an error is detected during self-diagnosis: • The output terminals for which errors have been detected will be made inactive without intervention from the user program. • The error will be recorded in the error history. • The NE1A-series Controller will continue to operate. Error Latch Time Setting The time to latch the error state when an error occurs in a safety input terminal or test output terminal can be set. The error state will continue until the error latch time passes even if the cause of the error is momentarily removed. When monitoring errors from a monitoring system, take the monitoring interval into account when setting the error latch time. The error latch time can be set in increments of 10 ms between 0 and 65,530 ms. The default is 1,000 ms. Resetting Errors Errors detected at test output terminals will be automatically reset after the error latch time. Leaving the short-circuit state as is may result in failure due to increased temperatures. If an external load short circuit occurs, remove the cause immediately. 128 Section 7-4 Safety Outputs 7-4 7-4-1 Safety Outputs Overview NE1A-series Controllers are equipped with eight safety output terminals. By selecting the setup and wiring based on the types of external devices to be connected or the safety level to be achieved, the NE1A-series Controller can flexibly handle various applications. The following output signal line errors can be detected for the NE1A-series Controllers. • Contact with the power supply line (positive side, only when the output is OFF) • Ground faults If the diagnostic pulse output is enabled, the following errors can be detected. • Contact with the power supply line (positive side, when the output is ON or OFF) • Ground faults • Short circuits between output lines 7-4-2 Output Channel Mode Setting Set the output channel mode based on the type of external device to be connected. Channel mode Not used Safety Safety pulse output Description Output not connect to an output device. A test pulse is not output when the output is ON. Short circuits with the power supply line (when the output is OFF) and ground faults can be detected. A test pulse is output when the output is ON. This enables detecting short circuits with the power supply line (positive side) (when the output is ON or OFF), ground faults, and short circuits between output signals. IMPORTANT If a safety pulse output is set, an OFF pulse signal (pulse width: 580 µs) will be output to diagnose the output circuit when the safety output turns ON. Check the input response time of the control device connected to the NE1Aseries Controller to be sure that this output pulse will not cause malfunctions. 7-4-3 Dual Channel Mode Setting The NE1A-series Controller‘s Local safety output terminals can be set to Dual Channel Mode. Setting Dual Channel Mode enables the following. • An error will be detected if the two outputs from a user program are not equivalent. • If an error is detected in one of the two output circuits, both outputs to the external device will become inactive. Channel mode Single Channel Dual Channel Description Used as an independent safety output. Used as a Dual Channel Output with the paired safety output terminal. The output can be turned on when both the output and the paired safety output are normal. 129 Section 7-4 Safety Outputs Reflecting Output Data from Output I/O Tags to Safety Output Terminals Output I/O tag data is reflected in the safety output terminals according to the channel mode, as shown in the following tables. Channel Mode Output tag Safety output terminal OUT (x) OUT (x) Single Channel 0 1 0 1 The meaning of status Inactive (OFF) Active (ON) X = 0-7 Channel Mode Output tag IN (n) Dual Channel 0 0 1 1 Safety output terminal IN (n+1) OUT OUT (n) (n+1) 0 0 (OFF) 0 (OFF) 1 0 (OFF) 0 (OFF) 0 0 (OFF) 0 (OFF) 1 1 (ON) 1 (ON) The meaning of status Inactive (OFF) Violation at Safety Output (OFF) Violation at Safety Output (OFF) Active (ON) n = even numbers 7-4-4 Error Handling Behavior on Error Detection Behavior in Single Channel Mode The following operations are performed if an error is detected during self-diagnosis. • The safety output which the error was detected becomes inactive without depending on the user program. • The LED indicator of the safety output terminal with the error lights red. • The error appears in the error history. • The NE1A-series Controller continues to operate. Behavior in Dual Channel Mode The following operations are performed if an error is detected in one of the two outputs. • Both outputs to the external device become inactive without depending on a user program. • The LED indicator of the safety output terminal with the error lights red, and LED indicator of the other output flashes red. • The error appears in the error history. • The NE1A-series Controller continues to operate. The following operations are performed if the two outputs from the user program to output I/O tags are equivalent. • Both outputs to the external device become inactive without depending on a user program. • The LED indicators of the paired safety output terminals light red. • The error appears in the error history. • The NE1A-series Controller continues to operate. 130 Section 7-4 Safety Outputs Error Latch Time Setting The time to latch the error state when an error occurs in a safety output circuit can be set. The error state will continue until the error latch time passes even if the cause of the error is momentarily removed. When monitoring errors from a monitoring system, take the monitoring interval into account when setting the error latch time. The error latch time can be set in increments of 10 ms between 0 and 65,530 ms. The default is 1,000 ms. Resetting Errors All conditions below are necessary to recover from an error that has occurred in a safety output. • The cause of the error must be removed. • Error latch time must have passed. • The output signals to the output I/O tags from the user application that correspond to the safety output terminals must go inactive. Note If the Dual Channel Mode is set for two outputs to implement redundant circuits and an error is detected for one of the outputs, the other output can be made to go inactive without relying on the user program. If the redundant circuits are implemented using two outputs in Single Channel Mode, the user program must be used to detect the error (using the External Device Monitoring function block). 131 SECTION 8 Programming 8-1 8-2 8-3 8-4 Outline of Programming . . . . . . . . . . . . . . . . . . . . . . . . . . . . . . . . . . . . . . . . . 134 8-1-1 Outline . . . . . . . . . . . . . . . . . . . . . . . . . . . . . . . . . . . . . . . . . . . . . . . 134 8-1-2 Programming Basics. . . . . . . . . . . . . . . . . . . . . . . . . . . . . . . . . . . . . 134 8-1-3 Program Capacity . . . . . . . . . . . . . . . . . . . . . . . . . . . . . . . . . . . . . . . 136 Function Block Overview . . . . . . . . . . . . . . . . . . . . . . . . . . . . . . . . . . . . . . . . 137 8-2-1 Supported Function Blocks. . . . . . . . . . . . . . . . . . . . . . . . . . . . . . . . 137 Function Block Editing . . . . . . . . . . . . . . . . . . . . . . . . . . . . . . . . . . . . . . . . . . 138 8-3-1 Function Block Parameter Settings . . . . . . . . . . . . . . . . . . . . . . . . . 138 8-3-2 I/O Settings . . . . . . . . . . . . . . . . . . . . . . . . . . . . . . . . . . . . . . . . . . . . 141 Command Reference: Logic Functions. . . . . . . . . . . . . . . . . . . . . . . . . . . . . . 143 8-4-1 NOT . . . . . . . . . . . . . . . . . . . . . . . . . . . . . . . . . . . . . . . . . . . . . . . . . 143 8-4-2 AND . . . . . . . . . . . . . . . . . . . . . . . . . . . . . . . . . . . . . . . . . . . . . . . . . 143 8-4-3 OR. . . . . . . . . . . . . . . . . . . . . . . . . . . . . . . . . . . . . . . . . . . . . . . . . . . 146 8-4-4 Exclusive OR (EXOR) . . . . . . . . . . . . . . . . . . . . . . . . . . . . . . . . . . . 148 8-4-5 Exclusive NOR (EXNOR) . . . . . . . . . . . . . . . . . . . . . . . . . . . . . . . . 149 8-4-6 Reset Set Flip-Flop (RS-FF) Unit Ver. 1.0 or Later . . . . . . . . . . . Comparator Unit Ver. 1.0 or Later . . . . . . . . . . . . . . . . . . . . . . . . 149 8-4-7 8-5 151 Command Reference: Function Blocks . . . . . . . . . . . . . . . . . . . . . . . . . . . . . 154 8-5-1 Reset . . . . . . . . . . . . . . . . . . . . . . . . . . . . . . . . . . . . . . . . . . . . . . . . . 154 8-5-2 Restart . . . . . . . . . . . . . . . . . . . . . . . . . . . . . . . . . . . . . . . . . . . . . . . . 157 8-5-3 Emergency Stop Pushbutton Monitoring (E-Stop) . . . . . . . . . . . . . . 159 8-5-4 Light Curtain Monitoring . . . . . . . . . . . . . . . . . . . . . . . . . . . . . . . . . 162 8-5-5 Safety Gate Monitoring . . . . . . . . . . . . . . . . . . . . . . . . . . . . . . . . . . 164 8-5-6 Two-hand Control . . . . . . . . . . . . . . . . . . . . . . . . . . . . . . . . . . . . . . . 169 8-5-7 OFF-delay Timer . . . . . . . . . . . . . . . . . . . . . . . . . . . . . . . . . . . . . . . 172 8-5-8 ON-delay Timer . . . . . . . . . . . . . . . . . . . . . . . . . . . . . . . . . . . . . . . . 173 8-5-9 User Mode Switch . . . . . . . . . . . . . . . . . . . . . . . . . . . . . . . . . . . . . . 174 8-5-10 External Device Monitoring (EDM). . . . . . . . . . . . . . . . . . . . . . . . . 176 8-5-11 Routing . . . . . . . . . . . . . . . . . . . . . . . . . . . . . . . . . . . . . . . . . . . . . . . 177 8-5-12 Muting Unit Ver. 1.0 or Later . . . . . . . . . . . . . . . . . . . . . . . . . . . . 8-5-13 Enable Switch Monitoring (Enable Switch) Unit Ver. 1.0 or Later 194 178 8-5-14 Pulse Generator Unit Ver. 1.0 or Later . . . . . . . . . . . . . . . . . . . . . 8-5-15 Counter Unit Ver. 1.0 or Later . . . . . . . . . . . . . . . . . . . . . . . . . . . 196 8-5-16 Multi Connector Unit Ver. 1.0 or Later . . . . . . . . . . . . . . . . . . . . 200 198 133 Section 8-1 Outline of Programming 8-1 8-1-1 Outline of Programming Outline The NE1A-series Safety Network Controller is programmed by starting a Logic Editor from the Network Configurator. As shown below, the Logic Editor consists of a Function List where function blocks, I/O tags, and other programming elements are registered and a workspace where programming is actually performed. Programming is achieved using the function blocks, I/O tags, and other programming elements are registered in the function list. Workspace Function List 8-1-2 Programming Basics Programs are created from logic functions and function blocks, which indicate commands, input tags, which indicate data input sources, and output tags, which indicate data output destinations. The I/O are connected with connection lines. Input tags Output tags Function blocks 134 Section 8-1 Outline of Programming ■ Input Tags Input tags reflect the status of inputs in the following I/O areas. • Input area from the NE1A-series Controller’s local terminals • Input area from safety slaves registered as communications partners • I/O area reflected from Safety Master data • I/O area reflected from Standard Master data • Local input status Unit Ver. 1.0 or Later • Local output status Unit Ver. 1.0 or Later • Test output status Unit Ver. 1.0 or Later • Muting lamp status Unit Ver. 1.0 or Later • General Unit status Unit Ver. 1.0 or Later • I/O area reflecting data from EtherNet/IP Standard Originators (Only Controllers that Support EtherNet/IP) Note Controllers that support EtherNet/IP are included among Controllers with unit version 1.0 or later. Input tags used in the Logic Editor include the following information. Node address Attribute (“[S]” for safety I/O) Bit address Registered I/O comment ■ Output Tags Output tags reflect the status of inputs in the following I/O areas. • Output area from the NE1A-series Controller’s local terminals • Output area from safety slaves registered as communications partners • I/O area reflected from Safety Master data • I/O area reflected from Standard Master data • Special area for restarting safety I/O communications Unit Ver. 1.0 or Later • I/O area reflecting data to EtherNet/IP Standard Originators (Only Controllers that Support EtherNet/IP) Note Controllers that support EtherNet/IP are included among Controllers with unit version 1.0 or later. Output tags used in the Logic Editor include the following information. 135 Section 8-1 Outline of Programming Node address Attribute (“[S]” for safety I/O) Bit address Registered I/O comment !WARNING Serious injury may possibly occur due to loss of required safety functions. Always verify that the safety-related signals used in safety-related logic meet applicable standards and regulations. Input only safety input signals to function blocks. It is the user's responsibility to verify that the proper sources for signals used in conjunction with these function blocks and the overall safety logic implementation adhere to relevant safety standards and regulations. Serious injury may possibly occur due to loss of required safety functions. When implementing safety-related functions, you must verify that the control strategy and risk reduction techniques you are using adhere to local, regional, and national regulations. Consult these regulations and industry standards to determine the requirements that may apply to your application. 8-1-3 Program Capacity The following table shows the maximum size of user program that can be used in the NE1A-series Controllers. Model Total number of logic functions and function blocks Pre-Ver. 1.0 Controllers 128 Controllers with unit version 1.0 or later 254 (including Controllers that support EtherNet/IP) 136 Section 8-2 Function Block Overview 8-2 Function Block Overview User programming for the NE1A-series Controller is accomplished using function blocks. Various safety applications can be achieved by using the function blocks described in this section to program operation to be compliant with safety standards. 8-2-1 Supported Function Blocks The following tables show which logic functions and function blocks are supported in each NE1A-series Controller. Logic Functions Name NOT AND OR Exclusive OR Exclusive NOR Reset Set Flip-flop Comparator Notation in function list NOT AND OR EXOR EXNOR RS-FF Comparator Compatible unit versions All All All All All Unit version 1.0 or later (including Controllers that support EtherNet/IP) Name Reset Restart Emergency Stop Pushbutton Monitoring Light Curtain Monitoring Safety Gate Monitoring Two-hand Controller OFF-Delay Timer ON-Delay Timer User Mode Switch External Device Monitoring Routing Muting Notation in function list Reset Restart E-STOP Compatible unit versions All All All Light Curtain Monitoring Safety Gate Monitoring Two Hand Controller Off-Delay Timer On-Delay Timer User Mode Switch EDM Routing Muting Enable Switch Pulse Generator Counter Multi Connector Enable Switch Pulse Generator Counter Multi Connector All All All All All All All All Unit version 1.0 or later (including Controllers that support EtherNet/IP) Function Blocks 137 Section 8-3 Function Block Editing 8-3 Function Block Editing Editing of function blocks can be used to set parameters, add optional I/O, and add comments according to the application. Tabs: Function block parameters Out point Setting, In/Out Settings Comments 8-3-1 Function Block Parameter Settings The following parameters can be set for function blocks depending on the user application. The parameters that can be set will vary from function block to function block. • Input type • Discrepancy time • Synchronization time • Function test Input Type Settings • Single Channel • Dual Channel Equivalent • Dual Channel Complementary • Dual Channel Equivalent (2 Pairs) • Dual Channel Complementary (2 Pairs) The following truth tables outline the internal evaluations performed by the NE1A-series Controller for each type of input signal. In the tables, 0 indicates OFF and 1 indicates ON. Setting: Single Channel Input 1 (NC) 0 1 Output Enable 0 1 Setting: Dual Channel Equivalent Input 1 (NC) 0 0 1 1 138 Input 2 (NC) 0 1 0 1 Output Enable 0 0 0 1 Section 8-3 Function Block Editing Setting: Dual Channel Complementary Input 1 (NC) 0 0 1 1 Input 2 (NO) 0 1 0 1 Output Enable 0 0 1 0 Setting: Dual Channel Equivalent (2 Pairs) Input 1 (NC) 0 0 0 0 0 0 0 0 1 1 1 1 1 1 1 1 Input 2 (NC) 0 0 0 0 1 1 1 1 0 0 0 0 1 1 1 1 Input 3 (NC) 0 0 1 1 0 0 1 1 0 0 1 1 0 0 1 1 Input 4 (NC) 0 1 0 1 0 1 0 1 0 1 0 1 0 1 0 1 Output Enable 0 0 0 0 0 0 0 0 0 0 0 0 0 0 0 1 Setting: Dual Channel Complementary (2 Pairs) Input 1 (NC) 0 0 0 0 0 0 0 0 1 1 1 1 1 1 1 1 Input 2 (NO) 0 0 0 0 1 1 1 1 0 0 0 0 1 1 1 1 Input 3 (NC) 0 0 1 1 0 0 1 1 0 0 1 1 0 0 1 1 Input 4 (NO) 0 1 0 1 0 1 0 1 0 1 0 1 0 1 0 1 Output Enable 0 0 0 0 0 0 0 0 0 0 1 0 0 0 0 0 139 Section 8-3 Function Block Editing Discrepancy Time If the function block input type is set to Dual Channel Equivalent or Dual Channel Complementary, the discrepancy time (i.e., the time between changes in the inputs) can be evaluated. The time between when one of the dual-channel inputs changes until the other one changes is monitored. If the second dual-channel input does not change before the discrepancy time expires, an error will occur and the Output Enable output from the function block will not turn ON. Dual channel mode Dual Channel Equivalent • Input 1: NC • Input 2: NC Dual Channel Complementary • Input 1: NC • Input 2: NO Input signals Input Input 1 2 0 0 0 1 1 0 1 1 0 0 0 1 1 0 1 1 Input signal status Inactive Discrepant Discrepant Active Discrepant Inactive Active Discrepant The dual channel modes can be used to detect faults in safety devices and safety device wiring monitored by the function block. The time between changes in the inputs will not be monitored if the discrepancy time is set to 0. The discrepancy time is evaluated both when the input signals go from active to inactive and from inactive to active. ■ Normal Operation Example for Dual Channel Equivalent Setting Input 1 Input 2 Discrepancy time Output Enable Discrepancy Normal Error 140 Discrepancy time Section 8-3 Function Block Editing ■ Discrepancy Error Operation Example for Dual Channel Equivalent Setting Input 1 Input 1 Input 2 Input 2 Discrepancy time Output Enable Output Enable Discrepancy Error Discrepancy time Error Normal Discrepancy Error Normal Error Synchronization Time Setting If the function block input type is set to Dual Channel Equivalent (2 Pairs) or Dual Channel Complementary (2 Pairs) for the Safety Gate Monitoring function block, the synchronization time (i.e., the time between changes in the input pairs) can be evaluated. The time between when one of the input pairs changes until the other one changes is monitored. If the second input pair does not change before the synchronization time expires, an error will occur and the Output Enable output from the function block will not turn ON. The time between changes in the input pairs will not be monitored if the synchronization time is set to 0. Function Tests Function tests are supported when using the Safety Gate Monitoring function block. If the function test is enabled when the NE1A-series Controller is started, a safety gate test must be performed when the function test request signal is input from the machine. 8-3-2 I/O Settings Input and Output Size Settings The number of inputs and outputs for logic functions can be increased. Output Points Setting Optional outputs from function blocks can be enabled. 141 Section 8-3 Function Block Editing Fault Present Setting Fault Present is a diagnostic status bit supported in some function blocks by selecting the checkbox located on the In/Out Setting or Out Point Tab Page of the function block properties. If the Fault Present checkbox is selected, an additional Fault Present output will be displayed on the function block. Example: Safety Gate Monitoring Function Block (SGATE) Out Point Tab Page in the Safety Gate Monitoring Function Block Editing Dialog Box 142 Safety Gate Monitoring Function Block with Default Settings Safety Gate Monitoring Function Block with Maximum Inputs and Outputs Enabled Section 8-4 Command Reference: Logic Functions 8-4 Command Reference: Logic Functions 8-4-1 NOT Diagram General Description The output will be the inverse of the input. Truth Table Input 1 0 1 Output 1 1 0 0: OFF, 1: ON 8-4-2 AND Diagram Default Maximum Number of Inputs General Description An AND of the input conditions will be output. Up to eight input conditions can be evaluated. Optional Input Settings The number of inputs can be increased on the In/Out Setting Tab Page in the function block property dialog box. Parameter Number of inputs Setting range 1 to 8 Default setting 2 143 Section 8-4 Command Reference: Logic Functions Truth Tables Truth Table for One-input AND Evaluation Input 1 0 1 Output 1 0 1 0: OFF, 1: ON Truth Table for Two-input AND Evaluation Input 1 0 x 1 Input 2 x 0 1 Output 1 0 0 1 0: OFF, 1: ON, x: Either ON or OFF Truth Table for Three-input AND Evaluation Input 1 0 x x 1 Input 2 x 0 x 1 Input 3 x x 0 1 Output 1 0 0 0 1 0: OFF, 1: ON, x: Either ON or OFF Truth Table for Four-input AND Evaluation Input 1 0 x x x 1 Input 2 x 0 x x 1 Input 3 x x 0 x 1 Input 4 x x x 0 1 Output 1 0 0 0 0 1 0: OFF, 1: ON, x: Either ON or OFF Truth Table for Five-input AND Evaluation Input 1 0 x x x x 1 Input 2 x 0 x x x 1 Input 3 x x 0 x x 1 Input 4 x x x 0 x 1 0: OFF, 1: ON, x: Either ON or OFF 144 Input 5 x x x x 0 1 Output 1 0 0 0 0 0 1 Section 8-4 Command Reference: Logic Functions Truth Table for Six-input AND Evaluation Input 1 0 x x x x x 1 Input 2 x 0 x x x x 1 Input 3 x x 0 x x x 1 Input 4 x x x 0 x x 1 Input 5 x x x x 0 x 1 Input 6 x x x x x 0 1 Output 1 0 0 0 0 0 0 1 0: OFF, 1: ON, x: Either ON or OFF Truth Table for Seven-input AND Evaluation Input 1 0 x x x Input 2 x 0 x x Input 3 x x 0 x Input 4 x x x 0 Input 5 x x x x Input 6 x x x x Input 7 x x x x Output 1 0 0 0 x x x 1 x x x 1 x x x 1 x x x 1 0 x x 1 x 0 x 1 x x 0 1 0 0 0 0 1 Input 6 x x x x x 0 x x 1 Input 7 x x x x x x 0 x 1 Input 8 x x x x x x x 0 1 Output 1 0 0 0 0 0 0 0 0 1 0: OFF, 1: ON, x: Either ON or OFF Truth Table for Eight-input AND Evaluation Input 1 0 x x x x x x x 1 Input 2 x 0 x x x x x x 1 Input 3 x x 0 x x x x x 1 Input 4 x x x 0 x x x x 1 Input 5 x x x x 0 x x x 1 0: OFF, 1: ON, x: Either ON or OFF 145 Section 8-4 Command Reference: Logic Functions 8-4-3 OR Diagram Default Maximum Number of Inputs General Description An OR of the input conditions will be output. Up to eight input conditions can be evaluated. Optional Input Setting The number of inputs can be increased on In/Out Setting Tab Page in the function block property dialog box. Parameter Number of inputs Setting range 1 to 8 Truth Table Truth Table for One-input OR Evaluation Input 1 0 1 Output 1 0 1 0: OFF, 1: ON Truth Table for Two-input OR Evaluation Input 1 0 1 x Input 2 0 x 1 Output 1 0 1 1 0: OFF, 1: ON, x: Either ON or OFF 146 Default setting 2 Section 8-4 Command Reference: Logic Functions Truth Table for Three-input OR Evaluation Input 1 0 1 x x Input 2 0 x 1 x Input 3 0 x x 1 Output 1 0 1 1 1 0: OFF, 1: ON, x: Either ON or OFF Truth Table for Four-input OR Evaluation Input 1 0 1 x x x Input 2 0 x 1 x x Input 3 0 x x 1 x Input 4 0 x x x 1 Output 1 0 1 1 1 1 0: OFF, 1: ON, x: Either ON or OFF Truth Table for Five-input OR Evaluation Input 1 0 1 x x x x Input 2 0 x 1 x x x Input 3 0 x x 1 x x Input 4 0 x x x 1 x Input 5 0 x x x x 1 Output 1 0 1 1 1 1 1 0: OFF, 1: ON, x: Either ON or OFF Truth Table for Six-input OR Evaluation Input 1 0 Input 2 0 Input 3 0 Input 4 0 Input 5 0 Input 6 0 1 x x x x x x 1 x x x x x x 1 x x x x x x 1 x x x x x x 1 x x x x x x 1 Output 1 0 1 1 1 1 1 1 0: OFF, 1: ON, x: Either ON or OFF 147 Section 8-4 Command Reference: Logic Functions Truth Table for Seven-input OR Evaluation Input 1 0 1 x x x x x x Input 2 0 x 1 x x x x x Input 3 0 x x 1 x x x x Input 4 0 x x x 1 x x x Input 5 0 x x x x 1 x x Input 6 0 x x x x x 1 x Input 7 0 x x x x x x 1 Output 1 0 1 1 1 1 1 1 1 0: OFF, 1: ON, x: Either ON or OFF Truth Table for Eight-input OR Evaluation Input 1 0 1 x x x x x x Input 2 0 x 1 x x x x x Input 3 0 x x 1 x x x x Input 4 0 x x x 1 x x x Input 5 0 x x x x 1 x x Input 6 0 x x x x x 1 x Input 7 0 x x x x x x 1 Input 8 0 x x x x x x x Output 1 0 1 1 1 1 1 1 1 x x x x x x x 1 1 0: OFF, 1: ON, x: Either ON or OFF 8-4-4 Exclusive OR (EXOR) Diagram General Description An exclusive OR of the input conditions will be output. 148 Section 8-4 Command Reference: Logic Functions Truth Table Truth Table for Exclusive OR Evaluation Input 1 0 0 1 1 Input 2 0 1 0 1 Output 1 0 1 1 0 0: OFF, 1: ON 8-4-5 Exclusive NOR (EXNOR) Diagram General Description An exclusive NOR of the input conditions will be output. Truth Table Truth Table for Exclusive NOR Evaluation Input 1 0 0 1 1 Input 2 0 1 0 1 Output 1 1 0 0 1 0: OFF, 1: ON 8-4-6 Reset Set Flip-Flop (RS-FF) Unit Ver. 1.0 or Later Diagram Input Output Enable RESET Default Input Output Enable RESET Fault Present Maximum Number of I/O 149 Section 8-4 Command Reference: Logic Functions General Description This function can be used with Controllers with unit version 1.0 or later (including Controllers that support EtherNet/IP). When the input condition to the Reset Set Flip-Flop function block is turned ON, that ON status is maintained (latched) in the function block and the ON output is maintained at the Output Enable signal. The ON status is maintained in the function block, so the Output Enable signal stays ON even if the input condition goes from ON to OFF. The signal maintained in the function block is turned OFF when the function block’s RESET condition is turned ON. Fault Present Output Setting A Fault Present output can also be used in programming. To enable this output, select the Fault Present checkbox on the Out Point Tab Page of the function block properties dialog box. Error Handling and Error Resetting Error condition Input and Reset are active simultaneously. Timing Table Input RESET Output Enable Fault Present 150 Behavior for error detection Output Enable Fault Present OFF ON (safety state) Resetting the error condition Make one of the signals inactive. Section 8-4 Command Reference: Logic Functions 8-4-7 Comparator Unit Ver. 1.0 or Later Diagram Output Enable Input1 Input1 Input2 Input3 Input4 Input5 Input6 Input7 Input8 Default Output Enable Maximum Number of Inputs General Description This function can be used with unit version 1.0 or later (including Controllers that support EtherNet/IP). The Comparator function block compares the specified input signals (up to 8 inputs) with the comparison data set in the Configurator, and turns ON the Output Enable signal when all of the input signals match the comparison data. The Output Enable signal will be turned OFF when the input signals no longer match the comparison data. From 1 to 8 inputs can be set for the input signals. Set Parameters Parameter Comparison Data Setting range Default setting 00000000 to 11111111 00000001 (Input 1 is ON.) (Individual bits correspond to Input 1 to Input 8) Optional Input Settings The number of inputs can be increased on the In/Out Setting Tab Page in the function block property dialog box. Parameter Number of inputs Setting range 1 to 8 Default setting 1 151 Section 8-4 Command Reference: Logic Functions Truth Table ■ Truth Table for Comparator Evaluation (CD = Comparison Data): Input signals to Comparator Output signals from Comparator Input 1 Input 2 Input 3 Input 4 Input 5 Input 6 Input 7 Input 8 Output Enable ≠ CD for Input 1 × × × × × × × 0 × ≠ CD for Input 2 × × × × × × 0 × × ≠ CD for Input 3 × × × × × 0 × × × × × × × 0 × × × ≠ CD for Input 4 × ≠ CD for Input 5 × × × 0 × × × × × × × 0 × × × × × ≠ CD for Input 6 × ≠ CD for Input 7 × 0 × × × × × × × 0 = CD for Input 1 = CD for Input 2 = CD for Input 3 = CD for Input 4 = CD for Input 5 = CD for Input 6 = CD for Input 7 ≠ CD for Input 8 = CD for Input 8 1 0: OFF; 1: ON Note 152 “= CD for Input n” indicates that the Comparator input signals are the same as the comparison data. “≠ CD for Input n” indicates that the Comparator input signals are not the same as the comparison data. ”×” indicates that the status is not applicable (the input signals and comparison data may or may not be the same). Section 8-4 Command Reference: Logic Functions Timing Chart Output Enable 1 2 The horizontal broken lines in the above diagram represent the comparison data for each input. 1. Output Enable turns ON when all of the input signals match the comparison data. 2. Output Enable turns OFF when any of the input signals does not match the comparison data. 153 Section 8-5 Command Reference: Function Blocks 8-5 Command Reference: Function Blocks 8-5-1 Reset Diagram Reset Output Enable Monitored Input Default Maximum Number of Inputs General Description The Output Enable signal will turn ON if the Reset signal is correctly input while the input condition to the Reset function block is ON. This function block can be used to prevent the machine from automatically reset, e.g., when the power to the NE1A-series Controller is turned ON, when the operating mode is changed (from IDLE Mode to RUN Mode), or when a signal from a safety input device turns ON. Conditions for Output Enable Turning ON • The Monitored Input and all enabled optional inputs must be ON. And the Reset signal must be input correctly. Conditions for Static Release Turning ON The Monitored Input and all enabled optional inputs must be ON. Conditions for Reset Required Indication Turning ON If the following condition is met, the Reset Required Indication will become a 1-Hz pulse output. • The Monitored Input and all enabled optional inputs must be ON. • And Output Enable must be OFF. If the Reset Signal is set to Low-High-Low, the Reset Required Indication will turn ON when the next condition is met. • The Reset signal turns ON. Set Parameters The Reset Signal can be set in NE1A-series Controllers with unit version 1.0 or later (including Controllers that support EtherNet/IP). Parameter Reset Signal Setting range • Low-High-Low • Rising Edge Unit Ver. 1.0 or Later 154 Default setting Low-High-Low Section 8-5 Command Reference: Function Blocks Low-High-Low Monitored Input Rising Edge 350 ms min. Monitored Input Reset Reset Output Enable Output Enable Number of Inputs Setting The number of inputs can be increased on the In/Out Setting Tab Page in the function block property dialog box. Parameter Number of inputs Setting range 2 to 8 (Optional Input Settings) Default setting 2 Optional Output Settings The outputs shown below can be used in the program. To enable either of these outputs, select the checkbox on the Out Point Tab Page of the function block properties dialog box. • Static Release • Reset Required Indication 155 Command Reference: Function Blocks Timing Chart Reset Signal set to Low-High-Low: Monitored input Optional Input N Reset Output Enable Static Release Reset Req. Indication Idle to RUN Reset Signal set to Rising Edge: Unit Ver. 1.0 or Later Monitored input Optional Input N Reset Output Enable Static Release Reset Req. Indication Idle to RUN 156 Section 8-5 Section 8-5 Command Reference: Function Blocks 8-5-2 Restart Diagram Output Enable Reset Monitored Input Default Maximum Number of Inputs General Description The Output Enable signal will turn ON if the Reset signal is correctly input while the input condition to the Restart function block is ON. This function block can be used to prevent the machine from automatically restarting, e.g., when the power to the NE1A-series Controller is turned ON, when the operating mode is changed (from IDLE Mode to RUN Mode), or when a signal from a safety input device turns ON. Functionally, the Reset function block and the Restart function block are equivalent. Conditions for Output Enable Turning ON • The Monitored Input and all enabled optional inputs must be ON. And the Reset signal must be input correctly. Conditions for Static Release Turning ON The Monitored Input and all enabled optional inputs must be ON. Conditions for Restart Required Indication Turning ON If the following condition is met, the Restart Required Indication will become a 1-Hz pulse output. • The Monitored Input and all enabled optional inputs must be ON. And Output Enable must be OFF. If the Reset Signal is set to Low-High-Low, the Reset Required Indication will turn ON when the next condition is met. • The Restart signal must be ON. Set Parameters The Restart Signal can be set in NE1A-series Controllers with unit version 1.0 or later (including Controllers that support EtherNet/IP). Parameter Reset Signal Setting range • Low-High-Low Default setting Low-High-Low • Rising Edge Unit Ver. 1.0 or Later 157 Section 8-5 Command Reference: Function Blocks Low-High-Low Monitored Input Rising Edge 350 ms min. Monitored Input Reset Reset Output Enable Output Enable Number of Inputs Setting The number of inputs can be increased on the In/Out Setting Tab Page in the function block property dialog box. Parameter Number of inputs Setting range 2 to 8 (Optional Input Settings) Default setting 2 Optional Output Settings The outputs shown below can be used in the program. To enable either of these outputs, select the checkbox on the Out Point Tab Page of the function block properties dialog box. • Static Release • Restart Required Indication 158 Section 8-5 Command Reference: Function Blocks Timing Chart Restart Signal set to Low-High-Low: Monitored input Optional Input N Reset Output Enable Static Release Reset Req. Indication Idle to RUN Restart Signal set to Rising Edge Unit Ver. 1.0 or Later : Monitored input Optional Input N Reset Output Enable Static Release Reset Req. Indication Idle to RUN 8-5-3 Emergency Stop Pushbutton Monitoring (E-Stop) Diagram Default Maximum Number of I/O 159 Command Reference: Function Blocks Section 8-5 General Description The Emergency Stop Pushbutton Monitoring function block allows the user to monitor an emergency stop pushbutton switch. The Output Enable signal will turn ON if the input from the emergency pushbutton being monitored is active. The Output Enable signal will turn OFF if the input is inactive or if an error is detected for the function block. IMPORTANT A manual reset function is required for emergency stop applications. When using the Emergency Stop Pushbutton Monitoring function block, you must also use the Reset function block. Refer to A-1-1 Emergency Stop Application for a Programming Examples. Set Parameters Parameter Input Type Discrepancy Time Setting range Default setting Single Channel Dual Channel Equivalent Dual Channel Equivalent Dual Channel Complementary 0 to 30 s in 10-ms increments 30 ms A discrepancy time check will not be performed if 0 is set. The discrepancy time must be equal to or greater than the NE1A-series Controller’s cycle time. Optional Output Setting The following error output can also be used in programming. To enable this optional output, select the checkbox on the Out Point Tab Page of the function block properties dialog box. • Discrepancy Error Fault Present Output Setting A Fault Present output can also be used in programming. To enable this output, select the Fault Present checkbox on the Out Point Tab Page of the function block properties dialog box. 160 Section 8-5 Command Reference: Function Blocks Truth Tables Setting: Single Channel Input 1 (NC) 0 Output Enable 0 1 1 0: OFF, 1: ON Setting: Dual Channel Equivalent Input 1 (NC) 0 0 1 1 Input 2 (NC) 0 1 0 1 Output Enable 0 0 0 1 0: OFF, 1: ON Setting: Dual Channel Complementary Input 1 (NC) 0 Input 2 (NO) 0 0 1 1 1 0 1 Output Enable 0 0 1 0 0: OFF, 1: ON Error Handling and Error Resetting Error condition Discrepancy error Behavior for error detection Output Fault Error output Enable Present OFF ON Discrepancy Error output: ON (safety state) Resetting the error condition Remove the cause of the error and then do the following: 1. Make the inputs inactive and then active again. 2. Or change the NE1A-series Controller’s operating mode to IDLE Mode and then back to RUN Mode. 161 Section 8-5 Command Reference: Function Blocks Timing Chart When Set to Dual Channel Equivalent Input1 (NC) Input2 (NC) Output Enable Discrepancy Error Fault Present Idle to RUN 8-5-4 Discrepancy time Light Curtain Monitoring Diagram Input 1 (NC) Output Enable Input 2 (NC) Default Maximum Number of I/O General Description The Light Curtain Monitoring function block monitors a type-4 safety light curtain. The Output Enable signal will turn ON if the input from the safety light curtain being monitored is active. The Output Enable signal will turn OFF if the input is inactive or if an error is detected for the function block. Set Parameters Parameter Input type Discrepancy time Setting range Dual Channel Equivalent Dual Channel Complementary 0 to 30 s in 10-ms increments A discrepancy time check will not be performed if 0 is set. Default setting Dual Channel Equivalent 30 ms The discrepancy time must be equal to or greater than the NE1A-series Controller’s cycle time. 162 Section 8-5 Command Reference: Function Blocks Optional Output Setting The following error output can also be used in programming. To enable this optional output, select the checkbox on the Out Point Tab Page of the function block properties dialog box. • Discrepancy Error Fault Present Output Setting Fault Present output can also be used in programming. To enable this output, select the Fault Present checkbox on the Out Point Tab Page of the function block properties dialog box. Truth Tables Setting: Dual Channel Equivalent Input 1 (NC) 0 Input 2 (NC) 0 0 1 1 1 0 1 Output Enable 0 0 0 1 0: OFF, 1: ON Setting: Dual Channel Complementary Input 1 (NC) 0 Input 2 (NO) 0 0 1 1 1 0 1 Output Enable 0 0 1 0 0: OFF, 1: ON Error Handling and Error Resetting Error condition Discrepancy error Behavior for error detection Resetting the error Output Fault Error output condition Enable Present OFF ON Discrepancy Remove the cause of the Error output: error and then do the following: (safety ON state) 1. Make the inputs inactive and then active again. 2. Or change the NE1A-series Controller's operating mode to IDLE Mode and then back to RUN Mode. 163 Section 8-5 Command Reference: Function Blocks Timing Chart When Set to Dual Channel Equivalent Input1 (NC) Input2 (NC) Output Enable Discrepancy Error Fault Present Idle to RUN 8-5-5 Discrepancy time Safety Gate Monitoring Diagram Input 1 (pair 1-NC) Output Enable Input 2 (pair 1-NC) Default Maximum Number of I/O General Description The Safety Gate Monitoring function block monitors the status of a safety gate. Safety gate status is monitored using an input signal from a safety door switch or safety limit switch connected to the door. The Output Enable signal will turn ON if the input from the switch being monitored is active. The Output Enable signal will turn OFF if the input is inactive or if an error is detected for the function block. 164 Section 8-5 Command Reference: Function Blocks Function Tests For some safety gate applications, safeguarding devices require physical verification that the device continues to operate properly (e.g., required for Category 2 safety gate applications). If the function test is enabled for the Safety Gate Monitoring function block, a safety gate test in which the safety gate must be opened and then closed again can be added as a condition for turning ON the Output Enable signal. If enabled, the safety gate test must be executed under the following conditions. 1. Startup The safety gate test must be executed when the NE1A-series Controller is started (i.e., when the Controller’s operating mode changes from IDLE Mode to RUN Mode). If the test ends normally, the Output Enable signal will turn ON. 2. Function Test Request from the Machine The safety gate test must be executed after the NE1A-series Controller detects the Function Test Signal from the machine turn ON and before the Function Test Signal turns ON again. If the Function Test Signal turns ON a second time before the safety gate test is completed normally, a function test error will occur, the Output Enable signal will turn OFF, and the Function Test Error signal will turn ON. 3. Error Detected in Safety Gate Monitoring Function Block The safety gate test must be executed if a function test error, discrepancy error, or other function block error occurs (after removing the cause of the error). The Function Test Required Signal from the Safety Gate Monitoring function block will turn ON when a safety gate test is required and it will remain ON until the safety gate test has been completed normally. Set Parameters Parameter Input Type Setting range Single Channel Dual Channel Equivalent (1 pair) Dual Channel Complementary (1 pair) Two Dual Channel Equivalent (2 pairs) Two Dual Channel Complementary (2 pairs) Function Test No Function Test/Function Test Required Discrepancy Time 0 to 30 s in 10-ms increments Pair 1 A discrepancy time check will not be performed if 0 is Discrepancy Time set. Pair 2 Synchronization 0 to 30 s in 10-ms increments Time A synchronization time check will not be performed if 0 is set. Default setting Dual Channel Equivalent (1 pair) No function test 30 ms 300 ms The discrepancy time and synchronization time must be equal to or greater than the NE1A-series Controller’s cycle time. 165 Section 8-5 Command Reference: Function Blocks Optional Output Settings The following outputs can also be used in programming. To enable any of these optional outputs, select the checkbox on the Out Point Tab Page of the function block properties dialog box. Discrepancy Error Pair 1 Discrepancy Error Pair 2 Function Test Required Signal Synchronization Error Function Test Error Fault Present Output Setting Fault Present output can also be used in programming. To enable this output, select the Fault Present checkbox on the Out Point Tab Page of the function block properties dialog box. Truth Tables Setting: Single Channel Input 1 (pair 1-NC) 0 1 Output Enable 0 1 0: OFF, 1: ON Setting: Dual Channel Equivalent (1 Pair) Input 1 (pair 1-NC) 0 Input 2 (pair 1-NC) 0 0 1 1 1 0 1 Output Enable 0 0 0 1 0: OFF, 1: ON Setting: Dual Channel Complementary (1 Pair) Input 1 (pair 1-NC) 0 0 1 1 0: OFF, 1: ON 166 Input 2 (pair 1-NO) 0 1 0 1 Output Enable 0 0 1 0 Section 8-5 Command Reference: Function Blocks Setting: Two Dual Channel Equivalent (2 Pairs) Input 1 (pair 1-NC) 0 Input 2 (pair 1-NC) 0 Input 3 (pair 2-NC) 0 Input 4 (pair 2-NC) 0 0 0 0 0 0 0 0 1 1 1 1 1 1 1 1 0 0 0 1 1 1 1 0 0 0 0 1 1 1 1 0 1 1 0 0 1 1 0 0 1 1 0 0 1 1 1 0 1 0 1 0 1 0 1 0 1 0 1 0 1 Output Enable 0 0 0 0 0 0 0 0 0 0 0 0 0 0 0 1 0: OFF, 1: ON Setting: Two Dual Channel Complementary (2 Pairs) Input 1 (pair 1-NC) Input 2 (pair 1-NO) Input 3 (pair 2-NC) Input 4 (pair 2-NO) Output Enable 0 0 0 0 0 0 0 0 1 1 1 1 1 1 1 1 0 0 0 0 1 1 1 1 0 0 0 0 1 1 1 1 0 0 1 1 0 0 1 1 0 0 1 1 0 0 1 1 0 1 0 1 0 1 0 1 0 1 0 1 0 1 0 1 0 0 0 0 0 0 0 0 0 0 1 0 0 0 0 0 0: OFF, 1: ON 167 Section 8-5 Command Reference: Function Blocks Error Handling and Error Resetting Error condition Output Enable Behavior for error detection Fault Error output Present Discrepancy error at pair 1 Discrepancy error at pair 2 Function test error Safety gate test was not performed normally between Function Test signals. Discrepancy Error Pair 1: ON Discrepancy Error Pair 2: ON Function Test Error: ON OFF (safety state) Synchronization Test Error: ON Synchronization error Note ON 1. Function Test Disabled Remove the cause of the error and then make the inputs in active and then active again (See note.), or change the NE1Aseries Controller's operating mode to IDLE Mode and then back to RUN Mode. 2. Function Test Required If Function Test Required is active: Remove the cause of the error and then make the inputs active, inactive, and then active again (i.e., perform the safety gate test). If Function Test Required is inactive: Remove the cause of the error and then make the inputs in active and then active again. If a discrepancy error occurs in one of the pairs when set to Dual Channel Equivalent (2 pairs) or Dual Channel Complementary (2 pairs), to reset the error make input pairs 1 and 2 both inactive and then active. Timing Charts Single Channel, Function Test Set to Enabled Input 1 Function Test Sig. Function Test Req. Output Enable Function Test Error Fault Present Idle to RUN 168 Resetting the error condition Section 8-5 Command Reference: Function Blocks Dual Channel Equivalent, Function Test Set to Disabled Input1 (NC) Input2 (NC) Output Enable Discrepancy Error Fault Present Idle to RUN Discrepancy time Discrepancy time Dual Channel Equivalent (2 pairs), Function Test Set to Disabled Input1 (Pair1-NC) Input2 (Pair1-NC) Input3 (Pair2-NC) Input4 (Pair2-NC) Output Enable Sync. Error Fault Present Idle to RUN 8-5-6 Synchronization time Synchronization time Two-hand Control Diagram Input 1 (pair 1-NO) Input 2 (pair 1-NC) Input 3 (pair 2-NO) Input 4 (pair 2-NC) Output Enable Default Maximum Number of I/O 169 Section 8-5 Command Reference: Function Blocks General Description The Two-hand Control function block enables monitoring the status of a twohand switch. The Two-hand Control function block can be used with a suitable 2-hand switch to meet the requirements of type III C in EN 574, Two-hand Control Devices, Functional Aspect – Principle for Design. The Output Enable signal will turn ON only if both inputs from the two-hand switch are active and satisfy the requirements of EN 574. The Output Enable signal will turn OFF if the inputs from the two-hand switch do not satisfy the requirements of EN 574, an input is inactive, or if an error is detected for the function block. Set Parameters Parameter Discrepancy Time Pair 1 Discrepancy Time Pair 2 Setting range 0 to 500 ms in 10-ms increments A discrepancy time check will not be performed if 0 is set. Default setting 30 ms The discrepancy times must be equal to or greater than the NE1A-series Controller’s cycle time. Optional Output Settings The following error outputs can also be used in programming. To enable either of these optional outputs, select the checkbox on the Out Point Tab Page of the function block properties dialog box. Discrepancy Error Pair 1 Discrepancy Error Pair 2 Fault Present Output Setting Fault Present output can also be used in programming. To enable this output, select the Use Fault Present checkbox on the Out Point Tab Page of the function block properties dialog box. 170 Section 8-5 Command Reference: Function Blocks Truth Table Input 1 (Pair 1-NO) 0 Input 2 (Pair 1-NC) 0 Input 3 (Pair 2-NO) 0 Input 4 (Pair 2-NC) 0 0 0 0 0 0 0 0 1 1 1 1 1 1 1 0 0 0 1 1 1 1 0 0 0 0 1 1 1 0 1 1 0 0 1 1 0 0 1 1 0 0 1 1 0 1 0 1 0 1 0 1 0 1 0 1 0 1 1 1 1 Output Enable 0 0 0 0 0 0 0 0 0 0 1 0 0 0 0 0 0: OFF, 1: ON Error Handling and Error Resetting Error condition Behavior for error detection Output Fault Error output Enable Present Discrepancy Error at Pair 1 OFF (safety state) Discrepancy Error at Pair 2 Note ON Resetting the error condition Remove the cause of the error and then do Discrepancy Error Pair 1: the following: ON 1. Make the both input pair 1 and pair 2 inactive and then active again. 2. Or change the NE1A-series ConDiscrepancy Error Pair 2: troller's operating ON mode to IDLE Mode and then back to RUN Mode. The Output Enable signal will not turn ON if the synchronization time requirement is not met (i.e., operation inputs for both hands must be completed within 500 ms), but this is not considered an error. 171 Section 8-5 Command Reference: Function Blocks Timing Chart Input1 (Pair1-NO) Input2 (Pair1-NC) Input3 (Pair2-NO) Input4 (Pair2-NC) Output Enable Discrepancy Error Pair1 Discrepancy Error Pair2 Fault Present Idle to RUN 8-5-7 500 ms 500 ms Discrepancy Time 500 ms OFF-delay Timer Diagram General Description The OFF-delay Timer function block performs a timer operation for an OFF delay set in 10-ms increments. The range for this delay is from 0 ms to 300 s. Set Parameters Parameter Delay Time Setting range 0 to 300 s in 10-ms increments Default setting 0 ms The delay time must be equal to or greater than the NE1A-series Controller’s cycle time. 172 Command Reference: Function Blocks Section 8-5 Timing Chart Input Set Value Timer Value 0 Output Enable Idle to RUN 8-5-8 ON-delay Timer Diagram General Description The ON-delay Timer function block performs a timer operation for an ON delay set in 10-ms increments. The range for this delay is from 0 ms to 300 s. Set Parameters Parameter Delay Time Setting range 0 to 300 s in 10-ms increments Default setting 0 ms The delay time must be equal to or greater than the NE1A-series Controller’s cycle time. Timing Chart Input Set value Timer value 0 Output Enable Idle to RUN 173 Section 8-5 Command Reference: Function Blocks 8-5-9 User Mode Switch Diagram Default Maximum Number of Inputs General Description The User Mode Switch function block is used to monitor an operating mode switch in the user system or device. The operating mode switch that can be connected with this function block must be a 1-of-N type switch (i.e., one of N contacts is ON). The function block supports a maximum of eight inputs and corresponding outputs. The output corresponding to the input that is active is turned ON. If an error is detected for the function block, however, all outputs will turn OFF. Optional Output Settings The number of I/O can be increased on the In/Out Setting Tab Page in the function block property dialog box. Parameter Setting range Number of inputs Number of outputs 2 to 8 Default setting 2 2 to 8 2 Fault Present Output Setting Fault Present output can also be used in programming. To enable this output, select the Fault Present checkbox on the In/Out Setting Tab Page of the function block properties dialog box. Truth Table 1 1 0 0 0 0 0 0 0 2 0 1 0 0 0 0 0 0 3 0 0 1 0 0 0 0 0 Inputs 4 5 0 0 0 0 0 0 1 0 0 1 0 0 0 0 0 0 0: OFF, 1: ON 174 6 0 0 0 0 0 1 0 0 7 0 0 0 0 0 0 1 0 8 0 0 0 0 0 0 0 1 1 1 0 0 0 0 0 0 0 2 0 1 0 0 0 0 0 0 3 0 0 1 0 0 0 0 0 Outputs 4 5 0 0 0 0 0 0 1 0 0 1 0 0 0 0 0 0 6 0 0 0 0 0 1 0 0 7 0 0 0 0 0 0 1 0 8 0 0 0 0 0 0 0 1 Section 8-5 Command Reference: Function Blocks Error Handling and Error Resetting Error condition Behavior for error detection Output Fault Present More than one input was ON for more than 2 s All inputs were OFF for more than 2 s Note OFF (safety state) ON Resetting the error condition Remove the cause of the error. (Correct system so that only 1 contact is ON.) If more than one input is ON, the output corresponding to the first input to turn ON will turn ON for 2 s. If more than one input turns ON in the same NE1Aseries Controller cycle, then all outputs will turn OFF. Timing Chart Input1 Input2 Input3 Output1 Output2 Output3 Fault Present Idle to RUN 2s 2s 2s 175 Section 8-5 Command Reference: Function Blocks 8-5-10 External Device Monitoring (EDM) Diagram EDM Feed Back Monitored Input Default Maximum Number of I/O General Description The External Device Monitoring function block evaluates the input signal and the status of an external device and outputs safety outputs to an external device. If the input signal turns ON, the Output 1 and Output 2 signals will turn ON. When this occurs, the status of the feedback signal must change within the specified time. If the input signal turns OFF, the Output 1 and Output 2 signals will turn OFF. When this occurs, the status of the feedback signal must change within the specified time. If the status of the feedback signal does not change within the specified maximum feedback time, an EDM error will occur, the Output 1 and Output 2 signals will turn OFF, and the EDM Error signal will turn ON. Set Parameters Parameter Maximum Feedback Time (TEDM) Setting range 100 to 1000 ms in 10-ms increments Default setting 300 ms The Maximum Feedback Time must be equal to or greater than the cycle time of the NE1A-series Controller. The network response time must be taken into consideration when inputting the feedback signal from a remote device. Optional Output Settings The following outputs can also be used in programming. To enable either of these optional outputs, select the checkbox on the Out Point Tab Page of the function block properties dialog box. EDM error Output 2 Fault Present Output Setting Fault Present output can also be used in programming. To enable this output, select the Fault Present checkbox on the Out Point Tab Page of the function block properties dialog box. 176 Section 8-5 Command Reference: Function Blocks Error Handling and Error Resetting Error condition EDM feedback time error Behavior for error detection Resetting the error Outputs 1 Fault Error output condition and 2 Present OFF (safety ON EDM Error output: ON Remove the cause of state) the error and turn ON the safety input. Timing Chart Monitored input EDM Feedback Output1 Output2 EDM Error Fault Present Idle to RUN TEDM TEDM TEDM TEDM TEDM 8-5-11 Routing Diagram Default Maximum Number of Outputs General Description The Routing function block routes one input signal to a maximum of eight output signals. It is used to output a signal to more than one output tag. Optional Output Settings The number of outputs can be increased on the In/Out Setting Tab Page in the function block property dialog box. Parameter Number of outputs 1 to 8 Setting range Default setting 1 177 Section 8-5 Command Reference: Function Blocks Truth Table Truth Table for Routing Evaluation Input 1 Output 1 Output 2 Output 3 Output 4 Output 5 Output 6 Output 7 Output 8 0 0 1 0 1 0 1 0 1 0 1 0 1 0 1 0 1 1 0: OFF, 1: ON 8-5-12 Muting Unit Ver. 1.0 or Later Diagram AOPD Input1 (NC) AOPD Input2 (NC) Output Enable Muting Signal11 Muting Status Muting Signal12 Default AOPD Input1 (NC) AOPD Input2 (NC) Override Input1 (NC) Override Input2 (NC) Muting Signal11 Muting Signal12 Muting Signal21 Muting Signal22 Output Enable Muting Status Override Status Sequence Error Synchronization Error Discrepancy Error (AOPD) Discrepancy Error (Override) Fault Present Maximum Number of I/O General Description This function can be used with unit version 1.0 or later (including Controllers that support EtherNet/IP). The Muting function block provides both muting and override functions. Muting Muting can be used to temporarily disable safety functions, e.g., so that workpieces or palettes can pass through the detection area of a light curtain. The Muting function block temporarily disables the input signal (AOPD input) of a light curtain while the muting condition is met and keeps the Output Enable signal turned ON even if the light curtain is interrupted until the muting end condition is met. Supported Muting Applications Any of the following four muting modes can be selected to enable typical muting applications. Muting Mode Parallel Muting with 2 Sensors Sequential Muting (Forward Direction) Sequential Muting (Both Directions) Position Detection 178 Application This mode is suitable for applications at a conveyor entrance. Use this mode when two Retro-reflective Photoelectric Sensors are set up as the muting sensors with intersecting detection zones. This mode is suitable for applications at a conveyor entrance. Use this mode when four Through-beam Photoelectric Sensors are set up as the muting sensors. This mode is suitable for applications at a conveyor entrance or exit. Use this mode when four Through-beam Photoelectric Sensors are set up as the muting sensors. This mode is suitable for applications in which the operator sets the workpiece and then the workpiece is moved to the processing area by a turn table or workpiece conveyor robot. Muting is enabled by detecting that the robot is in a safe location using a limit switch or other device. Use this mode to temporarily disable the light curtain when the operator sets the workpiece at the conveyor entrance. Section 8-5 Command Reference: Function Blocks Muting Starting, Ending, and Stopping Conditions Starting Condition If an input is normally received for the Muting Signal when the Muting function block is in a normal state, the AOPD input is ON (the light curtain is not obstructed), and the Output Enable is ON, muting status will be enabled and Muting Status will turn ON. Ending Condition Muting status will be cleared and Muting Status will turn OFF when the following conditions occur. Muting Mode Position Detection Parallel Muting with 2 Sensors Sequential Muting (Forward Direction) Sequential Muting (Both Directions) Ending condition Muting Signal 11 turns OFF. Muting Signal 11 or 12 turns OFF. Muting Signal 11, 12, and 21 turn OFF. Input Sequences Muting Signal 11, 12, and 21 turn OFF. Output Sequences Muting Signal 12, 21, and 22 turn OFF. Stopping Condition Muting status will be stop and Muting Status will turn OFF when the following conditions occur. • The maximum muting time expires. • A discrepancy error occurs for the AOPD input. • A discrepancy error occurs for the override input. Muting status will be resumed when the muting starting condition is met again. Note In the explanation above, the muting sensors are ON when the workpiece is detected and OFF when it is not detected. Note When the operating mode of the NE1A-series Controller switches from Idle to Run, input data from the slaves will be OFF until communications are established. If slave data is used for the AOPD input, Fault Present and Sequence Error will turn ON immediately after entering RUN Mode. When the AOPD input turns ON, Fault Present will turn OFF. When the muting starting condition is met, Sequence Error will turn OFF. Override Function The override function can be used, for example, to force a machine to operate to remove an object that has stopped in the detection area of the light curtain. The override function enables turning ON the Output Enable signal even when the muting starting condition has not been met. Override Starting and Stopping Conditions Starting Conditions The override will be started when all of the following conditions are met and Output Enable, Muting Status, and Override Status will turn ON. • At least one of the muting signals is ON (i.e., the muting sensor is detecting a workpiece). • The AOPD input is inactive (i.e., the lighting curtain is obstructed). • The override input is active. 179 Section 8-5 Command Reference: Function Blocks Ending Condition The override will be stopped when any of the following conditions is met and Muting Status and Override Status will turn OFF. • All of the muting signals are ON (i.e., the muting sensor is not detecting a workpiece). • The maximum override time has expired. • The override input is inactive. Set Parameters Parameter Input Type of AOPD Setting range • Dual Channel Equivalent (NC/NC) • Dual Channel Complementary (NC/NO) Discrepancy Time (AOPD) 10 to 500 ms in 10-ms increments (See note.) A discrepancy time check will not be performed if 0 is set. Input Type of Override • Single Channel • Dual Channel Equivalent (NO/NO) • Dual Channel Complementary (NC/NO) • Not used. Discrepancy Time 10 to 500 ms in 10-ms increments (See note.) (Override) A discrepancy time check will not be performed if 0 is set. Max. Override Time 500 ms to 127.5 s in 500-ms increments Muting Mode Position detection Parallel Muting with 2 Sensors Sequential Muting (Forward Direction) Sequential Muting (Both Directions) Max Muting Time Synchronization Time (See note 2.) Note 500 ms to 127.5 s in 500-ms increments 0 to 500 ms in 10-ms increments The muting time will be unlimited if 0 is set. 30 ms to 3 s in 10-ms increments (See note 1.) Default setting Dual Channel Equivalent 30 ms Not used. 30 ms 60 s Parallel Muting with 2 Sensors 60 s 3s (1) The timer SV must be longer than the NE1A-series Controller’s cycle time. (2) Sets the time between Muting Signal 11 and Muting Signal 12 or between Muting Signal 21 and Muting Signal 22. 180 Section 8-5 Command Reference: Function Blocks Optional Output Settings The following outputs can also be used in programming. To enable any of these optional outputs, select the checkbox on the Output Point Tab Page of the function block properties dialog box. • Override Status • Synchronization Error • Sequence Error • Discrepancy Error (AOPD) • Discrepancy Error (Override) Fault Present Output Setting A Fault Present output can also be used in programming. To enable this output, select the Fault Present checkbox on Output Point Tab Page of the function block properties dialog box. Error Handling and Error Resetting Synchronization Error A synchronization error can be detected in any mode other than Position Detection Mode. A synchronization error will occur and Synchronization Error will turn ON when the time difference between input signals for the muting signals (i.e., muting sensors) exceeds the synchronization time that has been set. If the AODP input turns OFF (i.e., if the light curtain is obstructed) while there is a synchronization error, Output Enable will turn OFF and Fault Present will turn ON. The condition for a synchronization error are give for each muting mode in the following table. Muting Mode Position Detection Parallel Muting with 2 Sensors Sequential Muting (Forward Direction) Sequential Muting (Both Directions) Condition for synchronization error Not detected. The time difference between muting signal 11 and muting signal 12 has exceeded the set value of the synchronization time. The time difference between muting signal 11 and muting signal 12 has exceeded the set value of the synchronization time. Input Sequence The time difference between muting signal 11 and muting signal 12 has exceeded the set value of the synchronization time. Input Sequence The time difference between muting signal 21 and muting signal 22 has exceeded the set value of the synchronization time. Sequence Error A sequence error will occur and Sequence Error will turn ON when the detection order of muting signals (i.e., muting sensors) 181 Command Reference: Function Blocks Section 8-5 The following table lists the conditions for sequence errors for each muting mode. Muting Mode Position Detection Normal sequence Error sequence that may cause an error AOPD input turning OFF is detected while AOPD input turning OFF is detected while muting signal 11 is ON. muting signal 11 is OFF. Parallel Muting with 2 Sensors Muting signal 11 is detected, and then mut- • Muting signal 12 is detected before muting ing signal 12 is detected. signal 11 is detected. • Muting signals 11 and 12 are detected simultaneously. • AOPD turns OFF before the normal sequence is detected. Sequential Muting (Forward Muting signal 11 is detected, and then mut- • Muting signal 12 is detected before muting Direction) ing signal 12 is detected. signal 11 is detected. • Muting signals 11 and 12 are detected simultaneously. • AOPD turns OFF before the normal sequence is detected. • Muting signal 21 or 22 is detected before muting signal 11 is detected. • Muting signal 21 or 22 is detected before muting signal 12 is detected. Sequential Muting (Both Direc- Input Sequence • Muting signal 12 is detected before muting tions) Muting signal 11 is detected, and then mut- signal 11 is detected. ing signal 12 is detected. • Muting signals 11 and 12 are detected simultaneously. • AOPD turns OFF before the normal sequence is detected. • Muting signal 21 or 22 is detected before muting signal 11 is detected. • Muting signal 21 or 22 is detected before muting signal 12 is detected. Output Sequence • Muting signal 12 or 21 is detected before Muting signal 22 is detected, and then mut- muting signal 22 is detected. ing signal 21 is detected. • Muting signals 21 and 22 are detected simultaneously. • AOPD turns OFF before the normal sequence is detected. • Muting signal 11 or 12 is detected before muting signal 21 is detected. • Muting signal 11 or 12 is detected before muting signal 22 is detected. Note 182 All muting signals must turn OFF before the normal sequence. Section 8-5 Command Reference: Function Blocks Resetting Errors Error Discrepancy error during AOPD input Operation when error occurs Output Enable Fault Present Error output OFF (safe state) ON Discrepancy Error (AOPD): ON Discrepancy error during override input Synchronization error Sequence error ON (See note.) ON (See note.) Note Resetting • Change the light curtain input pair (AOPD inputs 1 and 2) from inactive to active. • Change the NE1A-series Controller to IDLE Mode and then return it to RUN Mode. • Change the override input pair (override Discrepancy inputs 1 and 2) from inactive to active. Error (Override): ON • Change the NE1A-series Controller to IDLE Mode and then return it to RUN Mode. Synchronization • The error will be reset the next time a norError: ON mal muting status is enabled. • Sequence Error: Change the NE1A-series Controller to IDLE Mode and then return it to RUN Mode. ON If the AOPD input turns OFF (i.e., light curtain obstructed) while there is a synchronization or sequence error, Output Enable will turn OFF and Fault Present will turn ON. Example Muting System Configurations ■ Parallel Muting with 2 Sensors In this example, two Retro-reflective Photoelectric Sensors are set up as the muting sensors with intersecting detection zones. Use this configuration when the workpiece length (L) is not fixed or not long enough. Block Diagram Light curtain Reflected Board MS12 Workpiece V MS11 L D1= 1 d1 Reflected Board MS11: Muting sensor connected to Muting Signal 11 MS12: Muting sensor connected to Muting Signal 12 Note The intersection of the two sensors must be after the light curtain. Muting Sequence 1. In the block diagram above, the light is not interrupted between MS11 and MS12 and the light curtain, so the Output Enable signal is ON. 2. As the workpiece moves to the right and MS11 and MS12 go ON in order, muting is enabled. 3. As the workpiece continues advancing, the Output Enable signal is kept ON even if the light curtain is obstructed. 183 Command Reference: Function Blocks Section 8-5 4. As the workpiece continues advancing, the light from MS11 is no longer interrupted by the workpiece, the muting status is cleared and the Muting Status will go OFF. Setup Distances The following formula shows the minimum distance of D1 required for the muting sensors to provide effective muting function operation: Formula 1: D1 < L L: Length of the workpiece The following formula shows the maximum distance of d1 required for the muting sensors to provide effective muting function operation: Formula 2: V × T1min < d1 < V × T1max V: Transit speed of the workpiece T1min: NE1A-series Controller cycle time T1max: Synchronization time setting time The default setting is 3 s. D1 must satisfy formula 1 and d1 must satisfy formula 2 in order for the muting function to be operate effectively. These distance settings must prevent a passing person from enabling the muting function. Also, the light curtain and muting sensors must be setup so that a workpiece passes by all of the muting sensors before the next workpiece arrives at the muting sensors. 184 Section 8-5 Command Reference: Function Blocks ■ Timing Chart Normal Operation AOPD Input 1 (NC) AOPD Input 2 (NC) Muting Signal 11 Muting Signal 12 Output Enable Muting Status Fault Present Idle to RUN Synchronization time 185 Section 8-5 Command Reference: Function Blocks Synchronization Error AOPD Input 1 (NC) AOPD Input 2 (NC) Muting Signal 11 Muting Signal 12 Output Enable Muting Status Synchronization Error Fault Present Synchronization time (set value) Sequence Error AOPD Input 1 (NC) AOPD Input 2 (NC) Muting Signal 11 Muting Signal 12 Output Enable Muting Status Sequence Error Fault Present Sequence error occurred. 186 Section 8-5 Command Reference: Function Blocks ■ Sequential Muting (Forward Direction) In this example, four Through-beam Photoelectric Sensors are set up as the sensors with intersecting detection zones. Use this configuration when the length of the workpiece being transported is longer than a fixed length. Block Diagram Light curtain Workpiece MS11 MS12 MS21 MS22 MS11 MS12 MS21 MS22 V L d2 D2 D3 MS11: Muting sensor connected to Muting Signal 11 MS12: Muting sensor connected to Muting Signal 12 MS21: Muting sensor connected to Muting Signal 21 MS22: Muting sensor connected to Muting Signal 22 Muting Sequence 1. In the block diagram above, the light is not interrupted between MS11, MS12, MS21, and MS22 and the light curtain, so the Output Enable signal is ON. 2. As the workpiece moves to the right and MS11 and MS12 go ON in order, muting is enabled, and the Muting Status goes ON. 3. As the workpiece continues advancing, the Output Enable signal is kept ON even if the light curtain is obstructed. 4. As the workpiece continues advancing, light from MS21 is no longer interrupted by the workpiece, the muting status is cleared, and the Muting Status goes OFF. Setup Distances The following formulae show the minimum distances of D2 and D3 required for the muting sensors to provide effective muting function operation: Formula 3: D2 < L Formula 4: D3 < L L: Length of the workpiece The following formula shows the maximum distance of d2 required for the muting sensors to provide effective muting function operation: Formula 5: V × T1min < d2 < V × T1max V: Transit speed of the workpiece T1min: NE1A-series Controller cycle time T1max: Synchronization time setting time The default setting is 3 s. 187 Section 8-5 Command Reference: Function Blocks D2 must satisfy formula 3, D3 must satisfy formula 4, and d5 must satisfy formula 5 in order for the muting function to operate effectively. These distance settings must prevent a passing person from enabling the muting function. Also, the light curtain and muting sensors must be setup so that a workpiece passes by all of the muting sensors before the next workpiece arrives at the muting sensors. ■ Timing Chart AOPD Input 1 (NC) AOPD Input 2 (NC) Muting Signal 11 Muting Signal 12 Muting Signal 21 Muting Signal 22 Output Enable Muting Status Fault Present Idle to RUN Synchronization time 188 Section 8-5 Command Reference: Function Blocks ■ Sequential Muting (Both Direction) Block Diagram 1. Entrance Light Curtain MS11 MS12 MS21 MS22 MS11 MS12 MS21 MS22 V Workpiece d2 L D2 D3 2. Exit Light Curtain MS11 MS12 MS21 MS22 V MS11 MS12 MS21 MS22 d2 D2 Workpiece L D3 MS11: Muting sensor connected to Muting Signal 11 MS12: Muting sensor connected to Muting Signal 12 MS21: Muting sensor connected to Muting Signal 21 MS22: Muting sensor connected to Muting Signal 22 Muting Sequence 1. In the block diagram above, the light is not interrupted between MS11, MS12, MS21, and MS22 and the light curtain, so the Output Enable signal is ON. 2. For the entrance, as the workpiece moves to the right and MS11 and MS12 go ON in order (MS22 and MS21 go ON in order at the exit), muting is enabled, and the Muting Status goes ON. 3. As the workpiece continues advancing, the Output Enable signal is kept ON even if the light curtain is obstructed. 4. As the workpiece continues advancing, the workpiece is no longer detected by MS21 at the entrance (MS12 at the exit), the muting status is cleared, and the Muting Status goes OFF. 189 Section 8-5 Command Reference: Function Blocks Setup Distances The setup distance requirements are the same as for Sequential Muting (Forward Direction). ■ Timing Chart Entrance AOPD Input 1 (NC) AOPD Input 2 (NC) Muting Signal 11 Muting Signal 12 Muting Signal 21 Muting Signal 22 Output Enable Muting Status Synchronization time Time-difference Input Pattern 2: Exit AOPD Input 1 (NC) AOPD Input 2 (NC) Muting Signal 11 Muting Signal 12 Muting Signal 21 Muting Signal 22 Output Enable Muting Status Synchronization time 190 Section 8-5 Command Reference: Function Blocks ■ Position Detection In this application, the workpiece is mounted on a machine turntable surrounded by a guard fence. The operator can disable the light-interruption signal of the light curtain safety function in order to set a workpiece on the turntable when he is on the opposite side of the machine’s dangerous area. Block Diagram Machine’s Dangerous Area is on the Operator’s Side (Figure 1): Operator Light curtain Light curtain Guard fence Work platform Limit switch 2 (N.C. contact) Limit switch 1 (N.O. contact) ON OFF IN1 NE1A-series Controller IN0 Machine’s Dangerous Area is on the Opposite Side of the Operator (Figure 2): Operator Light curtain Light curtain Guard fence Work platform Limit switch 2 (N.C. contact) Limit switch 1 (N.O. contact) OFF ON IN1 Note IN0 NE1A-series Controller In the above example, limit switch 1 is wired to IN0 on the NE1A-series Controller and limit switch 2 is wired to IN1. Set the dual channel mode for local input in the NE1A-series Controller to dual channel complementary. 191 Command Reference: Function Blocks Section 8-5 Program Example Limit switches 1, 2 connected to IN0, IN1 on the NE1A-series Controller is connected to Muting Signal 11 of the Muting function block. Note (1) Limit switches 1 and 2 are set to the dual channel complementary setting for local inputs to evaluate the input data from the two switches. (2) The Safety Door Monitoring function block is used as a substitute for the Limit Switch function block. The input type for the Safety Door Monitoring function block is set as Dual Channel Complementary (1 pair). Muting Sequence 1. In figure 1 above, N.O. limit switch 1 is OFF and N.C. limit switch 2 is ON. In addition, the light curtain is not obstructed, so the Output Enable signal is ON. Muting Signal 11, which inputs the dual channel complementary signal for limit switches 1 and 2, goes OFF. 2. As the robotic arm rotates, limit switch 1 goes ON and limit switch 2 goes OFF as shown in figure 2. Muting Signal 11, which inputs the dual channel complementary signal for limit switches 1 and 2, goes ON, so muting is enabled, and the Muting Status goes ON. 3. At this point, the Output Enable signal is kept ON even if the light curtain is obstructed so the operator can access the work platform. 4. When the operator completes his task and the light curtain is unobstructed as the robotic arm rotates, Muting Signal 11 goes OFF, the muting status is cleared, and the Muting Status goes OFF. ■ Timing Chart AOPD Input 1 (NC) AOPD Input 2 (NC) Muting Signal 11 Output Enable Muting Status 192 Section 8-5 Command Reference: Function Blocks Override Function The Override function can turn ON the safety output ON even though the lightinterruption signal of the light curtain is inactive. If a workpiece gets jammed during transit as shown in the following diagram, the system cannot be returned to normal operation without forcibly removing the workpiece. In a situation like this, the Override function can be used to move the workpiece out of the light curtain detection zone. Light curtain MS12 Reflected Board WORK MS11 Reflected Board MS11: Muting sensor connected to Muting Signal 11 MS12: Muting sensor connected to Muting Signal 12 Override Sequence 1. In the block diagram above, the Output Enable signal is OFF. 2. When the Override Input goes ON, the Override function starts and the Override Status goes ON. As long as the Override inputs are ON, the muting status is forcibly enabled, and both the Muting Status and Output Enable signals are ON. 3. When the workpiece moves to the right until it is no longer detected by the MS12, the muting status forced by the Override function will be cleared, and both the Muting Status and Override Status will go OFF. 193 Section 8-5 Command Reference: Function Blocks ■ Timing Chart Normal Operation of the Override Function (Muting Mode: Parallel Muting with 2 Sensors) AOPD Input 1 (NC) AOPD Input 2 (NC) Override Input 1 (NO) Override Input 2 (NO) Muting Signal 11 Muting Signal 12 Output Enable Muting Status Override Status Fault Present All muting signals are OFF Override Discrepancy Time 8-5-13 Enable Switch Monitoring (Enable Switch) Unit Ver. 1.0 or Later Diagram Input1 (NO) Output Enable Input1 (NO) Input2 (NO) Input2 (NO) Grip Input Release Input Default Output Enable Grip Enable Release Enable Discrepancy Error Fault Present Maximum Number of Outputs General Description This function can be used with unit version 1.0 or later (including Controllers that support EtherNet/IP). The Enable Switch function block monitors the status of the enable-switch device. The Output Enable signal is ON when the input from the monitored enableswitch device is active. The Output Enable signal is OFF when the input is not active or an error is detected in the function block. 194 Section 8-5 Command Reference: Function Blocks In addition, if the enable-switch device is the type that outputs a grip signal and release signal, the device’s Grip Input and Release Input signal status can be monitored. The received Grip Input and Release Input signals do not affect the status of the Output Enable signal. Set Parameters Parameter Input Type Discrepancy Time Setting range Single Channel Dual Channel Equivalent 0 to 30 s in 10-ms increments A discrepancy time check will not be performed if 0 is set. Default setting Dual Channel Equivalent 30 ms The timer SV must be longer than the NE1A-series Controller’s cycle time. Number of I/O Points Setting The Grip Input and Release Input can be enabled and disabled on the In/Out Setting Tab Page in the function block property dialog box. Parameter Number of inputs Setting range 2 to 4 (Optional Input Settings) 2: Grip and Release Inputs disabled. 3: Grip Input enabled. 4: Relate Input enabled. Default setting 2 Optional Output Setting The following outputs can also be used in programming. To enable any of these optional outputs, select the corresponding checkbox on the Out Point Tab Page of the function block properties dialog box. • Grip Enable • Release Enable • Discrepancy Error Fault Present Output Setting A Fault Present output can also be used in programming. To enable this output, select the Fault Present checkbox on the Out Point Tab Page of the function block properties dialog box. Error Handling and Error Resetting Error condition Discrepancy Error Behavior for error detection Resetting the error condition Output Fault Error output Enable Present OFF (safety ON Discrepancy Remove the cause of the error state) Error: ON and then do one of the following: 1. Make the input inactive and then active again. 2. Change the NE1A-series Controller's operating mode to IDLE Mode and then back to RUN Mode. Timing Charts Normal Operation and Discrepancy Error: 195 Section 8-5 Command Reference: Function Blocks Idle to RUN Discrepancy Time Grip Signal and Release Signal: 8-5-14 Pulse Generator Unit Ver. 1.0 or Later Diagram Input Output Enable Default General Description This function can be used with Controllers with unit version 1.0 or later (including Controllers that support EtherNet/IP). The Pulse Generator function block generates an ON/OFF pulse output at the Output Enable signal while the function block’s Input signal is ON. The pulse’s ON time and OFF time can be set independently between 10 ms and 3 s, in 10-ms increments. When the ON time is set to 100 ms and the OFF time is set to 500 ms, the signal will repeatedly be turned ON for 100 ms and then OFF for 500 ms. Note 196 The output pulse width will have an error equivalent to the cycle time. For example, if the cycle time is 7 ms and the pulse width is set to 100 ms, the output pulse will be from 93 to 107 ms. Section 8-5 Command Reference: Function Blocks Set Parameters Parameter On Pulse Time Off Pulse Time Setting range 10 ms to 3 s in 10-ms increments 10 ms to 3 s in 10-ms increments Default setting 500 ms 500 ms The timer SV must be longer than the NE1A-series Controller’s cycle time. Timing Chart Idle to RUN 197 Section 8-5 Command Reference: Function Blocks 8-5-15 Counter Unit Ver. 1.0 or Later Diagram Input Output Enable Reset Default General Description This function can be used with Controllers with unit version 1.0 or later (including Controllers that support EtherNet/IP). The Counter function block counts the input pulses at Input and turns ON the Output Enable signal when the count reaches a set value (SV) set with the Network Configurator. The function counts the number of OFF-to-ON transitions in the input signal. To detect pulses in the input signal, the input pulse’s OFF time and ON time must be longer than the cycle time. ■ Counting Methods (Count Type) The Count Type can be set to Down counter or Up counter (decrementing or incrementing counter). With a Down (decrementing) counter, the preset SV is the counter’s initial value and the counter decrements the count by 1 each time that an input pulse is detected. The Output Enable signal is turned ON when the count reaches 0. With an Up (incrementing) counter, the counter’s initial value is 0 and the counter increments the count by 1 each time that an input pulse is detected. The Output Enable signal is turned ON when the count reaches the preset SV. The count value (present value) is saved in the function block work area and can be monitored from the Network Configurator. ■ Reset Methods (Reset Condition) The Reset Condition used to reset the input count (PV) can be set to Manual Reset or Auto Reset. When the reset condition is set to Auto Reset and the input count reaches the SV, the Output Enable signal is turned ON and remains ON as long as the input signal is ON. When the input signal goes OFF, the input count is reset. When the reset condition is set to Manual Reset, the input count is reset and the Output Enable signal is turned OFF when the Reset signal goes ON. Input pulses will not be counted while the Reset signal is ON. Counting will be continued when the Reset signals turns OFF. 198 Section 8-5 Command Reference: Function Blocks Set Parameters Parameter Reset Condition Count Type Counter Setting range Auto Reset Manual Reset Down counter (decrementing counter) Up counter (incrementing counter) 1 to 65,535 (count) Default setting Manual Reset Down counter (decrementing counter) 1 (count) Timing Charts 1. Auto Reset Incrementing counter: Input Counter (set value) Count Output Enable Idle to RUN Decrementing counter: Input Counter (set value) Count 0 Output Enable Idle to RUN 199 Section 8-5 Command Reference: Function Blocks 2. Manual Reset Decrementing counter: Input Counter (set value) Count 0 Output Enable Idle to RUN Decrementing counter: Input Counter (set value) Count 0 Output Enable Idle to RUN 8-5-16 Multi Connector Unit Ver. 1.0 or Later Diagram Input1 Output1 Default Maximum Number of outputs General Description This function can be used with Controllers with unit version 1.0 or later (including Controllers that support EtherNet/IP). The Multi Connector function outputs input signals (up to 8 inputs) to output signals (up to 8 outputs). The input signals and output signals are associated one-to-one from number 1 to 8. The status of other input signals has no effect. 200 Section 8-5 Command Reference: Function Blocks Optional Output Settings The number of outputs can be increased on the In/Out Setting Tab Page in the function block property dialog box. Parameter Number of inputs Setting range Default setting 1 to 8 1 Truth Tables ■ Multi Connector Truth Table: 1 0 1 x x 2 x x 0 1 3 x x x x Input 4 5 x x x x x x x x x x x x x x x x 0 1 x x x x 0 1 x x x x x x x x x x x x x x x x x x x x x x x x x x x x x x x x x x x x x x x x x x x x x x x x 0 1 x x x x x x x x 0 1 x x x x x x x x 0 1 x x x x x x x x 0 1 6 x x x x 7 x x x x 8 x x x x 1 0 1 x 2 x x 0 3 x x x Output 4 5 x x x x x x x x x x 1 x x x x 0 1 x x x x 0 x x x x x x x x x x x x x x x x x x x x x x x x x x x x x x x x x x x x x x x x x x x 1 x x x x x x x x x 0 1 x x x x x x x x x 0 1 x x x x x x x x x 0 1 x x x x x x x x x 0 1 6 x x x 7 x x x 8 x x x 0: OFF, 1: ON, x: Either ON or OFF 201 SECTION 9 Other Functions 9-1 9-2 9-3 Configuration Lock . . . . . . . . . . . . . . . . . . . . . . . . . . . . . . . . . . . . . . . . . . . . . 204 Reset . . . . . . . . . . . . . . . . . . . . . . . . . . . . . . . . . . . . . . . . . . . . . . . . . . . . . . . . 205 9-2-1 Reset Types . . . . . . . . . . . . . . . . . . . . . . . . . . . . . . . . . . . . . . . . . . . . 205 9-2-2 Reset Type and NE1A-series Controller Status . . . . . . . . . . . . . . . . 206 Access Control with Password . . . . . . . . . . . . . . . . . . . . . . . . . . . . . . . . . . . . 207 9-3-1 Scope of Access Control. . . . . . . . . . . . . . . . . . . . . . . . . . . . . . . . . . 207 9-3-2 Lost Password . . . . . . . . . . . . . . . . . . . . . . . . . . . . . . . . . . . . . . . . . . 207 203 Section 9-1 Configuration Lock 9-1 Configuration Lock The configuration data saved in the NE1A-series Controller can be locked using the Network Configurator to protect the data after downloading and verifying the configuration data. Once the configuration is locked, the configuration data cannot be changed until it is unlocked. The following occurs when the configuration lock is set. • The LOCK LED indicator on the front face of NE1A-series Controller lights yellow. (When unlocked, the indicator will flash yellow.) Lock LED indicator • On the Network Configurator, the icon indicating the LOCK status is displayed. Icon indicating lock status. 204 Section 9-2 Reset 9-2 9-2-1 Reset Reset Types The Network Configurator can reset the NE1A-series Controller in the following three ways. A password is required to enter reset. Reset type Emulate cycling power Configuration data Settings before the reset are retained. Initialization (Default) Return to the default configuration, and then emulate cycling power. (Initialize all data.) Return to the default configuration Depends on user specifiexcept to preserve the following parame- cations. ters, and then emulate cycling power. (Retain specified data.) Error history Log before the reset is retained. Initialized. (All data cleared.) Initialized. (All data cleared.) Configuration data includes device parameters, such as those for DeviceNet communications (Safety/Standard), EtherNet/IP communications settings (for Controllers that support EtherNet/IP), and I/O settings, as well as the user program and passwords. The NE1A-series Controller stores this data in its nonvolatile memory. Some information, however, cannot be changed once it is set. Select the corresponding reset type to return the information to the default parameter settings. Depending on the type of reset that is used, however, maintenance data such as the total ON times, contact operation counter monitor settings, or monitor values for the contacts of the local inputs, test outputs, and local outputs will not be cleared. Refer to DeviceNet Safety System Configuration Manual (Cat. No. Z905) for the configurable parameters. IMPORTANT When a Controller that supports EtherNet/IP is reset to its default settings, the IP address will be cleared and the IP address will then be acquired from the BOOTP server. If you wish to keep the same IP address, then select the Node Address (Software Set) Checkbox before resetting the Controller. 205 Section 9-2 Reset 9-2-2 Reset Type and NE1A-series Controller Status Depending on the reset type and NE1A-series Controller’s status, reset might not be possible. Reset type RUN and configuration unlocked. - MS indicator lit green - LOCK indicator flashing Not RUN, and configuration locked. - MS not lit green - LOCK indicator lit Not RUN, and configuration unlocked. - MS not lit green - LOCK indicator flashing or OFF Emulate cycling power Able to reset Able to reset Able to reset Able to reset Return to the default configuration, and then emulate cycling power. Unable to reset Able to reset Unable to reset Able to reset Return to the default configuration except to preserve the following parameters, and then emulate cycling power. Unable to reset Able to reset Unable to reset Able to reset Note 206 NE1A-series Controller’s status RUN and configuration locked. - MS indicator lit green - LOCK indicator lit Resetting is not possible after a safety I/O connection has been established. Section 9-3 Access Control with Password 9-3 Access Control with Password The NE1A-series Controller can register a password in its nonvolatile memory. The password can be used to prevent unexpected or unauthorized access to the Controller from a person other than a user (i.e., a safety manager). No password is set by default; the user needs to register one. Use the Network Configurator to set or change the password for the NE1Aseries Controller. For information on procedures for setting the password using the Network Configurator, refer to 3-6 Device Password Protection in the DeviceNet Safety System Configuration Manual (Cat. No. Z905). 9-3-1 Scope of Access Control The following operations require the user to enter a password. The NE1Aseries Controller does not perform the following operations unless the password matches. • Downloading configuration data • Locking or unlocking the configuration • Executing the NE1A-series Controller reset service • Changing the operating mode • Changing the password 9-3-2 Lost Password Contact OMRON if you lose your password and it has been set for NE1Aseries Controller devices. 207 SECTION 10 Operating Modes and Power Supply Interruptions 10-1 NE1A-series Controller Operating Modes . . . . . . . . . . . . . . . . . . . . . . . . . . . 210 10-1-1 Operating Mode Overview . . . . . . . . . . . . . . . . . . . . . . . . . . . . . . . . 210 10-1-2 Confirming the Operating Mode . . . . . . . . . . . . . . . . . . . . . . . . . . . 211 10-1-3 Functions Supported in Each Operating Mode. . . . . . . . . . . . . . . . . 212 10-1-4 Operating Mode Setting at Startup . . . . . . . . . . . . . . . . . . . . . . . . . . 213 10-1-5 Operating Mode Changes . . . . . . . . . . . . . . . . . . . . . . . . . . . . . . . . . 213 10-1-6 Program Execution Delay Unit Ver. 2.0 or Later . . . . . . . . . . . . . 10-2 Behavior for Power Supply Interruptions . . . . . . . . . . . . . . . . . . . . . . . . . . . . 213 215 10-2-1 Behavior in Voltage Drop . . . . . . . . . . . . . . . . . . . . . . . . . . . . . . . . . 215 10-2-2 Automatic Recovery from Voltage Drops . . . . . . . . . . . . . . . . . . . . 215 209 NE1A-series Controller Operating Modes Section 10-1 10-1 NE1A-series Controller Operating Modes 10-1-1 Operating Mode Overview The following modes are supported by the NE1A-series Controller. SELF-DIAGNOSTIC Mode The NE1A-series Controller performs self-diagnosis internally. This is required to ensure safety functions. CONFIGURING Mode CONFIGURING Mode exists while waiting for the completion of configuration from the Network Configurator. The NE1A-series Controller switches to Configurating Mode when it is not yet configured after initialization has been completed or when there is an error in the configuration data. IDLE Mode IDLE Mode exists while waiting for RUN Mode after initialization has been completed. Non-safety-related control (standard I/O communications, message communications, etc.) is supported. RUN Mode Safety control (user program, safety I/O communications, safety I/O refresh control) and non-safety-related control (standard I/O communications, message communications, etc.) are both supported. ABORT State The NE1A-series Controller switches to Abort Mode if the Controller’s switch setting is changed after the configuration has been completed. The Controller stops all functions except for message communications and puts them in the safety state. When Controller’s switch settings must be changed due to user system changes, reset the Controller to the default settings. Refer to SECTION 9 Other Functions for the reset function. CRITICAL ERROR State The NE1A-series Controller switches to this state if a critical error occurs. The Controller stops all functions and puts them in the safety state. 210 Section 10-1 NE1A-series Controller Operating Modes 10-1-2 Confirming the Operating Mode Confirming with the MS Indicator The user can confirm the operating mode using the MS indicator on the front of the NE1A-series Controller. MS indicator Indicator name Color MS Green State Meaning RUN Mode IDLE Mode Red Critical error Abort Green/ red - : ON Self-diagnosis, waiting for TUNID setting, or waiting for configuration. Power is not supplied. : Flashing : OFF Confirming with the Operating Mode Flag The user can determine whether the NE1A-series Controller’s operating mode is RUN Mode or not by checking bit 6 (Operating Mode Flag) of the Unit General Status. 211 Section 10-1 NE1A-series Controller Operating Modes 10-1-3 Functions Supported in Each Operating Mode The following table shows the conditions in each NE1A-series Controller mode and operations supported from the Network Configurator in each mode. Operating mode Safety functions Standard functions Operations from Network Configurator (See note 1.) Online monitor Changing password Reset Configuration lock/ unlock Configuration Message communications Standard I/O communications Local I/O control (including test outputs) Safety I/O communications User program Supported Supported Supported (See note 3.) Supported (See note 4.) Supported Supported Safety State Supported (See note 2.) Supported Supported Supported (See note 3.) Supported (See note 4.) Supported Supported Stopped Safety State Stopped Supported Supported Not supported Supported Supported Supported Stopped Stopped Safety State Stopped Supported Not supported Not supported Supported (See note 4.) Supported Supported CRITICAL ERROR Stopped Stopped Safety State Stopped Stopped Not supported Not supported Not supported Not supported Not supported INITIALIZATION Stopped Stopped Safety State Stopped Stopped Not supported Not supported Not supported Not supported Not supported RUN Supported Supported Refreshed IDLE Stopped Stopped CONFIGURING Stopped ABORT Note Supported (1) A password could be required for operations from the Network Configurator. For details, refer to SECTION 9 Other Functions. (2) When the operating mode of the NE1A-series Controller is changed from RUN to IDLE, input data to the Master depends on the hold setting of the Standard I/O Area. For details, refer to SECTION 4 DeviceNet Communications Functions and SECTION 5 EtherNet/IP Communications. (3) Depends on the configuration lock setting. For details, refer to SECTION 9 Other Functions. (4) Depends on reset types and the configuration lock setting. For details, refer to SECTION 9 Other Functions. 212 Section 10-1 NE1A-series Controller Operating Modes 10-1-4 Operating Mode Setting at Startup The user can select the NE1A-series Controller’s operating mode from the following two modes at startup, after the normal completion of configuration. Operating mode on startup Normal Mode Description The NE1A-series Controller starts in IDLE Mode after configuration has been completed. To switch to RUN Mode, use the Network Configurator to change the mode at every startup. When this mode is selected and the following operations are performed, the NE1A-series Controller starts up in RUN Mode thereafter. • Configuration lock • Power supply interruptions after switching to RUN Mode. Automatic Execution Mode IMPORTANT When the power supply is interrupted in IDLE Mode, the NE1A-series Controller will not start in RUN Mode at the next startup even though Automatic Execution Mode is set and the configuration is locked. Make sure to turn OFF the power supply in RUN Mode. 10-1-5 Operating Mode Changes NE1A-series Controller operating modes can be changed using the Network Configurator. A password may be required to change the operating mode. • IDLE Mode → RUN Mode • RUN Mode → IDLE Mode Configuring Configuring CONFIGURING Mode change IDLE Download completed normally. RUN Mode change 10-1-6 Program Execution Delay Unit Ver. 2.0 or Later When the NE1A-series Controller starts safety I/O communications in RUN Mode, it must establish safety connections in order with each safety slave that has been registered. Safety I/O communications are thus delay by a few seconds or tens of seconds over program execution. During this time, safety I/O data will be OFF, possibly causing logic errors if safety I/O data is used for dual-channel complementary inputs to function blocks or the EDM feedback input to an EDM function block. With unit version 2.0 or later (including Controllers that support EtherNet/IP), program execution can be delayed to help prevent logic errors. If the program execution delay, program execution will be delayed until safety I/O communications have started. 213 NE1A-series Controller Operating Modes Section 10-1 The program execution delay function is enabled on the Extend Mode Tab Page of the Edit Device Parameter Dialog Box for an NE1A-SCPU01-V1 Controller with unit version 2.0 (including Controllers that support EtherNet/IP) or an NE1A-SCPU02 Controller with unit version 2.0 (including Controllers that support EtherNet/IP). Note (1) Function block logic errors may still occur even if the program execution delay function is enabled. Test the system before starting actual operation. (2) The maximum program execution delay is 20 seconds. Program execution will start in 20 seconds even if all safety I/O communications have not started normally due to problems in the network, settings, or communications. (3) Program execution will start if there are not changes in connection status for 5 seconds even if safety I/O communications have not started normally. 214 Behavior for Power Supply Interruptions Section 10-2 10-2 Behavior for Power Supply Interruptions 10-2-1 Behavior in Voltage Drop Low Power Supply Voltage for the Internal Circuits If the power supply voltage for the internal circuit drops to 85% of the rated voltage or lower, the NE1A-series Controller will turn OFF the outputs. Low Power Supply Voltage for I/O Circuits If the power supply voltage for input drops to 85% of the rated voltage or lower when the power supply voltage for the internal circuit is normal, the NE1Aseries Controller will continue operation but will stop refreshing inputs. Similarly, if the power supply voltage for output drops to 85% of the rated voltage or lower, the Controller will continue operation but will stop refreshing outputs. The I/O power supply monitor function of the NE1A-series Controller can be used to monitor the I/O power supply voltage to confirm if it is normal. 10-2-2 Automatic Recovery from Voltage Drops Power Supply Voltage for the Internal Circuits If the power supply is recovered (to 85% of the rated voltage or more) because of a fluctuation in the power supply voltage, the following might occur: 1. Operation will automatically restart or 2. A critical error will occur, which will require cycling the power supply to restart operation. These operations occur because the NE1A-series Controller’s operation becomes unstable and it detects a self-diagnosis error. Operation (1) occurs if the power supply to the Controller is completely stopped because the power supply voltage is 85% of the rated voltage or lower, and operation (2) occurs if the power supply fluctuates around the lower operation limit of the internal power/voltage detection circuit. Power Supply Voltage for the I/O Circuits I/O refreshing is automatically restarted when the power supply is recovered (to 85% of the rated voltage or more). The I/O power monitor error is also automatically canceled. 215 SECTION 11 Remote I/O Communications Performance and Local I/O Response Time 11-1 Outline. . . . . . . . . . . . . . . . . . . . . . . . . . . . . . . . . . . . . . . . . . . . . . . . . . . . . . . 218 11-2 Operational Flow and Cycle Time . . . . . . . . . . . . . . . . . . . . . . . . . . . . . . . . . 219 11-3 Startup Time . . . . . . . . . . . . . . . . . . . . . . . . . . . . . . . . . . . . . . . . . . . . . . . . . . 220 11-4 I/O Refresh Cycle Time and Network Reaction Time . . . . . . . . . . . . . . . . . . 222 11-5 Reaction Time . . . . . . . . . . . . . . . . . . . . . . . . . . . . . . . . . . . . . . . . . . . . . . . . . 225 11-5-1 Reaction Time Concepts . . . . . . . . . . . . . . . . . . . . . . . . . . . . . . . . . . 225 11-5-2 Calculating the Reaction Time . . . . . . . . . . . . . . . . . . . . . . . . . . . . . 225 11-5-3 Verifying the Reaction Time. . . . . . . . . . . . . . . . . . . . . . . . . . . . . . . 230 217 Section 11-1 Outline 11-1 Outline The NE1A-series Controller’s remote I/O communications performance and local I/O response time are described in this section. The calculations shown here are assumed to satisfy the following conditions: • The configuration is correct. • The power has been turned ON, the SNC self-diagnostic function has been completed, and the NE1A-series Controller is in RUN Mode. • The necessary Safety Slaves have been added to the system. 218 Section 11-2 Operational Flow and Cycle Time 11-2 Operational Flow and Cycle Time The NE1A-series Controller’s operations are outlined here. The NE1A-series Controller initializes itself internally when the power is turned ON. Unless there are errors, the Controller then cyclically executes system processing, DeviceNet, EtherNet/IP, and USB communications processing, I/O refreshing, and the user program. When DeviceNet communications disable (Standalone) is set, DeviceNet processing is omitted from the cyclic execution. In Standalone Controller mode, the Controller cyclically executes all but the DeviceNet processes. The cycle time depends on the scale of the user program and the configuration of DeviceNet remote I/O communications. Normal mode flow Standalone Controller mode flow Power ON Power ON Initialize Initialize System processing System processing DeviceNet/EtherNet/IP/ USB communications processing USB communications processing Cycle time Cycle time I/O refresh User application calculation I/O refresh User application calculation The cycle time is expressed by the following formula. NE1A-series Controller cycle time = System processing time + DeviceNet, EtherNet/IP, or USB communications processing time + I/O refresh time + User application execution time The cycle time of the NE1A-series Controller is set in 1-ms increments according to the configuration. The cycle time can be checked from the Network Configurator, on the Mode/Cycle Time Tab Page of the Edit Device Parameters Window. IMPORTANT For a Controller that supports EtherNet/IP, the maximum cycle time is 60 ms. If a cycle time of more than 60 ms is set, correct the connection settings and user applications and change the system configuration so that the cycle time will be less than 60 ms. 219 Section 11-3 Startup Time 11-3 Startup Time Initialization Time The NE1A-series Controller performs initialization when the power is turned ON. During initialization, the Controller performs self-diagnosis of the hardware that is required to execute safety functions. The following table shows the times required to complete initialization from when the power is turned ON. Model NE1A-SCPU01 NE1A-SCPU01-V1 Unit version Initialization time None 1.0 2.0 1.0 2.0 1.0 1.0 NE1A-SCPU02 NE1A-SCPU01-EIP NE1A-SCPU02-EIP 6s 7s 9s 9s 9s 9s 9s Time Until Start of Program Execution Depending on Unit Version Unit Version 1.0 MS indicator: Lit green Start of program execution NE1A Initialization: SCPU01-V1: 7 s SCPU02: 9 s DST1 Initialization: 10 s Wait for Online processing: DST1 online 2s processing to start Connection established Online processing: 3 or 4 s Connection established The NE1A-series Controller establishes a connection with each DST1-series Safety Slave, and starts I/O communications as soon as it connects to each Slave. NE1A General Status Bit 6 (Operating Mode Flag) Unit Version 2.0 MS indicator: Lit green Program execution start (without program execution start delay) Program execution start delay time: 20 s max. Program execution start (with program execution start delay) NE1A Initialization: 9s Online wait: 5 s Online processing: 2s Connection established DST1 Initialization: 10 s NE1A online processing start delay Online processing: 3 or 4 s Connection established NE1A General Status Bit 6 (Operating Mode Flag) Note (1) With NE1A-series Controllers with unit version 2.0 (including Controllers that support EtherNet/IP), an online delay time of 5 s is added after the initialization has been completed to allow time for other devices to start. (2) After the initialization has been completed, the NE1A-series Controller checks for duplicated addresses on the DeviceNet network and then joins the network (i.e., goes online). After the Controller connects to the network, the NS indicator lights or flashes green. This processing takes a maximum of 2 s. 220 Startup Time Section 11-3 (3) There is no online delay time or online processing time when DeviceNet communications are disabled (i.e., in Standalone Mode). (4) When the NE1A-series Controller is set for automatic execution when the power is turned ON, program execution is slower for unit version 2.0 (including Controllers that support EtherNet/IP) than for unit version 1.0. With a program in which a timer is started simultaneous with the start of NE1A-series Controller program execution, the time from when the power is turned ON until the timer times out is extended. Therefore, when changing from unit version 1.0 to 2.0, adjust the set value of the timer. 221 I/O Refresh Cycle Time and Network Reaction Time Section 11-4 11-4 I/O Refresh Cycle Time and Network Reaction Time The I/O refresh cycle time and network reaction time parameters are required to evaluate local I/O response and I/O communications performance for the NE1A-series Controller. I/O Refresh Cycle Time The I/O reaction time of the NE1A-series Controller is used when calculating the local I/O reaction time. The I/O refresh cycle time is set to the optimum value for the configuration from among the following settings: 3.5, 4.0, 4.5, 5.0, 5.5, 6.0, or 6.5 ms. The I/O refresh cycle time can be checked from the Network Configurator. The I/O refresh cycle time of the NE1A-series Controller can be checked on the Mode/Cycle Time Tab Page of the Edit Device Parameters Window. 222 I/O Refresh Cycle Time and Network Reaction Time Section 11-4 The network reaction time The network reaction time of the NE1A-series Controller is used when calculating the remote I/O reaction time. The network reaction time can be checked on the Safety Connections Tab Page of the Edit Device Parameters Window. Note The minimum set for the EPI is either the cycle time of the Safety Network Controller or the cycle time of the Safety Slaves (always 6 ms), whichever is greater. The minimum setting for the EPI will therefore be affected if the cycle time of the Safety Network Controller is longer then 6 ms. 223 I/O Refresh Cycle Time and Network Reaction Time 224 Section 11-4 Section 11-5 Reaction Time 11-5 Reaction Time 11-5-1 Reaction Time Concepts The reaction time is the time required to stop machine operation in a worstcase scenario considering the occurrence of faults and failures in the safety chain. The reaction time is used to calculate the safety distance. The reaction time is calculated for each safety chain. Some typical safety chains are shown below. 1. Local Input - Local Output Safety sensor/switch NE1A Series Actuator 2. Remote Input - Local Output Safety sensor/switch Safety I/O Terminal Network NE1A Series Actuator 3. Local Input/Remote Output Safety sensor/switch NE1A Series Safety I/O Terminal Network Actuator 4. Remote Input/Remote Output Safety sensor/switch Note Safety I/O Terminal Network NE1A Series Network Safety I/O Terminal Actuator There is no I/O response time required in the reaction time when operation is normal. With the reaction time, the output shutoff time will be maintained even if there are faults or failures in devices or the network. 11-5-2 Calculating the Reaction Time Elements of the Reaction Time The elements of the reaction time are given below for each safety chain. 1. Local Input – Local Output Safety sensor/ switch NE1A Series Actuator Sensor/switch reaction time Local input/ local output reaction times (A) Actuator reaction time 2. Remote Input – Local Output Safety sensor/ switch Sensor/switch reaction time Safety I/O Terminal Input reaction time (E) Network reaction time (G) NE1A Series Remote input/ local output reaction times (B) Actuator Actuator reaction time 225 Section 11-5 Reaction Time 3. Local Input - Remote Output Safety sensor/ switch Sensor/switch reaction time NE1A Series Local input/ remote output reaction time (C) Safety I/O Terminal Actuator Output reaction time (F) Network reaction time (G) Actuator reaction time 4. Remote Input - Remote Output Safety sensor/ switch Sensor/switch reaction time Safety I/O Terminal Input reaction time (E) NE1A Series Remote input/remote output reaction times (D) Network reaction time (G) Safety I/O Terminal Network reaction time (G) Output reaction time (F) Actuator Actuator reaction time Reaction Time Calculation A B C D E F G Item Local input/local output reaction time (ms) at NE1ASCPU01 Remote input/local output reaction time (ms) at NE1A-SCPU01 Local input/remote output reaction time (ms) at NE1A-SCPU01 Remote input/remote output reaction time (ms) at NE1A-SCPU01 Input reaction time (ms) at Safety I/O Terminal Output reaction time (ms) at Safety I/O Terminal Network reaction time (ms) IMPORTANT Formula = ON/OFF delay time + I/O refresh cycle + NE1A-SCPU01 cycle time × 2 + 2.5 = NE1A-SCPU01 cycle time + 2.5 = ON/OFF delay time + I/O refresh cycle + NE1A-SCPU01 cycle time × 2 = NE1A-SCPU01 cycle time = ON/OFF delay time + Input reaction time = Output reaction time = Result of Network Configurator calculation If an output from a function block is fed back to the input side of the same function block, the cycle time of the NE1A-series Controller must be added to the reaction time for the safety chain. Reaction Time Calculation Examples ■ Example 1: Local Input – Local Output The following example shows calculating the reaction time from a local input to a local output for the NE1A-SCPU01 configuration shown in the illustration. NE1A-SCPU01 configuration: • Program: 1 AND (2 inputs) • Standard Slaves: 2 connections • Safety Masters: None • Safety Slaves: None Cycle time = 4 ms I/O refresh cycle = 4 ms Switch NE1A-SCPU01 Actuator DeviceNet 226 Section 11-5 Reaction Time The cycle times read by the Network Configurator will be as follows: Controller cycle time = 4 ms I/O refresh cycle time = 4 ms The cycle time of the NE1A-SCPU02 is 6 ms and the I/O refresh time is 6 ms. The reaction time is obtained using the following equation: Reaction time (ms) = Switch reaction time + NE1A-SCPU01 local input/local output reaction time + Actuator reaction time = Switch reaction time + ON/OFF delay time (NE1A-SCPU01) + 4 + 4 × 2 + 2.5 + Actuator reaction time = 14.5 + ON/OFF delay time (NE1A-series Controller) + Switch reaction time + Actuator reaction time Note Example 1 above shows the configuration for minimizing reaction time in the NE1A-series Controllers. The guideline for the minimum reaction time is 15 ms for the NE1A-SCPU01(-V1), 21 ms for the NE1A-SCPU02, 20 ms for the NE1A-SCPU01-EIP, and 28 ms for the NE1A-SCPU02-EIP. The Controller cannot be used when a reaction time lower than these values is required from the Controller by the user system. ■ Example 2: Remote Input – Local Output The following example shows calculating the reaction time from a remote input to a local output for the NE1A-SCPU01 configuration shown in the illustration. NE1A-SCPU01 configuration: • Program: 1 Safety Gate Monitor, 1 Reset, 1 E-STOP, 1 AND, 1 External Device Monitor • Standard Slaves: 2 connections • Safety Master: 1 connection (EPI = 6 ms) • Safety Slaves: None Cycle time = 6 ms I/O refresh cycle = 6 ms NE1A-SCPU01 Actuator DeviceNet DST1-ID12SL-1 Safety Connection Network reaction time = 24 ms Switch The cycle times read by the Network Configurator will be as follows: NE1A-SCPU01 cycle time = 6 ms I/O refresh cycle time = 6 ms 227 Section 11-5 Reaction Time The network reaction time will be 24 ms based on a safety connection EPI of 6 ms. The reaction time is obtained using the following equation: Reaction time (ms) = Switch reaction time + Safety I/O Terminal input reaction time + Network reaction time + NE1A-SCPU01 remote input/local output reaction time + Actuator reaction time = Switch reaction time + ON/OFF delay time (DST1-ID12SL-1) + 16.2 (= Input reaction time of DST1-ID12SL-1) + 24 + 6 + 2.5 + Actuator reaction time = 48.7 + ON/OFF delay time (DST1-ID12SL-1) + Switch reaction time + Actuator reaction time ■ Example 3: Local input - Remote output The following example shows calculating the reaction time from a local input to a remote output, for the NE1A-SCPU01 node 1 and node 2 configuration shown in the illustration. NE1A-SCPU01 node 1 (#1) configuration: • Program: 1 Safety Gate Monitor, 1 Reset, 1 E-STOP, 1 AND,1 External Device Monitor • Standard Slaves: 2 connections • Safety Masters: None • Safety Slave: 1 connection (EPI = 7 ms) NE1A-SCPU01 node 2 (#2) configuration: • Program: 1 Safety Gate Monitor, 1 Reset, 1 E-STOP, 1 AND, 1 External Device Monitor • Standard Slaves: 2 connections • Safety Masters: 3 connections (EPI = 7 ms) • Safety Slaves: None Cycle time = 6 ms I/O refresh cycle = 6 ms Switch Cycle time = 7 ms I/O refresh cycle = 3.5 ms NE1A-SCPU01#1 NE1A-SCPU01#2 Actuator DeviceNet Safety Connection Network reaction time = 28 ms The node 1 (#1) cycle times read by the Network Configurator will be as follows: NE1A-SCPU01 cycle time = 6 ms I/O refresh cycle time = 6 ms 228 Section 11-5 Reaction Time The node 2 (#2) cycle times will be as follows: NE1A-SCPU01 cycle time = 7 ms I/O refresh cycle time = 3.5 ms The network reaction time will be 28 ms based on a safety connection EPI of 7 ms. The reaction time is obtained using the following equation: Reaction time (ms) = Switch reaction time + NE1A-SCPU01 #1 local input/remote output reaction time + Network reaction time + NE1A-SCPU01 #2 remote input/local output reaction time + Actuator reaction time = Switch reaction time + ON/OFF delay time (NE1A-SCPU01) + 6 + 6 × 2 + 28 + 7 + 2.5 + Actuator reaction time = 55.5 + ON/OFF delay time (NE1A-SCPU01) + Switch reaction time + Actuator reaction time ■ Example 4: Remote Input - Remote Output The following example shows calculating the reaction time from a remote input to a remote output, for the NE1A-SCPU01 configuration shown in the illustration. NE1A-SCPU01 node configuration: • Program: 1 Reset, 1 E-STOP, 1 External Device Monitor • Standard Slaves: 2 connections • Safety Masters: 3 connections (EPI = 6 ms) • Safety Slaves: None Cycle time = 6 ms I/O refresh cycle = 6 ms Safety Connection Network reaction time #1 = 24 ms NE1A-SCPU01 Safety Connection Network reaction time #2 = 24 ms DeviceNet DST1-ID12SL-1 Switch DST1-MD16SL-1 Actuator The cycle times read by the Network Configurator will be as follows: NE1A-SCPU01 cycle time = 6 ms I/O refresh cycle time = 6 ms 229 Section 11-5 Reaction Time Network reaction times #1 and #2 will be 24 ms each, based on a safety connection EPI of 6 ms. The reaction times are obtained using the following equation: Reaction time (ms) = Switch reaction time + Safety I/O Terminal input reaction time + Network reaction time #1 + NE1A-SCPU01 remote input/remote output reaction time + Network reaction time #2 + Safety I/O Terminal output reaction time + Actuator reaction time #2 = Switch reaction time + ON/OFF delay time (DST1-ID12SL-1) + 16.2 (= Input reaction time of DST1-ID12SL-1) + 24 +6 + 24 + 6.2 (= Output reaction time of DST1-MD16SL-1) + Actuator reaction time = 76.4 + ON/OFF delay time (DST1-ID12SL-1) + Switch reaction time + Actuator reaction time 11-5-3 Verifying the Reaction Time Always confirm that the reaction time calculated for each safety chain satisfies the required specifications. If the reaction time exceeds the required specifications, consider the following items and correct the design of the network for that reaction time requirements are satisfied. • The network reaction time can be reduced by shortening the EPI. This, however, will also reduce the network band that can be used for other connections. • The cycle time of the NE1A-series Controller is automatically calculated based on the size of the program, the number of connections, and other factors. The cycle time can be reduced by using separate NE1A-series Controllers for safety chains that require high-speed reaction times. !WARNING Serious injury may possibly occur due to loss of required safety functions. Check to make sure that the reaction times calculated for all safety chains meet the required specifications. 230 SECTION 12 Troubleshooting 12-1 Error Categories . . . . . . . . . . . . . . . . . . . . . . . . . . . . . . . . . . . . . . . . . . . . . . . 232 12-2 Confirmation of Error State . . . . . . . . . . . . . . . . . . . . . . . . . . . . . . . . . . . . . . 233 12-3 Indicator/Display Status and Corrective Actions for Errors . . . . . . . . . . . . . . 234 12-4 Error History . . . . . . . . . . . . . . . . . . . . . . . . . . . . . . . . . . . . . . . . . . . . . . . . . . 241 12-4-1 Error History Table . . . . . . . . . . . . . . . . . . . . . . . . . . . . . . . . . . . . . . 241 12-4-2 Error Information Details . . . . . . . . . . . . . . . . . . . . . . . . . . . . . . . . . 244 12-4-3 EtherNet/IP-related Error Information Details . . . . . . . . . . . . . . . . . 246 12-5 Errors When Downloading . . . . . . . . . . . . . . . . . . . . . . . . . . . . . . . . . . . . . . . 248 12-5-1 Outline . . . . . . . . . . . . . . . . . . . . . . . . . . . . . . . . . . . . . . . . . . . . . . . 248 12-5-2 Error Messages and Countermeasures . . . . . . . . . . . . . . . . . . . . . . . 248 12-6 Errors When Resetting . . . . . . . . . . . . . . . . . . . . . . . . . . . . . . . . . . . . . . . . . . 251 12-6-1 Outline . . . . . . . . . . . . . . . . . . . . . . . . . . . . . . . . . . . . . . . . . . . . . . . 251 12-6-2 Error Messages and Countermeasures . . . . . . . . . . . . . . . . . . . . . . . 251 12-7 Errors When Changing Modes . . . . . . . . . . . . . . . . . . . . . . . . . . . . . . . . . . . . 252 12-7-1 Outline . . . . . . . . . . . . . . . . . . . . . . . . . . . . . . . . . . . . . . . . . . . . . . . 252 12-7-2 Error Messages and Countermeasures . . . . . . . . . . . . . . . . . . . . . . . 252 12-8 Connection Status Tables . . . . . . . . . . . . . . . . . . . . . . . . . . . . . . . . . . . . . . . . 253 12-8-1 Outline . . . . . . . . . . . . . . . . . . . . . . . . . . . . . . . . . . . . . . . . . . . . . . . 253 12-8-2 Connection Status for DST1 Series . . . . . . . . . . . . . . . . . . . . . . . . . 254 12-8-3 Connection Status for the NE1A-series Controller (Safety Slave Function) . . . . . . . . . . . . . . . . . . . . . . . . . . . . . . . . . . 256 231 Section 12-1 Error Categories 12-1 Error Categories NE1A-series Controller errors can be categorized into the following three categories: Nonfatal Errors The part where an error has occurred stops at each local I/O or safety I/O connection terminal and places it in the safety state. The Controller, however, continues in RUN Mode. Abort Errors The NE1A-series Controller completely stops safety functions and places them in the safety state when this error occurs. To enable checking the error state, explicit message communications or partial Network Configurator functions are supported. Critical Error The NE1A-series Controller completely stops its functions when this error occurs. 232 Note Refer to 12-5 Errors When Downloading for setting errors that occur during configuration. Note Refer to 12-6 Errors When Resetting for errors that occur when resetting the NE1A-series Controller. Note Refer to 12-7 Errors When Changing Modes for errors that occur when changing the operating mode of the NE1A-series Controller. Section 12-2 Confirmation of Error State 12-2 Confirmation of Error State Error details can be checked from the following two pieces of information: • LED indicator status on the front of the NE1A-series Controller • Reading the NE1A-series Controller’s error history using the Network Configurator 233 Section 12-3 Indicator/Display Status and Corrective Actions for Errors 12-3 Indicator/Display Status and Corrective Actions for Errors Critical Errors Indicators/display MS OFF Lit red Lit red NS Sevensegment display OFF None Left: H Right: --- P6 OFF OFF OFF Note 234 Error history Name Saved in nonvolatile memory Not supported Cause Corrective actions • Noise level higher than expected. • Critical hardware fault Cycle the power supply and check operation. If the problem recurs, the NE1Aseries Controller may be faulty. • Check whether there is any influence from noise, and take whatever corrective actions are required. System Fail- As much ure saved as possible. • Before operation, the safety output terminal or test output terminal was short-circuited to 24 VDC. • Noise impact more than expected. • Critical hardware fault • Check the external wiring for power supply short-circuiting at the output terminal. • Check whether there is any influence from noise, and take whatever corrective actions are required. • Turn the power OFF and back ON and check operation. If the problem recurs, the NE1Aseries Controller may be faulty. System Fail- (See note.) ure A safety output terminal or • Check the external wiring for test output terminal power supply short-circuiting at shorted to 24-VDC before the output terminal. operation started. • Turn the power OFF and back ON and check operation. If the problem recurs, the NE1Aseries Controller may be faulty. Not applicable to Pre-Ver. 1.0 Controllers. Applicable to unit version 1.0 or later (including Controllers that support EtherNet/IP). Section 12-3 Indicator/Display Status and Corrective Actions for Errors Abort Errors Indicators/display MS NS Flashing red Flashing green or Error history Sevensegment display E8Ù Node address of error Name Saved in nonvolatile memory Switch Yes Setting Mismatch Cause Corrective actions The node address and baud rate were changed after the normal completion of configuration download. • Configure the switches properly. • Reset the configuration data. Lit green Nonfatal Errors Indicators/display NS Error history Corrective actions I/O --- Duplicate MAC ID Lit red F0Ù Node address of error See note 1. Node address duplication (Same node address set for more than one node.) Check the node addresses of other nodes. Switch ON the power supply again after reconfiguring without duplication. --- Bus OFF Lit red F1Ù Node address of error See note 1. Bus Off (Communications cut off because of frequent data errors.) Check the following points and take corrective actions for each, then turn ON the power supply. • Make sure the baud rate is the same for all nodes. • Make sure the cable lengths (main/branch) are not too long. • Make sure the cable is not disconnected or loose. • Make sure terminating resistance is at both ends of the main line and only at both ends. • Make sure that there is not a lot of noise. L9Ù Master node address --- Standard I/O Connection Timeout See note 1. Standard I/O connection timeout --- Safety I/O Connection Timeout See note 1. Flashing red dAÙ Destination slave node address Safety I/O connection timeout --- Nonexistent Slave Device See note 1. No slave Flashing red d5Ù Destination slave node address Check the following points: • Make sure the baud rate is the same for all nodes. • Make sure the cable lengths (main/branch) are not too long. • Make sure the cable is not disconnected or loose. • Make sure terminating resistance is at both ends of the main line and only at both ends. • Make sure that there is not a lot of noise. --- Safety I/O Connection Establishment Failure See note 1. Flashing red d6Ù Destination slave node address Safety I/O conCheck the slave device. nection establish- • Make sure it its configured. ment error • Make sure it is in a normal operational state. --- Invalid Slave Device See note 1. Flashing red d6Ù Destination slave node address Invalid slave device (verification error) Verify the slave device (select Device - Parameters - Compare) and connect a suitable slave device. E0Ù Node address of error --- Network PS Voltage Low See note 1. Network power supply voltage low error Check the following points: • Make sure the power supply voltage is set within the specified range. • Make sure a cable or wire is not disconnected. Flashing red OFF Name Cause Sevensegment display Saved in nonvolatile memory 235 Section 12-3 Indicator/Display Status and Corrective Actions for Errors Indicators/display Error history NS Sevensegment display I/O Name --- E2Ù Node address of error --- Transmission Timeout --- Flashing red A0Ù Node address of error Relevant Safety I/O Yes communication (See note stopped because of 2.) a Safety I/O communication error --- Flashing red A1Ù Node address of error All Safety I/O Yes communication (See note stopped because of 2.) a Safety I/O communication error P1Ù Node address of error Target terminal --- Cause See note 1. Transmission timeout External Test Signal Failure at Safety Input See note 1. External wiring error in safety input. Discrepancy Error at Safety Input See note 1. Discrepancy error between 2 inputs at safety input. Internal Input Failure at Safety Input See note 1. Internal circuit failure at safety input. Paired terminal (Dual Setting) flashing red P1Ù Node address of error Target terminal (Dual Setting) --- P1Ù Node address of error Target terminal lit red lit red Paired terminal (Dual Setting) flashing red 236 Check the following points: • Make sure the baud rate is the same for all nodes. • Make sure the cable lengths (main/branch) are not too long. • Make sure the cable is not disconnected or loose. • Make sure terminating resistance is at both ends of the main line and only at both ends. • Make sure that there is not a lot of noise. A safety I/O Check the following points: connection timed • Make sure the baud rate is the out, interrupting same for all nodes. the relevant I/O • Make sure the cable lengths connection. (main/branch) are not too long. • Make sure the cable is not disA safety I/O connected or loose. connection timed • Make sure terminating resisout, interrupting tance is at both ends of the the relevant I/O main line and only at both connection. ends. • Make sure that there is not a lot of noise. lit red --- Corrective actions Saved in nonvolatile memory Check the following points: • Make sure the input signal wire is not contacting the power source (positive side). • Make sure the input signal wire does not have an earth fault. • Make sure the input signal wire is not disconnected. • Make sure there is not a short circuit between input signal wires. • Make sure there is no failure in the connected devices. • Make sure the Discrepancy Time setting values are valid. To recover from the above error state, the following conditions are required. Latch input error time must have passed and the root cause must have been removed. The target safety input terminal inputs must turn OFF. To change the discrepancy time, reconfiguration is required. Section 12-3 Indicator/Display Status and Corrective Actions for Errors Indicators/display Error history Cause Corrective actions NS Sevensegment display I/O Name Saved in nonvolatile memory --- P2Ù Node address of error No LED indicator Overload Detected at Test Output See note 1. Overloading was Check whether the output detected at test signal wire has an earth fault or output (when a is over loaded. test output terminal was set as a standard signal output). --- P2Ù Node address of error No LED indicator Stuck-at-high Detected at Test Output See note 1. Stuck-on-high at test output (when a test output terminal was set as a standard signal output). For the wires, check if the power supply source (positive side) is contacting the output signal wire. After the latch input error time has passed, turn OFF the input after the cause of the error has been removed. The error will be reset. If there is no fault with the wires, replace the unit. -- P2Ù Node address of error No LED indicator Under Current Detected Using Muting Lamp See note 1. Disconnection of indicator light was detected at test output (when Terminal T3 is set as the muting lamp signal output) Check whether the output signal wire is disconnected. If there is no error, check the indicator light. 237 Section 12-3 Indicator/Display Status and Corrective Actions for Errors Indicators/display Error history NS Sevensegment display I/O --- P3Ù Node address of error Target terminal Name Cause Corrective actions Check the following points: • Make sure there is no overcurrent for the output. • Make sure the output signal wire does not have an earth fault. • Make sure the output signal wire is not contacting the power source (positive side). • Make sure there is not a short circuit between output signal wires. Saved in nonvolatile memory Over Current Detected at Safety Output See note 1. Overcurrent was detected at safety output. Short Circuit Detected at Safety Output See note 1. Short circuit was detected at safety output. Stuck-at-high Detected at Safety Output See note 1. Stuck-on-high at safety output Cross Connection Detected at Safety Output See note 1. Short circuit was detected between output signal wires at safety output Dual Channel Violation at Safety Output See note 1. Output data error at safety output lit red Paired terminal (Dual Setting) flashing red --- P3Ù Node address of error Target terminal lit red Paired terminal (Dual Setting) To recover from these errors, the following conditions are required: Latch input error time must have passed, and the root cause must have been removed. The output signal from the user application for the target safety output must turn OFF. flashing red --- P3Ù Node address of error Target terminal lit red Paired terminal (Dual Setting) flashing red --- P3Ù Node address of error Target terminal lit red Paired terminal (Dual Setting) flashing red --- P3Ù Node address of error Target terminal (Dual Setting) lit red 238 Check whether program output data (for two outputs) in the Dual Channel Mode are configured as equivalent channels. Section 12-3 Indicator/Display Status and Corrective Actions for Errors Indicators/display Error history NS Sevensegment display --- P4Ù Node address of error All OFF P5Ù Node address of error All OFF --- I/O Note Name Cause Corrective actions Saved in nonvolatile memory Input PS Voltage Low See note 1. I/O power Check the following points: (input) is not con- • Make sure the power supply nected voltage is set within the specialthough a safety fied range. input terminal or • Make sure a cable or wire is test output terminot disconnected. nal is used. Output PS Voltage Low See note 1. I/O power (output) is not connected although a safety output terminal is used. (1) Not saved in Pre-Ver. 1.0 Controllers, but saved in Controllers with unit version 1.0 or later (including Controllers that support EtherNet/IP). (2) These functions are not supported by Pre-Ver. 1.0 Controllers. The error information is saved in Controllers with unit version 1.0 or later (including Controllers that support EtherNet/IP). Errors in Controllers that Support EtherNet/IP Fatal Errors Indicators/display MS NS Sevensegment display UF Error history Name System Fail- Yes ure OFF Cause Corrective actions Saved in nonvolatile memory Lit red EtherNet/IP adaptor hard- Turn the power OFF and back ware error ON, and check operation. If the problem occurs again, it may be necessary to replace the Controller. Nonfatal Errors Indicators/display MS NS Sevensegment display Cause Corrective actions Saved in nonvolatile memory F0↔n4 --- IP Address Duplication Error E3↔n4 --- Server Con- Yes nection Error BOOTP server connection Check the following points. error • Make sure the cable is con- F2↔n4 --- Ethernet Basic Setting Error Yes Basic setting logic processing error E9↔n4 Memory Access Error Yes EtherNet/IP memory error Cycle the power supply. If the problem occurs again, replace the Controller. Communications Controller Error Yes EtherNet/IP communications controller error Lit red OFF OFF OFF Lit red F4↔n4 OFF Error history Name Lit red Yes IP address duplication error The same IP address is set for another device on the network. Correct the settings so that there is no duplication, and then turn the power ON again. nected correctly. • Make sure the BOOTP server is operating normally. Correct the configuration. If the problem occurs again, replace the Controller. Cycle the power supply. If the problem occurs again, replace the Controller. 239 Section 12-3 Indicator/Display Status and Corrective Actions for Errors Indicators/display MS NS Sevensegment display L9↔n4 --- Error history Name Cause Tag Data Link Error Yes Link OFF Error Yes EtherNet/IP standard target communications error Flashing red E1↔n4 --OFF 240 Corrective actions Saved in nonvolatile memory Link OFF error Check the following points. • Make sure the same communications settings are used for each node. • Make sure cables are not disconnected or bent. • Make sure power is supplied to the Originator. Check the following points. • Make sure the same communications settings are used for each node. • Make sure cables are not disconnected or bent. • Make sure power is supplied to the hub. Section 12-4 Error History 12-4 Error History The error history records errors that the NE1A-series Controller detects in the total operating time of the Controller. The error history can be read from the Network Configurator. 12-4-1 Error History Table Error History Table When an error is detected in a Pre-Ver. 1.0 NE1A-series Controller, the error is recorded in the error history table in the RAM of the Controller. The error history contains one record per error and can hold up to 20 records. If the error history table already contains 20 records, the oldest record is deleted and the new error data is stored. When an error is detected in a NE1A-series Controller with unit version 1.0 or later (including Controllers that support EtherNet/IP), the error is recorded in the error history table in the RAM of the Controller. The error history contains one record per error and can hold up to 100 records. If the error history table already contains 100 records, the oldest record is deleted and the new error data is stored. The following information is stored in the error history table: • Status information when an error occurs • The time when an error occurs (total operating time of the NE1A-series Controller) • The node address where the error occurred or the error response value (when an explicit message is sent) EtherNet/IP Error History Table In addition to the error history table described above, the Controller has an EtherNet/IP error history table that holds up to 64 error records. If an error is recorded when the table already holds 64 error records, the oldest record is deleted and the newest record is stored. IMPORTANT Check EtherNet/IP errors in the EtherNet/IP Error History Tab Page. Error History Saving Area The description of an error is recorded as an error history in the NE1A-series Controller’s RAM, and if the error is critical, it is also saved in the nonvolatile memory. The error history recorded in nonvolatile memory is retained even when the power supply of the Controller is not supplied or restarted. The error history in the nonvolatile memory is copied to the RAM at the start of the Controller’s power cycle. The error history in RAM is read when reading the error history from the Network Configurator. When clearing the error history, however, the error history in both the RAM and nonvolatile memory are cleared. Reading and Clearing the Error History Table The error history can be displayed in realtime using the Error History Display function of the Network Configurator. The error history data can also be saved on the computer. Note (1) The total operating time of the NE1A-series Controller is recorded as the accumulated time in 6-minutes increments while the power supply for the internal circuit is ON. The total operating time is cleared using a Control- 241 Section 12-4 Error History ler Reset Command addressed to the NE1A-series Controller to clear all or only specified variables to their default settings. (2) When the error history is read from the Network Configurator, the node address where the error occurred or the error response value is displayed as manufacturer-specific ALARM exception detail [7] 0x**. (3) When the NE1A-series Controller’s error history is read from the Network Configurator, both the error status information and the node address where the error occurred or the error response value are displayed for each error history record. The NE1A-series Controller’s error histories are read by the Network Configurator as shown below. The time when an error occurs (total operating time) 1 record in the error history Status information when an error occurs Address of the node where the error occurred or the error response With Controllers that support EtherNet/IP, an EtherNet/IP Error History Tab can be selected in addition to the Error History Tab. This information appears as follows when read from the Network Configurator. 242 Section 12-4 Error History Time error occurred (total operation time) Error information 243 Section 12-4 Error History 12-4-2 Error Information Details Message Corrective Actions NE1A-series Controller System Failures System Failure System failure Replace the unit if the system failure still occurs after turning ON the power supply again. Invalid Configuration Configuration invalid Configuration differs from the original configuration. Reconfigure after checking. Programming-related Errors Function Block Status Error Function Block Status Error An incompatible signal input was set as an input condition in the function block’s Set Parameters. Check the inputs entered in the function block or the program logic. DeviceNet Communications Errors Switch Setting Mismatch Switch setting mismatch Check that the node address is the same as the one in the last configuration. If not, change back to the same node address or reconfigure. If the error occurs again, replace the unit. Duplicate MAC ID Node address duplication Check the node address of other nodes. Correct the configuration so that each node address is used only once and then cycle the power supply. Network PS Voltage Low Network power supply voltage low error Check the following points: • Make sure the power supply voltage is set within the specification range. • Make sure a cable or wire is not disconnected. Bus Off Bus OFF (Communications cut off by frequent data errors.) Transmission Timeout Transmission timeout Standard I/O Connection Timeout Standard I/O connection timeout Relevant Safety I/O communication stopped because of a Safety I/O communication error The corresponding safety I/O connection was stopped due to a safety I/O connection timeout. Check the following points: • Make sure the baud rate is the same for all nodes. • Make sure the cable lengths (of main/branch lines) are not too long. • Make sure a cable or wire is not disconnected or loose. • Make sure terminating resistance is at both ends of the main line and only at both ends. • Make sure there is not a lot of noise. • Make sure power is being supplied to the Slave. All Safety I/O communication stopped because of a Safety I/O communication error All safety I/O connections were stopped due to a safety I/O connection timeout. Safety I/O Connection Timeout Safety I/O connection timeout Nonexistent Slave Device No slave Safety I/O Connection Establishment Failure Safety I/O connection establishment error Check the following points on the slave device: • Make sure it is configured. • Make sure it is operating normally. Invalid Slave Device Unauthorized slave device (verification error) Verify the slave device (select Device - Parameters - Compare) and connect a suitable slave device. EM Transmission Error (Duplicate MAC ID) Unable to transmit due to node address duplication. Refer to the section on Duplicate MAC ID. EM Transmission Error (Invalid Header) Unable to transmit due to invalid header. Check the following points: • Node address of the transmission message • Class ID of the transmission message • Instance ID of the transmission message EM Transmission Error (Device Offline) Unable to transmit Check the following points: because local device is not • Make sure the baud rate is the same for all nodes. on the network. • Make sure the cable lengths (of main/branch lines) are not too long. Unable to transmit due to • Make sure a cable or wire is not disconnected or loose. message ID error. • Make sure terminating resistance is at both ends of the main line Unable to transmit due to and only at both ends. response timeout. • Make sure there is not a lot of noise. • Make sure the power supply voltage for the network power source is set within the specification range. EM Transmission Error (Message ID Error) EM Transmission Error (Response Timeout) 244 Section 12-4 Error History Message Corrective Actions EM Transmission Error (Destination Device Absence) Unable to transmit because the destination device is not on the network. Check the following points: • Node address of the destination node • Node address of the transmission message • Make sure the power supply voltage for the destination node is set within the specification range. • Make sure the baud rate is the same for all nodes. • Make sure the cable lengths (of main/branch lines) are not too long. • Make sure a cable or wire is not disconnected or loose. • Make sure terminating resistance is at both ends of the main line and only at both ends. • Make sure there is not a lot of noise. EM Transmission Error (Destination Buffer Full) Unable to transmit because the destination buffer was busy. Check the message receive size at the destination node. EM Transmission Error (Command Length Error) Unable to transmit because the command is longer than the maximum length. Check the response message size from the destination. Or check that the response size expected in the request message is correct. EM Transmission Error (New Request Received) Message was deleted due to receiving the new request. No Received Error Response (UEM) Receiving an error Check that the specified service or data size in the user explicit response when the user message matches the destination object specifications. explicit message function is used. Error Related to Power Supply for I/O Input PS Voltage Low Output PS Voltage Low I/O power supply (input) is not connected. Check the following points: • Make sure the power supply voltage is set within the specification range. I/O power supply (output) is • Make sure that a cable or wire is not disconnected. not connected. Safety Input Terminal-related Failures External Test Signal Fail- Failure in the external wire ure at Safety Input at safety input Discrepancy Error at Safety Input Discrepancy error between two inputs at safety input Check the following points: • Make sure the input signal wire is not contacting the power source (positive side). • Make sure the input signal wire does not have an earth fault. • make sure the input signal wire is not disconnected. • Make sure there is not a short circuit between input signal wires. • Make sure a failure had not occurred in the connected device. • Make sure the set value of discrepancy time is valid. To recover from these failures, the following conditions are required: Latch input error time must have passed, and the root cause must have been removed. The target safety input terminal inputs must turn OFF. When changing the discrepancy time, reconfiguration is required. Internal Input Failure at Safety Input Internal circuit failure at safety input Replace the unit if the system failure still occurs after cycling the power supply. Test Output Terminal-related Failures Overload Detected at Test Output Overloading was detected at test output. Check whether the output signal wire has an earth fault or is overloaded. Stuck-at-high Detected at Test Output Stuck-at-high at test output Check whether the power source (positive side) is contacting the output signal wire. After the latch input error time has passed, turn OFF the input when the cause of the error has been removed, and the error will be reset. If there is no fault with the wires, replace the unit. Under Current Detected Using Muting Lamp Lower limit error of Check whether the output signal wire is disconnected. current was detected at test If there is no fault with the wires, check the indicators. output. 245 Section 12-4 Error History Message Corrective Actions Safety Output Terminal-related Failures Over Current Detected at Safety Output Overcurrent was detected at safety output. Short Circuit Detected at Short circuit was detected Safety Output at safety output. Check the following points: • Make sure there is no overcurrent for the output. • Make sure the output signal wire does not have an earth fault. • Make sure the output signal wire is not contacting the power source (positive side). • Make sure there is not a short circuit between output signal wires. Stuck-at-high Detected at Safety Output Stuck-at-high at safety output Cross Connection Detected at Safety Output Short circuit was detected between output signal wires at safety output. To recover from these failures, the following conditions are required: Latch output error time must have passed, and the root cause must have been removed. The output signal from the user application for the target safety output must turn OFF. Dual Channel Violation at Safety Output Output data error at safety output Check whether the data of the two outputs in the Dual Channel Mode are configured as equivalent channels. 12-4-3 EtherNet/IP-related Error Information Details Message Memory access error Error Error information details inform st 1 byte 2nd byte ation 0602 01: Read error Not set. 02: Write error Cycle the power supply. If the problem occurs again, replace the Controller. Ethernet communi- 020F cations controller error IP address dupli0211 cation 00 01 Cycle the power supply. If the problem occurs again, replace the Controller. 02 Rightmost 8 bits of IP address The same IP address is set for another device on the network. Check the IP addresses of the other devices, and set an address that does not duplicate any other. Device parameter error 021A 00 Not set. Correct the configuration. If the problem occurs again, replace the Controller. Server connection error 03C4 04: BOOTP Ethernet basic set- 03D0 ting error 246 Corrective Actions 01: Specified host cannot be found. 07: Send error 08: Receive error 0A: Acquired IP address error 01: Ethernet setting 01: Checksum error error 11: Inconsistent settings 12: Specified baud rate not supported. 02: TCP/IP basic 01: Checksum error setting error 11: Illegal IP address 12: Illegal subnet mask 13: Illegal default gateway address 14: Illegal primary name server 15: Illegal secondary name server 16: Illegal domain name 17: Illegal host name Check the following points. • Make sure the cable is connected correctly. • Make sure the BOOTP server is operating normally. Correct the settings. If the problem occurs again, replace the Controller. Section 12-4 Error History Message Tag data link error Link OFF error Error inform ation 03D5 00 03D3 00 Error information details st 1 byte 2 nd Corrective Actions byte Rightmost 8 bits of IP address Check the following points. 00 Check the following points. • Make sure the same communications settings are used for each node. • Make sure cables are not disconnected or bent. • Make sure power is supplied to the Originator. • Make sure the same communications settings are used for each node. • Make sure cables are not disconnected or bent. • Make sure power is supplied to the hub. 247 Section 12-5 Errors When Downloading 12-5 Errors When Downloading 12-5-1 Outline An NE1A-series Controller or other Safety Device may return an error when configuration data is downloaded to them. The cause of the error can be determined from the error information displayed on the Network Configurator. 12-5-2 Error Messages and Countermeasures Message displayed on the Network Configurator Countermeasure Cannot be executed in the current mode. A fatal error (Abort) (MS indicator flashes red) has occurred. Set the switches correctly or execute reset (restarting with factory default settings) to clear the configuration data. The device is locked. The configuration data is locked. (LOCK indicator is lit.) Release the lock. The TUNID is different. The device is waiting for a TUNID setting after being reset (NS indicator is flashing green/red) or the TUNID of the Network Configurator is different from the device when downloading. Use the following steps to check the setting. 1. Reset the device to default settings and then download the parameters again. The network number may, however, be different from other devices. If the Controller's 7segment display shows “d6” (a Safety I/O Connection Establishment Failure message appears on the Error History Tab Page in the Network Configurator Monitor Device Window when Device − Device Monitor is selected) after the operating mode has been changed, use steps (2) or (3) to correct the error. 2. Select Network – Upload in the Network Configurator. Unify the network numbers and reset all devices to the default settings. Once reset, download the parameters to all devices again. 3. Select Network – Property, and then click the Get from Network Button in the Network Number Field in the dialog box that appears. If there are multiple network numbers, select one of these numbers to unify all to that network number. Privilege violation. 1. The password that is being used does not have the right to change the configuration. Check to see if the password is correct. 2. An attempt was made to disable DeviceNet communications (Standalone) through a DeviceNet connection. Connect the Network Configurator via the USB connector and download the parameters again. With Controllers that support EtherNet/IP, it is also possible to download via EtherNet/IP. Cannot be executed in the current device mode. 248 Downloading from more than one Network Configurator at the same time. Wait until other downloads have been completed. Section 12-5 Errors When Downloading Message displayed on the Network Configurator An error was found during parameter check. Countermeasure 1. There is a non-alignment between configuration parameters. Check the following items and change the parameters. • The time parameters (e.g., Discrepancy Time) set for function blocks in the NE1Aseries Controller’s settings is shorter than the Controller’s cycle time. • The safety connection EPI is shorter than the cycle time. • The safety input channel mode is set to Test pulse from test output, but the test source has not been set. • One of the safety inputs in a dual channel setting is set as a standard input and the other has a different setting. • One of the safety inputs in a dual channel setting is set to Not used and the other has a different setting. • One of the safety outputs in a dual channel setting is set to Not used and the other has a different setting. • The maximum number of connection IDs for one Safety Master (12) has been exceeded in the safety I/O configuration. Change the ID allocation under Edit Safety Connection – Expansion Connection Setting to “Check Produced IDs in the Safety Slave” in the corresponding Safety I/O Connection (Safety Input Assembly) setting, then download the device parameters to the Safety Master again. 2. The program may have been created with an earlier Network Configurator than version 1.5@. The checks for safety functions have been improved in version 1.5@ so programs created in an earlier version cannot be downloaded as is. Use the following procedure to convert the program and then download the program again. a. Click the Edit Button on the Logic Tab page in the Edit Device Parameters Window of the NE1A-series Controller to open the Logic Editor. b. Select Edit – Find Function Blocks with Open Connections to check whether all function block I/O are connected. For information on open function block connections, refer to Finding Function Blocks with Open Connections in 5-3-3 Programming Using Function Blocks and Precautions Updating from Network Configurator Version 1.3@ to a Higher Version in the DeviceNet Safety System Configuration Manual (Z905-E1-07 or higher). c. Select File – Apply to save the user program then close the Logic Editor. d. Return to the NE1A-series Controller’s Edit Device Parameters Window and click the OK Button. 3. The hardware may be malfunctioning. Cycle the NE1A-series Controller’s power and execute self-diagnosis. If the MS indicator is lit red, replace the hardware. The data used by the user program is not aligned with other data. The network configuration has changed, which has resulted in a non-alignment between the user program data and other data. Start Logic Editor and check changed I/O locations and make the settings again. Could not access the device. 1. Device is waiting for a TUNID setting (NS indicator is flashing green/red) after reset was executed from another node during download. Set the TUNID and download again. Refer to 3-4-2 Network Numbers in the DeviceNet Safety System Configuration Manual (Z905) for information on TUNIDs. 2. For NE1A-series Controllers that support EtherNet/IP, downloading is not possible from the EtherNet/IP sheet. Switch to the DeviceNet sheet to download. Could not open connection. 1. Could not establish connection with device when downloading to the device via DeviceNet or EtherNet/IP. Check that the power is ON to the device and download again. 2. The connection resources available for the device are being used to establish safety I/O connections with the Safety Master, so a connection cannot be established with the Network Configurator. Change the operation mode of the Safety Master to which the safety connections are registered to IDLE mode. 3. If the above causes do not apply, noise or other factors may be making communications unstable. Check the following items. • Do all nodes have the same baud rate? • Is the cable length correct (trunk lines and branch lines)? • Is the cable disconnected or slack? • Is the terminating resistance only on both ends of the main line? Message could not be sent. Downloaded via USB or EtherNet/IP to the device but could not connect to the device. Check that the power is turned ON to the device and download again. 249 Section 12-5 Errors When Downloading Message displayed on the Network Configurator Connection failed. Countermeasure Tried to configure a device on the DeviceNet or EtherNet/IP network via the NE1Aseries Controller's USB port, but connection failed. Check that power is turned ON to the device and download again. If the above cause does not apply, noise or other factors may be making communications unstable. Check the following items. • Do all nodes have the same baud rate? • Is the cable length correct (trunk lines and branch lines)? • Is the cable disconnected or slack? • Is the terminating resistance only on both ends of the main line? • Is there a lot of noise? Program incomplete. Start Logic Editor and check program. There are open inputs or outputs in a function block used in the user program. Click the Edit Button on the Logic Tab Page to open the logic and perform the following measures. • Connect the open inputs or outputs. • Change the number of I/O setting for the function block to delete the open input or output. Function blocks with open inputs or outputs can be searched by using Edit – Find Function Blocks with Open Connections. For information on open function block connections, refer to Finding Function Blocks with Open Connections in 5-3-3 Programming Using Function Blocks and Precautions Updating from Network Configurator Version 1.3@ to a Higher Version in the DeviceNet Safety System Configuration Manual (Z905-E1-07 or higher). 250 Section 12-6 Errors When Resetting 12-6 Errors When Resetting 12-6-1 Outline The NE1A-series Controller may return an error response when it is reset. The messages displayed on the Network Configurator can be used to identify and correct the error. 12-6-2 Error Messages and Countermeasures Message displayed on the Network Configurator Countermeasures Cannot execute in current mode. The specified reset cannot be executed in the current device status. Refer to 9-2-2 Reset Type and NE1A-series Controller Status and change the operating mode or configuration lock status of the Controller. Then execute the reset again. The device has a different TUNID. The device TUNID will be used to reset. Is that OK? 1. The TUNID saved to the device and the TUNID specified by Network Configurator do not match. Check that the device node address matches and execute the reset if it is OK to use the device TUNID. 2. This message will be displayed if an attempt is made to reset an NE1Aseries Controller that supports EtherNet/IP from the EtherNet/IP sheet. If there is no problem in using the device TUNID to reset the Controller, then reset the Controller. Access error The password used does not provide authority to change configurations. Check that the correct password is being used. The device cannot be accessed or the device type or password is different. 1. The device has just been reset or the power cycled and the device is not ready for communications (i.e., not online with the NS indicator flashing or lit green.) Check that the device is communications ready then reset. 2. The device specified for reset may not support that service. Check that the device node address is correct. 3. The configuration data is locked. (The LOCK indicator is lit.) Remove the lock then execute the specified reset. 4. The device is performing safety I/O communications and cannot, therefore, execute the specified reset. Change the operating mode of the relevant Safety Master to IDLE mode. Then execute the specified reset. Connection failed. Tried to reset a device on the DeviceNet or EtherNet/IP network via the NE1A-series Controller's USB port, but connection failed. Check that power is turned ON to the device and reset again. If the above cause does not apply, noise or other factors may be making communications unstable. Check the following items. • Do all nodes have the same baud rate? • Is the cable length correct (trunk lines and branch lines)? • Is the cable disconnected or slack? • Is the terminating resistance only on both ends of the main line? • Is there a lot of noise? The specified operation is not possible on this network. Use the DeviceNet network (for Controllers that support EtherNet/IP). This message will be displayed if an attempt is made to reset an NE1Aseries Controller that supports EtherNet/IP from the EtherNet/IP Network Window. If there is no problem in using the device TUNID to reset, then reset the Controller from the EtherNet/IP Network Window. 251 Errors When Changing Modes Section 12-7 12-7 Errors When Changing Modes 12-7-1 Outline The NE1A-series Controller may return an error response when its operating mode is being changed. The messages displayed on the Network Configurator can be used to identify and correct the error. 12-7-2 Error Messages and Countermeasures Message Displayed on the Network Countermeasures Configurator Cannot be executed in the current 1. The device has not been configured (Configurating Mode). Download the mode. device parameters. 2. A fatal error (Abort) has occurred. Set the switches correctly or execute reset (restarting with factory default settings) to clear the configuration data. Once the configuration data is cleared, download the device parameters again. Already set to the specified mode. The device is already in the specified operating mode. The device has a different TUNID. The TUNID saved to the device and the TUNID specified by the Network Configurator do not match. Check that the device node address matches. If it does, it means that the device network number and the network number in the Network Configurator do not match. Select Network – Upload in the Network Configurator to match the network numbers. Access error The password used does not provide authority to change the operating mode. Check that the correct password is being used. 1. The device has just been reset or the power cycled and the device is not The device cannot be accessed or ready for communications (i.e., not online with the NS indicator flashing or the device type or password is differlit green.) Check that the device is communications ready then reset. ent. 2. The device for which the operating mode change request was made may not support that service. Check that the device node address is correct. Connection failed. Tried to change the operating mode of a device on the DeviceNet or EtherNet/ IP network via the NE1A-series Controller's USB port, but connection failed. Check that power is turned ON to the device and reset again. If the above cause does not apply, noise or other factors may be making communications unstable. Check the following items. • Do all nodes have the same baud rate? • Is the cable length correct (trunk lines and branch lines)? • Is the cable disconnected or slack? • Is the terminating resistance only on both ends of the main line? • Is there a lot of noise? 252 Section 12-8 Connection Status Tables 12-8 Connection Status Tables 12-8-1 Outline If an error occurs when the NE1A-series Controller tries to establish a safety connection with a DST1-series Safety I/O Terminal or an NE1A-series Controller set as a Slave, the 7-segment display will display the error code “d6” or “d5.” If an error occurs during I/O communications, the 7-segment display will display the error code “dA” or “bA.” Check the status code (error code) shown on the Safety Connection Tab Page in the Monitor Device Window and take the corresponding countermeasure. 253 Connection Status Tables Section 12-8 12-8-2 Connection Status for DST1 Series 00:0001 01:0001 01:0105 01:0106 01:0110 01:0113 01:0114 01:0115 01:0116 254 Status Normal communications Safety I/O Connection Timeout Countermeasure The Safety I/O connection status is normal. The Safety I/O connection has timed out. Check the following items. • Do all nodes have the same baud rate? • Is the cable length correct (trunk lines and branch lines)? • Is the cable disconnected or slack? • Is the terminating resistance only on both ends of the main line? • Is there a lot of noise? • Is the network bandwidth allocation suitable? Configuration Owner Error The Safety Slave was configurated from a configuration tool or Safety Master at a different node address last time. Reset the Safety Slave to the default settings and download the device parameters again. Refer to 5-1-2 Setting Safety Connection Parameters in the DeviceNet Safety System Configuration Manual (Z905-E1-07 or higher) for information on configuration owners. Output connection Owner The Safety Slave established output safety I/O connections with a Safety Error Master at a different node address last time. Reset the Safety Slave to the default settings and download the device parameters again. Refer to 5-1-2 Setting Safety Connection Parameters in the DeviceNet Safety System Configuration Manual (Z905-E1-07 or higher) for information on output connection owners. Device Not Configurated The Safety Slave has not been configurated. Download the device parameters to the Safety Slave. No. of Connections Error The setting for the number of safety I/O connections exceeds the upper limit supported by the Safety Slave. Adjust the Safety Connection setting for the relevant Safety Master. Vendor ID or Program The device data (vendor ID or product code) for the device on the ConfiguCode Error rator and the device used in the actual system does not match. • Use Safety Slave Verification (Device − Parameter − Verify) to check that the device in the system and the device registered to the Safety Master match. • If they do match, delete then re-register the connections registered to the Safety Master. Device Type Error The device data (device type) for the device on the Configurator and the device used in the actual system does not match. • Use Safety Slave Verification (Device − Parameter − Verify) to check that the device in the system and the device registered to the Safety Master match. • If they do match, delete then re-register the connections registered to the Safety Master. Revision Error The device data (revision) for the device on the Configurator and the device used in the actual system does not match. • Use Safety Slave Verification (Device − Parameter − Verify) to check that the device in the system and the device registered to the Safety Master match. • If they do match, delete then re-register the connections registered to the Safety Master. Connection Status Tables 01:0117 01:0119 01:031E 01:031F 01:07FF 01:080C 01:080E Section 12-8 Status Connection Path Error Countermeasure 1. Two or more output safety I/O connections have been set for the Safety Slave. • Change the Safety Connection setting for the Safety Master so there is only one connection. Then reset the Safety Slave to default settings and download the device parameters to the Safety Slave again. 2. The same output assembly number for a Safety Slave has been used for both a Safety Master and a Standard Master. • Input assembly numbers can be duplicated but output assembly numbers cannot. Check the Safety Connection setting for both the Safety Master and the Standard Master then return the Safety Slave to default settings and download the device parameters to the Safety Slave again. • If the error remains even after the above countermeasure has been performed, delete and re-register the connections registered to the Safety Master. Safety I/O CommunicaThe execution mode of the DST1-XD@@ Safety Slave was set to Auto tions Failure Execution. Safety I/O communications are not possible in Auto Execution Mode. If the DST1-XD@@ Safety Slave is to be used with safety I/O communications, set the execution mode to After Establishing Safety I/O Connection. No. of Connections Error The setting for the number of safety I/O connections exceeds the upper limit supported by the Safety Slave. Adjust the Safety Connection setting for the relevant Safety Master. In particular, check that no more than 15 Safety Masters are set for each Multi-cast connection, with a maximum total of 30. Connection ID Resource The maximum number of connection IDs for one Safety Master (12) has Error been exceeded. Change the ID allocation under Edit Safety Connection – Expansion Connection Setting to “Check Produced IDs in the Safety Slave” in the corresponding Safety I/O Connection (Safety Input Assembly) setting, then download the device parameters to the Safety Master again. Non-existent Safety Slave The Safety Slave may not have been added to the network correctly. Check that the corresponding Safety Slave is online (i.e., the NS indicator is flashing green or lit green.) If the Safety Slave is not online, check the following items. • Is the node address for the Safety Slave correct? • Do all nodes have the same baud rate? • Is the cable length correct (trunk lines and branch lines)? • Is the cable disconnected or slack? • Is the terminating resistance only on both ends of the main line? • Is there a lot of noise? Safety Signature Mismatch The safety signature for the Safety Slave monitored by the Safety Master does not match the safety signature of the Safety Slave itself. • Reset the Safety Slave to default settings then download the device parameters again. • If the above remedy does not work, delete then re-register the connections registered to the Safety Master. TUNID Mismatch The TUNID for the Safety Slave monitored by the Safety Master does not match the TUNID of the Safety Slave itself. • Reset the Safety Slave to default settings then download the correct device parameters. • If the above remedy does not work, delete then re-register the connections registered to the Safety Master. Refer to 3-4-2 Network Numbers in the DeviceNet Safety System Configuration Manual (Z905) for information on TUNIDs. 255 Connection Status Tables 01:080F Status Safety Configuration not possible D0:0001 IDLE Mode Section 12-8 Countermeasure 1. The Safety Slave is configuration locked and Configure the target device is selected for the Open Type setting for the Safety Master connection. • Release the configuration lock on the Safety Slave to configure the Safety Slave from the Safety Master. • To configure the Safety Slave from a configuration tool, set the Safety Master connection to Check the safety signature under Open Type. Then reset the Safety Slave to default settings and download the device parameters to the Safety Slave again. 2. The execution mode of the DST1-XD@@ Safety Slave was set to Auto Execution and then the open type setting in the safety connection settings in the safety master was set to configure a safety slave. • Safety I/O communications are not possible in Auto Execution Mode. If the DST1-XD@@ Safety Slave is to be used with safety I/O communications, set the execution mode to After Establishing Safety I/O Connection. Safety I/O communications have not been started because the NE1Aseries Controller that is the safety master is in IDLE Mode. Change the Controller to RUN mode. 12-8-3 Connection Status for the NE1A-series Controller (Safety Slave Function) 00:0001 01:0001 01:0106 01:0109 01:0110 01:0111 01:0113 01:0114 256 Status Normal communications Safety I/O Connection Timeout Countermeasures The Safety I/O connection status is normal. The Safety I/O connection has timed out. Check the following items. • Do all nodes have the same baud rate? • Is the cable length correct (trunk lines and branch lines)? • Is the cable disconnected or slack? • Is the terminating resistance only on both ends of the main line? • Is there a lot of noise? • Is the network bandwidth allocation suitable? Output Connection Owner The Safety Slave has previously established an output safety I/O connecError tion with a Safety Master at a different node address. Reset the Safety Slave to the default settings, and then download the device parameters again. Refer to 5-1-2 Setting Safety Connection Parameters in the DeviceNet Safety System Configuration Manual (Z905-E1-07 or higher) for information on output connection owners. Data Size Error The Safety Slave I/O size set to the NE1A-series Safety Slave and the size set under the Safety Master safety connection setting does not match. The Safety Slave I/O setting may have been changed, so delete then re-register the connections registered to the Safety Master. Unconfigured Device The Safety Slave has not been configurated. Download the device parameters to the Safety Slave. EPI Error The EPI set under the Safety Master safety connection setting is smaller than the Safety Slave cycle time. The EPI must be longer than both the Safety Master and the Safety Slave cycle times. Check the Safety Master safety connection setting. No. of Connections Error The setting exceeds the maximum number of safety I/O connections supported by the Safety Slave. Check the relevant Safety Master safety connection settings. Vendor ID or Product Code The device data (vendor ID or product code) for the device on the ConfiguError rator and the device used in the actual system does not match. • Use Safety Slave Verification (Device − Parameter − Verify) to check that the device in the system and the device registered to the Safety Master match. • If they do match, delete then re-register the connections registered to the Safety Master. Connection Status Tables 01:0115 01:0116 01:0117 01:031E 01:031F 01:07FF 01:080C Section 12-8 Status Device Type Error Countermeasures The device data (device type) for the device on the Configurator and the device used in the actual system does not match. • Use Safety Slave Verification (Device − Parameter − Verify) to check that the device in the system and the device registered to the Safety Master match. • If they do match, delete then re-register the connections registered to the Safety Master. Revision Error The device data (revision) for the device on the Configurator and the device used in the actual system does not match. • Use Safety Slave Verification (Device − Parameter − Verify) to check that the device in the system and the device registered to the Safety Master match. • If they do match, delete then re-register the connections registered to the Safety Master. Connection Path Error Two ore more single-cast safety I/O connections or a multi-cast safety I/O connection with a different EPI has been set for a safety slave I/O. • To share one safety slave I/O on a Safety Slave with more than one Safety Master, make the EPI all the same and set the connection type to Multi-cast. • NE1A-series Safety Slaves cannot have more than one single-cast safety I/O connection for each Safety Slave I/O. Set multiple connection paths for the NE1A-series Safety Slave Safety Slave I/O. • If the connection is not restored with the above remedy, delete then re-register the connections registered to the Safety Master. No. of Connections Error The setting for the number of safety I/O connections exceeds the upper limit supported by the Safety Slave. Adjust the Safety Connection setting for the relevant Safety Master. In particular, check that no more than 15 Safety Masters are set for each Multi-cast connection, with a maximum total of 60. Connection ID Resource The maximum number of connection IDs for one Safety Master (12) has Error been exceeded. Change the ID allocation under Edit Safety Connection – Expansion Connection Setting to “Check Produced IDs in the Safety Slave” in the corresponding Safety I/O Connection (Safety Input Assembly) setting, then download the device parameters to the Safety Master again. Non-existent Safety Slave The Safety Slave may not have been added to the network correctly. Check that the corresponding Safety Slave is online (i.e., the NS indicator is flashing green or lit green.) If the Safety Slave is not online, check the following items. • Is the node address for the Safety Slave correct? • Do all nodes have the same baud rate? • Is the cable length correct (trunk lines and branch lines)? • Is the cable disconnected or slack? • Is the terminating resistance only on both ends of the main line? • Is there a lot of noise? Safety Signature Mismatch The safety signature for the Safety Slave monitored by the Safety Master does not match the safety signature of the Safety Slave itself. • Reset the Safety Slave to default settings then download the device parameters again. • If the above remedy does not work, delete then re-register the connections registered to the Safety Master. 257 Connection Status Tables 01:080E 258 Status TUNID Mismatch D0:0002 Safety slave that is communications partner is in IDLE Mode D0:0001 IDLE Mode Section 12-8 Countermeasures The TUNID for the Safety Slave monitored by the Safety Master does not match the TUNID of the Safety Slave itself. • Reset the Safety Slave to default settings then download the correct device parameters. • If the above remedy does not work, delete then re-register the connections registered to the Safety Master. Refer to 3-4-2 Network Numbers in the DeviceNet Safety System Configuration Manual (Z905) for information on TUNIDs. The communications partner, a NE1A-series Controller that is functioning as a safety slave, is in IDLE Mode, so a safety I/O connection cannot be established. Change the operating mode of the communications partner to RUN Mode. The NE1A-series Controller that is functioning as the safety master is in IDLE mode, so a safety I/O communications have not been started. Change the Controller’s operating mode to RUN mode. SECTION 13 Maintenance and Inspection 13-1 Inspection . . . . . . . . . . . . . . . . . . . . . . . . . . . . . . . . . . . . . . . . . . . . . . . . . . . . 260 13-2 NE1A-series Controller Replacement. . . . . . . . . . . . . . . . . . . . . . . . . . . . . . . 261 259 Inspection Section 13-1 13-1 Inspection To use an NE1A-series Controller’s functions in the best condition, daily or periodical inspection must be performed. • Check that the NE1A-series Controller is used within the range of specifications. • Check that installation conditions and wiring of the NE1A-series Controller are proper. • Diagnose the safety functions to maintain a level of operating reliability in safety functions. 260 NE1A-series Controller Replacement Section 13-2 13-2 NE1A-series Controller Replacement Note the following points when you find a defect and replace the NE1A-series Controller: • Do not disassemble, repair, or modify the NE1A-series Controller. To do so is dangerous because the original safety functions would be lost. • Replace the unit in conditions where safety is ensured. • To prevent electric shocks or unexpected performance of the device, perform the replacement after turning OFF the power supply. • Check that there is no error in the new unit after replacement. • When returning the defective unit for repair, attach a sheet of paper to the unit describing in as much detail as possible the defect. Send the unit to the OMRON branch or sales office listed in the back of this operation manual. !WARNING Serious injury may possibly occur due to loss of required safety function. To restart operation after replacing the NE1A-series Controller, reset all necessary configuration information, such as the user program. Check that the safety functions perform properly before starting actual operation. 261 Appendix A Appendix 1: Application and Configuration Examples A-1-1 Emergency Stop Application Safety category Equivalent to 4 Safety detection device Emergency stop pushbutton Stop category Reset method 0 Manual Wiring Diagram I0 I2 I4 I6 I8 I10 I12 I14 I1 I3 I5 I7 I9 I11 I13 I15 KM1-NC KM2-NC 11 21 S2 S1 12 22 KM1 V1 G1 T0 T2 O0 O2 O4 O6 V2 G2 T1 T3 O1 O3 O5 O7 KM2 KM2 KM1 M E2 E1 Note E1 and E2: 24-VDC power supplies S1: Emergency stop pushbutton S2: Reset Switch KM1 and KM2: Contactors M: Motor (1) Connect a 24-VDC power supply to terminals V0 and G0 (power supply terminals for internal circuits). (2) This example shows the NE1A-SCPU01(-V1)(-EIP) Controller’s terminal layout. 263 Appendix A Timing Diagram Limit switch turns ON. Emergency stop button (ESTOP) pressed. Emergency stop button pressed. ESTOP 11-12 ESTOP 21-22 More than 350 ms Reset More than 350 ms KM1 KM2 EDM Feedback Idle to RUN TEDM Programming Example 264 TEDM TEDM Appendix A Local Input and Test Output Setting Example Local Output Setting Example 265 Appendix A A-1-2 Safety Gate Application (1) Safety category Equivalent to 4 Safety detection device Safety limit switch Stop category Reset method 0 Auto reset Wiring Example Open S1 I0 I2 I4 I6 I8 I10 I12 I14 I1 I3 I5 I7 I9 I11 I13 I15 KM1-NC KM2-NC S2 KM1 V1 G1 T0 T2 O0 O2 O4 O6 T3 O1 O3 O5 O7 KM2 V2 G2 T1 KM2 KM1 E2 E1 Note M E1 and E2: 24-VDC power supplies S1: Safety limit switch S2: Limit switch (normal open contact) KM1 and KM2: Contactors M: Motor (1) Connect a 24-VDC power supply to terminals V0 and G0 (power supply terminals for internal circuits). (2) This example shows the NE1A-SCPU01(-V1)(-EIP) Controller’s terminal layout. Timing Diagram Safety gate opened. Safety gate closed. S1 S2 KM1 KM2 EDM Feedback Idle to Run 266 TEDM TEDM TEDM Appendix A Programming Example Local Input and Test Output Setting Example 267 Appendix A Local Output Setting Example 268 Appendix A A-1-3 Safety Gate Application (2) Safety category Equivalent to 4 Safety detection device Safety limit switch Stop category Emergency stop pushbutton Reset method 0 Auto reset 0 Manual Wiring Example E1 and E2: 24-VDC power supply S1: Emergency stop pushbutton S2: Reset Switch S3 and S5:Safety limit switch S4 and S6: Limit switch KM1, KM2, KM3, and KM4: Contactors M: Motor Open Open S5 S3 S6 S4 KM1 S1 11 21 KM2 S2 12 22 I0 I2 I4 I6 I8 I10 I12 I14 I1 I3 I5 I7 I9 I11 I13 I15 KM3-NC M KM1-NC V1 V2 G2 T0 T2 O0 O2 O4 O6 T1 T3 O1 O3 O5 O7 KM4-NC KM2-NC KM3 KM4 E2 E1 G1 KM1 KM2 KM3 KM4 M Note (1) Connect a 24-VDC power supply to terminals V0 and G0 (power supply terminals for internal circuits). (2) This example shows the NE1A-SCPU01(-V1)(-EIP) Controller’s terminal layout. 269 Appendix A Timing Diagram Emergency stop button (ESTOP) pressed. 350 ms min. ESTOP S1 RESET S2 Safety Limit Switch S3 Limit Switch S4 Safety gate open Safety gate open Safety Limit Switch S5 Limit Switch S6 KM1,2 EDM Feedback TEDM TEDM TEDM TEDM KM3,4 EDM Feedback TEDM Idle to RUN TEDM TEDM TEDM TEDM: Maximum feedback time Programming Example 270 Appendix A Local Input and Test Output Setting Example Local Output Setting Example 271 Appendix A A-1-4 Safety Light Curtain Application Safety category Equivalent to 4 Safety detection device • Safety limit switch • Emergency stop pushbutton Stop category Reset method 0 Manual Wiring Example Emitter Receiver F3W9-JC@A-D F39-JC@A-L S2 I0 I1 I2 I4 I6 I3 I5 I7 I8 I9 Shield 0V (Blue) Safety output 2 (White) Safety output 1 (Green) Auxiliary output (Yellow) +24 V (Brown) +24 V (Brown) Interlock selection input (White) S3 RS-485(B) (Pink) External device monitoring input (Red) Open S1 Open Reset input (Yellow) Open (Red) Test input (Green) 0V (Blue) Shield RS-485(A) (Gray) I10 I12 I14 I11 I13 I15 KM1 KM1-NC KM2 G1 V1 T0 T2 O0 O2 O4 O6 KM2-NC E1 V2 G2 E2 T1 T3 O1 O3 O5 O7 M KM1 KM2 NE1A-SCPU01(-V1) E1 and E2: 24-VDC power supply S1: Reset switch S2: Reset switch S3: Emergency stop pushbutton KM1 and KM2: Contactors M: Motor Note (1) Connect a 24-VDC power supply to terminals V0 and G0 (power supply terminals for internal circuits). (2) This example shows the NE1A-SCPU01(-V1)(-EIP) Controller’s terminal layout. 272 Appendix A Timing Diagram Emergency stop button (ESTOP) pressed. 350 ms min. 350 ms min. ESTOP S3 RESET S2 SLC KM1,2 EDM Feedback TEDM Idle to RUN TEDM TEDM TEDM TEDM: Feedback time Programming Example 273 Appendix A Local Input and Test Output Setting Example Local Output Setting Example 274 Appendix A A-1-5 Safety Mat Application Safety category Equivalent to 3 Safety detection device • Safety mat • Emergency stop pushbutton Stop category Reset method 0 Manual Wiring Example Black E1 and E2: 24-VDC power supply S1: Reset switch S2: Emergency stop pushbutton KM1 and KM2: Contactors M: Motor White Auto reset White Black S2 I0 I2 I4 I6 I8 I10 I12 I14 I1 I3 I5 I7 I9 I11 I13 I15 V1 G1 T0 T2 O0 O4 O6 S1 O2 KM1-NC KM1 KM2 KM2-NC V2 G2a T1 T3 O1 O3 O5 O7 M E2 E1 KM1 Note KM2 (1) Connect a 24-VDC power supply to terminals V0 and G0 (power supply terminals for internal circuits). (2) This example shows the NE1A-SCPU01(-V1)(-EIP) Controller’s terminal layout. Timing Diagram Emergency stop button (ESTOP) pressed. 350 ms min. 350 ms min. ESTOP S2 RESET S1 MAT KM1,2 EDM Feedback TEDM Idle to RUN TEDM TEDM TEDM TEDM: Maximum feedback time 275 Appendix A Programming Example Local Input and Test Output Setting Example 276 Appendix A Local Output Setting Example 277 Appendix A Appendix 2: Calculated Values of PFD and PFH Calculated values of PFD and PFH for the NE1A-series Controller are given in the following tables. These values must be calculated for the overall devices within the system to comply with the SIL required for application. A-2-1 Calculated PFD Values Model NE1A-SCPU01(-V1)(-EIP) NE1A-SCPU02(-EIP) A-2-2 PFD 4.68E-07 9.32E-07 1.86E-06 3.72E-06 5.90E-07 1.17E-07 2.34E-06 4.68E-06 Calculated PFH Values Model NE1A-SCPU01(-V1)(-EIP) NE1A-SCPU02(-EIP) 278 Proof test interval (years) 0.25 0.5 1 2 0.25 0.5 1 2 PFH 4.25E-10 5.39E-10 Appendix A Appendix 3: Explicit Messages User-specified NE1A parameters can be read and written by sending explicit messages to the NE1A-series Controller. The NE1A-series Controller will process the received messages and return responses. This appendix describes the messages that are supported by the NE1A-series Controller. A-3-1 Explicit Messages: NE1A-SCPU01-V1/NE1A-SCPU01-EIP Reading General Status Explicit message Read Unit General Status Service Read Function Reads the Unit’s general status. Command Instance ID Response Service code Class ID Attribute ID Data size 0E hex 39 hex 01 hex 6E hex --- Service code Class ID Instance ID Attribute ID Data size 0E hex 306 hex 01, 02, 05, or 06 hex --- First and second byte offset address: 0000 to 01FF hex (0 to 511), Third and fourth byte read size: 0001 to 0100 hex (1 to 48) 1 byte Reading I/O Area Explicit message Read I/O Area Service Read Function Reads the Unit’s I/O data. Instance ID Specification Range: Local input = 01 Local output/test output = 02 Safety input = 05 Safety output = 06 Address Specification Range: Local input: 0 or 1 Local output/test output: 0 or 1 Safety input: 0 to 511 Safety output: 0 to 511 Command Response Read data 279 Appendix A Setting and Monitoring Safety Input Terminals Explicit message Monitor Mode for Terminal Maintenance Information Service Function Command Service code Class ID Instance ID Attribute ID Response Data size Read Reads the monitor mode of maintenance information for the input (1 to 16) specified by the Instance ID. 0E hex 3D hex 01 to 10 hex 65 hex --- 1 byte 00 hex: Total ON time mode 01 hex: Contact operation counter mode Write Writes the monitor mode of maintenance information for the input (1 to 16) specified by the Instance ID. 10 hex 3D hex 01 to 10 hex 65 hex 1 byte 00 hex: Total ON time mode 01 hex: Contact operation counter mode --- Read Reads the SV of the total ON time (unit: seconds) or contact operation counter (unit: operations) for the input (1 to 16) specified by the Instance ID. 0E hex 3D hex 01 to 10 hex 68 hex --- 4 bytes 0000 0000 to FFFF FFFF hex (0 to 4,294,967,295) Write Writes the SV of the total ON time (unit: seconds) or contact operation counter (unit: operations) for the input (1 to 16) specified by the Instance ID. 10 hex 3D hex 01 to 10 hex 68 hex 4 bytes 0000 0000 to FFFF FFFF hex (0 to 4,294,967,295) --- Read Input Total ON Time or Contact Operation Counter Read Reads the total ON time (unit: seconds) or contact operation counter (unit: operations) for the input (1 to 16) specified by the Instance ID. 0E hex 3D hex 01 to 10 hex 66 hex --- 4 bytes 0000 0000 to FFFF FFFF hex (0 to 4,294,967,295) Reset Input Total ON Time or Contact Operation Counter Reset Resets to 0 the total ON time (unit: seconds) or contact operation counter (unit: operations) for the input (1 to 16) specified by the Instance ID. 05 hex 3D hex 01 to 10 hex 66 hex --- --- Read Monitor Status of Input Total ON Time or Contact Operation Counter Read Reads the monitor status of the total ON time or contact operation counter for the input (1 to 16) specified by the Instance ID. 0E hex 3D hex 01 to 10 hex 67 hex ? 1 byte 00 hex: In range 01 hex: Out of range (over monitor value) Read Safety Input Normal Flag Read Reads the normal flag status of the number (1 to 16) specified by the Instance ID. 0E hex 3D hex 01 to 10 hex 04 hex ? 1 byte 00 hex: Error 01 hex: Normal Read Safety Input Error Information Cause Read Reads the cause for the normal flag of the number (1 to 16) specified by the Instance ID being OFF (error). 0E hex 3D hex 01 to 10 hex 6E hex --- 1 byte 00 hex: No error 01 hex: Invalid configuration 02 hex: Test signal error 03 hex: Internal circuit error 04 hex: Discrepancy error 05 hex: Error in other channel of dual channels Read AND of Safety Input Normal Flags Read Reads the logical AND of the normal flag status for all inputs 1 to 16. 0E hex 3E hex 01 hex 05 hex --- 1 byte 00 hex: Error 01 hex: All normal Read OR of Monitor Status of Input Total ON Times or Contact Operation Counters Read Reads the logical OR of the monitor status of the total ON time or contact operation counter for all inputs 1 to 16. 0E hex 3E hex 01 hex 72 hex --- 1 byte 00 hex: All in range 01 hex: Input out of range (over monitor value) SV for Input Total ON Time or Contact Operation Counter 280 Appendix A Setting and Monitoring Safety Output Terminals Explicit message Monitor Mode for Terminal Maintenance Information Service Function Command Service code Class ID Instance ID Attribute ID Response Data size Read Reads the monitor mode of maintenance information for the output (1 to 8) specified by the Instance ID. 0E hex 3B hex 01 to 08 hex 65 hex --- 1 byte 00 hex: Total ON time mode 01 hex: Contact operation counter mode Write Writes the monitor mode of maintenance information for the output (1 to 8) specified by the Instance ID. 10 hex 3B hex 01 to 08 hex 65 hex 1 byte 00 hex: Total ON time mode 01 hex: Contact operation counter mode --- Read Reads the SV of the total ON time (unit: seconds) or contact operation counter (unit: operations) for the input (1 to 8) specified by the Instance ID. 0E hex 3B hex 01 to 08 hex 68 hex --- 4 bytes 0000 0000 to FFFF FFFF hex (0 to 4,294,967,295) Write Writes the SV of the total ON time (unit: seconds) or contact operation counter (unit: operations) for the input (1 to 8) specified by the Instance ID. 10 hex 3B hex 01 to 08 hex 68 hex 4 bytes 0000 0000 to FFFF FFFF hex (0 to 4,294,967,295) --- Read Output Total ON Time or Contact Operation Counter Read Reads the total ON time (unit: seconds) or contact operation counter (unit: operations) for the input (1 to 8) specified by the Instance ID. 0E hex 3B hex 01 to 08 hex 66 hex --- 4 bytes 0000 0000 to FFFF FFFF hex (0 to 4,294,967,295) Reset Output Total ON Time or Contact Operation Counter Reset Resets to 0 the total ON time (unit: seconds) or contact operation counter (unit: operations) for the output (1 to 8) specified by the Instance ID. 05 hex 3B hex 01 to 08 hex 66 hex --- --- Read Monitor Status of Output Total ON Time or Contact Operation Counter Read Reads the monitor status of the total ON time or contact operation for the output (1 to 8) specified by the Instance ID. 0E hex 3B hex 01 to 08 hex 67 hex --- 1 byte 00 hex: In range 01 hex: Out of range (over monitor value) Read Safety Output Normal Flag Read Reads the normal flag status of the number (1 to 8) specified by the Instance ID. 0E hex 3B hex 01 to 08 hex 05 hex --- 1 byte 00 hex: Error 01 hex: Normal Read Safety Output Error Information Cause Read Reads the cause for the normal flag of the number (1 to 8) specified by the Instance ID being OFF (error). 0E hex 3B hex 01 to 08 hex 6E hex --- 1 byte 00 hex: No error 01 hex: Invalid configuration 02 hex: Overcurrent detection 03 hex: Short-circuit detection 04 hex: High constant error 05 hex: Error in other channel of dual channels 06 hex: Internal relay circuit error 07 hex: Relay error 08 hex: Data error between dual channel outputs 09 hex: Detection of short circuit between wires Read AND of Safety Output a Normal Flags Read Reads the logical AND of all outputs 1 to 8. 0E hex 3C hex 01 hex 05 hex --- 1 byte 00 hex: Error 01 hex: All normal Read OR of Monitor Status of Output Total ON Times or Contact Operation Counters Read Reads the logical OR of the monitor status of the total ON time or contact operation counter for all outputs 1 to 8. 0E hex 3C hex 01 hex 72 hex --- 1 byte 00 hex: All in range 01 hex: Output out of range (over monitor value) SV for Output Total ON Time or Contact Operation Counter 281 Appendix A Monitoring Test Output Terminals Explicit message Monitor Mode for Terminal Maintenance Information Function Command Service code Class ID Instance ID Response Attribute ID Data size Read Reads the monitor mode of maintenance information of the test output (1 to 4) specified by the Instance ID. 0E hex 307 hex 01 to 04 hex 83 hex --- 1 byte 00 hex: Total ON time mode 01 hex: Contact operation counter mode Write Writes the monitor mode of maintenance information of the test output (1 to 4) specified by the Instance ID. 10 hex 307 hex 01 to 04 hex 83 hex 1 byte 00 hex: Total ON time mode 01 hex: Contact operation counter mode --- Read 0E hex Reads the SV of the total ON time (unit: seconds) or contact operation counter (unit: operations) for the input (1 to 4) specified by the Instance ID. 307 hex 01 to 04 hex 86 hex --- 4 bytes 0000 0000 to FFFF FFFF hex (0 to 4,294,967,295) Write Writes the SV of the total ON time (unit: seconds) or contact operation counter (unit: operations) for the input (1 to 4) specified by the Instance ID. 10 hex 307 hex 01 to 04 hex 86 hex 4 bytes 0000 0000 to FFFF FFFF hex (0 to 4,294,967,295) --- Read Test Output Total ON Time or Contact Operation Counter Read Reads the total ON time (unit: seconds) or contact operation counter (unit: operations) for the input (1 to 16) specified by the Instance ID. 0E hex 307 hex 01 to 04 hex 84 hex --- 4 bytes 0000 0000 to FFFF FFFF hex (0 to 4,294,967,295) Reset Test Output Total ON Time or Contact Operation Counter Reset Resets to 0 the total ON time (unit: seconds) or contact operation counter (unit: operations) for the test output (1 to 4) specified by the Instance ID. 05 hex 307 hex 01 to 04 hex 84 hex --- --- Read Monitor Status of Test Output Total ON Time or Contact Operation Counter Read Reads the monitor status of the total ON time or contact operation counter of the test output (1 to 4) specified by the Instance ID. 0E hex 307 hex 01 to 04 hex 85 hex --- 1 byte 00 hex: In range 01 hex: Out of range (over monitor value) Read Test Output Safety Flag Read Reads the normal flag status for the test output (1 to 4) specified by the Instance ID. 0E hex 307 hex 01 to 04 hex 68 hex --- 1 byte 00 hex: Normal 01 hex: Error Read Test Output Error Information Cause Read Reads the cause for the normal flag of the test output (1 to 4) specified by the Instance ID being OFF (error). 0E hex 307 hex 01 to 04 hex 76 hex --- 1 byte 00 hex: No error 01 hex: Invalid configuration 02 hex: Overcurrent detection 05 hex: High constant error 06 hex: Undercurrent detection Read OR of Test Output Safety Flags Read Reads the logical OR of the normal flag status for all test outputs 1 to 4. 0E hex 308 hex 01 hex 69 hex --- 1 byte 00 hex: All normal 01 hex: Error Read OR of Monitor Status of Test Output Total ON Times or Contact Operation Counters Read Reads the logical OR of the monitor status of the total ON time or contact operation counter for all test outputs 1 to 4. 0E hex 308 hex 01 hex 72 hex --- 1 byte 00 hex: All in range 01 hex: Test output out of range (over monitor value) SV for Test Output Total ON Time or Contact Operation Counter 282 Service Appendix A A-3-2 Explicit Messages: NE1A-SCPU02/NE1A-SCPU02-EIP Reading General Status Explicit message Read Unit General Status Service Read Function Reads the Unit’s general status. Command Service code Class ID Instance ID 0E hex 39 hex 01 hex Service code Class ID Instance ID Attribute ID 4B hex 306 hex 01, 02, 05, and 06 hex --- Response Attribute ID 6E hex Data size --- 1 byte Reading I/O Area Explicit message Read I/O Area Service Read Function Reads the Unit’s I/O data. Instance ID Specification Range: Local input = 01 Local output/test output = 02 Safety input = 05 Safety output = 06 Command Response Data size First and second byte offset address: 0000 to 01FF hex (0 to 511), Third and fourth byte read size: 0001 to 0100 hex (1 to 48) Read data Address Specification Range: Local input: 0 to 4 Local output/test output: 0 or 1 Safety input: 0 to 511 Safety output: 0 to 511 283 Appendix A Setting and Monitoring Safety Input Terminals Explicit message Monitor Mode for Terminal Maintenance Information Function Command Service code Class ID Instance ID Response Attribute ID Data size Read Reads the monitor mode of maintenance information for the input (1 to 40) specified by the Instance ID. 0E hex 3D hex 01 to 28 hex 65 hex --- 1 byte 00 hex: Total ON time mode 01 hex: Contact operation counter mode Write Writes the monitor mode of maintenance information for the input (1 to 40) specified by the Instance ID. 10 hex 3D hex 01 to 28 hex 65 hex 1 byte 00 hex: Total ON time mode 01 hex: Contact operation counter mode --- Read Reads the SV of the total ON time (unit: seconds) or contact operation counter (unit: operations) for the input (1 to 40) specified by the Instance ID. 0E hex 3D hex 01 to 28 hex 68 hex --- 4 bytes 0000 0000 to FFFF FFFF hex (0 to 4,294,967,295) Write Writes the SV of the total ON time (unit: seconds) or contact operation counter (unit: operations) for the input (1 to 40) specified by the Instance ID. 10 hex 3D hex 01 to 28 hex 68 hex 4 bytes 0000 0000 to FFFF FFFF hex (0 to 4,294,967,295) --- Read Input Total ON Time or Contact Operation Counter Read Reads the total ON time (unit: seconds) or contact operation counter (unit: operations) for the input (1 to 40) specified by the Instance ID. 0E hex 3D hex 01 to 28 hex 66 hex --- 4 bytes 0000 0000 to FFFF FFFF hex (0 to 4,294,967,295) Reset Input Total ON Time or Contact Operation Counter Reset Resets to 0 the total ON time (unit: seconds) or contact operation counter (unit: operations) for the input (1 to 40) specified by the Instance ID. 05 hex 3D hex 01 to 28 hex 66 hex --- --- Read Monitor Status of Input Total ON Time or Contact Operation Counter Read Reads the monitor status of the total ON time or contact operation counter for the input (1 to 40) specified by the Instance ID. 0E hex 3D hex 01 to 28 hex 67 hex --- 1 byte 00 hex: In range 01 hex: Out of range (over monitor value) Read Safety Input Normal Status Read Reads the normal flag status of the number (1 to 40) specified by the Instance ID. 0E hex 3D hex 01 to 28 hex 04 hex --- 1 byte 00 hex: Error 01 hex: Normal Read Safety input Error Information Cause Read Reads the cause for the normal flag status of the number (1 to 40) specified by the Instance ID being OFF (error). 0E hex 3D hex 01 to 28 hex 6E hex --- 1 byte 00 hex: No error 01 hex: Invalid configuration 02 hex: Test signal error 03 hex: Internal circuit error 04 hex: Discrepancy error 05 hex: Error in other channel of dual channels Read AND of Safety Input Normal Flags Read Reads the logical AND of the normal flag status for all inputs 1 to 40. 0E hex 3E hex 01 hex 05Hex --- 1 byte 00 hex: Error 01 hex: All normal Read OR of Monitor Status of Input Total ON Times or Contact Operation Counters Read Reads the logical OR of the monitor status of the total ON time or contact operation counter for all inputs 1 to 40. 0EHex 3EHe x 01 hex 72Hex --- 1 byte 00 hex: All in range 01 hex: Input out range (over monitor value) SV for Input Total ON Time or Contact Operation Counter 284 Service Appendix A Setting and Monitoring Safety Output Terminals Explicit message Monitor Mode for Terminal Maintenance Information Service Function Command Service code Class ID Instance ID Response Attribute ID Data size Read Reads the monitor mode of maintenance information for the output (1 to 8) specified by the Instance ID. 0E hex 3B hex 01 to 08 hex 65 hex --- 1 byte 00 hex: Total ON time mode 01 hex: Contact operation counter mode Write Writes the monitor mode of maintenance information for the output (1 to 8) specified by the Instance ID. 10 hex 3B hex 01 to 08 hex 65 hex 1 byte 00 hex: Total ON time mode 01 hex: Contact operation counter mode --- Read Reads the SV of the total ON time (unit: seconds) or contact operation counter (unit: operations) for the output (1 to 8) specified by the Instance ID. 0E hex 3B hex 01 to 08 hex 68 hex --- 4 bytes 0000 0000 to FFFF FFFF hex (0 to 4,294,967,295) Write Reads the SV of the total ON time (unit: seconds) or contact operation counter (unit: operations) for the output (1 to 8) specified by the Instance ID. 10 hex 3B hex 01 to 08 hex 68 hex 4 bytes 0000 0000 to FFFF FFFF hex (0 to 4,294,967,295) --- Read Output Total ON Time or Contact Operation Counter Read Reads the total ON time (unit: seconds) or contact operation counter (unit: operations) for the output (1 to 8) specified by the Instance ID. 0E hex 3B hex 01 to 08 hex 66 hex --- 4 bytes 0000 0000 to FFFF FFFF hex (0 to 4,294,967,295) Reset Output Total ON Time or Contact Operation Counter Reset 05 hex Resets to 0 the total ON time (unit: seconds) or contact operation counter (unit: operations) for the output (1 to 8) specified by the Instance ID. 3B hex 01 to 08 hex 66 hex --- --- Read Monitor Status of Output Total ON Time or Contact Operation Counter Read Reads the monitor status of the total ON time or contact operation of the number (1 to 8) specified by the Instance ID. 0E hex 3B hex 01 to 08 hex 67 hex --- 1 byte 00 hex: In range 01 hex: Out of range (over monitor value) Read Safety Output Normal Flag Read Reads the normal flag status of the number (1 to 8) specified by the Instance ID. 0E hex 3B hex 01 to 08 hex 05 hex --- 1 byte 00 hex: Error 01 hex: Normal Read Safety Output Error Information Cause Read Reads the cause for the normal flag status of the number (1 to 8) specified by the Instance ID being OFF (error). 0E hex 3B hex 01 to 08 hex 6E hex --- 1 byte 00 hex: No error 01 hex: Invalid configuration 02 hex: Overcurrent detection 03 hex: Short-circuit detection 04 hex: High constant error 05 hex: Error in other channel of dual channels 06 hex: Internal relay circuit error 07 hex: Relay error 08 hex: Data error between dual channel outputs 09 hex: Detection of short circuit between wires Read AND of Safety Output Normal Flags Read Reads the logical AND of the normal flag status for all outputs 1 to 8. 0E hex 3C hex 01 hex 05 hex --- 1 byte 00 hex: Error 01 hex: All normal Read OR of Monitor Status of Output Total ON Times or Contact Operation Counters Read Reads the logical OR of the monitor status of the total ON time or contact operation counter for all outputs 1 to 8. 0E hex 3C hex 01 hex 72 hex --- 1 byte 00 hex: All in range 01 hex: Output out of range (over monitor value) SV for Output Total ON Time or Contact Operation Counter 285 Appendix A Monitoring Test Output Terminals Explicit message Monitor Mode for Terminal Maintenance Information Function Command Service code Class ID Instance ID Response Attribute ID Data size Read Reads the monitor mode of maintenance information for the test output (1 to 8) specified by the Instance ID. 0E hex 307 hex 01 to 08 hex 83 hex --- 1 byte 00 hex: Total ON time mode 01 hex: Contact operation counter mode Write Writes the monitor mode of maintenance information for the test output (1 to 8) specified by the Instance ID. 10 hex 307 hex 01 to 08 hex 83 hex 1 byte 00 hex: Total ON time mode 01 hex: Contact operation counter mode --- Read Reads the SV of the total ON time (unit: seconds) or contact operation counter (unit: operations) for the test output (1 to 8) specified by the Instance ID. 0E hex 307 hex 01 to 08 hex 86 hex --- 4 bytes 0000 0000 to FFFF FFFF hex (0 to 4,294,967,295) Write Writes the SV of the total ON time (unit: seconds) or contact operation counter (unit: operations) for the test output (1 to 8) specified by the Instance ID. 10 hex 307 hex 01 to 08 hex 86 hex 4 bytes 0000 0000 to FFFF FFFF hex (0 to 4,294,967,295) --- Read Test Output for Total ON Time or Contact Operation Counter Read Reads the total ON time (unit: seconds) or contact operation counter (unit: operations) for the test output (1 to 8) specified by the Instance ID. 0E hex 307 hex 01 to 08 hex 84 hex --- 4 bytes 0000 0000 to FFFF FFFF hex (0 to 4,294,967,295) Reset Test Output for Total ON Time or Contact Operation Counter Reset Resets to 0 the total ON time (unit: seconds) or contact operation counter (unit: operations) for the test output (1 to 8) specified by the Instance ID. 05 hex 307 hex 01 to 08 hex 84 hex --- --- Read Monitor Status of Test Output Total ON Time or Contact Operation Counter Read Reads the monitor status of the total ON time or contact operation counter for the text output (1 to 8) specified by the Instance ID. 0E hex 307 hex 01 to 08 hex 85 hex --- 1 byte 00 hex: In range 01 hex: Out of range (over monitor value) Read Test Output Normal Flag Read Reads the normal flag status 0E hex for the text output (1 to 8) specified by the Instance ID. 307 hex 01 to 08 hex 68 hex --- 1 byte 00 hex: Normal 01 hex: Error Read Test Output Error Information Cause Read Reads the cause for the normal flag of the test output (1 to 8) specified by the Instance ID being OFF (error). 0E hex 307 hex 01 to 08 hex 76 hex --- 1 byte 00 hex: No error 01 hex: Invalid configuration 02 hex: Overcurrent detection 05 hex: High constant error 06 hex: Undercurrent detection Read OR of Test Output Normal Flags Read Reads the normal flag status of all test outputs 1 to 8. 0E hex 308 hex 01 hex 69 hex --- 1 byte 00 hex: All normal 01 hex: Error Read OR of Monitor Status of Test Output Total ON Times or Contact Operation Counters Read Reads the logical OR of the monitor status of total ON time or contact operation counter for all test outputs 1 to 8. 0E hex 308 hex 01 hex 72 hex --- 1 byte 00 hex: All in range 01 hex: Test output out of range (over monitor value) SV for Test Output Total ON Time or Contact Operation Counter 286 Service Appendix A A-3-3 Explicit Messages: NE1A-SCPU01 Reading General Status Explicit message Read Unit General Status Service Read Function Reads the Unit’s general status. Command Service code Class ID Instance ID 0E hex 39 hex 01 hex Service code Class ID Instance ID Attribute ID 4B hex 306 hex 01, 02, 05, and 06 hex --- Service code Class ID Instance ID Response Attribute ID 6E hex Data size --- 1 byte Reading I/O Area Explicit message Read I/O Area Service Read Function Reads the Unit’s I/O data. Command Instance ID Specification Range: Local input = 01 Local output/test output = 02 Safety input = 05 Safety output = 06 Response Data size First and second byte offset address: 0000 to 01FF hex (0 to 511), Third and fourth byte read size: 0001 to 0100 hex (1 to 48) Read data Address Specification Range: Local input: 0 or 1 Local output/test output: 0 or 1 Safety input: 0 to 511 Safety output: 0 to 511 Safety Input Terminal Settings and Monitors Explicit message Service Function Command Response Attribute ID Data size Read Safety Input Normal Flag Read Reads the normal flag status of the number (1 to 16) specified by the Instance ID. 0E hex 3D hex 01 to 10 hex 04 hex --- 1 byte 00 hex: Error 01 hex: Normal Read Safety input Error Information Cause Read Reads the cause for the normal flag of the number (1 to 16) specified by the Instance ID being OFF (error). 0E hex 3D hex 01 to 10 hex 6E hex --- 1 byte 00 hex: No error 01 hex: Invalid configuration 02 hex: Test signal error 03 hex: Internal circuit error 04 hex: Discrepancy error 05 hex: Error in other channel of dual channels Read AND of Safety Input Normal Flags Read Reads the logical AND of the normal flag status for all inputs 1 to 16. 0E hex 3E hex 01 hex 05 hex --- 1 byte 00 hex: Error 01 hex: All normal 287 Appendix A Setting and Monitoring Safety Output Terminals Explicit message Service Function Command Service code Class ID Instance ID Attribute ID Response Data size Read Safety Output Normal Flag Read Reads the normal flag status of the number (1 to 8) specified by the Instance ID. 0E hex 3B hex 01 to 08 hex 05 hex --- 1 byte 00 hex: Error 01 hex: Normal Read Safety Output Error Information Cause Read Reads the cause for the normal flag of the number (1 to 8) specified by the Instance ID being OFF. 0E hex 3B hex 01 to 08 hex 6E hex --- 1 byte 00 hex: No error 01 hex: Invalid configuration 02 hex: Overcurrent detection 03 hex: Short-circuit detection 04 hex: High constant error 05 hex: Error in other channel of dual channels 06 hex: Internal relay circuit error 07 hex: Relay error 08 hex: Data error between dual channel outputs 09 hex: Detection of short circuit between wires Read AND of Safety Output Normal Flags Read Reads the logical AND of the normal flag status for all outputs 1 to 8. 0E hex 3C hex 01 hex 05 hex --- 1 byte 00 hex: Error 01 hex: All normal Class ID Instance ID Attribute ID Monitoring Test Output Terminals Explicit message Service Function Command Service code 288 Response Data size Read Test Output Normal Flag Read Reads the normal flag status of the test output (1 to 4) specified by the Instance ID. 0E hex 307 hex 01 to 04 hex 68 hex --- 1 byte 00 hex: Normal 01 hex: Error Read Test Output Error Information Cause Read Reads the cause for the normal flag of the test output (1 to 4) specified by the Instance ID being OFF (error). 0E hex 307 hex 01 to 04 hex 76 hex --- 1 byte 00 hex: No error 01 hex: Invalid configuration 02 hex: Overcurrent detection 05 hex: High constant error 06 hex: Undercurrent detection Read OR of Test Output Normal Flags Read Reads the logical OR of the normal flag status for all outputs 1 to 4. 0E hex 308 hex 01 hex 69 hex --- 1 byte 00 hex: All normal 01 hex: Error Glossary Term assembly bit-strobe connection Busoff CAN CIP CIP safety configuration configuration data configuration lock connection connection type COS connection CPU Unit without EtherNet/IP Definition Internal data in a device gathered as one group to be accessed externally. One of the connection types for I/O communications in DeviceNet standard communications. For a bit-strobe connection, the Master broadcasts a message and the Slaves that receive the message return input data. Communications are performed on a communication cycle, just as for poll connections, but effective communications are possible for Input Slaves. Status that occurs when the error rate on the DeviceNet network is extremely high over a communications cable. An error is detected when the internal error counter in a device exceeds a certain threshold value. Countermeasures based on error corrective actions are required when a busoff occurs. An acronym for Controller Area Network. CAN is a highly reliable yet low-cost communications protocol standardized by the ISO. An acronym for Common Industrial Protocol. CIP is an open multivender communications protocol. It enables communications between various devices without restrictions due to network types or differences in devices. DeviceNet and EtherNet/IP and CIP networks. A safety extension of the CIP that supports IEC 61508 SIL3 and EN 954-1 Safety Category 4. A safety layer is added to the CIP application layer so that traditional CIP communications and CIP safety communication can coexist simultaneously without interfering with each other, achieving highly reliable safety communications. DeviceNet Safety and EtherNet/IP Safety are CIP Safety-compliant networks based on DeviceNet and EtherNet/IP Safety. Using the Network Configurator to built a network and set devices. The device setting parameters. Configuration data is set in devices using the Network Configurator. There are parameters related to safety functions and parameter not related to safety functions. Parameters related to safety functions are protected by a safety signature. Indicates that device operation has been checked by user testing and that the parameters that have been set related to safety functions have been verified. A logical communications path used to communicate between devices. The connection types are as follows depending on the communications method. DeviceNet Standard Communications • Poll connection • Bit-strobe connection • COS connection • Cyclic connection • Explicit message connection DeviceNet Safety Communications • Single-cast connection • Double-cast connection An acronym for Change of State. One of the connection types for I/O communications in DeviceNet standard communications. For this connection type, data is sent after a set period of time elapses, just as for a cyclic connection, but data can also be sent when data changes or a data send request is received from the application. Conditions depend on the device. A COS connection enables effective communications for changes in data or requests from applications without being dependent on the communications cycle of the Master. COS connections cannot be used at the same time as cyclic connections. A CPU Unit with one of the following model numbers: NE1A-SCPU01(-V1) or NE1A-SCPU02. 289 Glossary Term Definition CPU Unit with EtherNet/IP (Unit support- A CPU Unit with one of the following model numbers: NE1A-SCPU01-EIP or ing EtherNet/IP) NE1A-SCPU02-EIP cyclic connection One of the connection types for I/O communications in DeviceNet standard communications. For a cycle connection, data is sent after a set period of time elapses. A cyclic connection enables sending data on a cycle that is different from the communications cycle of the Master. DeviceNet A CIP-compliant network that uses CAN technology. DeviceNet is mainly used as a field network to connect controllers, sensors, and other devices. DeviceNet Safety A DeviceNet that complies with CIP Safety, i.e., IEC 61508 SIL3 and EN 954-1 Safety Category 4. discrepancy time The time period from a change in one of two inputs until the other input changes. When using a dual-channel input, a suitable time must be set depending on the characteristics of the connected devices. dual channel Using two inputs or outputs as the input or output for redundancy. Dual Channel Complementary Setting to evaluate that two logic states are complementary. Dual Channel Equivalent Setting to evaluate that two logic states are equivalent. EPI An acronym for Expected Packet Interval. The interval of safety data communications between the Safety Master and the Safety Slave through an established connection. error latch time The time period to hold an error state (control data, status data, and LED indications). EtherNet/IP A CIP-compliant network that uses TCP/IP technology. EtherNet/IP can coexist with other TCP/IP-based protocols in high-capacity, high-speed networks. explicit message connection A connection type for explicit messages in DeviceNet standard communications. Fault Present Several function blocks have Fault Present as an optional output. This is an error output that indicates that the applicable function block has detected an internal logic error or an input data timing error. multi-cast connection One of the connection types for DeviceNet Safety communications. With a multi-cast connection, multi-cast input data can be sent from a Safety Slave to up to 15 Safety Masters. This connection type can be set only for a Safety Slave input. It cannot be set for outputs. This connection type enables effective communications when sharing the data from one Safety Slave between more than one Safety Master. Network Configurator A software tool used to set networks and devices for CIP and CIP Safety. node A generic name for devices to which addresses are allocated in a network. Nodes are sometimes also called devices. offline The state in which a device is not connected to the network or in which communications are not possible because they have not been set from the Network Configurator. online The state in which communications through the network are possible. open type The opening method for a safety connection. One of three types is selected in the settings of a connection to the Safety Master. Refer to 5-1 Setting Safety Connections in the DeviceNet Safety System Configuration Manual (Cat. No. Z905-E1-07 or higher) for details. • Configuring the target device • Checking the safety signature • Only opening PFD An acronym for Probability of Failure on Demand. Shows the average failure rate for a system or device demand. Used for calculating the SIL (Safety Integrity Level) for a safety system. PFH An acronym for Probability of Failure per Hour. Shows the failure rate per hour for a system or device. Used for calculating the SIL (Safety Integrity Level) for a safety system. 290 Glossary Term poll connection reaction time safe state safety chain safety controller safety network controller safety data safety function safety network number safety protocol safety signature single channel single-cast connection standard Standard CPU Unit test pulse TUNID UNID Definition One of the connection types for I/O communications in DeviceNet standard communications. For a poll connection, output data is sent from the Master and Slaves that receive the output date return input data. This connection type is used for cyclic communications with Slaves that have both inputs and outputs. The worst-case response time required to move the system to a safe state after a safety input occurs (e.g., an emergency stop switch is pressed, a light curtain is interrupted, or a safety door is opened) or a device fails. The system reaction time includes the reaction time of sensors and actuators, just as it includes the reaction time of controllers and networks. The state of a component or device when the risk of human harm reduced to a permissible level. The logical chain to actualize a safety function, that consists of the input device (sensor), the control device (including a remote I/O device), and the output device (actuator). A controller with high reliability used for safety control. A safety network controller is a controller that is compatible with a safety network. Safety controllers and safety network controllers are sometimes generically referred to as safety PLCs. Extremely reliable data, with the risk of human harm reduced to a permissible level. A function executed by a safety-related system to achieve a safe state for a machine hazard. A unique number set for a safety network. With CIP Safety, a system can be built that included multiple networks. In this type of configuration, devices are uniquely identified and mutually confirmed using a TUNID that combines the network number and node address. The Network Configurator automatically sets network numbers for communications. Network numbers can also be specified by the user. The communications hierarchy added to actualize highly reliable communications. A certificate of the configuration data issued to a device from the Network Configurator. The device verifies that the configuration data is correct by using the safety signature. Using only one input or output as the input or output. One of the connection types for DeviceNet Safety communications. With a single-cast connection, a Safety Master and Safety Slave communications 1:1. This connection can be set for either an input or an output, and separate connections are needed for each. In this manual, items used for general control purposes are called “standard” to differentiate them from devices, functions, data, and other items for which which safety measures have been applied. A CPU Unit used for standard control, such as CPU Units in OMRON’s CS or CJ Series. This term is used to differentiate from Safety CPU Units. A signal used to detect external wiring coming into contact with the power supply (positive) or short circuits between signal lines. An acronym for Target Unique Network Network Identifier. The TUNID is the UNID of the local node. The TUNID is automatically set when configuring devices with the Network Configurator. The set TUNID is saved in nonvolatile memory in the device and used in the future. An acronym for Unique Network Network Identifier. An ID used to uniquely identify once device in and configuration of multiple networks. The UNID consists of the Safety Network number and node address. 291 Index A abort, 26, 64 abort errors, 232, 235 ABORT State, 210 access control, 207 AND, 137, 143 automatic baud rate detection, 65 dual channel complementary, 125, 138 dual channel complementary (2 pairs), 138 dual channel equivalent, 125, 126, 138 dual channel equivalent (2 pairs), 138 dual channel mode setting, 125, 129 E EDM, 137 B emergency stop pushbutton monitoring, 137, 159 Enable Switch, 194 baud rate, 101 EPI (data expected packet interval) setting, 83 baud rate setting, 28, 65 error detected during self-diagnosis, 127, 130 baud rate switch, 28 error history, 234, 239 error history saving area, 241 C calculated PFD values, 278 calculated PFH values, 278 centralized monitoring system, 10 COMM, 24 communication connectors, 57 Comparator, 151 configuration lock, 204 configuration lock status, 24 CONFIGURING Mode, 210 connection type setting, 83, 84 contact operation counter, 117 contact operations alarm threshold, 117 Counter, 198 creating a send message, 112 CRITICAL ERROR State, 210 critical errors, 232, 234 cycle time, 219 D error history table, 241 error latch time, 127, 131 example for dual channel equivalent setting, 140 Exclusive NOR, 137, 149 Exclusive OR, 137, 148 EXNOR, 137 EXOR, 137 external device monitoring, 137, 176 F fault present setting, 142 function block editing, 138 function block parameter settings, 138 function blocks, 137, 138 function tests, 141 G gateway default gateway, 101 general precautions, xviii data expected packet interval setting, 83, 85 general status, 89, 90, 93, 94, 103 default gateway, 101 glossary, 289 DeviceNet communications connector, 29 DeviceNet communications specifications, 35 discrepancy error, 126, 127 I discrepancy time, 125, 138, 140 I/O comments, 116 distributed safety control system, 10 I/O connection settings, 83 dual channel, 129 I/O power monitor, 117 293 Index I/O refresh cycle time, 222 I/O tags, 68, 90, 93, 104, 116, 125, 130 N I/O type, 90, 93, 103 NE1A-series, 3 IDLE Mode, 210 network configurator, 18 IN 0 to 15, 24 network reaction time, 223 IN 0 to 39, 24 node address duplication, 28 input and output size settings, 141 node address duplication error, 64 input channel mode, 124 node address setting, 64 input OFF delays, 124 node address switches, 28 input ON delays, 124 nomenclature, 20 input tags, 135 nonfatal errors, 232, 235 input type settings, 138 non-safety data, 79, 90 input/output terminals and internal connections, 30 NOT, 137, 143 inspection, 260 IP address, 100 L laws and regulations, xix LED indicators, 24 light curtain monitoring, 137, 162 Local Input Monitor, 79 O OFF-delay timer, 137, 172 ON-delay timer, 137 online monitoring, 5 open type setting, 83, 84 operating mode, 210 operating mode changes, 213 Local Input Status, 24, 78, 89, 90, 93, 94, 103 operating mode setting at startup, 213 local inputs, 110 OR, 137, 146 Local Output Monitor, 80 OUT 0 to 7, 24 Local Output Status, 24, 79, 89, 90, 93, 94, 103 outline of programming, 134 local outputs, 110 output channel mode, 129 local safety I/O, 3 output points setting, 141 LOCK, 24 output tags, 135 LOCK LED, 204 logic functions, 134, 137 lost password, 207 M mode setting, 129 module status, 24 monitoring control system, 8, 9 MS, 24 P password, 207 power supply terminal for external input devices and test outputs, 30 power supply terminal for external output devices, 30 power supply terminal for internal circuits, 30 program capacity, 136 Pulse Generator, 196 Multi Connector, 200 multi-cast, 84 multi-cast connection, 84 muting, 178 R reaction time, 225 reaction time calculation, 226 reaction time calculation examples, 226 reading and clearing the error history table, 241 294 Index remote I/O area, 68 subnet masks, 100 remote I/O area attributes, 69 supported function blocks, 137 Remote I/O Area Data Configuration, 70 synchronization time setting, 141 reset, 137, 154, 205 system configuration, 7 Reset Set Flip-Flop, 149 reset types, 205 resetting errors, 127, 131 restart, 137, 157 T test output mode, 128 routing, 137, 177 Test Output/Muting Lamp Status, 79, 89, 90, 93, 94, 103 RUN Mode, 210 test outputs, 110 test source, 124 S total ON time alarm threshold, 121 total ON time monitor, 119 safety chain, 225, 230 trigger address setting, 112 safety connections, 83 two inputs evaluated, 125 safety control system, 8, 9 two-hand control, 169 safety data, 78, 79, 85 two-hand controller, 137 safety gate monitoring, 137, 164 safety I/O communications, 3, 83 safety input, 124 U safety input terminals, 30 USB communications connector, 29 safety master, 82 USB communications status, 24 safety network controller, 2 user mode switch, 137, 174 safety output terminals, 30 safety precautions, xx safety signature, 84 W safety slave, 82, 89 waiting for TUNID setting, 211 safety slave I/O, 108 wiring input devices, 50 selecting the I/O type, 90 wiring output devices, 51 SELF-DIAGNOSTIC Mode, 210 send condition setting, 112 setting additional status, 90, 93, 104 setting I/O tags, 90 setting slave I/O, 93, 104 seven-segment display, 26 single channel, 125, 129, 138 single-cast, 84 single-cast connection, 84 slave I/O, 92 slave I/O area hold setting, 69 software setting, 28, 64 standalone controller, 66 standard I/O communications, 3, 92, 102 standard slave, 92, 102 standards, xviii 295 Revision History A manual revision code appears as a suffix to the catalog number on lower left corners of the front and back covers of the manual. Cat. No. Z906-E1-07 Revision code The following table outlines the changes made to the manual during each revision. Page numbers refer to the previous version. Revision code 01 02 03 04 05 06 07 Date April 2005 April 2006 Revised content Original production Page 16: Regulations and standards modified. Page 34: Seven-segment display information modified. Page 38: Information added on DeviceNet communications specifications. Page 59: Information added on node address setting. Page 60: Information added on baud rate setting. Page 63: Seven-segment display information modified. Pages 64 to 67: Information added on Remote I/O Area data configuration. Page 80: Information added on explicit message transmission. Pages 88 and 92: Information added on error latch time setting. Page 103: Information changed on number of inputs and outputs setting. Page 103: Information changed on output points setting. Pages 114 and 116: Headings changed. Pages 113, 118, 121, 124, and 128: Information changed on optional output setting. Pages 126 and 134: Information added on error handling and resetting. Pages 154 to 157: Information added on calculating reaction times. Page 161: Information added on indicator status. Page 166: Information added on error history table. Page 167: Information added to error information details. Pages 169 to 172: Information changed and added on corrections in response to display messages. Pages 173 to 176: Information added on connection status tables. Page 184: Changes and additions made to glossary. September Information added describing the functions added to the NE1A-SCPU01-V1 unit ver2006 sion 1.0 and NE1A-SCPU02 unit version 1.0 Controllers. June 2007 Information added describing the functions added to the NE1A-SCPU01-V1 unit version 2.0 and NE1A-SCPU02 unit version 1.0 Controllers. December 2007 Added descriptions and corrected mistakes. April 2008 Added descriptions and corrected mistakes. July 2009 Added descriptions on the NE1A-SCPU01-EIP and NE1A-SCPU02-EIP. 297 OMRON Corporation Industrial Automation Company Safety Devices Dvision Shiokoji Horikawa, Shimogyo-ku, Kyoto, 600-8530 Japan Tel: (81) 75-344-7093/Fax: (81) 75-344-8197 Regional Headquarters OMRON EUROPE B.V. Wegalaan 67-69-2132 JD Hoofddorp The Netherlands Tel: (31)2356-81-300/Fax: (31)2356-81-388 OMRON SCIENTIFIC TECHNOLOGIES INC. 6550 Dumbarton Circle, Fremont CA 94555-3605 U.S.A. Tel: (1) 510-608-3400/Fax: (1) 510-744-1442 Authorized Distributor: OMRON ASIA PACIFIC PTE. LTD. No. 438A Alexandra Road # 05-05/08 (Lobby 2), Alexandra Technopark, Singapore 119967 Tel: (65) 6835-3011/Fax: (65) 6835-2711 OMRON (CHINA) CO., LTD. Room 2211, Bank of China Tower, 200 Yin Cheng Zhong Road, PuDong New Area, Shanghai, 200120, China Tel: (86) 21-5037-2222/Fax: (86) 21-5037-2200 OMRON Industrial Automation Global: www.ia.omron.com © OMRON Corporation 2005 All Rights Reserved. In the interest of product improvement, specifications are subject to change without notice. Printed in Japan Cat. No. Z906-E1-07 0709-0.5C (C)