1
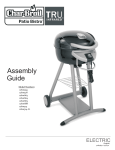
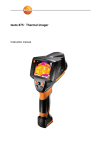
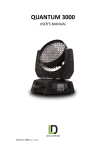
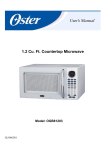
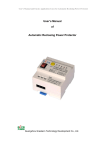
TRANSMITTER AND PROBE
2
1
Wireless Multi-Sensor
Meat Thermometer
Model: 4885637
1. Battery Compartment
2. Connector jack
for probe
3. POWER: ON / OFF
3
USER MANUAL
1. Probe Connector
INTRODUCTION
Thank you for selecting the CharBroil™ Wireless Multi-Sensor Meat
Thermometer. Please keep this manual for operation instructions and future
reference.
OVERVIEW
2. Multi-Sensor Probe
3. “Cold Spot” mark
1
FRONT VIEW
3
2
3
GETTING STARTED
BATTERIES
HANDHELD
RECEIVER
Insert the batteries as shown, taking care to match the
polarities (+ / -). Insert batteries into both receiver and
transmitter.
1
5
4
7
2
3
6
1
+
8
2
TRANSMITTER
1 POWER
: Power ON / OFF - Backlight ON / OFF
2 MEAT: Select meat type
3. PROBE / CF: Select probe tip or cold spot / change
between °C and °F
4. TASTE: Set Target Temperature
5. START / STOP: Timer Start/Stop
6. MIN / UP: Timer Minutes / Scroll Up
7. SEC/ DOWN: Timer Seconds / Scroll Down
8. CLEAR / ALARM: Clear entry / Alarm Silence
BACK VIEW
1
2
1.
2.
3.
4.
3
Removable Belt Clip
Battery Compartment
Transmitter ON/OFF
Transmitter Jack
4
LCD SCREEN
1
7
2
3
4
5
6
1.
2.
3.
4.
Meat Type
Target Temperature
Countdown Timer
Remaining Time
CHARBROIL, LLC. INSTRUCTIONS © 2013
5.
6.
7.
Alarm ON icon
Sensor selection Icon
Current temperature
-
3
-
+
+
- +
1
TRANSMITTER DATA TRANSMISSION
Place the transmitter within 100 Feet of the handheld unit.
OPERATION
CAUTIONThe probe is a sharp metal object, and will
become hot during cooking. Take care when handling.
1 Plug the probe connector to the transmitter jack.
2 Insert tip of the probe into the center of the meat, taking care
not to pierce through it. Do not expose any part of the probe or
to open flames.
3. The probe contains 5 separate sensors spaced along the probe
beginning at the tip. If utilizing the “Cold Spot” function, make sure
probe is fully inserted up to the “Cold Spot” mark indicated on the
probe.
4. Press the POWER button on both transmitter and handheld
receiver.
5. Press the MEAT button on handheld receiver to select the type of
meat that you are cooking. Each press of the button will cycle
through the selections. BEEF - LAMB - PORK - POULTRY
(PLTRY) - GROUND BEEF/LAMB (HMBGR) - OTHER
6. Press the TASTE button on handheld receiver to select the
doneness of meat that you desire. Each press of the button will
cycle through the selections. RARE - MED. RARE - MED - MED.
WELL - WELL
NOTE - if you select meat type “OTHER” you can set the desired
internal temperature manually. The default temperature is 150°F.
Press the UP/DOWN buttons to set the desired target
temperatures. The selectable range is 110°F to 250°F.
7. Set the Timer - Press the MIN or SEC button on handheld receiver
to select the desired cooking time.
NOTE - if you hold the button for more than 10 seconds, the digits will
increase/decrease rapidly. To reset the time, press the CLEAR
button.
8. Set the Alarm - Press and hold the ALARM button on handheld
receiver for 3 seconds to select Alarm ON or OFF. The
icon will
display when the alarm is active. Once the food has reached the
target temperature. the
will flash and an alarm beep will sound.
9. Set the Probe Mode.
Probe Function: The display can be set to “Tip” or “Coldspot”. To
use the probe in “TIP” mode, press the “PROBE” button until “Tip”
shows in the display. This function will display the temperature
sensed by the Tip sensor of the probe.
Press the “PROBE” button again to switch to the “Coldspot”
function. This function will scan each of the sensors in the probe
and display the coldest reading.
PRINTED IN CHINA
80022298_4885637 11.07.13
MANUALLY SET TARGET TEMPERATURE
1.
2.
3.
4.
5.
6.
Insert probe into the meat as described in “OPERATION”
section.
Press and hold MODE to select manual target
temperature mode. When in this mode, the meat icons
will disappear.
Press MEAT / UP and COOK / DOWN to select your
desired temperature.
Your target temperature will appear on the LCD
screen. Begin cooking.
The cooking alerts will sound as described above.
Press any button to silence the alert.
NOTE Press and hold MODE to return to automatic
target temperature mode.
ALARM INDICATIONS
1.
2.
3.
Once the meat probe has reached the desired internal
temperature, a loud beeping alarm will sound and the
symbol will flash. The audible signal will be two beeps with
one second of silence between beeps.
Press “STOP” to silence the alarm signal. Note that the
symbol will continue to flash unless current temperature is
below target temperature. The Alarm signal will silence itself
after 30 seconds if the STOP button is not pressed.
If the current temperature falls below the target temperature,
the alarm will silence itself.
COUNT-UP / COUNTDOWN TIMER
The count-up and countdown timers operate independently
of the temperature probe sensors.
To set a count-up timer:
If no countdown time is set the timer will act as a count
up timer.
To start timer:
1. Press START / STOP to begin.
2. Press START / STOP again to pause,.
3. Once paused, press CLEAR to reset to zero.
4. Once a countdown has finished, the unit will beep
4 times repeatedly until you press the STOP button.
The timer display will also flash.
The alert will silence itself after 30 seconds.
NOTE The countdown timer will count up to 23:59.59 sec.
To set a countdown time:
Use MIN and SEC to set the countdown time.
To start timer:
1. Press START / STOP to begin.
2. Press START / STOP again to pause,
3. Once paused, press CLEAR to reset to zero.
4. Once a countdown has finished, the unit will beep
4 times repeatedly until you press the STOP button.
The timer display will also flash.
The alert will silence itself after 30 seconds.
AFTER COOKING
•
•
Once cooking is finished, remove the probe using an
oven mitt.
Clean the probe with water and a mild detergent.
To clean the main unit and sensor, wipe with a damp
cloth.
NOTE: Do not clean the probe in a dishwasher
or immerse the main unit or sensor in water.
TEMPERATURE UNITS
Press C / F to select the preferred temperature units.
NOTE When the probe temperature exceeds the
maximum display temperature (310°C / 610°F) the LCD
will show “HHH”. When the probe temperature is below
the minimum display temperature (-10°C / 14°F) the LCD
will show “LLL”.
NOTE The technical specifications for this product and
the contents of the user manual are subject to change
without notice.
SPECIFICATIONS
TYPE
DESCRIPTION
HANDHELD RECEIVER UNIT
120 x 60 x 26.5 mm
LxWxH
(4.72 x 2.36 x 1.04 in)
Weight (without
75g (2.6 oz)
batteries)
Temperature unit
°C / °F
Temperature
1.6 °C (3°F) in the range (70°F - 210°F)
Accuracy
Display temperature
range
Signal frequency
915 MHz
Power
2 x UM-4 AAA 1.5 V batteries
BASE TRANSMITTER UNIT
LxWxH
Weight (without
batteries)
Transmission range
Power
PRECAUTIONS
•
•
•
•
•
•
•
•
Do not subject the unit to excessive force, shock, dust,
temperature or humidity.
Do not cover the ventilation holes with any items such
as newspapers, curtains etc.
Do not immerse the unit in water. If you spill liquid over
it, dry it immediately with a soft, lint-free cloth.
Do not clean the unit with abrasive or corrosive
materials.
Do not attempt to service this unit. There are no user
serviceable components.
Only use fresh batteries. Do not mix new and old
batteries.
Properly dispose of old batteries. be sure to Recycle
old batteries.
Do not place unit in dishwasher.
70 x 91 x 56 mm
(2.7 x 3.6 x 2.2 in)
50 g (1.75 oz)
33 m (100 ft) unobstructed
2 x UM-4 AAA 1.5V batteries
FCC STATEMENT
This device complies with Part 15 of the FCC Rules.
Operation is subject to the following two conditions: (1) This
device may not cause harmful interference, and (2) This
device must accept any interference received, including
interference that may cause undesired operation.
WARNING Changes or modifications not expressly
approved by the party responsible for compliance could
void the user’s authority to operate the equipment.
NOTE This equipment has been tested and found to
comply with the limits for a Class B digital device, pursuant
to Part 15 of the FCC Rules. These limits are designed to
provide reasonable protection against harmful interference
in a residential installation.
This equipment generates, uses and can radiate radio
frequency energy and, if not installed and used in
accordance with the instructions, may cause harmful
interference to radio communications. However, there is
no guarantee that interference will not occur in a particular
installation. If this equipment does cause harmful
interference to radio or television reception, which can be
determined by turning the equipment off and on, the user
is encouraged to try to correct the interference by one or
more of the following measures:
• Reorient or relocate the receiving antenna.
• Increase the separation between the equipment and
receiver.
• Connect the equipment into an outlet on a circuit
different from that to which the receiver is connected.
• Consult the dealer or an experienced radio / TV
technician for help.
DECLARATION OF CONFORMITY
The following information is not to be used as contact for
support or sales. Please call our customer service number
. harbroil.com, for all inquiries.)
(listed on our website at www.c
We
Name:
Address:
BACKLIGHT
Press the Power button to illuminate the screen for 10 seconds.
-10 °C - 321°C
(14°F - 610°F)
Telephone No.:
Charbroil, llc
1442 Belfast Avenue
Columbus, Ga 31902 USA
1-800-241-7548
declare that the product
Product No.:
4885637
Product Name:
Wireless Multi-Sensor Thermometer
Manufacturer:
SunYan
Address:
NO. 2, 7th South Street, QingGong Road 3
FoShan City, GuangDong, P.R. China
is in conformity with Part 15 of the FCC Rules. Operation
is subject to the following two conditions: 1) This device
may not cause harmful interference. 2) This device must
accept any interference received, including interference
that may cause undesired operation.