1
- -
UMTRI 86 50
Wizard of Oz
User's Manual
Version 4.0
Herbert Wesselman
Paul Green
I
DECEMBER 1986
UMTRI
The University of Michigan
Transportation Research Institute
Technical R.pert Documtation Page
2.
1. Ropoe No.
Accossin No.
3. Rodpimt's Cmtolog Mo.
UMTRI-86-50
5. R q o r t Dote
4. Title o d Subtitle
December, 1986
WIZARD OF OZ USER'S MANUAL VERSION 4.0
6. Prbming Or-izmtiorr
Coda
362905
8. Po&mimg Orgatizetin R.)ort No.
7. k W s )
UMTRI-86-50
H e r b e r t Wesselman and Paul Green
9. P u b m i n g Orgmirdocr N?
10. WorL Unit No.
md, Adbess
U n i v e r s i t y o f Michigan
T r a n s p o r t a t i o n Research I n s t i t u t e
2901 B a x t e r Road
Ann A r b o r . MI 48109-2150 U.S.A.
12. *suing
N-
11. b n o o c t or
13. TIO. of R-
and Period CoverwI
Interim
12/31/86
1/1/86
ad A d m s s
-
NCR C o r p o r a t i o n
R & D D i v i s i o n , Human F a c t o r s
1700 S. P a t t e r s o n
Dayton, Ohio 45479 U.S.A.
15. k*+l-twy
crontNO.
NCR Gift
A ~ M C V Code
(numan
Cost C e n t e r 9122 F a c t o r s )
14. $onsoring
Noks
Revised June 2, 1987
1'6. Absh.et
T h i s manual c o n t a i n s a d e s c r i p t i o n o f t h e Wizard o f Oz computer program,
s t e p - b y - s t e p i n s t r u c t i o n s on i t s use, and o t h e r m i s c e l l a n e o u s i n f o r m a t i o n .
The Oz p r o t o t y p e r i s b e s t s u i t e d f o r t h e development o f command language,
m e n u - o r i e n t e d and n a t u r a l language u s e r i n t e r f a c e s , p r i m a r i l y f o r " g l a s s
t e l e t y p e s " o r computers s i m u l a t i n g them. T h i s v e r s i o n was designed f o r t h e
IBM PC and c o m p a t i b l e c o m p u t e r s - s u c h as t h e NCR PC-8.
To b e g i n an Oz t e s t , messages a computer m i g h t send t o a u s e r a r e l o a d e d
u s i n g a keyboard enhancer, such as ProKey. The e x p e r i m e n t e r ' s PC i s t h e n
connected t o a n o t h e r PC o r a t e r m i n a l used b y t h e s u b j e c t , who i s l e d t o
b e l i e v e t h e y w i l l be i n t e r a c t i n g w i t h a computer. To b e g i n a d i a l o g u e , t h e
e x p e r i m e n t e r ( t h e w i z a r d ) h i t s a f u n c t i o n key. The a s s o c i a t e d t e x t ( e . g . ,
" T h i s i s t h e G a l a c t i c Computer. E n t e r y o u r name.") appears on b o t h screens.
Subsequently, t h e s u b j e c t t y p e s i n a response ( w h i c h a l s o appears on b o t h
s c r e e n s ) , t h e n t h e w i z a r d responds, and so f o r t h . The d i a l o g u e , a l o n g w i t h
t i m i n g d a t a , a r e s t o r e d on a d i s k f o r l a t e r a n a l y s i s .
17. K q Wrds
Human f a c t o r s , ergonomics,
u s e r i n t e r f a c e s , Wizard o f Oz,
p r o t o t y p i ng
19. Sowrity C l a u f . (of this
m)
Unclassified
P.
D"hibti*
S#i* CImssif. (of this
Unclassified
"*""'
21. No. of Poges
57
22. Price
CONTENTS
................................................. ii
WHAT IS THE WIZARD OF OZ? .................................1
WHAT IS OZ? ........................................... 1
WHAT IS NEEDED TO USE OZ? .............................1
HOW IS OZ USED TO DEVELOP AN INTERFACE? ...............2
WHY USE OZ? ...........................................3
HOW WAS oz DEVELOPED? ................................. 4
WHAT'S ON THE OZ DISK? ....................................7
USING WIZARD OF OZ ........................................8
OVERVIEW ..............................................8
STEP 1: MAKE A COPY OF THE OZ MASTER DISK ............. 8
STEP 2: GET A KEYBOARD ENHANCER ....................... 9
STEP 3: DEVELOP AND KEY IN THE INTERFACE DIALOGUE .... 11
STEP 4: TEST THE DIALOGUE WITH A WALK-THROUGH ........ 14
STEP 5: SET UP NULL MODEM OR MODEMS FOR A TEST ....... 18
STEP 6: PREPARE THE SUBJECT'S TERMINAL OR PC ......... 20
STEP 7: PREPARE THE WIZARD'S PC ...................... 24
STEP 8: TEST A SUBJECT ............................... 28
STEP 9: ANALYZE THE RESULTS AND REDESIGN THE DIALOGUE 31
SUGGESTIONS FOR TEST PROCEDURES ..........................34
CONVERTING THE PROTOTYPE INTO WORKING CODE ...............37
REFERENCES ............................................... 40
APPENDIX A .DETAILED FORMAT AND COPY INSTRUCTIONS ....... 41
APPENDIX B .HOW TO USE NEWKEY 3.0 WITH WIZARD OF 0Z ..... 43
APPENDIX C .ERROR MESSAGES AND THEIR MEANING ............ 47
APPENDIX D .MODEM SETUP .................................54
APPENDIX E .QUICK REFERENCE LIST OF COMMANDS ............ 55
APPENDIX F .BATCH FILE .................................. 57
PREFACE
.
PREFACE
This manual was written for students at the University
of Michigan taking Industrial and Operations Engineering
(IOE) 436, Human Factors in Computer Systems. It is also
intended for user interface developers, human factors
engineers, and programmers developing real user interfaces.
It is assumed readers know:
.
.
.
.
.
how
the
the
how
the
to turn on and restart an IBM PC and XT
following DOS commands: DIR, COPY, and PATH
rules for naming files and directories
to get to subdirectories (DOS CD command)
basic commands for EDLIN, the DOS line editor.
Readers without this knowledge should read the first
few chapters in the DOS manual, or any one of the many books
on the IBM PC Disk Operating System or on MS-DOS available
from local computer stores. Readers unfamiliar with a
keyboard enhancer (e,g. ProKey, Newkey) should skim a user's
manual before reading this.
Recent work on the development of the Wizard of Oz User
Interface Rapid Prototyper was supported by the Research and
Development Division of NCR, whose generosity is greatly
appreciated.
We also would like to thank John Boreczky for his
contributions to the editing of this manual, as well as Cam
Beattie, Rachel Krupp, Sue Adams, Melinda Rock, and Josh
Kerst for their comments. Finally, we would like to thank
the over 100 Michigan students who have used previous
versions of the Wizard of Oz for their patience and
feedback.
Copyright (c) 1986, 1987
Paul Green and the Regents of the University of Michigan
All Rights Reserved
*
**
***
*
**
**
*
**
*
*
**
NCR has a royalty-free, nonexclusive license to
use this software and documentation internally, and
make copies for internal use.
Students taking Industrial and Operations
Engineering 436 at the University of Michigan are
also given permission to make copies of the software
and documentation for use in that course. After the
course is over, they should erase their copies of
the Oz software.
iii
*
*
*
*
*
*
*
**
*
*
*
*
**
*
WHAT IS THE WIZARD OF OZ?
[This chapter is intended to familiarize readers
with the Wizard of Oz method and to describe the
version used at the University of Michigan.]
WHAT IS OZ?
The Wizard of Oz Rapid Prototyper is a computer program
to help people develop user interfaces to computer systems.
It has proven to be an effective tool for teaching human
factors concepts at the University of Michigan and
convincing people of the value of human factors efforts. In
its current form it is particularly well-suited for
prototyping command language, menu-oriented, and natural
language interfaces intended for "glass teletypes" (dumb
terminals) or personal computers simulating them.
WHAT IS NEEDED TO USE OZ?
The Michigan version of the Wizard of Oz was designed
for the IBM Personal Computer (PC) family and compatible
computers. The current software has been successfully
tested on the IBM PC, IBM XT, and the NCR PC-8 (an IBM AT
clone. )
In order to use the Wizard of Oz software, one will
need:
.
.
.
an IBM PC compatible with at least 256K of memory, a
serial port, and at least one 5-1/4 inch floppy
drive. (An AT class computer with a hard drive is
preferred. )
a color or monochrome display (and a display adapter
for it. )
a null modem or modems, connecting cabling, and a
second PC or terminal.
WHAT IS OZ?
-
.
WHAT IS NEEDED TO USE OZ? / HOW IS OZ USED...?
a keyboard enhancer/macro utility. (See STEP 2: GET
A KEYBOARD ENHANCER for further details.)
HOW IS OZ USED TO DEVELOP AN INTERFACE?
The development of the user interface begins with
deciding what users should be told and how they might
respond. Those ideas eventually take the form of a set of
messages and program logic. For Oz simulations, the exact
wording must be specified and not just the general nature of
the message.
After loading the Wizard of Oz and other software, a
typical Oz test session might begin with the experimenter
(the wizard) sending an introductory message to the subject
such as:
"Welcome to The University of Meshugenah Computer
System. Enter your ID."
The subject would then type a response such as:
" TURKEY. "
Characters typed by the subject are echoed to the
wizard's screen as they are typed so the wizard can
anticipate what to do next. On the other hand, messages
from the wizard are sent to the subject line by line to make
it appear that messages are coming from a computer. Thus
Wizard of Oz simulations are very much like the situation in
the children's tale of that name. In the simulation, the
appearance of the user interface is magically controlled by
a person behind the scenes.
To make the illusion seem realistic, system responses
to user input should be immediate. That is accomplished by
having a planned set of responses and assigning the text of
messages and menus to function (or soft) keys, though some
text may have to be typed in real time. For example, typing
function key one ( < F l > )might send the welcoming message
given previously. Several keyboard enhancers such as Newkey
WHAT IS OZ?
-
HOW IS OZ USED...? / WHY USE OZ?
(Bell, 1986), ProKey (Rosesoft, 1983) and SuperKey (Borland
International, 1985) have been used for that purpose.
WHY USE OZ?
The Wizard of Oz method has many advantages over
writing application-specific code for a user interface.
First, Wizard of Oz prototypes can be operational in much
less time than working application code, since the developer
does not actually have to code the interface and the program
logic. All the error messages and menus are merely assigned
to function keys, and the interface is ready to test. Thus,
Wizard of Oz user testing can be conducted at an early stage
in the development cycle, when there is flexibility in the
schedule and little commitment to the code.
Second, Wizard of Oz prototypes are easy to modify.
Modifying a message is as simple as using an editor or
keyboard enhancer to alter the text of a message. The
system is then ready for another user test. Ease-ofmodification is important because ease-of-use of the
interface being developed increases with the number of
iterations through the design-test cycle.
A third advantage of Wizard of Oz is that it contains
routines for collecting user performance data (response
times, typing times). Those data can be used to make
quantitative predictions of benefits of design alterations
and ultimate user performance. Thus, the Oz prototyping
methodology has many advantages over writing applicationspecific code.
There is other prototyping software in addition to Oz
(Palmiter, 1986), most of which has been designed for
engineering workstations and not PCs. Second, alternatives
that do exist for PCs (e.g. Dan Bricklin's Demo Program,
(Software Garden, 1986)) are strictly prototypers. They do
not have the interaction logging and analysis capabilities
that Oz has, nor the ability to modify the interface while
WHAT IS OZ?
-
WHY USE OZ? / HOW WAS OZ DEVELOPED?
it is being used (on the fly). On the other hand, they
provide many features for simulating full-screen interfaces,
something the Wizard of Oz Prototyper cannot do now. There
are no good alternatives for the particular class of
interfaces and hardware for which Oz was designed.
HOW WAS OZ DEVELOPED?
[This section is intended to give students a sense
of how teaching and research are connected and to
properly give credit to those that helped develop
the software.]
Original BASIC Version
The Wizard of Oz method was first developed by Chapanis
and his students at Johns Hopkins, who used it on a
mainframe. One of his students, Jeff Kelley, came up with
the name. After Chapanis popularized the method, it was
used by many others. (See Green and Wei-Haas, 1985a for
details. )
The work on Oz at Michigan began just over three years
ago. Paul Green heard Professor Marilyn Mantei talk about
the method at a seminar. He was then planning a new course
on Human Factors in Computer Systems (originally Industrial
and Operations Engineering (IOE) 491, now IOE 436). He
realized the Oz method was ideal for a user interface design
project to be included in the course. He knew that if
working code was required, the assignment would be
impossible to complete.
Since no one had ever written a version of Wizard of Oz
for microcomputers, Paul Green wrote the initial version in
his "spare" time. The early versions were written in
interpretive BASIC and supported communications up to 300
baud. Paul Ziots, working for Paul Green as a student
assistant, helped debug and test the initial version.
Students reacted enthusiastically to the Oz method, so
Paul Green continued to work on it on the side. A
description of that version of Wizard of Oz was presented at
WHAT IS OZ?
-
HOW WAS OZ DEVELOPED?
the Human Factors Society Annual Meeting (Green and WeiHaas, 1985b). Later in that year the code was modified to
support communications up to 1200 baud and to provide modem
support.
Since then, the Wizard of Oz Prototyper has progressed
rapidly. Mark Glaza, formerly a student in Paul's class,
modified the original BASIC version in early 1986 so that it
could be compiled. The compiled version had fewer bugs and
executed much faster than the interpretive BASIC version.
Revised Version in Pascal
In the spring of 1986, Mark left for a "real" job. Cam
Beattie, another former student from Paul's class, replaced
Mark. Cam redesigned the program and coded it in Turbo
Pascal (Borland International, 1985). This version of the
Wizard of Oz supported communications up to 9600 baud and
added many new features such as a help screen, traps for
problems with file and path names, and a one line input
window for the experimenter. Much of Cam's work focused on
developing code so that cosmetic alterations such as color
choices could be made with only minor code changes. At the
end of the summer, Cam left for active duty in the U.S. Air
Force.
Herb Wesselman, another graduate of Paul's class,
replaced Cam as the project programmer. Herb rewrote the
main menu, added modem support, enhanced the error checking
code, and added a feature to allow for structured walkthroughs. Herb also took the lead in writing this user's
manual. He is now also on active duty in the Air Force.
Herb was replaced by his friend John Boreczky. John
identified numerous small bugs in the code, redesigned some
areas of the user interface such as the modem handler, and
added new features such as an editor for the wizard, saving
of all characters typed by the subject, and improved error
WHAT IS OZ?
-
HOW WAS OZ DEVELOPED?
detection and recovery. John also revised and added to this
user's manual to reflect program changes.
The current version of Oz is written in Turbo Pascal,
version 3.01A, and uses 1/0 routines from several commercial
packages. The source code for the wizard's program is
roughly 7800 lines long (with comments) and the subject's
terminal emulator is 4500 lines. Work on Oz and Oz
utilities will continue for the next few years. Readers
interested in a more detailed history should read the report
describing the design rationale (Green and Wesselman, 1986).
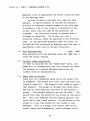
WHAT'S ON THE OZ DISK?
The contents of the Oz disk are described in the
README.DOC file. A self explanatory listing of it is in
Figure 1. This disk has the main Wizard of Oz program, the
subject's terminal emulator, a keyboard enhancer, and
analysis software.
To list the latest version (on disk) enter:
[See note below].
type readme.doc<RETURN>
FILE=README.DOC ---Wizard of Oz disk--- Version of 6-1-87
..............................................
------------ Description
File
README.DOC
COMMAND.COM
(list of files on this disk)
system file which allows you to boot your
system from this disk
main program file for the Wizard's
version of the program
subject's version of the program
user-supported keyboard enhancer (version 3.0)
the support program for Newkey 3.0
a sample key definition file
the batch file used to run Wizard of Oz
the batch file used to make working copy of
this disk
Oz session summary program
Microsoft QuickBASIC run-time module (needed
for 0ZSUMRY.EXE)
Figure 1. Listing of README.DOC file
Note:
In this manual
ab..zA..z0..89,etc.
represents
represents
represents
<ESC>
< CTRL>
<ALT>
<BREAK>
Some text
represents
represents
represents
represents
(italics) represents
keyboard characters
to type
the function keys
the return key
(often labeled < - I )
the escape key
the control key
the alternate key
the break key (often
labeled Scroll Lock)
messages printed by
the computer
USING WIZARD OF OZ
OVERVIEW
These steps are described in greater detail in the
section that follows. Readers that are familiar with Newkey
and the Oz method may wish to just skim over this chapter.
The steps required for using the Oz program are:
Step 1: Make a working copy of the master disk. Use the
working copy at all times.
Step 2: Get a keyboard enhancer, Newkey is the favored
choice for IOE 436.
Step 3: Develop and key in the interface dialogue using the
keyboard enhancer.
Step 4: Test the dialogue using the Oz walk-through mode.
Step 5: Set up the modems or a null modem cable for a test,
A null modem cable is used to hard wire the
computers together. Modems are used to link them by
a phone line.
Step 6: Prepare the subject's terminal or PC. If the
subject is using a PC, use the SUBJECT.COM program.
Step 7: Prepare the wizard's PC. Load in the WIZARD.EXE
program.
Step 8: Test a subject.
Step 9: Analyze the results and redesign the dialogue.
STEP 1: MAKE A COPY OF THE OZ MASTER DISK
To avoid accidentally erasing the Oz program, begin by
making a working copy of the Oz software. To make a copy of
the software, use the standard DOS COPY command. If the
computer has a hard disk drive, copy the files to a
directory on a hard disk and then to a formatted floppy
disk. If the computer has two floppy drives, copy the files
directly. (For those unfamiliar with the DOS FORMAT and
COPY commands, Appendix A of this manual gives step by step
instructions.) Although the Oz software does not take up
USING OZ
-
STEP 1: COPY MASTER DISK / STEP 2 : GET KEYBOARD ENHANCER
much disk space, the output files generated from test
sessions, which can be quite large, fill disks rapidly. It
is therefore suggested that the software be transferred to a
newly formatted disk or one that has been erased. If it is
anticipated that test sessions will be conducted with the
wizard and the subject in different rooms, copy the
subject's program (SUBJECT.COM) onto a separate disk.
STEP 2 : GET A KEYBOARD ENHANCER
The keyboard enhancer program is used to generate most
of the messages sent to the subjects. There are a number of
them available including Newkey (3.0), ProKey (4.0),
SmartKey (4.1) and SuperKey (1.0).
Newkey has been used by IOE 436 students far more often
than any other enhancer. The latest version of Wizard of Oz
has been most extensively tested with Newkey. Newkey (3.0)
employs the standard Prokey format for data files (Bell,
1986). A copy of this program, as well as its abbreviated
manual, are on the Oz disk. As with all user-supported
software, Newkey is not copy-protected and can be copied an
unlimited number of times for the purpose of evaluation.
(The author of Newkey has "stretched" the term evaluation to
include use for Paul Green's class.) If used for other
purposes, FAB Software, the developer of Newkey, should be
compensated. An order form is included in their
documentation.
ProKey (4.0) is the most popular commercial keyboard
enhancer on the market (Rosesoft, 1985). It is not copyprotected. Most people agree that ProKey is easier to use
and better documented than most other enhancers. ProKey
(4.0) sells for about $70.
Another popular keyboard enhancer is SrnartKey (4.1)
(Software Research Technologies, 1984). This program is
similar to the others, but has a "SuperShift" key which
USING OZ
-
STEP 2: GET KEYBOARD ENHANCER
allows for additional redefinable keys. It is not copyprotected and sells for about $50.
Finally, there is SuperKey (1.0) (Borland
International, 1985). Borland has an excellent reputation
for high quality software. (They developed Turbo Pascal.)
SuperKey is not copy-protected. It provides more features
than ProKey and sells for about $40.
All of these packages support saving, loading, and
merging of key definitions. The saved definitions can be
revised with commonly used editors. They are all memoryresident programs, and thus have an effect on the execution
speed of Wizard of Oz. Table 1 shows the display times and
computed baud rate for each keyboard enhancer using the
Wizard of Oz software. The times are for printing 23 lines
of 66 characters. The last two entries of the table are the
display speeds of the standard Writeln (print) function for
Turbo Pascal and the Fastwrite procedures from Turbo-Plus
(Nostradamus, Inc., 1985). The Writeln data approximates
how fast Wizard of Oz could run if keyboard enhancers were
infinitely fast, the communication rate was infinitely fast,
and the standard Turbo Pascal display routine was used. The
Fastwrite data is for the same conditions, but with the
display routine actually used in Wizard of Oz.
Table 1.
Comparison of Enhancer Speed
.................... Computer----------------------------- IBM PC-----------------NCR PC-8----Program
Time
(set)
Newkey
ProKey
SmartKey
SuperKey
Writeln
Fastwrite
7.65
8.81
8.96
9.51
2.20
0.55
Computed
Baud Rate
Time
(set)
Computed
Baud Rate
1980
1720
1690
1590
6900
27600
The data suggests that if a high speed (2400-9600 baud)
system is being simulated, Newkey on an IBM AT or compatible
USING OZ
-
STEP 2: GET KEYBOARD ENHANCER / STEP 3: DEVELOP DIALOGUE
should be used. For a slow speed system (300-1200 baud) the
choice of keyboard enhancer and computer has no limiting
effect of practical importance.
Those interested in more details about the keyboard
enhancer speed test should see the report describing design
rationale (Green and Wesselman, 1986). For reviews of
enhancer software in computer journals, readers should look
at Obregon (1985) or White (1985).
STEP 3: DEVELOP AND KEY IN THE INTERFACE DIALOGUE
After the choice of keyboard enhancers is made, the
interface messages must be developed and assigned to
function keys. The development of the interface messages is
a time-consuming process. After they are composed, they can
be assigned to function keys as follows.
3.1
- type: newkey /X<RETURN>
Load the enhancer
The loading process depends on the enhancer selected.
For Newkey, the number of characters ( X ) needed to
store the function key definitions (the messages being
keyed in) must be determined. This number is used by
Newkey to reserve space for these memory resident
definitions. (Other enhancers have similar
requirements,) For those with no idea of what that
total might be, start with X=15000,
If the definitions have been saved previously, use the
directory (DIR) command to determine the size (in
bytes) of the file holding the function key
definitions. That number is about 2X since each
character is stored as a two byte value. To be on the
safe side, always allow for room to add in new
definitions. The maximum allowable value of X is 32000
characters.
USING OZ
-
STEP 3: DEVELOP INTERFACE DIALOGUE
After entering "Newkey," etc, if the computer responds
with "Bad command or file name," then the keyboard
enhancer is not on the current drive:\path. Change the
current drive, path, or both to the one where Newkey
resides. Once Newkey has been loaded it will reside in
memory until the system is restarted.
- type: <ALT>=
3.2 Begin a key definition
The procedure for starting a key definition depends on
the program being used. In Newkey, holding down the
<ALT> key and then typing the " = " key will put the
enhancer in the definition mode. In response, a
message will appear at the top of the screen asking for
the key to be defined.
3.3
- type: <F1>
Identify the key to be defined
When a key is requested, depress it (in this example,
function key one on the upper left corner of the
keyboard, not capital F and then the digit one). Other
enhancers, such as SuperKey, require selecting the
definition mode before the key is identified.
3.4
type the definition
Enter the key definition
The enhancer is now in record mode. Type the text of
the message such as, Welcome to the University of
Meshugenah Computer System. Enter your ID.<RETURN>.
Every key pressed is recorded as part of the key
definition. (If a mistake is made while typing a
definition, refer to the General Advice section on page
13.
3.5
End the key definition
- type: <ALT>The procedure to end a key definition also varies from
enhancer to enhancer. For Newkey, hold down the <ALT>
key and press the " - " key on the top row. The message
at the top of the screen will then disappear, and the
-
USING OZ
-
STEP 3: DEVELOP INTERFACE DIALOGUE
program will allow more keys to be defined using steps
3.2 through 3.5.
3.6
Save the key definitions
- type: newkeysp<RETURN>
When the key definitions are finished they will need to
be saved to a file. With Newkey this is done by using
Newkeysp (a support program) and choosing option 3 in
the menu displayed on the screen. The program will
then ask for a file name for storing the current
definitions. After typing the file name and pressing
<RETURN> the program will then save the current
definitions, overwriting the previous contents of the
file. When it has finished press <RETURN> twice to
return to DOS.
General advice
When defining keys, watch out for the backspace key.
Some of the programs assume a backspace should be included
in the current definition if it is pressed, while others use
it as the correction key. For example, in Newkey, typing
"Help I'm trapped inside the computer." and then 37
backspaces will cause the message to appear and disappear on
the screen. Typing a series of spaces and backspaces
results in a dancing cursor. To find out how the backspace
key functions, read the user's manual for the enhancer
selected. The correction key combination for Newkey is
<CTRL>h.
To add a beep in a message type <CTRL>g where the beep
is to occur. For several beeps, type <CTRL>g, several
spaces and backspaces (for a delay between beeps) then
<CTRL>g again.
When using multiple line messages or menus, assign the
entire text to one function key. If many messages share a
common phrase (e.g. "Enter choice and press return."), the
phrase should be assigned to a function key to save typing.
Nesting a definition in another often leads to errors.
USING OZ
-
STEP 3: DEVELOP INTERFACE DIALOGUE / STEP 4: WALK-THROUGH
Be sure to end each line in a key definition with a
<RETURN> so that pressing a function key prints the message
on the wizard's display and sends it to the subject. Users
often forget to append <RETURN> to the last line of a multiline message. Including <RETURN> reduces the response time
and makes the wizard's job easier.
In order to define keys, most enhancement programs
suggest that an editor, such as EDLIN, be used. Once in
EDLIN (by typing: edlin filename<RETURN>) enter the insert
mode by typing "i" and then <RETURN>. The keys can now be
defined without system messages being displayed after
<RETURN> is pressed. When all the keys have been defined
press <CTRL>c followed by <RETURN> to get out of insert
mode. If the unformatted text for the messages is to be
saved, type "e" then <RETURN> to exit EDLIN, otherwise type
"q" then <RETURN> to return to DOS. (Saving the text
provides a history of what has been defined.)
For further details on using Newkey, see Appendix B.
STEP 4: TEST THE DIALOGUE WITH
A
WALK-THROUGH
After the messages have been assigned to function keys,
there is one more step before testing begins: carrying out a
one-machine walk-through of the interface. Walk-throughs
serve to test the interface without a subject. In this case
the wizard will display messages in the desired order and
type the expected subject response from the keyboard. All
keystrokes are recorded to an output file. The purpose of
the walk-through is to make sure the messages and their
sequence make sense. It also allows the wizard to become
familiar with the sequence of keys, decreasing "systemv
response time.
4.1
Load the key definitions - type: newkeysp<RETURN>, etc.
If the system has been rebooted, Newkey will have to be
reloaded (type: newkey<RETURN>) before Newkeysp will
load the files. (It is assumed that Newkey is the
USING OZ
-
STEP 4: WALK-THROUGH
keyboard enhancer used.) Load the key definition file
by choosing option 4 in the menu displayed by Newkeysp.
The program will then ask for the file which contains
the key definitions. Type the name of the file which
holds the key definitions followed by <RETURN>. Any
previous key definitions in memory will be erased.
Once Newkeysp has loaded the file, press <RETURN> twice
to return to DOS.
4.2
- type: wizard<RETURN>
Load wizard's version
If WIZARD.EXE is not in the current directory, change
the drive:\path to the one where WIZARD.EXE resides.
4.3
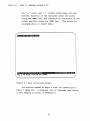
Exit title screen and go on
type: <RETURN>
Once the program has been loaded, the title screen in
Figure 2 (page 16) will be displayed on the screen. To
obtain further information about the Wizard of Oz
methodology press the <ESC> key. To start a session
press the <RETURN> key.
-
USING OZ
-
STEP 4: WALK-THROUGH
1BM PC/conpatible version f o r the experimnter' s conputer
Developed by:
Caneron 1, Beattie (Progrmner) and Paul Green (Project Manager)
Rddi t ional nodif icat ions by: Herbert Nesselnan and John Boreczky
The University of Michiyan
UNIRI Hwan Factom Divrsion
Lnn Lrbor, Michigan 48109-2150
Phone (313) 763-3795
-
Copyright
(c)
1986,1987
Paul Green and the Regents of the University of Michigan
1111 Rights Reserved
Figure 2.
4.4
Wizard of Oz title screen.
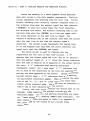
Specify walk-through mode
- answer: yes
Pressing <RETURN> will cause the parameter menu to
appear with the walk-through question displayed on the
left half of the screen (Figure 3 on page 17). Answer
"Yes" to this question so the program will enter the
walk-through mode.
USING OZ
-
STEP 4: WALK-THROUGH
Drive:\Path\Data File---(To dis lay directory contents,
enter he directory nane onlyl)
I
I
Wizard Nane--1 Subject lane-
'
Version Nun--
I
-
choice or to Move cursop laterally,
yo fron iten to iten,
to gle, Caps Lock, and Keyboard for typed entries,
da a collectionl
!
Figure 3. Walk-through menu screen.
4.5 Enter data fields
- type in responses
Now specify the items on the right half of the screen
by typing the response and using the arrow keys to
traverse the fields. The only data which must be
entered is the data file path and name. Entering only
a directory name will list the files in that directory
on the screen. For the remarks, enter any information
which might help describe the test session (e.g.
overall interface test, test of revised transfer funds
menus, etc.).
USING OZ
-
STEP 4: WALK-THROUGH / STEP 5 : SET UP MODEMS
4.6
Start data collection
- type: <ESC>
Once the data fields are specified, press the <ESC> key
to begin the walk-through. The program now enters the
data collection phase of the simulated user test. For
example, the wizard might press <F1> to display the
message "Welcome t o t h e University o f Meshugenah
Computer S y s t e m . Enter your I D . " and would also type
"TURKEY," the subject's expected response. Continue
pressing function keys and entering responses until the
interface has been completely tested. The wizard can
type in notes about how the function key messages
should be changed during the walk-through.
4.7
End data collection
- type: <CTRL><BREAK>
After you are done, press the <CTRL><BREAK> combination
to end the walk-through. The program will then ask if
another session is desired.
Most likely, typographical errors in some of the
definitions or confusing messages will be discovered during
the walk-through. These errors are readily detected by an
observer who was not involved in entering the function key
definitions. To revise them, answer "no" to the repeat
question so the Oz program will return control to DOS. Use
the enhancer or an editor to alter the messages before
testing subjects. If, on the other hand, the interface is
ready to be tested, answer "yes" and Oz will return to the
settings screen.
STEP 5: SET UP NULL MODEM OR MODEMS FOR A TEST
To use Wizard of Oz with the wizard and subject in
close proximity to each other, a null modem cable will be
needed. This cable has two 25 pin "D" connectors (the end
looks like a trapezoid or a "D" squashed sideways). Both
ends of the cable have identical female connectors. (Female
connectors have holes in them to plug things into. Male
USING OZ
-
STEP 5 : SET UP MODEMS
connectors have pins that stick out.) Connect either end to
the mating male connector on the back of the PC or terminal.
Each end will mate in only one way because of the
connector's "D" shape. Most computers have two of these
connectors. If the computer is connected to a network (or
other computers, e.g. MTS - Michigan Terminal System), only
one of these will be exposed, usually port #2. (The port
used is selected later in the settings menu.) Generally the
ports are not labeled or numbered, so guessing is required.
If both ports are available, use either one.
If the subject and experimenter will be separated by
some distance, two modems and telephone connectors will be
needed to communicate. The Wizard of Oz program expects the
modem used to be a Hayes Smartmodem or a 300, 1200, or 2400
baud Hayes-compatible modem. To set up the modems:
5.1
Connect the modems to the computers
Connect one modem to the wizard's PC and the other to
the subjects's PC or terminal using RS-232
communications cables. The cables should be connected
to the computers in the same manner as null modem
cables (described above). Then, connect the modem to
phone lines using the phone cord with the modular
connectors which comes with the modem.
5.2
Turn on the modem
Once the connections have been made, plug in the modem
to a wall outlet and turn it on.
5.3
Pre~aremodem for session
Modem set-up is done automatically by the program when
modem usage is specified in the opening menu. The
program will take care of dialing the phone or
answering it. If the subject is using a terminal, the
experimenter will have to set up the modem. (See
Appendix D for instructions.)
USING OZ
-
STEP 6: PREPARE SUBJECT'S PC
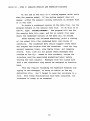
STEP 6: PREPARE THE SUBJECT'S TERMINAL OR PC
If the subject is using a PC, run the subject's version
of Wizard of Oz. The actions listed in this step (6.1
through 6.5) should be completed by the experimenter before
the subject arrives. (An abridged version of this section
is in Appendix E.)
- type: subject<RETURN>
6.1 Start subject's version
With the Oz disk in the active drive of the subject's
The
PC type: subject<RETURN> at the DOS prompt (C:)).
program will load and initially display a screen
resembling the one in Figure 2 (page 16). To obtain
additional information about Wizard of Oz, press the
<ESC> key.
- type: <RETURN>
6.2 Go to settings menu
Typing <RETURN> will cause the screen to blank
momentarily, and then the main menu (Figure 4 on page
21) will appear. The experimenter uses this menu to
set the communication parameters.
.
USING OZ
-
STEP 6: PREPARE SUBJECT'S PC
30fl l2fi4 249fl 4800
Serial Port--
91
Moden Used--- Yes
a
DataBits----7
3
Stop Bits---- I
a
Pari t~"""-
2
Even Odd
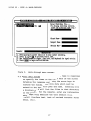
Figure 4. Subject's settings menu.
-
6.3 Set parameters
use ARROW KEYS
The menu in Figure 4 will have the default values (8
data bits, no parity, 1 stop bit, etc.) already
selected. Alter these settings by using the " < - "
(left) and "->" (right) arrow keys to change the value
of a field. Go from field to field by using the up and
down arrow keys, or with the <RETURN> key. The values
selected must match the ones selected on the wizard's
PC. Furthermore, make sure that the port specified in
the menu matches the one to which the communication
cable is connected.
6.4 Exit settings menu
-
type: <ESC>
When satisfied with the communication settings, press
the <ESC> key.
USING OZ
-
STEP 6: PREPARE SUBJECT'S PC
Optional modem preparation - type: phone number<RETURN>
This step will only take place if modem usage is
specified in the communication settings menu. The
program will display status messages while the modem is
being set up. When the set up is complete, the program
will prompt the experimenter for the phone number of
the wizard. Type in the phone number and press
<RETURN>. (Dashes, other punctuation, and spaces may
be typed as desired. Commas may be used to place a 2
second pause in the dialing. Letters may be
substituted for numbers.) The modem will then dial the
phone and establish the connection with the wizard's
PC. Once the connection has been made, the program
functions as if the PCs were connected by a null modem
cable.
6.6
Begin terminal emulation
The screen will clear, and the message "Beginning
Terminal Emulation. Use <CTRL><BREAK> when ready t o
quit. Press <RETURN> t o clear the screen and begin
testing." will appear at the top of the screen. When
<RETURN> is pressed, the screen will clear and the
cursor will be placed in the upper left corner of the
screen. The computer is now ready for the subject to
take control and test the interface.
USING OZ
-
STEP 6: PREPARE SUBJECT'S PC
Table 2 summarizes the actions needed to start the
subject's program.
Table 2.
Summary of actions needed to start subject's
version of Wizard of Oz.
Situation
Key pressed or
Action taken
Result
DOS prompt (C:\>)
Type SUBJECT
<RETURN>
Starts subject's
version
Title screen
displayed
<RETURN>
Brings up settings
menu
Parameter menu
displayed
Select desired
settings
Sets communication
parameters
Parameter menu
displayed
<ESC>
Exits menu and
displays message
Opening message
displayed
<RETURN>
Clears screen and
ready to test
If the subject is using a dumb terminal, it will have
to be configured by the experimenter. On some terminals
this can be done by using the keyboard or special function
keys to alter the communication parameters. On others, one
may have to remove the cover on the terminal and adjust the
dip switches on the circuit board. The terminal should be
set for full duplex mode or FDX (sometimes called no local
echo). If each character typed appears twice, the terminal
is in half duplex mode or HDX (local echo) and needs to be
changed. Also, the terminal should be set to 8 data bits,
no parity, and 1 stop bit (the defaults for Wizard of Oz).
Other values will work too, but whatever values are
selected, the communication settings of the terminal must
match the ones on the wizard's PC exactly. Otherwise, the
text sent by the wizard will appear as garbage on the
terminal's screen.
To initialize the modem and dial the wizard, see
Appendix D.
USING OZ
-
STEP 7: PREPARE WIZARD'S PC
STEP 7: PREPARE THE WIZARD'S PC
Before loading the wizard's software, the pre-defined
key definitions must be loaded, using Newkey and Newkeysp as
done in STEP 4. (If Newkey was loaded after the computer
was last turned on, there is no reason to load it again as
it remains in memory.) After the definitions are loaded,
several actions follow. (An abbreviated version of this
section is in Appendix E. Appendix F contains an automated
version. )
7.1
Start wizard's version
- type: wizard<RETURN>
After the key definitions have been loaded and control
is returned to DOS (as indicated by its prompt, C:\>),
type wizard<RETURN>. There will be a momentary pause,
the screen will clear, and the opening screen (Figure 2
on page 16) will appear. (If the WIZARD.EXE file is on
a floppy disk, this disk can be removed and replaced
with a data disk at this point.) To get further
information about the Wizard of Oz method, press the
< E X > key.
7.2
- type: <RETURN>
Go to settings menu
By pressing <RETURN> the settings menu with the walkthrough question (Figure 3 on page 17) will be
displayed. At this time answer "No," and the list of
communication options, as shown in Figure 5, will be
displayed on the left side of the screen. The right
side of the screen has several fill-in-the-blank fields
(e.g. Drive:\Path) which may contain initial values.
USING OZ
-
- I
STEP 7: PREPARE WIZARD'S PC
1
300 1208 2408 4800
,
Serial Port--
4
2
,Subject Uses-
a
Ter~inal
Model Used--- Yes fl
Data Bits---- 7
a
Stop Bi ts--0- 0
4
Wizard Na~e-Subject Hale-
2
~
-
Drive:\Path\Data File----
Version N U ~ -
Parity------- Even Odd
INSTHUCEIVNS
-
l I Press or to select choice or to rmve cursor laterallyl
2, Press
for
to yo fro* itel to itel.
3 1 Use Insert Qverwri te to gle, Caps Lock, and Keyboard for typed entries,
to begin da a collection,
4, Press
$
I
Figure 5 .
7.3
a
S
Wizard's settings menu.
Set parameters
- use ARROW KEYS/keyboard
The default settings (marked with asterisks) on the
left side of the screen can be altered to any of the
desired values by using the " < - " (left) and " - > "
(right) arrow keys to change the value, and the up and
down arrow keys to go from setting to setting. These
entries must match those selected in the subject's
version. Furthermore, the port to which the
communication cable is connected must match the port
given in the menu. To alter the fields on the right
side of the screen, select the appropriate field with
the up and down arrow keys and then type the response.
The insert/overwrite, caps-lock, and num-lock keys all
can be used to perform their normal functions. See
USING OZ
-
STEP 7 : PREPARE WIZARD'S PC
Appendix C for an explanation of errors which may occur
in the settings menu.
Be sure to enter a new data file name for each
session. It may be helpful to include the subject's
initials or interface version number in the file name.
To display a list of the files in a directory on the
screen, enter only the name of the directory (no
filename). The directory listing is removed when a
filename is specified. (If Oz does not give a
directory listing, check the spelling of the directory
name. If the specified directory does not exist, Oz
follows the DOS convention in assuming that the user is
specifying a data file on the main directory.)
7.4 Exit settings menu
- type: <ESC>
When satisfied with the settings press the <ESC> key to
start the actual testing.
7.5
Optional modem preparation
If "Yes" is selected for the "Modern Used" entry, the
modem will be automatically set up to answer the phone.
The program will display messages describing the
current state of communications.
7.6 Begin data collection
There will be a momentary delay while the output file
is prepared. The screen will then clear and look like
Figure 6 (page 27). The system is now ready to begin a
test session. The screen is divided into three parts.
The top 23 lines duplicate the text on the subject's
screen. (The subject actually can see 24 lines.) The
second line from the bottom of the screen is the status
bar. This line displays the two sending options, and
tells how to end a test session. At the bottom of the
screen is a one line window for the wizard to edit
messages. This is a simple line editor that allows
normal typing and backspacing, cursor movement using
USING OZ
-
STEP 7: PREPARE WIZARD'S PC
the " < - " (left) and " - > " (right) arrow keys, tab and
backtab, deletion of the character under the cursor
using the <DEL> key, and insertion of characters at the
cursor position using the <INS> key. (The cursor is
enlarged while in insert mode.)
Figure 6. Data collection screen.
The actions needed to begin a test are summarized in
Table 3 (page 28). A complete list of commands used during
a test session is given in APPENDIX E.
USING OZ
-
STEP 7: PREPARE WIZARD'S PC / STEP 8: TEST A SUBJECT
Table 3. Summary of actions needed to start the wizard's
version of Wizard of Oz.
Situation
Key pressed or
Action taken
Result
DOS prompt (C:\>)
Type:
WIZARD
<RETURN>
Starts subject's
version
Title screen
displayed
<ESC>
Displays further
information on
Wizard of Oz
Title screen
displayed
<RETURN>
Brings up parameter
menu
Parameter menu
displayed
Select desired
settings
Sets communication
parameters
Parameter menu
displayed
<ESC>
Exits menu and
enters data
collection phase
STEP 8: TEST A SUBJECT
Wizard of Oz interactions follow the WhaYKIWhTSS (wacky
wits) principle, What You Key Is What The Subject Sees. In
its simplest sense, Wizard of Oz simulations are
conversations between two parties who type in what they say
to each other. As was noted earlier, a line of text from
the wizard does not appear on the subject's screen until it
is complete. This makes the source look like a computer to
the subject. On the other hand, the subject's responses
appear on the wizard's screen as the subject types them, so
that the wizard can plan a response.
Messages from the wizard are sent by pressing the
<RETURN> key, which also moves the cursor to the next line
as expected. To send a message and not advance the cursor,
the wizard types <CTRL><RETURN> (a special type of return).
The <CTRL><RETURN> is used primarily for fill-in-the-blank
USING OZ
-
STEP 8: TEST A SUBJECT
responses and sending a system prompt (e.g. " = > " ) to the
subject
Most Wizard of Oz tests begin with the wizard sending
an introductory message, to which the subject replies. When
the subject has finished the response, the wizard will send
the next message. This type of exchange will continue
throughout the interface test. The predefined function keys
are used for most messages sent to the subject, although
short or unplanned messages may be typed in.
A sample dialogue between a subject and wizard is given
in Figure 7 (page 30). On the video screen, the text typed
by the wizard will be displayed in normal video (bright
characters on a dark background), while the subject's
responses will be shown in reverse video (dark characters on
a light background.) At the end of each line there will be
a return symbol if the <RETURN> key was used to send the
line. If the <CTRL><RETURN>key combination was used, then
no return symbol will be placed at the end of the line.
When the screen fills up, the text will be scrolled upward
to make room for new lines as they appear. If the current
line in the wizard's one line window extends beyond the
eightieth column, the line will be scrolled sideways across
the screen as more text is typed. Lines longer than 80
characters will wrap around on the subject's display.
Notice that there are two different cursors on the
screen. A blinking underscore in the wizard's one-line edit
window shows where text entered by the wizard will appear.
This cursor will be larger when the line editor is in insert
mode. The blinking happy face shows where responses from
the subject and messages sent to the subject will appear.
.
USING OZ
-
STEP 8: TEST
A
SUBJECT
Uelcone to the Wizard of Oz feedback sgsten,l-l
I ,Greetings!
What are y o u cerments?+
What are y o u c e m n t s ? C I
Y
Figure 7. Sample dialogue screen.
When the test is complete, hold down the <CTRL> key,
and while it is depressed, hit the <BREAK> key to end the
data collection. Do this on the wizard's PC first, and then
on the subject's PC if one was used. The screen will clear,
and a message will pop up asking about conducting another
session. Answering "no" will cause the program to end and
control will be returned to DOS. Answering "yes" will cause
execution to continue with the settings menu. (Notice that
the settings will default to those of the previous session.
If the settings are to remain the same in the next session,
only the data file name needs to be changed.)
USING OZ - STEP 9: ANALYZE RESULTS AND REDESIGN DIALOGUE
STEP 9: ANALYZE THE RESULTS AND REDESIGN THE DIALOGUE
After testing one to three people, look at the test
data. Analysis of these data should reveal weak or
confusing parts of the interface. Revisions to the
interface should then be made based on this analysis.
Shown in Figure 8 is the listing for the data file from
the test session in Figure 7 (page 30). Notice that there
is a heading which contains information about the
participants in the test, the current test session, and the
starting date and time.
-
University of Michigan, UMTRI
Human Factors MMMMMMMMMMMMM
#*
#*Wizard of Oz session listing. file = TEST1
#*
#*
Session started at 14:15:44 Wed, 1 Apr 1987
#*
#*
Wizard
> John Boreczky
#*
Subject
> Joe Shadowfax
#*
Subject used an IBM PC or compatible hard wired at 9600 baud.
#*
#*
Version Number -> 4.0
#*
Comments: This is a sample Oz session listing.
#*
#*--- - S f f l a = f P 1 = = = 1 3 ~ 0 1 I I I S 3 3 3 1 3 = I 3 I = = S = I ¶ I 3 ~ X ~ = = = = = = = = = = = = = S = ¶ = = = = = = = = = = = = = = = = = = =
#* Thinking/System Response Time ( in Seconds )
Typing Time ( in Seconds )
#*
Author ( W=Wizard, SaSubject )
#*
Line Type ( :=Normal text, <=editing (e.g. bksp), ?=Other chars,
*=other and editing)
Message Text ->
( " < - " = RETURN)
#*-+-- --++--------------------------------------------------------------05.2 18.3 W? Greetings! Welcome to the Wizard of Oz feedback system.<02.9 00.0 W: <00.8 06.9 W: What are your comments?<04.6 13.5 S: I am having all sorts of problems with Oz.<19.8 04.8 W: Please elaborate.<04.5 07.8 S: I get errors all the time.<13.2 10.3 W: When do these errors occur?<04.3 18.5 S: For instance, when I try to load the keyboard enhancer.<24.2 15.6 W? Did you follow the procedure in the user's manual?<05.9 09.8 S: I didn't read the user's manual.<14.6 16.6 W? That is your problem. Please read the manual.<02.4 00.0 W: <02.5 06.9 W: What are your comments?<#MMMMMMMMMMMMMMMM
----------------
::
11,
# * r a = r r r r t r r r t r r r ~ r a ~ a ~ ~ ) a = ~ = a a ~ ~ a ~ a a a = ~ ~ ~ = ~ = = a = a ~ = a ~ ~ ~ = = = = = = = = = =
#* Wizard of Oz Session terminated by Wizard
#*
Session ended at 14:19:42 Wed, 1 Apr 1987
#*rrrrr=rr==rrrrrraa=a=~a~~.~~===a==aaa~=====aa====a=========================
Figure 8. Data file listing.
USING OZ
-
STEP 9: ANALYZE RESULTS AND REDESIGN DIALOGUE
Below the heading is a short segment which describes
what each column in the data segment represents. The first
column represents the thinking time for that line. For the
wizard, thinking time (actually "system" response time), is
the interval from when the subject typed the last character
(<RETURN>)to when the wizard types the first character.
For multiple line menus, the wizard's thinking time is the
duration from when the <RETURN> on a line was typed until
the first character on the next line is typed. The
subject's thinking time is the interval from when the wizard
sent the last line to the time the subject types a
character. The second column represents the typing time.
It is the elapsed time from when the first character was
typed until when the <RETURN> was typed.
The third column is used to indicate who was
responsible for the line of text that follows. A "W"
denotes that the wizard typed the line, and an "S" denotes
that the subject typed it. A " : " after the letter indicates
that the text is exactly as it appeared on the screen during
the test. A " < " indicates that editing characters
(backspace, insert, etc.) were used. A " ? " indicates that
one or more of the characters on the line are unprintable,
and may not have appeared on the screen. (These characters
include control keys.) A "*" indicates that both editing
and unprintable characters appear. When analyzing the data,
lines carefully since they
look at the " < " , " ? " , and lf*~'
contain errors subjects made. One sign that an interface is
easy to use is that subjects make few errors.
Finally, the last field contains the entire text of the
message. Lines typed by the subject include all the
characters typed. Control and editing characters are shown
as "*(some character)", meaning <CTRL>(some character). The
most common of these are shown in Table 5 in Appendix B.
The lines typed by the wizard do not include these
characters.
USING OZ
-
STEP 9: ANALYZE RESULTS AND REDESIGN DIALOGUE
At the end of the file is a closing segment which tells
when the session ended. If the ending segment does not
appear, either the session listing continues on another disk
or it was lost.
To obtain a condensed version of the data file, run the
program OzSumry on the session data file. To do this on an
IBM PC, type: ozsumry<RETURN>. The program will ask for
the session data file name, and for an output file name
where the condensed version of the data will be stored.
After OzSumry has finished executing, print a listing
of its output file (the condensed data) and review it
carefully. The condensed data should suggest areas where
the subject had trouble with the interface. Look for long
subject response times, long typing times, and response
errors. Also, look out for places where messages were
created on the fly. Based on this evidence, revise the
interface (and the associated predefined keys) before
testing the next subject. Messages from the wizard more
than a few characters long should be assigned to function
keys.
This may require reloading the keyboard enhancer and
typing in new messages, or using an editor on the key
definition file. Don't forget to save the revisions to a
file. Once these modifications have been completed, the
interface is ready to be retested.
SUGGESTIONS FOR TEST PROCEDURES
This section contains hints on conducting Wizard of Oz
sessions based on experience with the software. It is
similar to the material in Green & Wei-Haas, 1985a and
1985b. While some of these suggestions may not seem
worthwhile, following them makes Oz sessions go much more
smoothly.
As was mentioned previously, conduct practice runs to
familiarize the wizard with the interface before testing
subjects. This will help speed up the "system" by reducing
the wizard's response time. Practice runs may be conducted
using either the walk-through mode, or the test mode with a
member of the design team posing as the subject.
The optimal number of experimenters is three. One will
act as the wizard, the others as observers. One observer
would deal directly with the subject giving any pretest
briefings and taking notes during the test. (This observer
should, however, play dumb if the subject asks questions
about the interface during the test: "I'm just taking
notes. I don't know what is supposed to happen.") The
second observer should be stationed next to the wizard.
That person should take notes and help the wizard decide
what to do. The observers can also aid in detecting any
problems with the connecting communication link during the
session, since they can have a greater range of view than
the wizard alone. (Remember, two or three heads can be
better than one.)
If the system being prototyped has a telephone hot
line, give the subject a phone to call the wizard's
assistant for help. The assistant should note or tape
record any questions and responses.
When conducting tests with subjects, have a copy of the
function keys and their associated messages next to the
wizard's display. It hasn't been fully resolved whether
messages should be listed alphabetically, grouped by
SUGGESTIONS FOR TEST PROCEDURES
function, or correspond spatially to the associated keys.
By some time early in 1987 there should be utilities written
to generate these lists.
Another listing which has proven helpful is a decision
tree (or flowchart) showing the function keys and the
alternatives available at any particular time.
When developing a test scenario, use a task list or
script. This will decrease the system response time by
allowing wizards to plan in advance the sequence of actions
to be taken during a test. By using a script, the interface
can be more thoroughly tested. When subjects are just asked
to "try it," they don't know what to do. This causes parts
of the interface to be missed during a test.
Even when scripts are used, subjects often respond in
unexpected ways. When the wizard tries to respond
immediately, the result is often a frantic search for the
appropriate function key or the hasty composition of a
message on the fly. Those response times are rarely short.
Such delays take some of the magic out of the Oz paradigm.
Further, when response times exceed a second or two,
subjects often realize something is not right and compound
the wizard's problem by entering a second message. When
unexpected responses are received, experimenters should
stall for time by sending the subject a planned (functionkey based) message to read while they wait.
Experimenters need to be clever in creating such stallfor-time messages. For example: "The system load is very
high. Please be prepared for some processing delays."
Translation: "We're confused and not sure what to do next.
Please wait." Such a message should minimize idle time, but
it should not be so long that it delays reading of the next
message sent by the wizard. Further, stall-for-time
messages should not distract subjects from the ongoing
dialogue. One or two such messages should be sufficient.
Messages are also needed for when the wizard hits the
wrong function key and thus sends the wrong message to the
SUGGESTIONS FOR TEST PROCEDURES
subject. For example: "The system is recovering from
primary processor failure. Please ignore the previous
message." Since these errors are not common, one or two
ignore-the-blooper messages should be adequate.
Giving the subject tangible materials that would
normally be associated with the type of system being
developed improves the task fidelity. Consider giving the
subject real phone bills or checks to use in a banking
simulation, for example. If available, give the subject a
preliminary user's manual describing the operation of the
interface being developed.
When testing the interface, try to simulate as closely
as possible the speed at which the final system will run.
If the system is to be a high-speed system (2400-9600 baud)
try to test it using an IBM PC AT or an AT compatible. If
the system is to run at a much slower rate (300-1200 baud)
then an IBM PC, PC XT, or compatible will do. The reader
may recall the performance data for computers and enhancers
was provided in STEP 2: GET A KEYBOARD ENHANCER.
When using modems to communicate, a second telephone
line for voice communication will be extremely helpful.
This will allow the wizard and the subject's observer to
communicate and discuss any problems which may arise during
the test session.
Finally, keep the test atmosphere relaxed, Most people
report that using Wizard of Oz is fun!
CONVERTING THE PROTOTYPE INTO WORKING CODE
[This section applies only to programmers in
industry, not students in IOE 436.1
While students taking Paul's class do not develop
working applications based on Oz prototypes, programmers in
industry will. How the results of the prototyping study are
communicated to programmers, and what information they need,
will depend upon the composition of the interface design
team.
In some organizations, interface development is carried
out entirely by the programming team without advice from
human factors engineers. Since coding the interface is done
by the same people that designed it, transfer of the
prototyping study results is not required.
In other organizations, the design of the interface is
turned over to human factors engineers who have total
control over the interface. They work independently of
those who will write the code. In that instance, the
programming team will need extensive documentation on how
the interface should function.
Currently, the most popular model is for one human
factors engineer to collaborate with a team of programmers
to develop the dialogue, The human factors engineer takes
the lead in designing and managing user tests. The
programmers help collect the data. This model works well
because it takes advantage of the expertise of the limited
number of human factors engineers and the availability of
programmers. It also increases the commitment of
programmers to human factors considerations because they
have had a hand in the tests. By witnessing those tests,
programmers become more attuned to what users can and cannot
do. Programmers usually assume that ordinary users are more
knowledgeable than they actually are.
Of the items programmers need, a flow chart of the
message sequence is the most important. They will also need
CONVERTING PROTOTYPE INTO WORKING CODE
a listing of all the messages sent to the user, both those
assigned to function keys and those entered on the fly.
Programmers should be given a copy of the floppy disk with
the function key definitions from the final version of the
prototype. That way, the programmers can load a keyboard
enhancer and use the function keys to enter the messages in
the source code. This will reduce the amount of typing they
do, saving time and minimizing errors. An added advantage
is that the desired wording is preserved. Some have
suggested that a listing of a typical session might also
prove to be useful.
The programmers should also be given a list of the
anticipated responses to each system message and how often
each response will occur (including errors), along with
predictions of user response times. This information can be
used to trap errors and predict performance of the completed
software.
Providing programmers with videotapes of users working
with preliminary and final versions of the prototype can be
most informative. The preliminary version shows how the
interface should not be designed and how users reacted to
it. The final version documents what is preferred. Usually
programmers are given only static information about an
interface and find it difficult to appreciate the
interaction dynamics. As an alternative, programmers might
be given a "re-play" file to show the interaction.
Finally, some have suggested a lessons learned/changes
made list to be provided for each version of the prototype.
("When the same prompt was used for both modes the subjects
or
To
were confused about whether they should
eliminate that problem...") This information is useful in
supporting previous design decisions, and when differences
between the prototype and application interfaces are
considered, it may help identify which changes will improve
user performance.
...
....
CONVERTING PROTOTYPE INTO WORKING CODE
Since Oz has yet to be used in an industrial setting,
it is unknown what format the information for programmers
should take -- a formal report, a memo, a specifications
document, etc. This issue will be resolved in the future.
REFERENCES
Bell, F.A. (1986). Newkey, version 3.0, Wayland, MA: FAB
Software.
Borland International, Inc. (1985). SuperKey, version 1.0,
Scotts Valley, CA: Borland International, Inc,
Borland International, Inc. (1985). Turbo Pascal, version
3.01A, Scotts Valley, CA: Borland International,
Inc.
Green, P. and Wei-Haas, L. (1985a). The Wizard of Oz: A
Tool for the Rapid Development of User Interfaces,
Ann Arbor, MI: The University of Michigan
Transportation Research Institute technical report
UMTRI-85-37, June.
Green, P. and Wei-Haas, L. (1985b). "The Rapid Development
of User Interfaces: Experience with the Wizard of
Oz Method," Proceedings of the Human Factors
Society 29th Annual Meeting, 470-474.
Green, P. and Wesselman, H. (1986). Design Rationale for
the Wizard of Oz User Interface Prototyper, Ann
Arbor, MI: The University of Michigan
Transportation Research Institute technical report
UMTRI-86-51, December.
Nostradamus, Inc. (1985). Turbo-Plus, Salt Lake City, UT:
Nostradamus, Inc.
Obregon, D. (1985). "Power Plays at Your Keyboard," PC
Magazine, October 29, 167-175.
Palmiter, S.L. (1986). "The Human Factors of Rapid
Prototyping," unpublished manuscript, The
University of Michigan, Industrial and Operations
Engineering 590 (Directed Study), Ann Arbor, MI.
Rosesoft, Inc. (1983). ProKey, version 3.0, Seattle, WA:
RoseSoft , Inc
.
Software Garden, Inc. (1986). Dan Bricklin's Demo Program,
version 1.0, West Newton, MA: Software Garden, Inc.
Software Research Technologies, Inc. (1984). SmartKey,
version 4.1, Los Angeles, CA: Software Research
Technologies, Inc.
White, R. (1985). "Automate Your Software," Popular
Computing, October, 4(12), 62-70.
APPENDIX A
-
DETAILED FORMAT AND COPY INSTRUCTIONS
FORMATTING A FLOPPY DISK
Before a new disk can be used, it needs to be
formatted. Formatting puts reference marks on the disk and
erases all existing information on it. To format a disk,
put a disk in the floppy drive, close the drive door, and
type: format a: /s/v<RETURN>. This will also put part of
the operating system on it and allow the disk to be named.
NEVER TYPE format<RETURN> as you may erase the hard drive, a
major disaster. While being formatted, the floppy disk will
spin for about 30 seconds and then ask for a volume (disk)
name. Choose one that is meaningful (e.g. Wizard-1).
COPYING A FLOPPY DISK
The Oz distribution disk should not be used for tests.
To copy it on a system with one floppy and a hard drive
complete the following steps:
1.
Create a temporary directory on the hard drive by typing
mkdir <path><RETURN>,where <path> is replaced by some
meaningful name.
2.
Make the directory just created the current directory,
by typing cd <path><RETURN>.
3.
Copy the contents of the Oz disk to this directory,
using copy a:*.* c:<RETURN>.
4. Insert the disk (newly formatted or erased) for the
Wizard of Oz software in the floppy drive, and type copy
*.* a:<RETURN> to transfer the files to the disk.
APPENDIX
A
-
FORMAT AND COPY INSTRUCTIONS
Table 4. Summary of copy command sequence.
Type
Result
mkdir <path>
cd <path>
copy a:*.*
Replace disk
copy *.* a:
creates a new directory
makes <path> the current directory
copies all files on drive A to the directory
Copies files to a new disk
If the system being used has two floppy drives, place
the Oz disk in drive A and a formatted disk in drive B, and
type: copy a:*.* b:<RETURN> instead of the two copy
commands given above. This will produce an exact copy of
the Oz disk on the other disk.
APPENDIX B
-
HOW TO USE NEWKEY 3.0 WITH WIZARD OF OZ
1.
When loading Newkey, use a very large value for the
number of bytes reserved for definitions such as: NEWKEY
/15000. If an out of memory message appears, save the
existing definitions to a file, then reboot the system
(press <CTRL>, <ALT> and <DEL> at the same time) and
start Newkey with more memory. Once Newkey is up again,
load the previously defined definitions and begin
defining the rest.
2.
If the machine is left idle for more than two minutes
the screen will automatically turn off until any key
(even <SHIFT>)is hit. To disable the screen-saving
option use the Newkeysp program. When the menu appears
enter 9 (Display/update parameters) to get another menu
where this option can be turned off or the time
increased. When exiting this menu answer "no" to the
question about making the changes permanent, unless they
should be.
While defining keys use Edlin to keep track of what has
been defined. While Newkey is loaded, type: edlin
filename<RETURN> to start the editor and "i" to enter
the insert mode. Then use Newkey to define the function
keys. When finished, type <CTRL>c to exit the insert
mode and "e" to save the file and end the editing.
(More complete information on the Edlin line editor is
in the DOS manual.) Be sure to save the key definitions
to a file by using Newkeysp. (The file saved by edlin
is just the text of the messages.) For this phase
Vedit, Microsoft Word, Wordstar, and other editors
should not be used. They all use function and control
key combinations which are likely to conflict with those
being defined.
APPENDIX B
4.
-
USING NEWKEY 3.0 WITH OZ
Once the keys are defined and saved to a file, an editor
such as Vedit can be used to edit them. If this editing
takes place immediately after Edlin is used, reboot the
system so Newkey and the conflicting definitions are
removed from memory.
Using this editing procedure, changes in wording can be
made easily. When making changes, be careful not to
delete any text inclosed in greater than and less than
signs (e.g., <enddef>) since this might render the file
unreadable by the keyboard enhancer. Once the
corrections have been made, reload the definitions and
begin testing.
To get a listing of how keys are defined, print the file
where the key definitions are saved. For a more
readable copy of the key definitions, make a copy of the
definition file and edit the copy as desired. Make sure
that the original definition file is not changed, since
this will prohibit it from loading. In the near future
a utility program will be available for listing key
definition files.
6. If a definition uses many spaces, use the <TAB> key for
every eight spaces instead of the space bar. A special
character is used to indicate a tab which reduces the
amount of memory used by the definitions, as well as the
time needed to display the messages.
7. When assigning messages, use the ten function keys for
the most common messages. Messages can be assigned to
combinations of the <ALT>, <SHIFT>, and <CTRL> keys with
the function keys (30 combinations) and the <ALT> key
with the numbers and letters (36 combinations). Users
should not redefine the numbers and letters, or the
<SHIFT> key in combination with them. Redefining the
<CTRL> in combination with the numbers and letters
APPENDIX B
-
USING NEWKEY 3.0 WITH OZ
should be avoided. As shown in Table 5 , many
combinations have other meanings. Redefining keys to
the right of the <RETURN> key (<INS>, <DEL>, the number
pad, etc.) should be avoided as those keys are used
elsewhere. For a further discussion, see the Newkey
manual.
Table 5 .
Synonymous keys
Control key
Meaning
CTRL
CTRL
CTRL
CTRL
CTRL
CTRL
CTRL
CTRL
CTRL
CTRL
CTRL
CTRL
BELL
BACKSPACE
TAB
CTRL RETURN (LINE FEED)
HOME
FORM FEED
RETURN
ESC
CURSOR RIGHT
CURSOR LEFT
CURSOR UP
CURSOR DOWN
G
H
I
J
K
L
M
[
\
]
-
In general, use of the control key with letters and
numbers should be avoided. The codes that these
combinations generate can have unpredictable effects.
With the recommended combinations, as many as 76
messages can be defined.
8.
If the interface requires more than about 40 function
key combinations (but less than 76), consider dividing
the definitions among two or more files, being sure to
keep related functions together. Multiple files
facilitate editing by making it easier to find
definitions to be changed. Just before testing, these
files should be merged into one. (If the definitions
are in files A and B then type: copy a+b c<RETURN> or
use the merge function in Newkeysp.)
9.
If more than 76 definitions are needed, the interface
must be tested in pieces. In such circumstances, it is
APPENDIX B
-
USING NEWKEY 3.0 WITH OZ
best to put all of the common definitions (e.g., main
menu, frequent prompts and error messages, etc.) in one
file, and have a different file for each piece of the
interface to be tested. This allows using a function
key for more than one message in separate pieces of the
interface.
For interfaces significantly in excess of 76
definitions, developers may wish to consider other
prototyping methods. Not only does one reach the limit
of available key combinations (for Newkey), but the
limit of what the wizard can handle as well.
APPENDIX C
-
ERROR MESSAGES AND THEIR MEANING
With the number of things that the Wizard of Oz program
does, it is not surprising that there are many error
conditions which can occur. Most of the errors are nonfatal and can be handled from within the program after some
intervention from the user. When an error occurs, a message
describing the error and how to correct it will be
displayed. In all cases when an error occurs, the program
stops until the error has been resolved. The errors are
listed alphabetically on the following pages with a short
explanation as to the cause and cure for each.
Descriptions can be found for the following error
messages :
ACCESS TO THE FILE YOU HAVE SPECIFIED IS NOT PERMITTED
BUSY SIGNAL FROM WIZARD
CALL TO WIZARD ABORTED
CALL WAIT ABORTED
CAN'T FIND DATA FILE
COMMUNICATION CARRIER SIGNAL HAS BEEN LOST
COMMUNICATION PORT NOT READY
DATA DISK HAS FILLED UP
FILE ALREADY EXISTS
FILE NAME ENTERED IS MISSING A ROOT
FILE NAME EXTENSION HAS MORE THAN THREE CHARACTERS
FILE NAME NOT GIVEN
FILE NAME ROOT IS LONGER THAN EIGHT CHARACTERS
IMPROPER CHARACTER IN FILE NAME
IMPROPER FILE NAME EXTENSION
MODEM MALFUNCTIONING
MODEM NOT RESPONDING
MODEM PREPARATION ABORTED
MODEM STILL NOT RESPONDING
MORE THAN ONE PERIOD IN FILE NAME
NO CARRIER SIGNAL FROM THE CALLER
NO CARRIER SIGNAL FROM WIZARD'S MODEM
NOT READY ERROR WRITING A:
PATH NAME IS NOT CORRECT
SUBJECT PRESSED <CTRL><BREAK>
THERE IS NOT ENOUGH DISK SPACE TO SAVE THE DATA
WRITE PROTECT ERROR WRITING A:
APPENDIX C
-
ERROR MESSAGES AND THEIR MEANING
ACCESS TO THE FILE YOU HAVE SPECIFIED IS NOT PERMITTED
This error occurs if the file name specified in the
settings menu already exists and is a read-only file. Type
a new file name when the settings menu returns.
BUSY SIGNAL FROM WIZARD
This error occurs when the phone number that the
subject program calls is busy. Either someone else called
the wizard's phone number first or the wrong number was
dialed.
CALL TO WIZARD ABORTED
This error occurs in the subject's program if <CTRL>
<BREAK> is pressed after the wizard's phone number is dialed
but before the wizard's modem responds. This is not really
an error and is in fact what should be done if the wrong
number was dialed.
CALL WAIT ABORTED
This error occurs in the wizard's program if <CTRL>
<BREAK> is pressed after the program starts its wait for the
subject's call. This is not really an error and is in fact
what should be done to stop the session if there seems to
some problem.
CAN'T FIND DATA FILE
This error occurs at the end of data collection. It
originates from changing floppy disks used for output in the
middle of a test session without being prompted to do so.
Oz can detect a disk swap only when trying to close the
output file. An unprompted swap will lead to ALL the data
being lost. More importantly, data on the second disk may
be overwritten. (The drive continues writing to the disk
from where the heads were last positioned.)
COMMUNICATION CARRIER SIGNAL HAS BEEN LOST
A carrier signal exists when using modems, or when the
subject uses a dumb terminal or PC. This is used to
APPENDIX C
-
ERROR MESSAGES AND THEIR MEANING
determine if a connection exists. If this error occurs when
the subject is using a terminal or PC hardwired to the
wizard's PC, the error is non-fatal. To correct it, find
the break in the line and fix it. There are several
possible causes of this error when modems are used for
communication. All of the causes stem from either the modem
or from the telephone system. For modems the error is
fatal. The only way to handle this is to end the session,
and try again. (Note: If the phone used has a call waiting
feature, garbage may be displayed on the screen. This
results from the computer trying to interpret the signal
which is used to indicate an awaiting call. Phones with
call waiting should not be used.)
COMMUNICATION PORT NOT READY
If the communication cable is not connected to the
serial port specified in the settings menu, this error will
occur. To correct this situation, connect the communication
cable to the proper port.
DATA DISK HAS FILLED UP
This is the only disk error which can occur during data
collection. If this happens the program will request that a
new disk be inserted into the drive. Once the new disk is
placed in the drive the program will continue as before.
FILE ALREADY EXISTS
If the output file name entered on the settings menu is
a duplicate, this message will appear. Wizard of Oz will
not permit the overwriting of existing files since these may
contain important data. If this error occurs, just type
another file name (one not used previously) when the program
returns to the settings menu.
FILE NAME ENTERED IS MISSING A ROOT
A file name was entered that consisted of only an
extension. A file name cannot have a period as its first
APPENDIX C
-
ERROR MESSAGES AND THEIR MEANING
character. Type in a new file name with at least one
character before the period.
FILE NAME EXTENSION HAS MORE THAN THREE CHARACTERS
The file name entered had more than three characters to
the right of the period. Type in a new file name with three
or less characters to the right of the period.
FILE NAME NOT GIVEN
This error occurs if the path and file name combination
ends with a " \ " . In order to get a directory listing, enter
a path name without a " \ " at the end. In order to specify
the output data file, type a file name after the " \ " .
FILE NAME ROOT IS LONGER THAN EIGHT CHARACTERS
This error occurs if the file name entered has more
than eight characters before the period, or is more than
eight characters long without a period. Type in a new file
name with the root no longer than eight characters.
IMPROPER CHARACTERS IN FILE NAME
The file name that was entered contained an improper
character. The only characters DOS allows are the letters
of the alphabet, the numbers 0 through 9, the following
special characters:
$ # & @ ! % ( I - { I '-
1
and a period to start the file name extension. Type in a
file name that contains only these valid characters.
IMPROPER FILE NAME EXTENSION
The file name was entered contained an improper
extension. Oz does not allow output data files to have the
following extensions:
.PAS
COM
EXE
SYS
.BAT
.BAS
.DOC
BAK
because these extensions are used to indicate system files
or programming language files. Type a filename that has a
different extension.
.
.
.
.
APPENDIX C
-
ERROR MESSAGES AND THEIR MEANING
MODEM MALFUNCTIONING
This error occurs when there is something wrong with
the modem, or if it is not Hayes-compatible. To correct
this, use a working Hayes or Hayes-compatible modem and
restart the test session.
MODEM NOT RESPONDING
If the modem has not been turned on, or is not
connected, this error will result when the program tries to
set up the modem. To correct this, turn on the modem or
connect it to the PC.
MODEM PREPARATION ABORTED
This error occurs if <CTRL><BREAK> is pressed while the
program is preparing the modem for communication. This is
not really an error and is in fact what should be done to
stop the session if there appears to be a problem.
MODEM STILL NOT RESPONDING
This error will rarely occur. It arises from three
attempts to reset the modem which have failed due to the
modem not responding. If it occurs, check the modem and
cables, and restart the test.
MORE THAN ONE PERIOD IN FILE NAME
The file name that was entered contained more than one
period. A file name is allowed to have only one period to
indicate the start of the file name extension. Type in a
file name that contains only one period.
NO CARRIER SIGNAL FROM THE CALLER
This error occurs in the wizard's program if the
incoming phone caller did not send a carrier signal (like
the subject's program does). Either the subject's modem is
not set up properly, the subject's program settings are
incorrect, or the call was a wrong number.
APPENDIX C
-
ERROR MESSAGES AND THEIR MEANING
NO CARRIER SIGNAL FROM WIZARD'S MODEM
This error occurs in the subject's program if the phone
number that was called did not respond with a carrier signal
(like the wizard's program does). Either the wizard's modem
is not set up properly, the wizard's program settings are
incorrect, or a wrong number was dialed.
NOT READY ERROR WRITING A:
This error is intercepted by DOS. It occurs whenever
the program tries to access the disk drive, and the door on
the drive is open or there is no disk in it. Solve the
problem and type "r" (for Retry), and the program will
resume where it left off. The screen may appear garbled
when control is returned to the Oz program.
PATH NAME IS NOT CORRECT
If the path specified in the drive:\path field does not
exist, this error will occur. To correct this error enter a
legal drive:\path after the program starts again. Notice
that the drive:\path is automatically reset to the last
legal path when the program resumes.
SUBJECT PRESSED <CTRL><BREAK>
This error occurs in the wizard's program if the
subject is using a PC and pressed <CTRL><BREAK> to exit the
program. If the PCs are connected by modems, the Oz session
must be restarted on both PCs. Otherwise, simply restart
the subject's program to continue the session.
THERE IS NOT ENOUGH DISK SPACE TO SAVE THE DATA
This error arises when there is a shortage of disk
space on the proposed data disk. If the disk has between
10K and 40K bytes of available space, the program will ask
for confirmation before using the disk. If there is less
than 10K bytes available the program will ask for the disk
to be replaced, since this will not be enough space to save
even a small test session.
APPENDIX C
-
ERROR MESSAGES AND THEIR MEANING
WRITE PROTECT ERROR WRITING A:
This error is intercepted by DOS. DOS will stop
execution of the program until it is resolved. If this
error arises, remove the write protect tab from the disk in
the drive or use another formatted disk. Since DOS takes
control in this situation, the screen may appear garbled
when the program regains control. The last message may not
be properly saved to disk, but everything else should be
fine. Ignore the garbled characters and continue.
APPENDIX D
-
MODEM SETUP
To set up a modem when using a terminal for the
subject's machine, give the commands in Table 6 after the
terminal communication parameters have be set. All commands
must be in capital letters, and must be followed by
<RETURN>.
Table 6. Modem setup commands
Command or action taken
Results
ATZ
this resets the modem
AT F1 EO 87-255 S12=150
this establishes full
duplex, echo off, and
wait times for the
session
ATDT phone number
replace phone number
with the wizard's phone
number
...conduct the test. ..
ATHO
hangs up the phone
APPENDIX E
-
QUICK REFERENCE LIST OF COMMANDS
Tables 7 and 8 below give a quick summary of the
commands used during a Wizard of Oz session. Table 7 has
the commands needed to run the subject's version, while
Table 8 has the commands for the wizard's version.
Table 7. Summary of actions needed to run subject's version
of Wizard of Oz.
Situation
Key pressed or
Action taken
Result
DOS prompt (C:\>)
Type:
SUBJECT
<RETURN>
Starts subject's
version
Title screen
displayed
<ESC>
Displays further
information on
Wizard of Oz
Title screen
displayed
<RETURN>
Brings up parameter
menu
Parameter menu
displayed
Select desired
settings
Sets communication
parameters
Parameter menu
displayed
<ESC>
Exits menu and
displays message
Opening message
displayed
< RETURN >
Clears screen and
ready to test
End of test
<CTRL><BREAK>
Clears screen and
displays repeat
question
Repeat question
Y
Returns to parameter
menu for new test
Repeat question
N
Returns control to
DOS
APPENDIX E
-
QUICK REFERENCE LIST OF COMMANDS
Table 8.
Summary of actions needed to run the wizard's
version of Wizard of Oz.
Situation
Key pressed or
Action taken
Result
DOS prompt (C:\>)
Type:
WIZARD
<RETURN>
Starts wizard's
version
Title screen
displayed
<ESC>
Displays further
information on
Wizard of Oz
Title screen
displayed
<RETURN>
Brings up parameter
menu
Parameter menu
displayed
Select desired
settings
Sets communication
parameters
Parameter menu
displayed
<ESC>
Exits menu and
enters data
collection phase
End of test
<CTRL><BREAK>
Clears screen and
displays repeat
question
Repeat question
Y
Returns to parameter
menu for new test
Repeat question
N
Returns control to
DOS
APPENDIX F
-
BATCH FILE
Figure 9 is a listing of the file WIZBATCH.BAT. This
file can be used to start Wizard of Oz up from DOS. To use
this file simply type: wizbatch.bat <keys><RETURN>,where
<keys> is the name of the file which contains all of your
key definitions. This batch file assumes Newkey has not
been loaded and that all the key definitions are in one
file, It also assumes that Newkey (3.0) is the keyboard
enhancer, and that all the files are on the same disk as the
batch file.
Figure 9. Listing of WIZBATCH.BAT
ECHO OFF
PROMPT SP SG
REM *** SET DATE AND TIME SO THAT TIME STAMPS ARE ACCURATE
DATE
TIME
REM *** LOAD NEWKEY AND SET DEFINED AREA = 20000
NEWKEY /20000
REM *** LOAD YOUR KEY DEFINITIONS
NEWKEYSP %1/1
REM *** LOAD WIZARD OF OZ
WIZARD