1
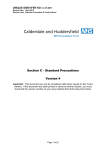
Zitruspresse orange
10008166
10008167
Vakuumierer
10027056
10008168
Warnung
Gerät
Zur Reduzierung der Gefahr von Brand, elektrischem Schlag und Beschädigung:
•
•
•
•
•
•
Setzen Sie dieses Gerät nicht dem Regen aus.
Stellen Sie keine mit Flüssigkeiten gefüllten Gefäße, wie Vasen, auf dieses Gerät.
Ausschließlich das empfohlene Zubehör verwenden.
Reparieren Sie dieses Gerät nicht selbst.
Wenden Sie sich zur Wartung an qualifiziertes Kundendienstpersonal.
Lassen Sie keine Gegenstände aus Metall in dieses Gerät fallen.
Stellen Sie keine schweren Gegenstände auf dieses Gerät.
Netzkabel/Netzteil
Zur Reduzierung der Gefahr von Brand, elektrischem Schlag und Beschädigung:
•
•
•
•
•
•
•
Gewährleisten Sie, dass die Spannung der Stromversorgung dem auf diesem Gerät angegebenen
Wert entspricht.
Stecken Sie den Netzstecker vollständig in die Steckdose ein.
Ziehen Sie nicht am Kabel, knicken Sie es nicht und stellen Sie keine schweren Gegenstände darauf.
Fassen Sie den Stecker nicht mit nassen Händen an.
Fassen Sie den Stecker beim Herausziehen an seinem Korpus an.
Verwenden Sie keinen beschädigten Netzstecker oder eine beschädigte Steckdose.
Installieren Sie dieses Gerät so, dass das Netzkabel sofort aus der Steckdose gezogen werden
kann, wenn Störungen auftreten.
Netzadapter
• Der Netzadapter kann mit Wechselstrom von 220 - 240 V betrieben werden.
• Verwenden Sie einen geeigneten Steckeradapter, wenn der Stecker nicht in die Netzsteckdose
passt.
Kleine Objekte/Verpackungsteile
(Plastikbeutel, Karton, etc.)
•
Bewahren Sie die kleine Objekte (z.B. Schrauben und anderes Montagematerial, Speicherkarten)
und Verpackungsteile außerhalb der Reichweite von Kindern auf, damit sie nicht von diesen
verschluckt werden können. Lassen Sie kleine Kinder nicht mit Folie spielen. Es besteht
Erstickungsgefahr!
Achtung
•Gerät
Stellen Sie keine Quellen offener Flammen, z.B. brennende Kerzen, auf das Gerät.
Aufstellung
• Stellen Sie das Gerät auf eine trockene, ebene, wasserfeste und hitzebeständige Oberfläche.
• Suchen Sie einen Aufstellort, an dem Kinder nicht an die heißen Oberflächen des Gerätes gelangen
können.
• Die Steckdose muss leicht zugänglich sein, um im Notfall das Gerät schnell vom Stromkreis trennen
zu können.
• Installieren oder positionieren Sie dieses Gerät nicht in einem Bücherregal, Einbauschrank oder
einem sonstigen engen Raum. Stellen Sie eine gute Belüftung des Gerätes sicher.
2
•
•
Stellen Sie das Gerät nicht auf Verstärker oder andere Geräte, die heiß werden können. Diese
Hitze könnte das Gerät beschädigen.
Setzen Sie dieses Gerät keinem direkten Sonnenlicht, hohen Temperaturen, starker Feuchtigkeit
und übermäßigen Erschütterungen aus.
Netzadapter
• Der Netzadapter kann mit Wechselstrom von 220 - 240 V betrieben werden.
• Verwenden Sie aber einen geeigneten Steckeradapter, wenn der Stecker nicht in die Netzsteckdose
passt.
Bestimmungsgemäßer Gebrauch
Dieses Gerät dient zum
• Verpacken von Lebensmitteln durch Vakuumieren
Es ist ausschließlich für diesen Zweck bestimmt und darf nur zu diesem Zweck verwendet werden. Es darf
nur in der Art und Weise benutzt werden, wie es in dieser Gebrauchsanleitung beschrieben ist.
Dieses Gerät ist nicht dafür bestimmt, durch Personen (einschließlich Kinder) mit eingeschränkten
physischen, sensorischen oder geistigen Fähigkeiten oder mangels Erfahrung und/oder mangels Wissen
benutzt zu werden, es sei denn,sie werden durch eine für ihre Sicherheit zuständige Person beaufsichtigt
oder erhielten von ihr Anweisungen, wie das Gerät zu benutzen ist. Kinder sollten beaufsichtigt werden,
um sicherzustellen, dass sie nicht mit dem Gerät spielen.
Transport des Gerätes
Bitte bewahren Sie die Originalverpackung auf. Um einen ausreichender Schutz beim Transport des
Gerätes zu erreichen, verpacken Sie das Gerät in der Originalverpackung.
Reinigung der äußeren Oberfläche
Verwenden Sie keine flüchtigen Flüssigkeiten, wie Insektensprays. Durch zu starken Druck beim
Abwischen können die Oberflächen beschädigt werden. Gummi- oder Plastikteile sollten nicht über einen
längeren Zeitraum mit dem Gerät in Kontakt sein.
Eigenschaften
•
•
•
•
•
•
•
Kompaktes Design
Weite Versiegelungslinie verhindert Luftaustritt und garantiert eine gute Vacuumierung
Pulse-Funktion zum vorischtigen Vakuumieren empfindlicher Lebensmittel.
Einfaches Verschlusssystem. Einfach Knopf drücken.
Abdeckung sehr leicht mit zwei bodenseitigen Knöpfen aufklappbar.
„Nur Versiegeln“-Funktion
Versiegelungsweite 28cm
Lebensmittellagerung und Sicherheit
Für eine besonders lange Haltbarkeit der Lebensmittel ist es wichtig, diese frisch zu vakuumieren. Sobald
die Lebensmittel ein mal angefangen haben zu verderbenm kann das Vakuumieren den weiteren Verfall nur
verlangsamen. Vakuumieren kann nicht das Wachsen von Schmimmel und anderen krankheitserregenden
Mikroorganismen verhindern.
3
Vorbereiten der Lebensmittel
Das Kochen, Auftauen oder Aufwärmen von Speisen in einem Vakuumbeutel hilft, den natürlichen
Geschmack der Nahrungsmittel zu erhalten. Außerdem sparen Sie sich das Reinigen von Pfannen und
Töpfen. Stechen Sie zuerst kleine Löcher in den Beutel, wenn Sie ihn zum Aufwärmen in die Mikrowelle
legen, um der Luft die Möglichkeit zum Entweichen geben. Sie können Speisen in Beuteln auch Aufwärmen,
indem Sie den Beutel in Wasser geben, das unter 75°C köchelt.
Vorbereiten von Fleisch und Fisch
Versuchen Sie Fleisch und Fisch vor dem Vakuumieren 1-2 Stunden einzufrieren. Dies hilft, Flüssigkeit
und Form zu bewahren und gewährleistet eine bessere Versiegelung.
Tipps zum Vakuumieren von Käse
Vakuumieren sie Käse am besten nach jeder Verwendung. Wenn Sie den Beutel länger machen als nötig,
können Sie den Käse ohne umzufüllen im gleichen Beutel erneut vakuumieren.
Vorbereiten von Gemüse
Blanchieren von Gemüse kann vor dem Vakuumieren helfen, Geschmack und Aussehen der Lebensmittel
zu bewahren. Legen Sie das Gemüse in köchelndes Wasser oder erhitzen Sie es in der Mikrowelle bis es
gar, aber immer noch knackig ist. Tauchen Sie das Gemüse nach dem Garen in kaltes Wasser, um den
Garprozess zu stoppen.
ACHTUNG: Aufgrund des Risikos sauerstoffunabhängiger Bakterien sollten Zwiebeln, Knoblauch und
frische Pilze nicht vakuumiert werden.
Tipps zum Vakuumieren von pulvrigen Lebensmitteln
Wenn Sie pulvrige Lebensmittel wie z.B. Mehl vakuumieren möchten, müssen Sie diese in ihrer OriginalVerpackung in den Beutel gebel. Lose könnte das Pulver in die Maschine gesaugt werden und diese
schwer beschädigen.
Tipps zum Vakuumieren von Flüssigkeiten
Bevor Sie Flüssigkeiten wie z.B. Suppen vakuumieren können, müssen Sie diese in einem Topf oder
einem ähnlichen Gefäß einfrieren. Entnehmen Sie dann die gefrorene Flüssigkeit dem Gefäß, legen Sie
diese in einen Vakuumier-Beutel und vakuumieren Sie sie wie gewohnt. Legen Sie den Beutel danach ins
Gefrierfach. Schneiden Sie zum auftauen einfach eine Ecke auf und legen Sie den Beutel in die Mikrowelle
oder lassen es in köchelndem Wasser auftauen.
Übersicht
A.Vakuum-Taste
Drücken um Lebensmittel zu vakuumieren und luftdicht zu versiegeln. Das Gerät schaltet
automatisch ab.
B.Abbrechen-Taste
Bricht die aktuelle Funktion sofort ab
C.Puls-Taste
Wird verwendet, wenn beim versiegeln der Speisen große Vorsicht notwendig ist. Drücken
aktiviert das Gerät, loslassen deaktiviert es.
4
D.Versiegelungs-Taste
Drücken, um von einer Rolle einen Beutel zu machen.
Drücken, um das Vakuumieren sofort zu stoppen und den Beutel zu versiegeln. So können Sie
verhindern, dass sensible Lebensmittel zerdrückt werden.
E. Versiegelungs-Linie
Nehmen Sie nicht das hitzeresistente Band ab.
F.Zubehör-Anschluss
Erlaubt das Verpacken mit Kanistern und Zubehör.
G. Vakuum-Kammer
Legen Sie das offene Ende des Beutels in die Kammer, um den Beutel vakuumieren zu können.
H.Versiegelungsdichtung
Wie Sie mit dem Beuteln vakuumieren
1. Legen Sie die Lebensmittel in den Beutel. Lassen Sie mindestens 5cm zwischen dem Inhalt und
der Beutelöffenung, um dem Material die Möglichkeit zum Zusammenziehen zu geben.
2. Öffnen Sie die Klappe und legen Sie das offene Ende des Beutels in die Vakuumkammer.
3. Schließen Sie die Klappe, indem Sie sie auf beiden Seiten herunterdrücken. Falls Sie die Klappe
nicht wieder angehoben werden kann, haben Sie sie erfolgreich eingerastet.
4. Umd das vakuumieren zu beginnen, drücken Sie die VAKUUM-Taste. Das Gerät wird dem Beutel
die Luft entziehen, und den Beutel danach verschweißen.
5. Drücken Sie nach dem Erlöschen der Betriebsleuchte die Löse-Knöpfe auf beiden Seiten, um den
Beutel zu lösen.
Wie Sie die Puls-Funktion verwenden.
Da der entstehende Druck im Beutel sehr hoch ist, kann es leicht passieren, dass einige empfindliche
Lebensmittel dadurch zerdrückt werden. In diesem Fall empfiehlt sich die Verwendung der Puls-Funktion,
bei der Sie mehr Kontrolle über den Prozess haben. Bei saftigen Lebensmitteln können Sie außerdem
verhindern, dass Flüssigkeiten in das Gerät gesaugt werden.
1. Legen Sie die Lebensmittel in den Beutel. Lassen Sie mindestens 5cm zwischen dem Inhalt und
der Beutelöffenung, um dem Material die Möglichkeit zum Zusammenziehen zu geben.
2. Öffnen Sie die Klappe und legen Sie das offene Ende des Beutels in die Vakuumkammer.
5
3. Schließen Sie die Klappe, indem Sie sie auf beiden Seiten herunterdrücken. Falls Sie die Klappe
nicht wieder angehoben werden kann, haben Sie sie erfolgreich eingerastet.
4. Drücken Sie die PULSE-Taste mehrmals, bis Sie sie den gewünschten Druck im Beutel erreicht
haben.
5. Drücken Sie dann die SEAL-Taste, um den Beutel zu verschweißen.
6. Drücken Sie nach dem Erlöschen der Betriebsleuchte die Löse-Knöpfe auf beiden Seiten, um den
Beutel zu lösen.
Problembehebung
Nichts passiert, wenn ich die VACUUM-Taste drücke:
• Stellen Sie sicher, dass der Stecker richtig in der Steckdose steckt.
• Stellen Sie sicher, dass das Stromkabel nicht beschädigt ist.
• Stellen Sie sicher, dass die Steckdose nicht defekt ist.
• Stellen Sie sicher, dass der Beutel richtig in der Vakuum-Kammer liegt.
• Stellen Sie sicher, dass das die Klappe richtig eingerastet ist.
• Warten Sie 25 Minuten, da sich das Gerät evl. abkühlen muss.
Die Luft wird nicht aus dem Beutel gesaugt:
• Stellen Sie sicher, dass das sich keine Falten, Knicke, Lücken oder Löche im Beutel befinden.
• Stellen Sie sicher, dass das die Dichtungen am Gerät intakt sind.
• Flüssigkeiten verhindern manchmal, dass Beutel verschweißt werden können. Wischen Sie das
innere des oberen Endes des Beutels aus und versuchen Sie es noch mal.
• Stellen Sie sicher, dass das Beutel richtig in der Vakuum-Kammer liegt.
Der Beutel schmilzt:
• Der Versiegelungsstreifen könnte überhitzt sein. Erlauben Sie dem Gerät sich zwischen den
Prozessen sich mindestens 20 Sekunden lang abzukühlen. Falls die Beutel weiter schmelzen,
warten Sie 25 Minuten, da sich das Gerät komplett abgekühlt hat.
Luft ist wieder in den Beutel eingedrungen:
• Überprüfen Sie den Beutel. U.u. haben Falten oder Knicke verhindert, dass der Beutel richtig
verschweißt wurde.
• Stellen Sie sicher, dass keine Lebensmittel den Beutel durchstochen haben.
• Stellen Sie sicher, dass keine Flüssigkeiten in den Versiegelungsbereich gelangt sind.
• Stellen Sie sicher, dass das die Dichtungen am Gerät intakt sind.
• Flüssigkeiten verhindern manchmal, dass Beutel verschweißt werden können. Wischen Sie das
innere des oberen Endes des Beutels aus und versuchen Sie es noch mal.
Der Beutel wird nicht verschweißt:
• Stellen Sie sicher, dass das sich keine Falten, Knicke, Lücken oder Löche im Beutel befinden.
• Flüssigkeiten verhindern manchmal, dass Beutel verschweißt werden können. Wischen Sie das
innere des oberen Endes des Beutels aus und versuchen Sie es noch mal.
• Erlauben Sie dem Gerät sich zwischen den Prozessen sich mindestens 20 Sekunden lang
abzukühlen. Falls die Beutel weiter schmelzen, warten Sie 25 Minuten, da sich das Gerät komplett
abgekühlt hat.
Reinigung und Pflege
1. Ziehen Sie den Stecker vor der Reinigung.
2. Tauchen Sie das Gerät nicht in Wasser.
3. Verwenden Sie keine Scheuermittel zum Reinigen.
4. Wischen Sie das Gehäuse mit einem weichen, feuchten Tuch mit etwas Spülmittel ab.
5. Wischen Sie Speisereste oder Flüssigkeiten im Inneren mit einem Papiertuch auf.
6. Trocknen Sie alles gründlich ab, bevor Sie das Gerät wieder mit dem Stromnetz verbinden und in
Betrieb nehmen.
7. Wischen Sie eventuelle Flüssigkeiten in der Vakuumkammer mit einem weichen, warmen, feuchten
Tuch und etwas mildem Reinigungsmittel auf. Trocken Sie die Vakuumkammer danach gründlich.
6
Reparaturen
•
•
•
•
•
Reparaturen am Gerät sollten nur von einer autorisierten Fachwerkstatt durchgeführt werden.
Ein Umbauen oder Verändern des Produktes beeinträchtigt die Produktsicherheit.
Achtung Verletzungsgefahr!
Öffnen Sie das Produkt niemals eigenmächtig und führen Sie Reparaturen nie selber aus!
Falscher Zusammenbau führt möglicherweise zu Fehlfunktionen oder dem Totalausfall.
Öffnen Sie in keinem Fall das Gerät.
Achtung:
Es wird keine Haftung für Folgeschäden übernommen. Technische Änderungen und Irrtümer vorbehalten!
Beachten Sie:
Die Gewährleistung verfällt bei Fremdeingriffen in das Gerät.
Technische Daten
Abmessungen: 340x150x64mm
Spannung: 220-240V / 50Hz
Leistung:175W
Der Hersteller dieses Produktes ist die CHAL-TEC Vertriebs- + Handels GmbH, Wallstraße 16,
10179 Berlin.
Konformitätserklärung
Dieses Produkt entspricht den folgenden Europäischen Richtlinien:
2004/108/EG (EMV)
2006/95/EG (Niederspannung)
2011/65/EG (RoHS)
Elektroaltgeräte
Befindet sich die obige Abbildung (durchgestrichene Mülltonne auf Rädern) auf dem
Produkt, gilt die Europäische Richtlinie 2002/96/EG. Diese Produkte dürfen nicht mit dem
normalen Hausmüll entsorgt werden. Informieren Sie sich über die örtlichen Regelungen
zur getrennten Sammlung elektrischer und elektronischer Gerätschaften. Richten Sie sich
nach den örtlichen Regelungen und entsorgen Sie Altgeräte nicht über den Hausmüll. Durch
die regelkonforme Entsorgung der Altgeräte werden Umwelt und die Gesundheit ihrer
Mitmenschen vor möglichen negativen Konsequenzen geschützt. Materialrecycling hilft,
den Verbrauch von Rohstoffen zu verringern.
CHAL-TEC Vertriebs- + Handels GmbH; Wallstraße 16; 10179 Berlin, Germany
7
IMPORTANT SAFETY INSTRUCTIONS
1. Read all instructions before using.
2. Before connecting the device to the power supply, check that the voltage indicated on the
appliance (underside the device) corresponds with the voltage in your home. If this is not the
case, contact your dealer and do not use the device.
3. Do not let the cord hang over edge of table counter or touch hot surface.
4. Do not place on or near a hot gas or electric burner or in a heated oven.
5. To protect against a fire, electric shock or personal injury, do not immerse cord, electric plugs or
device in water or other liquids.
6. To avoid all risk of electrocution, do not open the cover. Repairs to this appliance should only be
carried out by qualified persons.
7. If liquid penetrates inside the cover, unplug the appliance and have it checked by a qualified
technician before it is used again.
8. Do not place the appliance in full sunlight, close to heating equipment or any heat source, or in
a location subjected to excessive dust or mechanical shocks.
9. Do not expose the appliance to extreme temperatures. The appliance shall be used in moderate
climates.
10. Do not place any object that produces heat (candle, ash tray, etc.) close to the appliance.
11. Place the appliance on a surface that is flat, rigid and stable.
12. Install the appliance in a location with sufficient ventilation to avoid internal overheating. Avoid
restricted spaces such as bookcases, cabinets, etc.
13.Do not obstruct the appliance‘s ventilation openings. Do not install the appliance on a soft
surface, such as a carpet or blanket that might block the ventilation openings.
14.Disconnect the appliance from the power source if it is not going to be used for a long time, if
there is a thunderstorm or if it isn‘t working properly.
15. The use of attachments that are not recommended by the appliance manufacturer may result in
fire, electric shock or personal injury.
16. If the supply cord is damaged, it must be replaced by the manufacturer or its service agent or a
similarly qualified person in order to avoid a hazard.
17.This appliance is not intended for use by persons (including children) with reduced physical,
sensory or mental capabilities, or lack of experience and knowledge, unless they have been
given supervision or instruction concerning use of the appliances by a person responsible for
their safety.
18. Children should be supervised to ensure that they do not play with the appliance.
19. The appliance is not a toy. Do not let the children play it.
Never let children insert foreign objects into the appliance.
20.Do not use the appliance for other than intended use. This appliance has been designed solely
for domestic use; the manufacturer‘s liability shall not be engaged in the event of any professional
use, by any misuse or by any use not complying with the operating instructions.
21. Save these instructions.
22. Do not allow the appliance to be used as a toy.
23. Do not operate the appliance with a damaged power cord or plug.
24. This appliance should not be operated by children.
25. Do not use the appliance on a wet or hot surface, or near a heat source.
26. Always use the appliance on a level surface.
27. Do not immerse any part ofthe appliance, power cord or plug into water or other liquid.
28. To disconnect, unplug the power cord from the electrical outlet. Do not disconnect by pulling on
the cord. Always unplug the appliance before cleaning and when not in use.
29. Do not operate the appliance if it malfunctions or is any way damaged. if the cord or the machine
is damaged, please return it to our after-sales department for proper service, replacement or
repair.
30. Close supervision is required when this product is used near children.
31. The appliance is not for commercial use. If sealing more than 20 bags continuously, wait at least
25 minutes before resuming use of your appliance. Keep the upper lid of the appliance unlocked
when not in use.
Do not attempt to service this product. Service should be performed by an authorized sen/ice representative.
8
A short power-supply cord is provided to reduce the risk resulting from becoming entangled in or tripping
over a longer cord. Extension cords are not prohibited from being used when care is exercised in their
use. When an extension cord is used the marked electrical rating of the extension cord shall be no less
than the marked electrical rating of the appliance. The longer cord shall be arranged so that it does not
drape over the counter-top or tabletop where it is capable of being tripped over, snagged, or pulled on
unintentionally, especially by children.
INCLUDED
Your new vacuum sealer system includes the following
1. Vacuum Sealer
2. English User Manual
3. Starter Bags (optional)
VACUUM SEALING GUIDELINE
Food Storage & Safety
IMPORTANT .‘ Vacuum packaging is NOT a substitute for refrigeration or freezing. Any perishable foods
that require refrigeration must still be refrigerated or frozen after vacuum packaging.
For best result in extending the life of foods, it is important to vacuum package foods that are fresh.
Once food has begun to deteriorate, vacuum packaging may only slow the deterioration process.
Vacuum sealing cannot prevent the growth of mold. Other disease causing microorganisms can still grow
in low oxygen environments and may require further meansures to be eliminated.
Food Preparation Hints and Tips for Air-tight Vacuum Sealing
Cooking. Thawing and Reheating - Simmering in a vacuum bag helps food retain its flavor and it helps
with the clean up as well. No diny saucepans... When reheating foods in the microwave using your
vacuum bags, always puncture open the bag to allow hot air to escape. You can also reheat foods in the
vacuum bags by placing them in water at a low simmer below 17O°F (75°C).
IMPORTANT.“ Always thaw foods in either refrigerator or microwave - do not thaw perishable foods at
mom temperature.
Preparation Hints for Meat and Fish:
Try pre-freezing meats and fish for 1-2 hours before vacuum pakaging. This helps retain the juice and
shape, and provides for a better seal.
Ifyou can‘t, place a folded paper towel between the food and top ofthe bag, but below seal area.
Leave paper towel in bag to absorb excess moisture and juices during vacuum packaging process.
Preparation Hints for Cheeses:
Vacuum package cheese after each use. lfyou make your bagjust a little longerthan needed, you can
re-seal the bag after each use.
IMPORTANT: Due to the risk of anaerobic bacteria, soft cheeses should never be vacuum packaged.
Preparation Guidlines for Vegetables:
Blanching is a process that should be done before vacuum packaging vegetables. This process stops
the enzyme action that could lead to loss of flavor, color and texture, To blanch vegetables, place them
in Simmering water or in a microwave until they are cooked, but still crisp. Blanching times can range
from 1 to 2 minutes for leafy greens and peas; 3 to 4 minutes for snap peas, sliced zucchini or broccoli;
give your carrots about 5 minutes ; and 7 to 11 minutes for corn on the cob. Alter blanching, immerse
vegetables in cold water to stop the cooking process.
9
NOTE: All vegetables (including broccoli, Brussels sprouts, cabbage, cauliflower, kale, fumips) naturally
emit gases, during storage. Therefore, after blanching, it‘s best if fhay’re stored in the freezer.
More on Vegetables:
Vegetables are a great candidate for portion control ; when storing vegetables, try pre-freezing them
for 1 to 2 hours, then separate them into meal portions within your vacuum bags. Alter they have been
vacuum packaged, return them to the freezer.
IMPORTANT.“ Due to the risk of anaerobic bacteria, fresh mushrooms, onions & garlic should never be
vacuum packaged.
Preparation Hints for Powdery Foods:
When vacuum packaging powdery items like flour, it‘s best to use their original packaging inside of the
vacuum bags. The fine powder could get sucked into the machine and cause enough damage to shorten
the life ofthe sealer‘
Preparation Hints for Liquids:
Before you vacuum package liquid such as soup stock, pre-freeze in a casserole dish, loaf pan or ice cube
tray until solid, Remove frozen liquid from pan and vacuum package in the vacuum bags.
You can then stack in the freezer. When you’re ready to use, just cut corner of bag and place in either a
microwave dish or drop into waier at a low simmer, below 17O°F (75°C).
FEATURES
Key Features of our New Vacuum Seale
• Most compact design ever,
• Wide sealing line prevents air leakage and keeps high vacuum degree for a longertime.
• „Pulse“ function to stop or continue vacuuming any time you wish, ideal for soft food
•packaging.
• Easy lock system, slightly press the machine to lock.
• Press two buttons at bottom sides can unlock the cover easily.
• „Seal Only“ function is available.
• Pre-seal the vacuum bag any time when vacuuming.
• Sealing width : MAX 28cm.
MAIN PARTS
10
1. VACUUM button
Press to vacuum package and seal food airtight. Appliance shuts off automatically.
2. CANCEL button
Immediately halts the current function.
3. PULSE button
ls used when extreme control ofthe vacuuming process is needed for delicate foods.
Press the button and the vacuum pumps turns on, release the button and it shuts off.
4. SEAL button
1. Press to create a seal when making bags from bag roll.
2. Press to immediately stop the vacuum process and begin sealing the bag. Preventing
delicate foods from being crushed.
3. Press to create a seal on foil bags (such as a potato chip bag) to keep food sealed airtight.
5. SEALING LINE
Do not tearthe high-temperature resistant tape away.
6. ACCESSORY PORT
Allows vacuum packaging with Canisters and Accessories.
7. VACUUM CHAMBER
Make sure to place the open end of the bag down into the vacuum chamber for successful vacuuming
8. SEALING GASKETS
HOW TO MAKE CUSTOM SIZED BAGS
1. Pull enough bag material to hold item to be vacuum packaged, plus 2 inches. Vlfith a pair of
scissors or sharp knife, cut desired bag length from bag roll. Make sure to cut in a straight line.
Plug in power cord.
2. Open lid. Place one end of out bag onto sealing strip, don’t worry if you accidently place any
material onto the gasket area.
3. Close lid by pressing down on both sides. If the lid cannot be lifted. then you have successfully
locked the lid in place.
4. Now that lid has been locked, press the „SEAL“ button to create a custom sized bag. The indicator
light illuminates during the seal process.
5. Once completed the indicator light will turn off; press the release buttons on both sides of the
machine, it is now sate to take out the newly created bag.
6. The custom sized bag is now ready forvacuum sealing.
CAUTION: Make sure you give the appliance time to cool down. Wait
at least 20 seconds between seals. Under very heavy usage, appliance
will shut off automatically to prevent overheating. If it does, wait 25
minutes to allow appliance to cool off.
HOW TO VACUUM SEAL WITH THE VACUUM BAGS
1. Place the item(s) to be sealed into the pre-cut or custom sized bag, Leave at least 2 inches
between the contents and the top of the bag to allow for bag contraction.
2. Open lid and place the open end of the bag down into the vacuum chamber.
3. Close lid by pressing down on both sides. If the lid cannot be lifled, then you have successfully
locked the lid in place.
4. To begin the vacuum process, press the „VACUUM“ button. The unit will continue to vacuum and
then seal once air has been removed.
5. Once the indicator light has turned off. press the release buttons on both sides ofthe machine to
release the bag.
11
HOW TO USE THE PULSE FUNCTION
Since the pressure under the normal vacuum function is set to be high, sometimes it is easy to destroy
some delicate items by high pressure in the vacuum bags. In this case, you can use the „PULSE“ vacuum
function to control the vacuum time and pressure, and prevent crushing delicate items. When packing
some juicy foods, you can also use this function and prevent liquid being sucked out.
1. Place the item(s) to be sealed into the pre-cut or custom sized bag. Leave at least 2 inches
between the contents and the top of the bag to allow for bag contraction.
2. Open lid and place the open end of the bag down into the vacuum chamber.
3. Close lid by pressing down on both sides, If the lid cannot be lifted, then you have successfully
locked the lid in place.
4. Press the „PULSE“ button continually, till it reaches the pressure that you want. You can watch the
vacuum bag to decide the pressure. During this process, you can stop vacuum by stop pressing
this button ; and press it again to vacuum again.
5. When the pressure reaches what it needs, press „SEAL“ button to start sealing.
6. Once the indicator light has turned off, press the release buttons on both sides ofthe machine to
release the bag.
CARE & CLEANING
1. Always unplug the unit before cleaning
2. Do not immerse in water.
3. Do not use abrasives to clean the unit.
4. Wipe the outer surface with a soft. damp cloth and soap.
5. To clean the inside ofthe unit, wipe away any food or liquid with a paper towel.
6. Dry all parts thoroughly before you plug in and operate the unit again.
7. Vacuum chamber may trap liquids that were drawn from the bag ; use a mild dish washing soap
and a warm, damp cloth to wipe away any lefi behind liquid from the vacuum chamber.
8. Dry thoroughly.
TROUBLESHOOTING
Nothing happens when I press the „VACUUM“ button:
• Make sure the power cord is correctly plugged into the electrical outlet.
• Make sure the power cord is not damaged in any way.
• Make sure the electrical outlet is operative by plugging in another appliance. If it’s not,
• please check the circuit breakers or fuses in your home.
• Make sure the bag is positioned correctly down in the vacuum chamber.
• Press down on both sides ofthe lid and make sure it is locked in place.
• Wait 25 minutes to allow appliance to cool off, and then try using again.
Air is
•
•
•
•
•
not vacuumed from the bag:
Check that there are no gaps. folds, wrinkles or holes in the pre-sealed bags.
Check for loose, worn or cracked Upper and Lower sealing gaskets.
Foods with high liquid contents may prevent the bag from sealing properly. Cut bag open and wipe
top inside of bag and reseal.
Check to see if bag is properly inserted into the vacuum chamber.
Make sure you’ve placed the bag in the proper place. When making a bag from a roll, make sure
end of cut piece is on the sealing strip.
Bag melts:
• The sealing strip may have been too hot during the sealing process. Allow the unit to cool for 20
seconds between uses. lithe bag continues to melt. allow unit to cool with the lid in the upright
position for 25 minutes before using.
12
Air has seeped back into the vacuumed bag:
• Check the seal of the bag. There may be a hole or wrinkle that is allowing air to reenter the bag.
Carefully cut the bag open and re-seal it. or use an entirely new bag.
• Make sure there is no moisture or liquid from the food present within the bag seal. You may need
to cut open the bag and re-seal if, or use an entirely new bag. Partially freeze foods with excess
liquids, prior to vacuum sealing.
• Make sure there are no food items with sharp edges that may have punctured the bag. If you find
a puncture hole, seal the item in an entirely new bag.
• Make sure no liquids were drawn to the sealing strip area.
• Check for loose, worn or cracked Upper and Lower sealing gaskets.
• Moisture of foods with high liquid content will prevent the bag from sealing properly. Cut bag open
and wipe top inside of bag and reseal.
Bag will not seal:
• Check that there aren’t any gaps, folds, wrinkles or holes in pre-sealed edges.
• Moisture of foods with high liquid content will prevent the bag from sealing properly. Cut bag open
and wipe top inside of bag and reseal.
• Make sure you’ve placed the bag in the proper place. When making a bag from a roll, make sure
end of cut piece is on the sealing strip.
• Make sure you‘ve given the appliance time to cool down. Wait 20 seconds between seals.
SERVICE INSTRUCTION
1. Do NOT attempt to repair or adjust any electrical or mechanical functions on this unit. Doing so
will void the warranty.
2. lfyou have any questions or comments regarding the unit‘s operation or believe any repair is
necessary, please contact our after-sales department.
Technical specifications
Dimensions Voltage and Power Vacuum Degree 340‘15o 64mm
220-240V- 5DHZ 175W \
0.6~0 8 bar
Electric and electronic equipment and included batteries contains materials, componentsans substances
that can be hazardous to your health and the enviroment, if the waste material (discarded electric and
electronic equipment and batteries) is not handled correctly.
Electric and electronic equipment and batteries is marked with the crossed ou trash
can symbol, seen here. This symbol signifies that electric and electronic equipment and
batteries should not be disposed of with other household waste, but should be disposed of
separately.
As the end user it is important that you submit your used batteries to the appropriate and designated
facility. In this manner you make sure that the batteries are recycled in accordance with legislature and
will not harm the enviroment.
All cities have established collection points, where electric and electronic equipment and batteries can
either be submitted free of charge at recycling stations and other collection sites, or be collected from
the households. Additional information is available at the technical department of your city.
CHAL-TEC Vertriebs- + Handels GmbH; Wallstraße 16; 10179 Berlin, Germany
13