1
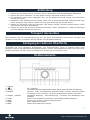
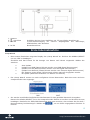
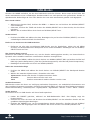
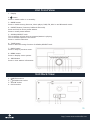
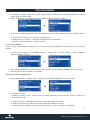
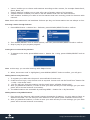
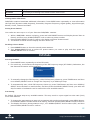
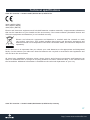
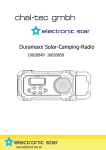
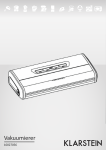
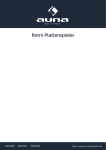
multimedia
Radio Weimar
DAB / Internet / FM / AUX / Bluetooth – Radio
1002641810026419
http://www.auna-multimedia.com
Sehr geehrter Kunde,
zunächst möchten wir Ihnen zum Erwerb Ihres Gerätes gratulieren.
Bitte lesen Sie die folgenden Anschluss- und Anwendungshinweise sorgfältig durch und befolgen Sie diese um
möglichen technischen Schäden vorzubeugen.
Warnung
Zur Reduzierung der Gefahr von Brand, elektrischem Schlag und Beschädigung:
• Setzen Sie dieses Gerät nicht dem Regen aus.
• Stellen Sie keine mit Flüssigkeiten gefüllten Gefäße, wie Vasen, auf dieses Gerät.
• Ausschließlich das empfohlene Zubehör verwenden.
• Reparieren Sie dieses Gerät nicht selbst.
Wenden Sie sich zur Wartung an qualifiziertes Kundendienstpersonal.
• Lassen Sie keine Gegenstände aus Metall in dieses Gerät fallen.
• Stellen Sie keine schweren Gegenstände auf dieses Gerät.
• Reinigen Sie das Gerät nur mit einem trockenen Tuch.
• Blockieren Sie nicht die Belüftungsöffnungen.
• Installieren Sie die Geräte nicht in unmittelbarer Nähe von Hitzequellen wie Heizungen, Herden, Öfen oder anderen heiß werdenden Geräten (wie z.B. Verstärkern o.a.)
Netzkabel/Netzteil
Zur Reduzierung der Gefahr von Brand, elektrischem Schlag und Beschädigung:
• Gewährleisten Sie, dass die Spannung der Stromversorgung dem auf diesem Gerät angegebenen
Wert entspricht.
• Stecken Sie das Netzteil vollständig in die Steckdose ein.
• Ziehen Sie nicht am Kabel, knicken Sie es nicht und stellen Sie keine schweren Gegenstände
darauf.
• Fassen Sie den Stecker nicht mit nassen Händen an.
• Fassen Sie den Stecker beim Herausziehen an seinem Korpus an.
• Verwenden Sie keinen beschädigten Netzstecker oder eine beschädigte Steckdose.
• Installieren Sie dieses Gerät so, dass das Netzkabel sofort aus der Steckdose gezogen werden
kann, wenn Störungen auftreten.
Netzadapter
• Der Netzadapter kann mit Wechselstrom von 220 - 240 V betrieben werden.
• Verwenden Sie einen geeigneten Steckeradapter, wenn der Stecker nicht in die Netzsteckdose
passt.
Kleine Objekte/Verpackungsteile
(Plastikbeutel, Karton, etc.)
• Bewahren Sie kleine Objekte (z.B. Schrauben und anderes Montagematerial, Speicherkarten) und
Verpackungsteile außerhalb der Reichweite von Kindern auf, damit sie nicht von diesen verschluckt
werden können. Lassen Sie kleine Kinder nicht mit Folie spielen. Es besteht Erstickungsgefahr!
Achtung - Stellen Sie keine Quellen offener Flammen, z.B. brennende Kerzen, auf das Gerät.
2
http://www.auna-multimedia.com
multimedia
Aufstellung
1. Stellen Sie das Gerät auf eine trockene, ebene, wasserfeste und hitzebeständige Oberfläche.
2. Suchen Sie einen Aufstellort, an dem Kinder nicht an das Gerät gelangen können.
3.Die Steckdose muss leicht zugänglich sein, um im Notfall das Gerät schnell vom Stromkreis
trennen zu können.
4. Installieren oder positionieren Sie dieses Gerät nicht in einem Bücherregal, Einbauschrank oder
einem sonstigen engen Raum. Stellen Sie eine gute Belüftung des Gerätes sicher.
5. Stellen Sie das Gerät nicht auf Verstärker oder andere Geräte, die heiß werden können. Diese
Hitze könnte das Gerät beschädigen.
6. Setzen Sie dieses Gerät keinem direkten Sonnenlicht, hohen Temperaturen, starker Feuchtigkeit
und übermäßigen Erschütterungen aus.
Transport des Gerätes
Bitte bewahren Sie die Originalverpackung auf. Um einen ausreichender Schutz beim Transport des
Gerätes zu erreichen, verpacken Sie das Gerät in der Originalverpackung.
Reinigung der äußeren Oberfläche
Verwenden Sie keine flüchtigen Flüssigkeiten, wie Insektensprays. Durch zu starken Druck beim
Abwischen können die Oberflächen beschädigt werden. Gummi- oder Plastikteile sollten nicht über einen
längeren Zeitraum mit dem Gerät in Kontakt sein. Nutzen Sie ein trockenes Tuch.
Bedienelemente
1. Display
2.
Ein / Standby
3. MODE
Umschalten zwischen Internet-Radio, Music Player, DAB, FM, AUX und Bluetooth.
4. PRESET
Internet-, DAB- und FM-Modus: Gedrückt halten, um den aktuellen Sender
zu speichern. Kurz drücken, um einen gespeicherten Sender abzurufen.
5. SCROLL / SELECT Lautstärke-Regelung / Menü-Steuerung – Drücken zum Bestätigen einer
Auswahl
6. TUNE
Aktiviert die Frequenz-Suchfunktion des SCROLL/SELECT-Reglers
7. BACK
Zurück zum vorigen / übergeordneten Menü
8. MENU
Menü-Optionen anzeigen
9. INFO
Sender-Informationen anzeigen
3
http://www.auna-multimedia.com
multimedia
1. Antenne
2.
- Anschluss
Schließen Sie hier ihren Kopfhörer mit 3,5-mm-Klinke-Anschluss an
3. AUX IN
3,5mm-Klinke-Eingang für externe Abspielgeräte wie MP3-Player,
Mobiltelefone oder ähnliches
4. DC IN
Netzteilanschluss
Erste Inbetriebnahme
Setup Wizard
• Beim ersten Einschalten zeigt das Display den ‚Setup Wizard‘ an. Drücken Sie SCROLL/SELECT
um mit ‚YES‘ zu bestätigen.
Zunächst wird das Format für die Anzeige von Datum und Uhrzeit eingestellt. Wählen Sie
zwischen
o
o
o
o
o
Auto Update
Update from DAB (Datum/Uhrzeit werden vom DAB-Signal übernommen)
Update from FM (Datum/Uhrzeit werden vom FM-Signal übernommen)
Update from Network (Datum/Uhrzeit werden vom Internet-Signal übernommen)
Die Zeitzone sowie Winter-/Sommerzeit müssen manuell eingegeben werden
No update (Manuelles Einstellen von Datum und Uhrzeit)
• Der ‚Setup Wizard‘ scannt nun nach verfügbaren W-Lan Netzwerken. Nach dem scan wird eine
entsprechende Liste angezeigt.
• Sie werden anschließend aufgefordert das Passwort für das gewählte Netzwerk einzugeben.
Nutzen Sie SCROLL/SELECT, um zu den entsprechenden Zeichen zu scrollen und drücken Sie zum
bestätigen. Beachten Sie: WEP/WPA-Passwörter sind case-sensitive, also müssen Sie die Groß-/
Kleinschreibung berücksichtigen. Wählen Sie , um ein falsch eingegebenes Zeichen zu
löschen.
4
http://www.auna-multimedia.com
multimedia
• Bestätigen Sie das eingegebene Passwort mit und drücken Sie schließlich SCROLL/
SELECT um zu bestätigen.
• Das Gerät verbindet sich jetzt mit ihrem W-LAN-Netzwerk.
Internet-Radio
• Nach erfolgreichem Setup zeigt das Gerät das Haupt-Menü an. Drücken Sie SCROLL/SELECT, um
den Internet-Radio-Modus zu wählen.
• Gehen Sie auf „Station list“ und wählen Sie per Knopfdruck auf SCROLL/SELECT. Wählen Sie einen
Sender (siehe Abb. unten)
Probleme bei der Verbindung? 1.Prüfen Sie, ob Ihr W-Lan-Router richtig funktioniert. – Haben Ihre Heimrechner eine funktionierende Verbindung zum Internet? 2. Vielleicht ist es nötig, das Radio an einen Ort
mit besserem Empfang zu stellen. 3. Stellen Sie sicher, dass Sie das Passwort richtig eingegeben haben.
Einen Sender auswählen
•
Scrollen Sie auf zum Beispiel auf „Local Germany“, um eine Liste Lokaler Sender zu erhalten, nach
Genres geordnet. Bestätigen Sie diese Wahl durch Druck auf SCROLL/SELECT. Sie sehen in jedem
Ordner eine Liste von Internet-Radiosendern. Wählen Sie jeweils mit SCROLL/SELECT aus.
Zurück zur Liste gelangen Sie mit BACK. Verfahren Sie ebenso mit Podcasts und den nach Genre
sortierten Sendern.
Beachten Sie: Nicht alle Sender sind ständig online.
Sender zu „My Favourites“ oder „My added Stations“ hinzufügen
Sie können ihr Radio auf dem Portal www.wifiradio-frontier-com registrieren. Erstellen Sie dazu
einen Account. Den „Access Code“ erfahren Sie über das Menü Ihres Radios: Scrollen Sie im Menü
„Internet Radio“ ganz nach unten auf „Help“ und dann auf „Get access code“.
Nachdem Sie auf wifiradio-frontier.de Ihre Lieblingssender eingestellt haben, können Sie diese über Ihr
Radio direkt abrufen. Schalten Sie dazu das Radio für einige Minuten ab. Beim Neustart erscheint die
Liste unter Menü -> Station list -> My favourites beziehungsweise Menü -> Station list -> My added
Stations.
Sender-informationen
Internet-Sender nutzen die ihnen zur Verfügung stehende Infrastruktur, um zusätzliche Informationen
mit dem regulären Programm zu senden. Drücken Sie mehrfach INFO, um diese auf dem Display
anzuzeigen: Sender-Beschreibung – Genre – Ort – Empfangs-Qualität – Bit-Rate – Codec – Sampling
Rate – Buffer und Datum/Uhrzeit.
Sender-Speicher
Sie können bis zu 10 Sender auf ihrem Radio speichern:
5
http://www.auna-multimedia.com
multimedia
•
•
•
Halten Sie PRESET gedrückt, während ein Internet-Radiosender läuft. Das Display zeigt die
Preset-Liste an.
Scrollen Sie durch die Liste und drücken Sie SCROLL/SELECT um den aktuellen Sender auf den
gewählten Speicherplatz abzulegen.
Drücken Sie PRESET kurz, um die gespeicherten Sender abzurufen. Scrollen Sie mit SCROLL/
SELECT durch die angezeigte Liste und wählen Sie durch drücken von SCROLL/SELECT aus.
Music Player
Einen Music Server installieren
•
•
•
Um Musikdateien von einem Computer abzuspielen, müssen Sie auf diesem die Freigabe dieser
Dateien ermöglichen.
UPnP media sharing erlaubt Geräten wie diesem Radio, auf Rechnern geteilte Musik abzuspielen,
ebenso, wie durch die Ordnerstruktur oder Bibliothek zu navigieren.
Bitte entnehmen Sie Hinweise zur Freigabe und zu UPnP den Informationen ihres jeweiligen
Betriebssystems.
Dateifreigabe mit dem Windows Media Player
Der gebräuchlichste UPnP-Client ist der Windows Media Player (Version 10 oder neuer). Um den Windows
Media Player als Bibliothek für die Wiedergabe von Musik über das Radio zu nutzen, führen Sie folgende
Schritte aus:
•
•
•
•
•
•
Stellen Sie sicher, dass Ihr PC mit dem Internet verbunden ist.
Stellen Sie sicher, dass das Radio an ist und mit dem selben Netzwerk verbunden ist wie der PC.
Fügen Sie im Windows Media Player Musikdateien oder Ordner zu einer Musikbibliothek hinzu
(Library -> Add to library).
Aktivieren Sie Media Sharing (Library -> Media sharing bzw. Medienstreaming aktivieren).
Stellen Sie sicher, dass das Radio Zugriff auf die geteilten Musikdateien hat, indem Sie sie anwählen
und „Erlauben“ klicken. In den Einstellungen können Sie weiterhin einen Namen für die geteilten
Musikdateien angeben.
Der Rechner ist nun bereit, Musik auf ihr Radio zu streamen. Der notwendige UPnP-Server läuft
im Hintergrund – Sie müssen nicht extra den Windows Media Player starten.
Shared Media abspielen
• Wählen Sie den Music Player Modus durch wiederholtes Drücken von MODE.
• Wählen Sie Music Player per Druck auf SCROLL/SELECT und klicken Sie Sich durch – analog zur
Sendersuche im Internet-Radio-Modus.
My Playlist
Die My Playlist – Funktion ermöglicht Ihnen eine Playlist Ihrer Lieblingsmusik aus den Windows Media
Player-Freigaben zu erstellen. Um einen Song zur My Playlist hinzuzufügen, scrollen Sie nach gewohnter
Art durch die Bibliothek bis zum gewünschten Song. Halten Sie SCROLL/SELECT gedrückt, um den Song
zu My Playlist hinzuzufügen.
Um My Playlist abzuspielen, drücken sie MENU und wählen Sie dann mit SCROLL/SELECT My Playlist aus.
My Playlist-Funktionen:
Drücken
Sie
MENU
und
drehen
Sie
SCROLL/SELECT
um
die
Playlist-spezifischen
Funktionen Repeat (wiederholt den aktuellen Song) und Shuffle (Zufallsmodus) zu wählen. Über Clear
My Playlist löschen Sie weiterhin die angelegte Liste. Wählen Sie Prune Servers, um Musik-Server zu
entfernen, die nicht weiterhin für Musikstreaming verfügbar sind.
6
http://www.auna-multimedia.com
multimedia
DAB-Modus
Drücken Sie MODE mehrfach, bis Sie den DAB-Modus aufrufen können. Beim ersten Aufruf führt das
Gerät automatische einen vollständigen Sendersuchlauf aus und speichert die gefundenen Sender in
alphabetischer Reihenfolge ab. Der erste Sender der Liste wird automatisch gewählt und abgespielt.
Einen Sender wählen
• Während ein Sender läuft, drücken Sie MENU -> Station list und drücken Sie SCROLL/SELECT
zum bestätigen.
• Alternativ, drücken Sie TUNE und drehen Sie SCROLL/SELECT bis zu dem Sender, den Sie hören
möchten.
• Wählen Sie in beiden Fällen durch Druck auf SCROLL/SELECT aus.
Sendersuchlauf
• Drücken Sie MENU und wählen Sie Scan. Bestätigen Sie per Druck auf SCROLL/SELECT, um einen
vollständigen Sendersuchlauf durchzuführen.
Entfernen von Sendern aus der DAB-Senderliste
• Entfernen sie alle nicht erreichbaren DAB-Sender aus der Senderliste, indem Sie auf MENU
drücken und anschließend den Menüpunkt Prune invalid auswählen. Bestätigen Sie mit SCROLL/
SELECT-Druck auf Yes.
DRC (Dynamic Range Control)
Stellen sie den Grad der Kompression ein, mit der Sender wiedergegeben werden, um Unterschiede in
Dynamik oder Lautstärke zwischen verschiedenen Sendern auszugleichen:
• Gehen Sie auf MENU, wählen Sie durch drehen von SCROLL/SELECT DRC und stellen Sie DRC auf
DRC high (starke Kompression), DRC low (leichte Kompression) oder DRC off (keine Kompression).
• Bestätigen Sie abermals mit Druck auf SCROLL/SELECT.
Ändern der Sender-Reihenfolge
• Drücken Sie MENU und wählen Sie durch drehen von SCROLL/SELECT den Menüpunkt Station
order.
• Wählen Sie zwischen Alphanumeric, Ensemble oder Valid.
Alphanumeric:Sortiert die Sender in alphanumerischer Order
Ensemble:
Sortiert aktive Sender nach vorn
Valid: Entfernt automatisch inaktive Sender von der Liste
Senderinformationen
DAB-Sender nutzen die ihnen zur Verfügung stehenden Frequenzen, um zusätzliche Informationen mit
dem regulären Programm zu senden. Drücken Sie mehrfach INFO, um diese auf dem Display anzuzeigen:
Sender-Beschreibung – Sendefrequenz – Signalqualität – Signalstärke – Bitrate – Codec – Kanal – Datum.
Sender-Speicher
Sie können bis zu 10 DAB-Sender auf ihrem Radio speichern:
•
•
•
Halten Sie PRESET gedrückt, während ein DAB-Radiosender läuft. Das Display zeigt die
Preset-Liste an.
Scrollen Sie durch die Liste und drücken Sie SCROLL/SELECT um den aktuellen Sender auf den
gewählten Speicherplatz abzulegen.
Drücken Sie PRESET kurz, um die gespeicherten Sender abzurufen. Scrollen Sie mit SCROLL/
SELECT durch die angezeigte Liste und wählen Sie durch drücken von SCROLL/SELECT aus.
7
http://www.auna-multimedia.com
multimedia
FM-Modus
Drücken Sie MODE mehrfach, bis Sie den FM-Modus aufrufen können. Beim ersten Aufruf startet das FMRadio auf der Frequenz 87,50MHz. Sonst wird die zuletzt gehörte Frequenz aufgerufen.
•
•
Um die Frequenz manuell zu ändern, drücken Sie TUNE und scrollen Sie dann mit SCROLL/
SELECT durch das Frequenzband (in 0.05MHz-Schritten).
Für einen automatischen Suchlauf, drücken Sie TUNE während des FM-Betriebs. Drehen Sie
SCROLL/SELECT im oder gegen den Uhrzeigersinn, um eine Suchrichtung zu bestimmen. Durch
Druck auf SCROLL/SELECT springt das Radio nun zum nächsten empfangbaren Sender in der
Richtung, die sie vorgegeben haben.
Sendersuchlauf
Standardmäßig stoppt der Suchlauf bei jedem verfügbaren Sender, was auch Sender mit schlechter
Signalqualität („schlechter Empfang“) beinhaltet. Um dies zu ändern
• gehen Sie auf MENU und wählen Sie Scan setting. Das Display zeigt „Strong stations only?“.
Wählen Sie durch Druck auf SCROLL/SELECT. Der FM-Sendersuchlauf stoppt nun nur noch bei
Sendern, die einen guten Empfang gewährleisten.
Stereo/Mono
Standardmäßig werden Radiosender im Stereo-Modus wiedergegeben. Bei schlechtem Empfang kann
dies in Rauschen münden. Um schlecht empfangene Sender in adäquater Qualiltät wiederzugeben, gehen Sie auf MENU, scrollen Sie mit SCROLL/SELECT auf Audio setting. Die Frage Listen in mono only?
wird angezeigt. Wählen Sie YES und bestätigen Sie durch Druck auf SCROLL/SELECT.
Senderinformationen
FM-Sender nutzen die ihnen zur Verfügung stehenden Frequenzen, um zusätzliche Informationen mit
dem regulären Programm zu senden. Drücken Sie mehrfach INFO, um diese auf dem Display anzuzeigen:
Radio Text – Programm Typ – Programm Name – Datum
Sender-Speicher
Sie können bis zu 10 FM-Sender auf ihrem Radio speichern:
•
•
•
Halten Sie PRESET gedrückt, während ein FM-Radiosender läuft. Das Display zeigt die Preset-Liste an.
Scrollen Sie durch die Liste und drücken Sie SCROLL/SELECT um den aktuellen Sender auf den
gewählten Speicherplatz abzulegen.
Drücken Sie PRESET kurz, um die gespeicherten Sender abzurufen. Scrollen Sie mit SCROLL/
SELECT durch die angezeigte Liste und wählen Sie durch drücken von SCROLL/SELECT aus.
Bluetooth-Modus
Drücken Sie MODE mehrfach, bis Sie den Bluetooth-Modus aufrufen. Auf dem Display beginnt
•
•
•
•
zu blinken.
Aktivieren Sie Bluetooth auf ihrem Bluetooth-fähigen Gerät (Smartphone, Tablet, Computer).
Verbinden Sie ihr Bluetooth-Gerät mit Digital Radio Station
Geben Sie, falls notwendig, „0000“ als Passwort ein.
Das Icon
wird auf dem Display des Radios angezeigt, solange die Bluetooth-Verbindung stabil ist.
Um die Bluetooth-Verbindung zu trennen, gehen Sie auf MENU und scrollen Sie mit SCROLL/SELECT bis
zum Punkt BT disconnect. Bestätigen Sie durch Druck auf SCROLL/SELECT.
Beachten Sie: Das Gerät schaltet nach 30 Minuten automatisch, falls das Bluetooth-Gerät die Verbindung
gekappt hat oder aus ist oder die Lautstärke zu gering ist.
8
http://www.auna-multimedia.com
multimedia
AUX-Modus
AUX IN erlaubt die schnelle und einfache Verbindung von externen Geräten wie MP3-Playern oder
Mobiltelefonen.
•
•
•
Verbinden Sie ihr externes Gerät per 3,5mm-Klinke-Kabel (nicht im Lieferumfang enthalten) mit
der AUX IN-Buchse des Radios.
Drücken Sie MODE mehrfach, bis Sie den AUX IN-Modus erreichen.
Steuern Sie die Musikwiedergabe über das externe Gerät.
Beachten Sie: Das Gerät schaltet nach 30 Minuten automatisch, falls das AUX-Gerät die Verbindung
gekappt hat oder aus ist oder die Lautstärke zu gering ist.
Generelle Funktionen
Sleep Timer (Das Gerät geht nach einer einstellbaren Zeit automatisch in den Standby-Modus)
• Drücken Sie MENU und wählen Sie Main menu –> Sleep. Entern Sie das Untermenü mit Druck auf
SCROLL/SELECT.
• Wählen Sie zwischen den Sleep-Time-Optionen Sleep OFF – 15min – 30min – 45min oder 60min.
Bestätigen Sie abermals mit SCROLL/SELECT.
• Das Icon sowie die Zeit bis zum Standby wird auf dem Display angezeigt.
• Um den Sleep-Timer auszuschalten, wiederholen Sie die Prozedur und wählen Sie als Sleep Option Sleep OFF.
Wecker / Alarm (Das Radio kann zwei individuelle Weckzeiten verwalten)
•
•
•
Gehen Sie auf MENU -> Main Menu -> Alarms
Wählen Sie via SCROLL/SELECT zwischen Alarm1 und Alarm2 und wählen Sie per Druck auf
SCROLL/SELECT die zu bearbeitende Weckzeit.
Scrollen Sie mit SCROLL/SELECT durch die Optionen:
Enable:Aktiver Weck-Tag – Aus / Täglich / Ein Mal / Nur am Wochenende / Nur an Wochentagen
Time: Weckzeit: standardmäßig 00:00; per SCROLL/SELECT einzustellen
Mode: Weckmodus: Buzz (Piepen), Internet-Radio, DAB oder FM
Preset:Zuletzt gehörter oder gespeicherter Sender
Volume:
Wecklautstärke
Save: Speichern
•
•
•
•
Das Display zeigt Alarm saved, sobald der Wecker erfolgreich eingestellt wurde.
bzw.
erscheint
auf dem Display.
Um den Wecker temporär abzuschalten (Snooze), drücken Sie SCROLL/SELECT, während das Gerät
versucht, Sie um Ihren wohlverdienten Schlaf zu bringen. Wiederholtes Drücken verschiebt die
Weckzeit um 5, 10, 15 oder 30 Minuten. Die Snooze-Zeit wird auf dem Display angezeigt.
Um den Wecker ganz auszuschalten, drücken Sie
.
Um die Wecker-Einstellungen rückgängig zu machen, wiederholen Sie die Schritte 1 und 2 und
schalten Sie den Wecker ab.
Equalizer
Die Equalizer-Funktion erlaubt Ihnen ein Klangprofil nach Ihren individuellen Vorlieben zu wählen.
• Wählen Sie MENU -> Main menu -> System settings -> Equalizer und entern Sie das Untermenü
wie gewohnt mit SCROLL/SELECT.
9
http://www.auna-multimedia.com
multimedia
•
•
Wählen Sie aus den Voreinstellungen Normal, Flat, Jazz, Rock, Movie, Classic, Pop, News, My EQ
oder My EQ Profile Setup.
Um Ihr persönliches EQ-Profil zu editieren, wählen Sie My EQ profile setup. Verändern Sie hier die
Einstellungen der Bass- und Höhenwiedergabe nach Ihrem Gusto und bestätigen Sie mit YES.
Datum/Uhrzeit einstellen
• Drücken Sie MENU und navigieren Sie zu Main Menu -> System settings -> Time/Date und drücken
Sie SCROLL/SELECT.
• Scrollen Sie mit SCROLL/SELECT durch die möglichen Optionen:
Set Time/date:
Stellen Sie Datum und Uhrzeit manuell ein.
Auto update:
Wählen Sie zwischen Update from DAB, Update from FM, Update from Network oder No update.
Set format:
12 / 24-Stunden-Anzeige
Set timezone:
Wählen Sie Ihre Zeitzone aus (nur verfügbar bei Update from Network).
Daylight saving:
Einstellungen zu Sommer-/Winterzeit (nur verfügbar bei Update from Network)
Spracheinstellungen
• Drücken Sie MENU und navigieren Sie zu Main Menu -> System settings -> Language und drücken
Sie SCROLL/SELECT.
• Wählen Sie die gewünschte Sprache aus und bestätigen Sie mit SCROLL/SELECT.
Werkseinstellungen zurücksetzen / Factory Reset
• Drücken Sie MENU und navigieren Sie zu Main Menu -> System settings -> Factory Reset und
drücken Sie SCROLL/SELECT zum bestätigen.
ACHTUNG: Alle Einstellungen, inklusive Datums-/Uhrzeit-Einstellungen, Weckzeiten sowie gespeicherte
Sender-Listen werden hierdurch gelöscht. Dies betrifft lediglich nicht die My Favourites-Listen bzw. My
added stations-Listen, die weiterhin online unter www.wifiradio-frontier-com abrufbar sind und nach
erneuter Anmeldung des Geräts an Ihrem lokalen Netzwerk erneut über Ihr Radio zu empfangen sind.
Software Update
Von Zeit zu Zeit bietet der Hersteller der Gerätesoftware Upgrades an, welche Bugfixes und/oder erweiterte Funktionen beinhalten kann. Sobald das Gerät erkennt, dass neue Software verfügbar ist, fragt es,
ob Sie ein Update installieren wollen. Bestätigen Sie mit YES, wird die Software automatisch heruntergeladen und installiert.
ACHTUNG: Wenn Sie ein Software-Update starten, stellen Sie sicher, dass die Stromverbindung stabil ist. Eine
Unterbrechung der Spannungsversorgung kann dazu führen, dass die Installation fehlschlägt und das Gerät in
Folge nicht mehr zu gebrauchen ist.
•
•
•
Drücken Sie MENU und navigieren Sie zu Main Menu -> System settings -> Software update und
drücken Sie SCROLL/SELECT zum bestätigen.
Scrollen Sie zu Auto-check setting und drücken Sie SCROLL/SELECT, damit das Gerät in Zukunft
regelmäßig automatisch nach Updates sucht.
Wählen Sie Check now, damit das Gerät sofort nach eventuell verfügbaren Updates sucht.
System Info
Drücken Sie MENU und navigieren Sie zu Main Menu -> System settings -> System Info und drücken Sie
SCROLL/SELECT zum bestätigen. Hier finden Sie Informationen zur aktuellen Software Version sowie die
Radio ID – Informationen, die Ihnen im Support-Falle weiterhelfen können.
10
http://www.auna-multimedia.com
multimedia
Display-Beleuchtung einstellen
•
•
•
Drücken Sie MENU und navigieren Sie zu Main Menu -> System settings -> Backlight und drücken
Sie SCROLL/SELECT zum bestätigen.
Wählen Sie Power-on Level bzw. Standby Level um die jeweilige Display-Beleuchtung zu ändern.
Wählen Sie aus folgenden Optionen:
Power-on Level
High
Low
Standby Level High
Low
Off
Netzwerk-Setup
Bei Problemen die Netzwerk-Einstellungen betreffend…
• …drücken Sie MENU und navigieren Sie zu Main menu -> System settings -> Network und drücken
Sie SCROLL/SELECT.l
• Scrollen Sie durch die folgenden Optionen:
Network Wizard:
Automatische Suche nach verfügbaren Netzwerken
PBC WLan Setup:
Verbinden Sie das Gerät mit einem WPS-verschlüsselten W-LAN (unterstützt
nur Router, die WPS 2.0 nutzen).
View settings: Zeigt Netzwerk-Eigenschaften an (MAC-Adresse, W-LAN-Region, IP-Adresse etc.)
Manual settings:
Eine W-LAN-Verbindung manuell erstellen
Network profile:
Listen Sie registrierte Netzwerke auf und löschen Sie nicht relevante oder
störende Netzwerke.
Sicherheitshinweise und Gewährleistung
• Diese Bedienungsanleitung dient dazu, Sie mit der Funktionsweise dieses Produktes vertraut zu
machen. Bewahren Sie diese Anleitung daher stets gut auf, damit Sie jederzeit darauf zugreifen
können.
• Sie erhalten bei Kauf dieses Produktes zwei Jahre Gewährleistung auf Defekt bei sachgemäßem
Gebrauch.
• Bitte verwenden Sie das Produkt nur in seiner bestimmungsgemäßen Art und Weise. Eine
anderweitige Verwendung führt eventuell zu Beschädigungen am Produkt oder in der Umgebung
des Produktes.
• Ein Umbauen oder Verändern des Produktes beeinträchtigt die Produktsicherheit. Achtung
Verletzungsgefahr!
• Öffnen Sie das Produkt niemals eigenmächtig und führen Sie Reparaturen nie selber aus!
• Behandeln Sie das Produkt sorgfältig. Es kann durch Stöße, Schläge oder den Fall aus bereits
geringer Höhe beschädigt werden.
• Halten Sie das Produkt fern von Feuchtigkeit und extremer Hitze.
ACHTUNG: Es wird keine Haftung für Folgeschäden übernommen. Technische Änderungen und Irrtümer vorbehalten!
Wichtige Hinweise zur Entsorgung
Dieses Elektrogerät gehört NICHT in den Hausmüll. Für die fachgerechte Entsorgung wenden Sie sich
bitte an die öffentlichen Sammelstellen in Ihrer Gemeinde.
Einzelheiten zum Standort einer solchen Sammelstelle und über ggf. vorhandene Mengenbeschränkungen
pro Tag/ Monat/ Jahr sowie über etwa anfallende Kosten bei Abholung entnehmen Sie bitte den
Informationen der jeweiligen Gemeinde.
11
http://www.auna-multimedia.com
multimedia
Warnhinweise
•
•
•
•
•
•
•
•
Reparaturen am Gerät sollten nur von einer autorisierten Fachwerkstatt durchgeführt werden.
Öffnen Sie in keinem Fall das Gerät.
Falscher Zusammenbau führt möglicherweise zu Fehlfunktionen oder dem Totalausfall.
Das Gerät sollte vor jeglichen Feuchtigkeit und direkter Sonneneinstrahlung geschützt werden.
Das Gerät bitte nicht mit Reinigungsmitteln reinigen.
Verwenden Sie zur Reinigung nur ein trockenes (Mikrofaser) Tuch.
Schließen Sie das Gerät nur an die dafür vorgesehene Netzspannung.
Schließen Sie das Gerät in keinem Fall an andere Spannungen als vorgesehen an.
Die Gewährleistung verfällt bei Fremdeingriffen in das Gerät.
Technische Eigenschaften
Stromversorgung: 220-240V 50/60Hz (mit Netzadapter) Der Hersteller dieses Produktes ist die CHAL-TEC Vertriebs- + Handels GmbH, Wallstraße 16, 10179 Berlin.
Konformitätserklärung
Dieses Produkt entspricht den folgenden Europäischen Richtlinien:
2004/108/EG (EMV)
2011/65/EG (RoHS)
1999/5/EG (R&TTE)
Elektroaltgeräte
Befindet sich die obige Abbildung (durchgestrichene Mülltonne auf Rädern) auf dem
Produkt, gilt die Europäische Richtlinie 2002/96/EG. Diese Produkte dürfen nicht mit dem
normalen Hausmüll entsorgt werden. Informieren Sie sich über die örtlichen Regelungen
zur getrennten Sammlung elektrischer und elektronischer Gerätschaften. Richten Sie sich
nach den örtlichen Regelungen und entsorgen Sie Altgeräte nicht über den Hausmüll.
Durch die regelkonforme Entsorgung der Altgeräte werden Umwelt und die Gesundheit
ihrer Mitmenschen vor möglichen negativen Konsequenzen geschützt. Materialrecycling
hilft, den Verbrauch von Rohstoffen zu verringern.
CHAL-TEC Vertriebs- + Handels GmbH; Wallstraße 16; 10179 Berlin, Germany
12
http://www.auna-multimedia.com
multimedia
Precautions for use
• Unpack all parts and remove protective material.
• Do not connect the unit to the mains before checking the main voltage and before all other
connections have been made.
• Do not cover any vents and make sure that there is a space of several centimeters around the unit
for ventilation.
Safety instructions
1. Read these instructions.
2. Keep these instructions.
3. Heed all warnings.
4. Follow all instructions.
5. Do not use this aparatus near water.
6. Clean only with dry cloth.
7. Do not block any ventilation openings. Install in accordance with manufacturer‘s instructions.
8. Do not install near any heat sources such as radiators, heat registers, stoves, or other apparatus
(including amplifiers) that produce heat.
9. This product is equipped with a 3 wire grounding type plug having a third(grounding) pin.
10. Do not defeat the safety purpose of the polarized or grounding-type plug.
11. A polarized plug has two blades with one wider than the other.
12. A grounding type plug has two blades and third grounding prong.
13. The wide blade or the third prong are provided for your safety. If the provided plug does not fit
into your outlet, consult an electrician for replacement of the obsolete outlet.
14. Protect the power cord from being walked on or pinched particularly at plugs, convenience
receptacles, and the point where they exit from the apparatus.
15. Only use attachments/accessories specified by the manufacturer.
16. Use only with the cart, stand, tripod, bracket, or table specified by the manufacturer, or sold
with the apparatus.When a cart is used, use caution when moving the cart/apparatus combination
to avoid injury from tip-over.
17. Unplug this apparatus during lightning storms or when unused for long periods of time.
18. Refer all servicing to qualified service personnel. Servicing is required when the apparatus has
been damaged in anyway, such as power-supply cord or plug is damaged, liquid has been spilled
or objects have fallen into the apparatus, the apparatus has been exposed to rain or moisture,
does not operate normally, or has been dropped.
19. The apparatus shall not be exposed to dripping or splashing and that no objects filled with
liquids, such as vases,shall be placed on the apparatus.
20. Minimum distances(e.q. 10cm) around the apparatus for sufficient ventillation.
21. WARNING - To reduce the risk of fire or electric shock, do not expose the apparatus to rain or
moisture.
22. The apparatus shall not be exposed to dripping or splashing and no objects filled with liquids,
such as vases, shall be placed on the apparatus.
23. Do not place this product on an unstable cart, stand or table. The product may fall, causing
serious damage to the product.
24. Slots and openings in the cabinet and the back are provided for ventilation: to ensure reliable
operation of the product, these openings must not be blocked by placing the product on a bed,
sofa, rug or other similar surface. This product should never be placed near or over a heat register.
This product should not be placed in a built-in installation unless proper ventilation is provided.
25. This product should be operated from the type of power source indicated on the marking label.
If you are not sure of the type of power available, consult your dealer or local power company.
This is a safety feature. If you are unable to insert the plug into the outlet, contact your electrician
to replace your obsolete outlet. Do not defeat the purpose of the grounding-type plug.
26. Do not allow anything to rest on the power cord. Do not locate this product where persons will
walk on the cord.
13
http://www.auna-multimedia.com
multimedia
27. If an extension cord is used with this product, make sure that the total of the ampere ratings on
the products plugged into the extension cord do not exceed the extension cord ampere rating.
Also, make sure that the total of all products plugged into the wall outlet does not exceed 10
amperes.
28. Never push objects of any kind into this product through cabinet slots as they may touch
dangerous voltage points or short out parts that could result in a risk of fire or electric shock.
29. Never spill any kind of liquid on the product.
30. Do not attempt to service this product yourself, as opening or removing covers may expose you
to dangerous voltage points or other risks. Refer all servicing to service personnel.
31. Unplug this product from the wall outlet and refer servicing to qualified service personnel under
the following conditions:
● When the power cord or plug is damaged or frayed.
● If liquid has been spilled into the product.
● If the product has been exposed to rain or water.
● If the Product does not operate normally when the operating instructions are followed.
(Adjust only those controls that are covered by the operating instructions since improper
adjustment of other controls may result in damage and will often require extensive work
by a qualified technician to restore normal operation.)
● If the product has been dropped or the cabinet has been damaged.
● If the product exhibits a distinct change in performance, indicating a need for service.
Caution
NEVER REMOVE THE BACK COVER
Removal of the back cover should be carried out only by qualified personnel.
DO NOT USE IN HOSTILE ENVIRONMENTS
To prevent shock or fire hazard, do not expose the unit to rain or moisture. This unit is designed to be
used in the office or home. Do not subject the unit to vibrations, dust of corrosive gases.
KEEP IN A WELL VENTILATED PLACE
Ventilation holes are provided on the cabinet to prevent the temperature from rising.
Do not cover the unit or place anything on the top of unit.
AVOID HEAT
Avoid placing the unit in direct sunshine or near a heating appliance.
14
http://www.auna-multimedia.com
multimedia
Unit Front View
1. Display
2.
button
Press to switch radio on or standby.
3. MODE button
Press to switch among Internet, Music player, DAB, FM, AUX in and Bluetooth mode.
4. PRESET button (Internet, DAB and FM mode)
Press and hold to store preset station.
Press to recall preset station.
5. SCROLL/SELECT knob
Turn to adjust volume when a program/station is playing.
Turn to browse options in the menu.
Press to confirm selection.
6. TUNE button
Press to activate tuning function of SCROLL/SELECT knob
7. BACK button
Press to skip to previous menu.
8. MENU button
Press to display menu options.
9. INFO button
Press to view station information.
Unit Back View
1. DAB/FM Antenna
2.
Headphones socket
3. AUX IN socket
4. DC IN socket
15
http://www.auna-multimedia.com
multimedia
Setup Wizard
1. For initial use, the display will show ‘Setup wizard’ screen.
2. Press SCROLL/SELECT knob to confirm ‘YES‘ to start setup. Options in the setup wizard include
the following: Date/Time - Set 12 or 24 hour format
Auto update (Update from DAB / Update from FM / Update from Network)
Select your time zone and daylight savings is needed.
No update
Set the date and time is needed.
3. The Wizard will now scan your location for accessible wireless networks. When the scan has
finished, a list of networks will be displayed.
Selecting wireless network
a. If a WEP/WPA key (password) is required, radio will ask you to input the WEP/WPA code and
display the password entry screen as follows:
b. Turn SCROLL/SELECT knob to cycle through the alphanumeric character list, press SCROLL/
SELECT knob to select an appointed character.
Note: WEP/WPA pass codes are case-sensitive.
c. If a wrong character is being input while entering your password, select to delete that
character.
Note: = Backspace; means return to previous track; radio will automatically save
the WEP/WPA you’ve input, so no bother to re-enter these codes.
d. After selecting the final character of your password, turn SCROLL/SELECT knob to , and
then press SCROLL/SELECT knob to confirm. The radio is connected to wireless network.
Note: If a password (WEP/WPA) isn’t required by your network, radio will connect to the network
automatically.
4. Setup wizard completed, press SCROLL/SELECT knob again to exit.
16
http://www.auna-multimedia.com
multimedia
Internet-Radio
1. The display will show ‚Main menu‘ after ‚Setup wizard‘ completed. Press SCROLL/SELECT knob to
select Internet radio mode.
2. While ‚Station list‘ is highlighted, press SCROLL/SELECT knob to confirm.
3. Then refer to following section to choose stations. Or if failed to connect to network, please follow:
a. Check your Router, see it working normally or not;
b. Relocating your radio to a stronger signal position is necessary!
c. Make sure your password is input correctly.
Local Country Stations
Local „Country“ will change according to your current location. It displays local programs of your current
location.
1. To enter Local stations, press MENU button > Station list > Local „Country“, press SCROLL/
SELECT knob to confirm.
2. Turn SCROLL/SELECT knob to select options, and then press SCROLL/SELECT knob to confirm.
3. Step by step to the program you desired.
Selecting a station through Stations
1. Press MENU button > Station list > Stations, press SCROLL/SELECT knob to confirm.
2. In ‚Stations‘ menu:
•‘Location’ enables you to choose from the radio stations provided by any country which you
choose from a list.
a. While ‚Location‘ is highlighted to show, press OK button to confirm.
b. Select the region you wanted, and then press OK button to confirm.
c. Using the same method to choose country, station in turn, radio will now loading.
17
http://www.auna-multimedia.com
multimedia
• ‘Genre’ enables you to choose radio stations according to their content, for example Classic Rock,
Sport, News, etc.
• ‘Search stations’ enables you to enter all or part of station name to find a station.
• ‘Popular stations’ enables your radio to list the stations that have the most listeners.
• ‘New stations’ enables your radio to list the stations that have recently joined the Internet radio
network.
Note: Some radio stations do not broadcast 24 hours per day, and some stations are not always on-line.
Selecting a station through Podcasts
1. Press MENU button > Station list > Podcasts, press SCROLL/SELECT knob to confirm.
2. Turn SCROLL/SELECT knob to select options, and then press SCROLL/SELECT knob to confirm.
3. Step by step to your purpose program.
Getting Access Code and FAQ Solutions
1. To assess to this order, press MENU button > Station list > Help, press SCROLL/SELECT knob to
confirm.
Note: at this step, you can also listening radio FAQ solutions.
2. When ‚Get access code‘ is highlighted, press SCROLL/SELECT knob to confirm, you will get it.
Adding Station to ‘My Favourites’
1. To register your radio with the portal: www.wifiradio-frontier.com.
2. Create account login, enter Access code is required. Access code can be found from “Station list
> Help > Get access code“.
3. You can add your favourite stations via the portal (www. wifiradio-frontier.com).
4. After you added the stations, in order to have your radio access your new settings, get your radio
power off for several minutes is necessary.
5. The added stations are accessible by selecting MENU > Station list > My favourites.
Adding Station to ‘My Added Stations’
1. Even though the Internet radio portal contains thousands of stations, you may want to listen to
stations not listed. You can add your own stations via the portal (www. wifiradio-frontier.com).
2. After you added the stations, in order to have your radio access your new settings, get your radio
power off for several minutes is necessary.
18
http://www.auna-multimedia.com
multimedia
3. The added stations are accessible by selecting MENU > Station list > My added stations.
Viewing Station Information
Internet programs broadcast additional information. Press INFO button repeatedly, the display will show
the information through Station Description, Genre, Country, Reliability, Bit rate, Codec, Sampling Rate,
Playback Buffer and Date.
Storing Preset Stations
Your radio can store up to 10 of your favourite Internet stations.
1. While an Internet station is playing, press and hold PRESET button until display shows ‘Save to
Preset’, and then turn SCROLL/SELECT knob to select a preset number.
2. Press SCROLL/SELECT knob to confirm, the display will show ‘Preset stored’.
3. The station is stored and the display will then show ‘P#’.
Recalling a Preset Station
1. Press PRESET button to show the stored preset stations.
2. Turn SCROLL/SELECT knob to select the preset station you want to play and then press the
SCROLL/SELECT knob to confirm.
Music Player Mode
Setting up a Music Server
•
•
•
•
In order for your radio play music files from a computer, the computer must be set up to share
files or media.
UPnP media sharing allows devices like this radio to play music from a shared media library,
navigating through tag menus such as Artist, Album or Genre.
If you are running a suitable server system such as a PC with Windows Media Player10 or later
(WMP), and your music library is well-tagged, then it is recommended to use media sharing.
Only the UPnP server needs to be set up.
Sharing Media with Windows Media Player
The most common UPnP server is Windows Media Player (10 or later). Alternatively, other UPnP platforms
and servers may be used. To set up WMP for media sharing, perform the following steps:
1. Ensure that the PC is connected to the network.
2. Ensure that the radio is powered on and connected to the same network.
3. In WMP, add to media library about the audio files and folders you want to share with your radio
(Library > Add to Library…).
4. In WMP, enable media sharing (Library > Media sharing…).
5. Make sure your radio has accessed to the shared media by selecting it and clicking Allow. You can
also set a name for the shared media in Settings… Click OK to close the dialogue boxes.
6. The PC is now ready to stream music to the radio. The WMP UPnP service runs in the background,
there is no need to start WMP explicitly.
Playing Shared Media
1. Press MODE button repeatedly to select Music player mode.
2. While ‚Shared media‘ is highlighted, press SCROLL/SELECT knob to confirm, and then step by
step to your selecting music.
19
http://www.auna-multimedia.com
multimedia
My Playlist
The My Playlist feature enables you to create a playlist of your favourite tracks from your music libraries.
Once you have your playlist ready you can choose to play through the playlist on your radio and can also
set shuffle and repeat play functions while your playlist is playing.
To save a track to ‘My Playlist’, browse the track you want to add to the playlist, press and hold SCROLL/
SELECT knob, then the track is added to the playlist.
To play ‚My Playlist‘, press MENU button, and then turn SCROLL/SELECT knob to select ‚My playlist‘,
press SCROLL/SELECT knob to confirm. Browse the track you want to play, press SCROLL/SELECT knob
to select.
Repeat Play Mode
Press MENU button, and then turn SCROLL/SELECT knob to select ‚Repeat play: Off‘, then press SCROLL/
SELECT knob repeatedly to shift repeat play ‚On‘ or ‚Off‘.
Shuffle Play Mode
Press MENU button, and then turn SCROLL/SELECT knob to select ‚Shuffle play: Off‘, then press SCROLL/
SELECT knob repeatedly to shift repeat play ‚On‘ or ‚Off‘.
Clearing My Playlist
This feature enables you to clear the contents of your playlist.
1. Press MENU button, turn SCROLL/SELECT knob to select ‚Clear My playlist‘ and then press
SCROLL/SELECT knob to confirm.
2. Select ‚YES‘ to clear my playlist.
Prune Servers
The Prune Servers feature enables you to remove music servers that are no longer available to you to
browse for music.
1. Press MENU button, turn SCROLL/SELECT knob to select ‚Prune servers‘ and then press SCROLL/
SELECT knob to confirm.
2. Select ‘YES’ to ‘Prune shared media wake on LAN servers’.
Now Playing Information
While a track is playing, the display shows the track and a progress bar with figures for elapsed and total
track time.
To view further information, press INFO button repeatedly to to display more information about the track.
DAB Mode
Selecting DAB Mode
1. Press MODE button repeatedly to select DAB mode.
2. For initial use, radio will carry out a full scan and store stations list in memory
20
http://www.auna-multimedia.com
multimedia
3. Once the scanning is completed, the DAB/DAB+ stations will be displayed in alphanumeric order.
The first station in the list will be selected, press SCROLL/SELECT knob to broadcast.
Note: if no DAB/DAB+ signal is found in your area, it may be necessary to relocate your radio to a stronger
signal area.
Selecting another DAB/DAB+ Station
1. While a program is playing, press MENU button > Station list, and then press SCROLL/SELECT
knob to confirm. Alternatively, press TUNE button and then turn SCROLL/SELECT knob to display
station list.
2. Turn SCROLL/SELECT knob to select the station you want to play, and then press SCROLL/SELECT
knob to confirm.
Scanning Stations
Press MENU button, turn SCROLL/SELECT knob to select Scan, and then press SCROLL/SELECT knob to
full scan.
Prune Invalid
You may remove all unavailable stations from the station list.
1. Press MENU button, turn SCROLL/SELECT knob to select Prune invalid, and then press SCROLL/
SELECT knob to confirm.
2. Turn SCROLL/SELECT knob to select ‘YES’, and then press SCROLL/SELECT knob to confirm.
DRC (Dynamic Range Control) value
You can set the compression level of stations to eliminate the differences in dynamic range or sound level
between radio stations.
Note: set DRC to off indicates no compression; set DRC to low indicates little compression; set DRC to
high shows maximum compression.
1. Press MENU button, turn SCROLL/SELECT knob to select DRC, and then press SCROLL/SELECT
knob to confirm.
2. Turn SCROLL/SELECT knob to select ‚DRC high‘, ‚DRC low‘ or ‚DRC off‘, and then press SCROLL/
SELECT knob to confirm.
Changing Station Order
You may want to display the stations in different order.
1. Press MENU button, turn SCROLL/SELECT knob to select Station order, and then press SCROLL/
SELECT knob to confirm.
2. Turn SCROLL/SELECT knob to select ‚Alphanumeric‘, ‚Ensemble‘ or ‚Valid‘, and then press
SCROLL/SELECT knob to confirm your selecting option.
21
http://www.auna-multimedia.com
multimedia
Alphanumeric
Display all stations in alphanumeric order.
Ensemble
List currently broadcasting active stations before inactive ones.
Valid
Remove inactive stations from the station list.
Viewing Station Information
DAB/DAB+ stations broadcast additional information. Press INFO button repeatedly to view information
through DLS (Dynamic Label Segment), Ensemble, Program Frequency, Signal Quality, Signal Strength,
Bitrate, Codec, Channel and Date.
Storing Preset Stations
Your radio can store up to 10 of your favourite DAB/DAB+ stations.
1. While a DAB/DAB+ station is playing, press and hold PRESET button until display shows ‘Save to
Preset’, and then turn SCROLL/SELECT knob to select a preset number.
2. Press SCROLL/SELECT knob to confirm, the display will show ‘Preset stored’.
3. The station is stored and the display will then show ‘P#’.
Recalling a Preset Station
1. Press PRESET button to show the stored preset stations.
2.Turn SCROLL/SELECT knob to select the preset station you want to play and then press the
SCROLL/SELECT knob to confirm.
FM Mode
Selecting FM Mode
1. Press MODE button repeatedly to select FM mode.
2. For initial use, it will start at the beginning of the FM frequency range (87.50MHz). Otherwise, the
last listened FM station will be selected.
3. To manually change the FM frequency, while FM frequency shows up, press TUNE button and then
turn SCROLL/SELECT knob to change the frequency by 0.05MHz per step.
4. To automatically scan, while FM frequency shows up, press TUNE button and then turn SCROLL/
SELECT knob clockwise or anticlockwise, and then press the SCROLL/SELECT knob, your radio will
skip forwards or backwards until it reached the next available station.
Scan Setting
By default, FM scans stop at any available station. This may result in a poor signal-to-noise ratio (hiss)
from weak stations.
1. To change the scan settings to stop only at stations with good signal strength, press MENU button,
turn SCROLL/SELECT knob to select Scan setting, and then press SCROLL/SELECT knob to confirm.
2. The display will show ‚Strong stations only?‘, turn SCROLL/SELECT knob to select ‚YES‘, and then
press SCROLL/SELECT knob to confirm.
22
http://www.auna-multimedia.com
multimedia
Audio Setting
By default, all stereo stations are reproduced in stereo. For weak stations, this may result in a poor
signal-to-noise ratio (hiss).
1. To play weak stations in mono, press MENU button, turn SCROLL/SELECT knob to select Audio
setting, and then press SCROLL/SELECT knob to confirm.
2. The display will show ‚Listen in Mono only?‘, turn SCROLL/SELECT knob to select ‘YES’, and then
press SCROLL/SELECT knob to confirm.
Viewing Station Information
FM stations broadcast additional information. Press INFO button repeatedly to view information through
Radio Text, Program Type, Program Name and Date.
Storing Preset Stations
Your radio can store up to 10 of your favourite FM stations.
1. While a FM station is playing, press and hold PRESET button until display shows ‘Save to Preset’,
and then turn SCROLL/SELECT knob to select a preset number.
2. Press SCROLL/SELECT knob to confirm, the display will show ‘Preset stored’.
3. The station is stored and the display will then show ‘P#’.
Recalling a Preset Station
Press PRESET button to show the stored preset stations.
Turn SCROLL/SELECT knob to select the preset station you want to play and then press the SCROLL/
SELECT knob to confirm
Bluetooth Mode
Pair the unit with a Bluetooth device to listen to music:
1. Press MODE button repeatedly to select Bluetooth mode.
2. The display will flash in
repeatedly.
3. Activate your Bluetooth device and select the search mode.
4. ‘Digital Radio Station’ will appear on your Bluetooth device.
5. Select ‘Digital Radio Station’ and enter “0000” for the password if necessary.
6.The
icon will remains steadily on the display when connection is successful.
To disconnect current Bluetooth connection:
1. Press MENU button, turn SCROLL/SELECT knob to select BT disconnect, and then press SCROLL/
SELECT knob to confirm.
2. Turn SCROLL/SELECT knob to select YES, and then press SCROLL/SELECT knob to disconnect.
Note: the unit will automatically switch to standby mode after 30 minutes if the source device is disconnect,
switch off or the volume is too close to mute.
AUX-IN Mode
AUX IN allows for quick and easy connection to an MP3 player or other external audio sources.
1. Before connecting to the mains socket, use a 3.5mm audio cable (not supplied) to connect to your
external audio device through the AUX IN socket on the rear of unit.
23
http://www.auna-multimedia.com
multimedia
2. Connect power adapter to mains socket, press
button to switch unit on.
3. Press MODE button repeatedly to select Auxiliary Input mode.
4. In Aux in mode, you may operate your audio device directly for playback features.
5. To gain optimal volume levels, adjusting the output volume level on the audio device as well is
recommended.
Note: the unit will automatically switch to standby mode after 30 minutes if the source device is disconnect,
switch off or the volume is too close to mute.
General Functions
Setting Sleep
This feature enables your radio to switch to standby mode by itself after a set sleep time.
1. Press MENU button > Main menu > Sleep, and then press SCROLL/SELECT knob to confirm.
2. Turn SCROLL/SELECT knob to view options Sleep OFF, 15, 30, 45 or 60 MINS, press SCROLL/
SELECT knob to confirm. The sleep icon
and sleep time will show on the display.
3. To turn the sleep function off while the sleep timer is still counting down, select ‚Sleep‘ option,
turn SCROLL/SELECT knob to select ‚Sleep OFF‘.
Setting Alarm
Your radio includes dual alarms. Set Alarm, making sure set time at first.
1. Press MENU button > Main menu > Alarms, and then press SCROLL/SELECT knob to confirm.
2. Turn SCROLL/SELECT knob to select ‘Alarm 1’ or ‘Alarm 2’, and then press SCROLL/SELECT knob
to confirm.
3. Turn SCROLL/SELECT knob to select options, and then press SCROLL/SELECT knob to confirm the
setting.
Enable:
Alarm active day: Off, Daily, Once, Weekends or Weekdays
Time:
Alarm time: 00:00 (manually set up the time )
Mode:
Alarm mode: Buzz, Internet radio, DAB or FM
Preset:
Last listened or saved preset station (not available for Buzz mode).
Volume:
Alarm volume
Save:
Save the alarm
4. When the display shows ‚Alarm Saved‘, the alarm setting is successful.
or
will show on the
display.
5. To temporarily switch off alarm, press SCROLL/SELECT knob to activate Snooze function when the
alarm sounds. Press SCROLL/SELECT knob repeatedly can set Snooze time of 5, 10, 15 or 30
minutes in turn. The set snooze time will show on the display.
6. To turn off alarm, press
button when the alarm sounds.
7. To cancel Alarm, refer to steps1-3 to enable alarm ‘Off’.
Equalizer
This feature enables you to choose a sound equalization profile. Each of the equalization setting will
change the tone of the sound from your radio when selected.
1. Press MENU button > Main menu > System settings > Equaliser, and then press SCROLL/SELECT
knob to confirm.
24
http://www.auna-multimedia.com
multimedia
2. Turn SCROLL/SELECT knob and then press it to select Normal, Flat, Jazz, Rock, Movie, Classic,
Pop, News, My EQ or My EQ profile setup.
3. To set up My EQ, select ‚My EQ profile setup ‚, and then press SCROLL/SELECT knob to confirm.
Turn SCROLL/SELECT knob to select Bass or Treble, and then press SCROLL/SELECT knob to
confirm. Turn SCROLL/SELECT knob to change the value of Bass or Treble, and then press
SCROLL/SELECT knob to confirm. Press BACK button, display will show ‘Save changes’. Turn and
press SCROLL/SELECT knob to select ‘YES’ to save changes.
Network Setup
Users encountering networking issue may find these options useful for diagnosing and fixing network
problems.
1. Press MENU button > Main menu > System settings > Network, press SCROLL/SELECT knob to
confirm.
2. Turn SCROLL/SELECT knob to select your preferred network setting option:
Network wizard:
Scan for available networks
PBC Wlan Setup:
Set up a WPS encrypted network (only supporting the router uses WPS 2.0)
View settings:
View network settings such as MAC address, Wlan region, IP address etc.
Manual settings:
Set wireless connection
Network profile:
List of registered networks or delete some of unwanted networks
3. Press SCROLL/SELECT knob to confirm your setting.
Setting Time/Date
1. Press MENU button > Main menu > System settings > Time/Date, press SCROLL/SELECT knob to
confirm.
2. Turn SCROLL/SELECT knob to select options, and then press SCROLL/SELECT knob to confirm the
setting.
Set Time/date:
Manually set-up both Time and Date
Auto update:
‘Update from DAB’, ‘Update from FM’, ‘Update from Network’ or ‘No update’
Set format:
12 or 24 hour format
Set timezone:
Select a timezone
(Only available when auto update from Network.)
Daylight saving:
Daylight saving settings
(Only available when auto update from Network.)
3. Then setting time according to your personal preference.
Setting Language
This feature enables you to change the language of displaying menu names.
1. Press MENU button > Main menu > System settings > Language, press SCROLL/SELECT knob to
confirm.
2. Turn SCROLL/SELECT knob to select your language, and then press SCROLL/SELECT knob to
confirm.
Factory Reset
A factory reset resets all user settings to default values, so time/date, alarms and presets are lost.
25
http://www.auna-multimedia.com
multimedia
1. Press MENU button > Main menu > System settings > Factory Reset, press SCROLL/SELECT knob
to confirm.
2. Turn SCROLL/SELECT knob to select ‘YES’, and then press SCROLL/SELECT knob to confirm.
Software Update
From time to time, your radio may make software upgrades available with bug fixes and/or additional
features. If your radio detects that newer software is available, it will ask if you want to go ahead with
an update. If you agree, the new software is then downloaded and installed. After a software upgrade,
all user settings are maintained.
C A U T I O N
Before starting a software upgrade, ensure that your radio is plugged into a stable mains power connection.
Disconnecting power during a software update may permanently damage the unit.
1. Press MENU button > Main menu > System settings > Software update, press SCROLL/SELECT
knob to confirm.
2. Turn SCROLL/SELECT knob to select ‚Auto-check setting‘, your radio will check periodically for
new version software.
3. Turn SCROLL/SELECT knob to select ‚Check now‘, your radio will now to check new version
software and automatically upgrade to new software.
Setup Wizard
When this unit is started for the first time, it runs through a setup wizard to configure settings for date/
time and network. Once this has finished, the system is ready to use in most modes.
1. Press MENU button > Main menu > System settings > Setup wizard, press SCROLL/SELECT knob
to confirm.
2. Turn SCROLL/SELECT knob to select ‚YES‘, and then press SCROLL/SELECT knob to confirm.
Viewing System Info
This information may be requested when dealing with technical support issues.
1. Press MENU button > Main menu > System settings > Info, press SCROLL/SELECT knob to
confirm.
2. Turn SCROLL/SELECT knob to view ‚SW version‘, ‚Radio ID‘ and ‚Friendly Name‘.
Setting Backlight
1. Press MENU button > Main menu > System settings > Backlight, press SCROLL/SELECT knob to
confirm.
2. Turn SCROLL/SELECT knob to select ‘Power-on Level‘ or ‚Standby Level‘, then press SCROLL/
SELECT knob to confirm.
3.Turn SCROLL/SELECT knob to select backlight level, and then press SCROLL/SELECT knob to
confirm the setting.
Power-on Level
•  High
•  Low
Standby Level
•  High
•  Low
•  Off
26
http://www.auna-multimedia.com
multimedia
Technical specifications
CHAL-TEC Vertriebs- + Handels GmbH, Wallstraße 16, 10179 Berlin.
2004/108/EG (EMV)
2011/65/EG (RoHS)
1999/5/EG (R&TTE)
Electric and electronic equipment and included batteries contains materials, componentsans substances
that can be hazardous to your health and the enviroment, if the waste material (discarded electric and
electronic equipment and batteries) is not handled correctly.
Electric and electronic equipment and batteries is marked with the crossed ou trash
can symbol, seen here. This symbol signifies that electric and electronic equipment and
batteries should not be disposed of with other household waste, but should be disposed of
separately.
As the end user it is important that you submit your used batteries to the appropriate and designated
facility. In this manner you make sure that the batteries are recycled in accordance with legislature and
will not harm the enviroment.
All cities have established collection points, where electric and electronic equipment and batteries can
either be submitted free of charge at recycling stations and other collection sites, or be collected from
the households. Additional information is available at the technical department of your city.
CHAL-TEC Vertriebs- + Handels GmbH; Wallstraße 16; 10179 Berlin, Germany
27
http://www.auna-multimedia.com
multimedia