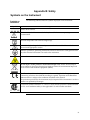
1
BenchPro® 2100 MaxiCard™ Plasmid Purification Instrument For automated maxiprep purification of plasmid DNA Catalog no. MC1001 Rev. Date: 25 June 2010 Manual part no. 25-1060 MAN0002684 User Manual ii Contents Unpacking the Instrument and Product Contents.................................................................................. v Safety Information..................................................................................................................................... vii BenchPro® 2100 Instrument.....................................................................................................................viii Introduction ................................................................................................................... 1 About the BenchPro® 2100 Instrument......................................................................................................1 Description of Parts......................................................................................................................................4 Methods ......................................................................................................................... 7 Installing the BenchPro® 2100 .....................................................................................................................7 General Guidelines.......................................................................................................................................9 Using BenchPro® 2100................................................................................................................................10 Troubleshooting..........................................................................................................................................17 BenchPro® 2100 Error Codes.....................................................................................................................19 Appendix A .................................................................................................................. 20 Connecting to Different Types of House Air Outlets ............................................................................20 Replacing the Fuse .....................................................................................................................................23 Repackaging the Instrument.....................................................................................................................24 Product Specifications................................................................................................................................25 Accessory Products ....................................................................................................................................27 Technical Support.......................................................................................................................................28 Purchaser Notification ...............................................................................................................................29 Appendix B: Safety ..................................................................................................... 31 Symbols on the Instrument .......................................................................................................................31 General Instrument Safety ........................................................................................................................32 Chemical Safety ..........................................................................................................................................33 Electrical Safety and Electromagnetic Compatibility (EMC) Standards.............................................34 iii iv Unpacking the Instrument and Product Contents Upon Receiving the Instrument Examine the unit carefully for any damage incurred during transit. Any damage claims must be filed with the carrier. The warranty does not cover in-transit damage. Unpacking Instructions Follow the instructions below to unpack the BenchPro® 2100 instrument. The weight of the instrument is 20 pounds (9.1 kg). BenchPro® 2100 Contents 1. Cut the plastic tape and remove the outer box. 2. Remove the BenchPro® 2100 from the box and place on a flat surface. 3. Remove any tape holding the reagent drawer. 4. Verify the product contents as described below. 5. Set up the BenchPro® 2100 as described on page 7. The contents of the BenchPro® 2100 MaxiCard™ Plasmid Purification Instrument are listed below: Component Quantity BenchPro® 2100 MaxiCard™ Plasmid Purification Instrument 1 AC/DC Switching Power Adapter with US, EU, UK, and AUS Input Plug 1 Waste Tray 2 Piercing device 1 Quick-disconnect house air fitting including 12 feet of tubing 1 Quick Reference Card (QRC) 1 Instruction Manual 1 ® See page 4 for specifications and description of the BenchPro 2100 instrument, and page 7 for installing the instrument. Note: Always use the instrument with the supplied power adapter or an equivalent adapter with the same rating that is certified for safety. The BenchPro® Maxi Plasmid Card and Reagent Tray are used with the BenchPro® BenchPro® 2100 Maxi Plasmid Card 2100 instrument for maxiprep purification of plasmid DNA from bacterial cells and are available separately (see page 27 for ordering information). & Reagent Tray Store the BenchPro® Maxi Plasmid Card and Reagent Tray at room temperature. Product BenchPro® Maxi Plasmid Card and Reagent Tray Catalog. no. MC2001 Contents Quantity ® BenchPro Maxiprep Cards Cell Liners Cell Liner Lids Elution Tubes (2 mL) Reagent Trays (filled with reagents) 1 pack of 4 1 pack of 4 1 pack of 4 1 pack of 4 4 trays Continued on next page v Unpacking the Instrument and Product Contents, Continued Reagent Tray Contents Store the Reagent Tray with reagents at room temperature and do not freeze the Reagent Tray. The reagents included in BenchPro® Reagent Tray are listed below: Resuspension Buffer Lysis Buffer RNase A (2.4 mg/mL RNase A, 50 mM Tris-HCl pH 8.0, 10 mM EDTA) Precipitation Buffer TE Buffer (10 mM Tris HCl pH 8.0, 1.0 mM EDTA) Wash Buffer 100% Isopropanol Elution Buffer (100 mM Sodium acetate, pH 5.0, 1.5 M NaCl) 70% Ethanol in nanopure water Intended Use vi For research use only. Not intended for any animal or human therapeutic or diagnostic use. Safety Information Safety Follow the instructions in this manual to ensure safe operation of the BenchPro® 2100 instrument. The BenchPro® 2100 instrument is designed to meet EN61010-1 Safety Standards. To ensure safe, reliable operation, always operate the BenchPro® 2100 instrument according to the instructions in this manual. Failure to comply with the instructions in this manual may create a potential safety hazard, and will void the manufacturer’s warranty and void the EN61010-1 safety standard certification. Invitrogen (part of Life Technologies) is not responsible for any injury or damage caused by use of this instrument when operated for purposes for which it is not intended. All repairs and service should be performed by Invitrogen (part of Life Technologies). In an emergency, immediately turn the power switch Off and unplug the adapter and instrument. Additional Safety Information See page 31 for additional safety information and explanation of symbols used on the instrument. vii BenchPro® 2100 Instrument Front View The front view of the BenchPro® 2100 instrument. Rear and Side View The rear and side view showing various parts of the BenchPro® 2100 instrument. The house air inlet is to connect to the house air supply as described on page 8. The DC inlet is used to connect to the power adapter. The fuse compartment contains the fuse that can be replaced as described on page 23. The USB port enables future firmware upgrades. Rear View House air inlet viii Side View USB DC inlet Fuse Power switch Introduction About the BenchPro® 2100 Instrument BenchPro® 2100 The BenchPro® 2100 MaxiCard™ Plasmid Purification Instrument is an automated bench-top instrument that uses electronic solenoid technology to control the transfer of on-board compressed air and vacuum to a disposable card for automated, easy, and reproducible maxiprep purification of highquality plasmid DNA from E. coli in less than 90 minutes. The BenchPro® 2100 instrument allows parallel processing of up to two experimental samples. The BenchPro® 2100 instrument is a complete walk-away maxiprep purification system that provides high-quality plasmid DNA using a series of capture and purification membranes. Each BenchPro® Maxiprep Card encompasses an entire plasmid purification protocol from the harvesting of cells to the final precipitation and elution of purified plasmid DNA with low endotoxin levels. The BenchPro® 2100 instrument eliminates routine manual processing steps for maxiprep plasmid DNA purification while maintaining a similar performance to manual processing. The purified plasmid DNA is ultrapure and suitable for a variety of downstream applications, including those requiring the highest purity (page 3): See page 4 for details on various parts of the system. System Components The BenchPro® 2100 system consists of: BenchPro® 2100 instrument The BenchPro® 2100 instrument provides a single, automated program to perform one or two maxiprep plasmid DNA preparations at a time from 125 mL of E. coli culture for maxipreps. The instrument is a simple, user friendly benchtop unit that is preprogrammed with maxiprep protocol and is used with an appropriate BenchPro® Maxiprep Card. See page 4 for details. Two Waste Trays are included with the instrument and supports the disposable Reagent Tray and reservoir inside the instrument drawer. A piercing device is also included with the instrument to pierce the foil seal covering the reagents. BenchPro® Maxiprep Card The BenchPro® Maxiprep Card is a disposable card that is inserted into the slot on top of the BenchPro® 2100 instrument. The onboard pumps powered by vacuum and pressure, transfers cell culture and reagents from the tray to the card to run the complete maxiprep purification process. BenchPro® Reagent Tray All buffers and appropriate volumes required for a maxiprep purification of plasmid DNA are supplied in the sealed BenchPro® Reagent Tray. A disposable Cell Liner with lid is included with the tray for adding bacterial cell culture. Continued on next page 1 About the BenchPro® 2100 Instrument, Continued System Overview The BenchPro® 2100 instrument performs automated maxiprep plasmid DNA purification from bacterial cell culture using electronic solenoid technology and anion-exchange chromatography developed by Invitrogen. To use the BenchPro® 2100 system, you will: 1. Grow 125 mL of overnight bacterial culture in LB medium with the appropriate antibiotic. 2. Assemble the Reagent Tray and Cell Liner on the Waste Tray. Add the cell culture to the Cell Liner. 3. Insert the BenchPro® Maxiprep Card in one of the instrument slots. 4. Select and run the purification protocol. During the automated maxiprep purification protocol, the appropriate amounts of reagents are pumped to the card as well as incubation steps are performed based on the protocol. Using a series of capture and purification membranes, E. coli cells are harvested, lysed, and the lysate is clarified. The cleared lysate is passed through an anion exchange membrane. Under the binding conditions, the negatively charged phosphates on the backbone of the DNA interact with the positive charges on the surface of the membrane such that plasmid DNA remains bound to the membrane while RNA, proteins, carbohydrates and other impurities are washed away with wash buffer. The plasmid DNA is eluted under high salt conditions. The eluted DNA is desalted and concentrated with an alcohol precipitation step and the final purified plasmid DNA is collected in the elution tube placed in the reagent tray. Features Important features of the BenchPro® 2100 system are listed below: User-friendly BenchPro® 2100 instrument design with a disposable BenchPro® Maxiprep Card for easy, automated maxiprep plasmid DNA purification Ability to perform simultaneous processing of up to two samples High-quality purified plasmid DNA suited for mammalian transfections as well as other downstream applications (page 3) Capable of purifying plasmid DNA from a variety of plasmids sizes ranging from 3 kb to 20 kb size No cross contamination between samples as reagents for each sample are isolated Provides consistent, reliable results comparable to manual processing Built-in safety features in the instrument enhance user safety Continued on next page 2 About the BenchPro® 2100 Instrument, Continued Downstream Applications Purpose of the Manual The purified plasmid DNA is ultrapure and suitable for downstream applications, including those requiring the highest purity, such as: Transfection of mammalian cells Automated and manual DNA sequencing PCR amplification In vitro transcription Bacterial cell transformation Cloning Labeling This manual provides the following information: Details and specifications on the BenchPro® 2100 instrument and BenchPro® Maxiprep Card Unpacking and installing the BenchPro® 2100 instrument Operating the BenchPro® 2100 instrument with a disposable BenchPro® Maxiprep Card Cleaning and maintaining the BenchPro® 2100 instrument Troubleshooting Safety information 3 Description of Parts BenchPro® 2100 Instrument The BenchPro® 2100 instrument is a benchtop, automated maxiprep plasmid DNA purification system capable of processing up to two experimental samples. The BenchPro® instrument is used with a BenchPro® Maxiprep Card and Reagent Tray that delivers the reagents from the reagent tray to the card for sample processing based on the maxiprep protocol. See page viii for a front and rear view of the instrument. The front view of the BenchPro® 2100 instrument identifying various parts is shown below. 2 Card Slots Digital display and functional keys Reagent drawer Reagent Drawer Unit The Reagent Drawer Unit contains the reagent tray assembly (see page 6 for details) and waste tray that are used to assemble the reagents for use with the protocol. Card Slots Each instrument contains 2 card slots to insert the disposable BenchPro® Cards (see next page for details on the card) into the unit. There is no need to use both cards at the same time. You can use only 1 card or up to 2 cards at a time. Do not insert anything (fingers, pipette, or liquid) into the card slots as it may damage the unit. Digital Display with Functional Keys The Digital Display along with the functional keys is used to operate the instrument. Continued on next page 4 Description of Parts, Continued BenchPro® Maxiprep Card The BenchPro® Maxiprep Card is a disposable, plastic card with embedded membranes and card sippers. The BenchPro® Maxiprep Card is used with the BenchPro® 2100 instrument for automated maxiprep plasmid DNA purification (see figure below). The BenchPro® Maxiprep Card aspirates reagents sequentially from the Reagent Tray reservoirs to complete the standard maxiprep protocol. The waste solutions are directed to a Waste Tray and the used Cell Liner. BenchPro® Maxiprep Cards are available separately (page 27). Always store the BenchPro® Maxiprep Card in the supplied box to prevent any damage to the card sippers. To avoid damaging the card: Do not drop the card or bend the card sippers. Always handle the card from the top side (away from the card sippers). Do not add any solution to the card. Note: If you accidentally damage the BenchPro® Maxiprep Card, you can purchase additional cards separately (see page 27 for ordering information). Sealing gaskets Card sippers Card alignment guide Card Sippers The card sippers are plastic tips attached to the card and inserted into the reagents in the Reagent Tray. During the procedure, the tips aspirate various reagents into the card and also dispense waste. The spacing of tips is aligned well with the reagents in the tray. The card is supplied with attached sippers. Do not use the card if the sippers are damaged. Card Alignment Guide The Card Alignment Guide allows you to position the card properly into the slot so the tips are aligned correctly into the reagents in the tray. Continued on next page 5 Description of Parts, Continued Reagent Drawer Unit The Reagent Drawer Unit contains the Waste Tray and Reagent Tray assembly (see figures below) that will supply the reagents for the protocol. The Waste Trays and piercing device are supplied with the instrument. The Reagent Tray is available separately with the BenchPro® Maxiprep Card (page 27). The Reagent Tray Assembly is composed of: Waste Tray that holds the Reagent Tray and Cell Liner Reagent Tray containing the appropriate volume of reagents for the maxiprep plasmid DNA purification protocol and includes an elution tube Cell Liner and Cell Liner Lid to hold the cell sample Piercing device to pierce the foil seal covering the Reagent Tray to allow card sippers access to the reagents during the purification protocol Instrument with Reagent Drawer open Reagent Tray Assembly Cell Liner lid Piercing device Cell Liner Reagent tray Reagent Tray Waste Tray Reservoir Cell Liner with Lid 6 Drawer unit Waste Tray with reservoir Methods Installing the BenchPro® 2100 Since the proper functioning of the BenchPro® 2100 instrument is dependent on house air supply, follow these recommendations for input house air supply to obtain the best results: Important Attaching the Power Adapter Ensure that the input air supply from house air or an external compressor is regulated to 80–100 psi (550 to 690 kPa) and the inlet flow rate is at least 3 CFM. Input air should be clean and dry with a maximum dew point of 5ºC. If more than one instrument is operating off a single air source, ensure the input air supply is regulated to 95–100 psi (620–690 kPa). You can only operate up to 4 instruments off a single house air supply line. See page 20 for details. 1. Check the 3 input plugs supplied with the instrument power adapter to ensure that one of the plugs is compatible with the local socket format. Attach the appropriate input plug to the power adapter prior to use by aligning the small tabs on each side of the plug with the two small slots in the power adapter (Figure A). 2. Push down slightly on the plug and push the plug towards the cable end of the power adapter until the plug snaps into place (Figure B). Figure A Figure B Slots Push plug in this direction Tabs Plug Release button Power adapter Note: To release the input plug, press the release button on the adapter and slide out the plug. 3. Place the BenchPro® 2100 instrument on a level laboratory bench. Keep the area around the instrument clear to ensure proper ventilation of the unit. 4. For your safety: Position the instrument properly such that the power switch located on the left side and the DC inlet located on the rear of the unit (page viii) is easily accessible. 5. Ensure the power switch is in the Off position (page viii). 6. Attach the cable end of the power adapter to the DC inlet on the instrument. Connect the adapter with the input plug into the electrical outlet. Note: Always use the instrument with the supplied power adapter or an equivalent adapter with the same ratings that is certified for safety. Continued on next page 7 Installing the BenchPro® 2100, Continued Connecting to House Air Supply 1. Connect the free end of the supplied flexible tube (¼” OD, 1/8” ID) to the regulated house air supply. Since the house air connectors can vary, examples of a few connector types and how to connect the tube to the house air connectors are shown in the Appendix on page 20. Important: You can only operate up to 4 instruments off a single house air supply line. See page 20 for details. 2. Insert the quick disconnector fitting on the other end of the tube into the air inlet connector on the back of the instrument to establish the house air connection to the instrument (Figure A). To disconnect the input air line, press down on the metallic release latch (Figure B). Figure A Air inlet 80-100 psi (550 to 690 kPa) Figure B Quick-disconnect house air fitting with tubing You are ready to use the BenchPro® 2100 instrument. See page 9 for the details. Using the Instrument for the First Time 8 If you are using the BenchPro® 2100 instrument for the first time, you may wish to clean the Waste Tray with a mild detergent before use (see page 16 for cleaning and maintenance of parts). Allow the tray to dry before starting the protocol. Be sure to place the tray back properly in the instrument before use. General Guidelines MEND ION AT RECOM Recommended Cards To use the BenchPro® 2100 instrument for maxiprep plasmid DNA purification, you need to purchase the BenchPro® Maxiprep Card separately from Invitrogen. Ordering information is on page 27. Do not use any other cards with the unit. To obtain the best results, follow these recommendations: Wear gloves during handling the card or assembling the reagents. Maintain a sterile environment when handling DNA to avoid any contamination from DNases. Ensure that no DNase is introduced into the sterile reagents supplied with the kit. Always use the BenchPro® 2100 instrument with BenchPro® Maxiprep Card for best results. Be sure to remove the caps of elution tubes and pierce the foil seal on the Reagent Tray with the piercing device prior to closing the reagent drawer. Discard the card and waste contents appropriately after use. Do not reuse the card. You can insert one or two BenchPro® Maxiprep Cards depending on the number of samples that you wish to process. If you are loading only 1 card, ensure that the reagent tray is loaded in the same row as the card. Always load the Reagent Tray with the foil seal pierced and elution tube without a cap in the Reagent Tray to allow the card sippers to draw the solution into the card. Always load the reagent tray assembly before inserting the card into the instrument. Important 9 Using BenchPro® 2100 Materials Needed You will need the following items. Ordering information is on page 27. BenchPro® Maxiprep Card and Reagent Tray (includes reagents, elution tube, Cell Liner, and Cell Liner Lid) 125 mL overnight culture of transformed E. coli cells Bacterial Cultures Grow transformed E. coli cells overnight in LB (Luria-Bertani) medium with the appropriate antibiotic. The bacterial culture should have a cell density of approximately 109 cells/mL or an optical density of 2.0–2.4 at 600 nm (OD600). Use a bacterial culture in transition between exponential phase and stationary phase. Plasmid Type and Copy Number The BenchPro® 2100 system allows purification of a variety of plasmid sizes ranging from 3 kb to 20 kb. Use a high copy number plasmid to obtain a good yield of plasmid DNA. High copy-number plasmids typically yield 2–6 μg DNA/mL LB culture grown overnight. Plasmid Copy Number High-copy number plasmid Maxiprep 100–125 mL Refer to the Chemical Safety section in this manual (page 33) for proper handling and disposal of reagents. Some of the reagents in the kit contain hazardous chemicals. Treat all reagents supplied in the kit as potential irritants. For your protection, always wear a laboratory coat, disposable gloves, and eye protection when handling the kit and reagents. Dispose of cell culture samples as biohazardous waste. Continued on next page 10 Using BenchPro® 2100, Continued Starting the Instrument 1. Press the power switch (located on the left side of the unit, page viii) to turn ON the BenchPro® 2100 instrument. The valves in the instrument begin to run and the digital display starts to show the status check screen (the screen/display takes a few seconds to stabilize). Maxiprep Plasmid Purification Digital display Instrument Startup… Instrument Self Check Passed Start Functional keys Once the status check is complete (air pressure and vacuum reach nominal values as indicated on the display), press the Start function key to display the protocol setup screen. 2. Press the Setup function key to set up the instrument for maxiprep purification. Note: If you are an experienced user and have already set up the Reagent Tray, sample, and card, press Run to start the protocol. Maxiprep Plasmid Purification Press Run to run protocol or Setup to run setup Continued on next page 11 Using BenchPro® 2100, Continued Performing Maxiprep Plasmid DNA Purification The onscreen prompts show instructions to set up the instrument for 1 maxiprep purification. To perform 2 maxiprep purifications, perform the indicated step twice. 1. Remove a Reagent tray foil seal with piercing device supplied with the instrument. Press Next. Maxiprep Plasmid Purification Set up 1 of 9 Pierce reagent tray foil with the provided piercing tool Back Next 2. Uncap and label the supplied elution tube (2 mL). Place the labeled tube into the elution tube slot in the tray. Press Next. Maxiprep Plasmid Purification Set up 2 of 9 Remove cap and place an empty 2 mL collection tube into the elution tube slot Back Next 3. Open the drawer unit and remove the Waste Tray. Place the Reagent Tray in the Waste Tray slot and press slightly to ensure the tray is aligned and flush with the slot. Press Next. Maxiprep Plasmid Purification Set up 3 of 9 Place pierced reagent tray into the autoclavable waste tray Next Continued on next page 12 Using BenchPro® 2100, Continued Performing Maxiprep Plasmid DNA Purification, Continued 4. Place the Cell Liner in the Waste Tray reservoir slot. Press Next. Maxiprep Plasmid Purification Set up 4 of 9 Place a disposable cell liner reservoir into the waste tray Next 5. Open the drawer unit and place the Waste Tray with Cell Liner and Reagent Tray into the instrument. Press Next. Maxiprep Plasmid Purification Set up 5 of 9 Open instrument drawer and place the waste tray/reagent tray into the slot Back Next 6. Add up to 125 mL of overnight bacterial culture into the Cell Liner. Place the Cell Liner Lid on the reservoir. Press Next. Maxiprep Plasmid Purification Set up 6 of 9 Pour 125 mL of 2.0 to 2.4 OD culture into disposable cell liner and cover with lid Back Next Note: There is an opening in the lid for the card sippers to aspirate the cell culture into the card for processing. Continued on next page 13 Using BenchPro® 2100, Continued Performing Maxiprep Plasmid DNA Purification, Continued 7. Ensure that you completed Steps 1–6. If you have accidentally missed a step, press Back and perform the missed step. Press Next. Maxiprep Plasmid Purification Set up 7 of 9 Please check the following before closing door -Elution tube is labeled and uncapped -Reagent tray is pierced -Cell culture volume is below maximum fill mark -Cell liner is covered with lid Back Next Note: If you wish to perform 2 maxiprep purifications, ensure that a second set of Waste Tray containing the pierced Reagent Tray, and Cell Liner with culture and Lid is loaded in the drawer. 8. Gently close the drawer unit of the instrument. Press Next. Maxiprep Plasmid Purification Set up 8 of 9 Close instrument drawer Back Next Note: Once the card is inserted (Step 9), you cannot open the drawer. 9. Remove the BenchPro® Maxiprep Card from the package and insert the card into a slot in the BenchPro® 2100 instrument such that the tips are inserted into the reagents placed in the reagent tray. Use the Card Alignment Guide to ensure the card is placed correctly in the slot. When the first card is placed correctly in the slot, you will hear a click indicating that the door lock is engaged. Press Start. Note: Avoid holding the cards by the card sippers as it can damage the card. Maxiprep Plasmid Purification Set up 9 of 9 Insert Card(s) Press Start Back Start Continued on next page 14 Using BenchPro® 2100, Continued Performing Maxiprep Plasmid DNA Purification, Continued 10. Press Run on the protocol set up screen to begin the protocol. The protocol begins and various steps of the protocol are displayed on the screen. Maxiprep Plasmid Purification Press Run to run protocol or Setup to run setup Note: You will not be able to open the drawer unit once the protocol begins. Any waste generated during the protocol is collected in the Cell Liner (after cell culture is removed) and in the cavity of the Waste Tray. 11. When the protocol is complete, the display shows Protocol Complete. Proceed to Unloading BenchPro® 2100, next page. Aborting the Protocol 1. To cancel the protocol, press the Abort function key. The protocol stops when the Abort key is activated and the cards are released. 2. If the protocol is aborted during a run, the card and reagent tray cannot be reused. After aborting the protocol, follow the prompts on the screen to clean up before starting another run. Note: If the protocol stops due to an external power failure, an error screen is displayed. Continued on next page 15 Using BenchPro® 2100, Continued Unloading BenchPro® 2100 1. Once the Protocol Complete screen is displayed, press Next to view the Clean up screen. Maxiprep Plasmid Purification Clean up Please perform the following cleanup: - Remove and dispose the card - Open drawer - Remove and cap the elution tube - Remove waste tray, reagent tray, and cell liner - Dispose of liquid waste and reagent tray/cell liner - Clean the waste tray Next 2. At the end of the run, remove the card from the slot and discard the card appropriately. Do not reuse the card. Note: You will not be able to open the drawer unit until the card is removed. 3. Open the drawer unit to remove the elution tube containing purified plasmid DNA. Cap the elution tube and store the plasmid DNA at –20C or use DNA for the desired downstream application. To avoid repeated freezing and thawing of DNA, store the purified DNA at 4C for immediate use or aliquot the DNA and store at –20C for long-term storage. 4. Remove used Reagent Tray and Cell Liner, and discard appropriately. Any waste generated during the protocol is collected in the Cell Liner and Waste Tray cavity. Discard waste solution appropriately. 5. If needed, you can remove Waste Tray to wash and/or autoclave. 6. To run another protocol, press the Next function key to return to the initial protocol setup screen. 7. Load a new Reagent Tray and Cell Liner. Add cell culture and insert a new card. Start the protocol as described previously. There is no cooling period required between runs. 8. If you are not using the instrument, turn OFF the power switch located on the left side of the unit. Cleaning and Maintenance Clean the surface of the BenchPro® 2100 instrument with a damp cloth. Do not use harsh detergents or solvents to clean the unit. Clean the bottom of the instrument drawer with a light spray of 70% ethanol and then wipe the ethanol with a paper towel. Clean the Waste Tray with a diluted bleach solution (10%) and/or autoclave. For any other repairs and service, contact Technical Support (page 28). Do not perform any repairs or service on the BenchPro® 2100 instrument to avoid damaging the unit. 16 Troubleshooting Problem Cause Solution Instrument Problems No power (the digital display remains blank when the power is turned on) Power cord is not connected Check DC power cord connections at both ends. Use the correct cords. Ensure the correct plug for your local socket is used. Error code displayed -- Make a note of the error code and see the list of error codes on page 19. Inlet pressure error House air not connected or house air connector is closed Ensure that the instrument is connected to house air outlet and the house air supply valve is open. Accidentally missed adding cell culture -- Be sure to confirm that you have added the reagents in the correct order prior to starting the protocol. If the protocol has started and you accidentally missed adding the culture, abort the protocol prior to the 65-minutes remaining mark. Then, remove the cards, open the drawer, and add the bacterial culture to the Cell Liner. If cell culture is added to the Cell Liner but you missed adding the Reagent Tray, abort the run and discard the Cell Liner with the culture. Restart the run using a new card, Reagent Tray, and Cell Liner with culture. Card is difficult to insert Card is not oriented correctly Use the Card Alignment Guide to ensure the card is placed correctly in the slot. When the card is placed correctly in the slot, you will hear a click. Reagent tray has foil seal or capped tube Make sure that the elution tube is uncapped and the foil seal on the reagent tray is pierced when placed in the Waste Tray. Continued on next page 17 Troubleshooting, Continued Plasmid DNA Quality Problems Problem Cause Solution Low DNA yield Incomplete lysis Decrease the amount of starting material used. Use the appropriate recommended starting culture volume based on the copy number of the plasmid. Poor quality of starting material Be sure to process sample immediately after collection or store the sample at appropriate temperature. The yield and quality of DNA isolated depends on the starting material. Expired or damaged card used Be sure to use BenchPro® Maxiprep Card before the expiration date printed on the card. Handle the card carefully and keep any unused cards in the original package to avoid any damage to the card. Low copy plasmid used or the plasmid size is not suitable for the purification system Use only high copy plasmid. Use bacterial cell cultures containing plasmids in the recommended 3–20 kb size range. No DNA recovered Accidentally missed uncapping the elution tube or tube not loaded at the correct position Be sure to load and uncap the elution tube prior to starting the purification protocol. DNA is sheared or degraded Purified DNA repeatedly frozen and thawed Aliquot purified DNA and store at 4C (short-term) or –20C (long-term). Avoid repeated freezing and thawing. DNA contaminated with DNases Maintain a sterile environment while working (i.e., wear gloves and use DNase-free reagents). -- If you are loading only one card, ensure that the reagent tray and tubes are loaded in the same row as the card to avoid any sample loss. If you accidentally started the run without adding the elution tube, abort the protocol as described on page 15. Accidentally missed loading the elution tube or tube not loaded at the correct position 18 BenchPro® 2100 Error Codes Error Hardware ERROR! Warning Message Action A leak has been detected in the system Fix Leak and Cycle Power. Inlet pressure out of range Check inlet pressure. Vacuum out of range Unit needs servicing, contact Technical Support (page 28). Pressure out of range Unit needs servicing, contact Technical Support (page 28). Valve failed pressure decay test Unit needs servicing, contact Technical Support (page 28). Valve failed vacuum decay test Unit needs servicing, contact Technical Support (page 28). Valve failed pressure POST test. Valve = * Unit needs servicing, contact Technical Support (page 28). Valve failed vacuum POST test. Valve = * Unit needs servicing, contact Technical Support (page 28). No card detected Insert a card and restart protocol. Please close door and restart protocol -- *valve number 19 Appendix A Connecting to Different Types of House Air Outlets Introduction Since the house air outlets can vary, examples of a few house air connector types and how to connect the supplied flexible tube to the house air connectors are described below. Ordering information from McMaster-Carr (www.mcmaster.com) is included. Quick Disconnect House Air Outlet If the house air outlet is a standard quick disconnect, then use Item 1 (McMaster Cat. no. 6534K46) and Item 2 (McMaster Cat. no. 5111K667) to connect the instrument’s ¼” tubing to the quick disconnect house air outlet. 1. Assemble Item 1 and Item 2 to create the connector. Item 2 Item 1 2. Attach the bare end of the supplied flexible tube to the push to connect to the end of the assembled connector from Step 1. Assembled connector connected to supplied tube 3. Insert the male end of the assembled connector into the existing house air outlet. Assembled connector inserted into house air outlet 4. Insert the quick disconnector fitting on the other end of the flexible tube into the air inlet connector on the back of the instrument (see page 8). 5. Test to ensure the proper house air pressure is maintained. Continued on next page 20 Connecting to Different Types of House Air Outlets, Continued Tube House Air Outlet If the house air outlet is ¼” diameter tube, then use Item 3 (McMaster Cat. no. 5111K468) to connect to the existing ¼" OD tubing of the instrument. If the house air outlet is 3/8” diameter tube, then use Item 4 (McMaster Cat. no. (9087K65) to connect to the existing ¼" OD tubing of the instrument. 1. Connect one end of the connector to the house air outlet tubing and the other end of the connector to the supplied flexible tube. See figures below. Item 3 Item 3 connected to supplied tubing and house air outlet Item 3 House air tubing Item 4 Supplied tubing Item 4 connected to supplied tubing and house air outlet Item 4 House air tubing Supplied tubing 2. Insert the quick disconnector fitting on the other end of the flexible tube into the air inlet connector on the back of the instrument (see page 8). 3. Test to ensure the proper house air pressure is maintained. Continued on next page 21 Connecting to Different Types of House Air Outlets, Continued Connecting Multiple Instruments If you wish to connect multiple BenchPro® 2100 instruments to a single house air outlet line, use Item 5 (McMaster Cat. no. 5779K34) to tee-off from the main supply tubing to each instrument. If needed, additional ¼” OD, 1/8” ID flexible tubing can be purchased separately (McMaster Cat. no. 5108K43). See figures below for details. Important: You can only operate up to 4 instruments off a single house air supply line. Item 5 connector Item 5 Three instruments connected to a single house air supply line using Item 5. 22 Replacing the Fuse Replacing the Fuse For additional fuses, contact Technical Support (page 28). Instructions are provided below to replace the 250 V, 2.0 A fuse for the main power socket. 1. Turn off the main power switch at the left side of the instrument and detach the power cord from the rear of the instrument. 2. Open the fuse compartment located on the rear of the instrument by pressing in and rotating the knob ¼ turn counter-clockwise. 3. Pull the fuse holder out of the compartment and inspect the fuse. If the fuse is burned or there is a break in the fuse element, replace the 250 V, 2.0 A fuse with the identical type fuse. 4. Place the fuse holder back into the compartment, press in the knob and rotate the knob clockwise until the knob clicks into place. 23 Repackaging the Instrument Repackaging and Storage If you need to send the instrument to Invitrogen for repair or warranty issues, or you wish to transport the instrument to another location, repackage the unit as follows: 1. Turn off the main power switch at the left side of the instrument and detach the power cord from the rear. 2. Secure the drawer unit with a tape. 3. Place the instrument in the original box including the original packing foam. 4. Tape the box securely and place appropriate shipping labels for shipping the unit to Invitrogen. Always transport the box with the unit in the upright position. 5. If the unit is not to be used for extended periods of time, store the repackaged unit in an upright position at 15ºC to 40ºC. 24 Product Specifications BenchPro® 2100 Specifications Environmental Conditions Input Power: DC 12 V, 2.5 A Installation site: Indoor use only. Pollution degree 2 environments Altitude: Up to 2,000 meters* Operating Temperature: 15–30°C Maximum Relative Humidity: 80% for temperatures up to 31ºC decreasing linearly to 50% relative humidity at 40ºC Specifications Instrument Type: Processor unit with 2 slots Sample Processing: 1 to 2 samples/batch Processing Time: ~90 minutes Dimensions: 13 inches (w) × 20.8 inches (d) × 11.7 inches (h) Weight: 20 pounds (9.1 kg) Built-in Features: Digital display, light LED ® The BenchPro 2100 instrument including the BenchPro® Maxiprep Card is compatible with standard nonhazardous laboratory reagents. The Waste Tray is reusable and can be autoclaved. *At high altitudes, air supply flow rates may be reduced (especially if an external compressor is used). When operating at high altitudes, ensure the input air pressure and flow rates meet the specifications listed on page 7. BenchPro® Maxiprep Card Specifications Waste Tray Specifications The BenchPro® Maxiprep Cards are used with the BenchPro® 2100 instrument and are available separately (page 27). For details on the BenchPro® Maxiprep Cards, see page 5. Card Dimensions: 21.5 cm × 19.5 cm Card Materials: ABS Card Tip Dimensions: 0.65 cm × 6 mm The Waste Tray is used with the BenchPro® 2100 instrument. For details on the BenchPro® Reagent Tray, see page 6. Tray Dimensions: 23 cm × 8 cm Tray and Reservoir Materials: Polypropylene Reservoir Volume: 125 mL Piercing device: 16 cm × 4.5 cm, polycarbonate Continued on next page 25 Product Specifications, Continued System Specifications Specifications High copy Starting culture volume 100–125 mL† Elution Volume ~1.0 mL Expected DNA Yield* ~750 μg Endotoxin** <10 EU/μg O.D.260/280 >1.8 † Volume is based on culture grown in LB medium and not TB or 2x YT medium. *DNA yield depends on plasmid copy number, type and size, bacterial strain, and growth conditions. **Endotoxin levels vary depending on bacterial strain, growth medium, and growth conditions. 26 Accessory Products Additional Products The following products are for use with the BenchPro® 2100 instrument and are available separately from Invitrogen. For more information, visit www.invitrogen.com or contact Technical Support (page 28). Product Catalog no. BenchPro® Maxi Plasmid Card and Reagent Tray 1 kit MC2001 BenchPro® 2100 MaxiCard™ Piercing Device 1 each MC3001 ® ™ BenchPro 2100 MaxiCard Waste Tray 1 pack (2 trays) MC4001 ™ 1000 assays Q33120 ™ Quant-iT DNA Assay Kit, Broad-Range 1000 assays Q33130 Qubit® Fluorometer 1 each Q32857 Luria Broth Base (Miller’s LB Broth Base)®, powder 500 g 2.5 kg 12795-027 12795-084 Ampicillin Sodium Salt, irradiated 200 mg 11593-027 Carbenicillin, Disodium Salt 5g 10177-012 Quant-iT DNA Assay Kit, High Sensitivity E-Gel® Agarose Gels and DNA Ladders Quantity E-Gel® Agarose Gels are bufferless pre-cast agarose gels designed for fast, convenient electrophoresis of DNA samples. E-Gel® agarose gels are available in different agarose percentages and well formats. A large variety of DNA ladders is available from Invitrogen for sizing DNA. For more details on these products, visit our website at www.invitrogen.com or contact Technical Support (page 28). 27 Technical Support Web Resources Contact Us Visit the Invitrogen Web site at www.invitrogen.com for: Technical resources, including manuals, vector maps and sequences, application notes, SDSs, FAQs, formulations, citations, handbooks, etc. Complete technical support contact information Access to the Invitrogen Online Catalog Additional product information and special offers For more information or technical assistance, call, write, fax, or email. Additional international offices are listed on our web page (www.invitrogen.com). Corporate Headquarters: 5791 Van Allen Way Carlsbad, CA 92008 USA Tel: 1 760 603 7200 Tel (Toll Free): 1 800 955 6288 Fax: 1 760 602 6500 E-mail: [email protected] Japanese Headquarters: LOOP-X Bldg. 6F 3-9-15, Kaigan Minato-ku, Tokyo 108-0022 Tel: 81 3 5730 6509 Fax: 81 3 5730 6519 E-mail: [email protected] European Headquarters: Inchinnan Business Park 3 Fountain Drive Paisley PA4 9RF, UK Tel: +44 (0) 141 814 6100 Tech Fax: +44 (0) 141 814 6117 E-mail: [email protected] SDS Safety Data Sheets (SDSs) are available at www.invitrogen.com/sds. Certificate of Analysis The Certificate of Analysis provides detailed quality control and product qualification information for each product. Certificates of Analysis are available on our website. Go to www.invitrogen.com/support and search for the Certificate of Analysis by product lot number, which is printed on the box. 28 Purchaser Notification Limited Use Label License No. 5: Invitrogen Technology The purchase of this product conveys to the buyer the non-transferable right to use the purchased amount of the product and components of the product in research conducted by the buyer (whether the buyer is an academic or forprofit entity). The buyer cannot sell or otherwise transfer (a) this product (b) its components or (c) materials made using this product or its components to a third party or otherwise use this product or its components or materials made using this product or its components for Commercial Purposes. The buyer may transfer information or materials made through the use of this product to a scientific collaborator, provided that such transfer is not for any Commercial Purpose, and that such collaborator agrees in writing (a) not to transfer such materials to any third party, and (b) to use such transferred materials and/or information solely for research and not for Commercial Purposes. Commercial Purposes means any activity by a party for consideration and may include, but is not limited to: (1) use of the product or its components in manufacturing; (2) use of the product or its components to provide a service, information, or data; (3) use of the product or its components for therapeutic, diagnostic or prophylactic purposes; or (4) resale of the product or its components, whether or not such product or its components are resold for use in research. For products that are subject to multiple limited use label licenses, the terms of the most restrictive limited use label license shall control. Life Technologies Corporation will not assert a claim against the buyer of infringement of patents owned or controlled by Life Technologies Corporation which cover this product based upon the manufacture, use or sale of a therapeutic, clinical diagnostic, vaccine or prophylactic product developed in research by the buyer in which this product or its components was employed, provided that neither this product nor any of its components was used in the manufacture of such product. If the purchaser is not willing to accept the limitations of this limited use statement, Life Technologies is willing to accept return of the product with a full refund. For information about purchasing a license to use this product or the technology embedded in it for any use other than for research use please contact Out Licensing, Life Technologies, 5791 Van Allen Way, Carlsbad, California 92008 ; Phone (760) 603-7200 or e-mail: [email protected] Continued on next page 29 Purchaser Notification, Continued BenchPro® 2100 Warranty Invitrogen, part of Life Technologies warrants to the original purchaser (“Purchaser”) that the BenchPro® 2100 instrument (“instrument”) will be free from defects in materials and workmanship for a period of one (1) year from the date of delivery. Invitrogen agrees, as its sole responsibility under this limited warranty, and upon prompt notice of a defect, to repair, replace or refund purchase price, at its discretion, any instrument discovered to be defective within the warranty period. This warranty does not include repair, replacement, or refund necessitated by accident, abuse, neglect, misuse, unauthorized repair, or modification of the instrument. In the event that Invitrogen determines that the instrument is in need of repair and not replacement, this Standard Warranty includes replacement parts and labor for the instrument. This Standard Warranty does not include shipment of the instrument to and from service location or travel cost of service engineer, the costs of which shall be borne by the Purchaser. This Warranty and the remedies set forth herein are exclusive and in lieu of all other express or implied warranties (including implied warranties of merchantability, fitness for a particular purpose and non-infringement), and no other warranties shall be binding upon Invitrogen. In no event shall Invitrogen be liable for any special, incidental or consequential damages resulting from the use or malfunction of this instrument or the system With which it is used, even if such damages could be anticipated by Invitrogen. To obtain service during the warranty period, contact Invitrogen Technical Support for further instruction. OUT OF WARRANTY SERVICE Contact Invitrogen Technical Support. We will be happy to assist you by phone at no charge. Repair service, if needed, will be billed depending on the parts replaced and labor hours needed to repair your instrument. You will be billed for shipment of the instrument to the recommended service facility. 30 Appendix B: Safety Symbols on the Instrument Symbols on Instrument The following table describes the symbols displayed on the instrument. Symbol Description Denotes direct current. The Caution symbol denotes a risk of safety hazard. Refer to accompanying documentation. Caution Placed on disposable card to denote single usage. DANGER! High voltage. Indicates the presence of an electrical shock hazard and to proceed with appropriate caution. Indicates a protective grounding terminal that must be connected to earth ground before any other electrical connections are made to the instrument. Biohazard. Do not dispose of this product as unsorted municipal waste. Follow local municipal waste ordinances for proper disposal provisions to reduce the environmental impact of waste electrical and electronic equipment (WEEE). The CE mark symbolizes that the product conforms to all applicable European Community provisions for which this marking is required. Operation of the BenchPro® 2100 instrument is subject to the conditions described in this manual. The protection provided by the instrument may be impaired if the instrument is used in a manner not specified by Invitrogen. A CSA mark with the indicators "C" and "US" means that the product is certified for both the U.S. and Canadian markets, to the applicable U.S. and Canadian standards. 31 General Instrument Safety Moving and Lifting the Instrument Operating the Instrument WARNING! PHYSICAL INJURY HAZARD. Use this product only as specified in this document. Using this instrument in a manner not specified in the user manual may result in personal injury or damage to the instrument. Ensure that anyone who operates the instrument has: Received instructions in both general safety practices for laboratories and specific safety practices for the instrument. Cleaning or Decontaminating the Instrument 32 Read and understood all applicable Safety Data Sheets (SDSs). See About SDSs on page 33. CAUTION! Using cleaning or decontaminations method other than those recommended by the manufacturer may compromise the safety or quality of the instrument. Chemical Safety Chemical Hazard Warning General Safety Guidelines Waste Disposal WARNING! CHEMICAL HAZARD. Before handling any chemicals, refer to the Safety Data Sheet (SDS) provided by the manufacturer, and observe all relevant precautions. All chemicals in the instrument, including liquid in the lines, may be potentially hazardous. Always determine what chemicals have been used in the instrument before changing reagents or instrument components. Wear appropriate eyewear, protective clothing, and gloves when working on the instrument. To minimize the hazards of chemicals: Read and understand the Safety Data Sheets (SDSs) provided by the chemical manufacturer before you store, handle, or work with any chemicals or hazardous materials. Minimize contact with chemicals. Wear appropriate personal protective equipment when handling chemicals (for example, safety glasses, gloves, or protective clothing). For additional safety guidelines, consult the SDS. Minimize the inhalation of chemicals. Do not leave chemical containers open. Use only with adequate ventilation (for example, fume hood). For additional safety guidelines, consult the SDS. Check regularly for chemical leaks or spills. If a leak or spill occurs, follow the manufacturer’s cleanup procedures as recommended in the SDS. Comply with all local, state/provincial, or national laws and regulations related to chemical storage, handling, and disposal. If potentially hazardous waste is generated when you operate the instrument: Characterize (by analysis if necessary) the waste generated by the particular applications, reagents, and substrates used in your laboratory. Ensure the health and safety of all personnel in your laboratory. Ensure that the instrument waste is stored, transferred, transported, and disposed of according to all local, state/provincial, and/or national regulations. IMPORTANT! Radioactive or biohazardous materials may require special handling, and disposal limitations may apply. 33 Electrical Safety and Electromagnetic Compatibility (EMC) Standards Power DANGER! ELECTRICAL SHOCK HAZARD. Severe electrical shock can result from operating the instrument without its instrument panels in place. Do not remove instrument panels. High-voltage contacts are exposed when instrument panels are removed from the instrument. DANGER! ELECTRICAL HAZARD. Grounding circuit continuity is vital for the safe operation of equipment. Never operate equipment with the grounding conductor disconnected. Use properly configured and approved line cords for the voltage supply in your facility. Plug the system into a properly grounded receptacle with adequate current capacity. U.S. and Canadian Safety Standards This instrument has been tested to and complies with standard UL 61010A-1, “Safety Requirements for Electrical Equipment for Laboratory Use, Part 1: General Requirements.” This instrument has been tested to and complies with standard CSA 1010.1, “Safety Requirements for Electrical Equipment for Measurement, Control, and Laboratory Use, Part 1: General Requirements.” European Safety and EMC Standards Safety This instrument meets European requirements for safety. This instrument has been tested to and complies with standards EN 61010-1:2001, “Safety Requirements for Electrical Equipment for Measurement, Control and Laboratory Use, Part 1: General Requirements.” EN 61010-2-081, “Particular Requirements for Automatic and Semi-Automatic Laboratory Equipment for Analysis and Other Purposes.” EMC EN 61326-1:2006 “Electrical equipment for measurement, control and laboratory use Part 1 General EMC requirements.” (Group 1, Class A) Australian EMC standards This instrument has been tested to and complies with standard AS/NZS 2064, “Limits and Methods Measurement of Electromagnetic Disturbance Characteristics of Industrial, Scientific, and Medical (ISM) Radio-frequency Equipment.” ©2010 Life Technologies Corporation. All rights reserved. The trademarks mentioned herein are the property of Life Technologies Corporation or their respective owners. 34 Corporate Headquarters 5791 Van Allen Way Carlsbad, CA 92008 T: 1 760 603 7200 F: 1 760 602 6500 E: [email protected] For country-specific contact information, visit our web site at www.invitrogen.com