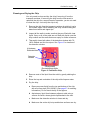
1
LabChip
EZ Reader Series
Hardware Manual
© Copyright 2007, Caliper Life Sciences, Inc. All rights reserved.
P/N 123090 Rev. 0
Caliper Life Sciences, Inc. Product Warranty
2
Caliper Life Sciences, Inc. Product Warranty
I. INSTRUMENTS
Caliper® Life Sciences, Inc. (“Caliper”) warrants your Caliper-manufactured instrument’s hardware and firmware against defects in material
and workmanship for a period of one (1) year from the date of shipment, subject to the exclusions set forth below and: (i) the warranty for
TurboVap products shall be ninety (90) days from the date of shipment, (ii) the warranty for Limited-Life Parts (as defined below) shall be thirty
(30) days from the date of installation, and (iii) the warranty for cosmetic surfaces shall be thirty (30) days from the date of installation (each, a
“Warranty Period”). Ongoing service support after the Warranty Period may be available at an additional expense.
A. What is Included during the Warranty Period:
• unlimited emergency on-site repair services1, parts and software updates that affect original functional design specifications, their
associated labor and travel expenses.
• unlimited access to Caliper’s Technical Support Center, which provides troubleshooting, repair instruction, service dispatching (other than
for TurboVap and Twister I), replacement part information and shipment.
1
• one pre-scheduled, on-site Preventive Maintenance and Diagnostic Servicing (PM) performed by a Caliper Field Service Engineer . A PM
visit includes the replacement of a pre-defined list of Limited-Life Parts exposed to fluidics, such as syringes, valves, seals and fittings. The
Caliper Field Service Engineer will perform comprehensive analysis and testing to confirm that the equipment is left operating to factory
specifications. Scheduling of the PM within the Warranty Period is flexible and determined by the customer after notification by the Caliper
Field Service Engineer. The servicing is typically scheduled six months after the equipment installation, but equipment usage rate and
availability may cause the date to vary.
• A completed Caliper Field Service Report provides thorough documentation of all maintenance and service work performed by the Caliper
Field Service Engineer during an on-site visit. Documentation is not provided when Caliper provides service via telephone, fax or email.
Any failure of a product to conform to this Warranty shall be corrected by replacing or repairing the affected product or refunding the purchase
price (as described below), in each case at Caliper’s option. Parts replaced during the Warranty Period will be covered for the remaining term
of the original Warranty Period, or for thirty (30) days from time of replacement, whichever is longer. Such replacement parts may, at Caliper’s
option, be new or remanufactured. All parts removed from warranted equipment become the property of Caliper. Caliper reserves the right to
satisfy its warranty obligations in full by refunding the purchase price of any non-conforming product, minus any service, validation, or travel
charges.
B. Customer Responsibilities
In order for a product to be covered under this Warranty, Customer must comply with the following terms:
• The equipment must be used under normal installation and application conditions as described in the product’s User Manual.
• The equipment must be maintained as described in the User Manual.
• Only water or DMSO at a maximum concentration of 65% may be used as a system fluid in the Sciclone inL10. Any other system fluid must
be approved by Caliper before use in the inL10.
• Customer is responsible for making the equipment available for a PM visit during the Warranty Period. Caliper will not be held liable for a
missed PM visit due to restricted access to the equipment during the Warranty Period.
• When Caliper provides telephone, fax, or email support, Customer is responsible for completing any necessary documentation of the
service.
• If Customer maintains a change control/validation logbook as a permanent record, then Customer is responsible for entering all service
documentation into such logbook.
• Customer must perform the appropriate level of revalidation required as a result of the maintenance or service provided.
C. Exclusions
• Failure to comply with any of the Customer Responsibilities listed above will void this Warranty.
• Any alteration of hardware or software on products covered under this Warranty that are not performed by Caliper or an approved Caliper
vendor will void this Warranty.
• A product that has been subject to misuse, accident, negligence or improper transportation, handling, installation, storage, use, or
maintenance is not covered under this Warranty.
• Many Caliper products require the use of Caliper Automation Certified Disposables for proper operation. These may include, but are not
limited to: pipet tips, seals, labels and filters. Use of a Caliper product with any disposables other than the specified Caliper Automation
Certified Disposables will void this Warranty.
• This Warranty covers equipment manufactured by Caliper. Equipment purchased from other vendors is not covered by this Warranty.
• Damage to Limited-Life Parts caused by insufficient maintenance or cleaning practices or unauthorized applications are not covered under
this Warranty.
• This Warranty applies only to the original buyer and delivery location. It is not transferable to other buyers or locations without Caliper’s prior
written approval.
1.
TurboVap and Twister I are not eligible for on-site service or a PM visit, and must be returned to Caliper’s Repair Depot for
warranty service pursuant to the process set forth in Section E below.
P/N 113642 Rev. 1
Caliper Life Sciences, Inc.
Caliper Life Sciences, Inc. Product Warranty
3
• The Sciclone 384-channel low-volume head is warranted for one (1) year or 750,000 aspirate or dispense movements, whichever comes
first.
• The Sciclone 100nL head is warranted for one (1) year or 600,000 aspirate or dispense movements, whichever comes first.
• The laser component of the LabChip 3000 is warranted for the earlier of one (1) year from the date of installation or 8,000 hours of use.
• The use in a Sciclone inL10 of DMSO above 65% concentration, or any other system fluid not sanctioned for use by Caliper, will invalidate
this warranty as it relates to the pipetting head assembly.
If Caliper performs service on equipment and determines that any of the exclusions set forth in this Warranty apply, then Caliper shall charge
Customer its then-current current list prices for parts, labor and travel.
D. Limited-Life Parts
Limited-Life Parts are any parts that are exposed to solvents, reagents, or samples. Such parts include, but are not limited to syringes, valves,
seals and fittings. A pre-defined list of Limited-Life Parts are routinely replaced by Caliper Field Service Engineers during a PM visit or during
Caliper Repair Depot servicing. Otherwise, these parts are available from Caliper at current list prices and are designed for replacement by
Customer.
E. Equipment Return Policy
In servicing situations requiring the return of equipment to Caliper, equipment must be returned to Hopkinton, MA, USA, or another facility
designated by Caliper. Customer shall prepay shipping charges for equipment returned to Caliper, and Caliper will pay for return shipment to
Customer.
A Returned Material Authorization (RMA) must be obtained for any equipment being returned to Caliper. Contact the Caliper Technical Support
Center by telephone at (508)-435-9761, or via the Internet at [email protected] or by fax at (508)-435-0950 before returning any
equipment to Caliper. Customer must complete a Caliper Chemical Questionnaire prior to the issuance of an RMA. All equipment returned to
Caliper must first be decontaminated to meet Caliper and United States Department of Transportation procedures and standards for the safety
of Caliper personnel.
F. Hazardous Limitation Statement
At no time will Caliper personnel perform service on unsafe equipment, perform service in unsafe environments or decontaminate
equipment to make it safe.
Prior to performing any service work, Caliper personnel will evaluate the condition of the equipment and the environment in which the
equipment is located. If Caliper determines that the equipment and/or the environment could be hazardous to Caliper personnel, Caliper
reserves the right to refuse to service the equipment.
II. MICROFLUIDIC CHIPS
Caliper warrants that microfluidic chips (each, a “Chip”) purchased from Caliper by Customer will be free from defects in material and
workmanship for a period of sixty (60) days from the date of shipment (the “Warranty Period”). A “defect” for purposes of this Warranty is
defined as any failure that occurs during analysis of the first one hundred (100) samples being run on a Chip. During the Warranty Period, if
the Chip fails to comply with this Warranty, Caliper will repair or replace the Chip at its option and expense. If a Chip becomes damaged or its
performance otherwise deteriorates due to solvents and or reagents other than those supplied or expressly recommended by Caliper, Caliper
will replace the Chip at Customer’s request and expense. No such replacement will extend the original Warranty Period. This Warranty does
not extend to any Chip which has been (a) the subject of an accident, misuse, or neglect, (b) modified by a party other than Caliper, (c) used in
a manner not in accordance with the instructions contained in the product User’s Manual, or (d) used for an assay or application which has not
been approved by Caliper. All claims under this Warranty must be made within thirty (30) days of the discovery of the defect. Caliper’s
obligations under this Warranty are limited to replacement as Caliper deems necessary to correct those failures of the Chip to comply with this
Warranty of which Caliper is notified prior to expiration of the Warranty Period.
III. GENERAL
CALIPER SPECIFICALLY DISCLAIMS ANY AND ALL OTHER PROMISES, REPRESENTATIONS, AND WARRANTIES, EXPRESSED OR
IMPLIED. THIS INCLUDES, BUT IS NOT LIMITED TO, THE PRODUCT’S CONDITION, ITS CONFORMITY TO ANY DESCRIPTION OR
REPRESENTATION, THE EXISTENCE OF ANY LATENT OR PATENT DEFECTS, AND IMPLIED WARRANTIES OF MERCHANTABILITY
AND FITNESS FOR A PARTICULAR PURPOSE. IN NO EVENT WILL CALIPER BE LIABLE, WHETHER ARISING IN CONTRACT, TORT
(INCLUDING NEGLIGENCE), STRICT LIABILITY OR OTHERWISE, FOR ANY LOSS OF PROFIT OR ANY OTHER COMMERCIAL
DAMAGES, INCLUDING, BUT NOT LIMITED TO, SPECIAL, INCIDENTAL, CONSEQUENTIAL, OR OTHER AND IN NO EVENT SHALL
CALIPER’S LIABILITY EXCEED THE PURCHASE PRICE OF THE PRODUCT. THERE ARE NO ORAL STATEMENTS, PROMISES,
REPRESENTATIONS OR OTHER WARRANTIES COLLATERAL TO OR AFFECTING THIS WARRANTY. THIS WARRANTY EXTENDS TO
BUYER ONLY AND NOT TO PURCHASERS OR USERS OF BUYER’S PRODUCTS.
No agent, employee, or representative of Caliper has any authority to bind Caliper to any affirmation, representation, or warranty concerning a
Caliper product that is not contained in Caliper’s printed product literature or this Warranty. Any such affirmation, representation, or warranty
made by any agent, employee, or representative of Caliper will not be binding on Caliper.
P/N 113642 Rev. 1
Caliper Life Sciences, Inc.
Caliper Life Sciences, Inc. Software License Agreement
4
Caliper Life Sciences, Inc. Software License Agreement
Thank you for purchasing our products. PLEASE READ THE TERMS AND CONDITIONS OF THIS LICENSE AGREEMENT CAREFULLY
BEFORE OPENING THE PACKAGE CONTAINING THE SOFTWARE MEDIA, THE COMPUTER SOFTWARE CONTAINED THEREIN, AND
THE ACCOMPANYING USER DOCUMENTATION (COLLECTIVELY REFERRED TO HEREIN AS THE "PROGRAM"). THE PROGRAM IS
COPYRIGHTED AND LICENSED, NOT SOLD. BY OPENING THE PACKAGE CONTAINING THE PROGRAM, YOU ARE ACCEPTING AND
AGREEING TO THE TERMS OF THIS LICENSE AGREEMENT. IF YOU ARE NOT WILLING TO BE BOUND BY THE TERMS OF THIS
LICENSE AGREEMENT, YOU SHOULD PROMPTLY RETURN THE PROGRAM IN UNOPENED FORM, AND YOU WILL RECEIVE A
REFUND. THIS LICENSE AGREEMENT REPRESENTS THE ENTIRE AGREEMENT CONCERNING THE PROGRAM BETWEEN YOU AND
CALIPER® LIFE SCIENCES, INC. (REFERRED TO AS "LICENSOR"), AND IT SUPERSEDES ANY PRIOR PROPOSAL,
REPRESENTATION, OR UNDERSTANDING BETWEEN YOU AND LICENSOR.
1
License Grant.
Licensor hereby grants to you, and you accept, a nonexclusive license to use the Program only as authorized in this License Agreement.
The software included in the Program (the "Software") may be used only on a single computer owned, leased, or otherwise controlled by
you; or, in the event of the inoperability of that computer, on a backup computer selected by you. If the Software is an applications
package, you may use it on a single, local system controller. Neither concurrent use on two or more computers nor use in a local area
network or other network is permitted without written authorization from licensor and the payment of additional license fees. You agree
that you will not assign, sublicense, transfer, pledge, lease, rent, or share your rights under this License Agreement, except that you may
permanently transfer all of your rights under this License Agreement, provided that you retain no copies, you transfer all of the Program,
and the transferee agrees to the terms of this License Agreement. You agree that you may not reverse assemble, reverse compile, or
otherwise translate the Software.
Upon loading the Software into your computer, you may retain the Software media for backup purposes. In addition, you may make one
copy of the Software on a second medium for the purpose of backup in the event the Software media is damaged or destroyed. Any such
copies of the Software shall include Licensor's copyright and other proprietary notices. Except as authorized under this paragraph, no
copies of the Program or any portions thereof may be made by you or any person under your authority or control.
2
Licensor’s Rights.
Licensor has invested significant time and money in developing the products purchased with the Program. The Program contains
Licensor's trade secrets, which must be used in confidence. You acknowledge and agree that the program is proprietary to Licensor and
protected under U.S. copyright law. You further acknowledge and agree that all right, title, and interest in and to the Program, including
associated intellectual property rights, are and shall remain with Licensor. This License Agreement does not convey to you an interest in
or to the Program, but only a limited right to use it, revocable in accordance with the terms of this License Agreement. In the event of a
breach, the Licensor reserves the right to seek equitable relief.
3
License Fees.
The license fees paid by you in connection with the purchase of the associated product(s) are paid in consideration of the licenses
granted under this License Agreement.
4
Term.
This License Agreement is effective upon your opening of this package and shall continue until terminated. You may terminate this
License Agreement at any time by returning the Program, and all copies thereof and extracts therefrom to Licensor. Licensor may
terminate this License Agreement upon the breach by you of any term hereof. Upon such termination by Licensor, you agree to return to
Licensor the Program and all copies and portions thereof.
5
Limited Warranty.
Licensor warrants, for your benefit alone, for a period of 90 days from the date of the commencement of this License Agreement (referred
to as the "Warranty Period") that the Software Media in which the Software is contained are free from defects in material and
workmanship. If, during the Warranty Period, a defect in the Software Media arises, you may return the Program to Licensor for either
replacement or, if so elected by Licensor, refund of amounts paid by you under this License Agreement. You agree that the foregoing
constitutes your sole and exclusive remedy for breach by Licensor of any warranties made under this License Agreement. EXCEPT FOR
THE WARRANTIES SET FORTH ABOVE, THE PROGRAM IS LICENSED "AS IS," AND THE LICENSOR DISCLAIMS ANY AND ALL
OTHER WARRANTIES, WHETHER EXPRESS OR IMPLIED, INCLUDING, WITHOUT LIMITATION, ANY IMPLIED WARRANTIES OF
MERCHANTABILITY OR FITNESS FOR A PARTICULAR PURPOSE.
6
Limitation of Liability.
Licensor's cumulative liability to you or any other party for any loss or damages resulting from any claims, demands, or actions arising out
of or relating to this License Agreement shall not exceed the license fee paid to Licensor for the use of the Program. In no event shall
Licensor be liable for any indirect, incidental, consequential, special, or exemplary damages or lost profits, even if Licensor has been
advised of the possibility of such damages. SOME STATES DO NOT ALLOW THE LIMITATION OR EXCLUSION OF LIABILITY FOR
INCIDENTAL OR CONSEQUENTIAL DAMAGES, SO THE ABOVE LIMITATION OR EXCLUSION MAY NOT APPLY TO YOU.
P/N 104954 Rev. 3
Caliper Life Sciences, Inc.
Caliper Life Sciences, Inc. Software License Agreement
5
7
Software Updates.
Licensor periodically creates Software updates which will be made available to you at no charge. Thereafter, Licensor shall not be
responsible for your use of, and shall not warrant or repair, superseded or outdated versions of Software.
8
Governing Law.
This License Agreement shall be construed and governed in accordance with the laws of the Commonwealth of Massachusetts. Any
dispute will be resolved in the state and federal courts of the Commonwealth of Massachusetts.
9
Severability.
Should any term of this License Agreement be declared void or unenforceable by any court of competent jurisdiction, such declaration
shall have no effect on the remaining terms hereof.
10
No Waiver.
The failure of either party to enforce any rights granted hereunder or to take action against the other party in the event of any breach
hereunder shall not be deemed a waiver by that party as to subsequent enforcement of rights or subsequent actions in the event of future
breaches.
P/N 104954 Rev. 3
Caliper Life Sciences, Inc.
Preface
6
Preface
Copyright
This manual is published by Caliper Life Sciences, Inc., 68 Elm
Street, Hopkinton, MA 01748 USA. Copyright 2006 - 2007, Caliper
Life Sciences, Inc. All rights reserved. Reproduction by any means
or in any form of this manual or the products it describes is
prohibited.
Trademarks
Caliper, CLARA, LabChip, and Twister are registered trademarks of
Caliper Life Sciences, Inc. The Caliper logo, ProfilerPro, and iLink
are trademarks of Caliper Life Sciences, Inc. Microsoft, Windows,
and Windows NT are either registered trademarks or trademarks of
Microsoft Corporation in the United States and/or other countries.
All other trademarks and registered trademarks are the property of
their respective holders.
Content
The information in this manual may contain typographical errors or
technical inaccuracies and is subject to change without notice.
Modifications may also be made to the product described in this
manual at any time.
Statement of Proper Use
The LabChip EZ Reader and LabChip EZ Reader II are laboratory
research instruments that use Caliper’s microfluidic LabChips. The
LabChip EZ Reader performs kinase profile assays. The LabChip
EZ Reader II performs off-chip mobility shift and kinase profile
assays. The LabChip EZ Reader software is used to automatically
process all of the samples in a microtiter plate and then analyze the
results. The LabChip EZ Readers are capable of interfacing with
automated microtiter plate handling equipment.
P/N 123090 Rev. 0
LabChip EZ Reader Series Hardware Manual
Caliper Life Sciences, Inc.
Preface
7
WARNINGS
•
•
To reduce the risk of electric shock, do not remove the covers.
No user serviceable parts are inside. Refer to qualified service
personnel if help is required.
Use this product only in the manner described in this manual. If
the equipment is used in a manner not specified by the
manufacturer, the protection provided by the equipment may be
impaired.
AVERTISSEMENTS
•
•
Pour réduire le risque de choc électrique, ne pas retirer le
couvercle. Ce produit ne contient aucune pièce pouvant être
réparée par l’utilisateur. Au besoin, confier l’appareil à un
réparateur qualifié.
Ce produit ne doit être utilisé que comme décrit dans ce
manuel. Si cet appareil est utilisé d’une manière autre que celle
spécifiée par le fabricant, la protection fournie par l’appareil peut
être entravée.
Contact Us
If you have a question about a product that is not answered in this
manual or online Help, or if you need assistance regarding this
product, please contact the Caliper Technical Support Center from
8:00 A.M. to 8:00 P.M., Eastern Time, Monday through Friday:
Phone:
(508) 435-9761;
1-877-LabChip for LabChip products only
Fax:
(508) 435-0950
Email:
[email protected]
Internet:
www.caliperLS.com
For support in Europe contact Caliper Life Sciences LTD, Runcorn,
UK +44-1928-711448 or fax +44-1928-791228. For more
information contact your local Caliper representative.
Before you call, you should have the following information available
for the technical representative:
P/N 123090 Rev. 0
•
Product serial number
•
Software version (found by choosing About from the main Help
menu)
•
If applicable, the error number shown in the software or from the
log file.
LabChip EZ Reader Series Hardware Manual
Caliper Life Sciences, Inc.
Preface
8
Product Service and Customer Support Plans
Caliper offers a full range of services to ensure your success. From
our original factory warranty through a comprehensive line of
customer support plans, Caliper offers you Field Service Engineers
and in-house Specialists who are dedicated to supporting your
hardware, software and application development needs.
Call:
(508) 435-9761
Fax:
(508) 435-0950
Email: [email protected]
Our programs can include such useful services as:
• Preventive maintenance
• Diagnostic servicing performed on-site by Caliper field service
engineers
• Extended use of the Caliper Technical Support Center
• Use of a software program for automated, remote
troubleshooting
• Software updates
• Parts, labor, and travel expense coverage
• Other customized services upon request
Training For Your Product
Contact the Caliper Center for Training and Development for
information about the availability of training courses for your
product:
Call:
(508) 497-2634
Fax:
(508) 435-3439
CE
This device complies with all CE rules and requirements.
NOTE
Changes or modifications to this equipment not expressly approved
by the party responsible for compliance could void the user’s
authority to operate the equipment.
REMARQUE
Tout changement ou modification apporté à cet instrument non
expressément approuvé par l’entité responsable de la conformité
peut annuler l’autorisation d’opérer l’appareil accordée à
l’utilisateur.
P/N 123090 Rev. 0
LabChip EZ Reader Series Hardware Manual
Caliper Life Sciences, Inc.
Preface
9
Table of Symbols
Table 1 contains symbols that identify particularly important
information and alert you to the presence of hazards. Some of
these symbols may not appear in this manual or on the product it
describes.
Table 1. Important Symbols
Symbol
Symbole
Description
Description
WARNING: Caution, risk of danger. Refer to the
User’s documentation.
AVERTISSEMENT: Attention, danger potentiel. Se
reporter à la documentation de l’utilisateur.
NOTE: A cautionary statement; an operating tip or
maintenance suggestion; may result in instrument
damage if not followed.
REMARQUE: Énoncé indiquant une précaution à
prendre, un conseil de fonctionnement ou une
suggestion d’entretien; son non-respect peut
provoquer des dommages à l’instrument.
Hazardous voltage; risk of shock injury.
Tension dangereuse; risque de blessure par
électrocution.
Risk of eye injury; wear safety glasses.
Risque de lésion oculaire; porter des lunettes de
sécurité.
Risk of fire.
Risque d’incendie.
Risk of poison.
Risque d’empoisonnement.
Hazardous fumes.
Émanations dangereuses.
Alternating current.
Courant alternatif.
CE compliance mark.
Marque de conformité CE.
P/N 123090 Rev. 0
LabChip EZ Reader Series Hardware Manual
Caliper Life Sciences, Inc.
Preface
10
Table 1. Important Symbols (Continued)
Symbol
Symbole
Description
Description
Equipment
Yellow Caution, risk of danger
labels are
Red
Stop
color coded: Blue
Mandatory action
Green Safe condition or information
Les
étiquettes
de l’appareil
sont codées
couleur:
P/N 123090 Rev. 0
Jaune
Rouge
Bleu
Vert
Attention, danger potentiel
Arrêter
Intervention obligatoire
Condition sûre ou informations de sécurité
LabChip EZ Reader Series Hardware Manual
Caliper Life Sciences, Inc.
Table of Contents
11
Table of Contents
Caliper Life Sciences, Inc. Product Warranty ....................................................... 2
Caliper Life Sciences, Inc. Software License Agreement ..................................... 4
Preface .................................................................................................................... 6
Product Safety ...................................................................................................... 13
Chemical Safety Information ............................................................................. 13
About MSDSs.................................................................................................... 14
Safety Approvals Label ..................................................................................... 14
LED Safety Information ..................................................................................... 15
Electrical Safety Information .............................................................................. 16
Mechanical Safety ............................................................................................. 16
Power Cord Set Selection ................................................................................. 17
Fuses ................................................................................................................ 17
Required Training.............................................................................................. 18
Introduction........................................................................................................... 19
ProfilerPro Assay.................................................................................................. 20
Quick Start ........................................................................................................ 20
Daily ............................................................................................................ 20
Weekly......................................................................................................... 21
Monthly ........................................................................................................ 22
As Needed ................................................................................................... 22
Assay Description ............................................................................................. 23
Laboratory Requirements............................................................................. 23
ProfilerPro Kit Contents ............................................................................... 24
Assay Controls and Compound Addition ...................................................... 25
Preparing the Separation Buffer ........................................................................ 26
Preparing the Chip ............................................................................................ 26
Setting up the LabChip EZ Reader Instrument .................................................. 28
Preparing the Reconstitution Buffer and Compounds ........................................ 29
Preparing the ProfilerPro Plate .......................................................................... 30
Reading the Plate.............................................................................................. 31
Hardware Reference ............................................................................................. 32
LabChip EZ Reader and LabChip EZ Reader II Hardware ................................. 33
Front View ................................................................................................... 33
Front Panel .................................................................................................. 34
Power Supply and Rear Connectors ............................................................ 35
Optics .......................................................................................................... 36
Cartesian Robot, Microplate Carrier, and Trough ......................................... 37
Buffer and Degasser System ....................................................................... 38
Chip Pressure System ................................................................................. 39
Barcode Readers ......................................................................................... 40
Chips................................................................................................................. 41
Chip Cartridge ................................................................................................... 42
P/N 123090 Rev. 0
LabChip EZ Reader Series Hardware Manual
Caliper Life Sciences, Inc.
Table of Contents
12
Chip Preparation Base ...................................................................................... 43
Operation .............................................................................................................. 44
Powering on the Instrument............................................................................... 44
Starting the LabChip EZ Reader Software ......................................................... 44
System Setup Procedure for 4- and 12-Sipper Chips......................................... 45
Filling the Dye Trough ....................................................................................... 45
Inserting the Chip into the LabChip EZ Reader.................................................. 45
Applying the Barcode Label to the Plate ............................................................ 47
Inserting a Plate into the LabChip EZ Reader Instrument .................................. 49
Running the Assay ............................................................................................ 49
Stopping the Run .............................................................................................. 50
Removing a Plate from the Instrument............................................................... 50
Removing the Chip from the Instrument ............................................................ 50
Emptying the Dye Trough .................................................................................. 51
Emptying the Buffer Trough............................................................................... 51
Powering Down the Instrument.......................................................................... 52
Maintenance .......................................................................................................... 54
Preventive Maintenance .................................................................................... 55
Cleaning the LabChip EZ Reader Instrument .................................................... 56
Cleaning the Chip Cartridge .............................................................................. 57
Changing the Buffer Bottle ................................................................................ 58
Troubleshooting ................................................................................................... 59
System Communication Problems ..................................................................... 59
Electrical Current Leaks .................................................................................... 60
Optics Problems ................................................................................................ 61
Optical Signal Carryover ................................................................................... 62
Buffer Leaks ...................................................................................................... 63
Chip Pressure Problems.................................................................................... 64
Degasser Problems ........................................................................................... 65
Barcode Reader Problems ................................................................................ 65
Broken Sippers.................................................................................................. 66
Spare Parts and Consumables............................................................................. 67
Specifications ....................................................................................................... 68
General Specifications ...................................................................................... 68
Environmental ................................................................................................... 69
Electrical ........................................................................................................... 69
Assay Voltage ................................................................................................... 69
Chip Pressure ................................................................................................... 69
Chip Temperature Control ................................................................................. 70
CCD Camera..................................................................................................... 70
Light Source (Blue LED) .................................................................................... 70
Barcode Reader ................................................................................................ 70
Index ...................................................................................................................... 71
P/N 123090 Rev. 0
LabChip EZ Reader Series Hardware Manual
Caliper Life Sciences, Inc.
Product Safety
13
Product Safety
Chemical Safety Information
WARNING
Some chemicals used with the LabChip EZ Readers are potentially
hazardous and can cause illness.
•
•
•
•
•
•
•
P/N 123090 Rev. 0
Read and understand the material safety data sheet (MSDS)
provided by the chemical manufacturer before you store,
handle, or work with any chemical or hazardous material.
Minimize contact with and inhalation of chemicals and chemical
wastes. Wear appropriate personal protective equipment when
handling chemicals (e.g., safety glasses, gloves, or clothing).
For additional safety guidelines consult the MSDS.
Do not leave chemical containers open. Use only with adequate
ventilation, including a fume hood, if necessary.
Check regularly for chemical leaks or spills. If a leak or spill
occurs, follow the manufacturer’s cleanup procedures as
recommended on the MSDS.
Dispose of the contents of the waste tray and waste bottle in
accordance with good laboratory practices and local,
state/provincial, or national environmental and health
regulations.
After emptying waste containers, seal them appropriately.
Comply with all local, state/provincial, or national laws and
regulations related to chemical storage, handling, and disposal.
LabChip EZ Reader Series Hardware Manual
Caliper Life Sciences, Inc.
Product Safety
14
About MSDSs
Some of the chemicals used with this instrument may be listed as
hazardous by their manufacturer. When hazards exist warnings are
prominently displayed on the labels of all chemicals.
Chemical manufacturers supply a current MSDS before or with
shipments of hazardous chemicals to new customers and with the
first shipment of a hazardous chemical after an MSDS update.
MSDSs provide you with the safety information you need to store,
handle, transport and dispose of the chemicals safely.
We strongly recommend that you replace the MSDSs in your files
each time you receive one packaged with hazardous chemicals.
CHEMICAL HAZARD. Be sure to familiarize yourself with the
MSDSs before using reagents or solvents.
Safety Approvals Label
The LabChip EZ Readers have the following approvals and/or
marks for Test and Measurement instruments.
•
CE (required for use in Europe)
•
TUV NRTL
WARNING
Disconnect all power cords to system before servicing.
P/N 123090 Rev. 0
LabChip EZ Reader Series Hardware Manual
Caliper Life Sciences, Inc.
Product Safety
15
LED Safety Information
WARNING
BRIGHT LIGHT HAZARD. Caliper LabChip EZ Reader Instruments
contain Class 3B Light Emitting Diodes (LEDs). However, the
LabChip EZ Readers are classified as a Class 1 devices because
the LEDs are appropriately shrouded and indicated with Warning
labels.
IEC 60825-1: 1993, A1: 1997, A2: 2001.
Class 1
LED Product
450 - 490 nm (visible blue) LED source, 500 mW maximum
continuous (CW)
WARNING
•
•
Use of controls or adjustments or performance of procedures
other than those specified herein may result in hazardous
radiation exposure.
NEVER remove back, side or front panels of the instrument
while the LED is powered. Panels (which, if removed, could lead
to LED exposure) are marked with the labels shown below:
These panels are intended to be removed for service only by
qualified personnel; they are not intended to be removed during
operation or for maintenance by users. The only removable
maintenance panel is the lower panel at the back of the instrument,
which can be removed to access the back of the robot, if cleaning is
necessary.
P/N 123090 Rev. 0
LabChip EZ Reader Series Hardware Manual
Caliper Life Sciences, Inc.
Product Safety
16
Electrical Safety Information
The LabChip EZ Readers are powered by a UL/CSA/VDE approved
100-240 VAC, 50/60 Hz input, 5, 15, 24 VDC output power supply.
Additionally, the LabChip EZ Reader's High Voltage circuitry is
current-limited to non-hazardous levels. Thus, no voltage hazards
are present on the LabChip EZ Reader instruments. However, users
should observe the following:
WARNING
Do not open the instrument enclosure. There are no user
serviceable parts inside.
The plug to the wall should be accessible after the system's
installation, in order for trained service personnel to safely
disconnect power from the system during servicing.
The computer, which is supplied with the LabChip EZ Reader
instrument, has internal lithium batteries. Batteries should not be
incinerated.
WARNING
Danger of explosion if battery is incorrectly replaced. Replace only
with the same or equivalent type recommended by the
manufacturer's instructions.
Mechanical Safety
The LabChip EZ Reader instruments have a three axis robot that
moves quickly and can be a pinch hazard. Keep the front door of
the instrument closed when the robot is moving. Keep hands away
from the robot when not actually placing microplates in the
instrument or changing the buffer trough. Robot access areas are
marked with the following warning label:
P/N 123090 Rev. 0
LabChip EZ Reader Series Hardware Manual
Caliper Life Sciences, Inc.
Product Safety
17
Power Cord Set Selection
United States and Canada
The LabChip EZ Reader instrument is shipped with a NEMA 5-15 /
IEC 320 power cord. If the power cord needs to be replaced,
substitute power cords must be UL Listed, Type SJT or equivalent,
minimum No. 18 AWG, 3-conductor with ground conductor that for
safety considerations should never be disconnected or defeated.
The cord’s plug to the wall must be a three-pin grounding type
connector at the unit with a NEMA 5-15P (15A, 125V) plug
configuration. The cord’s plug must conform to requirements for an
EN 60 320/IEC 320 Standard Sheet C13 connector.
The equipment is intended to be plugged into a standard NEMA
5-15R receptacle in the wall.
International
All power cord sets must be approved by an acceptable, accredited
agency responsible for evaluation in the country where the power
cord set and system will be used.
The flexible cord must be <HAR> Type HO5VV-F, 3-conductor,
minimum 0.75, 1.00 mm2 conductor size (230 volt input). Power
cord set fittings that is, the appliance coupler and wall plug, must
bear the certification mark of the agency responsible for evaluation
in the country where it will be used. The appliance coupler must
meet the mechanical configuration of an EN 60 320/IEC 320
Standard Sheet C13 connector for mating with appliance inlet on
the system.
Fuses
The LabChip EZ Reader instruments do not contain any user
replaceable fuses. Contact Caliper Technical Support if blown fuses
are suspected.
P/N 123090 Rev. 0
LabChip EZ Reader Series Hardware Manual
Caliper Life Sciences, Inc.
Product Safety
18
Required Training
Ensure that all personnel involved with the operation of the
instrument have:
•
Received instruction in general safety practices for laboratories.
•
Received instruction in specific safety practices for the
instrument.
•
Read and understood all related MSDSs.
WARNING
Use this product only in the manner described in this manual. If the
equipment is used in a manner not specified by the manufacturer,
the protection provided by the equipment may be impaired.
P/N 123090 Rev. 0
LabChip EZ Reader Series Hardware Manual
Caliper Life Sciences, Inc.
Introduction
19
Introduction
This manual describes the LabChip EZ Reader and LabChip EZ
Reader II hardware. For information about the LabChip EZ Reader
software, see the LabChip EZ Reader Help file (select Help→Help
on the main window).
The Caliper® LabChip EZ Reader is a laboratory research
instrument that uses Caliper’s microfluidic LabChip® technology to
perform kinase profile assays.
The Caliper LabChip EZ Reader II is a laboratory research
instrument that uses Caliper’s microfluidic LabChip technology to
perform Off-Chip Mobility Shift and kinase profile assays. The
LabChip EZ Reader II is capable of interfacing with automated
microtiter plate handling equipment, such as the Caliper Twister® II
robot.
The LabChip EZ Reader software is used to automatically process
all of the samples in a microtiter plate and then analyze the results.
The ProfilerPro Kits, available from Caliper (see “Spare Parts and
Consumables” on page 67), provide the Enzyme plate, Substrate
plate, Reconstitution buffer and DTT, and Termination buffer. All of
the kit components are designed to work together, providing
convenience and reliability. The Caliper Separation Buffer is
specifically designed to work with the ProfilerPro kits.
P/N 123090 Rev. 0
LabChip EZ Reader Series Hardware Manual
Caliper Life Sciences, Inc.
ProfilerPro Assay
20
ProfilerPro Assay
Quick Start
This section outlines the steps required to run a ProfilerPro™ plate
in the LabChip EZ Reader or LabChip EZ Reader II, divided into
daily, weekly, monthly, and as needed operations.
Daily
1
Prepare reagents for ProfilerPro Kit (see page 29 for details):
a
Remove Reconstitution and Termination Buffer from freezer
and thaw. Store at 4°C for extended periods.
b
Add Reconstitution buffer (50 mL) + DTT (50 uL) + 100X
Protease Inhibitor (500 uL)
c
Prepare compounds:
— For 1 uL transfer, dilute compounds to 26X assay
concentration in 100% DMSO and place in compound
plate in desired format.
— For 16 uL transfer, dilute compounds to 1.625X assay
concentration in Reconstitution Buffer + DTT + Protease
Inhibitor and place in compound plate in desired format.
2
Place Reconstitution buffer, compounds, and Termination buffer
in incubator at 28±1°C.
3
Prepare ProfilerPro plate (see page 30 for details):
a
Place frozen Substrate plate in incubator at 28±1°C.
b
After 30 minutes, place frozen Enzyme plate on second
incubator adapter plate in incubator at 28±1°C.
c
After 15 minutes, centrifuge Enzyme plate at 1000 rpm for 1
minute. Carefully remove seal.
d
For 1 uL compound addition:
— Add 15 uL of (Reconstitution Buffer + DTT + Protease
Inhibitor) to each well on the Enzyme plate.
— Add 1uL of compounds to each well on Enzyme plate
and mix.
e
For 16 uL compound addition:
— Add 16 uL of (Reconstitution Buffer + DTT + Protease
Inhibitor + compound) to each well on the Enzyme plate.
P/N 123090 Rev. 0
LabChip EZ Reader Series Hardware Manual
Caliper Life Sciences, Inc.
ProfilerPro Assay
21
Daily (Continued)
4
f
If necessary, spin plate at 500 rpm for 1 minute.
g
Preincubate for up to 15 minutes at 28±1°C.
h
At least 60 minutes after placing the Substrate plate in the
incubator in step a, remove the Substrate plate and spin at
500 rpm for 1 minute. Carefully remove seal.
i
Add 10 uL of Substrate plate to the Enzyme plate.
j
Spin the Enzyme plate at 500 rpm for 1 minute. Cover the
plate and place on a third incubator plate adapter in the
incubator for 90 minutes at 28±1°C.
k
After 90 minutes, add 45 uL of Termination Buffer, mix if
necessary, and spin at 500 rpm for 1 minute.
Read the plate (see page 31).
Weekly
Set up the LabChip EZ Reader Instrument and Chip
1
Remove chip from the refrigerator or LabChip EZ Reader
system and if cold, equilibrate to room temperature
(approximately 30 minutes).
2
Prepare Separation Buffer (see page 26):
3
P/N 123090 Rev. 0
a
Remove the CR-8 solution from storage (<-70°C), and thaw.
b
Add 2 mL of CR-8 to 400 mL Separation Buffer Bottle, mix.
c
Retain 20 mL of Separation buffer for chip preparation.
Prepare the chip (see page 26):
a
Add 35 mL of ultrapure, filtered water to the chip preparation
station.
b
Clean and dry the chip if the chip was stored in the chip
storage container. If the chip was in the instrument, verify
the chip surfaces are dry.
c
Rinse the chip wells 3 times with separation buffer, then load
the chip with reagents. See Figure 1 on page 22 for
volumes.
LabChip EZ Reader Series Hardware Manual
Caliper Life Sciences, Inc.
ProfilerPro Assay
22
Weekly (Continued)
250 uL
250 uL
500 uL
500 uL
Figure 1. Rinse and Load Chip Wells
4
Click the Setup button in the LabChip EZ Reader software and
follow the system prompts. For detailed instructions, see the
LabChip EZ Reader Help.
Preparing the LabChip EZ Reader Instrument and Chip for
Weekend Idle
1
Leave the chip in the chip cartridge.
2
Leave the Separation Buffer recirculating in the buffer trough.
1
Replace Buffer/Dye Trough and Buffer Pump Tubing when
prompted in the System Setup Wizard.
2
Prime trough system with ultrapure water and then drain.
3
Clean chip interface with a lint-free wipe dampened with
ultrapure water.
Monthly
As Needed
Preparing the LabChip EZ Reader Instrument and Chip for
Extended Idle (>1 week)
P/N 123090 Rev. 0
1
Remove the chip from the LabChip EZ Reader instrument, place
in chip container, and store at 4°C.
2
Using the System Setup wizard, empty the Separation Buffer
from the trough.
3
Using the System Setup Wizard, prime the buffer trough with
400 mL ultrapure water and recirculate for 30 minutes.
4
Using the System Setup wizard, empty the ultrapure water from
the trough.
LabChip EZ Reader Series Hardware Manual
Caliper Life Sciences, Inc.
ProfilerPro Assay
23
Assay Description
ProfilerPro Kits contain all necessary reagents to carry out in-house
compound profiling against kinase panels. Each ProfilerPro kit
comprises a 384-well microtiter plate which contains 24 individual
enzymes arranged in columns of 16. Each enzyme plate has a
matching substrate plate such that upon addition, reaction and
termination, the assays are optimized to yield a predictable
conversion at the apparent ATP Km of the assay. Full activity
controls can be compared to wells into which compounds have
been added to determine compound potency and selectivity against
the panel of enzymes on that plate.
The assays on the ProfilerPro plates have been developed using
Caliper's off-chip mobility shift assay technology. Here the extent of
phosphorylation of a fluorescently labeled peptide is measured by
electrophoretic separation of a product and substrate. This
separation occurs in the channel of a microfluidic sipper chip which
sips samples from the stopped reactions on a ProfilerPro plate. The
LabChip EZ Reader instrument presents the ProfilerPro plates to
the sipper chip and automatically provides the necessary buffers,
voltage, pressure, and illumination to sip, separate, and detect the
phosphorylated and non-phosphorylated peptide moieties in each
well of the plate. The raw data traces produced during this process
are analyzed automatically after all wells in the plate are sampled.
To successfully obtain high quality data on the LabChip EZ Reader
instrument a brief description is given in this chapter on how to:
•
Prepare the Separation Buffer, microfluidic chip, and LabChip
EZ Reader system used during analysis of ProfilerPro plates.
•
Prepare buffers and compounds used during reaction of
ProfilerPro plates.
Laboratory Requirements
Storage and preparation of ProfilerPro plates requires a set of
commonly available laboratory equipment. These include:
P/N 123090 Rev. 0
•
4°C refrigerator for chip and buffer storage.
•
-80°C freezer for ProfilerPro Kit storage.
•
28°C incubator for reagent storage and incubation
•
Microplate Centrifuge
•
Multi-channel manual pipettor (16 channel) or automated liquid
handler for reagent addition.
•
Vacuum pump with liquid trap for chip cleaning and preparation.
LabChip EZ Reader Series Hardware Manual
Caliper Life Sciences, Inc.
ProfilerPro Assay
24
ProfilerPro Kit Contents
Each ProfilerPro Kit contains:
•
One ProfilerPro (Enzyme) plate:
— Clear barcode labeled 384-well plate with 24 enzymes per
plate arranged in columns of 16 (see Figure 2 on page 25).
— The barcode on each plate identifies the plate type (e.g. first
or second grouping of 24 enzymes) and is used by the
software to automatically choose the correct parameters to
read and analyze the plate. (K001... indicates plate 1,
K002... indicates plate 2, etc.)
•
One Substrate plate
— Black barcode labeled 384-well plate with 24 peptide/ATP
pairs per plate, arranged in columns of 16. Additional
cofactors such as Mn++ and Mg++ are added to each
column on the substrate plate as dictated by assay needs.
— The barcode on each plate identifies the plate type and
should be used to ensure correct matching with the
corresponding enzyme plate type. (S001... indicates plate 1,
S002... indicates plate 2, etc.)
— Row P in this plate is a no ATP control to be used in data
analysis. See “Assay Controls and Compound Addition” on
page 25.
•
One bottle of Reconstitution Buffer
— used to dilute all enzymes on the enzyme plate prior to
addition of compound or peptide/atp mixture
•
One vial of DTT
— add to Reconstitution Buffer before adding to enzyme plate
•
One vial of Protease Inhibitors
— add to Reconstitution Buffer before adding to enzyme plate
•
One Bottle of Termination Buffer
— added to the final reaction mixture to terminate the kinase
reaction
NOTE
The concentration of the peptide/ATP mixture in each Substrate
plate is such that upon addition to the enzyme plate, each reaction
is carried out at the same peptide concentration and at an ATP/Km
ratio of 1.
P/N 123090 Rev. 0
LabChip EZ Reader Series Hardware Manual
Caliper Life Sciences, Inc.
ProfilerPro Assay
25
Assay Controls and Compound Addition
For each enzyme in a given column in the ProfilerPro plate, the
assay requires the use of 2 controls. The first controls are 100%
activity controls and should be present in rows A, B, and O. The
second controls are 0% activity or no ATP controls and will be
present in Row P.
The user is required to add DMSO only as a compound in rows A,
B, O, and P. Row P is a no ATP control and so will act as a 0%
activity control.
NOTE
The layout as described is chosen to ensure robust data analysis.
Other non-standard layouts may result in compromised data
integrity.
Figure 2. ProfilerPro Plate Layout
Up to 12 additional compounds can be added to the ProfilerPro
plate. Compounds can be added to the plate in one of two ways:
P/N 123090 Rev. 0
•
Addition of 1 uL of compound at 26X in 100% DMSO to the
enzyme after addition of 15 uL of reconstitution buffer prior to
addition of substrate plate mixture.
•
Pre-dilution of the compound in reconstitution buffer to a final
concentration of 1.625X and 6.75% DMSO with subsequent
addition of 16uL of compound/reconstitution buffer to each well
prior to addition of substrate plate mixture.
LabChip EZ Reader Series Hardware Manual
Caliper Life Sciences, Inc.
ProfilerPro Assay
26
Preparing the Separation Buffer
NOTE
The Separation Buffer used with the ProfilerPro kits is predefined. It
is strongly recommended that the separation buffer is purchased
from Caliper Life Sciences, since separation conditions for
ProfilerPro plates have been optimized with this buffer.
The Separation Buffer is shipped as two components: the base
buffer and a vial of a coating reagent (CR-8) used to prevent
peptide sticking in the microfluidic chip.
To prepare the final Separation Buffer:
1
Remove the CR-8 solution from storage (<-70°C), and thaw.
2
Remove the Separation Buffer Bottle from storage (4°C).
3
Add 2 mL of CR-8 to 400 mL Separation Buffer Bottle, mix well.
4
Retain 20 mL of Separation buffer for chip preparation.
NOTE
The Separation Buffer (base buffer/CR-8 mixture) is stable for at
least 1 week at room temperature. A new solution of Separation
Buffer should be prepared at the beginning of each new week.
Preparing the Chip
Preparing and loading the chip requires the following tasks:
•
Prepare the chip preparation station
•
Cleaning and drying the chip (only if chip was stored in transport
container)
•
Loading the chip with reagents
Prepare the Chip Preparation Station
P/N 123090 Rev. 0
1
Ensure the Chip Preparation Station is clean.
2
Place 35 mL of ultrapure, filtered water in the well of the Chip
Preparation Station.
3
Ensure the top surface is dry.
LabChip EZ Reader Series Hardware Manual
Caliper Life Sciences, Inc.
ProfilerPro Assay
27
Cleaning and Drying the Chip
You only need to clean and dry the chip if removing it from the
transport container. If removing the chip from the instrument to
replenish the chip for a second week of operation, you do not need
to clean the chip. Just verify the chip is dry.
1
Remove the chip from the transport container by picking it up by
the outside edges. When handling the chip, avoid touching the
detection window and sipper tips.
2
Inspect all the wells to make sure that they are filled with clear
liquid. If any or all of the wells are not filled with liquid, note the
chip number and the wells that were empty for future reference.
3
Thoroughly clean both sides of the detection window with 70100% ethanol and lint-free wipes. See Figure 3 for location of
the detection window.
4 Upstream
Electrode Wells
Detection
Window
2 Downstream
Electrode/Waste Wells
Figure 3. ProfilerPro Chip
P/N 123090 Rev. 0
4
Remove most of the liquid from the wells by gently shaking the
chip.
5
Rinse the top and underside of the chip with ultrapure water.
6
Dry the chip:
a
Remove excess liquid from the top and bottom of the chip
with a lint-free wipe (P/N 120306). (See page 67 for ordering
information.) Do not touch the tip of the sippers.
b
Aspirate any liquid from between adjacent wells using a
vacuum line with a clean pipette tip attached to the end.
c
Make sure the detection window is clean and dry.
d
Make sure the entire chip's top and bottom surfaces are dry.
LabChip EZ Reader Series Hardware Manual
Caliper Life Sciences, Inc.
ProfilerPro Assay
28
Loading the Chip with Reagents
250 uL
250 uL
500 uL
500 uL
Figure 4. Rinse and Load Chip Wells
Rinse and load the chip:
1
Rinse the upstream electrode wells three times with 250 uL of
Separation Buffer.
2
Rinse the downstream electrode/waste wells three times with
500 uL Separation Buffer.
3
Fill the upstream electrode wells with 250 uL of Separation
Buffer.
4
Fill the downstream electrode/waste wells with 500 uL of
Separation Buffer.
Setting up the LabChip EZ Reader Instrument
To prepare the LabChip EZ Reader instrument to run a plate, click
the Setup button in the LabChip EZ Reader software. Follow the
prompts in the System Setup Wizard to prepare the trough and the
chip. See the LabChip EZ Reader Help for detailed instructions.
P/N 123090 Rev. 0
LabChip EZ Reader Series Hardware Manual
Caliper Life Sciences, Inc.
ProfilerPro Assay
29
Preparing the Reconstitution Buffer and
Compounds
Remove Reconstitution Buffer and Termination Buffer from storage
and thaw. Thawing may take several hours. The Reconstitution
Buffer and Termination Buffer can be stored indefinitely at 4°C.
Before starting the enzymatic reaction, prepare the following
buffers:
•
Reconstitution Buffer + DTT + Protease Inhibitor
•
Compounds (either for 1 uL addition or for 16 uL addition)
NOTE
Ensure sufficient volume to address all 24 columns.
Reconstitution Buffer + DTT + Protease Inhibitor
1
Remove 1M DTT, Reconstitution Buffer, and Protease Inhibitor
from the freezer (<-70°C) and thaw.
2
Add 50 uL of 1M DTT to Reconstitution Buffer.
3
Add 500 uL of Protease Inhibitor to Reconstitution Buffer and
mix.
4
Store in incubator at 28±1°C.
Compounds (1uL Addition)
1
Dilute compounds to 26X assay concentration in 100% DMSO.
2
Distribute compounds on plate as desired, adding DMSO only
to rows A, B, 0, and P.
3
Seal compound plates and store at 28±1°C until ready to use.
Compounds (16 uL Addition)
P/N 123090 Rev. 0
1
Dilute compounds to 1.625X assay concentration in
Reconstitution Buffer + DTT + Protease Inhibitor.
2
Dilute equivalent amount of DMSO in Reconstitution Buffer +
DTT + Protease Inhibitor for assay controls.
3
Distribute compounds on plate as desired, adding DMSO
controls to rows A, B, O, and P.
4
Seal compound plates and store at 28±1°C until ready to use.
LabChip EZ Reader Series Hardware Manual
Caliper Life Sciences, Inc.
ProfilerPro Assay
30
Preparing the ProfilerPro Plate
1
Prepare reagents as described in “Preparing the Reconstitution
Buffer and Compounds” on page 29.
2
Ensure that three incubator plate adapters are present in an
incubator at 28±1°C.
3
Remove Substrate plate from storage (<-70°C) and place on
incubator plate adapter in incubator at 28±1°C.
4
After 30 minutes, remove Enzyme plate from storage (<-70°C)
and place on second incubator plate adapter in incubator at
28±1°C.
5
After 15 minutes, remove Enzyme plate from incubator and
centrifuge at 1000 rpm for 1 minute. Carefully remove seal.
6
For 1 uL compound addition:
7
a
Add 15 uL of (Reconstitution Buffer + DTT + Protease
Inhibitor) to each well on the Enzyme plate.
b
Add 1uL of compounds to each well on Enzyme plate and
mix.
For 16 uL compound addition:
a
Add 16 uL of (Reconstitution Buffer + DTT + Protease
Inhibitor + compound) to each well on the Enzyme plate.
8
If bubbles are present after mixing, spin plate at 500 rpm for 1
minute.
9
Preincubate for up to 15 minutes at 28±1°C.
10 After a total of at least 60 minutes in the incubator, remove the
Substrate plate and spin at 500 rpm for 1 minute. Carefully
remove seal.
11 Add 10 uL of Substrate plate to the Enzyme plate.
12 Spin the Enzyme plate at 500 rpm for 1 minute. Cover the plate
and place on a third incubator plate adapter in the incubator for
90 minutes at 28±1°C.
13 After 90 minutes, add 45 uL of Termination Buffer, mix if
necessary, and spin at 500 rpm for 1 minute.
P/N 123090 Rev. 0
LabChip EZ Reader Series Hardware Manual
Caliper Life Sciences, Inc.
ProfilerPro Assay
31
NOTES
•
•
•
If addition of substrate to enzyme plate was performed manually, then
care must be taken to add Termination Buffer to the Enzyme plate in
the same order to avoid variable incubation times.
Spinning the plate after compound, Reconstitution Buffer, Substrate
and Termination Buffer addition is necessary if bubbles are observed
after addition. If no bubbles are observed after addition, a single spin
after Termination Buffer addition is advised to ensure complete mixing.
It is most desirable to read plates immediately after termination. If this
is not possible, seal the plates and store at 4°C until needed.
Prolonged storage may result in sample degradation.
Reading the Plate
Click the Start button in the LabChip EZ Reader software to open
the Start Run Wizard and follow the system prompts to read the
plate. For detailed instructions, see the LabChip EZ Reader Help.
P/N 123090 Rev. 0
LabChip EZ Reader Series Hardware Manual
Caliper Life Sciences, Inc.
Hardware Reference
32
Hardware Reference
This section identifies the hardware components of the LabChip EZ
Reader and LabChip EZ Reader II and provides a description of
each of the components. This section includes:
•
“LabChip EZ Reader and LabChip EZ Reader II Hardware” on
page 33
— “Front View” on page 33
— “Front Panel” on page 34
— “Power Supply and Rear Connectors” on page 35
— “Optics” on page 36
— “Cartesian Robot, Microplate Carrier, and Trough” on
page 37
— “Buffer and Degasser System” on page 38
— “Chip Pressure System” on page 39
— “Barcode Readers” on page 40
P/N 123090 Rev. 0
•
“Chips” on page 41
•
“Chip Cartridge” on page 42
•
“Chip Preparation Base” on page 43
LabChip EZ Reader Series Hardware Manual
Caliper Life Sciences, Inc.
Hardware Reference
33
LabChip EZ Reader and LabChip EZ Reader II
Hardware
This section provides descriptions of the hardware components and
systems in the LabChip EZ Reader and LabChip EZ Reader II.
Front View
Side Door
Front Panel
Front Door
Buffer Alcove
Figure 5. LabChip EZ Reader and LabChip EZ Reader II
Table 1. Front View Parts and Functions
P/N 123090 Rev. 0
Part
Function
Front Panel
Buttons and indicator light (see “Front Panel”
on page 34)
Front Door
Opens automatically to provide access to the
microplate, chip, and buffer trough.
Side Door
Slides open to provide access to the buffer
pumps and tubing.
Buffer Alcove
Holds the buffer bottle.
LabChip EZ Reader Series Hardware Manual
Caliper Life Sciences, Inc.
Hardware Reference
34
Front Panel
The controls on the front panel open the front door and indicate the
status of the instrument.
Chip Access
Button
Plate In/Out
Button
Status Indicator
Light
Figure 6. Front Panel
Table 2. Front Panel Parts and Functions
P/N 123090 Rev. 0
Part
Function
Chip Access
button
Moves the robot to open the door and releases
the chip cartridge to access the chip. This
button is illuminated green when this function
is available and flashes green when movement
is in progress.
Plate In/Out
button
Moves the robot and opens the door to access
the plate in the microplate carrier. This button
is illuminated green when this function is
available and flashes green when movement is
in progress.
Status Indicator
light
Indicates the state of the instrument:
Dark (not lit) - Power is off.
Solid green - Power is on and instrument is
idle.
Flashing green - Running a plate.
Red - Power is on, cannot communicate with
software.
Flashing Red - Error detected.
LabChip EZ Reader Series Hardware Manual
Caliper Life Sciences, Inc.
Hardware Reference
35
Power Supply and Rear Connectors
The rear connectors are used to connect the LabChip EZ Reader
instrument to the computer and power supply.
IEEE488 Firewire
(for CCD
camera)
USB
(to computer)
COM 1
Power Entry
COM 2
Power
Switch
Figure 7. Rear Connectors
Table 3. Rear Panel Parts and Functions
Part
Function
AC Power Entry
Port
Plug the power cord into this connector and a
power outlet.
WARNING
Appliance inlet is disconnecting device. Place
device or equipment in a manner so that
disconnecting device is accessible at all times.
P/N 123090 Rev. 0
USB Port
Connects the LabChip EZ Reader instrument
to the computer.
Comm Port 1
Connects Barcode Reader 1 to the PC's COM1
serial port.
Comm Port 2
Connects Barcode Reader 2 to a USB port on
the PC, using a serial-to-USB adapter.
Power Switch
Turns the LabChip EZ Reader instrument On
(Run) or Off (Standby). Note that power is still
supplied to the power supply fans when the
power switch is in the Standby position.
Turning the instrument on reloads the system
firmware and homes the robot.
Firewire
Connector
Connects the CCD camera to Firewire
connector on PC
LabChip EZ Reader Series Hardware Manual
Caliper Life Sciences, Inc.
Hardware Reference
36
Optics
The LabChip EZ Reader and LabChip EZ Reader II optics provide
fluorescence detection (blue excitation and green emission) and
robot teaching.
Blue LED
The LabChip EZ Reader and LabChip EZ Reader II use a high
intensity, long-life blue LED to excite fluorescence on microfluidic
chips. The Blue LED power can be set from 3% to 100%. It is
expected to provide sufficient light for tens of thousands of
operating hours.
White LED for Focusing and Alignment
The LabChip EZ Reader instruments use a white LED for
autofocusing and for teaching the robot.
CCD Camera
The LabChip EZ Reader and LabChip EZ Reader II use a single
CCD camera for fluorescence detection and robot teaching. Its
integration rate is adjustable from 1 Hz to 100 Hz, and fluorescence
data can be acquired and stored at rates from 1 to 10 Hz.
Optical Train
The excitation, detection, autofocus, and robot teaching optical
trains contain several lenses and high efficiency interference filters.
The optical trains are factory aligned and do not require adjustment.
P/N 123090 Rev. 0
LabChip EZ Reader Series Hardware Manual
Caliper Life Sciences, Inc.
Hardware Reference
37
Cartesian Robot, Microplate Carrier, and Trough
The LabChip EZ Reader instruments contain a stepper motor driven
robot that moves the ProfilerPro plate or microplate to be accessed
by the LabChip.
Microplate
Carrier
Disposable
Trough
Buffer Outlet
Tubing
Buffer Inlet
Tubing (2)
Overflow
Drip Tray
Figure 8. Robot, Microplate Carrier, and Trough
Table 4. Components of the Robot, Microplate Carrier, and
Trough
P/N 123090 Rev. 0
Part
Function
Microplate
Carrier
Holds the ProfilerPro plate or microplate.
Disposable
Trough
Contains buffer and dye to be accessed by the
sippers on the chip.
Buffer Inlet
Connections (2)
Buffer flows into the buffer trough through two
buffer inlets.
Buffer Outlet
Connection
Used buffer flows out to the buffer bottle.
Overflow Drip
Tray
Contains any dripped or spilled liquid.
LabChip EZ Reader Series Hardware Manual
Caliper Life Sciences, Inc.
Hardware Reference
38
Buffer and Degasser System
The Buffer and Degasser system provides a constant supply of
clean, degassed buffer solution into the buffer trough. The buffer is
used to wash the sippers, preventing cross-contamination, and to
provide a temporal space between the samples in the chip to
separate the optical signals. The buffer recirculates through the
system. Contamination of the buffer from sample compounds being
washed into it are negligible because of the high volume of buffer.
Pressure Relief
Valve
Buffer Supply
Tubing
Pinch Valves
Buffer Supply
Pump
Buffer Return
Pump
Buffer Return
Tubing
Side Door
(Open)
HPLC Cap
Pump Drip
Tray
Buffer Bottle
Figure 9. Buffer and Degasser System
Table 5. Buffer and Degasser Parts and Functions
P/N 123090 Rev. 0
Part
Function
Buffer Bottle and
HPLC cap
Holds the buffer solution.
Buffer Supply
pump and tubing
Draws buffer from the buffer bottle and pushes
the buffer through the degasser and into the
buffer trough (see “Cartesian Robot,
Microplate Carrier, and Trough” on page 37).
Buffer Return
pump and tubing
Draws buffer out of the buffer trough and
returns the used buffer to the buffer bottle.
LabChip EZ Reader Series Hardware Manual
Caliper Life Sciences, Inc.
Hardware Reference
39
Table 5. Buffer and Degasser Parts and Functions (Continued)
Part
Function
Pressure relief
valve
Relieves pressure in the buffer pumping
system if an overpressure situation occurs to
prevent leakage of buffer.
Pinch Valves
Eliminate air bubbles in the buffer tubing during
priming and aid in draining the system.
Vacuum
Degasser
Reduces dissolved gas content in the buffer
solution to help prevent bubbles from forming
in the chip.
Pump Drip Tray
Contains any dripped or spilled liquid.
Chip Pressure System
The pressure pump applies pressure or vacuum to the wells on the
chip to move liquid through the chip. The Pressure Pump is located
on the back of the LabChip EZ Reader instrument. The O-Rings on
the Chip Cartridge (see page 42) seal the chip wells and maintain
the pressure.
Pressure Tubing
Pressure Pump
Figure 10. Chip Pressure Pump
Table 6. Front Panel Parts and Functions
P/N 123090 Rev. 0
Part
Function
Pressure Tubing
Applies the pressure or vacuum to the chip.
Pressure Pump
Turns clockwise to apply pressure, or counterclockwise to apply vacuum.
LabChip EZ Reader Series Hardware Manual
Caliper Life Sciences, Inc.
Hardware Reference
40
Barcode Readers
The LabChip EZ Reader instruments are equipped with two internal
Barcode Readers. Barcode Reader 1 reads the customer-supplied
barcode on the short (portrait) edge of the ProfilerPro plate or
microplate. Barcode Reader 2 reads the Caliper-supplied barcode
on the long (landscape) edge of the ProfilerPro plate or microplate.
Proper selection and placement of barcode labels is critical for
successful reading. See “Applying the Barcode Label to the Plate”
on page 47 for specifications.
The barcode readers are internal to the system and cannot be
viewed from the outside.
P/N 123090 Rev. 0
LabChip EZ Reader Series Hardware Manual
Caliper Life Sciences, Inc.
Hardware Reference
41
Chips
LabChip EZ Reader 4-Sipper Chip
The LabChip EZ Reader 4-sipper chip shown in Figure 11 is used
with both the LabChip EZ Reader and LabChip EZ Reader II to read
the results of the kinase assays on the ProfilerPro plate.
4 Upstream
Electrode Wells
Detection
Window
2 Downstream
Electrode/Waste Wells
Figure 11. LabChip EZ Reader 4-Sipper Chip
LabChip EZ Reader 12-Sipper Chip
The LabChip EZ Reader 12-sipper chip shown in Figure 12 is used
with the LabChip EZ Reader II to read the results of Off-Chip
Mobility Shift assays.
6 Upstream
Electrode Wells
Detection
Window
2 Downstream
Electrode/Waste Wells
Figure 12. ProfilerPro Chip
P/N 123090 Rev. 0
LabChip EZ Reader Series Hardware Manual
Caliper Life Sciences, Inc.
Hardware Reference
42
Chip Cartridge
The Chip Cartridge holds the chip, provides the voltage to the chip
channels to separate the sample, and provides vacuum to the chip
wells to pull fluid through the chip channels. The Chip Cartridge
also contains a heating element to maintain a constant temperature
in the chip’s microfluidic channels and provides an optically black
background for fluorescence detection.
Lock Screw
Lid
Electrodes
O-Rings (8)
Bottom of
Cartridge
Pressure Plate
Figure 13. Chip Cartridge
Table 7. Chip Cartridge Parts and Functions
P/N 123090 Rev. 0
Part
Function
Lid
Holds the electrodes and o-rings to supply
voltage and pressure to the chip.
Bottom of
Cartridge
Holds the chip. The sippers on the chip extend
through the bottom of the cartridge.
Lock Screw
Locks the chip cartridge closed.
Electrodes
Apply voltage to the chip to move fluid through
the chip and drive electrophoretic separations
in the chip channels. 1 electrode in the center
of each upstream and downstream well, 6 total.
O-Rings
Create a seal between the chip cartridge and
the chip to apply pressure or vacuum to the
wells.
Pressure Plate
with Heating
Element
Maintains a constant temperature in the chip’s
microfluidic channels.
Optical Beam
Dump
Provides an optically dark background under
the chip.
LabChip EZ Reader Series Hardware Manual
Caliper Life Sciences, Inc.
Hardware Reference
43
High Voltage interface
Supplies DC voltage to the separation channels in the chip via inert
electrodes that are immersed in specific wells on the chip. There
are 4 voltage channels for the 4-sipper ProfilerPro chip. HV
channels can be run in either constant voltage or constant current
mode.
Pressure Interface
The downstream electrode/waste wells are pressurized wells.
Pressure or vacuum can be applied to the wells to drive the flow in
the microfluidic channels in the chip.
Sealing interface (Evaporation control)
The downstream electrode/waste wells (DD and GG) and wells BB
and KK are evaporation-controlled wells.
Chip Preparation Base
The Chip Preparation Base supplied with the LabChip EZ Reader
instruments is used to hold the chip securely during chip
preparation and ensure that the sippers are immersed in buffer to
prevent bubbles in the chip channels.
Buffer Well
Figure 14. Chip Preparation Base
Table 8. Chip Preparation Base Parts and Functions
P/N 123090 Rev. 0
Part
Function
Buffer Well
Fill with 35 mL of ultrapure, filtered water.
LabChip EZ Reader Series Hardware Manual
Caliper Life Sciences, Inc.
Operation
44
Operation
This section describes how to operate the LabChip EZ Reader
instrument hardware. Any procedures requiring use of the LabChip
EZ Reader software (for example, filling the buffer trough), are
located in the LabChip EZ Reader Online Help.
Powering on the Instrument
The LabChip EZ Reader hardware is powered on when the system
is installed. The power can be left on up to one week with the buffer
pumps set to the idle (Slow Flow) speed and the pressure set to the
base pressure. If the instrument will be idle for more than one week,
see “Long Term Shutdown (more than 1 week)” on page 52.
To turn on the power to the instrument:
1
Verify that the communication cables are connected as
described in “Power Supply and Rear Connectors” on page 35.
2
Connect the instrument's power cord to the AC Power Entry Port
on the back of the instrument.
3
Plug the AC Power Cord into a suitable wall receptacle.
4
Switch the power switch on the back of the instrument to Run.
The system firmware loads and the robot moves to the home
position.
5
Start the computer, and log in, if necessary.
Starting the LabChip EZ Reader Software
To start the LabChip EZ Reader software:
•
On the Windows Start menu, select Programs→Caliper Life
Sciences→LabChip EZ Reader→LabChip EZ Reader
Software.
OR
•
Double-click on the LabChip EZ Reader icon on the desktop.
The LabChip EZ Reader software opens and displays the Status
tab.
For instructions on using the LabChip EZ Reader software to run
the instrument, select Help→Help on the main menu bar.
P/N 123090 Rev. 0
LabChip EZ Reader Series Hardware Manual
Caliper Life Sciences, Inc.
Operation
45
System Setup Procedure for 4- and 12-Sipper
Chips
The LabChip EZ Reader software provides a System Setup Wizard
to guide you through the setup process. See the LabChip EZ
Reader Online Help for a complete description.
Filling the Dye Trough
The dye trough holds the dye used to create the plate row markers
during the assay. To fill the dye trough:
1
Press the Plate In/Out button on the front of the instrument to
open the front door and present the trough and plate carrier.
2
Use a pipette to place the dye into the trough.
3
Press the Chip Access button on the front of the instrument to
close the front door.
Inserting the Chip into the LabChip EZ Reader
This procedure describes how to insert a chip into the LabChip EZ
Reader instrument. The chip is normally inserted at the start of a
week, using the System Setup Wizard. See the LabChip EZ Reader
Online Help for a complete description of setting up the system.
To insert a new chip into the LabChip EZ Reader instrument:
1
Press the Chip Access button on the front of the instrument to
open the front door and release the chip cartridge.
2
Pull the chip cartridge out, loosen the thumbscrew, and open the
lid.
3
If there is a chip in the instrument, remove and discard the used
chip.
4
Place the new prepared chip into the chip cartridge with the
notched corner toward the upper right. Be careful not to damage
the sippers. Note the orientation of the chip as shown in
Figure 15 on page 46.
The LabChip EZ Reader supports LabChip EZ Reader 4-sipper
chips. The LabChip EZ Reader II supports LabChip EZ Reader
4-sipper chips and LabChip EZ Reader 12-sipper chips.
P/N 123090 Rev. 0
LabChip EZ Reader Series Hardware Manual
Caliper Life Sciences, Inc.
Operation
46
Inserting the Chip into the LabChip EZ Reader
(Continued)
Notched
Corner
Downstream
Electrode/Waste
Wells
Detection
Window
Figure 15. Chip in Chip Cartridge
P/N 123090 Rev. 0
5
Close the lid and tighten the thumbscrew firmly. (Tools are not
necessary and should not be used.)
6
Push the chip cartridge into the instrument until it stops.
7
Press the Chip Access button on the front of the instrument to
close the front door.
LabChip EZ Reader Series Hardware Manual
Caliper Life Sciences, Inc.
Operation
47
Applying the Barcode Label to the Plate
The customer-supplied Plate Barcode Label on the short (portrait)
end of the ProfilerPro plate or microplate is read at the start of an
assay and is used to identify the data files that are created. The Job
Barcode feature in the LabChip EZ Reader software can be used on
the LabChip EZ Reader II to automatically select the job or batch to
run based on the barcode on the plate.
When applying a plate barcode label to a plate, make sure the
barcode label is applied as specified below. Figure 16 on page 48
shows where to place the barcode on the microplate.
Parameter
Portrait side (customer applied)
Barcode Label
Side of plate to apply Label
Short side of plate closest to #1
column of wells
Overall Label width
2.5 inches (65 mm) maximum
Overall Label height
¼” (6.3 mm)
Barcode types supported
Code 39, Code 93, Code 128,
32 digits maximum, limited by max
width requirements of barcode
Barcode bar width
.0099" minimum
Max width of barcode portion of label
(including start and end characters, but not
quiet zones)
1.5 inches (38 mm)
Minimum height of bars
6 mm (bars must be printed on
entire height of label
Quiet Zones on either side of barcode
¼ inch (6.3 mm) minimum on each
side
Horizontal Placement of center of barcode
portion of label to center of label (printing
tolerance)
Centered, +/- 1 mm
Horizontal Placement of center of barcode
label to center of skirt of microtiter plate (label
application tolerance)
0+/- 2 mm
Vertical Placement of top edge of label to top
edge of plate (label application tolerance)
Top edge of label to top edge of
plate 1 +/- 0.5 mm
P/N 123090 Rev. 0
LabChip EZ Reader Series Hardware Manual
Caliper Life Sciences, Inc.
Operation
48
Applying the Barcode Label to the Plate
(Continued)
6.3 mm
white space
(“Quiet zone”)
6.3 mm
white space
(“Quiet zone”)
38 mm max
65 mm max
6.3 mm
max
Well A1
(Chamfer)
Barcode center and Plate Skirt center
aligned ± 3 mm
ProfilerPro
Barcode Label
(Caliper-Applied)
Plate
Barcode Label
(Customer-Applied)
Figure 16. Barcode Label Specifications and Placement
P/N 123090 Rev. 0
LabChip EZ Reader Series Hardware Manual
Caliper Life Sciences, Inc.
Operation
49
Inserting a Plate into the LabChip EZ Reader
Instrument
This procedure describes how to insert a plate into the LabChip EZ
Reader or LabChip EZ Reader II. The plate is normally inserted at
the start of an assay using the Start Wizard. See the LabChip EZ
Reader Online Help for a complete description of using the Start
Wizard to start the assay.
To manually insert the plate:
1
Press the Plate In/Out button on the front of the LabChip EZ
Reader instrument to open the front door and present the trough
and plate carrier.
2
Place the prepared plate into the plate carrier with well A1 at the
top left corner as shown in Figure 17.
Well A1
Figure 17. Plate in Plate Carrier
3
Press the Plate In/Out button on the front of the instrument to
close the front door.
Running the Assay
The LabChip EZ Reader software provides a Start Run Wizard to
guide you through starting an assay. See the LabChip EZ Reader
Online Help for a complete description of starting the assay and
collecting the data.
P/N 123090 Rev. 0
LabChip EZ Reader Series Hardware Manual
Caliper Life Sciences, Inc.
Operation
50
Stopping the Run
If the assay must be stopped while it is in progress, click the Stop
button in the LabChip EZ Reader software. The run stops
immediately and the sippers move to the buffer trough.
If you need to clear any samples or dye from the chip:
1
Click the Monitor button in the software to start monitoring.
2
Use the Devices tab to sip Separation buffer until all channels
are clear. (Use the Status tab or Active Data tab to monitor the
channel signals.)
3
Use the Devices tab to set the buffer pumps to Slow Flow
4
Set the pressure to the selected base pressure.
5
If desired, remove the plate and/or chip from the instrument.
Removing a Plate from the Instrument
To remove the plate:
1
Press the Plate In/Out button or click the View Plate button in
the software to extend the robot and open the door.
2
Remove the plate.
3
Press the Plate In/Out button on the front of the instrument or
click the Buffer button in the software to close the door and
move the sippers to the buffer trough.
4
Use the Devices tab to set the buffer pumps to Slow Flow and
the pressure to the base pressure.
Removing the Chip from the Instrument
To remove the chip:
P/N 123090 Rev. 0
1
Press the Chip Access button to extend the robot, open the
door and eject the chip cartridge.
2
Pull the chip cartridge out fully.
3
Unscrew the thumbscrew on the chip cartridge and open the lid
4
Remove the chip. (If the chip is going to be reused, properly
store the chip in the storage container at 4°C.)
LabChip EZ Reader Series Hardware Manual
Caliper Life Sciences, Inc.
Operation
51
Emptying the Dye Trough
Empty the dye trough to prevent the dye from drying in the trough
and creating particles that can clog the sippers.
1
Press the Plate In/Out button, or click the View Plate button in
the software to extend the robot.
2
Pipet out any dye in the dye trough.
3
Press the Plate In/Out button on the front of the instrument or
click the Buffer button in the software to close the door and
move the sippers to the buffer trough.
Emptying the Buffer Trough
You must use the LabChip EZ Reader software to empty the buffer
trough. See the LabChip EZ Reader Online Help for details (select
Help→Help on the main menu bar).
P/N 123090 Rev. 0
LabChip EZ Reader Series Hardware Manual
Caliper Life Sciences, Inc.
Operation
52
Powering Down the Instrument
The LabChip EZ Reader instrument is designed to be left powered
on with buffer slowly flowing through the trough for up to one week.
At the end of a work day, or when the instrument will not be used for
up to one week, follow the instructions for Short Term Shutdown
below.
If the instrument will not be used for more than one week, or if the
instrument needs to be shut down for servicing, follow the
instructions for Long Term Shutdown below.
Short Term Shutdown (1 week or less)
If the instrument will be idle for less than one week:
1
Using the Status tab in the software, move the robot to the
Buffer position. This is the default position for the robot after an
assay completes.
2
Using the Recirculating Buffer Pump tab on the Devices tab,
click the Slow Flow button. This is the default setting for the
pumps after a plate run. The pumps will circulate buffer at a
slower rate than when a plate is running.
Long Term Shutdown (more than 1 week)
Long Term Shutdown includes removing the chip, draining the
assay buffer from the instrument, and unplugging the instrument. If
the instrument will be idle for more than one week:
P/N 123090 Rev. 0
1
Open the instrument door (using the LabChip EZ Reader
software or the Chip Access button on the front of the
instrument).
2
Remove the chip from the instrument. If the chip will be reused,
place the chip in its shipping container and store the container at
4°C.
3
Drain the buffer system using the Drain command in the
LabChip EZ Reader software.
4
Close the chip cartridge lid and tighten the thumbscrew firmly.
(Tools are not necessary and should not be used.)
5
Push the chip cartridge into the instrument until it stops.
LabChip EZ Reader Series Hardware Manual
Caliper Life Sciences, Inc.
Operation
53
Powering Down the Instrument (Continued)
6
Close the instrument door either by pushing the Plate Access
button on the front of the instrument, or by using the “Buffer”
button in the software.
7
Exit the LabChip EZ Reader software.
8
Switch the power switch on the back of the instrument to
Standby.
9
Unplug the instrument from the wall, if desired.
10 Exit Windows and turn off the PC and monitor.
11 Empty the buffer bottle into an appropriate waste container.
P/N 123090 Rev. 0
LabChip EZ Reader Series Hardware Manual
Caliper Life Sciences, Inc.
Maintenance
54
Maintenance
The procedures in this section are routine maintenance to be
performed by either the instrument operator or by trained Caliper
service personnel. Note that service items that require Safety
Instructions, such as robot adjustment and optics alignment are not
described in this document. These items require specific training,
and are to be performed only by trained Service personnel.
NOTE
Perform only the maintenance procedures described in this section.
For additional assistance, contact the Caliper Technical Support
Center (see “Contact Us” on page 7).
WARNING
Some chemicals used with the LabChip EZ Reader instruments
may be potentially hazardous and can cause illness. Refer to the
MSDS for detailed information.
•
•
•
P/N 123090 Rev. 0
Avoid direct contact with spilled liquid.
Wear appropriate personal protective equipment when handling
chemicals (e.g., safety glasses, gloves, or clothing).
Dispose of liquids, containers, and tubing properly.
LabChip EZ Reader Series Hardware Manual
Caliper Life Sciences, Inc.
Maintenance
55
Preventive Maintenance
LabChip EZ Reader instrument preventive maintenance consists of
procedures performed regularly to maintain equipment in top
condition. During normal operation, salt crystals can build up.
Regular maintenance reduces this problem, maximizes running
time, and extends the life of the instrument. A regular maintenance
schedule consists of the preventive maintenance tasks described in
this section.
Daily
•
Inspect the LabChip EZ Reader instrument before and after
each use to ensure that there is no debris (liquid, dirt, or plastic
items) on the plate carrier, in the containment trays, around the
buffer/dye troughs, in or on the chip cartridge, around the buffer
pumps, or under the unit.
•
Clean the LabChip EZ Reader instrument after each use (see
page 56).
Weekly
•
Change the buffer bottle (see page 58) weekly or as required by
your laboratory procedures.
Monthly
•
Replace the Buffer/Dye Trough and Tubing (see the instructions
included with the kit).
•
Change the Buffer Pump tubing (see the instructions included
with the kit).
Every Six Months
•
Change the Pinch Valve tubing (see the instructions included
with the kit).
•
Change the Chip Pressure tubing (see the instructions included
with the kit).
As Needed
If current leaks are suspected from the chip cartridge, clean the
chip cartridge (see page 57).
P/N 123090 Rev. 0
LabChip EZ Reader Series Hardware Manual
Caliper Life Sciences, Inc.
Maintenance
56
Cleaning the LabChip EZ Reader Instrument
Clean outside surfaces with a soft cloth moistened with only water.
DO NOT use alcohol or other cleaning solvents, which may damage
the finish and plastic parts.
If buffer spills occur, the containment trays in the instruments can
be cleaned. The Buffer Trough tray and the Pump Tray both drain
into the main containment tray under the instrument.
Pump
Tray
Buffer Trough
Tray
Main Containment
Tray
Figure 18. Liquid Containment Trays
P/N 123090 Rev. 0
•
To clean the main containment tray: The instrument's main
containment tray is located under the instrument. Carefully slide
the Main Containment tray out from under the instrument. Drain
any accumulated liquids, wash and rinse with water, and then
dry thoroughly. Replace the tray under the instrument.
•
To clean the pump tray: Remove the two screws that hold the
tray in place. Carefully remove the tray and detach the tubing.
Wash and rinse the tray with water, and then dry thoroughly.
Replace the tray, reattach the tubing, and install the two screws.
•
To clean the buffer trough tray: Remove any standing liquid in
the tray with a pipet or vacuum aspirator. Rinse the tray with
water. Dry the tray thoroughly inside and out with lint-free wipes
and/or vacuum aspiration.
LabChip EZ Reader Series Hardware Manual
Caliper Life Sciences, Inc.
Maintenance
57
Cleaning the Chip Cartridge
NOTE
Do not apply voltages to the instrument without having a chip in the
instrument. Current leaks may occur.
1
Open the door using the software or the Chip Access button on
the instrument.
2
Open the chip cartridge and remove the chip. Store the chip in
its shipping container if it is to be reused, or discard it in the
appropriate waste container.
3
Clean any accumulated residue from the electrode block and
the pressure plate of the chip cartridge using lint-free wipes
moistened with ultrapure water. (See page 67 for part numbers
and ordering information.)
Electrode
Block
Pressure Plate
Figure 19. Cleaning the Chip Cartridge
4
Dry the chip cartridge thoroughly with dry lint-free wipes and/or
vacuum aspiration.
NOTE
Do not disassemble the chip cartridge.
P/N 123090 Rev. 0
LabChip EZ Reader Series Hardware Manual
Caliper Life Sciences, Inc.
Maintenance
58
Changing the Buffer Bottle
The buffer bottle should be changed every week or as required by
your laboratory procedures and assays. The System Setup Wizard
in the LabChip EZ Reader software prompts you to change the
buffer bottle on the Prepare Trough tab (see the Online Help for
instructions). The instructions below describe how to change the
buffer bottle without running the System Setup Wizard.
1
On the Tools tab in the LabChip EZ Reader software, click the
Recirculating Buffer Trough tab.
2
Click the Drain button to empty the buffer tubing and trough.
Make sure there is no standing liquid in the buffer trough and
that the clear blue tubing leading to and from the trough is
empty (see Figure 20). Repeat the Drain command if the trough
or tubing is not completely empty.
Tubing
P/N 123090 Rev. 0
Tubing
Buffer Trough
Figure 20. Empty Trough and Tubing
3
Remove the buffer bottle from the alcove on the side of the
LabChip EZ Reader instrument. Clean any accumulated residue
from the alcove and tubing with lint-free wipes and deionized
water. Dry the area thoroughly to prevent current leaks.
4
Remove the cap from a new bottle of buffer (see “Spare Parts
and Consumables” on page 67).
5
Unscrew the HPLC-type cap from the buffer bottle and screw it
onto the new buffer bottle. Clean up any drops of buffer that may
have spilled.
6
Replace the new buffer bottle in the alcove.
7
Tuck the clear tubing into the alcove, being careful not to stretch
or kink it.
8
Discard the used assay buffer in an appropriate waste
container.
9
Use the LabChip EZ Reader software to prime the buffer trough.
(See the Online Help for details.)
LabChip EZ Reader Series Hardware Manual
Caliper Life Sciences, Inc.
Troubleshooting
59
Troubleshooting
This section contains the following troubleshooting charts for
identifying the cause and possible solutions for problems operating
the LabChip EZ Reader instruments:
•
“System Communication Problems” (see below)
•
“Electrical Current Leaks” on page 60
•
“Optics Problems” on page 61
•
“Optical Signal Carryover” on page 62
•
“Buffer Leaks” on page 63
•
“Chip Pressure Problems” on page 64
•
“Degasser Problems” on page 65
•
“Barcode Reader Problems” on page 65
•
“Broken Sippers” on page 66
System Communication Problems
Software, Firmware, and USB communication problems may cause
the system to display errors or stop working properly.
Symptom
Possible Cause
Possible Solutions
System crash
Software crash
Exit and restart the LabChip EZ Reader
software.
Firmware crash
Exit the LabChip EZ Reader software.
Power cycle the LabChip EZ Reader
instrument as follows: Disconnect the
power cord from the back of the
instrument. Wait at least 30 seconds.
Reconnect the power cord. Wait at least
30 seconds. Restart the LabChip EZ
Reader software.
USB crash
Exit the LabChip EZ Reader software.
Disconnect and reconnect the USB cable
from the back of the instrument. Restart
the LabChip EZ Reader software.
P/N 123090 Rev. 0
LabChip EZ Reader Series Hardware Manual
Caliper Life Sciences, Inc.
Troubleshooting
60
Electrical Current Leaks
Electrical current leaks may adversely affect separation voltages.
Current leaks are due to leakage paths that form between the chip
and/or buffer system and electrical ground, and may occur at the
locations listed in the table below.
A current imbalance in the system is when the absolute value of
the sum of upstream wells and downstream wells is greater than
200 nanoamps.
Possible Source
of Current Leak
Buffer is aspirated
to the back side of
the Electrode block
and forms a
conductive path to
the lid of the Chip
Cartridge and then
to Ground
Appearance / Symptoms
Possible Solutions
Current leak occurs whether or
not sippers are immersed in
buffer trough in which buffer is
flowing.
Contact Caliper Technical
Support (see page 7).
Current leak occurs even if dry
(dead) chip is placed in
instrument)
If system is going to be idle
for more than 1 week, shut
the system down (see
page 52).
May be evidence of salts or
other residue on face of
electrode block.
Buffer wicks from
the top side of the
chip to the Chip
Cartridge pressure
plate and forms a
conductive path to
Ground
Current leak occurs whether or
not sippers are immersed in
buffer trough in which buffer is
flowing.
Current leak disappears, or is
reduced if dry (dead) chip is
placed in instrument.
May be evidence of salts or
other residue on top surface of
pressure plate or underside of
chip.
P/N 123090 Rev. 0
Remove the chip from the
chip cartridge.
Clean the surface of the
pressure plate with lint-free
wipes moistened with
ultrapure water. Dry
thoroughly with wipers and/or
vacuum aspiration.
If this does not solve
problem, contact Caliper
Technical Support (see
page 7).
LabChip EZ Reader Series Hardware Manual
Caliper Life Sciences, Inc.
Troubleshooting
Possible Source
of Current Leak
Appearance / Symptoms
Possible Solutions
Buffer system
(trough, tubing,
pumps) is shorted
to ground
Current leak occurs only when
sippers of a good chip are
immersed in buffer trough in
which buffer is flowing.
Replace trough.
May be evidence of salts or
other residue on or around
trough, fittings, pumps, and
tubing.
61
Replace buffer pump tubing.
Thoroughly clean and dry
fittings and tubing with lintfree wipes moistened with
ultrapure water. Pay close
attention to the buffer pump
tubing, rollers and bail of
pumps, and quick connect
fittings.
Optics Problems
Symptoms
Possible Cause
Possible Solutions
Autofocus Failure
Moisture, dust or other
contamination on microfluidic
chip
Clean both sides of the
microfluidic chip in the optical
detection area with ultrapure
water and a lint-free wipe. Be
sure both sides of the chip
are dry.
Chip drawer not fully docked
Close the lid over the chip,
fully tighten the thumbscrew,
and push the chip drawer
fully into the instrument.
CCD Camera communication
failure
Exit and restart the LabChip
EZ Reader software. If that
fails, shut down and restart
the computer.
White LED failure
Contact Caliper Technical
Support (see page 7). The
replacement White LED must
be installed by Caliper
authorized personnel.
The intensity of fluorescent
light is too high
Reduce LED power level
and/or increase CCD Shutter
Rate and/or adjust the
reagents.
CCD Saturation
Warning
P/N 123090 Rev. 0
LabChip EZ Reader Series Hardware Manual
Caliper Life Sciences, Inc.
Troubleshooting
62
Symptoms
Possible Cause
Possible Solutions
Weak, noisy, or
absent
fluorescence
signals
The intensity of fluorescent
light is too low
Increase LED power and/or
decrease CCD Shutter Rate
and/or adjust the reagents.
Blue LED failure
Contact Caliper Technical
Support (see page 7).
Optics are misaligned
Focus optics (see the
LabChip EZ Reader Help).
System is focused on the
ghost image.
Ensure thumbscrew closing
the lid over the microfluidic
chip is fully tightened.
Focus optics (see the
LabChip EZ Reader Help).
Moisture, dust or other
contamination on microfluidic
chip
Clean both sides of the
microfluidic chip in the optical
detection area with pure
water and a lint-free wipe. Be
sure both sides of the chip
are dry.
The surface of the chip heater
plate around optical beam
dump (in the chip cartridge) is
moist or contaminated.
Clean and dry the surface of
the chip heater plate around
the beam dump with a lintfree wipe.
High background
seen on focus
screen or high
baseline levels
seen during the
assay run
Optical Signal Carryover
The sippers are washed by a flowing stream of assay buffer in the
trough to prevent carryover. If the flow velocity is insufficient, the
buffer is overly contaminated, or the sippers are not positioned
properly in the trough, then the sippers may not be washed
properly.
Symptoms
Possible Cause
Carryover of optical Slow flow velocity of buffer in
signal.
trough.
P/N 123090 Rev. 0
Possible Solutions
Replace buffer pump tubing.
Contaminated buffer.
Drain system and change
buffer solution.
Sippers are not in proper
location.
Focus the chip (see the
LabChip EZ Reader Help).
LabChip EZ Reader Series Hardware Manual
Caliper Life Sciences, Inc.
Troubleshooting
63
Buffer Leaks
If the buffer system leaks, use the LabChip EZ Reader software to
turn off the buffer pumps, and then aspirate all buffer out of the
system. Thoroughly clean the LabChip EZ Reader instrument with
lint-free wipes moistened with ultrapure water, and then dry
thoroughly.
Symptom
Possible Cause
Possible Solutions
Dampness and/or
residue at pump
rollers and tubing.
Perforated buffer pump tubing. Replace buffer pump tubing.
Clean area thoroughly with
lint-free wipes moistened with
ultrapure water.
Drops or residue at
pipe-threaded
fittings, flanged
fittings, or flexible
tube/barbed
fittings.
Leaking barb or pipe fittings.
Tighten fitting.
Replace buffer pump tubing
and/or pinch valve tubing
using the instructions
included with the Tubing
Replacement Kit.
Trough overflowing. Buffer return flow is not
sufficient to drain trough.
Replace Trough. Clean
trough area and drip tray
thoroughly. Replace buffer
pump tubing. Test to verify
proper operation by priming
and circulating assay buffer.
Underside of chip
cartridge is wet.
Focus the chip (see the
LabChip EZ Reader Help for
instructions).
Replace trough.
Clean up residual buffer.
P/N 123090 Rev. 0
Trough is contacting chip
cartridge and spilling droplets.
LabChip EZ Reader Series Hardware Manual
Caliper Life Sciences, Inc.
Troubleshooting
64
Chip Pressure Problems
The chip pressure system applies vacuum or pressure to the chip to
induce flow. If this is not working properly, then unexpected data
may occur in that the transit time of sample plugs is not appropriate.
Symptom
Possible Cause
Slow pressure
Pressure pump tubing is
response when
perforated or worn.
new setpoint is set.
Inability to maintain
setpoint.
Possible Solution
Replace pressure pump
tubing.
Tubing appears
flat.
Transit times of
sample plugs are
different than
expected.
Waste well pressure ports or
Upstream Electrode well vent
ports in chip cartridge
electrode block are clogged.
Clean ports by aspirating with
a vacuum source and pipet
tip.
Residue in waste
well pressure ports
and/or upstream
electrode well vent
ports.
Inability to achieve Leaking o-ring at chip
interface.
or maintain
setpoint.
O-ring appears torn
or rough.
Clean or replace the O-rings.
System appears to
achieve setpoint,
but transit times
are not as
expected.
Contact Caliper Technical
Support (see page 7).
P/N 123090 Rev. 0
The internal liquid trapping
filter is clogged. (If the liquid
trapping filter is clogged, it is
highly likely the chip cartridge
requires service, and the liquid
trapping filter needs to be
replaced.)
LabChip EZ Reader Series Hardware Manual
Caliper Life Sciences, Inc.
Troubleshooting
65
Degasser Problems
The degasser removes dissolved air from the circulating Assay
buffer. Degassing the buffer prevents air bubbles from forming in
the chip, which can clog the chip. Clogged chips may indicate that
the degasser is not working properly.
Symptoms
Possible Cause
Possible Solutions
Chip clogged with
air bubble.
Degasser not switched on.
The System Setup Wizard
automatically starts the
degasser. Check that the
degasser is switched on
using the Devices→Degasser
tab in the LabChip EZ Reader
software.
Degasser error in
the LabChip EZ
Reader software.
Degasser timeout error
generated when the degasser
runs at excessive speed for a
duration of time.
Clear the Degasser error in
the LabChip EZ Reader
software.
Check the system for vacuum
leaks that could cause
excessive flow rate and
System Errors. Check the
Pharmed tubing that
connects the vacuum pump
to the degasser modules, and
the liquid lines on the
degasser modules.
Barcode Reader Problems
The barcode reader should automatically read the barcode label on
each plate. The table below describes common barcode reader
problems.
Symptom
Possible Cause
Barcode not read
properly.
Wrong barcode applied. Customer-applied barcodes must be
a minimum 0.25mm (0.0099 inches)
thickness, with a maximum bar
length of 60 millimeters. The
barcode label must be applied as
specified in “Applying the Barcode
Label to the Plate” on page 47.
Damaged label.
P/N 123090 Rev. 0
Possible Solutions
Replace with labels that are not
marred or smeared.
LabChip EZ Reader Series Hardware Manual
Caliper Life Sciences, Inc.
Troubleshooting
66
Broken Sippers
If the LabChip EZ Reader system's robot is not properly aligned to
the system optics, the robot may move to the wrong position and
break the sippers on the chip. If this occurs, focus the chip (see the
LabChip EZ Reader Help for instructions) and verify that the trough
and other items on the robot are installed properly.
P/N 123090 Rev. 0
LabChip EZ Reader Series Hardware Manual
Caliper Life Sciences, Inc.
Spare Parts and Consumables
67
Spare Parts and Consumables
The following spare parts and consumables are available from
Caliper Life Sciences for use with the LabChip EZ Reader
instruments:
Table 9. Kits and Consumables
Kits and Consumables
Part Number
ProfilerPro Chip
760375
Separation Buffer
760367
ProfilerPro Kit 1
760373
ProfilerPro Kit 2
760374
Lint-Free Wipes (package of 100)
120306
Buffer Pump Tubing Replacement Kit
119447
Disposable Trough and Tubing Replacement
Kit
119451
Pinch Valve Tubing Replacement Kit
119448
Pressure Pump Tubing Replacement Kit
119452
Incubator Plate Adapter
120244
See “Contact Us” on page 7 to order the consumables listed above
or to inquire about other consumables, kits, or accessories.
P/N 123090 Rev. 0
LabChip EZ Reader Series Hardware Manual
Caliper Life Sciences, Inc.
Specifications
68
Specifications
NOTE
Technical specifications are subject to change without notice.
General Specifications
Size (H x W x D)
18.28 in. (464mm) x 18.6 in. (472mm) x
25.57 in. (649mm)
Weight
100 lbs. (45.5 kg)
Plate Capacity
one 96-well or 384-well microplate
Plate Orientation
Landscape
Consumables
Supported
96 well plates:
• Costar
384 well plates:
• Greiner
NOTE
All microplates must conform to the Society for
Biomolecular Screening (SBS) standard.
Ventilation/Cooling
3” (77 mm) minimum space required around instrument
for proper air flow.
Solvent Compatibility
All buffer/degasser components are chemically resistant
to aqueous kinase buffers, which contain water, ~5%
DMSO, salts, and detergents.
P/N 123090 Rev. 0
LabChip EZ Reader Series Hardware Manual
Caliper Life Sciences, Inc.
Specifications
69
Environmental
Operating Temperature
65° to 78°F (18° to 26°C)
Operating Humidity
20% to 70% relative humidity, non-condensing
Storage Temperature
50° to 104°F (10° to 40°C)
Transient Overvoltages
Installation Category II
Pollution
Pollution Degree 2
Altitude
Up to 2000m
Indoor Use Only
Electrical
Power Input
3.0A max at 100-127Vac, 50-60Hz (±10%)
1.5A max at 200-240Vac, 50-60Hz (±10%)
Line Voltage
100-127/200-240V~ nominal
90-264V~ maximum operating range
Total Heat Emission
800W
Fuses
No customer-replacable fuses in system. Contact Caliper
Technical Support (see page 7) if blown fuses are
suspected
Grounding
Through the power cord
Computer Interface
(2) RS-232 serial ports, USB 2.0, and Firewire
Assay Voltage
Minimum Voltage/Current
-100V (limited by current)
Maximum Voltage/Current
-3000V (limited by current)
Chip Pressure
Pressure Range
+5 to -5 psig, ±0.05 psig
(+0.34 to -0.34 bars, ±0.0034 bars)
Cycle Time
30 seconds or less, from -5 to +5 psig or from
+5 to -5 psig (-0.34 to +0.34 bars or from +0.34
to -0.34 bars)
P/N 123090 Rev. 0
LabChip EZ Reader Series Hardware Manual
Caliper Life Sciences, Inc.
Specifications
70
Chip Temperature Control
Temperature Range
Ambient + 5°C to 40°C (no active cooling)
Accuracy
± 0.5°C
Thermal limit switch
65°C - 70°C
Idle Mode Setting
27°C (80.6°F)
If internal temperature (ambient + ~5°C) is
above 27°C, the heater turns off.
CCD Camera
Detection Wavelength
515 - 550 nm
Integration rates
1 to 100 Hz
Data rates
1 to 10 Hz
Light Source (Blue LED)
Warmup Time
5 seconds
Wavelength
450 - 490 nm
Barcode Reader
Barcode Engine
Microscan MS3CCD
Supported Barcode Types
Code 39, Code 93, Code 128
P/N 123090 Rev. 0
LabChip EZ Reader Series Hardware Manual
Caliper Life Sciences, Inc.
Index
Index
Numerics
12-Sipper Chip . . . . . . . .
16uL Compound addition
1uL Compound addition .
4-Sipper Chip . . . . . . . . .
.
.
.
.
.
.
.
.
.
.
.
.
.
.
.
.
.
.
.
.
.
.
.
.
.
.
.
.
.
.
.
.
.
.
.
.
41
29
29
41
A
Adding compounds . . . . . .
Altitude . . . . . . . . . . . . . . .
Assay
controls . . . . . . . . . . . .
ProfilerPro . . . . . . . . . .
ProfilerPro description .
running . . . . . . . . . . . .
stopping . . . . . . . . . . .
. . . . . . . . 25
. . . . . . . . 69
.
.
.
.
.
.
.
.
.
.
.
.
.
.
.
.
.
.
.
.
.
.
.
.
.
.
.
.
.
.
.
.
.
.
.
.
.
.
.
.
25
20
23
49
50
.
.
.
.
.
47
65
40
36
58
.
.
.
.
.
.
.
.
.
38
58
63
29
26
38
38
37
51
.
.
.
.
.
. 8
. 7
37
36
13
B
Barcode
applying plate label . . . . . . . . . .
reader problems . . . . . . . . . . . .
readers . . . . . . . . . . . . . . . . . . .
Blue LED . . . . . . . . . . . . . . . . . . . .
Bottle, changing buffer . . . . . . . . . .
Buffer
bottle . . . . . . . . . . . . . . . . . . . . .
changing bottle . . . . . . . . . . . . .
leaks . . . . . . . . . . . . . . . . . . . . .
preparing Reconstitution Buffer .
preparing Separation Buffer. . . .
tubing . . . . . . . . . . . . . . . . . . . .
Buffer pumps . . . . . . . . . . . . . . . . .
Buffer trough . . . . . . . . . . . . . . . . . .
emptying . . . . . . . . . . . . . . . . . .
C
Caliper Center for Training and
Development. . . . . . . . . . . . . . . . . .
Caliper, contacting . . . . . . . . . . . . .
Cartesian robot . . . . . . . . . . . . . . . .
CCD Camera . . . . . . . . . . . . . . . . .
Chemical safety . . . . . . . . . . . . . . .
Chip
cleaning . . . . . . . . . . . . . . . . . .
inserting in LabChip EZ Reader.
P/N 123090 Rev. 0
. 27
. 45
loading with reagents . . . . . . .
preparing . . . . . . . . . . . . . . . .
pressure problems . . . . . . . . .
pressure tubing. . . . . . . . . . . .
removing . . . . . . . . . . . . . . . .
Upstream/Downstream wells .
Chip Access button . . . . . . . . . . .
Chip cartridge . . . . . . . . . . . . . . .
cleaning . . . . . . . . . . . . . . . . .
placing chip . . . . . . . . . . . . . .
Chip Preparation Base . . . . . . . . .
using . . . . . . . . . . . . . . . . . . .
Cleaning
chip . . . . . . . . . . . . . . . . . . . .
chip cartridge . . . . . . . . . . . . .
LabChip EZ Reader . . . . . . . .
Comm ports . . . . . . . . . . . . . . . . .
Communication cable. . . . . . . . . .
Communication problems. . . . . . .
Compounds
adding to plate . . . . . . . . . . . .
preparing . . . . . . . . . . . . . . . .
Computer interface specifications
Connectors, rear . . . . . . . . . . . . .
Consumables
ordering information . . . . . . . .
supported types . . . . . . . . . . .
Contact Caliper . . . . . . . . . . . . . .
Containment trays . . . . . . . . . . . .
CR-8, preparing . . . . . . . . . . . . . .
Current leaks . . . . . . . . . . . . . . . .
Customer Support plans. . . . . . . .
71
. . . 28
. . . 26
. . . 64
. . . 39
. . . 50
. . . 41
33, 34
. . . 42
. . . 57
. . . 45
. . . 43
. . . 26
.
.
.
.
.
.
.
.
.
.
.
.
. 27
. 57
. 56
. 35
. 35
. 59
.
.
.
.
.
.
.
.
. 25
. 29
. 69
. 35
.
.
.
.
.
.
.
.
.
.
.
.
.
.
. 67
. 68
. .7
. 56
. 26
. 60
. .8
.
.
.
.
.
.
.
.
.
.
.
.
.
.
.
.
. 55
. 20
. 41
. 33
. 29
. 37
. 51
. 45
D
Daily maintenance
Daily operation . . .
Detection window .
Door. . . . . . . . . . .
DTT, adding . . . . .
Dye trough . . . . . .
emptying. . . . .
filling. . . . . . . .
.
.
.
.
.
.
.
.
.
.
.
.
.
.
.
.
.
.
.
.
.
.
.
.
.
.
.
.
.
.
.
.
.
.
.
.
.
.
.
.
.
.
.
.
.
.
.
.
.
.
.
.
.
.
.
.
.
.
.
.
.
.
.
.
.
.
.
.
.
.
.
.
.
.
.
.
.
.
.
.
.
.
.
.
.
.
.
.
.
.
.
.
.
.
.
.
E
Electrical current leaks . . . . . . . . . . . . 60
Electrical safety . . . . . . . . . . . . . . . . . 16
Electrical specifications . . . . . . . . . . . 69
LabChip EZ Reader Series Hardware Manual
Caliper Life Sciences, Inc.
Index
Electrodes . . . . . . . . . . . . . .
Emptying buffer trough . . . . .
Emptying dye trough . . . . . . .
Environmental specifications.
Extended idle time . . . . . . . .
.
.
.
.
.
.
.
.
.
.
.
.
.
.
.
.
.
.
.
.
.
.
.
.
.
.
.
.
.
.
42
51
51
69
22
F
Filling chip . . . . . . .
Firewire connector .
Front door . . . . . . . .
Front panel . . . . . . .
Fuse specifications .
.
.
.
.
.
.
.
.
.
.
.
.
.
.
.
.
.
.
.
.
.
.
.
.
.
.
.
.
.
.
.
.
.
.
.
.
.
.
.
.
.
.
.
.
.
.
.
.
.
.
. . . 28
. . . 35
. . . 33
. 33, 34
. . . 69
G
General specifications. . . . . . . . . . . . 68
Grounding. . . . . . . . . . . . . . . . . . . . . 69
H
Hardware Reference . . . . . . . . . . . . . 32
I
Incubating ProfilerPro Plate . . . . . . . 30
Instrument, preparing . . . . . . . . . . . . 28
Introduction. . . . . . . . . . . . . . . . . . . . 19
K
Kits
ordering. . . . . . . . . . . . . . . . . . . . 67
ProfilerPro contents. . . . . . . . . . . 24
L
LabChip EZ Reader
cleaning . . . . . . . . . . . . . . . . . . . 56
powering off . . . . . . . . . . . . . . . . 52
powering on . . . . . . . . . . . . . . . . 44
LabChip EZ Reader software, starting 44
Label
applying plate barcode . . . . . . . . 47
Laboratory requirements . . . . . . . . . . 23
Leaks, buffer . . . . . . . . . . . . . . . . . . . 63
LED . . . . . . . . . . . . . . . . . . . . . . . . . 36
LED safety . . . . . . . . . . . . . . . . . . . . 15
Light, status indicator . . . . . . . . . . 33, 34
Line Voltage specification . . . . . . . . . 69
Long term shutdown . . . . . . . . . . . . . 52
M
Maintenance . . . . . . . . . . . . . . . . . . . 54
P/N 123090 Rev. 0
preventive. . . . . . . . . . .
Material Safety Data Sheet
Mechanical safety . . . . . . .
Microplate carrier . . . . . . . .
Microplates
supported types . . . . . .
Monthly maintenance . . . . .
Monthly operation . . . . . . .
.
.
.
.
.
.
.
.
.
.
.
.
.
.
.
.
.
.
.
.
.
.
.
.
72
.
.
.
.
. 55
. 13
. 16
. 37
. . . . . . . . 68
. . . . . . . . 55
. . . . . . . . 22
O
Operating humidity . . . .
Operating temperature .
Operation . . . . . . . . . . .
Optical signal carryover
Optical Train. . . . . . . . .
Optics . . . . . . . . . . . . .
Optics Problems. . . . . .
O-Rings . . . . . . . . . . . .
.
.
.
.
.
.
.
.
.
.
.
.
.
.
.
.
.
.
.
.
.
.
.
.
.
.
.
.
.
.
.
.
.
.
.
.
.
.
.
.
.
.
.
.
.
.
.
.
.
.
.
.
.
.
.
.
.
.
.
.
.
.
.
.
.
.
.
.
.
.
.
.
.
.
.
.
.
.
.
.
. 69
. 69
. 44
. 62
. 36
. 36
. 61
. 42
P
Percent Inhibition controls . . . . . .
Pinch valves. . . . . . . . . . . . . . . . .
Plate
capacity . . . . . . . . . . . . . . . . .
orientation . . . . . . . . . . . . . . .
placing into instrument . . . . . .
removing . . . . . . . . . . . . . . . .
Plate carrier . . . . . . . . . . . . . . . . .
Plate In/Out button . . . . . . . . . . . .
Pollution Degree . . . . . . . . . . . . .
Power
Input specification. . . . . . . . . .
turning off . . . . . . . . . . . . . . . .
turning on . . . . . . . . . . . . . . . .
Power cord. . . . . . . . . . . . . . . . . .
Power entry port. . . . . . . . . . . . . .
Preparing the LabChip EZ Reader
Pressure problems . . . . . . . . . . . .
Pressure Relief valve . . . . . . . . . .
Pressure tubing . . . . . . . . . . . . . .
Preventative maintenance . . . . . .
ProfilerPro
assay . . . . . . . . . . . . . . . . . . .
assay description . . . . . . . . . .
kit contents . . . . . . . . . . . . . . .
preparing plate . . . . . . . . . . . .
reading plate. . . . . . . . . . . . . .
LabChip EZ Reader Series Hardware Manual
. . . 25
. . . 38
. . . 68
. . . 68
. . . 49
. . . 50
. . . 37
33, 34
. . . 69
.
.
.
.
.
.
.
.
.
.
.
.
.
.
.
.
.
.
.
.
. 69
. 52
. 44
. 17
. 35
. 28
. 64
. 38
. 39
. 55
.
.
.
.
.
.
.
.
.
.
. 20
. 23
. 24
. 30
. 31
Caliper Life Sciences, Inc.
Index
Pumps
buffer. . . . . . . . . . . . . . . . . . . . . . 38
pressure . . . . . . . . . . . . . . . . . . . 39
Q
Quick Start . . . . . . . . . . . . . . . . . . . . 20
R
Reading plates . . . . . . . . . . . . .
Reagents
loading on chip . . . . . . . . . .
Reconstitution Buffer, preparing
Robot . . . . . . . . . . . . . . . . . . . .
Trough . . . . . . . . . . . . . . .
emptying buffer trough
emptying dye trough . .
filling dye trough . . . . .
Tubing
buffer . . . . . . . . . . . . .
pressure . . . . . . . . . . .
S
Safety . . . . . . . . . . . . . . . . . . . . . . . . 13
Separation Buffer
loading on chip . . . . . . . . . . . . . . 28
preparing . . . . . . . . . . . . . . . . . . . 26
Service plans . . . . . . . . . . . . . . . . . . . 8
Setup for ProfilerPro plate. . . . . . . . . 21
Setup Wizard . . . . . . . . . . . . . . . . . . 28
Short term shutdown . . . . . . . . . . . . . 52
Side door . . . . . . . . . . . . . . . . . . . . . 33
Signal, optical carryover . . . . . . . . . . 62
Sippers, broken. . . . . . . . . . . . . . . . . 66
Six month maintenance. . . . . . . . . . . 55
Size . . . . . . . . . . . . . . . . . . . . . . . . . 68
Spare parts . . . . . . . . . . . . . . . . . . . . 67
Specifications . . . . . . . . . . . . . . . . . . 68
Start Run Wizard. . . . . . . . . . . . . . 31, 49
Starting the assay . . . . . . . . . . . . . . . 49
Starting the LabChip EZ Reader software
44
Status Indicator light . . . . . . . . . . . 33, 34
Stopping a run . . . . . . . . . . . . . . . . . 50
Storage Temperature . . . . . . . . . . . . 69
Support plans . . . . . . . . . . . . . . . . . . . 8
System Setup
Wizard. . . . . . . . . . . . . . . . . . . . . 45
.
.
.
.
.
.
.
.
.
.
.
.
.
.
.
.
.
.
.
.
.
.
.
.
.
.
.
.
. 37
. 51
. 51
. 45
. . . . . . . . . 38
. . . . . . . . . 39
W
. . . . 31
. . . . 28
. . . . 29
. . . . 37
.
.
.
.
73
Weekend idle time . .
Weekly maintenance
Weekly operation . . .
Weight . . . . . . . . . . .
White LED . . . . . . . .
Workflow . . . . . . . . .
.
.
.
.
.
.
.
.
.
.
.
.
.
.
.
.
.
.
.
.
.
.
.
.
.
.
.
.
.
.
.
.
.
.
.
.
.
.
.
.
.
.
.
.
.
.
.
.
.
.
.
.
.
.
.
.
.
.
.
.
.
.
.
.
.
.
.
.
.
.
.
.
. 22
. 55
. 21
. 68
. 36
. 30
T
Technical Support . . . . . .
Training requirements . . .
Transient Overvoltages . .
Trays, liquid containment
Troubleshooting . . . . . . .
P/N 123090 Rev. 0
.
.
.
.
.
.
.
.
.
.
.
.
.
.
.
.
.
.
.
.
.
.
.
.
.
.
.
.
.
.
.
.
.
.
.
.
.
.
.
.
.
.
.
.
.
. 7
18
69
56
59
LabChip EZ Reader Series Hardware Manual
Caliper Life Sciences, Inc.
Caliper Life Sciences, Inc.
68 Elm Street
Hopkinton, Massachusetts 01748
TEL 508-435-9500
FAX 508-435-3439
http://www.caliperLS.com