1
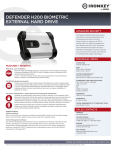
Coordinated NIMS Incident Planner
(CNIP)
User Manual
Website: www.coordinatedresponsetools.com
Contact: [email protected]
Last Updated: May 25, 2011
© 2011 Coordinated Response Tools, LLC
The Coordinated NIMS Incident Planner©, or CNIP, is important new technology that addresses the
main obstacle in emergency management planning – the development of the Incident Action Plan
and its associated ICS forms. Created by Coordinated Response Tools, LLC, CNIP is first software
program to allow planners to build IAPs that can be synchronized with multiple first responder
organizations, including both public and private organizations.
© 2011 Coordinated Response Tools, LLC
Page
1
“Let our advance worrying become advanced thinking and planning."
– Winston Churchill
Coordinated NIMS Incident Planner
© 2011 Coordinated Response Tools, LLC
All rights reserved. No parts of this work may be reproduced in any form or by any means –
graphic, electronic, or mechanical, including photocopying, recording, taping, or information
storage and retrieval systems – without the written permission of the publisher.
Products referred to in this document may be either trademarks and/or registered trademarks of
the respective owners. The publisher and the author make no claim to these trademarks.
While every precaution has been taken in the preparation of this document, the publisher and
the author assume no responsibility for errors or omissions, or for damages resulting from the
use of information contained in this document or from the use of programs and source codes
that may accompany it. In no event shall the publisher and the author be liable for any loss of
profit or for any other commercial damage caused or alleged to have been caused directly or
indirectly by this document.
© 2011 Coordinated Response Tools, LLC
Page
2
Table of Contents
Part I: Overview............................................................................................................................ 6 Part II: CNIP Versions.................................................................................................................. 7 2.1 Field Incident Command ...................................................................................... 7 2.2 Emergency Operations Center............................................................................. 7 2.3 CNIP Online ......................................................................................................... 7 2.4 IronKey Flashdrive ............................................................................................... 7 2.4.1 Operating Systems Compatibility............................................................. 7 2.4.2 Starting the IronKey ................................................................................. 8 2.5 CNIP Network....................................................................................................... 8 Part III: Getting Started................................................................................................................. 9 3.1 Install CNIP .......................................................................................................... 9 3.2 Activate CNIP ....................................................................................................... 9 Part IV: Create an Incident Action Plan..................................................................................... 10 4.1 Quick Start.......................................................................................................... 10 4.2 Save Your Work ................................................................................................. 10 Part V: The CNIP Wizard........................................................................................................... 11 5.1 Pre-Plan an Event (ICS Form 201) .................................................................... 11 5.2 Build the ICS Structure (Forms ICS 202, 203, 204, 205, 206 & 207) ................. 12 5.3 ICS Wizard Components .................................................................................... 13 5.3.1 The Wizard Panel .................................................................................. 13 5.3.2 Incident Action Plan Wizard Panel ........................................................ 13 5.3.3 ICS Wizard Task Panel.......................................................................... 13 Part VI: CNIP Email Functions .................................................................................................. 14 6.1 Receive an IAP by Email.................................................................................... 14 6.2 Send an IAP by Email ........................................................................................ 14 6.3 Send Individual Forms by Email......................................................................... 15 Part VII: ICS Forms .................................................................................................................... 16 7.1 Modify or Print an ICS Form ............................................................................... 16 7.2 ICS Form 201: Incident Briefing ......................................................................... 16 7.3 ICS Form 202: Incident Objectives..................................................................... 16 7.4 ICS Form 203: Organization Assignment List .................................................... 17 7.5 ICS Form 204: Assignment List.......................................................................... 17 7.5.1 Prepare ICS Form 204........................................................................... 18 7.6 ICS Form 205: Incident Radio Communications Plan ........................................ 18 7.6.1 Prepare ICS 205 .................................................................................... 18 7.7 ICS Form 206: Medical Plan .............................................................................. 19 7.7.1 Prepare ICS Form 206........................................................................... 19 7.8 ICS Form 207: Incident Organization Chart ....................................................... 19 7.8.1 Print Form ICS 207 ................................................................................ 20 7.9 ICS Form 210: Status Change Card................................................................... 20 7.9.1 Prepare ICS Form 210........................................................................... 21 7.10 ICS Form 213: General Message ...................................................................... 21 © 2011 Coordinated Response Tools, LLC
Page
3
Part VIII: IAP Tools..................................................................................................................... 22 8.1 Print a Form........................................................................................................ 22 8.2 Find & Replace................................................................................................... 22 8.3 Personnel List..................................................................................................... 22 8.4 Incident Phone List............................................................................................. 23 8.5 Maps and Drawings ........................................................................................... 23 8.6 Weather Information........................................................................................... 23 Part IX: IAP Management.......................................................................................................... 24 9.1 Add a Unit .......................................................................................................... 24 9.2 Add a Division or Group ..................................................................................... 24 9.3 Add a Branch ..................................................................................................... 25 9.4 Add Personnel.................................................................................................... 25 9.5 Move a Unit or Resource.................................................................................... 26 9.6 Delete a Position or Resource............................................................................ 26 Part X: Organizational Charts..................................................................................................... 28 10.1 Open an Org Chart ............................................................................................ 28 10.2 Print an Org Chart ............................................................................................. 28 10.3 Reassign Units .................................................................................................. 29 10.4 Create a Division or Group ................................................................................ 29 10.5 Create a Branch ................................................................................................ 29 10.6 Organization Chart Menus................................................................................. 30 Part XI: Plan Setup & CNIP Customization............................................................................... 31 11.1 Hospitals Setup................................................................................................... 31 11.1.1 Add a New Hospital Record................................................................... 31 11.1.2 Edit a Hospital Record ........................................................................... 31 11.1.3 Delete a Hospital Record ....................................................................... 32 11.1.4 Import Hospital Data .............................................................................. 32 11.2 Ambulance Services Setup................................................................................ 33 11.2.1 Add a New Ambulance Service ............................................................. 33 11.2.3 Edit an Ambulance Service Record ....................................................... 33 11.2.3 Delete an Ambulance Service................................................................ 33 11.2.4 Import Ambulance Services Data .......................................................... 34 11.3 Personnel Records Setup.................................................................................. 34 11.3.1 Add New Personnel ............................................................................... 34 11.3.2 Edit a Personnel Record ........................................................................ 35 11.3.3 Delete a Personnel Record.................................................................... 35 11.3.4 Import Personnel Records ..................................................................... 35 11.3.5 Build Simulated Resources.................................................................... 36 11.4 Critical Contacts Phone List Setup .................................................................... 37 11.4.1 Add a Name to List ................................................................................ 37 11.4.2 Edit a Name on the List ......................................................................... 37 11.4.3 Delete a Name From List ....................................................................... 37 11.4.4 Import Phone List Data .......................................................................... 38 11.5 Radio Communications Setup ........................................................................... 38 11.5.1 Add a Radio Communications Record................................................... 38 11.5.2 Edit a Communications Record ............................................................. 39 11.5.3 Delete a Radio Communications Record ............................................... 39 © 2011 Coordinated Response Tools, LLC
Page
4
11.5.4 Import Radio Communications Records ................................................ 39 11.6 Create Organizational Templates ...................................................................... 40 © 2011 Coordinated Response Tools, LLC
Page
5
Part I: Overview
CNIP is a high-level IAP development tool that standardizes and coordinates the crucial and
necessary information needed in an actual emergency or pre-planned event. CNIP removes the
bottleneck that comes with filling out the numerous and repetitious ICS forms with an easy-touse Wizard that walks planners through the completion process. Information is entered only
once, and the Wizard fills in all the ICS forms for you. CNIP also creates and builds
organizational charts, phone lists, task scheduling, and on-scene rosters. Completed plans can be
changed or updated at any time and anywhere in the program.
© 2011 Coordinated Response Tools, LLC
Page
6
Part II: CNIP Versions
2.1
Field Incident Command
The Field Incident Command version of the Coordinated NIMS Incident Planner is for singleincident use or for events with a single command structure.
2.2
Emergency Operations Center
The Emergency Operations Center version of the Coordinated NIMS Incident Planner is
designed specifically for the EOC. It allows you to build the EOC structure and import plans
from the different field command organizations responding to the same event.
2.3
CNIP Online
Both the EOC and Field Incident Command versions of CNIP can be used over Internet. CNIP
Online requires a paid subscription.
2.4
IronKey Flashdrive
All versions of CNIP are available on an IronKey Personal USB Flashdrive. Designed
specifically for the military and others with top security issues, the IronKey flashdrive is fully
encrypted, waterproof, damage proof, and password protected.
Many of our customers use the IronKey flashdrive as a backup and as a means to bring their
department's emergency operational plans and policies to a training or command post
location. But what if the flashdrive is lost or stolen? Not a problem. Your data remains
protected and can even be restored to a new IronKey from an encrypted backup. And
information on an IronKey flashdrive cannot be accessed without its correct password. In fact,
all stored information will be totally destroyed after ten attempts to access the flashdrive with
an incorrect password.
2.4.1
Operating Systems Compatibility
IronKey flashdrives work on these operating systems:
•
Windows 2000 (SP4), Windows XP (SP2+), Windows Vista, Windows 7
•
IronKey Unlocker for Linux (2.6+, x86)
•
IronKey Unlocker for Mac (10.4+, Intel)
NOTE: IronKey supports functionality on many Virtual Machine platforms. Certain
configurations might be necessary for USB support within Virtual Machines.
© 2011 Coordinated Response Tools, LLC
Page
7
2.4.2
Starting the IronKey
The IronKey Unlocker allows you to securely access your files on multiple operating
systems. It prompts you for your password, a secure system validates your
password, and then mounts your secure volume where all of your files are stored on
the IronKey.
Here is how to unlock and use your IronKey flashdrive:
2.5
•
Plug your IronKey flashdrive into a USB port on your computer. The Unlock Your
IronKey window will appear. Type in your password.
•
If the Unlock Your IronKey window does not appear, start it manually by doubleclicking the IronKey Unlocker drive in My Computer. Double-click the IronKey.exe file.
•
Enter your password correctly (which is verified in hardware) to mount your secure
volume with all your secure applications and files.
•
Entering the wrong password too many times will permanently erase all of your
data. After every three attempts, you must unplug and reinsert the IronKey.
•
Select the corresponding checkboxes before unlocking your IronKey to view your
secure files and launch the IronKey Control Panel.
CNIP Network
CNIP Network lets you to share your IAP with anyone connected to your network. This allows
all your planners to work simultaneously on the same plan. With CNIP Network, all newly
entered data is automatically uploaded and immediately available.
A single disc will install CNIP Network on PC-based computers with the Windows Operating
System. One computer will be designated as the Host and all others will access CNIP using
the softwareʼs notification system. Each computer must be connected to a Local Area Network
and will need both read and write access to a shared folder or drive. Users can update their
screens to reflect any changes made. Your server will provide connectivity and remote site
approval, storage and backup.
The utilities needed to manage CNIP Network:
•
Network Utilities Setup
•
Shared Data Source Setup
•
Shared Data Sources
•
Remove Shared Data Source
•
Start Network Server
•
Start Network Client
© 2011 Coordinated Response Tools, LLC
Page
8
Part III: Getting Started
3.1
Install CNIP
Installing the CNIP program takes only a few clicks. Go to the Coordinated Response Tools
website (www.coordinatedresponsetools.com) and click on the CNIP Download button. You
will be prompted to complete a registration form with your name, rank, agency, email address,
and phone number. Next, click the Submit button. You will then be asked to decide the
location on your computer where you wish to download the CNIP software program. We
suggest you select the default location: My Computer / Local Disk C / Program Files /
Coordinated NIMS Incident Planner.
3.2
Activate CNIP
After CNIP is installed on our computer, open the program, copy the Registration Number, and
email the number to [email protected]. You will receive a return
email with your Activation Key. Cut and paste the Activation Key into the opening box and
youʼre ready to begin using CNIP.
© 2011 Coordinated Response Tools, LLC
Page
9
Part IV: Create an Incident Action Plan
4.1
Quick Start
When CNIP opens, you are given the choice to either open a blank IAP or use an IAP
template that you created previously.
You also have the option to open a saved IAP by choosing from the files listed under the Open
Incident Action Plan tab.
4.2
Save Your Work
It is important to periodically save your information. CNIP offers two ways to do this.
1. On the top toolbar, go to File / Save.
2. Select the Save button on the second-level toolbar.
© 2011 Coordinated Response Tools, LLC
Page 10
Part V: The CNIP Wizard
The CNIP Wizard is the most comprehensive and user-friendly way to set up an Incident Action
Plan. The easy-to-use process minimizes errors and omissions of data.
How it works: Simply fill in each field the Wizard presents. Your data will be automatically entered
into all relevant areas throughout the each IAP form.
Note: CNIP is designed for ease of use. Opening multiple windows at once maximizes operability of
the software and simplifies the process of organizing and inputting your data. The tabs at the top of
the screen allow you to keep track of your position. Toggle between the opened windows by clicking
on the tabs. However, modifications in one area will not reflect your change until you refresh the
form. To refresh a form, first save your work by clicking on the Save icon on the toolbar. Then close
the form it by clicking on the X at the upper right side of the opened form.
5.1
Pre-Plan an Event (ICS Form 201)
To pre-plan or respond to an event:
•
From the top-level toolbar, select the Plan Wizard button on the second-level toolbar. The
Plan Event Wizard will appear.
•
The yellow box contains a question that is to be answered in the clear blank box below it.
Either type the answer or cut and paste text from another document. Input is
automatically saved into the program.
•
Select the Next button to move to another question. You will be prompted through a total
of seven questions to complete the IAP Plan Wizard.
•
The IAP Plan Wizard questions are also listed on the right side of your screen. Find the
question you wish to address and click on it to be taken directly to that screen. You can
Save and Close your file and return later to finish the IAP Plan Wizard.
•
Move through the IAP Plan Wizard functions by clicking the Next or Back button at any time.
•
When you click Next on the IAP Plan Wizardʼs last question, a dialog box will appear
stating, "You have reached the end of the interview." This indicates that the IAP Plan Wizard
has been completed.
•
End the IAP Plan Wizard by clicking the small X Box in the upper right of the IAP Plan
Wizard screen.
•
All inputted information has been entered in the appropriate sections of each ICS form that
requires this information. The bulk of which has been placed in ICS Form 201. To view
this form, click the ICS Forms button on the second-level toolbar, select Form 201, and
click Print Selected Form. This form is a Print Only form that cannot be modified from this
© 2011 Coordinated Response Tools, LLC
Page 11
position. If you choose to modify or update this form: Return to the IAP Plan Wizard,
locate the area to be updated by clicking on the relevant question on the right column, and
enter the information.
Note: To duplicate the IAP for modification and use in a different event, go to the top toolbar
and select File / Save As. In the dialog box, change the name of your existing file and click the
Save button. The new name will appear at the top of the work page.
5.2
Build the ICS Structure (Forms ICS 202, 203, 204, 205, 206 & 207)
To set up your Incident Action Plan structure, select the Plan Wizard button on the secondlevel toolbar. The Incident Action Plan Wizard will appear and prompt you through the
development of your IAP.
Following are three methods you can use to enter your IAP information. Inputted data is
automatically and placed where appropriate on each ICS form.
Method 1. From the Incident Action Plan Wizard (center of screen): Type or paste
your answer to the question in the yellow box and then click Next or Back, as needed.
Enter information and follow each prompt until completed. The TBD button acts like a
placeholder to remind you to enter this information later.
Method 2. Toggle through the Wizard Questions (right of screen): Find the sub-section
you wish to address (General Information, Incident Commander and Staff, Agency
Representatives, Operations Section, Planning Section, Logistics Section, or Finance
Section), and click the Down arrow to find the questions you need. Enter your information
into the IAP Wizard (center of screen). Click the Up arrow to minimize that sub-selection
of questions.
Method 3. From the Task Panel (left of screen): Select the area you wish to complete
and answer the questions directly into the box provided. Click the + boxes to expand the
selection to view all the questions. Some IAP positions and structure, such as Branches,
Divisions, Groups, or Units, cannot be added using Method #3. Add this information in the
IAP Plan Wizard, the Resource Management section, or directly on the Organizational
Charts. See the appropriate sections in this manual for more information.
•
Answering each of the IAP Wizard questions is the easiest and most efficient way to get
started. CNIP's IAP Wizard begins with the General Information section and follows through
to the end of the Finance Section. You have the option to skip to any question or section
you choose.
•
When certain information is not yet available, as often occurs when planning a special
event, select the TBA button (To Be Determined) to mark the section for future input. TBA is
a placeholder that should be addressed as soon as the information is available. After
clicking the TBA button, CNIP takes you to the next screen. Note: Hitting the Next button
without entering any information omits that section from the IAP you are creating. Selecting
the TBA button ensures that the section will be included in your IAP.
•
The Auto Fill option shows available data that has been previously entered. Click on the
© 2011 Coordinated Response Tools, LLC
Page 12
resource you need, and the relevant data will be entered into the IAP you are creating.
5.3
•
When you complete a section, the IAP Wizard automatically takes you to the next section
listed: General Information, Incident Commander and Staff, Agency Representatives,
Operations Section, Planning Section, Logistics Section, and Finance Section.
•
Upon reaching the last position in the Finance Section, a dialog box will appear stating,
"You have reached the end of the interview." This is to inform you that the IAP Plan Wizard
has been completed.
•
Cancel out of the screen by hitting the X Box in the upper right of the screen.
•
The majority of your ICS forms and organization charts are now complete.
ICS Wizard Components
5.3.1
The Wizard Panel
The Wizard Questions Panel contains all of the questions asked by the Wizard. You
can jump to any question in the Wizard by clicking on the questions.
5.3.2
Incident Action Plan Wizard Panel
Answer the questions asked by the Wizard and hit the Next button to be taken to the
next question. Select the TBD (To Be Determined) button to save the question for
later, or the Auto Fill button to select resource information entered previously.
5.3.3
ICS Wizard Task Panel
Hit the + box to find the area where you wish to add new information.
© 2011 Coordinated Response Tools, LLC
Page 13
Part VI: CNIP Email Functions
6.1
Receive an IAP by Email
Receiving a new IAP:
•
Open the email message containing the IAP. Double-click or right-click on the IAP file
name and choose File / Save As. Select the location on your system where you want to
place the file.
•
Open the CNIP program.
•
Go to File / Import Data File. Select the name of your IAP, which will have a .CEAP
extension.
•
Go to File / Convert Data File. Large files sent by email are automatically compressed to
make it easier to send. The Convert Data File option uncompresses the file, which has an
.EAP extension.
Receiving a returned IAP with new data:
6.2
•
Open the CNIP program.
•
Open the email message containing the IAP. Double-click or right-click on the IAP file
name, which will have a .CEAP extension.
•
Go to File / Import Data File. Select the name of your IAP.
•
Go to File / Convert Data File. Large files sent by email are automatically compressed to
make it easier to send. The Convert Data File option uncompresses the file, which has an
.EAP extension.
•
CNIP will import all new data. CNIP will then walk you through the fields with new data that
conflict with the established data. You can then choose which data you wish to use in
your IAP. CNIP will not allow your IAP to be overwritten with the new data.
•
Save the changes.
Send an IAP by Email
•
On the top toolbar, select File / Send Data File. Select the IAP you want to send by either
double-clicking on the file name, or click once on the file name and hit Open. Or, if the
IAP you wish to send is currently on your screen, the file name will appear in the File
Name box. Next, click Open.
•
Fill out the required fields: From Name and Email Address; To Name and Email Address.
© 2011 Coordinated Response Tools, LLC
Page 14
Fill out the Subject line and Message box as desired.
6.3
•
Hit Send. The email with the IAP attachment will take several minutes to arrive at its
destination.
•
To send the same IAP to another recipient: Use the steps above, or go directly to your
email program, select Attachment, locate the file on your computer, and send a message
with the attachment.
Send Individual Forms by Email
•
Select File / Print, then choose the form you wish to email by checking the box to the left of
the form name. You can select as many forms as you wish. They will all be merged into one
PDF file.
•
Select Email Selected Forms as PDF.
•
The Save As window allows you to select the location on your computer where you wish to
place the file. Type in the name your wish to use, i.e., Event X Form 201. The extension is
automatically added for you. Hit Save.
•
Enter your recipient information into the CNIP Email window. Fill out the required fields:
From Name and Email Address; To Name and Email Address. Fill out the Subject line and
Message box as desired.
•
Hit Send. The email with the form attached as a PDF will take several minutes to arrive at
its destination.
•
To send the same from to another recipient: Use the steps above, or go directly to your
email program, select Attachment, locate the file on your computer, and send a message
with the attachment.
© 2011 Coordinated Response Tools, LLC
Page 15
Part VII: ICS Forms
7.1
Modify or Print an ICS Form
All ICS forms can be accessed from the Tools / ICS Form Selection on top-level toolbar or the
ICS Forms button on the second-level toolbar.
7.2
•
Highlight the form you want to view and hit either Modify Selected Form or Print Selected
Form.
•
To add or change data in a form, highlight the form you want, select Modify Selected Form,
and make changes accordingly.
•
When necessary, select the necessary resource from the Task Panel on the right before
choosing Modify Selected Form.
ICS Form 201: Incident Briefing
Purpose. The Incident Briefing form provides the Unified Command (and the Incident
Commander and General Staffs assuming command of the incident) with basic information
regarding the response situation and the resources allocated to the incident. It is also a
permanent record of the initial incident response.
Preparation. This briefing form is prepared under the direction of the initial Incident
Commander for presentation to the Unified Command. This form can be used for managing
the response during the initial period until the beginning of the first operational period for which
an Incident Action Plan (IAP) is prepared.
Distribution. After the initial briefing of the Unified Command and General Staff members, the
Incident Briefing form is duplicated and distributed to the Command Staff, Section Chiefs,
Branch Directors, Division/Group Supervisors, and appropriate Planning and Logistics Section
Unit Leaders. The sketch map and summary of current action portions of the briefing form are
given to the Situation Unit while the Current Organization and Resources Summary portion are
given to the Resources Unit. All completed original forms MUST be given to the
Documentation Unit.
The ICS 201 Incident Briefing form is automatically completed with the information entered into
the ICS Wizard and Plan Wizard. It cannot be modified in the ICS Form Selection window.
7.3
ICS Form 202: Incident Objectives
Purpose. The Incident Objectives form describes the basic incident strategy, control
objectives, command emphasis/priorities, and safety considerations for use during the next
operational period.
Preparation. The Incident Objectives form is completed by the Planning Section following
© 2011 Coordinated Response Tools, LLC
Page 16
each Command and General Staff meeting conducted to prepare the Incident Action Plan.
Distribution. The Incident Objectives form will be reproduced with the IAP and given to all
supervisory personnel at the Section, Branch, Division/Group, and Unit levels. All completed
original forms MUST be given to the Documentation Unit.
The ICS Form 202 form is automatically completed with the information entered into the ICS
Wizard and Plan Wizard. It cannot be modified in the ICS Form Selection window.
7.4
ICS Form 203: Organization Assignment List
Purpose. The Organization Assignment List provides ICS personnel with information on the
units that are currently activated and the names of the personnel staffing each position/unit. It
is used to complete the Incident Organization Chart (ICS Form 207),
which is posted on the
Incident Command Post display. An actual organization will be event-specific. Not all
positions need to be filled. The size of the organization is dependent on the magnitude of
the incident and can be expanded or contracted as necessary.
Preparation. The Resources Unit prepares and maintains this list under the direction of the
Planning Section Chief. Note: Depending on the incident, the Intelligence and Information
function may be organized in several ways: 1) within the Command Staff as the Intelligence
Officer; 2) as an Intelligence Unit in Planning Section; 3) as an Intelligence Branch or Group in
the Operations Section; 4) as a separate General Staff Intelligence Section; or 5) as an
Intelligence Technical Specialist. The incident will drive the need for the Intelligence and
Information function and where it is located in the ICS organization structure. The Intelligence
and Information function is described in significant detail by NIMS.
Distribution. The Organization Assignment List is duplicated and attached to the Incident
Objectives form (ICS 202) and given to all recipients of the Incident Action Plan. All completed
original forms MUST be given to the Documentation Unit.
The ICS Form 203 form is automatically completed with the information entered into the ICS
Wizard, Plan Wizard, Organization Chart and Resource Manager. It cannot be modified in the
ICS Form Selection window.
7.5
ICS Form 204: Assignment List
Purpose. The Assignment List(s) informs Division and Group supervisors of incident
assignments. Once the Unified Command and General Staff agree to the assignments, the
assignment information is given to the appropriate Divisions and Groups.
Preparation. The Assignment List is normally prepared by the Resources Unit with guidance
from the Incident Objectives (ICS 202), Operational Planning Worksheet (ICS 215), and the
Operations Section Chief. The Assignment List must be approved by the Planning Section
Chief and Operations Section Chief. When approved, it is included as part of the Incident
Action Plan. Specific instructions for specific resources may be entered on the ICS Form 204
for dissemination to the field. A separate sheet is used for each Division or Group. The
identification letter of the Division is entered in the form title. Also enter the number (roman
numeral) assigned to the Branch.
© 2011 Coordinated Response Tools, LLC
Page 17
Distribution. The Assignment List is duplicated and attached to the Incident Objectives and
given to all recipients of the Incident Action Plan. In some cases, assignments may be
communicated via radio/telephone/fax. All completed original forms MUST be given to the
Documentation Unit.
Special Note. The Assignment List includes assignments at the level of Divisions and
Groups. The Assignment List Attachment shows more specific assignment information, if
needed. The Planning and Operations Section Chiefs determine the need for an ICS Form 204
during the development of the Operational Planning Worksheet (ICS 215).
7.5.1
7.6
Prepare ICS Form 204
•
Go to Tools / ICS Forms Selection on the top toolbar, or ICS Forms button on the
second-level toolbar. The ICS Forms Selection window will appear.
•
Select Form 204. Select a Unit from the Task Panel on the right.
•
Click the Modify Selected Form Button.
•
Fill in the needed information.
ICS Form 205: Incident Radio Communications Plan
Purpose. The Incident Radio Communications Plan is a summary of information obtained
from the Radio Requirements Worksheet (ICS 216) and the Radio Frequency Assignment
Worksheet (ICS 217). Information about frequency assignments from the Radio
Communications Plan is normally noted on the appropriate Assignment List (ICS 204).
Preparation. The Incident Radio Communications Plan is prepared by the Communications
Unit Leader and given to the Planning Section Chief. Detailed instructions on the preparation
of this form may be found in ICS Publication 223-5, Communications Unit Position Manual.
Distribution. The Incident Radio Communications Plan is duplicated and given to all
recipients listed on the Incident Objectives form, including the Incident Communications
Center. Information from the plan is placed on Assignment Lists. All completed original forms
MUST be given to the Documentation Unit.
Special Note. ICS Form 205 is used to provide, in one location, information on all radio
frequency assignments down to the Division/Group level for each operational period; whereas,
the ICS 205 Communications List is used to list the contact information for personnel
assigned to the incident (radio frequencies, phone numbers, pager numbers, etc.).
7.6.1
Prepare ICS 205
•
Go to Tools / ICS Forms Selection on the top toolbar, or ICS Forms button on the
second-level toolbar. The ICS Forms Selection window will appear.
•
Select Form 205.
© 2011 Coordinated Response Tools, LLC
Page 18
7.7
•
Click the Modify Selected Form Button.
•
Fill in the needed information.
ICS Form 206: Medical Plan
Purpose. The Medical Plan provides information on incident medical aid stations,
transportation services, hospitals, and medical emergency procedures.
Preparation. The Medical Plan is prepared by the Medical Unit Leader and reviewed by the
Safety Officer.
Distribution. The Medical Plan may be attached to the Incident Objectives (ICS 202) or
information from the plan pertaining to incident medical aid stations and medical emergency
procedures may be taken from the plan and noted on the Assignment List (ICS 204) or on the
Assignment List Attachment (ICS 204). All completed original forms MUST be given to the
Documentation Unit.
Distribution. The Medical Plan may be attached to the Incident Objectives (ICS 202). Or,
information from the plan pertaining to incident medical aid stations and medical emergency
procedures may be taken from the plan and noted on the Assignment List (ICS 204) or on the
Assignment List Attachment (ICS 204). All completed original forms MUST be given to the
Documentation Unit.
7.7.1
Prepare ICS Form 206
To build a medical plan:
7.8
•
Select the Tools / ICS Forms Selection from the top toolbar, or hit the ICS Forms
button on the second-level toolbar.
•
The Ambulance Services and Hospital boxes are preloaded with area resources
used in other plans you created, or that you added in the Plan Setup section.
•
For the remaining entries, select the tab you need and hit the Add button. Answer
the popup questions. Or, type information directly into the appropriate spaces.
Input is automatically saved into the program.
•
Common information that identifies the incident and ICS positions are
automatically entered from sections previously completed.
•
Cancel out of the screen by hitting the X Box in the upper right corner of the
screen. Your input will be automatically saved.
ICS Form 207: Incident Organization Chart
Purpose. The Incident Organization Chart provides ICS personnel with information on the
units that are currently activated and the names of personnel staffing each position/unit. An
© 2011 Coordinated Response Tools, LLC
Page 19
actual organization will be event-specific. Not all positions need to be filled. The size of the
organization is dependent on the magnitude of the incident and can be expanded or
contracted as necessary.
Preparation. The Resources Unit prepares and maintains this chart under the direction of the
Planning Section Chief. The ICS Form 203 is used to help complete the Incident Organization
Chart.
Distribution. The Incident Organization Chart is posted on the Incident Command Post
display and may be posted in other places as needed (e.g., the Joint Information Center). All
completed original forms MUST be given to the Documentation Unit.
Special Note. Depending on the incident, the Intelligence and Information function may be
organized in several ways: 1) within the Command Staff as the Intelligence Officer; 2) as an
Intelligence Unit in the Planning Section; 3) as an Intelligence Branch or Group in the
Operations Section; 4) as a separate General Staff Intelligence Section; and 5) as an
Intelligence Technical Specialist. The incident will drive the need for the Intelligence and
Information function and where it is located in the ICS organization structure. The Intelligence
and Information function is described in significant detail by NIMS.
The ICS Form 207 form is automatically completed from information gathered in the ICS
Wizard, Plan Wizard, Organization Chart, and Resource Manager. It cannot be modified when
opened in the ICS Form Selection window.
7.8.1
Print Form ICS 207
To print an organization chart as ICS Form 207:
7.9
•
Go to Tools / ICS Forms Selection on the top toolbar, or hit the ICS Form button on
the second-level toolbar. Next, select Form 207 and choose the Modify Selected
Form button.
•
Click on the + symbol(s) to expand the boxes to show the extent of the
organization you wish to print.
•
Hit the Zoom In or Zoom Out buttons to adjust the chart to the desired look.
•
Select Apply Changes. Either hit the X Box to exit the screen or go directly to the
next step.
•
Go back to ICS Form Selection. Select the position you want. Click the Print
Selected Form button. The org chart will be printed in the ICS 207 format.
ICS Form 210: Status Change Card
•
Purpose. The Status Change form is used to record status change information received on
resources assigned to the incident.
•
Preparation. Form 210 is completed by radio/telephone operators who receive status
© 2011 Coordinated Response Tools, LLC
Page 20
change information from individual resources, Task Forces, Strike Teams, and
Division/Group Supervisors. Status information could also be reported by Staging Area
and Helibase Managers or fixed-wing facilities.
•
Distribution. The original is given to the Resources Unit, and the Communications Unit
retains a second copy. All completed original forms MUST be given to the Documentation
Unit.
7.9.1
Prepare ICS Form 210
•
Go to Tools / ICS Forms Selection from the top toolbar, or ICS Forms button on
the second-level toolbar. The ICS Forms Selection window will appear.
•
Select Form 210 Status Change Card. The list of available units will appear in the
Task Panel.
•
Click the Modify Selected Form Button.
•
Fill in the needed information.
7.10 ICS Form 213: General Message
Purpose. The General Message is used by: Incident personnel to record incoming messages
that cannot be orally transmitted to the intended recipients; Command Post and other incident
personnel to relay messages to the Incident Communications Center for transmission via radio
or telephone to the addressee; incident personnel to send any message or notifications that
require a hard-copy delivery; and incident personnel to place resource orders.
Preparation. This form is prepared by any incident personnel needing to transmit a hard-copy
message. The recipient should send a timely reply to the originator, as necessary.
Distribution. Upon completion, the General Message may be hand-carried to the addressee
or to the incident Communications Center for transmission. Originator retains a copy of the
form. All completed original forms MUST be given to the Documentation Unit.
© 2011 Coordinated Response Tools, LLC
Page 21
Part VIII: IAP Tools
8.1
Print a Form
CNIP offers three ways to print a form:
1. On the top toolbar, go to File / Print, then select the form you want.
2. On the top toolbar, go to Tools / ICS Form Selection, then select the form you want.
3. On the second-level toolbar, click the ICS Forms button and select the form you want.
8.2
•
Hit the Print Selected Form button. The form will appear on your screen.
•
Select the Print button on the upper left of your screen.
•
You have the option of selecting a specific printer and other options under the Preferences
button.
•
Hit Print.
Find & Replace
This option allows you to conduct a global replace for any name, phone number, or other entry
in your plan. Be sure to use this carefully. Use full names, phone numbers, etc.
•
•
•
Go to Tools / Find and Replace.
•
Replace with: Type in the data you wish to replace it with.
•
Hit Process.
Enter text to find: Type in the data you wish to change.
Your change has been made throughout your IAP.
8.3
Personnel List
The Personnel List references all the personnel assigned to each section of your plan.
•
Go to Tools / Personnel List.
•
Click on an agency name at the top to see the full list of assigned names. It may be
necessary to drag the box vertically to expand it to a full-screen width and height. To do
this, put the cursor on the corner of the form and drag it to a larger format.
© 2011 Coordinated Response Tools, LLC
Page 22
8.4
Incident Phone List
All your ICS personnel contact name and phone numbers can be accessed here. The phone
list is automatically updated when you enter personnel to the Incident Action Plan.
8.5
•
To access this list, go to Tools / Incident Phone List.
•
To print, select from Print Sorted by Name, Print Sorted by Agency, or Print Sorted by
Assignment.
Maps and Drawings
To import drawings that illustrate key locations in your plan:
8.6
•
Go to Tools / Map/Drawing on the top toolbar, or select the Map/Drawing button on the
second-level toolbar.
•
Click the Add button and locate the image you want from your files.
•
Click the Edit Text button to edit text or make changes as needed.
•
Click the Edit Image button to add lines and other shapes. Select Format to fit elements
into the graphic as desired.
•
Hit Save.
Weather Information
This option takes you to the MSN weather page on the Internet.
•
Go to Tools / Weather Forecast on the top toolbar.
•
Select the Change link and type in a city or zip code into the empty field. Hit Enter on your
keyboard. The weather forecast for your selected city will appear.
•
Hit the X in the upper right corner to close the screen.
© 2011 Coordinated Response Tools, LLC
Page 23
Part IX: IAP Management
The following IAP management functions can be executed from the Resource Management section of
CNIP. Each can also be accomplished in the Org Chart (see the Organizational Charts section of this
manual) and by the ICS Wizard.
9.1
Add a Unit
To add a Unit in the Org Chart window, follow the instructions listed under the Organizational
Charts section in this manual.
Add a Task Force, Strike Team, Mobile Field Force, or Single Resource to your organization:
•
Click on the Resource Management button on the second-level toolbar.
•
The left side of your screen is the Organization Structure box. Click on the + sign(s) to
expand the organization tree.
•
Click once on the point in the organization where the new unit will report.
•
Select the Add Unit button.
•
A dialog box will appear asking for the name and designation of the unit to be added. Enter
the name and hit OK.
•
A popup box will ask if you want to use the Auto Fill feature. Select Yes if the information
you need is already in your database from another IAP. Double-click on the selection you
want to add.
If you donʼt want to use Auto Fill, select the No button. Several more dialog boxes will
appear in succession. Each will ask questions to set up the new resource. You are only
required to enter the name of the new unit. You can return later to fill in the missing
information.
•
9.2
The new unit has been added and will appear beneath the appropriate section on the
organization tree.
Add a Division or Group
To add a Unit in the Org Chart window, follow the instructions listed under the Organizational
Charts section in this manual.
To add a Division or Group from the Resource Manager window, follow the instructions listed
above under Add a Unit.
To add a Division or Group using the ICS Wizard:
© 2011 Coordinated Response Tools, LLC
Page 24
•
Click on the ICS Wizard button on the second-level toolbar.
•
Select the Operations Section from the Wizard Questions area on the right side of your
screen. Click the down arrow to expand the list. Click once on the question, Do you want
to create a Division or Group? Click Yes.
Or, select the Operations Section from the Task Panel on the left side of your screen.
Click the + option to expand the list. Click once on the section where you want to add a
Division or Group.
•
A dialog box will appear asking if this is a Division. If you select Yes, a division will be
created. If you select No, a group will be created.
•
A dialog box will appear asking for the name of the Division or Group.
•
A dialog box will appear asking you to select the Reporting Branch of the new Division or
Group.
•
A popup box will ask if you want to use the Auto Fill feature. Select Yes if the information
you need is already in your database from another IAP. Double-click on the selection you
want to add.
If you donʼt want to use Auto Fill, select the No button. Several more dialog boxes will
appear in succession. Each will ask questions to set up the new resource. You are only
required to enter the name of the new Division or Group. You can return later to fill in the
missing information.
•
9.3
The new division or group has been added and will appear beneath the appropriate branch
on organization tree
Add a Branch
To add a Branch from the Resource Manager window, follow the instructions listed above
under Add a Unit.
To add a Branch from the ICS Wizard window, follow the instructions listed above under Add a
Division or Group.
To add a Branch from the Org Chart, follow the instructions listed under the Organizational
Charts section in this manual.
9.4
Add Personnel
To add personnel to a unit in your organization:
•
Click on the Resource Management button on the second-level toolbar.
•
The left side of your screen is the Organization Structure box. Click on the + sign(s) to
© 2011 Coordinated Response Tools, LLC
Page 25
expand the organization tree.
•
Click once on the point in the organization where the new person will report.
•
Select the Add Personnel button.
•
A popup box will ask if you want to use the Auto Fill feature. Select Yes if the person is
already in your database from another IAP. Double-click on the person you want to add.
•
If you are not using Auto Fill, select the No button. A dialog box will appear asking for the
name of the person to be added. Enter the name and hit OK.
Several more dialog boxes will appear in succession. Each will ask questions to set up the
new resource.
•
9.5
The new person has been added and will appear beneath the appropriate supervising unit
on the organization tree.
Move a Unit or Resource
To change the reporting structure of a unit or resource:
9.6
•
Click on the Resource Management button on the second-level toolbar.
•
The left side of your screen is the Organization Structure box. Click on the + sign(s) to
expand the organization tree.
•
Click once on the point in the organization where the new unit will report.
•
Click on the unit or resource you wish to move. Hold down the mouse button and drag the
unit or resource to position it over its new reporting area. Let go of the mouse. The unit or
resource will show up in its new place on the Organization Structure tree.
Delete a Position or Resource
Before deleting a position or resource: Be certain to reassign all entities reporting to the
position or resource being deleted. Any entity that reports to the deleted resource will
automatically be deleted from the organization. THIS ACTION CANNOT BE UNDONE.
To delete a position or resource in your organization:
•
Click on the Resource Management button on the second-level toolbar.
•
The left side of your screen is the Organization Structure box. Click on the + sign(s) to
expand the organization tree.
•
Click once on the resource you wish to delete.
•
Select the Delete button.
© 2011 Coordinated Response Tools, LLC
Page 26
•
A dialog box will appear asking if you are certain you want to delete the resource. If you are
sure, click the Yes button.
•
You may need to close and reopen the window to see the update.
© 2011 Coordinated Response Tools, LLC
Page 27
Part X: Organizational Charts
Most functions required for building an Incident Action Plan can be performed directly in the
Organizational Chart.
A special feature offered by CNIP is the ability to drag and drop resources to different locations.
For instance, someone reporting to the Operations Chief can be moved under the Finance Chief by
simply clicking once on the person's name and then, while holding down the mouse key, move the
individual under the new reporting chief's section.
10.1 Open an Org Chart
•
Command Structure: The full Command Structure is accessed from Organization Chart on
the top toolbar, or the Org Chart button on the second-level toolbar.
•
Individual Sections or Units: Go to Organization Chart on the top toolbar and select the
chart you want. Choose from Operations Section, Planning Section, Logistics Section,
Finance Section, Branches, Divisions/ Groups, or Units.
•
The name of the opened chart appears on the tab.
•
Hit the + or - boxes to expand or contract the chart. From here you can create a Division or
Group or add a Deputy.
10.2 Print an Org Chart
Print out the org chart for your entire organization. Or, print out org charts for individual
Sections, Branches, Units, Divisions, or Groups as standalone documents.
•
To print the full Command Structure, go to Organization Charts on the top toolbar, or hit the
Org Chart button on the second-level toolbar.
•
To print a chart for an individual section, go to Organization Chart on the top toolbar and
select the chart you want. The name of the chart appears on the tab. Choose from
Operations Section, Planning Section, Logistics Section, Finance Section, Branches,
Divisions/ Groups, or Units.
•
Click on the + symbol(s) to expand the boxes to show the extent of the organization you
wish to print.
•
Select the Zoom In or Zoom Out buttons to adjust the chart to the desired look you want on
the printed page.
•
Hit the Print button. A screen will appear allowing you to change the margins and the
printer setup. Select Print to print the chart.
© 2011 Coordinated Response Tools, LLC
Page 28
10.3 Reassign Units
•
In the Command Structure screen, locate the unit or person you wish to reassign.
•
Find the location of the new reporting assignment for that unit or resource.
•
Hit the + or – options to expand or contract the chart so that you see both your start and
end point.
•
Click once on the unit or person you wish to reassign. Then, while holding the mouse
button, drag and drop the unit or resource to the new supervisor.
10.4 Create a Division or Group
To create a new Division or Group from the org chart screen:
•
Click the + sign to expand the chart to find the section you wish to address. Click once on
the section where the new Division or Group will report.
•
Select the Create Division/Group button.
•
A dialog box will appear asking for the name of the new Division or Group.
•
A dialog box will appear asking if this is a Division. If you select Yes, a Division will be
created. If you select No, a Group will be created.
•
A dialog box will appear asking you to Select Reporting Branch for the new Division or
Group. You will be given the option to select the Incident Commander or any of the other
established sections.
•
A dialog box will appear asking if you wish to use the Auto Fill feature.
If you select Yes, a box appears with all the available personnel that you have
entered previously. Double-click the name you wish to use as the new Division or
Groupʼs leader.
If you select No, a series of boxes will appear asking you to enter the Division or
Group leader's name, agency, and contact number. Fill in each box and hit OK. Note:
It is not necessary to fill in the telephone number at this time. Hit Cancel and add this
information later.
The new Division or Group has been added and will appear underneath the appropriate
branch on the organization tree.
10.5 Create a Branch
To create a new Branch from the org chart screen:
© 2011 Coordinated Response Tools, LLC
Page 29
•
Click the + sign to expand the chart to find the section you wish to address. Click once on
the section where the new Branch will report.
•
Select the Create Branch button.
•
A dialog box will appear asking if you wish to use the Auto Fill feature.
If you select Yes, a box appears with all available resources. Double-click the name
you wish to use as the new Branchʼs director.
If you select No, a series of boxes will appear asking you to enter the name of the
Branch and the Branch Directorʼs name, agency, and contact number. Fill in each box
and hit OK. Note: It is not necessary to fill in the telephone number at this time. Hit
Cancel and add this information later.
The new Branch has been added and will appear underneath the appropriate section. Hit the
+ option to expand the org chart to see the new branch.
10.6 Organization Chart Menus
Right click any box on the organization chart to display a menu that gives you direct control of
information for that resource or section.
•
Change Name: Change the name of the person currently assigned to that function. The
name change will be reflected wherever this position appears in the IAP for the current
operational period.
•
ICS 204 Division Assignments: Select Modify to open ICS Form 204. From here you can
make changes directly onto the form. Or, select Print to print the form.
•
ICS 210 Status Change: Select Modify to open ICS Form 210. From here you can make
changes directly onto the form. Or, select Print to print the form.
•
ICS 214 Unit Log: Select Modify to open ICS Form 214. From here you can make
changes directly onto the form. Or, select Print to print the form.
•
ICS 221 Demobilization: Select Modify to open ICS Form 221. From here you can make
changes directly onto the form. Or, select Print to print the form.
•
Add Unit: Add a Unit or resource under the supervision of the chosen selection.
•
Add Personnel: Add a person under the supervision of the chosen selection.
•
Delete: Delete the unit or resource from the organization for the current operational
period. Note: You must reassign any resources under that section that you wish to keep.
•
View Organizational Chart: A separate window will open containing the organization
supervised by the chosen selection.
© 2011 Coordinated Response Tools, LLC
Page 30
Part XI: Plan Setup & CNIP Customization
Each option under File / Setup is preloaded with the resources you added in previous plans.
Information entered in Setup populates the Auto Fill feature. This information is entered into the
program only once, and is retained in the system for use in future Incident Action Plans.
In order to use CNIP to its maximum potential, preload the program with generic information that will
be used in most the Incident Action Plans you develop. This chapter addresses the steps to do this.
11.1
Hospitals Setup
11.1.1 Add a New Hospital Record
•
Go to File / Setup / Hospitals Setup.
•
Click the Add New Record button.
•
A dialogue box will appear. Type in the name of the hospital and click OK.
•
Several more dialog boxes will appear in succession. Each will ask questions to
set up the record.
•
You are only required to enter the name of the hospital. The other questions do
not need to be answered at this time. You can return later to fill in the missing
information.
•
The hospital's information you entered will appear in the panel on the left side of
your screen.
•
Select the Update Database button to save your entry into the database. Your
information will be added to Auto Fill for future use when you need it.
•
Your entry will also be added to ICS Form 206 for the current plan.
11.1.2 Edit a Hospital Record
•
Go to File / Setup / Hospitals Setup.
•
Find the hospital record you wish to edit on the left side of your screen. Click once
on the record.
•
The information for that record will appear in the Task Panel on the right side of
your screen.
•
Make your corrections directly into the Task Panel.
© 2011 Coordinated Response Tools, LLC
Page 31
•
Click the Update Database button.
11.1.3 Delete a Hospital Record
•
Go to File / Setup / Hospitals Setup.
•
Find the hospital record you wish to delete on the left side of your screen. Click
once on the record.
•
The information for that record will appear in the Task Panel on the right side of
your screen.
•
Click the Delete Record button.
•
A dialog box will ask if you are sure you want to delete the record. Click the Yes
button.
•
Click the Update Database button.
11.1.4 Import Hospital Data
Hospital data can be imported in bulk through the use of Excel spreadsheets. The
spreadsheets must be formatted in a set pattern it order for CNIP to import the data.
To import multiple hospital records, complete the following steps:
Excel Spreadsheet Setup
•
Set up your spreadsheet with the following headers across the top of the page
(Row 1):
Column A – Name
Column B – Address, City, State
Column C – Phone
Column D – Helipad
Column E – Burn Unit
•
Format your data to fit these five columns.
Import Spreadsheet
•
Go to File / Setup / Hospitals Setup.
•
Click the Import Hospital Data button.
•
The Open File dialog box will appear.
•
Navigate to the Excel spreadsheet containing the information you wish to import.
Click the Open button.
© 2011 Coordinated Response Tools, LLC
Page 32
•
Click the Update Database button.
11.2 Ambulance Services Setup
11.2.1 Add a New Ambulance Service
•
Go to File / Setup / Ambulance Services Setup.
•
Click the Add New Record button.
•
A dialogue box will appear. Type in the name of the ambulance company and click
OK.
•
Several dialog boxes will appear in succession. Each will ask questions to set up
the record.
•
You are only required to enter the name of the ambulance company. The other
questions do not need to be answered at this time. You can return later to fill in the
missing information.
•
The ambulance company's information will appear in the panel on the left side of
your screen.
•
Select the Update Database button to save your entry into the database. Your
information will be added to Auto Fill for future use when you need it.
•
Your entry will also be added to ICS Form 206 for the current plan.
11.2.3 Edit an Ambulance Service Record
•
Go to File / Setup / Ambulance Services Setup.
•
Find the ambulance service record you wish to edit on the left side of your screen.
Click once on the record.
•
The information for that record will appear in the Task Panel on the right side of
your screen.
•
Make your corrections directly into the Task Panel.
•
Click the Update Database button.
11.2.3 Delete an Ambulance Service
•
Go to File / Setup / Ambulance Services Setup.
•
Find the hospital service record you wish to delete on the left side of your screen.
Click once on the record.
© 2011 Coordinated Response Tools, LLC
Page 33
•
The information for that record will appear in the Task Panel on the right side of
your screen.
•
Click the Delete Record button.
•
A dialog box will ask if you are sure you want to delete the record. Click the Yes
button.
•
Click the Update Database button.
11.2.4 Import Ambulance Services Data
Ambulance services data can be imported in bulk through the use of Excel
spreadsheets. The spreadsheets must be formatted in a set pattern it order for CNIP
to import the data. To import multiple ambulance services records, complete the
following steps:
Excel Spreadsheet Setup
•
Set up your spreadsheet with the following headers across the top of the page
(Row 1):
Column A – Name
Column B – Address, City, State
Column C – Phone
Column D – Has Paramedics
•
Format your data to fit these four columns.
Import Spreadsheet
•
Go to File / Setup / Ambulance Services Setup.
•
Click the Import Ambulance Services button.
•
The Open File dialog box will appear.
•
Navigate to the Excel spreadsheet containing the information you wish to import.
Click the Open button.
•
Click the Update Database button.
11.3 Personnel Records Setup
11.3.1 Add New Personnel
•
Go to File / Setup / Personnel Records. You can also access this from the
Resource Management button on the second toolbar.
© 2011 Coordinated Response Tools, LLC
Page 34
•
Click the Add New Name button.
•
A dialogue box will appear. Type in the personʼs last name and click OK.
•
Two more dialog boxes will appear in succession. Enter the personʼs first name
and then his/her I.D. number. This will set up the record.
•
You are only required to enter the personʼs name. All other information can be
answered at a later time.
•
The person's information will appear in the panel on the left side of your screen.
11.3.2 Edit a Personnel Record
•
Go to File / Setup / Personnel Records.
•
Find the personnel record you wish to edit on the left side of your screen. Click
once on the record.
•
The information for that record will appear in the Task Panel on the right side of
your screen.
•
Make your corrections directly into the Task Panel.
•
Click the Update Database button.
11.3.3 Delete a Personnel Record
•
Go to File / Setup / Personnel Records.
•
Find the personnel record you wish to delete on the left side of your screen.
•
The information for that record will appear in the Task Panel on the right side of
your screen.
•
Check the box to the right of the record. Click the Delete Selected Name(s) button.
•
A dialog box will ask if you are sure you want to delete the record. Click the Yes
button.
•
Click the Update Database button.
11.3.4 Import Personnel Records
Personnel records can be imported in bulk through the use of Excel spreadsheets.
The spreadsheets must be formatted in a set pattern it order for CNIP to import the
data. To import multiple personnel records, complete the following steps:
© 2011 Coordinated Response Tools, LLC
Page 35
Excel Spreadsheet Setup
•
Set up your spreadsheet with the following headers across the top of the page
(Row 1):
Column A – First Name
Column B – Last Name
Column C – Title/Rank
Column D – Agency
Column E – Assignment
Column F – ID Number
Column G – Badge/Star
Column H – Phone Number
Column I – Cell Phone Number
•
Format your data to fit these nine columns.
Import Spreadsheet
•
Go to File / Setup / Personnel Records.
•
Click the Import/Update Roster button.
•
The Open File dialog box will appear.
•
Navigate to the Excel spreadsheet containing the information you wish to import.
Click the Open button.
11.3.5 Build Simulated Resources
The Build Simulated Resources feature allows you to build a roster of personnel that
can be used for training exercises. To create simulated resources, complete the
following steps:
•
Go to File / Setup / Personnel Records.
•
Click the Build Simulation Resources button.
•
A dialog box will appear. Type in the name of the agency and click OK.
•
Several more dialog boxes will appear in succession. Each will ask questions to
set up the simulation. These include: job title or rank, regular hourly pay rate, and
badge number.
•
A list of simulated resources has been created and placed on your roster.
© 2011 Coordinated Response Tools, LLC
Page 36
11.4 Critical Contacts Phone List Setup
The Critical Contacts Phone List is a roster of personnel designated to be called during an
incident. This list is preloaded into CNIP and used as necessary.
11.4.1 Add a Name to List
•
Go to File / Setup / Critical Contacts Phone List Setup.
•
Click the Add button.
•
A dialogue box will appear. Type in the organization name and click OK.
•
Several more dialog boxes will appear in succession. Each will ask questions to
set up the record.
•
You are only required to enter the organization name. The other questions do not
need to be answered at this time. You can return later to fill in the missing
information.
•
The information you entered will appear in the panel on the left side of your screen.
•
Click the Update Database button.
11.4.2 Edit a Name on the List
•
Go to File / Setup / Critical Contacts Phone List Setup.
•
Find the name you wish to edit on the left side of your screen. Click once on the
name.
•
The information for that name will appear in the Task Panel on the right side of
your screen.
•
Make your corrections directly into the Task Panel.
•
Click the Update Database button.
11.4.3 Delete a Name From List
•
Go to File / Setup / Critical Contacts Phone List Setup.
•
Find the name(s) you wish to delete on the left side of your screen. Check the box
to the right of the name(s).
•
Click the Delete button.
•
A dialog box will ask if you are sure you want to delete the record. Click the Yes
button.
© 2011 Coordinated Response Tools, LLC
Page 37
•
Click the Update Database button.
11.4.4 Import Phone List Data
Information needed for your Critical Contacts Phone List can be imported in bulk
through the use of Excel spreadsheets. The spreadsheets must be formatted in a set
pattern it order for CNIP to import the data. To import multiple records, complete the
following steps:
Excel Spreadsheet Setup
More information to come.
Import Spreadsheet
•
Go to File / Setup / Critical Contacts Phone List Setup.
•
Click the Import Phone List button.
•
The Open File dialog box will appear.
•
Navigate to the Excel spreadsheet containing the information you wish to import.
Click the Open button.
•
Click the Update Database button.
11.5 Radio Communications Setup
11.5.1 Add a Radio Communications Record
•
Go to File / Setup / Radio Communications Setup.
•
Click the Add New Record button.
•
A dialogue box will appear. Type in the name of the communications system and
click OK.
•
Several more dialog boxes will appear in succession. Each will ask questions to
set up the record.
•
You are only required to enter the name of the communications system. The
other questions do not need to be answered at this time. You can return later to fill
in the missing information.
•
The incident radio communications information you entered will appear in the
panel on the left side of your screen.
•
Select the Update Database button to save your entry into the database. Your
© 2011 Coordinated Response Tools, LLC
Page 38
information will be added to Auto Fill for future use when you need it.
•
Your entry will also be added to ICS Form 205 for the current plan.
11.5.2 Edit a Communications Record
•
Go to File / Setup / Radio Communications Setup.
•
Find the record you wish to edit on the left side of your screen. Click once on the
record.
•
The information for that record will appear in the Task Panel on the right side of
your screen.
•
Make your corrections directly into the Task Panel.
•
Click the Update Database button.
11.5.3 Delete a Radio Communications Record
•
Go to File / Setup / Radio Communications Setup.
•
Find the record you wish to delete on the left side of your screen. Click once on the
record.
•
The information for that record will appear in the Task Panel on the right side of
your screen.
•
Click the Delete Record button.
•
A dialog box will ask if you are sure you want to delete the record. Click the Yes
button.
•
Click the Update Database button.
11.5.4 Import Radio Communications Records
Radio communications data can be imported in bulk through the use of Excel
spreadsheets. The spreadsheets must be formatted in a set pattern it order for CNIP
to import the data.
Excel Spreadsheet Setup
More information to come.
Import Spreadsheet
•
Go to File / Setup / Radio Communications Setup.
© 2011 Coordinated Response Tools, LLC
Page 39
•
Click the Import Radio Channels button.
•
The Open File dialog box will appear.
•
Navigate to the Excel spreadsheet containing the information you wish to import.
Click the Open button.
•
Click the Update Database button.
11.6 Create Organizational Templates
To create an organizational template for use in training or future events, complete the following
steps:
•
Go to File / Create Organization Template. Your Incident Command structure will appear.
•
Click the + option to expand the organizational chart to expose all the standard positions.
•
Right click on the positions you wish to include in the template.
•
Add any additional Branches, Divisions, Groups or Units.
•
Click the Apply button.
•
Enter a name for your new template.
•
The template will appear as an icon in the New Incident Action Plan window.
© 2011 Coordinated Response Tools, LLC
Page 40