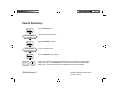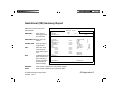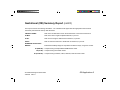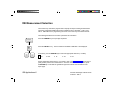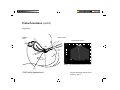
1
GE Medical Systems
Training in Partnership
Technical
Publications
Direction 2166104
Revision 0
RT 3200 Advantage III Quick Guide
Copyright© 1996 by General Electric Company
Operating Documentation
GE Medical Systems
GE Medical Systems: Telex: 3797371
P.O. Box 414, Milwaukee, Wisconsin 53201 U.S.A.
(Asia, Pacific, Latin America, North America)
GE Medical Systems—Europe:
283 rue de la Miniére BP34
78533 Buc Cedex
Telex: 261794
Revision History
REV
DATE
REASON FOR CHANGE
0
August 9, 1996
Initial Release
LIST OF EFFECTIVE PAGES
PAGE
NUMBER
REVISION
NUMBER
PAGE
NUMBER
REVISION
NUMBER
PAGE
NUMBER
REVISION
NUMBER
Title Page
0
Introduction-1 thru -10
0
GYN/Fert. Apps-1 thru -16
0
A and B
0
Initial Set Up-1 thru -6
0
Urology Apps-1 thru -10
0
i thru iv
0
Measurements-1 thru -8
0
Accessories-1 thru -8
0
Safety-1 thru -4
0
OB Apps-1 thru -8
0
RT 3200 Advantage III Quick Guide
2166104 REV 0
A
Please verify that you are using the latest revision of this document. Information pertaining to this
document is maintained on GPC (GE Medical Systems Global Product Configuration). If you need
to know the latest revision, contact the GE Ultrasound Clinical Answer Center at 1-800-682-5327.
B
RT 3200 Advantage III Quick Guide
2166104 REV 0
Table of Contents
Title Page
Revision History ........................................................................................................................... A
Table of Contents ........................................................................................................................... i
Safety
Prescription Device .............................................................................................................................................
Indications for Use ..............................................................................................................................................
Contraindications ................................................................................................................................................
Serviceable Components ....................................................................................................................................
Operator Manual .................................................................................................................................................
Troubleshooting—Who To Contact .....................................................................................................................
Safety-2
Safety-2
Safety-3
Safety-3
Safety-3
Safety-4
Introduction
Major Features ............................................................................................................................................ Introduction-2
Probe Ports ................................................................................................................................................. Introduction-4
Keyboard ..................................................................................................................................................... Introduction-5
Image Preparation Keys ...................................................................................................................... Introduction-5
Alphanumeric Keyboard and Function Keys ........................................................................................ Introduction-6
Image Adjustment and Annotations ..................................................................................................... Introduction-7
Trackball and Measurements ............................................................................................................... Introduction-8
Image Setup Keys ............................................................................................................................... Introduction-9
RT 3200 Advantage III Quick Guide
2166104 REV 0
i
Table of Contents (cont'd)
Initial Set Up
Monitor Contrast/Brightness ..................................................................................................................... Initial Set Up-2
Hospital Name ........................................................................................................................................... Initial Set Up-3
Date Format .............................................................................................................................................. Initial Set Up-4
Time Format .............................................................................................................................................. Initial Set Up-5
Recommended Presets ............................................................................................................................ Initial Set Up-6
Measurements
Measurement Controls ........................................................................................................................... Measurements-2
Distance Measurement .......................................................................................................................... Measurements-3
Circumference Measurement ................................................................................................................. Measurements-4
Area Measurement ................................................................................................................................ Measurements-5
Ellipse Measurement ............................................................................................................................. Measurements-6
OB Applications
Patient Data Entry ...........................................................................................................................................
Gestational (OB) Summary Report .................................................................................................................
OB Measurement Selection ............................................................................................................................
Recommended OB Comments Library ...........................................................................................................
ii
OB Apps-2
OB Apps-3
OB Apps-6
OB Apps-8
RT 3200 Advantage III Quick Guide
2166104 REV 0
Table of Contents (cont'd)
GYN/Fertility Applications
Patient Data Entry ................................................................................................................................ GYN/Fert. Apps-2
GYN Summary Report ......................................................................................................................... GYN/Fert. Apps-3
Probe Orientation ................................................................................................................................. GYN/Fert. Apps-5
GYN Measurement Selection .............................................................................................................. GYN/Fert. Apps-7
Fertility Summary Report ................................................................................................................... GYN/Fert. Apps-10
IVF Measurement Selection ............................................................................................................... GYN/Fert. Apps-12
Recommended GYN Comments Library ........................................................................................... GYN/Fert. Apps-15
Urology Applications
Patient Data Entry .................................................................................................................................... Urology Apps-2
Urology Summary Report ........................................................................................................................ Urology Apps-3
Probe Orientation ..................................................................................................................................... Urology Apps-5
Urology Measurement Selection .............................................................................................................. Urology Apps-7
Recommended Urology Comments Library ........................................................................................... Urology Apps-10
RT 3200 Advantage III Quick Guide
2166104 REV 0
iii
Table of Contents (cont'd)
Accessories/Supplies
Placing Orders ........................................................................................................................................... Accessories-2
Disinfection ................................................................................................................................................. Accessories-2
Probe Covers ............................................................................................................................................. Accessories-3
Gel .............................................................................................................................................................. Accessories-4
Gel Holders ................................................................................................................................................ Accessories-4
Biopsy Supplies ......................................................................................................................................... Accessories-5
Sony Printer Paper ..................................................................................................................................... Accessories-8
iv
RT 3200 Advantage III Quick Guide
2166104 REV 0
Safety
Prescription Device
Indications for Use
Contraindications
Serviceable Components
Operator Manual
Troubleshooting—Who to Contact
This chapter emphasizes precautions to be aware of when working with the RT 3200 Advantage III. Refer to the
Preface—Safety and Section 10—Appendices in the RT 3200 Advantage III Operator Manual for more thorough
explanations.
RT 3200 Advantage III Quick Guide
2166104 REV 0
Safety-1
Prescription Device
CAUTION: United States law restricts this device to sale or use by or on the order of a physician.
Indications for Use
The RT 3200 Advantage III is an ultrasonic diagnostic system equipped for linear, convex and micro-convex scanning. It
may be used in many areas such as obstetrics, gynecology, urology and radiology. The optional 7 MHz transrectal probes
give the RT 3200 Advantage III urology scanning capabilities.
The RT 3200 Advantage III produces high-quality images employing dynamic focus on transmit and continuous focus on
receive. It is equipped with functions to enhance the clinical diagnosis, such as display mode selections, measurements,
calculations, OB, GYN, IVF and Urology Summary Report Pages.
Safety-2
RT 3200 Advantage III Quick Guide
2166104 REV 0
Contraindications
The RT 3200 Advantage III is NOT intended for ophthalmic use (or any use causing the acoustic beam to pass
through the eye).
Serviceable Components
DANGER
The RT 3200 Advantage III contains no user serviceable components. To avoid electrical
shock hazard, do not remove panels or covers from the console. Failure to do so could
cause serious injury. Servicing must be performed by qualified service personnel only.
Operator Manual
Read and understand the RT 3200 Advantage III Operator Manual (2158323) prior to operating the system. Keep the
User Manual with the system for quick and easy reference.
RT 3200 Advantage III Quick Guide
2166104 REV 0
Safety-3
Troubleshooting—Who To Contact
If additional information or assistance is needed, please contact your local distributor or the appropriate support
resource listed below:
USA
GE Medical Systems
Ultrasound Service Engineering
4855 W. Electric Avenue
Milwaukee, WI 53219
Customer Answer Center
CANADA
GE Medical Systems
Ultrasound Service Engineering
4855 W. Electric Avenue
Milwaukee, WI 53219
Customer Answer Center
LATIN AND SOUTH AMERICA
GE Medical Systems
Ultrasound Service Engineering
4855 W. Electric Avenue
Milwaukee, WI 53219
Customer Answer Center
Safety-4
TEL: (1) 800-437-1171
FAX: (1) 414-647-4090
TEL: (1) 800-682-5327 or (1) 414-524-5255
TEL: (1) 800-664-0732
TEL: (1) 800-682-5327 or (1) 414-524-5255
TEL: (1) 305-735-2304
TEL: (1) 800-682-5327 or (1) 414-524-5255
RT 3200 Advantage III Quick Guide
2166104 REV 0
Introduction
Major Features
Probe Ports
Keyboard
This chapter is an introduction to the basic features of the system console of the RT 3200 Advantage III. Refer to
Section 1—Introduction, Section 2—Front Panel Keyboard and Section 3—Detailed Control Description in the
RT 3200 Advantage III Operator Manual for more thorough explanations.
RT 3200 Advantage III Quick Guide
2166104 REV 0
Introduction-1
Major Features
1
The following are major features of the RT 3200 Advantage III system console. Most
features come with the standard configuration, while other features are options to the
standard console.
2
1.
12-inch monochrome monitor
It displays the ultrasound image and scan parameter data.
3
2.
Probe arm
Used to support the probe cable. Keeps the cable off the floor.
3.
Adjustment of monitor height
The height of the monitor can be adjusted by pressing and holding this
button while raising and lowering the monitor.
4.
Adjustment of contrast and brightness
These controls adjust the contrast and brightness of the display to the
operator's preference.
5.
Power switch
Used to turn on/off the main AC power to the system.
6.
Probe connectors
Connects up to two probes to the system at one time.
7.
Front panel
Used to connect the system to a camera, VCR, page printer or external
monitor.
4
5
1
6
2
RS-232C
Introduction-2
Ext TV
Ext TV
In
Out
Camera &
TV Printer
In
Out
Video Out
Shutter
12Vdc
Foot Switch
for Camera
7
Caution
See Operating Manual
for connection.
RT 3200 Advantage III Quick Guide
2166104 REV 0
Major Features (cont'd)
1.
2.
12-inch monochrome monitor
It displays the ultrasound image and scan parameter
data.
1
Probe arm
Used to support the probe cable. Keeps the cable off
the floor.
3.
Upper panel
Used to connect a VCR or page printer (under top
coverplate).
4.
Alphanumeric Keyboard
Used to change scan parameters, enter the text, or
select various function menus.
5.
Handle
Used to aid in the movement of the system and to wrap
power cord around when transporting.
6.
Probe holder, gel holder
Used to hold scan probes and scan gel.
7.
Wheel locks
Used to lock wheel rotation in order to prevent
accidental system movement. To lock wheels, depress
the lever with your foot.
RT 3200 Advantage III Quick Guide
2166104 REV 0
2
3
4
5
6
7
Introduction-3
Probe Ports
Two transducers can be attached to the system at one time. The
default outlet is at the top (#1 in figure on right).
To lock the probe to the system connector, turn the knob clockwise.
1
CAUTION
Make sure that the name of the probe is
right side up.
2
Introduction-4
RT 3200 Advantage III Quick Guide
2166104 REV 0
Keyboard
Image Preparation Keys
New
Patient
ID
Name
Comment
Erase
Preset
Ext
Video
Key
Light
1
2
Probe
This group of controls are used to let the user get prepared for imaging.
New Patient: Used at the beginning of each study to reset the system.
ID/Name:
Used during a study to enter/change patient data or exam categories.
Comment:
Used to enable the placement of comments in the image area.
Erase:
Used to erase an image, comments, measurements and calculations (must be pressed twice to erase).
Preset:
Used to select preset scan parameters for the active probe.
Ext. Video:
Enables an external video signal (i.e. VCR playback) to be processed through the system to the monitor.
Key Light:
Turns the soft green backlight to the keyboard on or off.
Probe:
Used to select a probe for scanning from the two that may be attached.
RT 3200 Advantage III Quick Guide
2166104 REV 0
Introduction-5
Alphanumeric Keyboard and Function Keys
Function
)
(
1
2
Q
E
W
Shift
4
3
A
S
Z
?
!
G
F
D
C
7
Y
T
R
X
6
5
=
"
V
Space
8
U
H
B
~
N
Space
0
9
K
M
-
L
.
BS
P
O
I
J
%
+
Return
/
Shift
Control
Enter
OB
Tbl 1
OB
Tbl 2
Calc 1
Calc 2
Calc 3
Map
Mode
Alphanumberic Keyboard:
Used to change scan parameters, enter the text or select various function menus.
Function Keys:
OB Tbl 1 and OB Tbl 2:
Used to call up preset program menus to select OB calculation tables.
Calc 1, Calc 2 and Calc 3: Used to call up preset program menus to select Advanced Calculation packages.
Map:
Arrows:
Introduction-6
Used to call up preset program menus to select Gray Scale Mapping selections.
Allows left/right movement for selecting a menu option.
RT 3200 Advantage III Quick Guide
2166104 REV 0
Image Adjustment and Annotations
Image Direction:
Rvs:
Inv:
TGC:
Used to reverse the image
display (left and right).
Rvs
Body Pattern
Rotation
Inv
L
R
Center
Sel
Used to invert the image
display (top/bottom).
Used to adjust the gain at 8
specific depth levels.
Dynamic Range: Used to adjust dynamic range
of the image in B- and
M-Modes.
Gain:
Image Direction
Used to adjust the receiver gain
in B- and M-Modes.
-
TGC
+
cm
0
Dynamic Range
2.5
5
7.5
Used to step frame by frame
through the optional 32 frame
Cine memory in Freeze Mode.
10
Gain
12.5
Body Pattern:
15
L, R, Center Enables a group of body
and Sel:
patterns for display.
Rotation:
17.5
Used to rotate transducer
position on body pattern.
RT 3200 Advantage III Quick Guide
2166104 REV 0
Introduction-7
Trackball and Measurements
Trackball:
Used to move a cursor while making comments, to
select tables or functions within the reports and to
make measurements.
Measurements:
Dist:
Measurement
Dist
Used to enable the cursors to make generic linear
distance measurements. Used in conjunction with the
Trackball, Set and measure functions.
Set
Trace
Area
Off
Meas
Trace/Area: Used to enable the trace function. Used to trace an
object to determine circumference and/or area of the
object. Used in conjunction with the Trackball, Set and
measure functions.
Off:
Used to erase the measurement cursors, trace and
measured or calculated data.
Set:
Used to fix a measurement cursor and enable the
second of the pair.
Meas:
Used to complete a measurement sequence and
display the results.
Introduction-8
RT 3200 Advantage III Quick Guide
2166104 REV 0
Image Setup Keys
Mode (B, B/M and M):
Used to select a display mode format.
Sweep Speed:
Used to change the display speed in
M-Mode.
Mode
B
B/M
Focus (1, 2, 3, 4 and Comb): Used to assign the optimum transmit
focal zone.
Scale - Depth:
(x0.7, x1.0, x1.5 and x2.0)
These keys are used to change
the depth (magnification) of an image
display.
Scroll:
Used to scroll an image.
Record:
Used to trigger a camera, page printer
or DMC Data Transfer.
Multi Image:
Used to display and move between
multiple image displays.
Freeze:
Used to freeze an image. Stops the
acquisition of Ultrasound data.
High Sweep
Speed
Low
M
Focus
1
2
3
4
Comb
x1.5
10cm
x2.0
7.5cm
Scale
Depth
x0.7
20cm
x1.0
15cm
Scroll
Record
Multi Image
Freeze
RT 3200 Advantage III Quick Guide
2166104 REV 0
Introduction-9
This page left intentionally blank.
Introduction-10
RT 3200 Advantage III Quick Guide
2166104 REV 0
Initial Set Up
Monitor Contrast/Brightness
Hospital Name
Date Format
Time Format
Recommended Presets
This chapter outlines the initial adjustment of the monitor and set up of display parameters of the
RT 3200 Advantage III. Refer to Section 1—Introduction and Section 5—Control Key Functions in the RT 3200
Advantage III Operator Manual for more thorough explanations.
RT 3200 Advantage III Quick Guide
2166104 REV 0
Initial Set Up-1
Monitor Contrast/Brightness
Adjust the brightness and contrast of the display to the room lighting by using the controls under the left, front corner
of the monitor.
1
2
1.
This control adjusts the brightness. The brightness will increase as the control is turned counterclockwise.
2.
This control adjusts contrast. The picture will become lighter as the control is turned counterclockwise.
Initial Set Up-2
RT 3200 Advantage III Quick Guide
2166104 REV 0
Hospital Name
Use the Control function to enter the name of the hospital and department. They should be entered within 2 lines (8
characters maximum per line).
Press the CONTROL key.
Control
▼
Press the letter H.
H
▼
Press the ENTER key to set the hospital name information.
Enter
▼
Enter Hospital Name
8 characters/2 lines
▼
Enter the hospital name. A maximum of 16 characters (8 characters per line) is available.
Press ENTER to display and store the hospital name information.
Enter
The hospital name is shown in the upper left corner of the screen. This information is retained even after the power is
turned off.
RT 3200 Advantage III Quick Guide
2166104 REV 0
Initial Set Up-3
Date Format
To set the DATE:
Press the CONTROL key.
Control
▼
C
Press the letter C followed by the letter D.
D
▼
Press the ENTER key to set the internal clock for month/day/year.
Enter
▼
Input 6 digits
Month/Day/Year
▼
Use the numeric keys to input the current date to readjust the date on the system. The
date needs to be input in the appropriate format (i.e. MMDDYY = 07/27/91).
Data for the date is set when the ENTER key is pressed the second time.
Enter
NOTE: Slashes are required in the input string. If the date or month is a single digit, it
must include a zero to fill out the two-character field.
Initial Set Up-4
RT 3200 Advantage III Quick Guide
2166104 REV 0
Time Format
To set the clock TIME:
Press the CONTROL key.
Control
▼
Press the letter C followed by the letter T.
T
C
▼
Press ENTER to set the clock time (24 hour run).
Enter
▼
Hour/Minute Input
4 digits
Use the numeric keys to input the current time to readjust the time on the system. The
time needs to be input in the appropriate format (i.e. HM = 1422).
▼
Time data is set when the ENTER key is pressed the second time.
Enter
NOTE: Multiple functions are available through the Control key operation. See Section 5
of the RT 3200 Advantage III Operator Manual for a complete list and applications.
RT 3200 Advantage III Quick Guide
2166104 REV 0
Initial Set Up-5
Recommended Presets
The following are recommended preset settings for specific probes used in OB/GYN and
Urology exam categories:
Initial Set Up-6
OBSTETRICS/GYNECOLOGY
UROLOGY
CA 5.0 MHz Probe
Gain
Dynamic Range
Focus
Depth
CA 5.0 MHz Probe
Gain
44
Dynamic Range
60
Focus
3
Depth
x1.0
40
60
3
x1.0
CB 3.5 MHz and CK (CF) 3.5 MHz Probe
Gain
36
Dynamic Range
60
Focus
3
Depth
x1.0
CB 3.5 MHz and CK (CF) 3.5 MHz Probe
Gain
40
Dynamic Range
60
Focus
3
Depth
x1.0
R 7.0 MHz TransVaginal Probe
Gain
30
Dynamic Range
56 or 60
Focus
3
Depth
x1.5
R 7.0 MHz TransRectal Probe
Gain
30
Dynamic Range
48
Focus
3
Depth
x2.0
RT 3200 Advantage III Quick Guide
2166104 REV 0
Measurements
Measurement Controls
Distance Measurement
Circumference Measurement
Area Measurement
Ellipse Measurement
This chapter shows how to make basic measurements with the RT 3200 Advantage III. Refer to Section 4—Generic
Measurements in the RT 3200 Advantage III Operator Manual for more thorough explanations.
RT 3200 Advantage III Quick Guide
2166104 REV 0
Measurements-1
Measurement Controls
Measurement controls are located above the Trackball. The main keys/
controls involved are:
Dist (Distance):
Enables the cursors to make generic linear
distance measurements. Used in conjunction
with the Trackball, Set and measure functions.
Trace/Area:
Enables the trace function. Used to trace an
object to determine circumference and/or area of
the object. Used in conjunction with the
Trackball, Set and measure functions.
Off:
Used to erase the measurement cursors, trace
and measured or calculated data.
Set:
Used to fix a measurement cursor and enable the
second of the pair.
Measurement
Dist
Set
Trace
Area
Off
Meas
Meas (Measurement): Used to complete a measurement sequence and
display the results.
Trackball:
Measurements-2
Used to move a cursor while making comments,
to select tables or functions within the reports and
to make measurements.
RT 3200 Advantage III Quick Guide
2166104 REV 0
Distance Measurement
By using four cursor patterns, four distance measurements can be made on one display.
Press the DIST key. The LED is lit and the "+" cursor is displayed.
▼
Dist
▼
Set
T. B.
Use the TRACKBALL to move the cursor to the measurement starting point and press the
SET key. The initial measurement point will be locked (set) and the measurement end
point cursor appears.
▼
Meas
T. B.
Use the TRACKBALL to move the end point "+" cursor to the opposite end of the
measurement. (A dotted line with 10 mm intervals connects the two points and the
measured value will appear on the left side of the CRT in mm.) Press the MEAS key. The
second cursor is locked and the measurement values are displayed.
▼
Press the OFF key to erase the cursor, dotted line, and measured values.
Off
NOTE: If the DIST key is pressed in the middle of the measurement, the cursor and
measure values will be cleared (LED will go out). To complete a measurement, repeat the
preceding procedure.
By repeating the preceding procedure, up to four measurements are possible on the same image.
RT 3200 Advantage III Quick Guide
2166104 REV 0
Measurements-3
Circumference Measurement
By using four cursor patterns, four circumference measurements can be made on one
display.
Press the TRACE/AREA key. The LED is lit and the "+" cursor is displayed.
▼
Trace
Area
▼
Set
T. B.
▼
Meas
T. B.
▼
Off
Use the TRACKBALL to move the "+" cursor to the measurement starting point. Press the
SET key. The starting point "+" cursor is locked and the "+" cursor changes to a dot cursor.
Use the TRACKBALL to move the dot cursor, tracing the object to be measured. The
trace is displayed as a continuous curve and the measured value in mm is displayed on
the left side of the screen. When the tracing is complete, press the MEAS key. The cursor
is locked and measured values are fixed.
Press the OFF key to erase the cursor, trace, and the measured values.
NOTE: If the TRACE/AREA key is pressed in the middle of the measurement, the cursor
and measured values will be cleared (LED will go out). To complete a measurement,
repeat the preceding procedure.
By repeating the preceding procedure, up to four measurements for circumference and
area are possible on the same screen.
Measurements-4
RT 3200 Advantage III Quick Guide
2166104 REV 0
Area Measurement
By using the four different cursor patterns, four area measurements can be made on one
display.
Press the TRACE/AREA key. The LED is lit and the "+" cursor appear is displayed.
▼
Trace
Area
▼
Set
T. B.
Use the TRACKBALL to move the "+" cursor to the measurement starting point. Press
the SET key. The starting point "+" cursor is locked and the "+" cursor changes to a dot
cursor.
▼
Set
T. B.
▼
Meas
T. B.
▼
Use the TRACKBALL to move the dot cursor, tracing the object to be measured. The
trace is displayed as a continuous curve and the measured value in mm is displayed on
the left side of the screen. When the tracing is complete, press SET. The circumference
measurement is locked. The "+" cursor appears again.
Use the TRACKBALL to move the "+" cursor inside the traced area. Press MEAS. The
cursor is locked and area is measured by a graphical method. The measured value is
displayed in square cm.
Press OFF to erase all the display of the cursor, trace, and measured data.
Off
RT 3200 Advantage III Quick Guide
2166104 REV 0
Measurements-5
Ellipse Measurement
An ellipse measurement function has been provided in order to improve the measurement
of head and abdominal circumferences and areas.
The ellipse function supersedes any prior measurements on the screen. Entering the ellipse
mode clears all measurements, calipers and traces like when the OFF key is pressed.
Trace
Area
Dist
Press the DIST key, then press the TRACE/AREA key. Both the DIST and TRACE/
AREA LEDs will light and the highlighted
cursor appears on the screen.
NOTE: Pressing DIST or TRACE/AREA keys at any time before the completion of this
sequence will exit the ellipse mode and remove any ellipse graphics from the display.
▼
Set
T. B.
Use the TRACKBALL to position the
cursor at one end of the transverse axis of the
ellipse (i.e. BPD for HC or TAD for AC). Press SET. A second
cursor will appear.
▼
Set
T. B.
Use the TRACKBALL to position the highlighted "+" cursor to the opposite end of the
transverse axis. Press SET. The ellipse graphic will appear with a 1:1 Aspect Ratio (a
circle).
NOTE: The transverse diameter is between the two "+" cursors. The sagittal diameter is
between the two "x" cursors. The highlighted "x" cursor is now active.
▼
(continued)
Measurements-6
RT 3200 Advantage III Quick Guide
2166104 REV 0
Ellipse Measurement (cont'd)
▼
T. B.
Set
Use the TRACKBALL to position the highlighted "x" cursor to the upper end of the sagittal
axis. Press SET. The highlighted "x" cursor is now active.
Set
Use the TRACKBALL to position the highlighted "x" cursor to the lower end of the sagittal
axis. Press SET. The original "+" cursor is now active.
▼
T. B.
NOTE: Each time SET is pressed, the cursors become alternately active. Adjustments
may be made to the ellipse as desired. The highlighted cursor is the active cursor.
▼
When the ellipse cursors are satisfactorily positioned, press MEAS to complete the
measurement.
Meas
The two diameters, circumference and area measurements will be displayed in their
respective fields on the left-hand side of the display screen.
▼
OB
Tbl 1
or
▼
Enter
OB
Tbl 2
This measurement may be used in OB TBL 1 (AC and HC). It may also be used in user
programmable OB TBL 2 menu levels 4 and 5. For gestational age estimations after
making an ellipse measurement, select the function (OB TBL 1 or 2).
Select the menu level and press ENTER.
RT 3200 Advantage III Quick Guide
2166104 REV 0
Measurements-7
This page left intentionally blank.
Measurements-8
RT 3200 Advantage III Quick Guide
2166104 REV 0
OB Applications
Patient Data Entry
Gestational (OB) Summary Report
OB Measurement Selection
Recommended OB Comments Library
This chapter highlights how to set up for OB measurements and display of the Gestational (OB) Summary Report with
the RT 3200 Advantage III. Refer to Section 7—Gestational Summary Report in the RT 3200 Advantage III Operator
Manual for more thorough explanations.
RT 3200 Advantage III Quick Guide
2166104 REV 0
OB Applications-1
Patient Data Entry
Press the ID/Name key.
ID
Name
▼
Enter ID Number
8 characters/2 lines
Type in the patient's ID number.
▼
Press the ID/Name key again.
ID
Name
▼
Enter ID Name
8 characters/3 lines
Type in the patient name.
▼
Press the ID/Name key a third time.
ID
Name
▼
Control
O
OB Applications-2
Once the ID number and name have been entered, the personal fields of the OB Report
Page can be input. Press CONTROL and the letter O to activate the Gestational (OB)
Report Page. The patient ID and name are already entered on the report page.
RT 3200 Advantage III Quick Guide
2166104 REV 0
Gestational (OB) Summary Report
Data needs to be entered into the
personal fields:
REFERRAL:
Enter name of
referring physician
(16 characters)
REFERRED FOR: Enter reason for
referral.
PATIENT AGE:
LMP:
EGA:
Enter age using a
2-digit number.
Enter date, using
same format as
exam date at top of
form.
If LMP date does not
apply and the exact
age of the fetus is
known, enter that in
the EGA area (in
weeks and days).
EXAM DATE:
NAME:
ID:
REFERRAL:
REFERRED FOR:
EGA:
GRAVIDA:
PARA:
CALCULATIONS
CGA? N
CGA? N
CGA? N
CGA? N
CGA? N
CGA? N
CGA? N
CGA? N
CGA? N
CGA? N
CEPHALIC INDEX:
FL/BPD:
FL/AC:
HC/AC:
EFBW:
#1 (BPD,AC):
#2 (FL,AC):
#3 (FL,AC,HC):
HEART RATE:
AFI:
/
%
%
%
%
GM
GM
GM
BPM
CM
%
EDD BY LMP:
EDD BY EGA:
EDD BY CGA:
COMMENTS:
REPORTED BY:
GRAVIDA:
Enter number of pregnancies of the patient (2 digits).
PARA:
Enter number of deliveries of the patient (2 digits).
RT 3200 Advantage III Quick Guide
2166104 REV 0
GE MEDICAL SYSTEMS
AGE:
LMP:
GESTATIONAL AGE
GA BY LMP:
BPD(HADLOCK)
OFD
CRL(ROBINSON)
FL(O BRIEN)
HC(HADLOCK)
TAD
APD
AC(HADLOCK)
(TBL 2)
(TBL 2)
(TBL 2)
(TBL 2)
(TBL 2)
CGA:
08/15/92
REPORT DATE:
OB Applications-3
Gestational (OB) Summary Report (cont'd)
The Gestational Summary Report consists of the measurements and calculations derived from measurements taken
from selected anatomy. To perform the measurements listed below, see the OB Measurement Selection portion of
this section.
BIPARIETAL DIAMETER (BPD):
Distance or Ellipse
OCCIPITAL-FRONTAL DIAMETER (OFD): If 2 Distance is performed for BPD, this is the second distance
measurement.
CROWN RUMP LENGTH (CRL):
Distance
FEMUR LENGTH (FL):
Distance
HEAD CIRCUMFERENCE (HC):
2 Distance, Trace or Ellipse
TRANSVERSE ABDOMINAL
DIAMETER (TAD):
If a 2 Distance measurement is performed for AC, this is the first distance
measurement.
ABDOMINAL ANTERIOR-POSTERIOR
DIAMETER (APD):
If a 2 Distance measurement is performed for AC, this is the second
distance measurement.
ABDOMINAL CIRCUMFERENCE (AC):
2 Distance, Trace or Ellipse
HEART RATE (HR):
Distance in M-Mode
AMNIOTIC FLUID INDEX (AFI):
AFI needs to be selected first in the Calc2 menu function before any
measurements are taken. Then four separate distance measurements
need to be performed, one in each quadrant of the uterus. Do NOT
press the ENTER key until all four measurements have been made.
OB Applications-4
RT 3200 Advantage III Quick Guide
2166104 REV 0
Gestational (OB) Summary Report (cont'd)
This report consist of the following calculations. The calculations will appear after the appropriate measurements
have been performed that make up that calculation.
CEPHALIC INDEX:
Ratio of the two diameters used in the measurement of the head circumference.
FL/BPD:
Ratio of the femur length to biparietal diameter, in percent.
FL/AC:
Ratio of femur length to abdominal circumference, in percent.
HC/AC:
Ratio of head circumference to abdominal circumference, in percent.
ESTIMATED FETAL BODY
WEIGHT:
Estimated Fetal Body Weight is computed three different ways, using three models.
#1 (BPD/AC): Computed using a Shephard/Richards/Berkowitz model.
#2 (FL/AC): Computed using the Hadlock model.
#3 (FL/AC/HC): Computed using a Hadlock, Harris, Sharman, Deter and Park model.
RT 3200 Advantage III Quick Guide
2166104 REV 0
OB Applications-5
OB Measurement Selection
The function keys have been programmed to simplify the steps for taking measurements.
The factory programmed OB measurement calculations are in OB Table 1, Calc-1 and
Calc-2. OB Table 2 is for programming the user's most commonly used measurements.
The following describes how to select a parameter for calculation.
Press the FREEZE key to stop image acquisition.
Freeze
▼
OB
Tbl 1
▼
Press the OB TBL 1 key. The five selections available in OB Table 1 are displayed.
If necessary, use the ARROW keys to select the appropriate selection (i. e. BPD).
1 BPD
2 CRL
3 FL
4 AC
5 HC
Do the appropriate measurement. If necessary, refer to the Measurements section of this
quick guide to perform the measurements. Once the measurement is completed, press
the ENTER key to calculate the gestational age and to transfer the information to the
report page.
OB Applications-6
RT 3200 Advantage III Quick Guide
2166104 REV 0
OB Measurement Selection (cont'd)
The selections available for Calc-1, Calc-2 and OB Table 2 are as follows:
CALC 1
1 CIRC
2 VOL
3 HR
4 VELO
5 A/B
2 EFBW
3 STVOL
4 AFI
5 HIP
2
3
4
5
CALC 2
1 EDC
OB TABLE 2
1
The name programmed by the user follows the appropriate number.
Up to five user programmable tables can be programmed into OB TBL 2 by using the
CONTROL, G, 0 function.
NOTE: Menu levels 1 through 3 are for single distance measurements. Menu levels 4
and 5 are for circumference measurements.
Refer to Section 6 of the RT 3200 Advantage III Operator Manual for complete
programming procedures.
RT 3200 Advantage III Quick Guide
2166104 REV 0
OB Applications-7
Recommended OB Comments Library
The following list is the recommended comments library for the OB exam category. For
programming, either review the video tape again or refer to the User Programmable
Comments Library portion of Section 7 in the Operator manual.
A
B
CI
CRL
D
F
FA
FM
4
GS
=
=
=
=
=
=
=
=
=
=
Abdomen
Bladder
Cord Insertion
Crown Rump Length
Diaphragm
Face
Forearm
Femur
Four Chamber Heart
Gestational Sac
H
HM
K
LL
LV
P
SP
ST
3
YS
=
=
=
=
=
=
=
=
=
=
Head
Humerus
Kidneys
Lower Leg
Lateral Ventricle
Placenta
Spine
Stomach
Three Vessel Cord
Yolk Sag
NOTE: There is one comments library for all exam categories. The comments library is
common to all exams.
OB Applications-8
RT 3200 Advantage III Quick Guide
2166104 REV 0
GYN/Fertility Applications
Patient Data Entry
GYN Summary Report
Probe Orientation
GYN Measurement Selection
Fertility Summary Report
IVF Measurement Selection
Recommended GYN Comments Library
This chapter highlights how to set up for the GYN/Fertility measurements and display of the GYN/Fertility Summary
Reports with the RT 3200 Advantage III. Refer to Section 8—GYN/Fertility Report Pages in the RT 3200 Advantage
III Operator Manual for more thorough explanations.
RT 3200 Advantage III Quick Guide
2166104 REV 0
GYN/Fertility Applications-1
Patient Data Entry
Press the ID/Name key.
ID
Name
▼
Enter ID Number
8 characters/2 lines
Type in the patient's ID number.
▼
Press the ID/Name key again.
ID
Name
▼
Enter ID Name
8 characters/3 lines
Type in the patient name.
▼
Press the ID/Name key a third time.
ID
Name
▼
Control
O
Once the ID number and name have been entered, the personal fields of the GYN/Fertility
Report Pages can be input. Press CONTROL and the letter M to activate the GYN/Fertility
Report Pages. The patient ID and name are already entered on the report page.
GYN/Fertility Applications-2
RT 3200 Advantage III Quick Guide
2166104 REV 0
GYN Summary Report
Data needs to be entered into the
personal fields:
REFERRAL:
Enter name of
referring physician
(16 characters)
EXAM DATE:
NAME:
ID:
REFERRAL:
REFERRED FOR:
08/15/92
GE MEDICAL SYSTEMS
AGE:
LMP:
GRAVIDA:
PARA:
GYN REPORT
REFERRED FOR: Enter reason for
referral.
PATIENT AGE:
LMP:
Enter age using a
2-digit number.
Enter date, using
same format as
exam date at top
of form.
GRAVIDA:
Enter number of
pregnancies of the
patient.
PARA:
Enter number of
deliveries of the
patient.
L (cm)
H (cm)
VOL (cm 3 )
COMMENTS
CERVIX
ENDOMETRIUM
UTERUS
RIGHT OVARY
LEFT OVARY
COMMENTS:
REPORTED BY:
RT 3200 Advantage III Quick Guide
2166104 REV 0
W (cm)
REPORT DATE:
GYN/Fertility Applications-3
GYN Summary Report (cont'd)
The GYN Summary Report consists of volume calculations derived from length, width and height measurements
taken from selected anatomy. To perform the measurements of the anatomy listed below, see the GYN
Measurement Selection portion of this section.
CERVIX:
3 Distance Measurements
ENDOMETRIUM:
3 Distance Measurements
UTERUS:
3 Distance Measurements
RIGHT OVARY:
3 Distance Measurements
LEFT OVARY :
3 Distance Measurements
GYN/Fertility Applications-4
RT 3200 Advantage III Quick Guide
2166104 REV 0
Probe Orientation
Coronal View
(B)
(C)
Patient's
Left
Side
Image Display Screen
A
GENERAL
ELECTRIC
06 / 20 / 91
12 : 28 : 59
R 7.0MHz
x1.0
(A)
Patient's
Right
Side
D+
x
x
x
C+
x
x
x
A+
x
x
x
ID:
1234
NAME:
SMITH
JOHN
B
C
G46D66T50
NOTE: The Image Reverse Function is “ON”.
RT 3200 Advantage III Quick Guide
2166104 REV 0
GYN/Fertility Applications-5
Probe Orientation (cont'd)
Sagittal View
Patient's Feet
Patient's
Head
Image Display Screen
(B)
(A)
A
GENERAL
ELECTRIC
06 / 20 / 91
12 : 28 : 59
R 7.0MHz
x1.0
D+
x
x
x
C+
x
x
x
A+
x
x
x
ID:
1234
NAME:
SMITH
JOHN
B
C
G46D66T50
NOTE: The Image Reverse Function is “ON”.
(C)
GYN/Fertility Applications-6
RT 3200 Advantage III Quick Guide
2166104 REV 0
GYN Measurement Selection
The function keys have been programmed to simplify the steps for taking measurements.
The factory programmed GYN measurements/calculations are in Calc-3.
The following steps detail the process to select the parameter for calculation using the
three diameter method in the split screen mode.
NOTE: Multiple GYN measurements should always be made in order:
1.
2.
3.
"+"
"x"
"x"
L
W
H
Length
Width
Height
Before pressing ENTER, all desired measurements must be displayed on the same screen to
be included in the volume calculation.
RT 3200 Advantage III Quick Guide
2166104 REV 0
GYN/Fertility Applications-7
GYN Measurement Selection (cont'd)
Multi Image
▼
Press the MULTI-IMAGE LEFT ARROW key. Scan the object in either a sagittal or axial
scan plane.
Press FREEZE to stop image acquisition of the left image.
Freeze
▼
Multi Image
▼
Press the MULTI-IMAGE RIGHT ARROW key to activate the right image. Scan the
object in the appropriate scan plane.
Press FREEZE to stop image acquisition of the right image.
Freeze
▼
(continued)
GYN/Fertility Applications-8
RT 3200 Advantage III Quick Guide
2166104 REV 0
GYN Measurement Selection (cont'd)
▼
Calc 3
Press the CALC 3 key once to display the GYN calculations menu at the bottom of the
display.
1 CERVIX
2 ENDO
3 UTERUS
4 RT OV
5 LT OV
▼
Use the ARROW keys to select the organ being measured.
1 CERVIX
2 ENDO
3 UTERUS
4 RT OV
5 LT OV
Always measure the anatomy length first, then width, and finally height. Failure to perform
the three measurements in this order will result in an inaccurate volume calculation. If
necessary, refer to the Measurements section of this quick guide to perform distance
measurements. The ENTER key must not be pressed until all desired measurements are
performed and displayed on the same screen.
RT 3200 Advantage III Quick Guide
2166104 REV 0
GYN/Fertility Applications-9
Fertility Summary Report
Data needs to be entered into the
personal fields:
REFERRAL:
Enter name of
referring physician
(16 characters).
REFERRED FOR: Enter reason for
referral.
PATIENT AGE:
Enter age using a
2-digit number.
LMP:
Enter date, using
same format as
exam data at top of
form.
GRAVIDA:
Enter number of
pregnancies of the
patient (2 digits).
PARA:
Enter number of
deliveries of the
patient (2 digits).
EXAM DATE:
NAME:
ID:
REFERRAL:
REFERRED FOR:
GE MEDICAL SYSTEMS
AGE:
LMP:
GRAVIDA:
PARA:
FERTILITY REPORT
RIGHT OVARY FOLLICLES
DIAMETERS (mm)
MEAN
+
x
x
1
2
3
4
5
6
VOL
(cm 3)
LEFT OVARY FOLLICLES
DIAMETERS (mm)
+ x x
MEAN
1
2
3
4
5
6
VOL
(cm 3 )
FOLLICULAR OBSERVATIONS
VOLUME CHANGES
:
BORDER APPEARANCE :
CONTENTS
:
OTHER
:
COMMENTS:
REPORTED BY:
GYN/Fertility Applications-10
08/15/92
REPORT DATE:
RT 3200 Advantage III Quick Guide
2166104 REV 0
Fertility Summary Report (cont'd)
The Fertility Report Page has five other fields that can be edited directly by the user. They are:
VOLUME CHANGES:
Enter follicular observations (alphanumeric, 40 characters).
BORDER APPEARANCE:Enter follicular observations (alphanumeric, 40 characters).
CONTENTS:
Enter follicular observations (alphanumeric, 40 characters).
OTHER:
Enter follicular observations (alphanumeric, 40 characters).
COMMENTS:
Enter general comments (alphanumeric, one line of 56 and two lines of 64 characters).
The Fertility Summary Report consists of volume and mean calculations derived from length, width and height
measurements taken from selected anatomy. To perform the measurements of the anatomy listed below, see the IVF
Measurement Selection portion of this section.
FOLLICLE DIAMETERS: Up to six measurements for each ovary can be taken. For each follicle, the length, width
and height measurements must be performed.
MEAN DIAMETERS:
Up to six calculations for each ovary (six follicles for the right ovary and six follicles for the
left ovary) can be calculated.
VOLUME:
Calculated for the six follicles measured for the right ovary and six follicles for the left
ovary.
RT 3200 Advantage III Quick Guide
2166104 REV 0
GYN/Fertility Applications-11
IVF Measurement Selection
The function keys have been programmed to simplify the steps for taking measurements.
The factory programmed IVF measurement calculations are in the second menu of the
Calc-3 selections. Press CALC-3 twice to display the IVF selections.
The following steps detail the process to select the parameter for calculation using the
three diameter method in the split screen mode.
NOTE: Multiple IVF measurements should always be made in order:
1.
2.
3.
"+"
"x"
"x"
L
W
H
Length
Width
Height
Before pressing ENTER, all desired measurements must be displayed on the same screen to
be included in the volume calculation.
GYN/Fertility Applications-12
RT 3200 Advantage III Quick Guide
2166104 REV 0
IVF Measurement Selection (cont'd)
Multi Image
▼
Press the MULTI-IMAGE LEFT ARROW key. Scan the object in either a sagittal or axial
scan plane (for more information, see the Probe Orientation portion of this section).
Press FREEZE to stop image acquisition of the left image.
Freeze
▼
Multi Image
▼
Press the MULTI-IMAGE RIGHT ARROW key to activate the right image. Scan the
object in the appropriate scan plane.
Press FREEZE to stop image acquisition of the right image.
Freeze
▼
(continued)
RT 3200 Advantage III Quick Guide
2166104 REV 0
GYN/Fertility Applications-13
IVF Measurement Selection (cont'd)
▼
Calc 3
Calc 3
Press the CALC 3 key twice to display the IVF calculations menu at the bottom of the
display.
1 RT OV
2 LT OV
FOLLICLE = __
▼
Use the ARROW keys to select the organ being measured.
1 RT OV
2 LT OV
FOLLICLE = __
Always measure the anatomy length first, then width, and finally height. Failure to perform
the three measurements in this order will result in an inaccurate volume calculation. If
necessary, refer to the Measurements section of this quick guide to perform distance
measurements. The ENTER key must not be pressed until all desired measurements are
performed and displayed on the same screen.
GYN/Fertility Applications-14
RT 3200 Advantage III Quick Guide
2166104 REV 0
Recommended GYN Comments Library
The following list is the recommended comments library for the GYN exam category.
B
C
CX
CS
E
F
FB
FL
L
LO
M
R
RO
S
T
=
=
=
=
=
=
=
=
=
=
=
=
=
=
=
Bladder
Cyst
Cervix
Cul de Sac
Endometrium
Fundus
Fibroid
Follicle
Left
Left Ovary
Midline
Right
Right Ovary
Sagittal
Transverse
NOTE: There is one comments library for all exam categories. The comments library is
common to all exams.
RT 3200 Advantage III Quick Guide
2166104 REV 0
GYN/Fertility Applications-15
This page intentionally left blank.
GYN/Fertility Applications-16
RT 3200 Advantage III Quick Guide
2166104 REV 0
Urology Applications
Patient Data Entry
Urology Summary Report
Probe Orientation
Urology Measurement Selection
Recommended Urology Comments Library
This chapter highlights how to set up for the basic Urology measurements and display of the Urology Summary
Report with the RT 3200 Advantage III. Refer to Section 9—Urology in the RT 3200 Advantage III Operator Manual
for more thorough explanations.
RT 3200 Advantage III Quick Guide
2166104 REV 0
Urology Applications-1
Patient Data Entry
Press the ID/Name key.
ID
Name
▼
Enter ID Number
8 characters/2 lines
Type in the patient's ID number.
▼
Press the ID/Name key again.
ID
Name
▼
Enter ID Name
8 characters/3 lines
Type in the patient name.
▼
Press the ID/Name key a third time.
ID
Name
▼
Control
O
Once the ID number and name have been entered, the personal fields of the Urology
Report Pages can be input. Press CONTROL and the letter U to activate the Urology
Report Pages. The patient ID and name are already entered on the report page.
Urology Applications-2
RT 3200 Advantage III Quick Guide
2166104 REV 0
Urology Summary Report
Data needs to be entered into the
personal fields:
EXAM DATE:
04/15/91
PATIENT DATA
REFERRAL:
Enter name of
referring physician
(16 characters)
REFERRED FOR: Enter reason for
referral
PATIENT AGE:
Enter age using a
2-digit number
AP:
Alkaline
Phosphatase
concentration (12
characters)
PSA:
Prostatic Specific
Antigen
concentration (12
characters)
RT 3200 Advantage III Quick Guide
2166104 REV 0
GE MEDICAL SYSTEMS
NAME:
ID:
AGE:
REFERRAL:
REFERRED FOR:
AP:
PSA:
PPSA:
DRE:
XXX:
XXXXXXXXXXXX
XXXXXXXXXXXX
BASED ON VOLUME 1
XXXXXXXXXXXXXXXXXXXXXXXXXXXXXXXXXXXXXXXXXXXXXXXXXXXXXXXXX
XXXXXXXXXXXXXXXXXXXXXXXXXXXXXXXXXXXXXXXXXXXXXXXXXXXXXXXXX
VOLUME
VOLUME
VOLUME
#####.# cm3
#####.# cm3
#####.# cm3
#1
#2
#3
LESION SITE:
1
2
3
4
✳✳✳✳✳✳✳✳✳✳✳✳✳✳✳✳✳✳✳✳✳✳✳✳✳✳✳✳✳✳✳✳✳✳✳✳✳✳✳✳
✳✳✳✳✳✳✳✳✳✳✳✳✳✳✳✳✳✳✳✳✳✳✳✳✳✳✳✳✳✳✳✳✳✳✳✳✳✳✳✳
✳✳✳✳✳✳✳✳✳✳✳✳✳✳✳✳✳✳✳✳✳✳✳✳✳✳✳✳✳✳✳✳✳✳✳✳✳✳✳✳
XXXXXXXXXXXXXXXXXXXX
XXXXXXXXXXXXXXXXXXXX
XXXXXXXXXXXXXXXXXXXX
XXXXXXXXXXXXXXXXXXXX
BIOPSY
YES NO
YES NO
YES NO
YES NO
COMMENTS:
REPORTED BY:
REPORT DATE:
Urology Applications-3
Urology Summary Report (cont'd)
PPSA:
On the PPSA line is a non-edit field that corresponds to the calculation result. The edit field
following the words "BASED ON VOLUME" is a single digit (1, 2 or 3) to indicate which volume
measurement (corresponding to the entire gland) is used to calculate the PPSA.
The volume chosen is multiplied by the value (0.12 or 0.15) used as the threshold level. (It is
based on standard production of PSA per gram of volume of prostatic tissue.)
NOTE: 0.12 is the system default. To change from 0.12 to 0.15, see Control, U, P in Section 5 of
the RT 3200 Advantage III Operator Manual.
DRE:
Digital Rectal Exam results (56 characters)
XXX:
Optional User Specific field (4 character name, 56 character text).
LESION SITE:
User specified comments.
VOLUME 1-3:
Comment line, to the right of each measurement, can be used to describe the volume
measurement (40 characters each).
BIOPSY:
Indicated whether the lesion site was biopsied. Enter "Y" for yes and "N" for no.
COMMENTS:
General comments and findings (248 characters in 4 lines).
The Urology Summary Report consists of volume calculations derived from length, width and height measurements of
the prostate. To perform the measurements, see the Urology Measurement Selection portion of this section.
VOLUME:
3 Distance Measurements
Urology Applications-4
RT 3200 Advantage III Quick Guide
2166104 REV 0
Probe Orientation
Axial View
Patient's Right Side
Patient's Left Side
(B)
(C)
Image Display Screen
GENERAL
ELECTRIC
06 / 20 / 91
12 : 28 : 59
R 7.0MHz
x1.0
(A)
C
B
D+
x
x
x
C+
x
x
x
A+
x
x
x
ID:
1234
NAME:
SMITH
JOHN
G46D66T50
A
NOTE: The Image Reverse Function
is “OFF”. The Image Invert Function
is “ON”.
RT 3200 Advantage III Quick Guide
2166104 REV 0
Urology Applications-5
Probe Orientation (cont'd)
Sagittal View
Anterior/
(B)
Patient's Feet
Image Display Screen
GENERAL
ELECTRIC
06 / 20 / 91
12 : 28 : 59
R 7.0MHz
x1.0
C
B
D+
x
x
x
C+
x
x
x
A+
x
x
x
Patient's Head
ID:
1234
NAME:
SMITH
JOHN
(A)
G46D66T50
A
NOTE: The Image Reverse
Function is “OFF”. The Image
Invert Function is “ON”.
(C)
Posterior
Urology Applications-6
RT 3200 Advantage III Quick Guide
2166104 REV 0
Urology Measurement Selection
The function keys have been programmed to simplify the steps for taking measurements.
The factory programmed Urology measurements/calculations for the prostate volume are
in Calc 1.
The following steps detail the process to select the parameter for calculation using the
three diameter method in the split screen mode.
NOTE: Multiple Urology measurements should always be made in order:
1.
2.
3.
"+"
"x"
"x"
L
W
H
Length
Width
Height
Before pressing ENTER, all desired measurements must be displayed on the same screen
to be included in the volume calculation.
RT 3200 Advantage III Quick Guide
2166104 REV 0
Urology Applications-7
Urology Measurement Selection (cont'd)
Multi Image
▼
Press the MULTI-IMAGE LEFT ARROW key. Scan the object in either a sagittal or axial
scan plane.
Press FREEZE to stop image acquisition of the left image.
Freeze
▼
Multi Image
▼
Press the MULTI-IMAGE RIGHT ARROW key to activate the right image. Scan the
object in the appropriate scan plane.
Press FREEZE to stop image acquisition of the right image.
Freeze
▼
(continued)
Urology Applications-8
RT 3200 Advantage III Quick Guide
2166104 REV 0
Urology Measurement Selection (cont'd)
▼
Calc 1
Press the CALC 1 key to display the Urology calculations menu at the bottom of the
display.
1 CIRC
2 VOL
3 HR
4 VELO
5 A/B A+Bx
▼
Use the ARROW keys to select the volume.
1 CIRC
2 VOL
3 HR
4 VELO
5 A/B A+BxC*
Always measure the anatomy length first, then width, and finally height. Failure to perform
the three measurements in this order will result in an inaccurate volume calculation. If
necessary, refer to the Measurements section of this quick guide to perform distance
measurements. The ENTER key must not be pressed until all desired measurements are
performed and displayed on the same screen.
RT 3200 Advantage III Quick Guide
2166104 REV 0
Urology Applications-9
Recommended Urology Comments Library
The following list is the recommended comments library for the OB exam category.
A
B
BL
BX
ED
K
L
LT
M
ML
P
PB
R
RT
S
SV
T
U
V
=
=
=
=
=
=
=
=
=
=
=
=
=
=
=
=
=
=
=
Apex
Base
Bladder
Biopsy Site
Ejaculatory Duct
Kidney
Left
Left Teste
Mid Gland
Mid Line
Prostate
Post Biopsy
Right
Right Teste
Sagittal
Seminal Vesicle
Transverse
Urethra
Vas Deferens
NOTE: There is one comments library for all exam categories. The comments library is
common to all exams.
Urology Applications-10
RT 3200 Advantage III Quick Guide
2166104 REV 0
Accessories/Supplies
Placing Orders
Disinfection
Probe Covers
Gel
Gel Holders
Biopsy Supplies
Sony Printer Paper
This chapter lists the accessories available for the RT 3200 Advantage III.
RT 3200 Advantage III Quick Guide
2166104 REV 0
Accessories-1
Placing Orders
To place an order, call your local Applications, Sales or Service Representative.
FOR USA
ONLY
GE Access Center at 1-800-472-3666
Disinfection
PART NO.
DESCRIPTION
E8386EE
Sterilizing/Disinfecting Tray for TV/TR Probes. 19"L x 6"W x 5"H with perforated inner liner and
transparent lid.
E8386EB
CIDEX Activated Dialdehyde Solution. 16 1-quart bottles per case.
E8386EC
CIDEX Activated Dialdehyde Solution. Four 1-gallon bottles per case.
Accessories-2
RT 3200 Advantage III Quick Guide
2166104 REV 0
Probe Covers
PART NO.
DESCRIPTION
E8385CC
Sanitary, double tumbled, dry lubricant latex cover, 3.5 cm x 20 cm with 40 elastic bands each.
Outer Probe Cover for TR/TV Probes. Box of 20 individually packaged sanitary sets.
E8385CG
Outer Cover Econo Pack. Sanitary latex covers for TE/TV probes, 3.5 cm x 20 cm, includes 100
bands, not individually wrapped, box of 100.
E8386CD
Sanitary Endocavitary Probe Covers. Latex covers fit GE's 7.0 MHz probe, 2.0 cm x 20 cm.
Individually wrapped with 4 band each. 24 covers per box.
E8385CH
Sheathes™ Bulk Probe Covers. Box of 100 latex covers, 5 cm x 20 cm, without bands.
E8385CK
Bulk Sanitary #35 Elastic Bands, 100 per pack.
RT 3200 Advantage III Quick Guide
2166104 REV 0
Accessories-3
Gel
PART NO.
DESCRIPTION
E8365AF
Aquasonic 100 Ultrasound Transmission Gel. One 5 liter jug.
E8365BA
Aquasonic 100 Ultrasound Transmission Gel. Case of twelve 250 ml plastic bottles.
E8365BJ
Sterile Aquasonic 100 Transmission Gel. Box of forty eight 20-gram foil pouches.
E8365BC
Scan Ultrasound Gel. Case of twelve 8 oz. plastic bottles.
E8365BK
Scan Ultrasound Gel. Four 1 gallon containers, two dispensers and one dispenser pump.
E8365BD
Scan Ultrasound Gel. One gallon jug includes one empty dispensing bottle.
Gel Holders
PART NO.
DESCRIPTION
E8365BH
Thermasonic Gel Warmer. Holds three 8 oz. dispenser bottles. 110V.
E8365BL
Echowarm Gel Warmer. Holds single 12 oz. gel dispenser bottle. Designed for continuous use.
Hospital grade plug, 110V.
Accessories-4
RT 3200 Advantage III Quick Guide
2166104 REV 0
Biopsy Supplies
FOR CA/CB PROBES (CONVEX)
PART NO.
DESCRIPTION
E8385FA
Starter Kit for CA/CB Convex Probe. Includes one reusable bracket and 5 sterile procedure kits.
E8385LC
Replacement Biopsy Kit. Includes 24 Sterile Procedure Kits (no bracket).
Procedure Kit includes : 1 Needle Guide usable with 14, 16, 18, 20, 22 or 25 gauge needles
1 Non-latex Probe Cover
20 ml Packet of Sterile Ultrasound Gel
2 Rubber Bands
E8385LF
Sterile Probe Cover Kit. Includes 24 Sterile 5.5" x 24" Non-Latex Probe Covers, 24 Sterile Gel
Packs and 48 Elastic Bands. (No Bracket or Needle Guides).
FOR LP PROBES (LINEAR)
E8385LB
Starter Kit for LP 7.5 Probe. Includes one reusable bracket and 24 sterile procedure kits.
Procedure Kit includes : 1 Needle Guide usable with 14, 16, 18, 20, 22 or 25 gauge needles
1 Non-latex Probe Cover
20 ml Packet of Sterile Ultrasound Gel
2 Rubber Bands
E8385LF
Sterile Probe Cover Kit. Includes 24 Sterile 5.5" x 24" Non-Latex Probe Covers, 24 Sterile Gel
Packs and 48 Elastic Bands. (No Bracket or Needle Guides).
RT 3200 Advantage III Quick Guide
2166104 REV 0
Accessories-5
Biopsy Supplies (cont'd)
FOR 6.5 MHz (MZ) PROBE
PART NO.
DESCRIPTION
*
Stainless Steel Non-disposable (straight) for 25 cm Needle
E8323GE
Cleaning Brushes for use with the non-disposable Biopsy Guide for 6.5 MHz Endo Probe. Single
use only. 5 brushes per package.
E8386AE
Biopty Biopsy System. Standard reusable instrument with 23mm penetration depth for use with our
endocavitary probes. Packaged individually, non-sterile.
E8386AJ
Biopty-Cut Needles for the Biopty System, 18g x 25cm length. Packaged individually, sterile.
Box of 10. For use with non-disposable stainless steel straight guide.
*
Contact your Sales Representative for information regarding this accessory.
Accessories-6
RT 3200 Advantage III Quick Guide
2166104 REV 0
Biopsy Supplies (cont'd)
FOR 5 MHz TV STRAIGHT HANDLE PROBE
PART NO.
DESCRIPTION
E8323GB
Bx Guides—Sterile disposable biopsy guide. Box of 25.
FOR 7MHz TR/TV PROBE
E8386CB
Bx Guides—Sterile disposable endocavitary biopsy guide, long. For GE H4618E probe.
Individually packaged in Tyvek bag, with instruction kit. Box of 25.
E8323GD
Cleaning Brushes, for the 7.0 MHz endocavitary probe needle guides. 5 brushes per pack.
E8386AE
Biopty Biopsy System. Standard reusable instrument with 23mm penetration depth for use with our
endocavitary probes. Packaged individually, non-sterile.
E8386AF
Biopty-Cut Needles for the Biopty System, 18g x 20cm length. Packaged individually, sterile.
Box of 10.
E8386AG
Monopty Biopsy System. Disposable instrument/needle combination for use with our 7.0 MHz
endocavitary probe. 18g x 20cm length, 22mm needle penetration. Packaged individually, sterile.
Box of 10.
RT 3200 Advantage III Quick Guide
2166104 REV 0
Accessories-7
Sony Printer Paper
PART NO.
DESCRIPTION
E8310KB
Superior Dynamic Range Video Printer Paper for use with the UP-890, case of 5 rolls.
E8310FA
High Density Video Printer Paper for use with the UP-870MD or UP-850, 210 prints per roll, box of
5 rolls. (UPP-110H) Not for use with UP-811.
E8310GA
Standard Density Video Printer Paper for use with UP-870MD, UP-850 or UP-811, box of 12 rolls.
(UPP-1105/1).
Accessories-8
RT 3200 Advantage III Quick Guide
2166104 REV 0