1
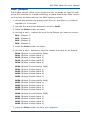
SDI-DMX Mixer Pro
User Manual
Contact Information
U.S. and the Americas
Sales Department
Customer Service
Barco Lighting Systems
Barco Lighting Systems
2105 Gracy Farms Lane
2105 Gracy Farms Lane
Austin, TX 78758 USA
Austin, TX 78758 USA
voice: 512.836.2242
voice: 800.890.8989
fax:
fax:
512.837.5290
Toll Free: 800.890.8989
512.834.9195
toll free: 800.890.8989
World Wide Web:
www.highend.com
©Barco Lighting Systems, 2010, All Rights Reserved
Information and specifications in this document are subject to change without notice.
High End Systems, Inc. assumes no responsibility or liability for any errors or
inaccuracies that may appear in this manual.
Trademarks: High End Systems is a registered trademark; and, Internal Effects, the
High End Systems globe logo, are trademarks of High End Systems, Inc. or High End
Systems Europe Ltd. Other trademarks and trade names may be used in this
document to refer to either the entities claiming the marks and names or their
products. High End Systems disclaims any proprietary interest in trademarks and
trade names owned by others.
ii
Product Modification Warning
High End Systems products are designed and manufactured to meet the requirements
of United States and International safety regulations. Modifications to the product
could affect safety and render the product non-compliant to relevant safety
standards.
Mise En Garde Contre La Modification Du Produit
Les produits High End Systems sont conçus et fabriqués conformément aux exigences
des règlements internationaux de sécurité. Toute modification du produit peut
entraîner sa non conformité aux normes de sécurité en vigueur.
Produktmodifikationswarnung
Design und Herstellung von High End Systems entsprechen den Anforderungen der
U.S. Amerikanischen und internationalen Sicherheitsvorschriften. Abänderungen
dieses Produktes können dessen Sicherheit beeinträchtigen und unter Umständen
gegen die diesbezüglichen Sicherheitsnormen verstoßen.
Avvertenza Sulla Modifica Del Prodotto
I prodotti di High End Systems sono stati progettati e fabbricati per soddisfare i
requisiti delle normative di sicurezza statunitensi ed internazionali. Qualsiasi modifica
al prodotto potrebbe pregiudicare la sicurezza e rendere il prodotto non conforme agli
standard di sicurezza pertinenti.
Advertencia De Modificación Del Producto
Los productos de High End Systems están diseñados y fabricados para cumplir los
requisitos de las reglamentaciones de seguridad de los Estados Unidos e
internacionales. Las modificaciones al producto podrían afectar la seguridad y dejar al
producto fuera de conformidad con las normas de seguridad relevantes.
FCC Information
This equipment has been tested and found to comply with the limits for a Class A
digital device, pursuant to part 15 of the FCC rules. These limits are designed to
provide reasonable protection against harmful interference when the equipment is
operated in a commercial environment. This equipment generates, uses, and can
radiate radio frequency energy and, if not installed and used in accordance with the
instruction manual, may cause harmful interference to radio communications.
Operation of this equipment in a residential area is likely to cause harmful
interference, in which case the user will be required to correct the interference at his
own expense.
iii
Warranty Information
Limited Warranty
Unless otherwise stated, your product is covered by a one year parts and labor limited
warranty. It is the owner’s responsibility to furnish receipts or invoices for verification
of purchase, date, and dealer or distributor. If purchase date cannot be provided, date
of manufacture will be used to determine warranty period.
Returning an Item Under Warranty for Repair
It is necessary to obtain a Return Material Authorization (RMA) number from your
dealer or point of purchase BEFORE any units are returned for repair. The
manufacturer will make the final determination as to whether or not the unit is covered
by warranty.
The SDI-DMX Mixer Pro unit must be returned in its original packaging. Any other parts
returned to High End Systems must be packaged in a suitable manner to ensure the
protection of such Product unit or parts, and such package shall be clearly and
prominently marked to indicate that the package contains returned Product units or
parts and with an RMA number. Accompany all returned Product units or parts with a
written explanation of the alleged problem or malfunction. Ship returned Product units
or parts to: 2105 Gracy Farms Lane, Austin, TX 78758 USA.
Note:
Freight Damage Claims are invalid for fixtures shipped
in non-factory boxes and packing materials.
Freight
All shipping will be paid by the purchaser. Items under warranty shall have return
shipping paid by the manufacturer only in the Continental United States. Under no
circumstances will freight collect shipments be accepted. Prepaid shipping does not
include rush expediting such as air freight. Air freight can be sent customer collect in
the Continental United States.
REPAIR OR REPLACEMENT AS PROVIDED FOR UNDER THIS WARRANTY IS THE
EXCLUSIVE REMEDY OF THE CONSUMER. HIGH END SYSTEMS, INC. MAKES NO
WARRANTIES, EXPRESS OR IMPLIED, WITH RESPECT TO ANY PRODUCT, AND HIGH
END SPECIFICALLY DISCLAIMS ANY WARRANTY OF MERCHANTABILITY OR FITNESS
FOR A PARTICULAR PURPOSE. HIGH END SHALL NOT BE LIABLE FOR ANY INDIRECT,
INCIDENTAL OR CONSEQUENTIAL DAMAGE, INCLUDING LOST PROFITS, SUSTAINED
OR INCURRED IN CONNECTION WITH ANY PRODUCT OR CAUSED BY PRODUCT
DEFECTS OR THE PARTIAL OR TOTAL FAILURE OF ANY PRODUCT REGARDLESS OF THE
FORM OF ACTION, WHETHER IN CONTRACT, TORT (INCLUDING NEGLIGENCE), STRICT
LIABILITY OR OTHERWISE, AND WHETHER OR NOT SUCH DAMAGE WAS FORESEEN
OR UNFORESEEN.
Warranty is void if the product is misused, damaged, modified in any way, or for
unauthorized repairs or parts. This warranty gives you specific legal rights, and you
may also have other rights which vary from state to state.
iv
Patents
This High End Systems product is protected by ONE OR MORE patents and pending
patents. Patents owned or licensed by Barco Lighting Systems or High End Systems
include:
US 4,602,321; US 4,688,161; US 4,701,833; US 4,709,311; US 4,779,176; US 4,800,474;
US 4,962,687; US 4,972,306; US 4,980,806; US 5,010,459; US 5,031,078; US 5,073,847;
US 5,078,039; US 5,186,536; US 5,209,560; US 5,278,742; US 5,282,121; US 5,307,295;
US 5,329,431; US 5,331,822; US 5,367,444; US 5,402,326; US 5,414,328;US 5,426,576;
US 5,430,629; US 5,432,691; US 5,454,477; US 5,455,748; US 5,502,627; US 5,506,762;
US 5,515,254; US5,537,303;US 5,545,951; US 5,588,021; US 5,590,954; US 5,590,955;
US 5,640,061; US 5,647,662; US 5,691,886; US 5,702,082; US 5,728,994; US 5,758,955;
US 5,758,956; US 5,769,527; US 5,769,531; US 5,774,273; US 5,788,365; US 5,794,881;
US 5,795,058; US 5,798,619; US 5,806,951; US 5,812,596; US 5,823,661; US 5,825,548;
US 5,828,485; US 5,829,868; US 5,857,768; US 5,882,107; US 5,921,659; US 5,934,794;
US 5,940,204; US 5,945,786; US 5,953,151; US 5,953,152; US 5,969,485; US 5,980,066;
US 5,983,280; US 5,984,248; US 5,986,201; US 6,011,662; US 6,029,122; US 6,048,080;
US 6,048,081; US 6,054,816; US 6,057,958; US 6,062,706; US 6,079,853; US 6,126,288;
US 6,142,652; US 6,142,653; US 6,172,822; US 6,175,771; US 6,188,933; US 6,208,087;
US 6,219,093; US 6,220,730; US 6,241,366; US 6,249,091; US 6,255,787; US 6,256,136;
US 6,261,636; US 6,278,542; US 6,278,545; US 6,278,563; US 6,288,828; US 6,326,741;
US 6,327,103; US 6,331,756; US 6,346,783; US 6,421,165; US 6,430,934; US 6,459,217;
US 6,466,357; US 6,502,961; US 6,515,435; US 6,523,353; US 6,536,922; US 6,538,797;
US 6,545,586; US 6,549,324; US 6,549,326; US 6,563,520; US 6,565,941; US 6,570,348;
US 6,575,577; US 6,578,991; US 6,588,944; US 6,592,480; US 6,597,132; US 6,600,270;
US 6,601,974; US 6,605,907; US 6,617,792; US 6,621,239; US 6,622,053; US 6,635,999;
US 6,648,286; US 6,664,745; US 6,682,031; US 6,693,392; US 6,696,101; US 6,719,433;
US 6,736,528; US 6,771,411; US 6,775,991; US 6,783,251; US 6,801,353; US 6,812,653;
US 6,823,119; US 6,865,008; US 6,866,390; US 6,866,402; US 6,866,451; US 6,869,193;
US 6,891,656; US 6,894,443; US 6,919,916; US 6,930,456; US 6,934,071; US 6,937,338;
US 6,955,435; US 6,969,960; US 6,971,764; US 6,982,529; US 6,988,805; US 6,988,807;
US 6,988,817; US 7,000,417; US 7,011,429; US 7,018,047; US 7,020,370; US 7,033,028;
US 7,048,838; US 7,055,963; US 7,055,964; US 7,073,910; US 7,078,869; US 7,092,098;
US 7,119,902; US 7,161,562; US 7,175,317; US 7,181,112; US 7,206.023; US 7,210,798;
US 7,253,942; US 7,325,930; US 7,374,288; US 7,377,651; US 7,390,092; US 7,465,052;
US 7,486,339; US 7,527,382; US 7,527,389; US 7,543,955; US 7,559,670; US 7,600,891;
US 7,600,892; US 7,635,188; US D347,113; US D350,408; US D359,574; US D360,404;
US D365,165; US D366,712; US D370,080; US D372,550; US D374,439; US D377,338;
US D381,740; US D409,771; US RE40,015; AT E169413; CA 2142619; CA 2145508;
CA 2245842; DE 22588.4-08; DE 621495; DE 655144; DE 69320175.4; DE 69322401.0;
DE 69331145.2; DE 69525856.7; DE 69734744.3; DE 797503; DK 0655144; DK 1447702;
EP 0475082; EP 0621495; EP 0655144; EP 0662275; EP 0767398; EP 0797503; EP 0969247;
EP 1447702; ES 0621495; FR 0621495; FR 0655144; FR 0662275; FR 1447702;
GB 2043769B; GB 2055842B; GB 2283808B; GB 2290134B; GB 2291814B; GB 229253
0B; GB 2292896B; GB 2294909B; GB 2295058B; GB 2303203B; GB 2306887B;
GB 2307036B; GB 2316477B; IE 0621495; IT 034244BE; 2005; IT 0621495; IT 0655144;
JP 3495373; JP 3793577; NL 0621495; NL 0797503; NL 0969247; UK 0621495;
UK 0655144; UK 0662275; UK 0797503; UK 0969247; UK 1447702
v
vi
Table of Contents
Contact Information ...................................................................ii
Product Modification Warning ..................................................... iii
FCC Information ....................................................................... iii
Warranty Information ................................................................iv
Patents ....................................................................................v
Product Overview
Features .................................................................................... 1
Specifications ............................................................................. 2
Mechanical ............................................................................... 2
Operation ................................................................................ 2
Electrical ................................................................................. 2
Construction ............................................................................ 2
Installation
Unpacking .................................................................................. 3
Hardware Installation .................................................................. 3
Connecting the Video Inputs and Outputs .................................... 3
Connecting to Communication Interface ....................................... 4
Connecting to Power ................................................................. 4
Powering Up the Unit ................................................................ 5
Operation
Menu System ............................................................................. 6
AddR (Address) ........................................................................ 6
OutP (Output) .......................................................................... 7
AUtO (Auto-chase) .................................................................... 8
SYSt (Set Standard) ................................................................. 9
RSET (Reset) ........................................................................... 9
Cycling Power ............................................................................. 9
DMX Control
DMX Protocol ..........................................................................10
Serial Commands
RS232 Interface Settings ............................................................12
Commands Structure ..................................................................13
Single-slot Command .................................................................13
Multi-slot Command ...................................................................13
Decimal to Hex Conversion ..........................................................14
vii
viii
SDI-DMX Mixer Pro User Manual
Product Overview
The SDI-DMX Mixer Pro is a hybrid switcher with the ability to switch, mix
and matrix four SDI video inputs to four video outputs directly from any
DMX lighting controller. Incoming video signals can be switched and mixed
to their output(s) via command signals from a DMX512 lighting desk, the
RS232 port or the onboard menu system.
Features
• Operates as both a 4x4 matrix and a 'virtual' mixer whose inputs may
be assigned and whose output may be routed to any combination of
outputs
• Four independent SDI inputs and outputs with BNC connectors
• Patented gen-lock bus system for faster mixing and switching
• Each input signal frame-buffered and genlocked to an internal black
burst signal ensuring that a video signal is always output
• Frame delay of 1 frame or less
• Individual digital video processor chips per input and output
• Multiple control methods - DMX, Serial (RS232) or from the menu
• Input verification and display
• Multi-format, auto-detecting video system (supports NTSC and PAL)
• Force video format NTSC/PAL and manual output override
• Input chasing function for stand alone usage
• Daisy chain units to expand input/output options
• Small - 1U rack mount
1
SDI-DMX Mixer Pro User Manual
Specifications
Mechanical
Dimensions: 481 mm x 40 mm x 205 mm (18.9 in x 1.6 in x 8 in)
Shipping Box Dimensions: 533 mm x 152 mm x 279 mm (21 in x 6 in x
11 in)
Fixture weight: 3.1 kg (6.9 lb)
Shipping weight: 51.3 kg (9.1 lb)
Operation
Input: 4 x SDI (BNC) 525+625 line
Output: 4 x SDI (BNC) 525+625 line selectible
Format: Multi-format - 625 line (PAL) , 525 line (NTSC). Note that all
inputs must be same format.
Control Options: DMX-512 (5-Pin XLR) using seven channels
RS232 (D-Sub)
Front Panel User Interface
Display: Power LED
DMX Present LED
Four Video Input Present LEDs
Seven-Segment Menu Display
Electrical
Power: 100-240 VAC 50/60Hz Switchable IEC Connector on PSU
DC Output: 6v
Consumption: 1- 4.5 A, 6-27w
Construction
Casing: 1U x 19" Rack Casing
Compliance:
NOTE: Design and specifications are subject to change without notice.
2
SDI-DMX Mixer Pro User Manual
Installation
Unpacking
Carefully unpack the SDI-DMX Mixer Pro the verify that it arrived complete
and without any damage. If you do find damage, you must notify both the
shipping agent and your sales agent immediately.
Do not discard the shipping carton and packing materials. The carton and
packing materials are specifically designed to protect the product during
transport. High End Systems assumes no responsibility for products
damaged during transport. Any product being returned for repair must be
shipped in its original shipping carton and packing materials.
NOTE: Before sending anything to the factory, be sure to call your HES
dealer/distributor for a Return Authorization (RA) number. The
factory cannot accept any goods shipped without an RA number.
Hardware Installation
DMX Link
Power
Video Outputs
Video Inputs
RS232
Connecting the Video Inputs and Outputs
• Connect the SDI sources to the unit via the four BNC connectors.
• Connect the SDI outputs to the unit via the four BNC outputs.
• Connect the power connector and power up the unit.
When an input receives a video signal, the corresponding "Video Present"
LED will illuminate on the front of the unit. This lets you verify that the
video source equipment is operating correctly.
NOTE: This unit is not a standards converter so all input and output
devices must be of the same video standard, either 625 line - PAL
or 525 line - NTSC. You can “force” a video standard for an output
using menu commands, see SYSt (Set Standard) on page 9.
3
SDI-DMX Mixer Pro User Manual
Connecting to Communication Interface
The SDI-DMX Mixer Pro can accept DMX Controller commands or RS232
commands.
NOTE: Only one signal type should be used at any one time. Connection
and transmission of both signal types may result in erratic
behaviour.
You can set a DMX Start Channel for the unit using the menu system. See
AddR (Address) on page 6.
Connecting to the DMX 512 link
The DMX512 control is connected by the 5-pin XLR connectors on the rear
of the unit. The unit features a DMX in and DMX through port for connection
to other devices. Plug in the DMX cable and also the DMX Thru cable if
required.
Connecting the RS232 Interface
The unit features an RS232 serial port for computer control and system
integration. This is connected via the D-Type connector on the rear of the
unit.
Connecting to Power
Power for the units is supplied in the form of a plug-top mains adapter or
inline mains "brick". This is an auto-ranging unit and can be used with any
mains voltage.
The low voltage DC connector plugs into the power connector on the rear of
the unit and secures by means of a screw thread.
CAUTION! Always unscrew the connector before
attempting to remove it! Failure to do so may result in
damage to the connector, mains adapter or unit.
Original PSUs must be used with these units. Using a
non-OEM PSU may result in damage to the unit and will
void the warranty. PSUs may be ordered from your
local distributor.
4
SDI-DMX Mixer Pro User Manual
Powering Up the Unit
There is no ON/OFF switch on the SDI-DMX Mixer Pro. When connected to
power, the unit starts and initiates the following:
• The Power light comes on and runs a self test sequence.
• The numeric display on the front panel illuminates displaying the current
DMX address.
• The DMX OK LED will light when the unit is receiving external DMX-512
data.
• After 60 seconds, the unit's numeric display dims to conserve power and
the unit will auto lock. To unlock the interface, press both the <+> and
<-> buttons for 3 seconds.
5
SDI-DMX Mixer Pro User Manual
Operation
Menu System
You can use the onboard menu system to:
• set a DMX Start Channel
• switch between the inputs
• manually assign a video standard
• set up an auto-sequence/chase function
• reset the unit.
Navigate through the menu functions by pressing the Plus <+> and Minus
<-> buttons to cycle through the options available on a menu level. Use
the Enter button to store a menu option and the Menu button to exit a
menu level.
Note: You have to wait 60 seconds for the menu to time out and return to
the lock/output display mode
AddR (Address)
The Address menu option lets you assign a DMX Start Channel value for the
unique seven-channel range the SDI-DMX Mixer Pro unit requires on a DMX
link. To set a Start Channel Address:
1. Unlock the interface by pressing the Plus (+) and Minus (–) buttons
together for 3 seconds. Addr is the first option you will see.
2. Press the Enter button to select
3. Use the Plus and Minus buttons to scroll to the a valid DMX decimal
value.
4. Use the Plus and Minus buttons to increase or decrease the DMX value
to a valid start channel. Holding a button will accelerate the count
increment after 2 seconds.
5. Press the Enter button to store the value.
6
SDI-DMX Mixer Pro User Manual
OutP (Output)
The output section of the menu allows the user to assign an input to each
of the four outputs for manual switching, or place them under DMX control
so they may be switched from the DMX lighting console.
1. Unlock the interface by pressing the Plus (+) and Minus (–) buttons
together for 3 seconds.
2. Use the Plus and Minus buttons to scroll to OutP
3. Press the Enter button to select
4. Use the + and – buttons to scroll to the Output you want to control:
OP1- (Output 1)
OP2- (Output 2)
OP3- (Output 1)
OP4- (Output 1)
5. Press the Enter button to select.
6. Use the + and – buttons to scroll to choose the input for an Output:
OP1d (Output 1 controlled by DMX)
OP11 (Output 1 takes Input 1)
OP12 (Output 1 takes Input 2)
OP13 (Output 1 takes Input 3)
OP14 (Output 1 takes Input 4)
OP2d (Output 2 controlled by DMX)
OP21 (Output 2 takes Input 1)
OP22 (Output 2 takes Input 2)
OP23 (Output 2 takes Input 3)
OP24 (Output 2 takes Input 4)
OP3d (Output 3 controlled by DMX)
OP31 (Output 3 takes Input 1)
OP32 (Output 3 takes Input 2)
OP33 (Output 3 takes Input 3)
OP34 (Output 3 takes Input 4)
OP4d (Output 4 controlled by DMX)
OP41 (Output 4 takes Input 1)
OP42 (Output 4 takes Input 2)
OP43 (Output 4 takes Input 3)
OP44 (Output 4 takes Input 4)
7. Press the Enter button to store your selection.
7
SDI-DMX Mixer Pro User Manual
AUtO (Auto-chase)
The Auto-chase function lets you jump between all the inputs currently
transmitting video and switch them across the four video outputs at a rate
determined by the Speed setting.
1. Unlock the interface by pressing the + (Plus) and – (Minus) buttons
together for 3 seconds.
2. Use the + (Plus) and – (Minus) buttons to scroll to Off to AUtO.
3. Press the Enter button to select.
4. Use the + and – buttons to scroll to ON to automatically chase
transmitting inputs or OFF to stop a chase that is currently selected.
5. Press the Enter button to select.
6. Press the Enter button to select. If you have selected ON, the menu
will display SPD to select the chase speed.
7. Press the Enter button to select.
8. Use the + and – buttons to scroll to the chase speed you want and
then press the Enter button to store your selection.
SP-0 = (512 seconds)
SP-1 = (256 seconds)
SP-2 = (128 seconds)
SP-3 = (64 seconds)
SP-4 = (32 seconds)
SP-5 = (16 seconds)
SP-6 = (8 seconds)
SP-7 = (4 seconds)
SP-8 = (2 seconds)
SP-9 = (1 seconds)
8
SDI-DMX Mixer Pro User Manual
SYSt (Set Standard)
1. Unlock the interface by pressing the + (Plus) and – (Minus) buttons
together for 3 seconds.
2. Use the + (Plus) and – (Minus) buttons to scroll to Off to SYSt.
3. Press the Enter button to select.
4. Use the + and – buttons to scroll to PAL to force 625 line PAL or ntSc
to force 525 line NTSC format.
5. Press the Enter button to store your selection.
RSET (Reset)
1. Unlock the interface by pressing the + (Plus) and – (Minus) buttons
together for 3 seconds.
2. Use the + (Plus) and – (Minus) buttons to scroll to Off to RSET.
3. Press the Enter button to select.
4. Use the + and – buttons to scroll to YES
5. Press the Enter button to store your selection. The unit will be reset
to:
DMX address = 1
Output = DMX control
Video Standard does not change
Cycling Power
When you restart the unit, it starts up in the following state:
• the DMX address remains as the last selected value
• all output(s) default to DMX control
• all auto chase functions switch to OFF
9
SDI-DMX Mixer Pro User Manual
DMX Control
The SDI-DMX Mixer Pro utilizes seven consecutive channels on a DMX link
beginning with the start channel that you set using the unit’s menu system,
(see AddR (Address) on page 6.
DMX Protocol
Channel Parameter
1
2
3
Output 1
Output 2
Output 3
Description
Output 4
0-40
00-28
Route video input 1 to Output 1
41-80
29-50
Route video input 2 to Output 1
81-120
51-78
Route video input 3 to Output 1
121-160
79-A0
Route video input 4 to Output 1
161-200
A1-C8
Route Mixed Video to Output 1
201-255
C9-FF
Route video black to Output 2
0-40
00-28
Route video input 1 to Output 2
41-80
29-50
Route video input 2 to Output 2
81-120
51-78
Route video input 3 to Output 2
121-160
79-A0
Route video input 4 to Output 2
161-200
A1-C8
Route Mixed Video to Output 2
201-255
C9-FF
Route video black to output 3
0-40
00-28
Route video input 1 to Output 3
41-80
29-50
Route video input 2 to Output 3
81-120
51-78
Route video input 3 to Output 3
121-160
79-A0
Route video input 4 to Output 3
161-200
A1-C8
Route Mixed Video to Output 3
201-255
C9-FF
0-40
00-28
Route video input 1 to Output 4
41-80
29-50
Route video input 2 to Output 4
81-120
51-78
Route video input 3 to Output 4
121-160
79-A0
Route video input 4 to Output 4
161-200
A1-C8
Route Mixed Video to Output 4
201-255
C9-FF
Crossfade video black to Mixer Souce A
0-50
00-32
51-100
33-64
Crossfade video input 2 to Mixer Source A 101-150
65-96
Crossfade video input 1 to Mixer Source A
5
10
Mixer
Source A
Value
(hex)
Route video black to Output 1
Route video blacrce A to output 4
4
Value
(dec.)
Crossfade video input 3 to Mixer Source A 151-200
97-C8
Crossfade video input 4 to Mixer Source A 201-255
C9-FF
SDI-DMX Mixer Pro User Manual
Channel Parameter
Description
Crossfade video black to Mixer Souce B
Mixer
Source B
0-50
00-32
33-64
Crossfade video input 2 to Mixer Source B 101-150
65-96
Crossfade video input 3 to Mixer Source B 151-200
97-C8
Crossfade video input 4 to Mixer Source B 201-255
C9-FF
100% Source A
7
Value
(hex)
51-100
Crossfade video input 1 to Mixer Source B
6
Value
(dec.)
Crossfade Variable from 99% Source A to 99%
100% Source B
0
00
1-254
01-FE
255
FF
11
SDI-DMX Mixer Pro User Manual
Serial Commands
The serial interface is intended to only be used when there is no DMX input
connected. If serial is used at the same time as DMX, the results will be
unpredictable.
RS232 Interface Settings
Buad:
19200
Databits:8
StopBits:1
Parity:
none
When communicating with the unit using RS232, remember the following:
The unit only receives data, it does not transmit.
The protocol is entirely ASCII based for ease of use or programming. You
can even type the commands into hyperterminal if required.
Each command is preceded by one of two unique synchronization
characters, as detailed below, followed by the numeric data and terminated
by a carriage return character. The command will not be executed until the
carriage return is received.
The protocol uses data slots in a similar way to the existing DMX. Each
control (slot) has an 8-bit value that is subdivided into sections, each of
which represents a different value. e.g. 0-50 = 1, 51-100 = 2 etc.
The hexidecimal value in a serial command will correspond to a decimal
value in the protocol.
All commands carry an address that is the same one set for the DMX via the
front panel interface. This allows multiple DMX units to be daisy-chained
together from a single RS232 source. So, the command's address value
(Start channel) must be in the range [DMX base address] to [DMX base
address plus 7] to qualify for execution.
NOTE: Valid Start Channels and can range from 1 to 505 as long as they
are followed by seven unused channels on the link.
12
SDI-DMX Mixer Pro User Manual
Commands Structure
All data values must be hexadecimal characters with leading zeros for
value 0 to F hex. Each command comprises the following sub-elements:
1. Synch character (one character)
2. Address (3 hexadecimal characters)
3. One or more command data values comprising pairs of hexadecimal
characters (each pair makes 1 8-bit value)
4. termination character (carriage return single character)
Two commands are available as indicated by the sync character. The #
(hash) sync character is used for a single slot transmission. The : (colon)
sync character is used for a multi-slot, transmitting all 7 slots
together.
Note: The carriage return character is represented in the following
examples as <cr>. This should be replaced by a carriage return
(ascii 0D hex) character when transmitting.
Single-slot Command
The single-slot command sets a DMX value for a single channel on the DMX
link. This command comprises a total of 7 ascii characters. In the following
command, a value of 31 (1F hex ) is sent to address 12 (00C hex).
Sync
DMX Channel
#
0
Channel Value
0
C
1
Term
F
<CR>
So, if the unit’s Start Channel address is 10, this would set Output 3 to
video black.
Multi-slot Command
This command comprises a total of 19 ASCII characters, and transmits
values to all seven DMX Channel Values at once. The following command,
assigns values for all seven DMX channel values for the unit’s channel
range beginning at channel 500 (1F4).
Sync
:
Mixer Mixer
Cross
DMX Start Output Output Output Output
Term
Source Source
Fade
Channel
1
2
3
4
B
A
1
F
4
1
0
1
8
2
0
3
F
6
6
C
0
D
2 <CR>
13
SDI-DMX Mixer Pro User Manual
Decimal to Hex Conversion
DMX Address channel will display in Decimal in the unit, but need to
entered into serial strings in Hex.
DEC HEX DEC HEX DEC HEX DEC HEX DEC HEX DEC HEX DEC HEX DEC HEX
0
00
32
20
64
40
96
60
128
80
160
A0 192 C0 224
E0
1
01
33
21
65
41
97
61
129
81
161
A1 193 C1 225
E1
2
02
34
22
66
42
98
62
130
82
162
A2 194 C2 226
E2
3
03
35
23
67
43
99
63
131
83
163
A3 195 C3 227
E3
4
04
36
24
68
44
100
64
132
84
164
A4 196 C4 228
E4
5
05
37
25
69
45
101
65
133
85
165
A5 197 C5 229
E5
6
06
38
26
70
46
102
66
134
86
166
A6 198 C6 230
E6
7
07
39
27
71
47
103
67
135
87
167
A7 199 C7 231
E7
8
08
40
28
72
48
104
68
136
88
168
A8 200 C8 232
E8
9
09
41
29
73
49
105
69
137
89
169
A9 201 C9 233
E9
10
0A
42
2A
74
4A 106
6A 138
8A 170 AA 202 CA 234 EA
11
0B
43
2B
75
4B 107
6B 139
8B 171 AB 203 CB 235 EB
12
0C
44
2C
76
4C 108 6C 140 8C 172 AC 204 CC 236 EC
13
0D
45
2D
77
4D 109 6D 141 8D 173 AD 205 CD 237 ED
14
0E
46
2E
78
4E
15
0F
47
2F
79
16
10
48
30
80
17
11
49
31
18
12
50
19
13
51
20
14
21
15
22
110
6E 142
8E 174 AE 206 CE 238 EE
4F
111
6F
143
8F
175 AF 207 CF 239 EF
50
112
70
144
90
176
B0 208 D0 240
F0
81
51
113
71
145
91
177
B1 209 D1 241
F1
32
82
52
114
72
146
92
178
B2 210 D2 242
F2
33
83
53
115
73
147
93
179
B3
D3 243
F3
52
34
84
54
116
74
148
94
180
B4 212 D4 244
F4
53
35
85
55
117
75
149
95
181
B5 213 D5 245
F5
16
54
36
86
56
118
76
150
96
182
B6 214 D6 246
F6
23
17
55
37
87
57
119
77
151
97
183
B7 215 D7 247
F7
24
18
56
38
88
58
120
78
152
98
184
B8 216 D8 248
F8
25
19
57
39
89
59
121
79
153
99
185
B9 217 D9 249
F9
26
1A
58
3A
90
5A 122
7A 154
9A 186 BA 218 DA 250 FA
27
1B
59
3B
91
5B 123
7B 155
9B 187 BB 219 DB 251 FB
28
1C
60
3C
92
5C 124 7C 156 9C 188 BC 220 DC 252 FC
29
1D
61
3D
93
5D 125 7D 157 9D 189 BD 221 DD 253 FD
30
1E
62
3E
94
5E 126
7E 158
9E 190 BE 222 DE 254 FE
31
1F
63
3F
95
5F
7F
9F
14
127
159
211
191 BF 223 DF 255
FF
SDI-DMX Mixer Pro User Manual
Decimal to Hex Conversion, cont.
DEC HEX DEC HEX DEC HEX DEC HEX DEC HEX DEC HEX DEC HEX DEC HEX
256 100 288
20
320
40
352
60
384
80
416
A0 448 C0 480
E0
257 101 289
21
321
41
353
61
385
81
417
A1 449 C1 481
E1
258 102 290
22
322
42
354
62
386
82
418
A2 450 C2 482
E2
259 103 291
23
323
43
355
63
387
83
419
A3 451 C3 483
E3
260 104 292
24
324
44
356
64
388
84
420
A4 452 C4 484
E4
261 105 293
25
325
45
357
65
389
85
421
A5 453 C5 485
E5
262
06
294
26
326
46
358
66
390
86
422
A6 454 C6 486
E6
263
07
295
27
327
47
359
67
391
87
423
A7 455 C7 487
E7
264
08
296
28
328
48
360
68
392
88
424
A8 456 C8 488
E8
265
09
297
29
329
49
361
69
393
89
425
A9 457 C9 489
E9
266
0A 298
2A 330
4A 362
6A 394
8A 426 AA 458 CA 490 EA
267
0B 299
2B 331
4B 363
6B 395
8B 427 AB 459 CB 491 EB
268 0C 300 2C 332 4C 364 6C 396 8C 428 AC 460 CC 492 EC
269 0D 301 2D 333 4D 365 6D 397 8D 429 AD 461 CD 493 ED
270
0E 302
2E 334
4E 366
6E 398
8E 430 AE 462 CE 494 EE
271
0F
303
2F
335
4F
367
6F
399
8F
431 AF 463 CF 495 EF
272
10
304
30
336
50
368
70
400
90
432
B0 464 D0 496
F0
273
11
305
31
337
51
369
71
401
91
433
B1 465 D1 497
F1
274
12
306
32
338
52
370
72
402
92
434
B2 466 D2 498
F2
275
13
307
33
339
53
371
73
403
93
435
B3 467 D3 499
F3
276
14
308
34
340
54
372
74
404
94
436
B4 468 D4 500
F4
277
15
309
35
341
55
373
75
405
95
437
B5 469 D5 501
F5
278
16
310
36
342
56
374
76
406
96
438
B6 470 D6 502
F6
279
17
311
37
343
57
375
77
407
97
439
B7 471 D7 503
F7
280
18
312
38
344
58
376
78
408
98
440
B8 472 D8 504
F8
281
19
313
39
345
59
377
79
409
99
441
B9 473 D9 505
F9
282
1A 314
3A 346
5A 378
7A 410
9A 442 BA 474 DA 506 FA
283
1B 315
3B 347
5B 379
7B
9B 443 BB 475 DB 507 FB
411
284 1C 316 3C 348 5C 380 7C 412 9C 444 BC 476 DC 508 FC
285 1D 317 3D 349 5D 381 7D 413 9D 445 BD 477 DD 509 FD
286
1E 318
3E 350
5E 382
7E 414
9E 446 BE 478 DE 510 FE
287
1F
3F
5F
7F
9F
319
351
383
415
447 BF 479 DF 511 1FF
512 200
15
SDI-DMX Mixer Pro User Manual
16