1
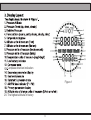
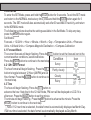
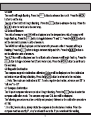
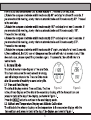
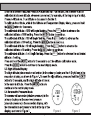
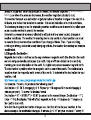
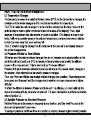
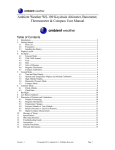
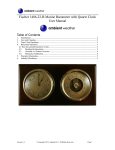
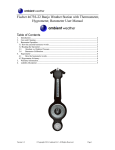
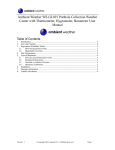
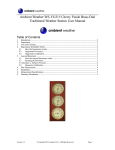
Mini Digital Altimeter
& Climb rate & Barometer & Thermometer & Compass & Weather forecast & Time
User Manual
Mini Digital Altimeter
1.Introduction
Thank you for purchase of Mini Digital Altimeter. This mini digital atimeter is designed small
and delicate with multifunction including altimeter,climb rate, barometer, thermometer,
compass, weather forecast, time and blue LED back light. The following user guide provides
step by step instructions for operation and troubleshooting.
Features:
1. Adopt super-accuracy sensor from Swiss
2. Incorporate altimeter, barometer, thermometer and compass functions etc.
3. The highest altitude record during climbing
4. Sea level altitude setting directly
5. Climb rate measurement
6. Carabiner key chain design for easy carry
7. Lovely mini shape, size: 63 × 53 × 15mm
8. IPX4 waterproof
2.Getting Started
2.1 Parts List
QTY
1
1
1
Item
Unit
Dimensions: 2.5 x 2.0 x 0.6 inches
CR2032 battery
Strap
1
2.2 Precautions
Caution: This unit is water resistant but not water proof. Do not submerse in water. When
installing the battery, make sure the gasket is properly seated (see battery installation
instructions). Avoid leaving out in the rain.
Caution: Keep away from strong magnetic forces, which can destroy the compass.
Caution: Do not drop or apply excessive force to the LCD display. When replacing the
battery, apply force to the outer ring.
Caution: Do not operate outside of the specified temperature range (14 to 140 °F). Use
your body warmth to keep within the low temperature range.
Note: Do not use a magnetized CR2032 battery, which can corrupt the compass
measurement.
Note: Do not use near strong magnetic or EMI forces (TVs, computers, electronics) which
can corrupt the compass measurement.
2.3 Installing the Battery
Rotate the back cover counter clockwise about 20°, then gently pry off the back cover with
your fingers, exposing the battery compartment.
Insert the CR2032 battery (+ side up), and close the back cover, insuring the gasket is
firmly seated in the housing trace.
To remove the battery, use a small pen or paperclip to pry the battery out of the battery
compartment.
To close the back cover, rotate the back cover clockwise until the back cover is completely
closed. The display should be powered up in the time and date mode, and ready for use.
2
1
Compass direction indication
Figure 1
20. The highest altitude in history
3
4.Set Mode
To enter the SET Mode, press and hold the MODE button for 3 seconds. To exit the SET mode
and return to the NORMAL mode at any time, press and hold the MODE button again for 3
seconds. The SET mode will also automatically exit after 30 seconds of inactivity, and return
to the NORMAL mode.
The following sections describe the settings available in the Set Mode. To skip any step,
press the MODE button again.
Set Modes:
Forecast -> 12/24 Hr -> Hour -> Minute -> Month -> Day -> Temperature Units -> Pressure
Units -> Altitude Units -> Compass Magnetic Declination -> Compass Calibration
4.1 Forecast Mode
The current forecast will begin flashing. Press the SET button to set the forecast icon to the
current weather conditions, as defined below:
Condition
Icon
Press the MODE button to continue to the next step.
Sunny
4.2 12Hr/ 24Hr Format
The hour format will begin flashing. Press the SET
Partly cloudy
button to toggle between 12 Hour (AM/PM) and 24
Cloudy
Hour format. Press the MODE button to continue to
the next step.
Rainy
4.3 Time
The hour will begin flashing. Press the SET button to
advance the hour. Note that in the 12 hour mode, PM icon will be displayed on LCD if it is
afternoon. Press the MODE button to set the minute.
The minute will begin flashing. Press the SET button to advance the minute. Press the
MODE button to continue to the next step.
Note: If 12 hour time is selected, the date format is automatically displayed as Month.Day.
If 24 hour time is selected, the date format is automatically displayed as Day.Month.
4
SET
SET
SET
SET
SET
SET
5
Figure 2
Figure 3
2
3
6
SET
SET
SET
SET
4
5
Figure 4
7
Figure 5
6
SET
SET
Figure 6
7
Figure 7
8
minute (ft/min) is the secondary display, as shown in Figure 8. The climb rate updates once
per minute.
Figure 8
7. Backlight
To activate the backlight, press and hold the SET button for three seconds. The backlight will
remain on for 30 seconds of inactivity.
8. Low Battery Indicator
When the low battery indicator icon is displayed
, it is time to replace the battery.
9. Discussion of Features and Limitations
9.1 Weather Forecasting
The weather forecast or pressure tendency is based on the rate of change of barometric
9
Partly cloudy to
sunny
10
11
12
Term
Range
Definition
Range is defined as the amount or extent a value can be measured.
Relative pressure is the barometric pressure measured at your
Relative Pressure
location. The relative pressure is adversely affected by altitude,
Measured Pressure and to a lesser extent, changes in the weather.
Resolution is defined as the number of significant digits (decimal
Resolution
places) to which a value is being reliably measured.
Sea-level Pressure is the relative pressure measured at your
Sea-level Pressure location, compensated to sea-level. To compare pressure
Absolute Pressure conditions from one location to another, meteorologists correct
pressure to sea-level conditions.
True altitude is the elevation above mean sea level. To measure
True Altitude
true altitude, you must know your exact position on the earth, as
measured by a GPS. An altimeter measures pressure altitude.
11. Specifications
Measurement
Range
Accuracy
Altitude
-2,296 to 29,500 feet
± 65 ft (20 m)
3 ft (1 m)
Temperature
14 to 140 °F
± 2 °F (1°C)
0.1 °
Barometer
8.86 to 32.49 inHg
± 0.04 inHg (1.5
0.01 inHg (0.1 mbar)
(300 to 1100 mbar)
mbar)
0 to 360°
± 3°
Compass
Resolution
1°
12. Other Specifications
Update Rate: 4 seconds
13. Troubleshooting Guide
13
14
15
14. Accessories
Accessory
Sunroad CR2032 3 Volt
Lithium Button Cell
Battery - One Battery
Image
Description
Standard CR2032 3 Volt Lithium Battery
(1 battery)
15. Liability Disclaimer
Please help in the preservation of the environment and return used batteries to an authorized
depot.
The electrical and electronic wastes contain hazardous substances. Disposal of electronic
waste in wild country and/or in unauthorized grounds strongly damages the environment.
Reading the “User manual” is highly recommended. The manufacturer and supplier cannot
accept any responsibility for any incorrect readings and any consequences that occur should
an inaccurate reading take place.
This product is designed for personal use as indication of weather conditions. This product is
not to be used for medical purposes or for public information.
The specifications of this product may change without prior notice.
This product is not a toy. Keep out of the reach of children.
No part of this manual may be reproduced without written authorization of the manufacturer.
Sunroad Technology WILL NOT ASSUME LIABILITY FOR INCIDENTAL, CONSEQUENTIAL,
PUNITIVE, OR OTHER SIMILAR DAMAGES ASSOCIATED WITH THE OPERATION OR
MALFUNCTION OF THIS PRODUCT.
16
16. Warranty Information
Sunroad Technology provides a 1-year limited warranty on this product against manufacturing
defects in materials and workmanship.This limited warranty begins on the original date of
purchase, is valid only on products purchased and only to the original purchaser of this
product. To receive warranty service, the purchaser must contact Sunroad for problem
determination and service procedures.
Warranty service can only be performed by Sunroad. The original dated bill of sale must
be presented upon request as proof of purchase to Sunroad.
Your Sunroad warranty covers all defects in material and workmanship with the following
specified exceptions: (1) damage caused by accident, unreasonable use or neglect (lack of
reasonable and necessary maintenance); (2) damage resulting from failure to follow
instructions contained in your owner's manual; (3) damage resulting from the performance of
repairs or alterations by someone other than an authorized Sunroad authorized service
center; (4) units used for other than home use (5) applications and uses that this product was
not intended
This warranty covers only actual defects within the product itself, and does not cover the cost
of installation or removal from a fixed installation, normal set-up or adjustments, claims based
on misrepresentation by the seller or performance variations resulting from installationrelated circumstances.
17