1
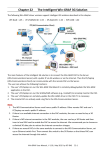
Chapter 2
Dispatch Server
The availability of Center V2 Servers may be threatened by network
overload. Thru Dispatch Server, the concern can be settled by arranging
and distributing subscribers’ requests to the least busy Center V2 Servers.
With Dispatch Server, a central monitor station can run several Center V2
servers and serve a large number of subscribers with the fastest
responding time. If any of Center V2 Servers needs maintenance, Dispatch
Server can automatically redistribute subscribers’ requests to other Center
V2 within a server farm or to servers in another location.
2.1
System Requirements
Before installation, make sure that your computer meets the following
minimum requirements:
OS
Windows 2000, Windows XP, Server 2003
CPU
Pentium 4, 2.6 GHz, 800 MHz FSB
Memory
2 x 256MB dual DDR400 SDRAM
Hard Disk
60GB
VGA
NVIDIA GeForce II 32MB, 1024 x 768 screen resolution
Network
TCP/IP
54
2
2.2
1.
Dispatch Server
Installing Dispatch Server
Insert the CMS Software CD to your computer. It will automatically run
and a window appears.
2.
Select the Install V 8.0.0.0 Central Monitoring System item.
3.
Click Dispatch Server System, and follow the on-screen instructions.
Note:
The Dispatch Server application is provided with a USB dongle.
Make sure the dongle is tightly connected to the computer.
55
2.3
The Dispatch Sever Window
1
2
3
4
5
6
7
8
9
10
Figure 2-1
The controls on the Dispatch Server window:
No. Name
1
Start Server
Description
Starts Dispatch Sever.
2
Stop Server
Stops Dispatch Sever.
3
Server Setting
Configures Dispatch Sever.
4
Account
Adds, edits and deletes the accounts of Center V2
5
Subscriber Notification Sets the alert conditions and methods
6
Stop/Start Query
Servers and subscribers.
Setting
Specifies an event query.
Center V2 Event
7
56
Real-time CenterV2
Views real-time events occurring on Center V2
Event
Servers.
2
8
Exit
9
Center V2 Status
Dispatch Server
Closes the Dispatch Server window.
The window displays the status of Center V2
Servers. A check appearing on the check box
indicates the Center V2 Server is allowed to
connect to Dispatch Server. Unchecking will
disable the connection.
10 Tree View
The list displays all created group folders, servers
and subscribers. You can right click any online
subscriber to call up Subscriber Address Book and
Camera/Audio Control Panel.
57
2.4
Creating a Subscriber Account
Dispatch Server can serve up to 500 Center V2 Servers and 25,000
subscribers at the same time. Before starting the services, create at least
one subscriber on the Dispatch Server. To create an account, click the
Account button (No. 4, Figure 2-1) to display this Address Book window.
1
2
3
4
5
6
7
8
9
Figure 2-2
The toolbar on the Address Book window:
No. Button
Description
1
Add A Group
Adds a group folder.
2
Add A Server
Adds a server.
3
Add A Subscriber
Adds a subscriber.
4
View/Edit Subscriber
Opens Subscriber Address Book for viewing
5
Address Book
and editing.
Subscriber Setting
Highlight one subscriber and click this button to
configure the settings of video and alert
formats.
6
7
Subscriber Schedule
Sets up subscription schedules
Delete A
Highlight a group, a server or a subscriber and
Group/Server/Subscriber
click this button to delete it.
8
Find A Subscriber
Searches a subscriber account.
9
Find A Server
Searches a server account.
58
2
Dispatch Server
The creation of a subscriber account is similar to that in Center V2. See 1.4
Creating a Subscriber Account.
Note:
1.
You can create sub-groups beneath a group; every sub-group can
only include one server; every server can include up to 50 subscribers.
2.
When one server stops running, its own subscribers will be distributed
to available servers at the same or higher level of the hierarchical file
system.
3.
If you don’t arrange servers and subscribers into groups, they will be
distributed to the least busy servers randomly.
2.5
Creating a Subscription Schedule
The Dispatch Server operator can create schedules to monitor subscription
status. When subscribers don’t log in Dispatch Server on the programmed
time, the operator and subscribers will get notified.
•
To set up a schedule, see 1.4 Creating a Subscription Schedule.
•
When a subscriber doesn’t log in Dispatch Server on time, this
message will appear on the Event List: Subscriber session is not
established. Wait-Time expired.
When a subscriber logs out suddenly during a service time, this
message will appear: Unexpected logout before subscriber session is
completed.
•
To notify subscribers by SMS and E-Mail, see 2.13 SMS Alerts and
2.14 E-Mail Alerts.
59
2.6
Configuring Dispatch Server
To configure Dispatch Server, click the Server Setting button (No. 3, Figure
2-1) on the toolbar to display the following dialog box.
Figure 2-3
[Network Setting]
Server Port:
The port should match with the Center Port of the
subscriber (Figure 1-13) and Dispatch Server Port of Center V2 (Figure
2-4) (All the three ports should match with each other).
Or, keep the
port setting as default.
Auto start server when startup:
service when its program starts.
60
Automatically starts the Dispatch
2
Dispatch Server
Center V2 Auto-change to another Dispatch Server when this
server is abnormal:
Distributes Center V2 Servers to another
Dispatch Server when the serving Dispatch Server breaks down.
Enabling this item, you will be prompted to enter the IP address and
port of another Dispatch Server.
[Dispatch Setting]
Group First:
Distributes subscribers to the Center V2 Servers
according to the assigned groups and servers.
Balance Only:
Distributes subscribers to the Center V2 Servers with
fewer subscribers randomly.
[Dispatch Log]
Keep Days:
Specify the days of the Dispatch log kept in the HDD
from 1 to 999 days.
Log Path:
Click the button next to the item to assign a storage path.
[CenterV2 Event Log]
Enable Real-Time CenterV2 Event:
Allows real-time event
messages coming from Center V2 Servers.
Keep Days:
Specify the days of the Center V2 event log kept in the
HDD from 1 to 999 days.
Log Path:
[Recycle Log]
Click the button next to the item to assign a storage path.
Deletes the files of the oldest days when storage space is
lower than 500MB.
[CenterV2 Identification Setting]
Identification Code:
The code protects Dispatch Server against
unauthorized Internet access. Center V2 will need the code to log in
Dispatch Server.
Allow unidentified CenterV2 Server login:
Allows Center V2 to
access Dispatch Server without entering the Identification Code.
61
2.7
Starting Dispatch Server
After subscriber accounts are created, Dispatch Server is ready to provide
services. Click the Start Server button (No. 1, Figure 2-1) on the Dispatch
window to start the services.
62
2
2.8
Dispatch Server
Connecting Center V2 to Dispatch Server
Follow these steps to connect Center V2 to Dispatch Server:
1.
2.
Start the Dispatch Server service.
At Center V2, click the Preference Settings button, select System
Configure to display the Preference window, and then click the
Dispatch Server tab to display the following window.
Figure 2-4
[Location name of Center V2]
Enter a name to identify the Center
V2 Server. The name should match the one created in Dispatch server.
See Figure 2-2.
[Dispatch Server]
Check the Use Dispatch Server item to make
other settings available. Enter the identification code, IP address, and
port of the Dispatch Server. See Figure 2-3.
[Connection Broken]
Enable and specify the interval between
connection retries.
3.
After above settings, click OK and restart Center V2.
63
2.9
Connecting GV-System to Dispatch Server
By default, GV-System is set to connect to Center V2. You need to reset
GV-System so that it can connect to Dispatch Server. Follow these steps to
connect GV-System to Dispatch server:
1.
In the main screen of GV-System, click the Network button, and then
select Connect to Center V2. The Connect to Center V2 dialog box
appears. See Figure 1-12.
2.
In the Center IP field, type the IP address of the Dispatch Server.
3.
Type a valid user ID and password created in the Dispatch Server.
4.
Select Normal Mode, and then click the Advance button. The
Advance Settings dialog box appears. See Figure 1-13.
5.
In the Center Port field, type the port of Dispatch Server (default at
21112), and then click OK.
6.
Click the Connect button in the Connect to CenterV2 dialog box for
connection.
64
2
2.10
Dispatch Server
Querying an Event on Center V2
This feature lets you locate a desired event by posing a query on Center V2
Servers. Click the Stop/Start Query Center V2 Event button (No. 6, Figure
2-1) on the toolbar to display the following dialog box. Check the desired
query items (Type, ID, Date and/or Time), define your query condition under
each item, and then click OK to display the query results.
Figure 2-5
The Query feature supports the remote playback when file sharing on
Center V2 Server is enabled. Double-clicking any found event with video
attachment can play it back on Dispatch Server.
65
2.11
Displaying Real-Time Events of Center V2
The feature lets you view the real-time events occurred on Center V2
Servers. For the application, make sure the Enable Real-Time CenterV2
Event option is enabled; see Figure 2-3. Then click the Real-Time Event
button (No. 7, Figure 2-1) on the toolbar to display the following window.
Figure 2-6
The controls on the Real-Time Center V2 Event window:
1.
The window supports the remote playback when file sharing on the
Center V2 Server is enabled. Double-clicking any event with video
attachment can play it back on Dispatch Server.
2.
You can flag an incoming event for later reference. Click in the flag
column to flag an event. Click the flag icon to remove it.
A list of Types and Messages from Center V2 will be displayed:
Type
Message
Motion
Camera detected motion
Trigger
I/O Trigger; Module xx Trigger Resume; Video of Camera xx (By:
Module xx)
Connection Video Lost; Module Lost; The network connection is lost; The
connection of (client xx) is abnormal; Camera cannot be controlled;
Ping Timeout; Failed to establish the connection; Video signal of
Camera xx has resume; Module xx has returned to normal; Failed
to Login SMS Server; Failed to send short message; SMS Server is
shutdown.
66
2
Alarm
Dispatch Server
There isn't enough space for recording; There isn't enough space
for recording; The storage for Event Log is low, Event Log will not
take any new entries; An unexpected error occurred in Multicam
Surveillance System (Error Code: 1 or 2); There is an intruder;
Object Missing; Unattended Object; Alert Message of POS.
Attachment Record file of Camera xx [Live, Attachment or offline].
System
Start Recycle; Recycle Event Log; Status change of monitoring
cameras. On: (camera no.) Off: (camera no.) / (By Schedule);
Stop all cameras monitoring; Start all cameras monitoring; Start I/O
Monitoring. / (By Schedule); Stop I/O Monitoring. / (By Schedule);
Schedule Start; Schedule Stop. All monitoring devices are stop too;
Start monitoring all type events; Stop monitoring all type events;
Subscriber session is not established. Wait-time expired;
Unexpected logout before subscriber session is completed.
Note:
Error Code 1 indicates a codec error; Error Code 2 indicates that
users can’t write or record any data due to HD failure or user privilege.
67
2.12
Launching Log Browser
The following two log browsers let you locate the events of Dispatch Server
and Center V2 Servers easily.
Dispatch Log Browser
The browser lets you view and locate the system status of Dispatch Server,
the login/out status of Center V2 Servers. Click View on the window menu
and then select Dispatch Log to display the following log browser. For
details on Log Browser, see 1.8 Event Log Browser.
Figure 2-7
A list of Status and Messages will be displayed:
Status
Message
System
Start Dispatch Server; Failed to start Dispatch Server; Stop
Dispatch Server; Can't find KeyPro; Start to recycle the Dispatch
Server; Start to recycle the CenterV2 Event Log.
Login/logout
CenterV2 Server (IP: CS_IP) connects to Dispatch Server;
CenterV2 Server (IP: CS_IP) disconnects from Dispatch
Server;CenterV2 Server (IP: CS_IP) disconnects from Dispatch
Server abnormally; CenterV2 Client login; CenterV2 Client
logout
Connection
68
CenterV2 Server (IP: CS_IP) is disconnected by Dispatch
2
Dispatch Server
Server; CenterV2 Server changes IP from (CS_old_IP) to
(CS_new_IP); CenterV2 Server (IP: CS_IP) is transferred to
another Dispatch Server (DS_IP:DS_Port).
Control
CenterV2 Server [CS_Name] is enabled; CenterV2 Server
[CS_Name] is disabled.
Dispatch
ID: login_ID is dispatched to [CS_Name] (IP: CS_IP); Invaild
login ID; Invaild login Password; This account has already
logged in; There is no server online for CenterV2 Client; All
online CenterV2 Servers have utmost service.
Event Log Browser
The browser lets you view and locate the real-time events from Center V2
Servers. Click View on the window menu, and then select Event log to
display Event Log Browser. For details on Log Browser, see 1.8 Event Log
Browser.
69
2.13
SMS Alerts
This feature automatically sends SMS messages to subscribers when they
don’t log in on the programmed time. For this, ensure to type a mobile
number for each subscriber in the Subscriber Address Book (Figure 2-2).
To set up SMS Server, click Configure on the window menu and select
SMS Setup. For details, see 1.12 SMS Alerts.
To define alert conditions to send SM messages, click the Subscriber
Notification Setting button (No. 5, Figure 2-1) on the toolbar to display the
Notification Setting dialog box. For setup details, see 1.11 Notification
Settings.
2.14
E-Mail Alerts
This feature automatically sends e-mails to subscribers when they don’t log
in on the programmed time. For this, ensure to type a e-mail address for
each subscriber in the Subscriber Address Book (Figure 2-2).
To set up mailbox, click Configure on the window menu and select E-Mail
Setup. For details, see 1.13 E-Mail Alerts.
To define alert conditions to send e-mails, click the Subscriber Notification
Setting button (No. 5, Figure 2-1) on the toolbar to display the Notification
Setting dialog box. For setup details, see 1.11 Notification Settings.
70