1
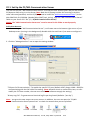
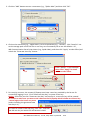
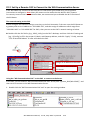
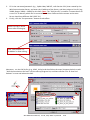
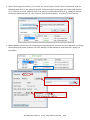
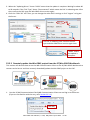
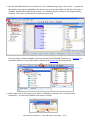
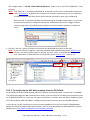
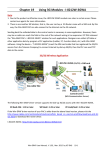
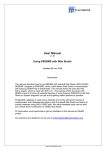
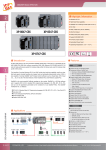
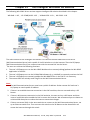
Chapter 22 The Intelligent Win-GRAF 3G Solution The following Win-GRAF driver versions support intelligent 3G solution described in this chapter. WP-8xx8 : 1.05 ; VP-25W8/4138 : 1.05 ; XP-8xx8-CE6 : 1.03 ; WP-5238 : 1.02 The main features of the intelligent 3G solution is to connect the Win‐GRAF PAC to the Server (WG‐Communication‐Server) with a public IP via 3G wireless or via the Internet. Then the PC/laptop (WG‐Communication‐Client) can communicate with the remote PAC via the Server. The user can achieve the following functions: 1. The user’s PC/laptop can run the Win-GRAF Workbench to remotely debug/update the Win-GRAF application in the PAC. 2. The user’s PC/laptop can run the SCADA/HMI software (e.g., InduSoft) to remotely monitor the PAC. 3. The user’s PC/laptop can remotely update the Win-GRAF driver in the PAC if it is necessary. 4. The remote PAC can actively send a log file to the WG-Communication-Server. Note: 1. The WG-Communication-Server must have a public IP address. Other remote PAC and user’s PC/laptop no need a public IP address. 2. If there is an available Internet connection in the PAC worksite, the user no need to buy a 3G Router. 3. If there is NO Internet connection in the PAC worksite, the user can buy a 3G Router and then insert a local SIM card to enable the PAC to access the Internet. We recommend you to choose an unlimited 3G data plan to reduce the Internet connection charges. 4. If there are several PACs in the same worksite to connect to the WG‐Communication‐Server, set up an Ethernet switch first. Then connect this switch to the 3G Router so that these PACs can access the Internet through this switch. Win-GRAF User Manual, V 1.03, May 2015 by ICP DAS 22-1 22.1 Set Up the PC/WG-Communication-Server The user can use the "WG-Communication-Server" to create the user account (max. 100) for the remote PC/laptop or PAC to log in to the Server (Note: Both the PC/laptop and the PAC must log in with the same username/password, and the PC/laptop need to install the "WG-Communication-Client".) In the Win-GRAF PAC CD (CD-ROM: \Napdos\Win-GRAF\Tools_Utility), copy the "WG-Communication-Server" folder to your Server PC’s "D:" (i.e., D:\WG-Communication-Server). Notice: The "WG-Communication-Server.exe" must be stored in this folder to work properly. Add a User Account: 1. After running the "WG-Communication-Server", it will zoom out to the bottom-right corner of your desktop screen (running in the background). Double-click the small icon if you want to configure it. 2. Click the "Manage Account" icon to open the setting window. "TCP port for file transmission": To enable the specific TCP port (Default: 4567; Range: 1000 ~ 9999) for communicating with the PAC while file sending. (Note: Whether check or uncheck this item, or even modify the TCP Port number, the user must restart this software to apply the setting.) "History Log File": To generate one historical log file per day/month (defaults: "per day"). Note: Just go to the next step to set up an account. In addition, the user can open the "D:\WGCommunication-Server\account.txt" to check the account that you set up before. Win-GRAF User Manual, V 1.03, May 2015 by ICP DAS 22-2 3. Click the "Add" button to enter a username (e.g., "Spider-Man") and then click "OK". 4. Click on the username (e.g., "Spider-Man") to set its password (e.g., "AB-567"). Click "Root Dir" can set the storage path of the PAC file or user key, we recommend you to use the defaults - D:\ WG-Communication-Server\User Name (e.g., Spider-Man), and then click "Apply" to take effect (and unlock the "Generate User Key" button. 1. 2. Enter “AB-567” in this example. Note: Click "Apply" for these settins to take effect. 3. 4. 5. 5. For security concerns, the remote PC/laptop must have a user key provided by the Server for successfully logging in to it. Click "Generate User Key" to create a user key. Notice: Each time you click "Generate User Key" and confirm it, a new user key will be created. Be careful to make sure you want to do it because the PC/laptop which includes an old user key cannot login to the Server any more (unless installing the generated new user-key in it) . If it must to create a new user key, click “Yes", and then the old user key on remote PC will become invaild. Win-GRAF User Manual, V 1.03, May 2015 by ICP DAS 22-3 Send the user key to the remote user (client), and copy it to the D:\WG-Communication-Client on user‘s PC. Then, the user will have the access authority to use this username/password to login to the Server. Copy this user key to the user‘s PC (D:\ WG-Communication-Client). Delete a User Account Click on the username you want to delete (e.g., "Spider-Man"), click the "Remove" button, and click "OK" to delete this username/password. View the connection status This feature is used to view what PC/laptop or Win-GRAF PAC is connected to this Server. A PAC, its Port ID is 20009 (See Section 22.2), is connected to this Server. The user use the account - “Spider-Man” to log in to the Server (122.147.137.140). Win-GRAF User Manual, V 1.03, May 2015 by ICP DAS 22-4 22.2 Set Up a Remote PAC to Connect to the WG-Communication-Server If the Win-GRAF PAC connects to the Internet via a 3G Router (plus a SIM card), see its product instructions to configure it. Note: Many 3G routers on the market has the build‐in Wi‐Fi feature. For security issues on PAC communication data, we recommend you to disable the Wi‐Fi function of the 3G Router. The network setting on the PAC Please configure the network settings according to the field demands. If the user uses the 3G Router as a gateway and set its IP address as “192.168.0.254”, and then assign IP addresses which range from “192.168.0.100” to “192.168.0.200” for PACs, then you can set the PAC’s network setting as below. Double click the PAC Utility (e.g., XPAC_Utility) on the PAC’s desktop, and then click the IP setting tab (e.g., IP Config) to fill in the proper IP, Mask, and Gateway address, and click “Apply”. Finally, execute “File Save and Reboot” to save and reboot the PAC. 2. 1. 3. Assign an IP address for this PAC. 5. Enter the IP address of the 3G Router. 4. Using the “WG-Communication-PAC” on the PAC to connect to the Server In the PAC, you can find out “WG-Communication-PAC.exe” at the path “\System_Disk\Win-GRAF\”, and then use it to connect to the WG-Communication-Server. 1. Double click the “WG-Communication-PAC.exe” to open the setting window. Win-GRAF User Manual, V 1.03, May 2015 by ICP DAS 22-5 2. 3. Fill in the username/password (e.g., Spider-Man/ AB-567, refer Section 22.1) that created by the WG-Communication-Server, and enter the IP address of the Server, and then assigns a Port ID (e.g., 20009; Range: 20000 ~ 22000) for this PAC. (Note: The "PAC‐Port‐ID" is used for a remote Server or a user‘s PC to identify which PAC is connected with them. Different PACs connect to the same Server should use different PAC-PORT-ID.) Finally, click the "Set parameter" button to take effect. Select it to log in to the Server after starting up. Click “Lock/Unlock” to forbidden or allow editing. Moreover, run the PAC Utility (e.g., XPAC_Utility) and then follow the steps (shown as below) to add “WG-Communication-PAC.exe” into the startup program list, and then execute “File Save and Reboot” to save and reboot the PAC. 2. 1. 3. 5. 4. 7. 6. Win-GRAF User Manual, V 1.03, May 2015 by ICP DAS 22-6 22.3 Set Up the WG-Communication-Client on a User PC or the SCADA PC The user‘s PC can connect to the Server and then debug/download the Win-GRAF project or update the Win-GRAF driver to the remote PAC by using the "WG-Communication-Client" software. In the Win-GRAF PAC CD (CD-ROM: \Napdos\Win-GRAF\Tools_Utility), copy the "WG-Communication-Client" folder to your PC’s "D:" (i.e., D:\WG-Communication-Client). Notice: The "WG-Communication-Client.exe" must be stored in this folder to work properly. 22.3.1 Logging to the Server and detect the PAC connection status Before logging to the Server, make sure the "WG-Communication-Client" folder contains the user key provided by the Server. 1. Mouse double click the "WG-Communication-Client" to open the setting window, and fill in the user name, password, and Server IP, and then click the "Connect" button. Notice: If the Server is disconnect, the Client will log out and then try to connect to the Server every 30 seconds. User Key Fill in the username, password, and the Server IP that are provided by the Server. Check the box to save the account setting. Win-GRAF User Manual, V 1.03, May 2015 by ICP DAS 22-7 2. After connecting to the Server, you can see the "Server Status" shows "Server Connected" and the following table will list the status of the PAC connection that connect with the Server (refer Section 22.2). The user can click "Add PAC-Port-ID to detect" to add a PAC‐PORT‐ID (e.g., 20001) to the PAC connection-detection lists. Or, click "Remove PAC‐Port‐ID to detect" to remove it from the lists. 3. Mouse double click on any PAC name to open that setting tab. The user can click “Rename” to change the displayed PAC name, and also can click “Modify” to add comments, and then click “Apply” to take effect. Win-GRAF User Manual, V 1.03, May 2015 by ICP DAS 22-8 Remotely update the Win-GRAF PAC Driver from the PC In the normal case, the user doesn’t need to update the Win-GRAF PAC driver unless you want newer driver version that contains new released functions or bug fixing. The user can visit the website to download the latest version of the Win-GRAF PAC driver. www.icpdas.com/root/product/solutions/softplc_based_on_pac/win-graf/download/win-graf-driver.html Before updating the Win-GRAF driver, make sure you have copied all related files into the proper folder. Using the “XP-8xx8-CE6” as an example, first unzip the driver file (.zip) and then copy all files from the \xp-8xx8-ce6-driver-1.xx\1.xx (e.g., 1.03) to the D:\WG-Communication-Client\XP-8xx8-CE6. 1. Run the D:\WG-Communication-Client\WG-Communication-Client.exe and log in to the Server. (If you are not familiar with the way, refer Section 22.3.1.) 2. Double click on the PAC name that you want to update and has been connected to the Server, and then click the “Update Win-GRAF Driver” button. Note: Don’t restart this PAC, stop this Client, or close this tab while updating the driver. And, update only one PAC at each time. 1. 2. Win-GRAF User Manual, V 1.03, May 2015 by ICP DAS 22-9 3. When the “Updating Driver” shows “100%” means that the update is complete. Waiting for about 60 to 90 seconds. If the “PAC Type” shows “Disconnected” which means the PAC is rebooting now. After that, confirm the PAC type and Win-GRAF driver version again. 4. Close the “XPAC-01” tab. Then, you can change the other PAC’s settings or click “Logout” to log out the Server. 3. 4. The PAC is rebooting now. Confirm the PAC type and Win-GRAF driver version again later. "100%" means the update is complete. 22.3.2 Remotely update the Win-GRAF project from the PC/Win-GRAF Workbench This section will describe how to use the WG-Communication-Client on the PC/Win-GRAF Workbench to connect to the Server and then remotely download/update the Win-GRAF project to the PAC. 1. Run the D:\WG-Communication-Client\WG-Communication-Client.exe and log in to the Server. (If you are not familiar with the way, refer Section 22.3.1.) User Key Win-GRAF User Manual, V 1.03, May 2015 by ICP DAS 22-10 1. Run the Win-GRAF Workbench and then click "File Add Existing Project From Zip..." to open the Win-GRAF project (demo_3GModbus.zip) which is stored in the Win-GRAF PAC CD and its file path is CD-ROM: \Napdos\Win-GRAF\demo-project\. This example project includes an LD program (Main), using the “Time_Get” function block to read the system time. And, this project enables a Modbus TCP Slave to allow the SCADA/HMI software (e.g., “InduSoft”) or the Modbus Master to access Win-GRAF variables (refer Section 3.1 for more details). 2. Mouse right click on the project name (demo_3GModbus), and then click “Communication Parameters..” to enter the IP address and the port number. Win-GRAF User Manual, V 1.03, May 2015 by ICP DAS 22-11 The configure way is “127.0.0.1:PAC-PORT-ID(Timeout)”, and it's set to “127.0.0.1:20009(15)” in this example. Note: “PAC-PORT-ID” is a uniquely identified ID, and make sure this PAC is connected to the Server (refer Section 22.2). By default, the Timeout is 3 seconds, recommend you to set it between 15 and 30 seconds if the PAC access to the Internet via the 3G router (plus a SIM card). Due to the 3G is a wireless network and transmit signals through a base station, it can cause communication delays or exceptions sometimes. Recommend you to set a bigger timeout value to range from 15 to 30 seconds to reduce the communication timeout or read/write error. 3. Click the “On Line” button to make a connection and download the project to the PAC. Note: If you ever edit this program, it must be compiled before downloading (refer Section 2.3.4); If there is the other project name is running, just click “Stop” to stop that project and then click “Download” to download the current project (refer Section 2.3.5 - Steps 4 ~ 6). Stop/Download On Line 22.3.3 To read/write the PAC data remotely from the PC/SCADA For the different kinds of HMI/SCADA software intend to communicate with a remote PAC via Modbus TCP protocol through the WG-Communication-Server, the user must run the WG-Communication-Client on an HMI/SCADA PC first. Then use it to log in to the Server, and then enter the PAC‘s IP address (fixed 127.0.0.1) and PAC-PORT-ID (20000 ~ 22000) that you want to connect to on the SCADA software. In this section, we will introduce you how to use the Modbus Poll to act as an HMI/ SCADA/Modbus Master on the PC to read the PAC data remotely. You can visit the website to download and install the Modbus Poll: http://www.modbustools.com/modbus_poll.html Win-GRAF User Manual, V 1.03, May 2015 by ICP DAS 22-12 1. First, run the “D:\WG-Communication-Client\WG-Communication-Client.exe", and then log in to the Server. (If you are not familiar with the setting, refer Section 22.3.1) 2. Double click the “Modbus Poll” icon to open it, and then click “Connection Connect” to set the connection parameters. Select the “TCP/IP” way to connect, set the "Response Timeout” ranges from 15 to 30 seconds, set the "IP Address" as “127.0.0.1” (fixed), and set the "Port" as the PAC’s ID (PAC-PORT-ID, e.g., 20009, refer Section 22.2). If a PAC/PC use the 3G wireless, recommend you to set its Timeout to 15 ~ 30 seconds. 3. Click “Setup Poll Definition” to set the data type you want to read. Then, select “04 INPUT REGISTER” in the "Function" field (refer Section 22.3.2 – Step2) and click “OK” to view the read data shown on the Modbus Poll. Win-GRAF User Manual, V 1.03, May 2015 by ICP DAS 22-13