1
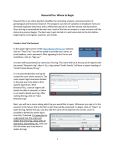
NASA ADS - Historical Literature User Manual
The ADS Team
October 19, 2011
Contents
1 Overview
1.1 Introduction . . . . . . . . . . . . .
1.2 Contributing to the Project . . . .
1.3 Online Interface . . . . . . . . . . .
1.3.1 Login . . . . . . . . . . . .
1.3.2 How It Works: Sessions and
1.3.3 Logout . . . . . . . . . . . .
1.4 Contacting ADS Staff . . . . . . .
.
.
.
.
.
.
.
.
.
.
.
.
.
.
.
.
.
.
.
.
.
.
.
.
.
.
.
.
.
.
.
.
.
.
.
.
.
.
.
.
.
.
.
.
.
.
.
.
.
.
.
.
.
.
.
.
.
.
.
.
.
.
.
.
.
.
.
.
.
.
.
.
.
.
.
.
.
2
2
2
3
3
3
3
4
2 Usage
2.1 Page Numbering . . . . . . . . . . . . . . . . .
2.1.1 Moving Through Images . . . . . . . . .
2.1.2 Enter Page Numbers . . . . . . . . . . .
2.1.3 Page Type . . . . . . . . . . . . . . . .
2.1.4 Choosing A Page Number . . . . . . . .
2.1.5 Duplicate Pages . . . . . . . . . . . . .
2.1.6 Comments . . . . . . . . . . . . . . . . .
2.1.7 Last Image Marked . . . . . . . . . . . .
2.1.8 Finish With Page Numbering . . . . . .
2.2 Article Metadata . . . . . . . . . . . . . . . . .
2.2.1 The Graphical User Interface . . . . . .
2.2.2 Entering Article Information . . . . . .
2.2.3 Formatting Rules . . . . . . . . . . . . .
2.2.4 Modifying Article Information . . . . .
2.2.5 Finishing Article Metadata Information
.
.
.
.
.
.
.
.
.
.
.
.
.
.
.
.
.
.
.
.
.
.
.
.
.
.
.
.
.
.
.
.
.
.
.
.
.
.
.
.
.
.
.
.
.
.
.
.
.
.
.
.
.
.
.
.
.
.
.
.
.
.
.
.
.
.
.
.
.
.
.
.
.
.
.
.
.
.
.
.
.
.
.
.
.
.
.
.
.
.
.
.
.
.
.
.
.
.
.
.
.
.
.
.
.
.
.
.
.
.
.
.
.
.
.
.
.
.
.
.
.
.
.
.
.
.
.
.
.
.
.
.
.
.
.
.
.
.
.
.
.
.
.
.
.
.
.
.
.
.
5
5
5
6
6
6
7
8
8
8
8
9
9
10
11
11
1
. . . .
. . . .
. . . .
. . . .
Status
. . . .
. . . .
.
.
.
.
.
.
.
.
.
.
.
.
.
.
Chapter 1
Overview
1.1
Introduction
The ADS Historical Literature project has been launched with the aim of fully
integrating historical literature into the ADS databases. ADS in collaboration
with the John G. Wolbach Library and the Harvard-Smithsonian Center for
Astrophysics have digitized microfilms from selected historical publications in
astronomy, including observatory reports, bulletins and annals. Currently over
170 serials counting for a total of 300,000 scanned pages have been made available online. The scanned images represent the sequence of pages, including front
and back matter for the volumes. As a result, the page numbers of the scanned
images are unknown.
To be able to browse and search this publications by page number or article
information the corresponding metadata needs to be collected.
We have, within ADS, developed a software tool to facilitate the entry of
this type of metadata by users and librarian willing to contribute to improve
access to this valuable collection.
1.2
Contributing to the Project
You can contribute to the project by subscribing to the Historical Literature
Users Group. To volunteer follow the subscription link at the project login
page.
By subscribing to the Historical Literature Users Group you identify yourself
by providing your mail address. This address will be used as your login name
to the system. The address will be also used to keep you inform about the state
of advancement of the project. Once a month you will receive a mail informing
you about with general information about the project and also with the status
of your contributions.
The password you provide when you subscribe will only be needed to change
your subscription options. To login to the system you will only need your e-mail
2
address. Do not use a valuable password for this account: we do not
use a secure server and so that password will transmitted through the network
without being coded.
1.3
1.3.1
Online Interface
Login
Once you have login into the system you will be first presented with the list of
publication volumes in the projects. By selecting one of them you will open a
session on your name and that volume will be assigned to you. Nobody else
will be able to select that volume later on. The system will keep the status of
your work. Next time you will log in the session ( or sessions ) that are opened
with your name will be shown first, before the list of available volumes. You
could then select to resume the work and the system will be restored with the
situation you left last time you were working on it.
1.3.2
How It Works: Sessions and Status
A session will go though a number of different phases. Pagination information
have to be entered before article information can be provided. Once you have
finish with the pagination, by clicking the corresponding *Finish* button, the
session will change its status to gathering article information. The interface
will then change to allow you to enter title, authors and other article information.
You will not be able to return to the pagination mode. Once you decide
your pagination is finished, if you realize that you made a mistake on the page
numbering, only ADS staff will be able to change the session status. Please,
check that the numbers you entered are correct before continuing.
Finally, when all the article information is collected, you will close the session, changing its status to completed. Automatically ADS staff will be informed
and all the data you provided will be then verified and included in the ADS
databases.
You will receive a report once or twice a month with the latest news on the
advancement of the project and with a review of your contribution. If you do not
want to receive these mails you can disable that feature from the subscription
page.
1.3.3
Logout
Data are saved while you enter it, so you do not need to logout, nor need
to finish data entry in one sitting. When you decide to stop working just
use your browser to go to anywhere else you want to go (or simply close the
browser’s window). This is ok since the session status and related data are saved
at each interaction with the interface. Next time you login you will be able to
resume at the exact point where you left off.
3
1.4
Contacting ADS Staff
If you experience problems with the online interface or the subscription or if
you have questions concerning the use of the application please contact the
ADS group at mailto:[email protected]
4
Chapter 2
Usage
The ADS software for historical literature metadata capture ask contributors
to enter data in two phases. First, the page numbering is entered. Once this
phase is finished, the volume is ready to enter the metadata capture phase. In
this phase, page numbers are associated with article information: author, title,
starting and ending pages. Once the page numbering has been finished it is
not possible, without ADS intervention, to step back. This is done to avoid
confusing or incorrect page numbering being entered with the articles. If, after
starting entering article information, you discover that the page numbering is
wrong, please contact us and we will correct the problem
Each of the two phases uses a different interface to ask the user for the
corresponding information. The following sections will describe these interfaces
and give hints about how to enter information.
2.1
Page Numbering
In the page numbering interface the software collects page numbers and types
for each of the scanned images of a volume.
2.1.1
Moving Through Images
To navigate through the volume images a first group of links appear at the top
of the interface with Prev, Next, First and Last links. These links will advance
page by page ( if in page mode ) or by group of thumbnails if in thumbnail
mode.
You can directly go to an image by entering the image number in the top-left
field marked as Image#.
To change from thumbnail mode to page mode click on the scanned image
and the mode will toggle.
5
2.1.2
Enter Page Numbers
Page numbers can be entered in the field labeled as Page# at the left of the
interface. You can also enter a page number at the input field associated with
each of the images in the thumbnail frame. Remember to enter the correct page
type before setting the page number.
Every time you enter a new page number, the software will set a mark in
the image table that will contain page number and page type. The software will
automatically number all pages from a page mark to the next one. In this way
you only need to enter page numbers when the sequential numbering is broken
for whatever reason.
2.1.3
Page Type
Before setting a page number you have to decide what kind of page you are
looking at. A page can be either a body page or an additional page like insert,
plate, front matter or back matter. ADS will only add article records for
pages in body pages. Remember to check that the page type is correct.
2.1.4
Choosing A Page Number
As as rule of thumb enter as page number the one that appears in the page,
whatever it may be. A page number can be a number or a roman numeral.
Pages in the form ”A7” or ”12.3” are also accepted. In all of those cases the
software will renumber the following pages accordingly.
Still, many pages do not show page numbers. Here are a few rules to help
you find the correct page number.
Implied Pages
If there is an implied page number, use that number. For example, if the first
page with a number shows a ”3”, the two previous pages without a page number
should be page ”1” and page ”2”.
Insert and Plates
Do not forget to select the corresponding page type in the interface. First,
use the rule of thumb, if a page number appears use that one. If not, use the
syntax xx.yy. For example in ”12.3” , the number ”12” is the page number
of the previous body page and ”3” stands for third insert. Read that as third
insert after page twelve. Automatic page numbering works in this case too. By
entering ”12.1” all the following pages will be numbered ”12.2”... . Then you
will need to go to the actual page ”13” and set a mark there. For blank pages
after insert pages, let the pagination continue, a blank page after insert ”12.3”
will be ”12.4”.
6
Plates At End of Volume
First of all, mark them as plates. Then, once more, apply the rule of thumb: if
there is a page number use it. If there is no page number but there is a plate
number use that one. If there is no number at all assign ”P1”, ”P2”...
Front Matter
Mark it always as front matter. Front matter typically includes title pages,
contents, preface... Beware that, in some cases, pages with roman numerals are
not necessarily front matter. If you think that the pages contain real articles
mark them as body pages. If you cannot decide mark them as body pages too.
Trailing Blank Pages
If you can recognize them as back matter mark them as such. If you do not
know which page number to assign let the pagination continue from the last
mark.
Appendices
Yet again, use the rule of thumb: choose first the page numbering that appears
in the pages. Eventually use also implied page numbers as described above. In
this case if the page numbers in the page can conflict with other page numbers
in the body of the volume read the following section.
2.1.5
Duplicate Pages
As a general rule there should not be two body pages with the same number.
Otherwise front matter or back matter can have duplicated page numbers without conflicting. There are a number of cases in which the rule above can be
broken:
• duplicate pages: if there are two images of the same page that were generated by the scanning process. Mark one of them as ignore.
• multiple issues: it is possible that a publication has multiple issues that all
start on page 1. In that case page 1 of issue 1 should get the page number
”A1”, page 1 of issue 2 should get page ”B1”, etc etc It is probably a good
thing to double check with us if you run into a situation like this.
• appendixes: it may be that appendixes are numbered starting with page
number 1. In this case you must break our golden rule and call the page
number ”A1”, ”A2”... for appendix ”A”, etc... In the case of an appendix
in the case of multiple issues mentioned above, use a letter that isn’t used
in the above scheme (like the first available letter).
7
• other cases: it may still be that the volume has two body pages with the
same number that cannot be resolved by any of the previous methods.
In that case... well... let them be. The software will detect it and will
stop users from entering article information. ADS staff will look to that
volume and decide what needs to be done.
2.1.6
Comments
You can submit comments for any of the pages. Just fill the corresponding field
in the interface and the text will be saved with the volume.
2.1.7
Last Image Marked
If you decide to interrupt your work on a volume the software will remember
the last page mark that you set. When you return you can quick jump to that
mark and resume your work from there.
2.1.8
Finish With Page Numbering
When you have finished entering page information for a volume, click the Finish
button. Check the information you entered before finishing the page numbering.
Once you have close the page numbering you will not be able to come back and
change it without ADS intervention.
2.2
Article Metadata
In the Article metadata interface users are asked to enter data concerning the
articles printed on the pages being displayed. This information includes starting
and ending pages, author name(s), title, abstract, keywords, and any comments
that the user may want to provide us. The only mandatory information at this
stage are the starting and ending pages for each article.
In this context, an article should be considered a related collection of pages
found in the publication at hand. In modern publications, these are usually well
defined and identified as individual bibliographic records, but in older publications it may be difficult to decide what constitutes an article. The following
guidelines may be helpful in this process:
• If there is a table of contents published at the beginning or at the end
of the publication, you can use it as a guideline in deciding what article
entries to create: in most cases you will want to create one record for each
entry in the table of contents.
• If the publication is structured as a book with chapters, it is usually a
good idea to create an entry for each chapter, entering the publication
name as a title and the chapter names as subtitles (as described below).
8
• There may be sections in the publication that appear to be articles in their
own right but which may contain subsections (for instance, Society Matters
may contain sections on the different meetings of the society). In this case,
you may want to create article entries at both levels, so that there is a
main article containing sub-articles. This can be accomplished by simply
defining separate entries for the main article and the sub-articles.
2.2.1
The Graphical User Interface
The interface used to enter article metadata consists of three different frames:
• A page display frame on the right side of your browser, where thumbnails
and full-page images of the scanned full-text pages are displayed; you can
navigate through the pages using the links available on the top bar (Prev,
Next, First and Last).
• A metadata entry frame on the top-left side of your browser, where
input fields for article metadata are found.
• A table of contents frame on the bottom-left side of your browser, where
the current table of contents for article metadata entered so far is displayed.
Additionally, a status line can be found on the very bottom left of the screen
(right under the table of contents frame). This line is used to display informational as well as error messages.
2.2.2
Entering Article Information
Entering article metadata is best done by looking at the pages as thumbnails
in the page display frame. Users can then see where the first page of an article
may be and click on that thumbnail for a larger view. Once the start of an
article has been determined its information can be entered into the metadata
entry frame as described below:
1. In the metadata entry frame click on current for the start page field (or
you may type in the page number manually).
2. Enter title, author, and any other appropriate information (if available)
in the input boxes provided on the metadata entry frame.
3. Return to the page display frame and click on Thumbnails to look for the
end of the article. Once identified click on the corresponding thumbnail,
bringing up a larger image, and verify that the last page for the article
has been identified.
4. In the metadata entry frame click on current for the end page field (or you
may type in the page number manually).
9
5. Click on Add (located at the bottom of the metadata entry frame). This
sends the information you have just entered to our server. The status line
will display ...working..., after which an entry for it will appear in the
table of contents frame, assuming no error has occurred.
2.2.3
Formatting Rules
When entering data in the input fields, please follow these basic rules:
• Page numbers: the page numbers correspond to the ones that have been
assigned to the image scans during the page numbering process; it is best
to fill these fields by navigating through the pages and using the current
buttons next to the start and end page fields to ensure that the right page
numbers are selected.
• Author(s): author names, if present, should be entered following ADS’s
canonical formatting rules: Lastname1, Firstname1; Lastname2, Firstname2; ... where first names can be reduced to a single initial followed by
a period if only the initial is known.
• Title: enter the title of the paper as printed on the original manuscript.
Subtitles, if available, can be entered after the main title by ending each
one with a period. If you are creating separate entries for different sections
of a long work, please enter both the main title of the work and the relevant
subtitle for each entry.
• Abstract: in some rare cases the article in question may contain an
abstract or summary section; in these cases the abstract text may be
typed into this input field.
• Keywords: keywords should be entered if any were specified on the
printed paper; these usually appear under a heading of Keywords or Subject Headings.
• Comments: this field is available so that users can provide us with any
ancillary information that does not fit in any of the fields described above.
For an example of an article containing both an abstract and keywords, please
see: Erman P., & Iwamae, A. 1995, ApJ, 450, L31 The corresponding ADS bibliographic record is: http://adsabs.harvard.edu/cgi-bin/nph-bib query?1995ApJ...450L..31E
As far as entering non-ascii characters, that may appear in the title, abstract, or author fields, these are best represented using their latex or HTML
equivalents. For a short list of examples, please see our Help page on submitting
abstracts to the ADS .
10
2.2.4
Modifying Article Information
As you add more article entries, the list of these records will appear in the table
of content frame. Each of these records can be deleted by clicking on the [ del ]
link on its left. Clicking on the entry for the record will load the corresponding
data in the metadata entry frame allowing you to re-edit it the information.
Once you’re done with any modifications, click on the Update button to save
the changes.
2.2.5
Finishing Article Metadata Information
When you have finished entering article metadata for the publication, click the
Finish button. This will lock the current session as completed, so you will not
be able to come back and change it without ADS intervention.
11