1
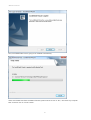
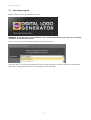
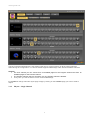
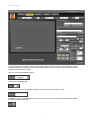
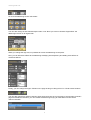
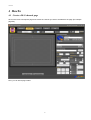
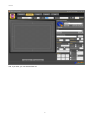
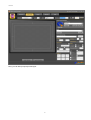
Axel Digital Logo Generator Broadcast graphic device server User Manual (Rev. 1.1) Cover Via Caduti Di Sabbiuno 6/F 40011 Anzola Emilia - Bologna - Italy Tel. +39 051 736555 - Fax. +39 051 736170 e-mail: [email protected] web site: www.axeltechnology.com All rights are reserved. No parts of this manual can be reproduced or spread through photocopies, microfilms or any other media, without the written permission from Axel Technology. All quoted brands belong to the respective owners. 2 Introduction 1 Introduction Congratulations on your purchase of Axel Digital Logo Generator, the broadcasting graphic device server. 1.1 What is the Digital Logo Generator? Axel DLG is a software based solution for multichannel logo generation. It works with BlackMagic DeckLink video boards and allow you to broadcast simultaneously from 1 to 4 channels and it supports any video resolution (from SD to 4K). For each channel DLG provides up to 15 different templates and a blank one customizable with a user friendly Composer. The operator could add from static logos to dynamic swf files or animated png and tga sequences. 1.2 Why Digital Logo Generator? Axel DLG is set as a standalone graphic logo generator. The system could receive commands from external devices for hot keys functions (MOXA boards, RS232, custom Keyboards) to load and play multiple pages. The simple Composer platform gives you a wide range of possibilities to set position, transparency, static effects (blur, glow, shadow, ecc) and in & out transition effects for each object. The interactive Axel DLG engine allows to switch from different templates always in a blend mode (without cut) recognizing same elements and adding just new ones. This smart solution permits infinites* layer of graphic. Web interface for simple configuration and management. * It depends from the PC hardware performance. 1.3 Minimum requires DLG hardware and software requires are: HARDWARE CPU: Intel QuadCore RAM: 4Gb VIDEO: BlackMagic video board. SOFTWARE OS: Windows XP SP3 or higher. Preferred Windows 7. Microsoft Framework 3.5 installed. Microsoft Framework 4 installed. 3 Installation 2 Installation DLG has a very simple setup configuration and it’s not necessary the PC restarting after the installation. 2.1 Setup Start the “DLGSetup.exe” file: Click on “Next” button: 4 Installation Then, click on “Install” button: When the DLG installation finished, click on “Finish” button: 5 Installation Now, Axel Multimedia Pack is going to be installed automatically: When Axel Multimedia Pack installation finished, please set the check on “No, I will restart my computer later” and then click on “Finish” button: 6 Installation Now, DLG program is installed on you pc! 2.2 Hardware Key Now, you must insert the hardware key on your PC. WARNING: If you don’t insert the hardware key on your PC, DLG will start on Demo Mode. 7 Configuration 3 Configuration DLG configuration requires only the manual insertion of a standard format for the video card Blackmagic installed on your PC. The program automatically will set the format for all Blackmagic’s output channels. After, the user can set for each channel a different format to suit your needs. For each BlackMagic channel installed, the program will creating automatically 5 output pages + 1 blank page with some logos added into each page. The user can add, edit or delete individual logos for each page at any time. 8 Configuration 3.1 Start the program Please, start the “Axel Logo Generator.exe” file: WARNING: If you don’t have any BlackMagic video board installed into your PC an error message will appear and DLG will be closed. Now, you must choose a BlackMagic supported format from the list: After that, click on “OK” button and waiting until the program finishing to set all the necessary configurations. When DLG configuration finished, the main program screen will appear: 9 Configuration 3.1.1 Playout - Multichannel 1 0 Configuration The DLG’s Playout Multichannel is the starting page layout. It’s the summery of all the output channels setted during the configuration. You will see all the supported BlackMagic video board’s available channels. Channel For each channel you can choose from 16 available pages for the Program channel and from 16 available pages for the Preview channel. The Preview channel choice is exclusive: only one Preview channel is allowed. At any time you see the status of each channel BlackMagic It's possible to change channels’ layout page simply by clicking on the available page you want to send to output. 3.1.2 Playout - Single Channel 1 1 Configuration In addition to multichannel, the Playout menu offers a view for each channel (excluding Preview channel). Each channel it shows the visualization of what is going on the air in the Preview channel and also in the selected channel. This view allows, compared to that of Multichannel, to read the pages’ description of the selected channel. So it is easier to remember what page it is on the air. It's possible to change channels’ layout page simply by clicking on the available page you want to send to output. 3.1.3 Composer 1 2 Configuration The Composer page is used to create or edit output’s pages for each channel. It is possible also see the changes made to the temporary page with the buttons Take Preview (to the Preview channel) and Take Program (on the current channel). You can choose the available channel: And then the available page: You can also add a key combination (shortcut) to bring up the page making it online: In addition, you can also add a GPI device to select the page: the DLG accepts commands from MOXA boards and RS232 commands: 1 3 Configuration Any changes to the page can be undone using the "UNDO" button, or saved by the "SAVE". In addition, you can see real-time changes to the page without saving using the buttons and “Take Preview” and “Take Program”. The DLG also allows you to manage logos with Delete and Update button. If you click on Update button you can choose a supported DLG logo from your PC. The supported file types are: *.tga, *.swf, *.bmp, *.jpg, *.gif, *.png It's possible, before the logo’s addition, see it into the preview window: 1 4 Configuration Click on “Add” button to add it into the page: 1 5 Configuration Now you can change the logo added as see fit with all the “Logo Properties” functions: You can change the logo position: 1 6 Configuration Or move the added logo to the “safe areas”: You can also change its size maintain aspect ratio or not. But if you click on “Restore Original Size” the added logo returns on its original size: When you change the logo size, it’s possibile to anchor the added logo to the panel. Now, you can add some effects to the added logo modifying its transparency and adding some effects or movement effects: Finally, you can change the logos’ Z-Order on the page clicking on “Bring to front” or “Send to back” buttons: You can also import from another channel’s page all its logos into the current page. If the importing channel’s page has a different resolution, you can choose to add the logos trying to resize them into the current channel resolution. 1 7 Configuration Finally, you can delete the selected logo with the “Delete” button or you can delete all the current page’s logos with the “Clear” button. 3.1.4 Setup In the left list of the Setup page, you can choose the channels order clicking on “Up” and “Down” buttons. In the rest of the Setup page you can change the selected channel properties: Description: the channel’s user description. User can distinguish from the others by setting this property page. Format: the channel’s resolution and aspect ratio. User can choose from all the supported BlackMagic format video resolution. KeyMode: the channel’s output mode. User can choose between off, internal or external mode. Fields Order: the channel’s fields order. User can choose between Auto, First Field, Second Field or Progressive order. Is Preview: sets whether the channel to the preview channel. User can choose to set the selected channel to be the preview channel. ATTENTION: User can also choose to set all the available channel with no preview. Automatically a virtual VGA channel will be created as a preview channel. Active: sets whether the channel is active. User can uncheck this property whether the channel is not enabled. Remote Port: the remote connector’s channel port. User can upgrading the DLG to an ALG (Advanced Logo Generator) and set the remote port to waiting remote command from other program like Axel DigiTV. Use left Axel Keyboard shortcuts: specifies whether the user can use, for the selected channel, the left keyboard of the Axel Keyboard commands shortcuts*. Use right Axel Keyboard shortcuts: specifies whether the user can use, for the selected channel, the right keyboard of the Axel Keyboard commands shortcuts*. 1 8 Configuration When you want to save the channel’s changes, click on “Set Channel”. You can also “Re-Scan All” the available BlackMagic channels installed on the PC or “Reset All” the channels settings and restart the Wizard procedure (see 3.1). * Axel Keyboard similar type: 3.1.5 Report The Report page shows all the shortcut, MOXA, RS232 commands that DLG program received. It’s possible to know the datetime, the context and the command type received. 1 9 Configuration 3.1.6 Log The Log page is a popup which shows all the saved DLG’s user actions. 2 0 HowTo 4 HowTo 4.1 Create a DLG channel page Click on the menu’s Composer page and choose the channel you want to be added to the page (for example page #6): Now, you can add a page’s label: 2 1 HowTo And, if you want, you can add the Shorcut: 2 2 HowTo Now, you can add (or import) some logos: 2 3 HowTo You can resize (maintaing the aspect ratio) your logo and put it into the bottom right position of the panel (see at the following three figures): 2 4 HowTo 2 5 HowTo 2 6 HowTo Finally, you can see on the preview channel the temporary result with the “Take Preview” or you can see it on the current channel with the “Take Program” button. However, you can also save the current page with the “Save” button. 2 7 HowTo And see the result on the Playout – Multichannel: 2 8 HowTo 2 9 Index 5 Index 1 INTRODUCTION .................................................................................................................................................... 3 1.1 WHAT IS THE DIGITAL LOGO GENERATOR? ......................................................................................................... 3 1.2 WHY DIGITAL LOGO GENERATOR? ..................................................................................................................... 3 1.3 MINIMUM REQUIRES ............................................................................................................................................ 3 2 INSTALLATION ...................................................................................................................................................... 4 2.1 SETUP .................................................................................................................................................................. 4 2.2 HARDWARE KEY ................................................................................................................................................. 7 3 CONFIGURATION ................................................................................................................................................. 8 3.1 START THE PROGRAM .......................................................................................................................................... 9 3.1.1 Playout - Multichannel ............................................................................................................................. 10 3.1.2 Playout - Single Channel ......................................................................................................................... 11 3.1.3 Composer .................................................................................................................................................. 12 3.1.4 Setup ......................................................................................................................................................... 18 3.1.5 Report ....................................................................................................................................................... 19 3.1.6 Log ............................................................................................................................................................ 20 4 HOWTO .................................................................................................................................................................. 21 4.1 CREATE A DLG CHANNEL PAGE ........................................................................................................................ 21 5 INDEX ..................................................................................................................................................................... 30 3 0